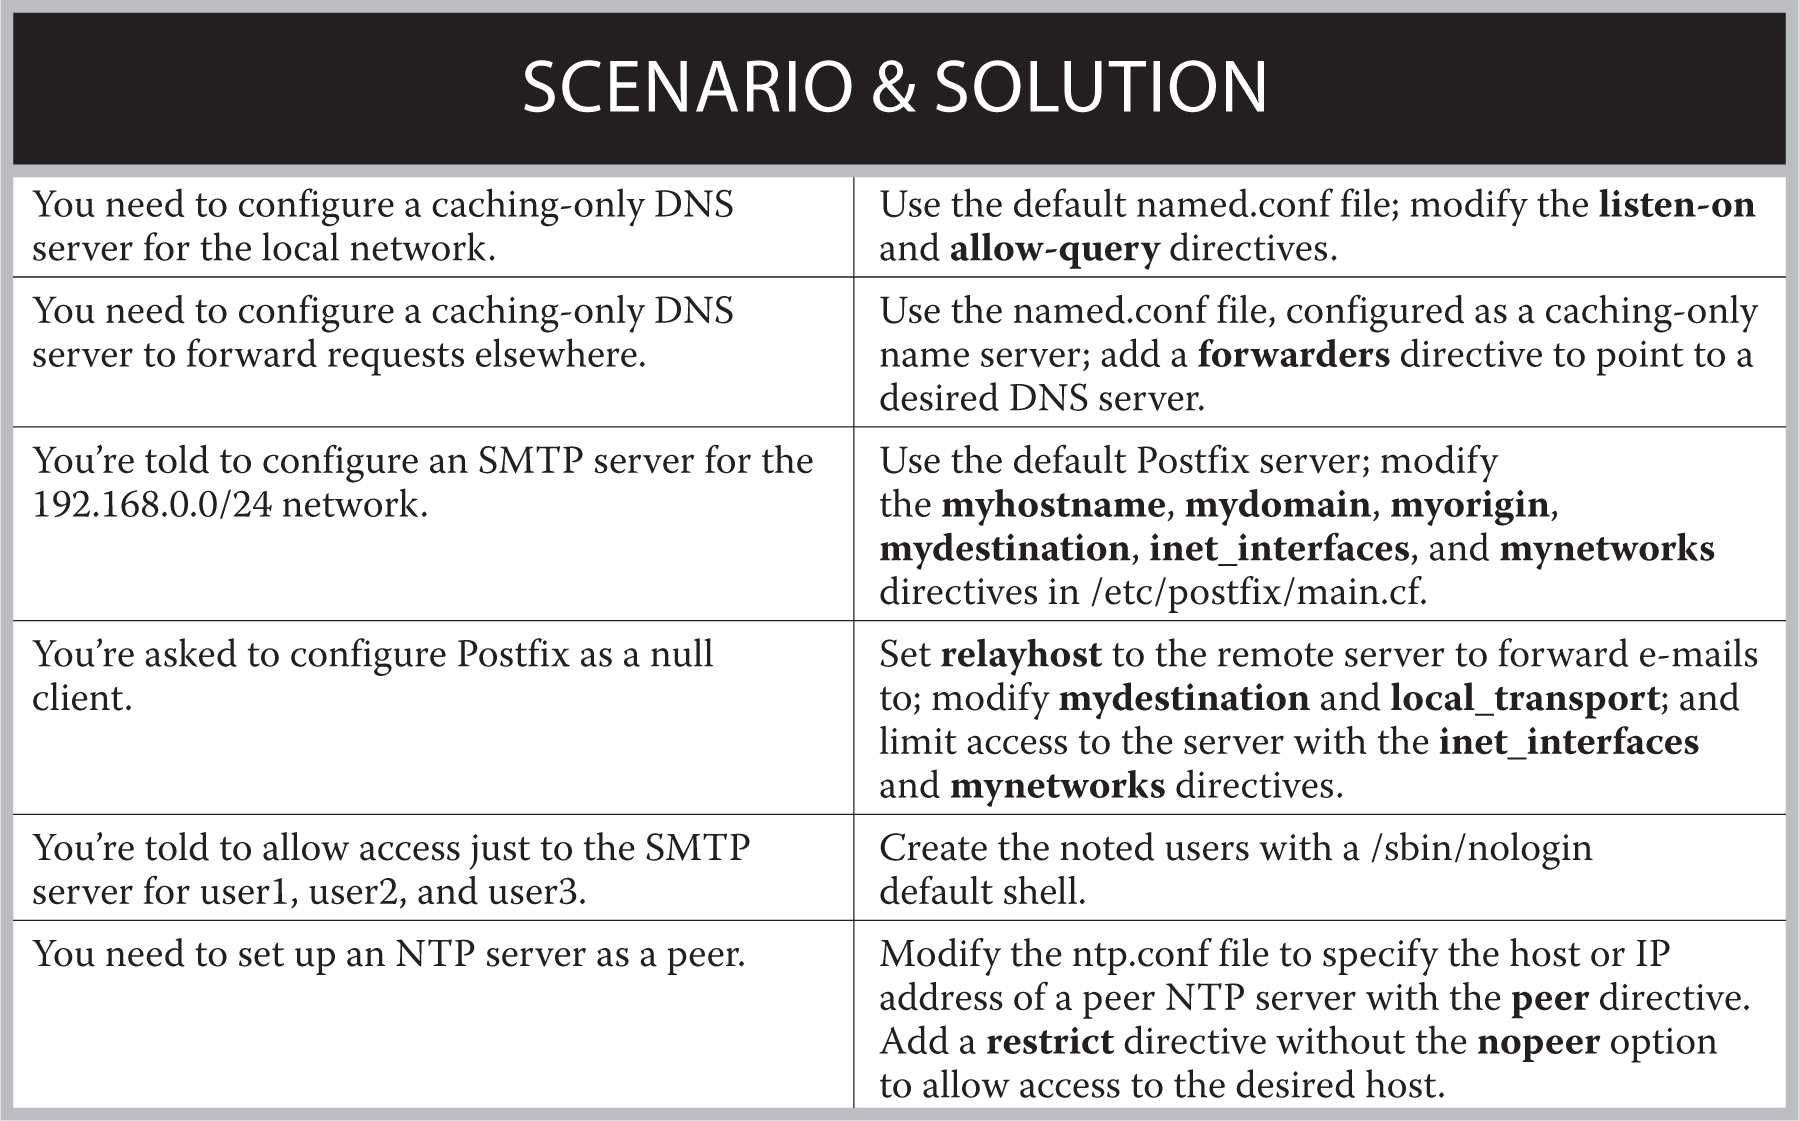
Two-Minute Drill
13.01 An Introduction to Domain Name Services
13.02 Minimal DNS Server Configurations
13.03 A Variety of E-Mail Agents
13.04 The Configuration of Postfix
13.05 iSCSI Targets and Initiators
13.06 The Network Time Service
This chapter examines four system services: the Domain Name System (DNS), the Simple Mail Transfer Protocol (SMTP), the Internet Small Computer System Interface (iSCSI), and the Network Time Protocol (NTP) service.
For DNS, the RHCE objectives require the configuration of a caching-only name server. So in this book, we do not cover the configuration of a master or secondary DNS server.
Next, we’ll cover SMTP e-mail services. Linux offers a number of alternative methods for handling incoming and outgoing e-mail. RHEL 7 includes two SMTP services: sendmail and Postfix. We focus on Postfix, the default RHEL 7 mail transfer agent. Postfix was originally developed in the late 1990s as an alternative to sendmail. It is modular and relatively easy to configure.
You will also learn how to configure a storage device and persistent mount that via the Internet Small Computer Systems Interface (iSCSI) protocol. The storage device is known as an iSCSI target, whereas clients are known as iSCSI initiators.
Finally, whereas you learned about the default NTP server in Chapter 5, you’ll learn about the configuration of NTP peers in this chapter.
Domain Name Service
Examine the RHCE objectives associated with DNS:
 Configure a caching-only name server
Troubleshoot DNS client issues
You’ll learn how to troubleshoot DNS client issues with the help of the dig and host commands.
The SMTP Service
The objective related to e-mail services on the RHCE exam is relatively simple:
Configure a system to forward all email to a central mail server
The focus of this objective is to configure a null client—that is, a system that can only forward e-mails to a remote server. However, for testing purposes in our lab environment we would need a second system configured to accept inbound e-mails. Although this is not a specific RHCE requirement (it was on the RHCE objectives for RHEL 6), we will cover some of the more general configuration of mail transfer agents (MTAs).
iSCSI Targets and Clients
This chapter also addresses the configuration of iSCSI targets and clients (initiators), as described in the following objective:
Configure a system as either an iSCSI target or a initiator that persistently mounts an iSCSI target
The Network Time Service
Finally, one service that was partially covered in the RHCSA objectives is based on the NTP protocol. Whereas the focus on the RHCSA was to “configure a system to use time services,” the RHCE objective suggests that you need a more in-depth knowledge of the configuration of NTP servers:
Synchronize time using other NTP peers
In addition, you need to meet the basic RHCE objectives that apply to all network services, as discussed in Chapter 11.
DNS is a service that translates human-readable hostnames such as www.mheducation.com to IP addresses such as 192.0.2.101, and vice versa. DNS is a distributed database; each server has its own delegated zone of authority for one or more domains. The DNS service associated with RHEL is the Berkeley Internet Name Domain (BIND). As no individual DNS server is large enough to keep a database for the entire Internet, each server can refer requests to other DNS servers.
RHEL 7 includes another DNS service, Unbound. The Unbound package does not include all the features of BIND, but it is simple and easy to configure if you need just a secure caching DNS resolver. In this chapter, we will cover the configuration of both BIND and Unbound. You can use either of them to meet the RHCE objective related to DNS configuration.
The default DNS service on RHEL 7 is based on the named daemon, included with the BIND 9.9 software package developed through the Internet Systems Consortium. This package includes the rndc command, which you can use to manage DNS operations.
To configure a system as a BIND DNS server, start with the RPMs associated with the DNS Name Server package group, shown here:
bind Includes the basic name server software and extensive documentation
bind-chroot Adds directories that isolate BIND in a so-called “chroot jail,” which limits access if DNS is compromised
bind-dyndb-ldap Provides an LDAP back-end plug-in for BIND
bind-libs Adds library files used by the bind and bind-utils RPMs
bind-libs-lite Includes a lite version of the BIND libraries for client utilities
bind-license Contains the license file of BIND
bind-utils Includes tools such as dig and host to query DNS servers and retrieve information about hostnames and domains
By now, you should be comfortable installing these packages with commands such as yum from software repositories, as discussed in Chapter 7 .

RHEL 7 also supports the dnsmasq package, which can be used to set up a forwarding DNS server with an integrated DHCP service in a small network.
While additional options are available, there are four basic types of DNS servers:
A master DNS server, authoritative for one or more domains, includes host records for that domain.
A slave DNS server, which relies on a master DNS server for data, can be used in place of that master DNS server.
A caching-only DNS server stores recent requests like a proxy server. If configured with forwarding features, it refers to other DNS servers for requests not in its current cache.
A forwarding-only DNS server refers all requests to other DNS servers.
As described earlier, all you need to know for the RHCE exam is how to configure a caching-only DNS server.
Each of these servers can be configured with access limited to internal networks, or even just a local system. Alternatively, they can be configured as public DNS servers, accessible to the entire Internet. But such access comes with risks, as a successful attack against an authoritative corporate DNS server could easily keep their websites hidden from customers’ web browsers. This attack is a form of denial of service.
CERTIFICATION OBJECTIVE 13.02
You can configure DNS servers by directly editing the associated configuration files. In this section, we’ll briefly review the configuration files installed with the BIND and Unbound software packages. You’ll then learn how to configure a caching-only name server, as well as a name server that includes forwarding to specified DNS servers.
DNS configuration files can help you configure a Linux system as a database of hostnames and IP addresses. That database can be cached, listed in a local database, or the request can be forwarded to a different system. The configuration files that support the use of DNS as a server are described in Table 13-1. While the table includes references to standard /var/named database files, changes to such files are not required to configure a caching-only or forwarding DNS server.
TABLE 13-1 DNS Server Configuration Files

If you’ve installed the bind-chroot package, a tree of directories and files will also be available in the /var/named/chroot directory to run BIND in a confined chroot jail. If you wish to run BIND in a chroot jail, you’ll have to move the configuration files and DNS zones to /var/named/chroot/etc and /var/named/chroot/var/named and then enable the named-chroot service unit.
In the following sections, you’ll experiment with the /etc/named.conf file. You should back it up in some fashion. Just be aware of the ownership and, yes, the SELinux contexts of the file, as shown in this output:

If backups are restored haphazardly, even by the root user, the group ownership and/or the SELinux contexts may be lost. So if there’s ever a failure in starting or restarting the named service, check the ownership and SELinux contexts of the /etc/named.conf file. If necessary, apply the following commands to that file:

In addition, after a DNS configuration is tested, some information may remain in a cache. That’s the nature of a caching DNS server. If that cache still exists after a change to DNS configuration files, it could affect the results. Therefore, it’s wise to flush the DNS cache after each configuration change with the following command:

When you request a web page such as www.mcgraw-hill.com, a request to resolve the hostname is sent to the configured DNS server. The response is the associated IP address. The request is also known as a name query. For requests to external DNS servers, responses can take time. That’s where a caching-only name server can help, as repeated requests are stored locally.


The default version of /etc/named.conf is set up for a caching-only name server, limited to the localhost system. Minor changes are required to open that server up to a local network.
When you are configuring a caching-only name server, the first step is to look at the default version of the /etc/named.conf configuration file. The directives in the default version of this file are organized to set up a caching-only name server. One view of this file is shown in Figure 13-1.
The options directive encompasses several basic DNS directives, including the following:
The listen-on port (and listen-on-v6 port) directives specify the port number to listen on (for IPv4 and IPv6).
To extend this to a local network, you’ll need to include the IP address of the local network interface. For example, if you want the server to respond to queries on the local IPv4 address of 192.168.122.50, you’d change the directive to read as follows (don’t forget the semicolon followed by a space after each IP address):

If IPv6 networking is active on the local network, you would need to configure similar IPv6 addresses for the listen-on-v6 directive. If IPv6 networking is not active, the default listen-on-v6 directive is sufficient.
The directory directive specifies where the DNS server looks for data files. Be aware, if the bind-chroot RPM is installed, these file paths are relative to the /var/named/chroot path.
The dump-file directive specifies the file on which BIND dumps the cache for the current DNS database when the rndc dumpdb command is issued.
FIGURE 13-1 The /etc/named.conf configuration file for a caching-only name server

The statistics-file directive specifies the file to write statistics data when the rndc stats command is issued.
The memstatistics-file directive specifies the location to save memory usage statistics when BIND exits.
The allow-query directive lists the IP addresses allowed to get information from this server. By default, access is limited to the local system. To extend this to another network such as 192.168.122.0/24, you’d change the directive to this:

The recursion directive enables recursive queries. A recursive query will interrogate the authoritative name servers for the requested domain and always provide an answer to clients. This is the behavior that you would expect from a caching name server. As shown in the comments of the named.conf file in Figure 13-1, if the server has a public IP address, you must restrict access to legitimate clients with the allow-query directive.
Since BIND version 9.5, the software has included support for DNS Security Extension (DNSSEC), with dnssec-* directives. DNSSEC protects a caching name server from spoofing and cache poisoning attacks by validating the integrity and authenticity of responses received from other name servers. The following directives enable DNSSEC security, validation (to check authenticity), and querying, with the noted bindkeys-file:

The logging directive specifies several more parameters; the channel directive specifies output methods, in this case to default_debug, activated in the named.run file in the /var/named/data directory, logging only dynamic issues.
The zone “.” directive specifies the root zone for the Internet, along with the root DNS servers as specified in the /var/named/named.ca file.
Finally, the include directives include the localhost settings described in the /etc/named.rfc1912.zones file, along with a key for the DNSSEC security protocol stored in the /etc/named.root.key file.
No changes are required to create a caching DNS server. All you need to do is install the aforementioned bind-* packages and start the named service with the following command:

Next, run the rndc status command. If successful, you’ll see output similar to that shown in Figure 13-2. The rndc command is the name server control utility.
FIGURE 13-2 The status of an operational DNS server

After starting the DNS server with the systemctl start named command, view the systemd journal with the journalctl -u named command. If there are problems, you’ll see error messages. The journal will usually display the file with the error. You can then stop the service with the rndc stop or systemctl stop named command and then check the applicable configuration files.
Once you are satisfied with the new configuration, make sure that DNS starts the next time you reboot Linux. As noted in other chapters, the following command makes sure that the named daemon starts the next time you boot Linux in the default target:

This type of DNS server is simple. It requires a single configuration line in the /etc/named.conf configuration file. As you can see, it’s straightforward; we’ve set it to refer to a couple of other DNS servers on our network:
With this configuration, queries to the local name server are forwarded to DNS servers on the IP addresses shown. In a home lab, these are usually the name servers of your Internet service provider.
If you want to open up this server to external queries, a couple of more changes are required. The changes are the same as made earlier to the caching-only name server configuration. As an example, if the local network card has an address of 192.168.122.50, you’d change the listen-on directive to

You should also include the allow-query directive described earlier, with references to the localhost system and the local network address:

Don’t forget to enable the DNS service on the local firewall:

As suggested earlier, the caching-only name server configured in the default version of the /etc/named.conf file is enabled for recursive queries. Otherwise, it would not be able to return any results from DNS requests for zones for which it is not an authoritative server.
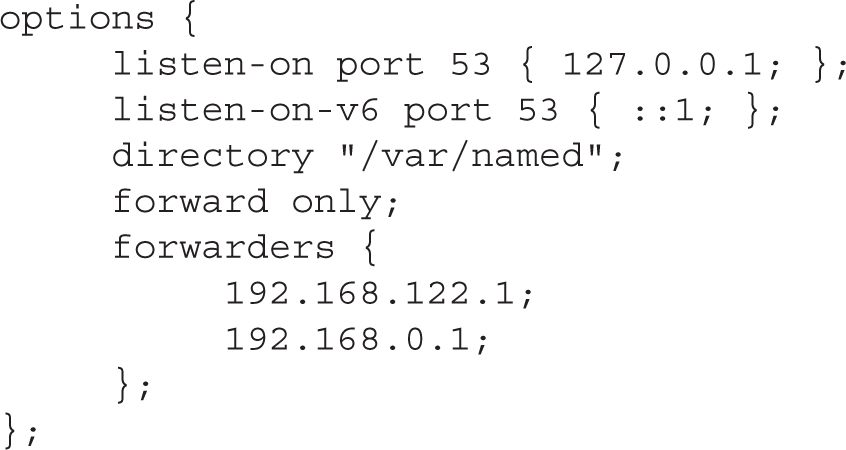
However, you can combine aspects of the caching-only and forwarding name servers just described. Requests not in the local cache would be forwarded to the name servers specified with the forwarders directive. Figure 13-3 displays the relevant excerpt of a /etc/named.conf file where the forwarding directives have been included.
Two useful commands associated with the BIND service are named-checkconf and rndc. The named-checkconf command checks the /etc/named.conf file for syntax errors. If no errors are found, it exits with a status of 0; otherwise, it shows onscreen the problematic configuration lines.
The rndc command arguments are straightforward. Try rndc by itself. The output guides you through the available options. The options we use are straightforward: rndc status, rndc flush, rndc reload, and rndc stop. If the DNS server is running correctly, the rndc status command should display the results shown in Figure 13-2. The rndc flush command flushes the server cache. The rndc reload command rereads any changes made to the configuration or DNS zone files. Finally, the rndc stop command stops the operation of the DNS server.
FIGURE 13-3 A caching name server that forwards to specific DNS servers

If you don’t need a full-featured name server such as BIND, you can opt for the Unbound DNS resolver. This is a small package that provides a caching and forwarding name server.
The Unbound project was initially funded by VeriSign. The software is currently maintained by NLnet Labs and distributed under the BSD license. It was developed with security and modularity in mind, and as such it is a viable alternative to BIND as a local DNS resolver.
Red Hat exams are lab based, so results do matter, rather than the way in which you achieve them. Therefore, unless a lab question specifically asks you to install BIND or Unbound, feel free to choose either of them to set up a caching name server.
To install Unbound, run the following command:

The default configuration file is /etc/unbound/unbound.conf. Although the file contains more than 500 lines, it includes lots of comments and examples. The man unbound.conf command provides additional information and some configuration examples.
To set up a caching/forwarding name server, you only need to enable three directives in the unbound.conf file. First, you should specify which interfaces Unbound should be listening on:

If you don’t include the interface directive in the configuration file, Unbound listens only on the localhost interface. The interface directive is similar to the listen-on port and listen-on-v6 port configuration options of BIND. You can specify the IP address of a local interface or 0.0.0.0 to bind to all IPv4 interfaces. If Unbound listens on an interface other than the localhost, enable the DNS service on the local firewall.
Next, specify which clients are allowed to send queries to the server:

The access-control directive has the same function of allow-query in BIND. The unbound.conf file provides several commented examples of valid configuration lines:

With no access-control directive, Unbound allows client queries only from the localhost.
Optionally, configure forwarding to send DNS requests to another name server. Similar to the BIND configuration, you need to define a zone with name “.” to forward all queries to a name server:

Finally, check the syntax of the configuration with the unbound-checkconf command. Start and enable the unbound service with the commands listed here:

After you configure a DNS resolver, examine the results with a command such as the host mheducation.com localhost command. The output confirms the use of the local system as a DNS server and then provides a straightforward view of the IP address of the host and the hostname of the mail server:

You can use the dig or host command to examine your work. For example, with the command dig @127.0.0.1 www.mheducation.com, you’ll see something like the output shown in Figure 13-4.
The dig command shown in the figure asks the local DNS server to look for the “A record” of www.mheducation.com. An A record maps a hostname to an IP address. Assuming the IP address information for www.mheducation.com isn’t cached locally, it then contacts one of the forward DNS systems listed in the named.conf file. If those systems are down or otherwise inaccessible, the local DNS server proceeds to forward the request to one of the name servers listed in the named.ca file. As though those are the root name servers for the Internet, the request will be passed on to another DNS server that is authoritative for the mheducation.com domain. Therefore, it may take a number of seconds before you see an answer.
FIGURE 13-4 Test a local DNS server with the dig command.
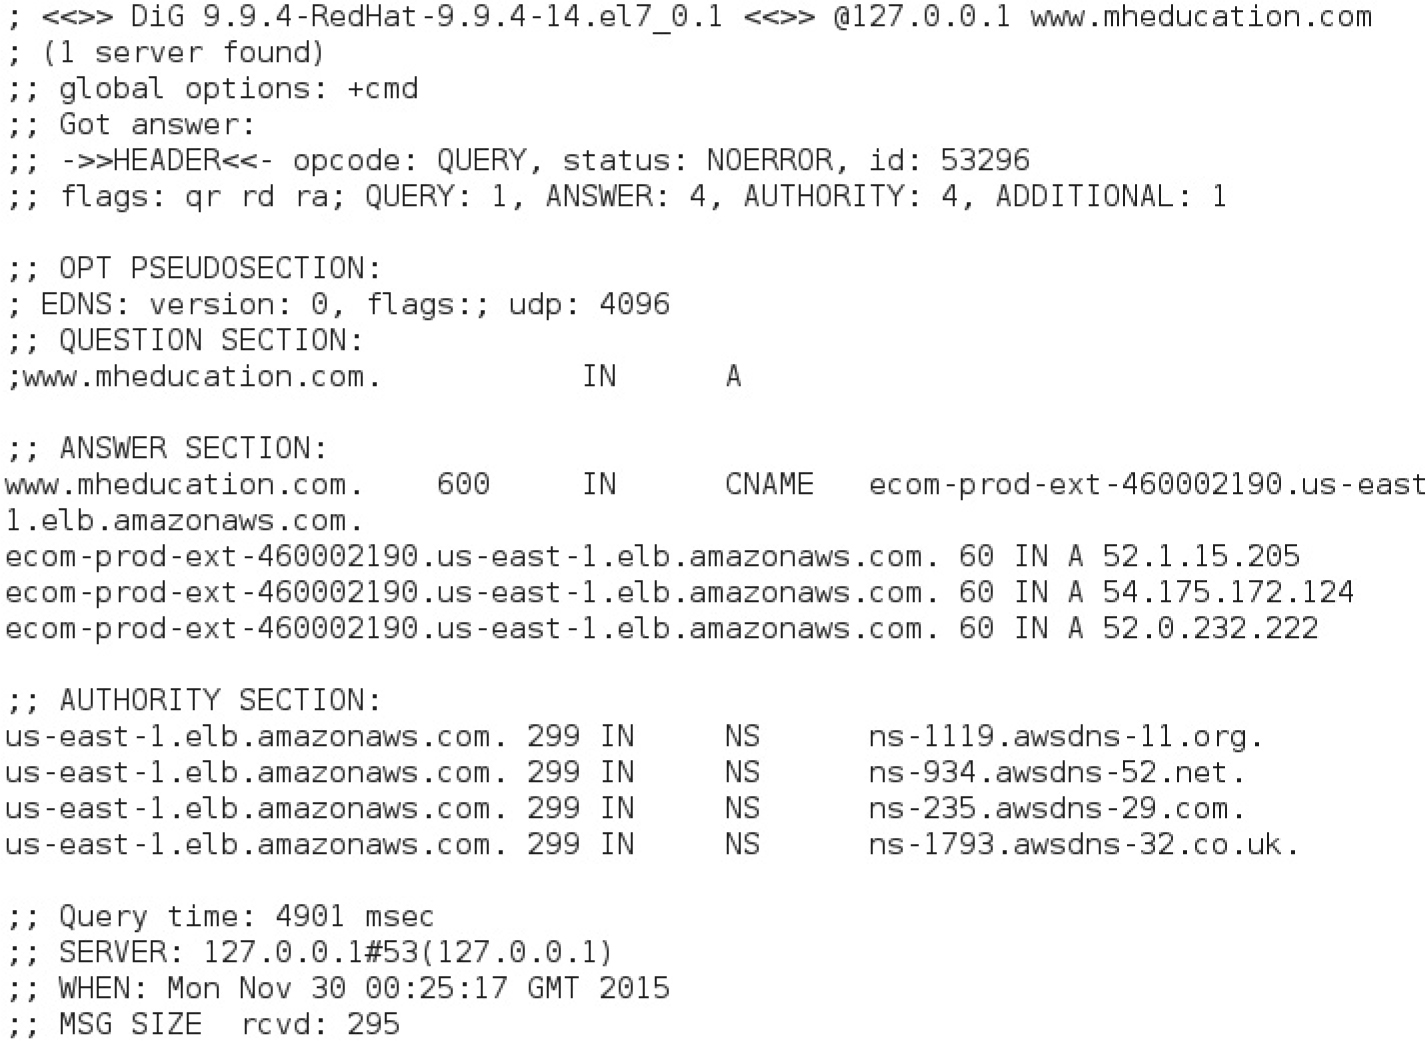
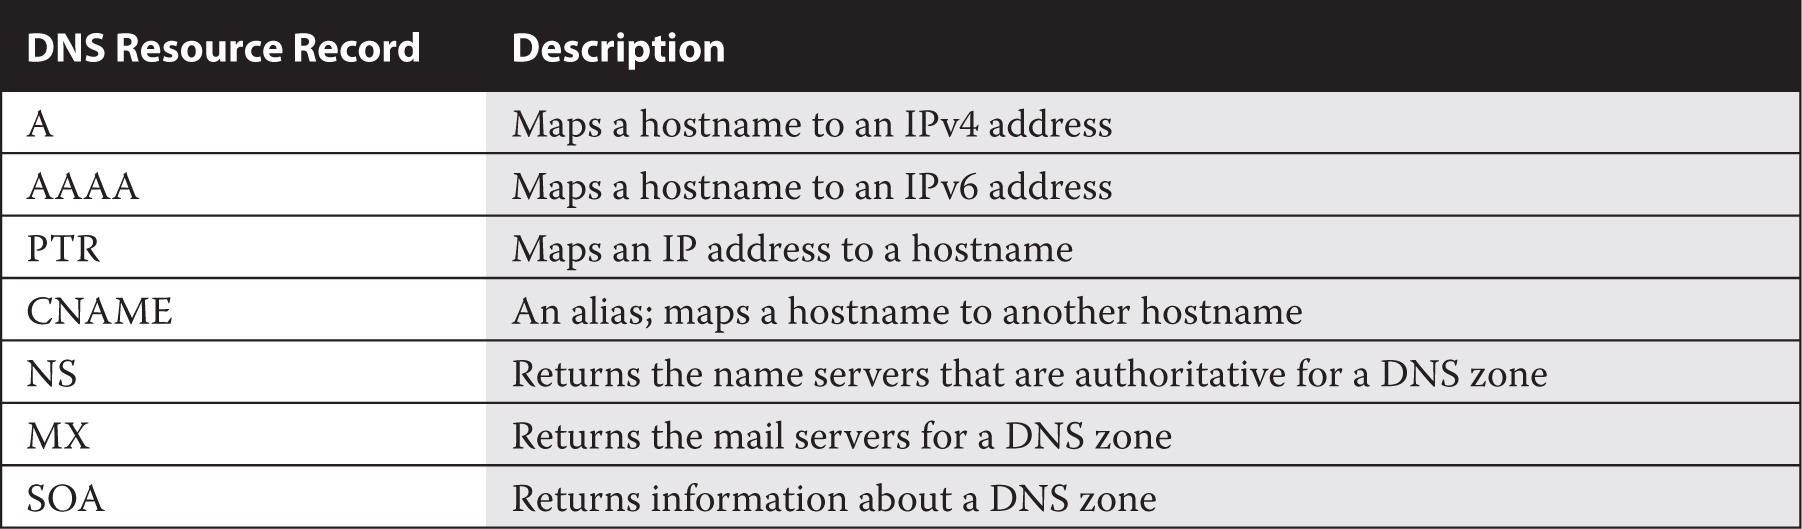
TABLE 13-2 The Most Common DNS Resource Records
In the answer section shown in Figure 13-4, it looks like www.mheducation.com is actually an alias (CNAME) that points to another hostname. The dig command can query all types of DNS resource records with the help of the -t switch. For example, to identify the mail servers for the mheducation.com domain, ask for the MX (mail exchange) record with the following command:

As you have noticed, there are different types of DNS resource records. The most common are summarized in Table 13-2.
EXERCISE 13-1
Following the example files shown previously, set up a local caching DNS server using the BIND name server. Access will be limited to the local system.
1. Install the bind RPM package.
2. Review the contents of the /etc/named.conf file, based on the discussion so far in this chapter. Do not make any changes.
3. Start the DNS server with the following command:

4. To make sure the DNS server is running, run the rndc status command. The output should be similar to that shown in Figure 13-2. Compare the output with the systemctl status named command.
5. Flush the current cache with the rndc flush command.
6. Test the DNS server. Try the dig @127.0.0.1 www.mheducation.com command.
7. Stop the BIND service with the systemctl stop named command
EXERCISE 13-2
The requirements for this exercise are identical to the previous one. However, you will be using the Unbound name server, rather than BIND.
1. Install the unbound RPM package.
2. Review the /etc/unbound/unbound.conf configuration file. Do not make any changes.
3. Start the DNS server with the following command:

4. Test the DNS server. Try the dig @127.0.0.1 www.mheducation.com command.
CERTIFICATION OBJECTIVE 13.03
The Postfix configuration files may seem verbose to Linux engineers who are newer to e-mail administration. Do not let the size of the configuration files intimidate you. Just a few changes are required to meet the requirements associated with the RHCE objective. In this section, you’ll explore where SMTP services fit in the hierarchy of e-mail services.
TABLE 13-3 Mail Server Components

A mail server has four major components, as described in Table 13-3. On any Linux computer, you can configure a mail transfer agent (MTA) such as Postfix or sendmail for various outbound services, such as forwarding, relaying, smart host communication with other MTAs, aliases, and spooling directories. Other MTAs, such as Dovecot, are designed to handle only incoming e-mail services, based on the protocols they serve, POP3 (Post Office Protocol, version 3) and IMAP4 (Internet Message Access Protocol, version 4).
E-mail systems are heavily dependent on name resolution. While you could handle name resolution through /etc/hosts on a small network, any mail system that is connected to the Internet needs access to a fully functional DNS server. For spam protection and more, it’s important to make sure that the system that intends to send an e-mail has a valid reverse DNS record (PTR) and is actually transmitting with that IP address.
But that is only one component of how e-mail works, from transmission to delivery. E-mail messages start with a mail user agent (MUA), a client system for sending and receiving e-mail such as mutt, Evolution, or Thunderbird. With the help of a mail submission agent (MSA), such mail is normally sent to an MTA such as Postfix or sendmail. A mail delivery agent (MDA) such as procmail works locally to transfer e-mail from a server to an inbox folder. procmail can also be used to filter e-mail. Red Hat supports additional MTA services such as Dovecot to enable POP3 and/or IMAP (or the secure cousins, POP3s and IMAPs) to receive e-mail.
SMTP, the Simple Mail Transfer Protocol, has become one of the most important service protocols of the modern era. Much of the Internet-connected world lives and dies by e-mail and relies on SMTP to deliver it. Like POP3 and IMAP, SMTP is a protocol, a set of rules for transferring data used by various mail transfer agents.
The packages associated with Postfix are part of the “E-mail Server” package group. Key packages are listed in Table 13-4. You can install them with the rpm or yum command. Just remember that you do not need to install everything in this table.
TABLE 13-4 Mail Server Packages
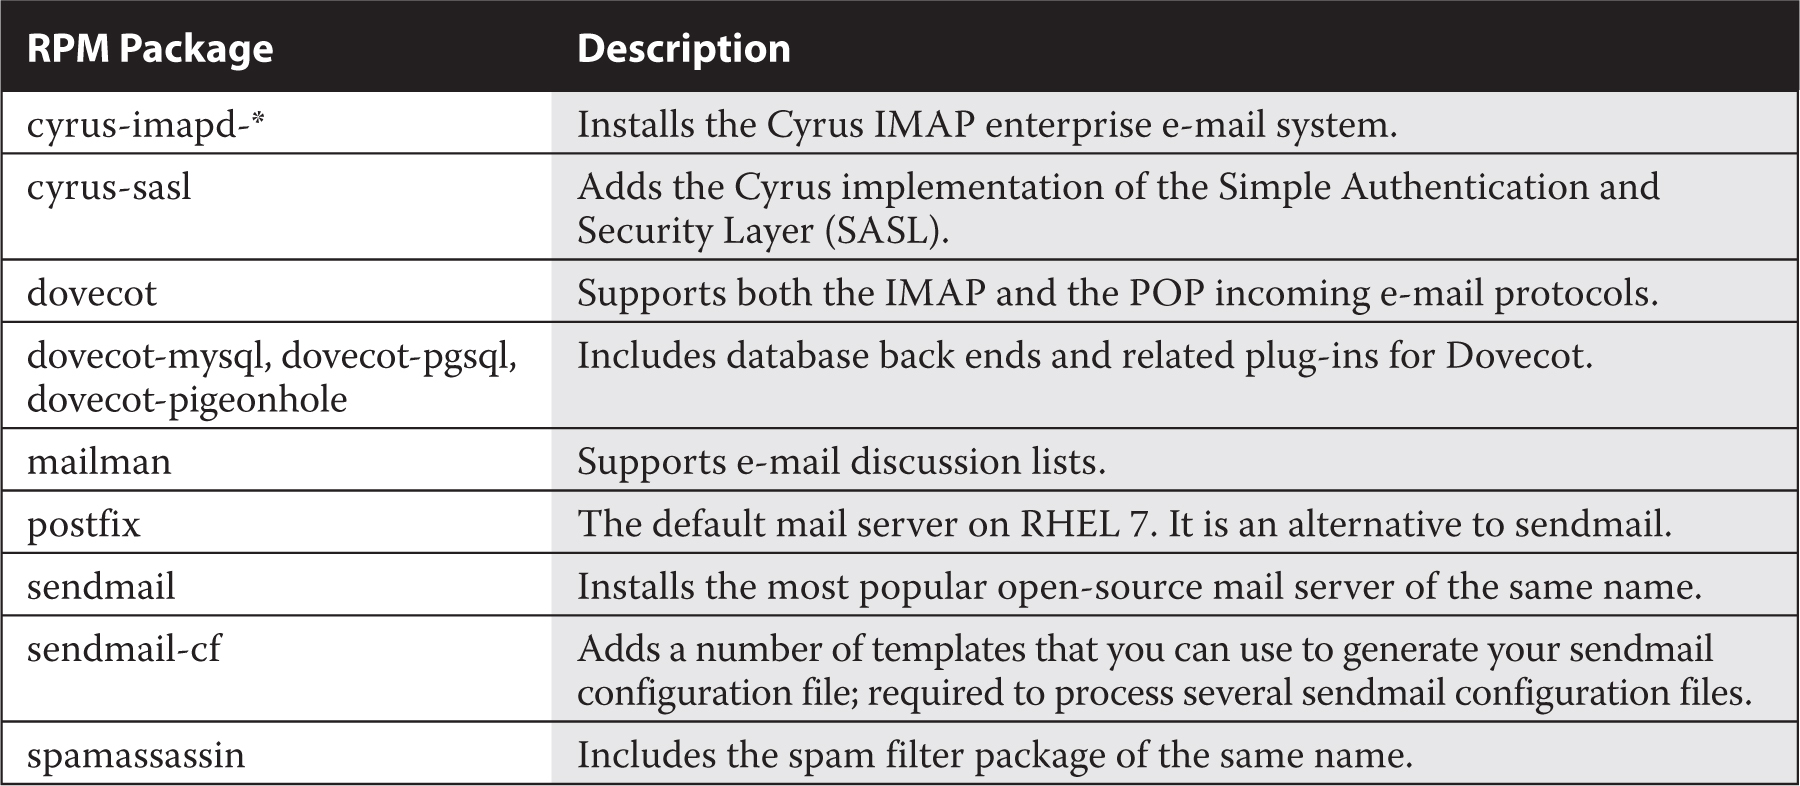
When installed, the default E-mail Server package group includes software packages for the Postfix and Dovecot servers, along with the SpamAssassin filter. For the purpose of the RHCE exam, you do not need all of these packages, just Postfix. Install Postfix with the rpm or yum command, if it is not installed by default.
The alternatives command, with the --config switch, supports choices between different services such as Postfix and sendmail:

The command leads to the following output, which allows you to choose from installed SMTP e-mail servers. Other SMTP services, if installed, would be included in the list that follows:

The preceding output assumes that both Postfix and sendmail are installed in the system.
The alternatives command does not by itself stop or start a service. If you do not stop the original mail service, the daemon will still be running. It’s important to have only one SMTP service running on a system. Interactions between sendmail and Postfix would lead to errors.
In this chapter, we assume that you are running the Postfix mail transfer agent. You can confirm that Postfix is the default MTA with the following command:

By default, all users are allowed to use locally configured SMTP services, without passwords. You’ll see how this can be changed for Postfix later in this chapter.
In some cases, you may want to set up local users just so they have access to such services. If you don’t want such users to log in to the server with regular accounts, one option is to make sure that such users don’t have a login shell. For example, the following command can set up a user named tempworker on a local system without a login shell:

That tempworker user can then set up his own e-mail manager, such as Evolution, Thunderbird, or even Outlook Express, to connect to networked Postfix or sendmail SMTP services. Any attempts by that user to open an SSH session to the server are rejected.
Of course, access is limited to configured users, whether or not their accounts are configured with a login shell. That’s configured courtesy of the Simple Authentication and Security Layer (SASL). As implemented in RHEL 7, it’s based on the cyrus-sasl package, configured in the /etc/sasl2 directory. The configuration file for Postfix (smtpd.conf) refers back to the same authentication scheme with the following directive:

The /etc/sysconfig/saslauthd configuration file confirms the standard mechanism for password checks with the following directive:

That’s a reference to the Pluggable Authentication Modules (PAM) described in Chapter 10. In other words, users who are configured on the local system are controlled by an associated file in the /etc/pam.d directory—namely, smtp.postfix and smtp.sendmail for Postfix and sendmail, respectively. However, you’ll need to make a few changes to Postfix to actually make it read the authentication database.
Most log messages associated with SMTP services can be found in the /var/log/maillog file. Messages that you might expect to see in this file relate to
Restarts of Postfix
Successful and failed user connections
Sent and rejected e-mail messages
By default, the SMTP service uses port 25. If you open port 25 on the firewall, outside users may have access to that server. You can open that port on the default zone with the following commands:

To create a custom rule that supports access only from systems on the 192.168.122.0/24 network, you can add a rich rule with the following command:

In general, SELinux is not an issue for SMTP services. Only one SELinux boolean applies to the Postfix service, allow_postfix_local_write_mail_spool. It’s active by default. As suggested by the name, it allows the Postfix service to write e-mail files to local spools in the /var/spool/postfix directory.
Besides the telnet command described later in this chapter, the appropriate way to test an e-mail server is with an e-mail client. Of course, it would be convenient to have a GUI e-mail client available; however, as discussed in Chapter 2, only text clients such as mutt might be available.
EXERCISE 13-3
In this exercise, you will create three users on the local system, just so they can access the local SMTP server. It is understood that additional configuration is required to set up access or limits for these users on the Postfix SMTP server. The users are mailer1, mailer2, and mailer3.
1. Review the useradd command. Identify the switch associated with the default login shell.
2. Review the contents of the /etc/passwd file. Find a shell that does not allow logins:

3. Run commands such as useradd mailer1 -s /sbin/nologin to add a new user. Make sure to assign that user a password.
4. Review the result in /etc/shadow.
5. Repeat Step 3 for the mailer2 and mailer3 users.
6. Try logging in to one of the new accounts as a regular user. It should fail. Review associated messages in the /var/log/secure file.
7. Keep the new users.
CERTIFICATION OBJECTIVE 13.04
The Postfix mail server is one way to manage the flow of e-mail on a system and for a network. Standard configuration files are stored in the /etc/postfix directory. The postconf command can be used to test the configuration. As installed, Postfix accepts e-mail from only the local system. The configuration changes required to set up Postfix to accept incoming e-mail and to forward e-mail through a smart host are relatively simple.
For the purpose of this chapter, Postfix was installed on the physical host system. Another Postfix server was installed on server1.example.com and configured to forward e-mails to the central mail server running on the physical host. Access tests were performed from the VMs configured in Chapters 1 and 2, representing different external networks.
The details of Postfix configuration files include options for user- and host-based security. If you already know how to configure Postfix for basic operation and just want to know what’s required to meet the SMTP objectives for Postfix, jump ahead to the section associated with configuring Postfix as a null client.
The configuration files are stored in the /etc/postfix directory. The main configuration file, main.cf, is somewhat simpler than the sendmail alternative, sendmail.cf. It’s still complex, as it includes nearly 700 lines.
Except for the .cf files, any changes must first be processed into a database with the postmap command. For example, if you’ve added limits to the access file, it can be processed into a binary access.db file with the following command:

In many cases, the content of files in the /etc/postfix directory is a commented version of the associated man page. The following sections do not cover the main.cf and master.cf files, as those are explained later. They also do not cover the header_checks file, as that’s more of a message filter.
After any changes are made to Postfix configuration files, it’s normally best to reload them into the daemon with the following command:

The access file may be configured with limits on users, hosts, and more. It includes a commented copy of the associated man page, which can also be called with the man 5 access command. When limits are included in that file, they’re configured in the following form:

Patterns can be set up in a number of ways. As suggested by the man 5 access man page, you can limit users with patterns such as

Patterns can be configured with individual IP addresses, network addresses, and domains, such as in the following examples. Pay attention to the syntax, specifically the lack of a dot at the end of the 192.168.100 and at the beginning of the example.org expressions. These expressions are inclusive of all systems on the 192.168.100.0/24 network and the *.example.org domain.
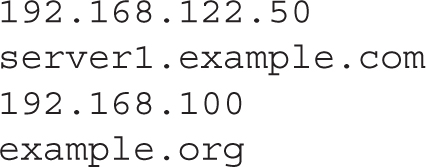
Of course, such patterns have no meaning without an action. Typical actions include REJECT and OK. The following examples of lines in the /etc/postfix/access file follow the pattern action format:

One way to configure host- and user-based security for Postfix is through the access file in the /etc/postfix directory. Another way to configure host-based security is with rich firewall rules, as described in Chapter 10. While there are more complex methods to configure user-based security, the RHCE objectives suggest that you “configure the service for basic operation.”
The files named canonical and generic in the /etc/postfix directory work like an alias file. In other words, when users move from place to place, or if a company moves from one domain to another, the canonical file can ease that transition. Whereas the canonical file applies to incoming e-mail from other systems, the generic file applies to e-mail being sent to other systems.
Similar to the access file, options in these files follow a pattern:

The simplest iteration is the following, which forwards e-mail sent to a local user to a regular e-mail address:

For companies that use different domains, the following line would forward e-mail directed to michael@example.org to michael@example.com. It would forward other example.org e-mail addresses in a similar fashion.

Don’t forget to process the resulting files into databases with the postmap canonical and postmap generic commands. If you modify the relocated, transport, or virtual files in the /etc/postfix directory, apply the postmap command to those files as well.
The /etc/postfix/relocated file is designed to contain information for users who are now on external networks, such as users who have left a current organization. The format is similar to the aforementioned canonical and generic files in the same directory. For example, the following entry might reflect forwarding from a local corporate network to a personal e-mail address:

The /etc/postfix/transport file may be useful in some situations where mail is forwarded, such as from a smart host. For example, the following entry forwards e-mail directed to the example.com domain to an SMTP server such as Postfix on the server1.example.com system:

The /etc/postfix/virtual file can forward e-mail addressed in a normal fashion, such as to elizabeth@example.com, to the user account on a local system. For example, if user elizabeth is actually the administrator on a system, the following entry forwards mail sent to the noted e-mail address to the root administrative user:

Back up the main.cf configuration file and open it in a text editor. There are several things that you should configure in this file to get it working. When the service is properly configured, the changes should limit access to the local system and network. This section also describes the function of other active directives, based on the default version of the file.
First, Postfix queues include either e-mail that has yet to be sent or e-mail that has been received. They can be found in the queue_directory:

The following directory is a standard. It describes the location of most Postfix commands.

Postfix includes a substantial number of executable files for configuration in the master.cf file. The daemon_directory directive specifies their location:

Postfix includes writable data files in the following directory; it normally includes a master.lock file with the PID of the Postfix daemon:

As defined in the comments of the main.cf file, some files and directories should be owned by the root administrative user; others should be owned by the specified mail_owner. In the /etc/groups file, you can confirm a dedicated group named postfix, as well as a group named mail that contains the postfix user:

While Postfix works for the local system “out of the box,” you need to do more to get it running on a network. To that end, you may need to activate and modify the following myhostname directive to point to the fully qualified domain name of the local system, as returned by the hostname command. Unless this differs from the Internet hostname of the system, there’s no need to change the entry

to the fully qualified domain name, such as

An MX record can be configured on the authoritative DNS server for a domain to specify the hostname of the SMTP server that accepts e-mails for that domain.
You need to configure an SMTP server for an entire domain name with the mydomain directive. To that end, change the comment

to reflect the domain name of the local network:

Normally, you’d just uncomment the following myorigin directive to label e-mail addresses coming from this Postfix server with an origination domain. In this case, the origination domain is example.com:

By default, the following active directive limits the scope of the Postfix service to the local system:

For an e-mail server that handles incoming e-mails for an entire domain, you’d normally change the active directive so that Postfix listens on all active network interfaces:

Normally, Postfix listens on both IPv4 and IPv6 networks, based on the following inet_protocols directive:

The mydestination directive specifies the systems served by this Postfix server. Based on the previous settings, the following default directive means that accepted mail may be sent to the local system’s FQDN (server1.example.com), the localhost address on the example.com network, and the localhost system:

For a Postfix server configured for the local network, you should add the name of the local domain, already assigned to the mydomain directive:

The RHCE objectives require you to configure a null client—that is, a system that forwards all e-mails to a central mail server. In that case, you should leave the mydestination directive empty to indicate that the local Postfix system is not the final destination for any e-mail domains:

In addition, you’ll want to set up the mynetworks directive to point to the client IP address to be trusted by this Postfix server. The default commented directive does not point to the example.com network defined for this book:

So for systems like server1.example.com, this directive may be changed to

If you are configuring a null client, this directive should instead be set to the localhost IP address:

Once the changes made to the main.cf file (and any other files in the /etc/postfix directory) are complete and saved, you may want to review the current Postfix parameters. To do so, run the following command:

You can configure host-based security in Postfix through the mynetworks directive in the /etc/postfix/main.cf file.
Of course, most of these parameters are defaults. To review the parameters defined by the main.cf file, run the following command:

FIGURE 13-5 Custom Postfix settings, based on /etc/posfix/main.cf

The output is shown in Figure 13-5.
One setting from the postconf -n output is important to authentication. Specifically, when the following directive is added to the main.cf file, Postfix requires authorized usernames and passwords for access:

In addition, Postfix includes a syntax checker in the basic daemon. Run the following command to see if there are any fatal errors in the main.cf file:

Another directive from the /etc/postfix/main.cf file includes the database hash from the /etc/aliases file, which is processed into the /etc/aliases.db file when the Postfix system is restarted:

The /etc/aliases file is normally configured to redirect e-mail sent to system accounts, such as to the root administrative user. As you might see at the end of that file, e-mail messages sent to root can be redirected to a regular user account:

While there are a number of additional directives available in this file, they’re beyond the basic configuration associated with the RHCE objectives. When changes are complete, you can and should process this file into an appropriate database with the newaliases command.
As noted in previous chapters, the telnet command is an excellent way to review the current status of a service on a local system. Based on the default configuration of Postfix, an active version of this service should be listening on port 25. In that case, a telnet localhost 25 command should return messages similar to the following:
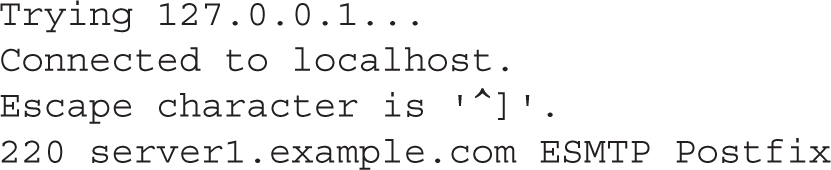
If IPv6 networking is enabled on the local system, the IPv4 loopback address (127.0.0.1) would be replaced by the regular IPv6 loopback address (::1). The quit command can be used to exit from this connection. But don’t quit yet. Type the EHLO localhost command and press ENTER; the EHLO is the enhanced HELO command, which returns the basic parameters of an SMTP server.

For our purposes, the most important information is what’s missing. No authentication is required on this server. When authentication is properly configured on Postfix, you’ll also see the following line in the output:

FIGURE 13-6 Directions to set up Postfix authentication

When authentication is configured in Postfix, user limits can apply. However, as there are no hints in the standard main.cf configuration file, you’ll have to refer to Postfix documentation for clues. As suggested in Chapter 3, most packages include some level of documentation in the /usr/share/doc directory. Fortunately, Postfix documentation in that directory is rather extensive. In RHEL 7, you’ll be able to find that documentation in the postfix-2.10.1/ subdirectory.
The directives that you need to add to the main.cf file to set up authentication are shown in the README-Postfix-SASL-RedHat.txt file in that directory. The key excerpt is shown in Figure 13-6.
For the first step listed, it’s sufficient to copy the four directives indicated to the end of the main.cf file. The first enables SASL authentication for Postfix connections:

Next, the following disables anonymous authentication:

The directive that follows allows authentication from nonstandard and deprecated clients such as Microsoft Outlook Express:

The next line allows authenticated users, grants access from networks configured with the mynetworks directive, and rejects destinations other than the Postfix server:

The directives required to set up Postfix to accept incoming e-mail from other systems have been previously shown in the description of the main.cf file. However, that discussion was a more comprehensive description of that file. This section just summarizes the minimum requirements to configure Postfix to accept inbound e-mails from other systems. Given a Postfix server configured on the maui.example.com system, on the 192.168.122.0/24 network, you’d make the changes shown in Table 13-5 to the main.cf file in the /etc/postfix directory.
Each of these options replaces either a comment or an active directive in the default /etc/postfix/main.cf file. For example, you should at least comment out the following directive:

This section covers the minimum requirements to configure Postfix, in the words of the RHCE objectives, “to forward all email to a central mail server.” A smart host provides this functionality and works as a regular SMTP server, except for the forwarding of all e-mail through a second SMTP server. The location of the smart host can be specified with the relayhost directive. For example, if the remote smart host is outsider1.example.org, you’d add the following directive to the /etc/postfix/main.cf file:

TABLE 13-5 Postfix Configuration as an SMTP Server for example.com
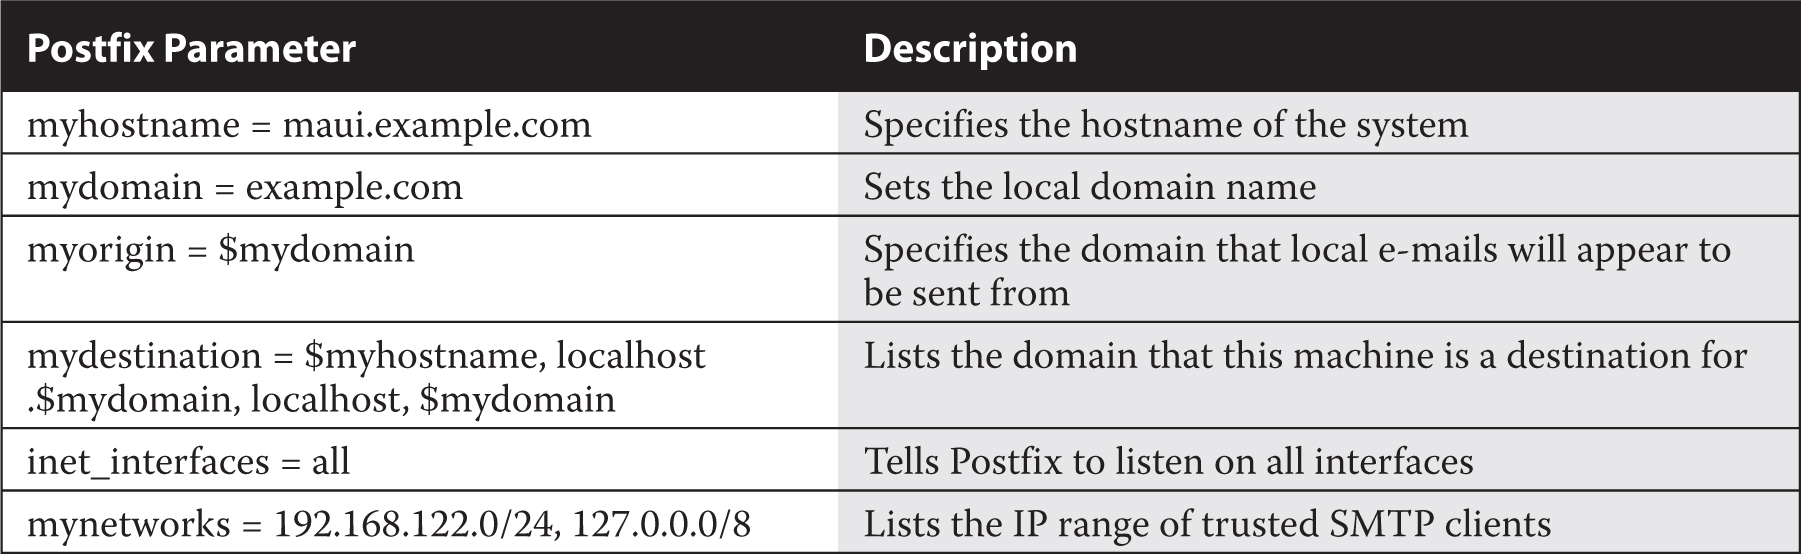
TABLE 13-6 Postfix Configuration as a Null Client

A null client configuration is even more restrictive than a smart host. Similarly to a smart host configuration, all e-mails are forwarded to a central mail server. In addition, no e-mail message is accepted for local delivery. The corresponding configuration settings are shown in Table 13-6.
CERTIFICATION OBJECTIVE 13.05
The relevant RHCE objective of this section is to “configure a system as either an iSCSI target or initiator that persistently mounts an iSCSI target.” The iSCSI initiator is a client. The iSCSI target is the shared storage on the server, which communicates with the client over TCP port 3260.
The iSCSI protocol encapsulates and delivers SCSI commands over an IP network. Once the server and the client are configured, you’ll have access to the storage LUN on the iSCSI target; that LUN will look like just another SCSI hard drive on the client.
Today, many storage arrays support the iSCSI protocol. However, for the purpose of the RHCE exam, you need to learn how to configure a Linux server as an iSCSI target (that is, an iSCSI storage server). Of course, the latency and response time will probably be slower than on an enterprise-class iSCSI storage array, but that depends on many factors, including the type of disks and throughput of the network.
In a production iSCSI deployment, you may consider enabling “jumbo frames” on all targets, initiators, and Ethernet switches in the iSCSI fabric. Jumbo frames are Ethernet frames with a larger MTU size (typically 9,000 bytes), and as such they usually provide better throughput than the default 1,500 bytes MTU. To enable Jumbo frames on a network card on RHEL 7, add the MTU=9000 directive to the corresponding ifcfg-* configuration file in the /etc/sysconfig/network-scripts directory.
One way you can set up an iSCSI target is with the targetcli package. Install it as shown:

The package includes the targetcli command, which starts a user-friendly configuration shell that guides you through all the steps to deploy an iSCSI target. After starting the targetcli shell, type the ls command. You will see the output displayed in Figure 13-7.
From the targetcli shell, you can navigate to different configuration sections using the cd command, like in a filesystem. The ls command displays the content of the current section, while help provides a useful contextual help screen. Like in a normal shell, you can use TAB completion to fill partially typed commands or arguments.
FIGURE 13-7 The targetcli administrative shell
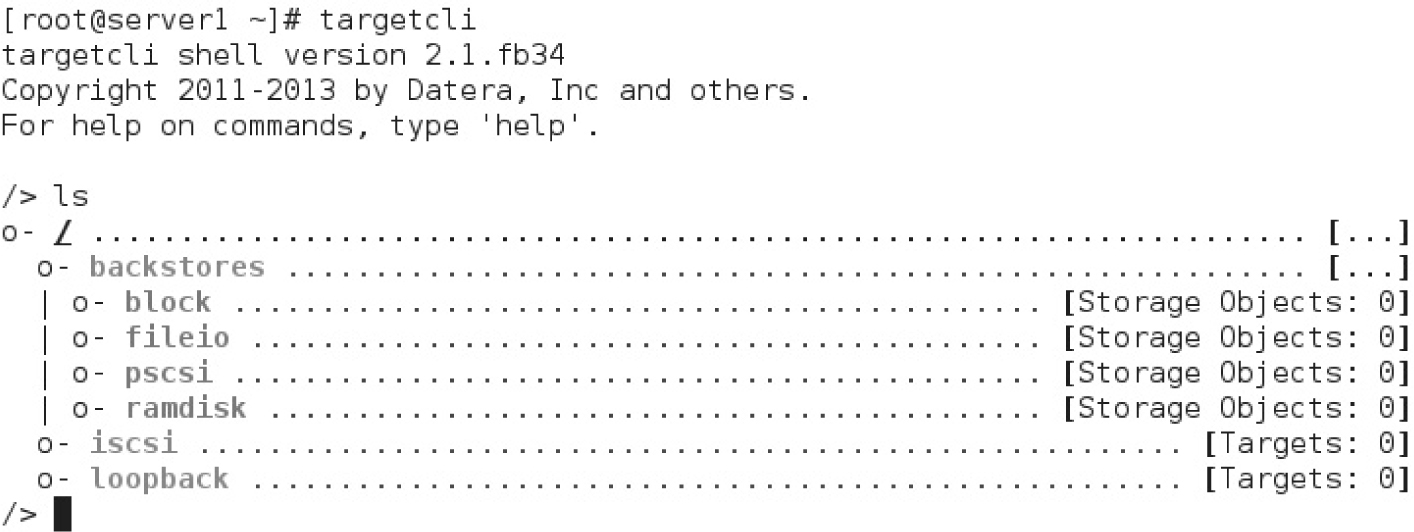
As suggested by Figure 13-7, the first step consists of configuring a backstore—that is, a backing store device that will be later exported to iSCSI clients. If you have set up the virtual machines as suggested in Chapter 1, you should have enough free space on the local drive to create a new logical volume to be dedicated to an iSCSI backstore area.
As an example, log in to server1.example.com and create a new logical volume that’s 1GB in size on the default rhel_server1 volume group that was created during the operating system installation (substitute accordingly if the name of your volume group is different):

For the backstore device, you can use any block device, such as a logical volume, a disk partition, or even an entire disk drive. But there’s more. As shown in Figure 13-7, targetcli not only supports block devices as backing storage, but also image files (fileio), physical SCSI disks in pass-through mode (pscsi), and temporary in-memory filesystems (ramdisk). For the purpose of this section, we’ll be using a block device.
Once you have a block device ready to be configured, go back to the targetcli shell and create a block storage object:

This create command tells targetcli to use the /dev/rhel_server1/backstore volume as a block storage object, with a name of disk1.
From the targetcli shell, navigate to the /iscsi path:

Type the help command to display a list of available options. The next step consists of creating an iSCSI Qualified Name (IQN). This is a unique string that identifies an iSCSI initiator or target, for example:

The IQN must follow a specific format. It must start with the “iqn.” string, followed by the year and month (YYYY-MM) in which an organization registered its public domain. Next, there is the domain of the organization in reverse order, followed by a column-separated optional string.
Back to the targetcli shell, let’s create the IQN:

As indicated by the output of the preceding command, targetcli created the IQN for the target and a new entity, TPG 1. A TPG is a target portal group. Its purpose is to link together several parts of the configuration, as you will see in the next section.
If you have completed the configuration steps illustrated so far, type the ls command from the targetcli shell. You will see the output illustrated in Figure 13-8.
As you can see in the figure, the targetcli shell includes new menu entries underneath the IQN and TPG lines. Following the order shown in Figure 13-8, we will perform the following steps:
1. We will configure an access control list (ACL) to allow access to the target only from a specific client.
2. We will create a logical unit number (LUN) for the current backstore device.
3. We will define a portal—that is, an IP address and optionally a custom port that the iSCSI target will listen on for connections.
To configure an ACL and restrict access to the IQN of a specific iSCSI initiator, type the following commands:

FIGURE 13-8 Configuring a TPG from the targetcli shell

Next, navigate to the LUNs section and associate a LUN number to the backstore device previously created:

Finally, navigate to the portal section and create a new iSCSI portal to listen to the local IP address (192.168.122.50 in this example). If you don’t specify a TCP port, by default targetcli will be using TCP port 3260:

This completes the configuration of the TPG. Type ls / to show the full configuration of the iSCSI target, as illustrated in Figure 13-9. Then, type exit to close the targetcli shell. The configuration is saved automatically.
All system services must be configured to start at boot. There’s no exception for the iSCSI target service, so you must ensure that it is configured to start the next time that the machine is powered on. This can be done by running the following commands:

FIGURE 13-9 The configuration of an iSCSI target

Don’t forget to allow connections through the local firewall. By default, the iSCSI target service uses TCP port 3260:

In this section we will configure the tester1.example.com virtual machine to mount the LUN exported by the iSCSI target defined in the previous section. To set up an iSCSI client, you’ll need the iscsi-initiator-utils packages, along with any dependencies:

The iscsi-initiator-utils package implements a software iSCSI initiator. However, today most network adapters provide iSCSI initiator functionalities in hardware. The configuration of a hardware iSCSI initiator depends on the manufacturer of the card, and as such it varies between different card vendors and models.
Next, configure an IQN for the initiator. This is defined in the /etc/iscsi/initiatorname.iscsi file. Edit the content and type a custom IQN:

If you have configured an ACL on the iSCSI target, the IQN of the client must match the IQN defined on the ACL; otherwise, the client will not be granted access to the target.
Next, enable the iscsi service on the client and ensure that it starts at the next boot:

You’d use the iscsiadm utility to discover available iSCSI targets. One method is with the following command:

To interpret, this iscsiadm command queries iSCSI targets. It works in discovery database (discoverydb) mode (-m), where the discovery type (-t) requests that the sendtargets (or st) command is sent to the iSCSI target, defined on a portal (-p) listening on the noted IP address, to discover (-D) shared storage LUNs.
If successful, you’ll see output similar to the following:

To use the target you have just discovered, you need to run the following command:

To set up an iSCSI client, you’ll need access to an iSCSI target acting as a server. Normally, TCP port 3260 should be open on that server, making it accessible with the iscsiadm command described in this chapter.
This command works in node mode (-m) to log in to (-l) the target IQN (-T) iqn.2015-01.com.example:server1-disk1. If successful, you’ll be able to see an additional disk storage device by running the fdisk -l command
You should then be able to manage the shared storage as if it were a new hard drive on the local system. The hard drive device file will show up in the /var/log/messages file with information such as the following, which points to device file /dev/sdc:

Then, you can create partitions and more on the new /dev/sdc drive, just as if it were a local drive, based on the techniques discussed in Chapter 6. Of course, a “persistent mount” as described in the relevant RHCE objective requires that you make sure the iSCSI service starts the next time the system is rebooted.
To make sure there’s an actual mount, you may also need to set up a partition that’s actually mounted in the /etc/fstab file. In practice, the actual device file for the iSCSI drive may vary on each reboot. Therefore, such mounts should be configured with the Universally Unique Identifier (UUID) numbers described in Chapter 6.
CERTIFICATION OBJECTIVE 13.06
The configuration of NTP as a client and a default server is covered in Chapter 5. In contrast, the configuration of NTP as a server that synchronizes time using NTP peers is covered here. Nevertheless, you need to know how to secure NTP just as you secure other network services such as Samba and NFS.
To allow NTP to work as a server, you need to allow access through UDP port 123. This can be achieved by adding the ntp service to the relevant firewalld zone.
As discussed in Chapter 5, the time configuration depends on the time zone that the /etc/localtime symbolic link points to, as well as the NTP servers configured in the /etc/ntp.conf file (or /etc/chrony.conf file, if chronyd is in use). Now it’s time to configure one of those NTP servers. We’ll focus on ntpd, as this is the standard NTP daemon for systems that are always connected to the network.
The default /etc/ntp.conf configuration file starts with the driftfile directive, which monitors the error drift in the local system clock:

There are also restrict directives that can help protect an NTP server. This directive works with IPv4 and with IPv6 networking, as shown here:

The options to the restrict directive can be described as follows:
default Refers to default connections from other systems; may be further limited by other restrict directives.
nomodify Denies queries that attempt to change the local NTP server configuration.
notrap Denies the control message trap service; you might remove this option to enable remote logging.
nopeer Stops access from potential peer NTP servers.
noquery Ignores queries.
However, these restrictions, when combined, are good only for an NTP client. To set up an NTP server, specifically one that “synchronizes time using other NTP peers,” you should remove at least the nopeer directive from the restrict list. Some NTP servers may need to synchronize with yours, which is possible if you remove the noquery from the list as well.
The next two restrict directives limit access to the local NTP server to the local system. You should recognize the default IPv4 and IPv6 loopback addresses here:

Of course, when setting up an NTP server for other clients, you’ll want to loosen that restriction. The comment that follows includes a network address in the required format. So to set up an NTP server for the 192.168.122.0/24 network, you’d change the restrict directive to

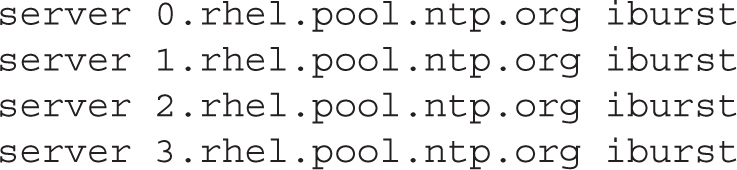
For a basic “default configuration NTP server,” no additional changes should be required. Of course, the local NTP server should also be configured as a client to master NTP servers. Substitute the hostname for the actual NTP servers on your network for the following:
And to repeat the reference from the RHCE objectives, the other reference is to peers. The relevant directive is peer.
To test the directive on one NTP server, you could set this machine to peer with another host, as shown here:

Alternatively, you could be given the hostname to an NTP peer server, perhaps on a corporate network, perhaps on a network that has been configured during the exam.
As just described, the restrict directive from the /etc/ntp.conf configuration file can be used to limit access to a local NTP server, but that assumes an open port 123. Security limits can also refer to configured firewalls. Just be aware that an appropriate firewall rule for NTP opens up UDP (not TCP) port 123. This can be configured by adding the ntp service to the appropriate firewall zone, like so:

To test a connection to an NTP server, the ntpq -p hostname command can help. That command looks for the peers listed in the /etc/ntp.conf file. If the server is operational, you’ll see something similar to the following output to the ntpq -p localhost command shown in Figure 13-10.
Since NTP is a UDP-based service, the telnet command won’t verify the operation of that service. You can check the local status of the NTP service with the ntpq -p and nmap -sU -p123 commands.
The * sign in front of a hostname or IP address indicates the current NTP peer or server is used as a primary reference, whereas the + sign identifies additional peers designated as acceptable for synchronization. Of course, if the ntpq command works from a remote system, using the local hostname or IP address, you’ve verified that the remote NTP server is operational.
FIGURE 13-10 NTP server status, verified with the ntpq -p command

DNS provides a database of domain names and IP addresses that help hosts translate hostnames to IP addresses on various networks, including the Internet. It’s a distributed database where each administrator is responsible for his or her own zone of authority, such as mheducation.com. The default DNS server uses the named daemon, based on the Berkeley Internet Name Domain (BIND). Other alternatives, such as the Unbound resolver, are also available.
There are four basic types of DNS servers: master, slave (or secondary), caching-only, and forwarding-only. The RHCE objectives specifically exclude master and slave name servers. The default /etc/named.conf file is built for a caching-only DNS server configuration. A forwarding-only name server uses the forward only and forwarders directives in the named.conf file. In either case, you should configure the listen-on and allow-query directives to support access from the local system and desired network(s). To test a DNS server, use commands such as rndc status, dig, and host.
Red Hat includes two servers associated with the SMTP protocol: Postfix and sendmail. Postfix is the default and is somewhat easier to configure than sendmail. Different Postfix configuration files can be found in the /etc/postfix directory. User and host limits can be configured in the access file. Several other files relate to redirected or renamed e-mail accounts or domains. You’ll need to modify Postfix configuration directives in the /etc/postfix/main.cf file, including myhostname, mydomain, myorigin, mydestination, inet_interfaces, and mynetworks. The relayhost directive can help configure forwarding to a smart host. If you need to configure a null client, you also need to set the local_transport directive to avoid e-mails being delivered to the local system.
The iSCSI protocol emulates a SCSI bus over an IP network. With the targetcli command shell, you can configure interactively a Linux host as an iSCSI target to export local storage to remote iSCSI initiators. The iSCSI initiators can discover and log in to remote targets using the iscsiadm command.
Finally, to configure an NTP server for a network, you need to modify the /etc/ntp.conf file. The restrict directive should be changed to specify the network address. To support the peers suggested in the RHCE objectives, you also need a restrict directive without the noquery and (most important) nopeer options. Then to set up other systems as peers, you’d use the peer hostname format.
 TWO-MINUTE DRILL
Here are some of the key points from the certification objectives in Chapter 13.
 DNS is based on the Berkeley Internet Name Domain (BIND), using the named daemon.
Key packages include bind-chroot, which adds security by supporting DNS in a chroot jail, and bind-utils, which includes command utilities such as dig and host.
Four basic types of DNS servers are master, slave (secondary), caching-only, and forwarding-only. The RHCE objectives specifically require coverage of just caching-only DNS services.
Critical BIND configuration files include /etc/named.conf and the files in the /var/named directory.
The default /etc/named.conf file is set up for a caching-only name server, limited to the local system. Changes to the listen-on and allow-query directives can enable access from DNS clients on a network.
A forwarding name server requires a forward only and forwarders directive that specifies the IP addresses of the remote DNS servers.
Unbound provides an alternative to BIND for setting up a secure caching-only and forwarding name server.
Postfix is the default mail transfer agent in RHEL 7.
Mail server information is logged in the /var/log/maillog file.
The Postfix server can be configured through configuration files in the /etc/postfix directory. The main configuration file is main.cf file.
You can configure e-mail aliases in /etc/aliases.
You can set up various kinds of e-mail forwarding in files such as canonical, generic, and relocated, all in the /etc/postfix directory.
The relayhost directive can be used to set up a connection to a smart host.
To set up Postfix as a null client, you need to prevent e-mails from being delivered to the local system with the local_transport directive.
You can test a standard Postfix configuration from the local system with the telnet localhost 25 command.
You can configure an iSCSI target by activating the target service and running the targetcli administrative shell.
To set up an iSCSI target, you need to define a backstore device, set an IQN, define a LUN, create a portal, and (optionally) define ACLs.
To configure an iSCSI client, you need the iscsi-initiator-utils package, which can be used to discover and log in to iSCSI targets with the iscsiadm command.
To make sure the iSCSI connection survives a reboot, you’ll need to activate the iscsi service.
The default NTP configuration file, /etc/ntp.conf, sets up a client with access limited to the local system.
A standard restrict directive in the default ntp.conf file is available to open access to systems on a specified network. You’ll also need to allow NTP traffic through the local firewall.
The RHCE objectives suggest connections to peers; such connections can be configured with the peer directive.

The following questions will help measure your understanding of the material presented in this chapter. As no multiple choice questions appear on the Red Hat exams, no multiple choice questions appear in this book. These questions exclusively test your understanding of the chapter. It is okay if you have another way of performing a task. Getting results, not memorizing trivia, is what counts on the Red Hat exams. There may be more than one answer to many of the questions.
1. Name two packages that provide DNS services on RHEL 7.

2. To configure DNS communication on port 53, what changes would you make to a firewall to support access by other clients to the local DNS server?
3. What file includes a basic template for a BIND DNS caching-only name server?
4. What command makes sure that the BIND DNS service starts the next time you boot Linux in the default target?
5. List two examples of an MTA available on RHEL 7.
6. What command can be used to switch between the installed Postfix and sendmail services?
7. How would you change the following directive in /etc/postfix/main.cf to open Postfix to all systems?

8. If you use /etc/aliases for forwarding e-mail, what command processes these files into an appropriate database file for Postfix?
9. What directive in the main.cf file is used to specify the domain served by the Postfix server?
10. What service should be running on reboot on a properly configured iSCSI target?
11. What command utility can be used to configure an iSCSI target?
12. Enter a directive, suitable for /etc/ntp.conf, that limits access to the 192.168.0.0/24 network.
Several of these labs involve configuration exercises. You should do these exercises on test machines only. It’s assumed that you’re running these exercises on KVM-based virtual machines. For this chapter, it’s also assumed that you may be changing the configuration of a physical host system for such virtual machines.
Red Hat presents its exams electronically. For that reason, the labs in this and future chapters are available from the media that accompanies the book. Labs for this chapter are in the Chapter13/ subdirectory. In case you haven’t yet set up RHEL 7 on a system, refer to Chapter 1 for installation instructions.
The answers for each lab follow the Self Test answers for the fill-in-the-blank questions.

1. The BIND and Unbound software packages provide DNS services on RHEL 7.
2. To support access by other clients to the local DNS server, make sure TCP and UDP traffic is supported through the firewall on port 53 by enabling the dns service on the required firewalld zone.
3. The default /etc/named.conf file includes a basic template for a DNS caching name server.
4. The command that makes sure that the BIND DNS service starts the next time you boot Linux is

5. Two examples of MTAs supported on RHEL 7 are Postfix and sendmail.
6. The command that can be used to help switch between the Postfix and sendmail MTAs is alternatives --config mta.
7. The simplest solution is to change the directive to

8. Forwarding e-mail addresses are normally stored in /etc/aliases. Make sure to process these files into appropriate databases; for /etc/aliases, the database is updated with the newaliases command.
9. The directive in the main.cf file that is used to specify the domain served by the Postfix server is mydestination.
10. The target service should be running on reboot on a properly configured iSCSI target.
11. The targetcli command shell can be used to configure an iSCSI target.
12. One directive in the /etc/ntp.conf file that limits access based on the noted conditions is

In this lab, you can use the existing configuration in the /etc/named.conf configuration. All you need to do is follow these steps:
1. Install the bind RPM package.
2. Modify the listen-on port 53 directive to include the local IP address; for example, if the local IP address is 192.168.122.150, the directive will look like

3. Modify the allow-query directive to include the local IP network address:

4. Save your changes to /etc/named.conf.
5. Start the named service:

6. Change the local client to point to the local DNS caching name server; replace any nameserver directives in /etc/resolv.conf with the IP address of the local system. For example, if the local computer is on 192.168.122.150, the directive is

7. Test out the new local DNS server. Try commands such as dig www.mheducation.com.
8. Point client systems to the DNS server. Add the aforementioned nameserver directive to

9. To make sure the DNS service starts the next time Linux is booted, run the following command:

10. Open up TCP and UDP ports 53 in the firewall on the local system. The simplest method is with the firewall-cmd utility:

As with Lab 1, the focus in this lab is on the configuration of the /etc/named.conf file. Nominally, the default caching-only DNS server already includes forwarding features. However, to set up a specific forwarding server, you should add a forwarders entry such as the following in the options stanza:

As for the other requirements of the lab, you can clear the current cache with the rndc flush command and reload the configuration file with the rndc reload command.
For Labs 3, 4, and 5, you may be using an e-mail client such as mutt. To send an e-mail to user michael@localhost, take the following steps:
1. Run the mutt michael@localhost command. The To: michael@localhost message should appear.
2. Press ENTER. At the Subject: prompt, enter an appropriate test subject name and press ENTER.
3. You’re taken to a blank screen in the vi editor. Use commands appropriate to that editor in a screen similar to that shown in Figure 13-11.
4. From the screen shown in Figure 13-11, press Y to send the noted message.
In addition, you may be verifying e-mail receipt in a username file in the /var/spool/mail directory. Normally, such e-mail can be reviewed from within a user account with the mail or mutt command.
FIGURE 13-11 The mutt e-mail client

In Postfix, to disable local-only access in the /etc/postfix/main.cf file, change the inet_interfaces directive to accept all connections:

However, to meet the requirements of the lab, you’ll want to retain the default value of that directive:

In general, to verify authentication on an SMTP server, connect from the local system with the telnet localhost 25 command. When you see a message similar to

type in the following command:

To verify receipt of e-mail in a user account, log in to that account, or at least verify the timestamp associated with the username in the /var/mail directory. To make sure e-mail directed to the root user is redirected to a regular user account, you’d add a line like the following to the /etc/aliases file:

Given the wording for the question, any standard user account would be acceptable. Of course, to implement this change, you’ll have to run the newaliases command, which processes this file into the /etc/aliases.db file.
To enable access from more than just the localhost, you’ll need to modify the inet_interfaces directive in /etc/postfix/main.cf to

The next job is to limit access to a specific network (in this case, example.com). While there are options in /etc/postfix files, perhaps the most efficient way to limit access to a specific network is with an appropriate firewalld rich rule. For example, the following custom rule would limit access to TCP port 25 to systems on the given IP address network. The network shown is based on the originally defined configuration for example.com, the 192.168.122.0/24 network:

In addition, you can set up this network in the /etc/postfix/access file with a rule like the following:

Once Postfix is running, you should be able to confirm the result with an appropriate telnet command from a remote system. For example, if Postfix is configured on a system with a 192.168.122.50 IP address, the command would be

The configuration of a smart host in Postfix is based on the relayhost directive. For the parameters given in the lab, if the physical host is located on the system maui.example.com, the directive in the main.cf file would be

If Postfix on the server1.example.com system is properly configured as a smart host, e-mails to the forwarded host should be reliably delivered and logged in to the appropriate /var/log/maillog file.
The configuration of Postfix as a null client is straightforward and is summarized in Table 13-6.
At a minimum, you should configure the myorigin, mydestination, local_transport, and relayhost directives. Other directives such as myhostname, mydomain, and mynetworks should already have appropriate default values.
Confirm your settings with the postconf -n command and start the service. Don’t forget to configure Postfix to start automatically the next time the machine is powered on.
This is a long lab, but it is very similar to the configuration example described in the “iSCSI Targets and Initiators” section of this chapter. Please refer to that section for an in-depth discussion.
In this lab, you’ll set up one NTP server as a peer to another. That’s possible with the peer directive, configured in the /etc/ntp.conf configuration file. For example, if a regular NTP server is configured on IP address 192.168.122.50, you can set up a peer on the 192.168.122.150 server with the following directive:

Just remember, an NTP peer doesn’t work unless the nopeer option has been removed from the restrict directive in the ntp.conf file.