Chapter 4 Designing a Magazine Layout
Chapter Objectives
Chapter Learning Objectives
Create a multicolumn layout.
Add master items to master pages.
Apply master pages to document pages.
Work with spot colors.
Use dummy text to create a design proposal.
Thread stories across multiple pages.
Wrap text around images.
Add form elements.
Create an interactive PDF form.
Chapter ACA Objectives
For full descriptions of the objectives, see the table on pages 270–276.
DOMAIN 2.0
PROJECT SETUP AND INTERFACE
2.1, 2.5
DOMAIN 3.0
ORGANIZING DOCUMENTS
3.2, 3.8
DOMAIN 4.0
CREATING AND MODIFYING DOCUMENT ELEMENTS
4.1, 4.2, 4.4, 4.6, 4.7
DOMAIN 5.0
PUBLISHING DOCUMENTS
5.2
![]() Video 4.1
Video 4.1
Introducing the Magazine Interior Layout Project
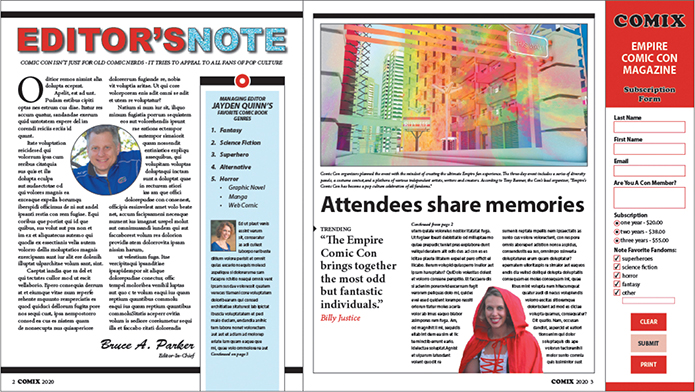
In this design project, you will put together a basic layout to present to your customer. Specifically, you will provide design and text formatting ideas for the editor’s note pages, a subscription form that will be included as a foldout in the print version of the magazine, and an interactive form that readers can fill out in the PDF version of the magazine. You’ll be introduced to the concept of master pages, try additional paragraph formatting controls, and learn how to wrap text around images. Finally, you will gain an understanding of the various form elements used in PDF form designs (Figure 4.1).
Note
This chapter supports the project created in Video Project 4. Go to the Project 4 page in the book’s Web Edition to watch the entire lesson from beginning to end.
Note
The most commonly used magazine or newsletter size in the US is 8 3/8” x 10 7/8”.
As with the previous project, this project’s primary output medium will be print. The magazine content is made up of photos, headlines, body copy, background tints, and line and form elements. The magazine example in this project is folded to a finished portrait letter size (8.5 inches by 11 inches). The magazine is designed with facing pages (left and right pages), and text appears in three columns. Additionally, its cover and some of its content design contain images and background color frames that extend to the edge of the page.
Setting Up the New Document Dialog
Start a new document for this project (Figure 4.2) using the following settings:
Intent: Choose Print. This sets the document’s default color mode to CMYK.
 ACA Objective 2.1
Name: Type project04_magazine_pages.
Units: Choose Inches.
 Video 4.2
Setting Up Master Pages
Number of Pages: Magazines are multipage documents. Start with four pages and add more pages as needed during production.
Page Size and Orientation: In the Blank Document Presets section, click the Letter page size icon, and for Orientation click the portrait icon.
Facing Pages: Select Facing Pages to create a document with spreads (left and right pages side by side). Notice that with Facing Pages enabled, the Left and Right margin fields change to Inside and Outside. The inside margin is the margin that appears on either side of the spine, where the magazine is bound. The outside margin is the margin that appears on the edge where there is no binding.
Columns: Enter 3 for the number of columns. With Screen Mode set to Normal, the column guides assist with consistent and easy placement of design elements.
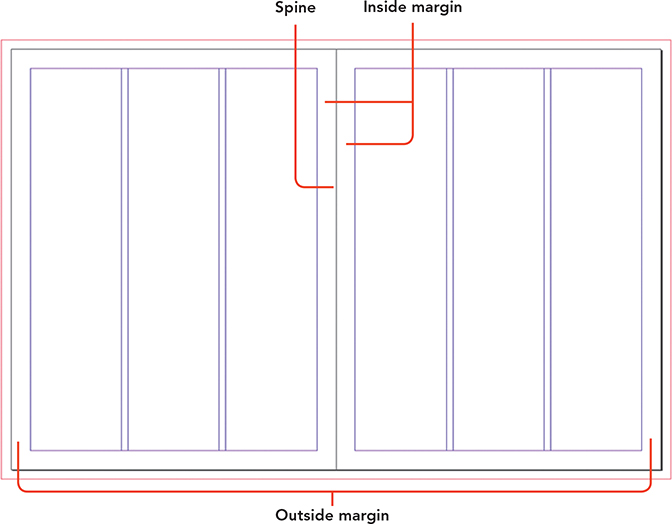
Figure 4.2 Viewing the second and third pages of a four-page facing-pages document, including three attributes when Facing Pages is enabled Note
Remember that you can click the Preview option to see how a spread is built from your settings.
Margins: Enter 0.5 inches for all sides.
Bleed: Enter 0.25 inches on all sides.
The Slug option won’t be used in this project.
After you click OK, remember to save the document.
Setting Up Master Pages
![]() ACA Objective 2.1
ACA Objective 2.1
Master pages apply common design elements across the pages of your document. This saves you the time of adding those elements to each page individually, ensures consistency, and provides an easy method for making global changes across a document.
If you have a magazine or other multipage publication nearby, flip through the pages. Can you spot common design elements or layout features? What design elements appear repeatedly across multiple pages in a report or book layout?
The magazine contains several examples of master items, which live on master pages. Page headers (the area above the top margin guide on a page) and footers (the area below the bottom margin guide) are areas on the page where you would position elements that repeat across different pages (Figure 4.3). Some examples of repeating header and footer elements are page numbers, company logos, and navigation controls.

If you have an item you want to appear on many pages, add that item to a master page. Then, when you apply that master page to document pages, those master items appear on those document pages automatically.
Creating and Editing Master Pages
![]() ACA Objective 4.1
ACA Objective 4.1
![]() Video 4.3
Video 4.3
Adding Elements to Master Page A
When you create a new document, a blank document opens with the number of pages you specified. All the pages are automatically based on a default master page named A-Master. This default master page is applied to all empty pages and applies the original new document settings, such as the page size, orientation, margins, columns, and bleed settings.
Before adding items to a master page, display the master page by doing one of the following:
In the master pages area of the Pages panel, double-click the name of the master page (in this case, A-Master).
In the Status bar, select the master page name (A-Master) from the Go to Page menu.
Choose Layout > Go to Page, and then select the master page name (A-Master) from the Page menu (Figure 4.4).
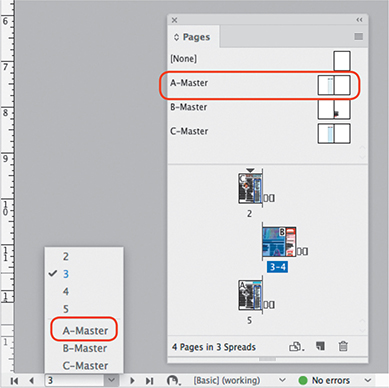
Figure 4.4 A-Master selectable from the status bar at the bottom of the document window, and in the master page area of the Pages panel
The A-Master page or spread now appears in the document window. You can now start to add common master items.
Note
Video 4.3 includes a layer group called Master Pages. This layer group was manually created to help organize the document; it isn’t automatically created when you use master pages.
Tip
To customize how the Pages panel looks, such as making the page thumbnail icons larger, choose Panel Options from the Pages panel menu.
When you use facing pages, a master page spread contains both a left and a right master page so that you can add items to just one page of each spread.
A special page number marker is often the first master item you add to a master page, especially for longer documents such as books, reports, or magazines. The marker automatically updates to display the current page number.
To add a current page number marker (Figure 4.5):
Using the Type tool, draw a text frame on the A-Master page, in the footer area, and click inside the frame.
Choose Type > Insert Special Character > Markers > Current Page Number.
The special page number marker that is inserted appears as the letter A, matching the prefix of the master page. A page number on a B-Master would appear as the letter B. If you want to add more text to the footer text frame that contains the page number marker, such as the name of the magazine, go ahead.
When you return to a document page, you’ll see the new master item on every page that uses that master.
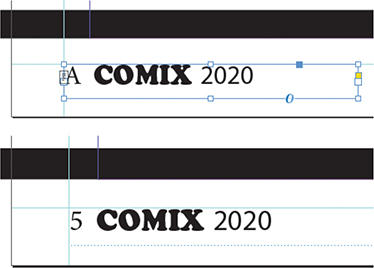
Figure 4.5 Current page number markers on the left side of A-Master (top), and how the marker looks on page 5 Tip
Include column guides and ruler guides on your master pages to help maintain layout consistency.
If you’re using facing pages and you want to see a master item on every page, remember to add the master item to both the left and right pages of the master spread.
In the same way, you can add any other text or graphics to a master spread, such as a document title or issue date.
Note
Keep in mind that master items are placed at the bottom of the stacking order of the layer on which you place them. When you’re working on that layer on a document page, any new objects are placed above the master items.
Master pages aren’t just for objects that appear on every page. They can also be useful for layouts that you want to reuse frequently. In Video 4.3, the Editor’s Note page is being built on a master page because it’s a specific page layout that will be needed for every issue. Instead of rebuilding the layout for every issue, having it ready as a master page lets you simply apply it to whichever page in the next issue will be used for the Editor’s Note and fill it in with that issue’s text.
Adding Master Pages
Documents are not limited to a single master page or master spread. For example, in a magazine layout, different sections might use different standard layouts.
![]() ACA Objective 3.2
ACA Objective 3.2
To create a new master page, do any of the following:
With a master page or spread selected, click the Create New Page button at the bottom of the Pages panel.
Choose New Master from the Pages panel menu.
Right-click the master page area in the Pages panel, and choose New Master.
If you choose the New Master command (or choose the Master Options command when a master is selected), you can change the settings for a master (Figure 4.6):
Prefix: A short way of identifying a master when there isn’t room to display the entire master name.
Name: The name of the master.
Based on Master: Basing one master on another is a great way to handle variations. For example, if two sections of a catalog have identical rectangles in the header except for the rectangle fill color, you can base the second master on the first and just change the rectangle color. When you edit the first master, the changes also apply to the second (except for the fill color), so you edit just once to change both masters.
Number of Pages: A master can have more than two pages; for example, you can design a master for a three-panel gatefold layout.
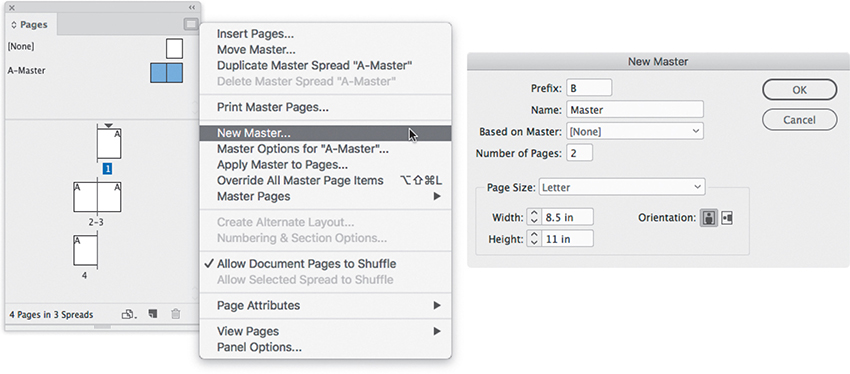
Figure 4.6 Adding a new master page with the New Master command
In addition to having different objects and guides, each master can also have its own page size, margin settings, and column settings.
Duplicating Master Pages
![]() Video 4.4
Video 4.4
Creating a Second Master Page
You can duplicate an existing master page to serve as the basis for a new master page. When you are creating multiple related masters, duplicating an existing master is faster than building a new master from a blank page.
To duplicate a master page or spread, do any of the following:
With a master selected, choose Duplicate Master Spread from the Pages panel menu.
Tip
To create a new master page that copies a document page design, select the document page in the Pages panel and then select Master Pages > Save As Master from the Master panel menu.
Right-click a master and choose Duplicate Master.
Drag a master onto the Create New Page button at the bottom of the Pages panel.
After you duplicate a spread, you can use the Master Options command to customize its name and attributes. Then you can add or remove items on the duplicate as needed.
Putting Master Pages to Work
![]() ACA Objective 3.2
ACA Objective 3.2
You can apply master pages to any document pages, and you can apply master pages to new pages as you add them.
Applying Master Pages
When master pages are applied to document pages, the prefix letter (A for A-Master, for example) appears on the page thumbnail in the Pages panel. This makes it easy to see which master page is applied to a document page.
To apply a master page to a document page (Figure 4.7):
In the Pages panel, select the document pages for applying the master page.
Select Apply Master to Pages from the Pages panel menu.
In the Apply Master dialog, select a master to apply to the document page from the Apply Master menu.
Click OK.
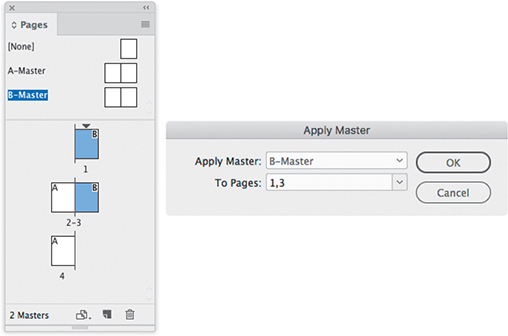
Figure 4.7 Applying a master page to selected document pages in the Pages panel Shortcut
To select a continuous range of pages in the Pages panel, click the first page in the range and then Shift-click the last page in the range. To select noncontiguous pages, Ctrl-click (Windows) or Command-click (macOS) the page icons.
You can also apply a master in the Pages panel by dragging a master thumbnail and dropping it on page thumbnails in the Pages panel.
Adding Pages Based on Master Pages
Tip
You can also open the Insert Pages dialog by choosing Insert Pages from the Pages panel menu, or by Alt-clicking (Windows) or Option-clicking (macOS) the Create New Page button in the Layers panel.
When you add a new page, it uses the same master as the page that was selected at the time you added the new page.
If you want to choose which master is used for a new page, choose Layout > Pages > Insert Pages (Figure 4.8). In the Insert Pages dialog, you can choose where to add the new pages and which master they should use. You can also drag a master from the masters area of the Pages panel before or after any pages in the document pages area of the Pages panel.

Deleting Masters
Deleting a master is nearly the same as creating one. In the Pages panel, you can simply drag a master page or spread to the Delete Selected Pages icon ![]() . When a master is selected, you can click the Delete Selected Pages icon or choose Delete Master from the Pages panel menu.
. When a master is selected, you can click the Delete Selected Pages icon or choose Delete Master from the Pages panel menu.
Editing Master Items on Document Pages
Tip
When pasting text, you may want to discard its formatting and have it take on the formatting of the text it’s replacing. To do this, first select and copy the formatted text, excluding the paragraph return character ![]() at the end of the paragraph. Then choose Edit > Paste Without Formatting. To see the end-of-paragraph characters, choose Type > Show Hidden Characters, and set the Screen Mode to Normal.
at the end of the paragraph. Then choose Edit > Paste Without Formatting. To see the end-of-paragraph characters, choose Type > Show Hidden Characters, and set the Screen Mode to Normal.
Master items are recognizable by a thin dotted border when Screen Mode is set to Normal. To protect master items from being altered accidentally, they are not normally editable on a document page.
There may be times when a master page is almost, but not quite, the layout you want. For example, if one page of the magazine is a special feature where background or header elements should be different, you can override, or release, master page items so that you can edit or delete them.
Keep in mind that overriding a master item may disconnect it from updates you make to the master page. For example, if you change the fill color of the overridden item on the page and later change the fill color of the master item, the color will not update on the document page with the override. If you want the master to change everywhere it’s used, edit the master itself, not a document page.
To override a master item on a document page (Figure 4.9):
Using the Selection tool, Shift+Ctrl-click (Windows) or Shift+Command-click (macOS) the master item.
Make any design changes to the object, such as text or color changes. You can also delete the object if needed.
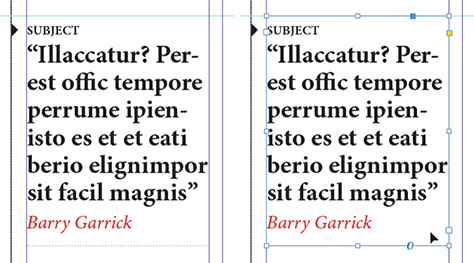
Figure 4.9 Shift+Ctrlclick (Windows) or Shift+Command-click (macOS) the quote’s text frame (a master item). The master item becomes a standard page object, so you can replace the placeholder text for the quote with real text.
Using Spot Colors in Print Designs
![]() ACA Objective 2.5
ACA Objective 2.5
![]() Video 4.3
Video 4.3
Adding Elements to Master Page A
In Chapter 2, you were introduced to color theory and learned about RGB and CMYK color. In Videos 4.3 and 4.12 you see a document that is initially designed using spot colors and is later converted to process colors.
Adding Spot Colors from a Color Matching System
InDesign offers many built-in PANTONE color guides, along with TRUMATCH, TOYO, and HKS color matching systems. These color matching systems provide reference lists and printed sample books of precisely formulated colors. The sample books show exactly how a specific color will print, to overcome the limitations of trying to reproduce color consistently on computer displays. Even if designers, clients, and commercial printers are in different locations, as long as they refer to the same color swatch number, they will be looking at exactly the same color. One reason there are so many color systems is that some are optimized for certain types of materials, such as uncoated or matte paper, coated or glossy paper, or textiles; other color systems represent printing standards in different parts of the world.
To add a spot color to the Swatches panel (Figure 4.10):
Select New Color Swatch from the Swatches panel menu.
In the New Color Swatch dialog, select Spot from the Color Type menu.
From the Color Mode menu, select one of the spot color guides, such as PANTONE+ Solid Coated.
Tip
You can create tints of spot colors the same way you did for process colors earlier by adjusting the Tint percentage in the Control panel or Swatches panel.
Coated refers to the paper, or stock, that your publication is printed on. Coated papers work well for publications that are rich in color and detail. If you’re not sure what color guide to pick, ask your commercial printer.
Select a color from the list, or enter a color reference number from the color guide.
Click OK.
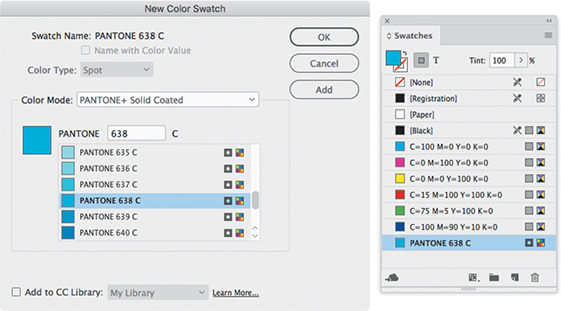
Figure 4.10 Adding a new PANTONE spot color to the Swatches panel
Working with Text Frames and Columns
![]() ACA Objective 4.1
ACA Objective 4.1
![]() ACA Objective 4.2
ACA Objective 4.2
![]() Video 4.5
Video 4.5
Adding Text Frames
![]() Video 4.6
Video 4.6
Adding Body Copy to a Document
When a design lays out a story using multiple columns, there’s more than one way to implement the columns. You can specify multiple columns within the page margins of the entire page, or you can have a single text frame contain multiple columns (Figure 4.11). Many designs use both, where the columns at the page level define the overall design grid of the page, and columns at the text-frame level define how an individual story is laid out on the page.
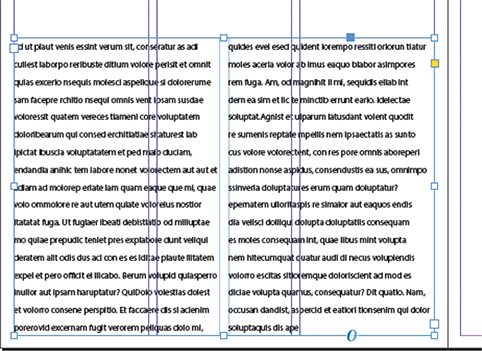
You can create columns manually by drawing text frames and threading a single story through them (see “Threading Stories Through Text Frames” later in this chapter), but it’s usually easier to draw one text frame and set it to contain multiple columns. Drawing text frames manually for each column may be better for highly creative layouts in which you want to vary column heights and positions.
Changing the Number of Columns in a Text Frame
To change the column settings for a text frame (Figure 4.12), select the text frame with the Selection tool and then do one of the following:
In the Control panel, change the values in the Number of Columns field and the Gutter field.
Choose Object > Text Frame Options, change the values in the Number of Columns field and the Gutter field, and click OK.
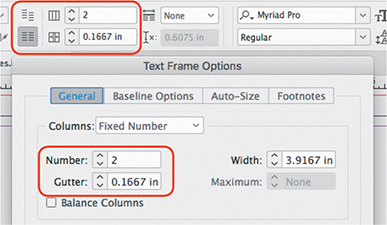
Figure 4.12 Number of Columns and Gutter options for a text frame, in the Control panel and in the Text Frame Options dialog
The gutter is the space between columns.
Changing How Far Text Sits Inside a Frame Edge
When you apply a background tint to a text frame to make a story stand out, the text can end up too close to the edges of the frame. To push the text in from the edges of the text frame, change the Inset Spacing values in the General tab of the Text Frame Options dialog.
Creating a Drop Cap
![]() ACA Objective 4.2
ACA Objective 4.2
![]() Video 4.6
Video 4.6
Adding Body Copy to a Document
Drop caps are often used to make the introductory paragraph for a story stand out. One or more characters are increased in size and extended several lines down into the paragraph. Although this effect might seem like a character format, it is actually a paragraph format that you can apply automatically through a paragraph style.
To start a paragraph with a drop cap (Figure 4.13):
Using the Type tool, click in the paragraph.
In the Control panel, click the Paragraph Formatting Controls button
 , or show the Paragraph panel.
Enter a value in the Drop Cap Number of Lines field to specify how far the characters drop down.
To drop multiple characters—for example, when a paragraph starts with a quotation mark, you might want to drop the first two characters of the paragraph—increase the value in the Drop Cap One or More Characters field.
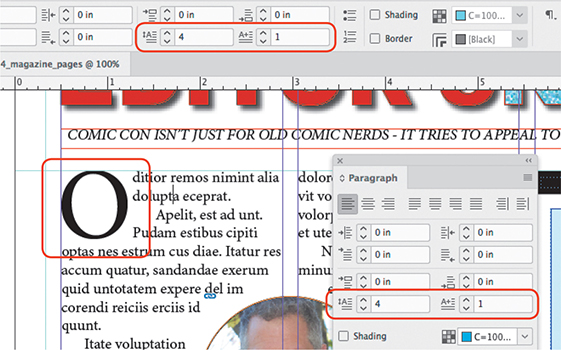
Figure 4.13 Starting a story with a drop cap, using the Control panel or the Paragraph panel
Now that you have started working with stories, there are more paragraph formatting controls that are handy to learn, such as working with spacing between paragraphs, indentation, and lists.
Adjusting Space Between Paragraphs
![]() ACA Objective 4.2
ACA Objective 4.2
Spacing between paragraphs is an important part of typography and page layout. Correct spacing can help capture the relationship between different text elements and add harmony to the design.
For example, the space between a heading and the rest of the text is important. If the space is too large, the bond between the heading and the following body paragraph could disappear. If the space is too small, it will be less eye-catching. Getting the spacing just right makes it clear to the reader that the heading and body paragraphs form a unit.
Tip
The Paragraph panel (Type > Paragraph) also provides Space Before and Space After options.
To add space before or after a paragraph (Figure 4.14):
Using the Type tool, click in a paragraph to select it, or select a range of paragraphs.
In the Control panel, select the Paragraph Formatting Controls.
Enter a value in the Space Before or Space After field, or click the arrows next to it.
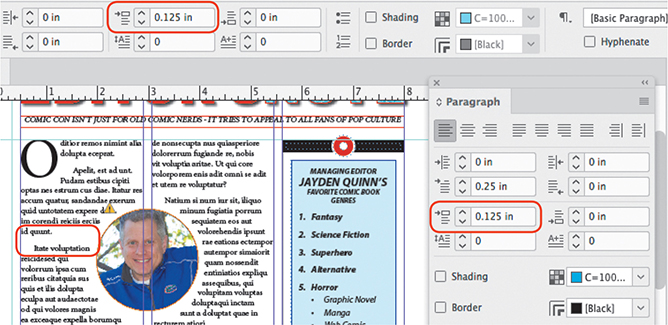
Figure 4.14 Adding space between paragraphs, using the Control panel or the Paragraph panel
Setting Indents
![]() ACA Objective 4.2
ACA Objective 4.2
![]() Video 4.6
Video 4.6
Adding Body Copy to a Document
Indents move paragraph text away from the left or right edge of a column. InDesign offers four indent controls, each of which determines how paragraph text moves away from the left or right edge of a column (Figure 4.15).
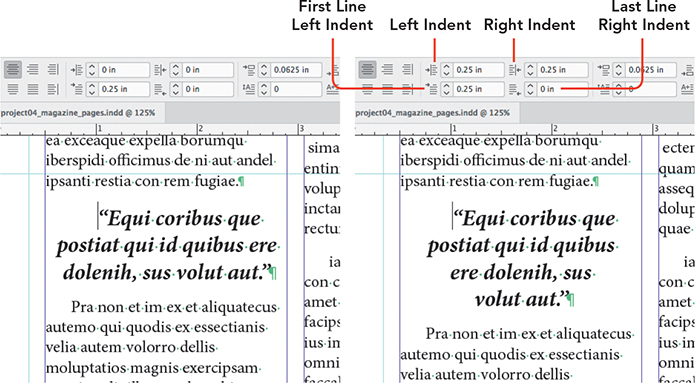
Left Indent: Moves all lines in a paragraph away from the left side of the column.
Tip
You can also use an Indent To Here special character to create an indentation. Click with the Type tool in the indentation position in the paragraph, then choose Type > Insert Special Character > Other > Indent To Here. Alternatively, press Ctrl+\ (Windows) or Command+\ (macOS).
Right Indent: Moves all lines in a paragraph away from the right side of the column.
First Line Left Indent: Affects only the first line of the paragraph, moving it away from the left side of the column.
Last Line Right Indent: Moves the last line of the paragraph away from the right side of the column.
Setting Tabs
![]() ACA Objective 4.2
ACA Objective 4.2
Unlike indents, which are intended for controlling whole paragraphs of text, tabs are intended to control lists or tables such as restaurant menus and schedules. This is done by setting tabs across a column so that each time you press the Tab key, the text insertion point moves to the next tab.
An example of tabbed text is an evaluation form (Figure 4.16). It contains a table of questions and responses. Tabs align the columns of responses.
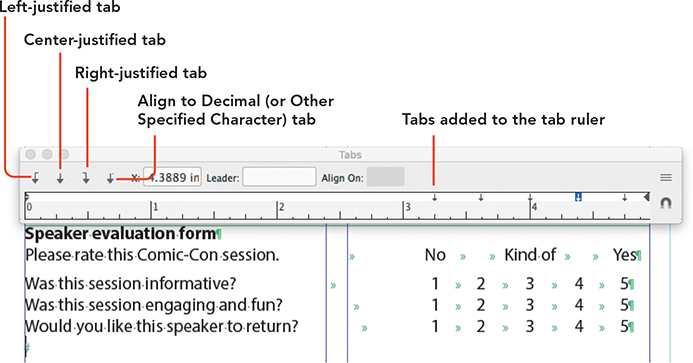
To add tabs:
If necessary, choose Type > Show Hidden Characters so you can see the tab characters in your text. (Make sure Screen Mode is Normal.)
Using the Type tool, click a text insertion point immediately before the word you want to align, and press Tab.
Choose Type > Tabs to display the Tabs panel.
Click one of the tab alignment icons on the tab ruler. The four tab types provide different ways to align text to a tab:
Left-Justified tab aligns the left edge of the text immediately following the tab character to the tab stop.
Center-Justified tab aligns the text equally on either side of the tab stop.
Right-Justified tab aligns the right side of the text to the tab stop.
Align to Decimal (or Other Specified Character) tab aligns the text on the decimal point or another character you specify.
Click just above the ruler in the white bar to insert a tab stop, then drag it to the right location. Or, with the tab stop selected, enter an exact position in the X field.
To adjust tabs for multiple lines, first use the Type tool to select the lines, and then adjust settings in the Tabs panel.
 ACA Objective 4.2
Adjusting Hyphenation
![]() Video 4.6
Video 4.6
Adding Body Copy to a Document
Hyphenation causes words that do not fit at the end of a line to split across two lines, with a hyphen appearing at the end of the first line. The use of hyphenation is a design and editorial choice. Enabling hyphenation assists in creating more even word spacing within a paragraph; for paragraph text that is justified, for example, enabling hyphenation could help reduce the word space variations.
To disable hyphenation for a paragraph (Figure 4.17):
Using the Type tool, click to select the paragraph.
In the Control panel or the Paragraph panel, deselect Hyphenate.
Tip
To customize hyphenation settings, choose Hyphenation from the Paragraph panel menu.
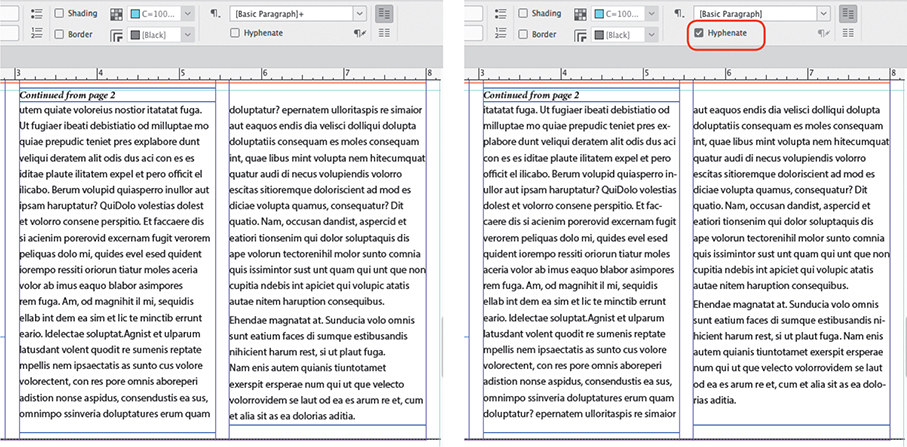
Figure 4.17 Text with hyphenation disabled (left) and enabled (right)
Wrapping Text Around Objects
![]() ACA Objective 4.2
ACA Objective 4.2
![]() ACA Objective 4.4
ACA Objective 4.4
![]() Video 4.7
Video 4.7
Applying Text Wrap
The Text Wrap panel provides an easy way to wrap text around an object. Text is commonly wrapped around an imported graphic. But text wrap works with any type of frame; for example, you could wrap text around a text frame containing a pull quote (see “Adding a Pull Quote” later in this chapter). To handle various situations, the Text Wrap panel lets you flow the text around an object, an image’s rectangular bounding box, or the contours of an imported image.
To wrap text around an object:
Select an object that overlaps (or is overlapped by) a text frame.
If the Text Wrap panel isn’t visible, choose Window > Text Wrap.
Click a button at the top of the Text Wrap panel (Figure 4.18):
Wrap Around Bounding Box: This wraps text around the rectangular bounding box of an object, regardless of the shape of the frame or the object inside it.
Wrap Around Object Shape: This wraps text around the shape of the frame instead of the shape of the bounding box. If the frame is a rectangle that contains a non-rectangular graphic, try choosing options from the Contour Options list depending on how the graphic indicates its shape. An alpha channel indicates shape using an extra image channel; a Photoshop path or clipping path indicates shape using vector paths saved with the image.
Jump Object: Instead of wrapping text, this makes text jump over the object. That means text won’t appear to the sides of the object. Jump to Next Column is similar, but instead of text resuming after the object, text resumes in the next column that the object doesn’t overlap.
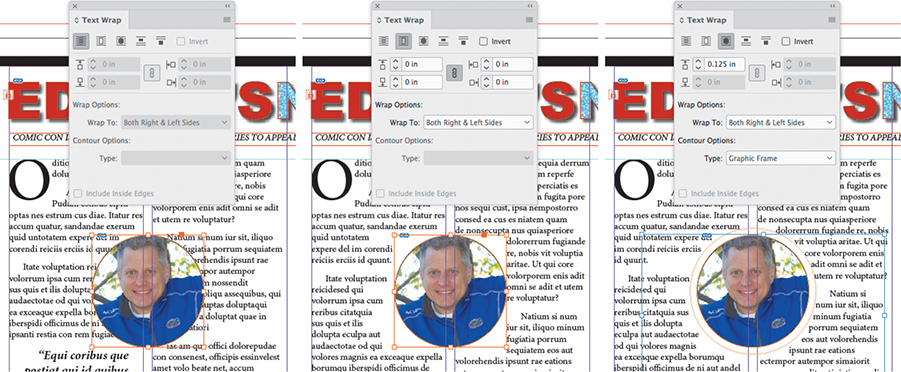
Figure 4.18 Applying Wrap options in the Text Wrap panel Enter Offset values as needed to push text away from the shape (Figure 4.19).
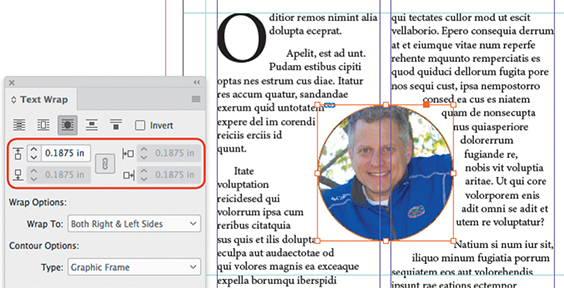
Figure 4.19 Applying Offset values in the Text Wrap panel
Creating Bulleted and Numbered Lists
![]() ACA Objective 4.2
ACA Objective 4.2
![]() Video 4.8
Video 4.8
Formatting Text
![]() Video 4.9
Video 4.9
Designing a Sidebar with Lists and an Image
You can automatically add bullet characters or sequential numbers to paragraphs. Use numbered lists when the order or sequence of steps is specific. Use bulleted lists when the order isn’t important. In a cookbook, for example, the ingredients might be in a bulleted list and the instructions might be in a numbered list.
To create a bulleted or numbered list:
With the Type tool, select the paragraphs you want in the list.
Do one of the following (Figure 4.20):
In the Control panel, click the Bulleted List or Numbered List icon.
Choose Type > Bulleted & Numbered Lists, and choose Apply Bullets or Apply Numbers from the submenu.
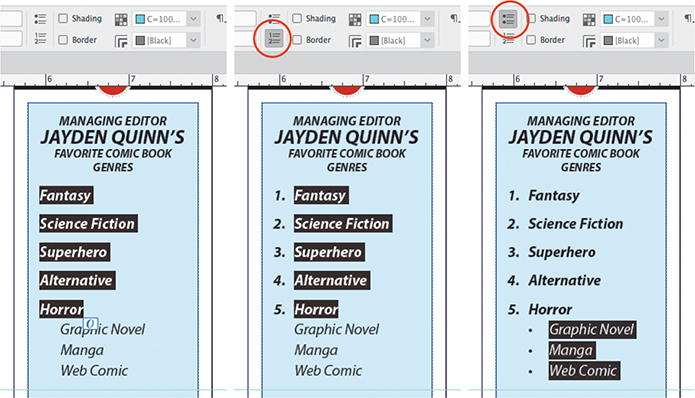
Figure 4.20 Creating a numbered list and then a bulleted list by clicking icons in the Control panel
To adjust the format of the list:
With the Type tool, select the paragraphs in the list.
Do one of the following:
Alt-click (Windows) or Option-click (macOS) the Numbered List icon in the Control panel.
Choose Bullets and Numbering from the Paragraph panel menu.
Adjust options as needed (Figure 4.21), and click OK. To learn more about the Bullets and Numbering options, see https://helpx.adobe.com/indesign/using/bullets-numbering.html.
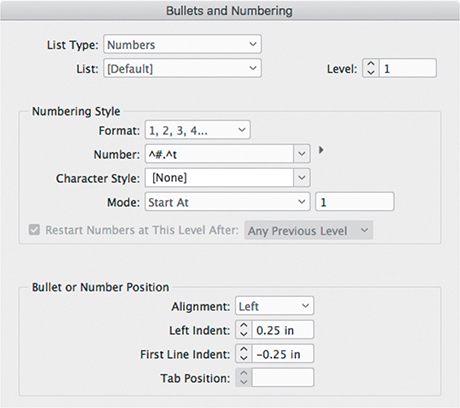
Figure 4.21 List formatting options in the Bullets and Numbering dialog
A bulleted or numbered list typically includes a hanging indent, where the first line of a paragraph is indented less than the rest of the paragraph (Figure 4.22) to make space for a bullet or number character. A hanging indent is the opposite of a first-line indent, where the first line is indented more than the rest of the lines. When you create your own list formatting, you can customize the hanging indent using Bullets and Numbering options.
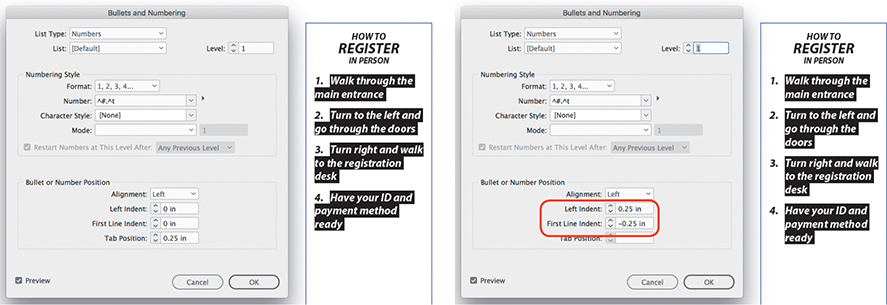
To create a hanging indent in the Bullets and Numbering dialog, set First Line Indent to be less than Left Indent. Typically, First Line Indent will be the same value as Left Indent but negative; for example, the default list formatting is a left indent of 0.25 inches and a first-line indent of –0.25 inches.
Tip
Because bulleted and numbered lists are at the paragraph level, you can save them as part of a paragraph style.
Threading Stories Through Text Frames
![]() ACA Objective 4.2
ACA Objective 4.2
![]() Video 4.10
Video 4.10
Threading Text from One Page to the Next
![]() Video 4.11
Video 4.11
Adding Page Jumps to a Story
In InDesign, the term story specifically means a single continuous article of text. A story can be a single text frame, such as a caption, but it can also flow among a series of threaded (linked) text frames. A story that’s too long for the first text frame can be threaded through multiple linked text frames on the same page or spread (as in a story spanning multiple columns), and can also be threaded to text frames across multiple pages (as in a magazine). When you change the number of words in a threaded story, it affects the overall length of the story across all the threaded text frames.
Threading Text Frames
Text frames have an in port at the top left and an out port at the lower right (Figure 4.23). These ports connect text frames and allow text to flow across frames. You can draw text frames first and thread them later, or you can thread text frames interactively as you import text. Both ways involve using the in port and out port of a text frame.
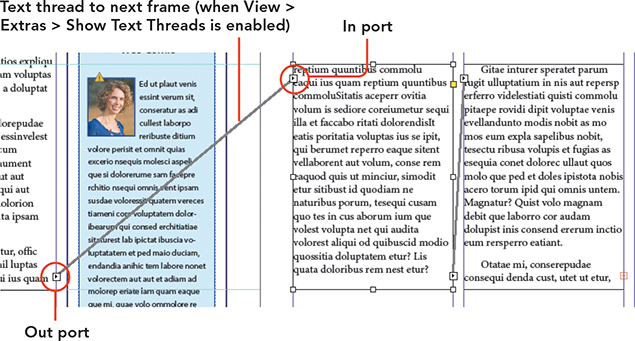
If you want to see how text frames are threaded in Normal screen mode, choose View > Extras > Show Text Threads.
To thread text frames that already exist:
With the Selection tool, click the out port of the first text frame (Figure 4.24). The pointer changes into a loaded text icon with a link icon to indicate that the next text frame you click will be threaded to the previous one.

Figure 4.24 Threading text frames Click the loaded text icon on an empty text frame. The two text frames are now threaded; overflow text from the first frame will appear in the second frame.
To thread text frames as you create them:
Choose File > Place, select a text file, and click Open. The pointer changes into a loaded text icon
 .
.Alt-drag (Windows) or Option-drag (macOS) to create a text frame. The loaded story flows into the frame, and the pointer is still loaded.
Repeat step 2 to create the next text frame. As long as you Alt/Option-drag the loaded text icon, the next text frame you drag will be linked to the previous one, even if there isn’t any more text to flow. If you add text to the story, it will eventually flow through each threaded frame in the order you linked them.
Tip
With the loaded text icon, you can click a page to quickly create a text frame or click inside an existing empty text frame.
To change the order in which text frames are threaded:
With the Selection tool, click the out port of a text frame that’s already threaded, and then click a different text frame than the one it’s currently linked to.
Creating Jump Lines
Tip
If the Next Page Number marker doesn’t update to the jump page number until it seems too close to the story text, try extending the bottom of the story text frame. The jump page number updates only when it touches the actual story area of a text frame, not its frame edge or inset.
Tip
When creating a “continued from” jump line, choose Insert Special Character > Markers > Previous Page Number.
When a story continues on a different page, a jump line tells the reader where to find the remainder of the story, or where a story is continued from.
To add a “continued on” jump line (Figure 4.25):
With the Type tool, create a separate small text frame for the jump line.
Enter jump line text such as Continued on page.
With the text insertion point at the end of the line, choose Type > Insert Special Character > Markers > Next Page Number.
Using the Selection tool, position the text frame so that it touches or slightly overlaps the text area of the story that continues.
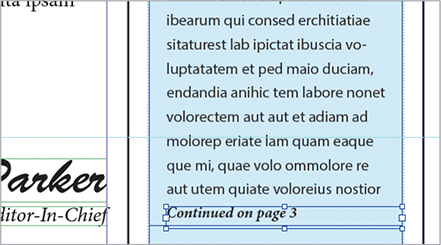
Figure 4.25 A jump line for a story that continues on another page
Resolving Overset Text
When there is more text than can fit in a frame, the out port displays a red plus sign. This is referred to as overset text, and it’s marked in red (Figure 4.26). It means there’s text that isn’t currently displayed and so it won’t appear on the final output.
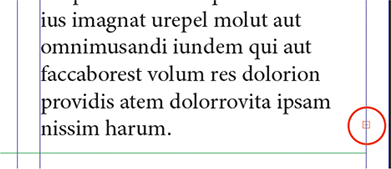
To resolve overset text, do one of the following:
Shorten the text by editing it until all of the story fits in the frame.
Make the text frame taller until all of the story fits in the frame.
Thread the story to an empty text frame so that it can continue there.
Tip
Stories threaded through multiple frames can be a challenge to edit when you can’t see the entire story at once. Choose Edit > Edit in Story Editor to see and edit the story in a single window. Changes you make in Story Editor are reflected in the layout, and vice versa.
Converting Text into a Graphic
![]() ACA Objective 4.4
ACA Objective 4.4
![]() Video 4.12
Video 4.12
Replacing Spot Colors with Process Colors
It isn’t always possible to achieve the text effect you want using the type controls alone. For example, you might want some headline type to apply a kind of fill that is not possible in InDesign, even though it’s possible in applications such as Adobe Photoshop and Adobe Illustrator. In these situations you can convert text to outlines.
Tip
To un-anchor the text-shaped frame, select the frame, choose Edit > Cut, click anywhere on the page, and then choose Edit > Paste.
When you convert text to outlines, the individual text characters become graphics frames. At that point you can do anything with them that you can do with a graphics frame, such as edit their paths (for customized letterforms) or fill them with images. But there’s one downside: Once you convert the text to outlines, you can no longer edit the text using the Type tool. You may want to keep a copy of the original text on the pasteboard so that you have an easy fallback option if needed.
There are two ways to convert text to a graphic:
Convert all the text in the frame: Using the Selection tool, select the text frame, and then choose Type > Create Outlines. This converts the text into a compound path, which is a series of paths that behave as a single frame or a group. Once it’s selected, you can place a graphic inside the compound path (Figure 4.27).

Figure 4.27 Converting all the text in a frame to outlines Convert selected text: Using the Type tool, select the characters you want to convert, and then choose Type > Create Outlines. In this case, only the text you selected is converted. The new text-shaped frame is anchored within the rest of the text.
When you move the Direct Selection tool over the converted text, you can see all the anchor points and line segments (Figure 4.28).

Tip
Double-clicking a group with the Selection tool lets you select different elements within the group.
How do you fill these outlines with an imported image? Because they’re graphics frames, you do it the same way you have many times before when you were placing an image inside a rectangular graphics frame. The only difference is that these frames aren’t rectangular. Just make sure the outlines are selected when you place an image, and the image will be placed inside the outlines (Figure 4.29).
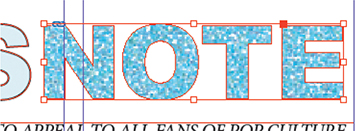
You’ve previously edited inside graphics frames, and these work the same way: You can use the Direct Selection tool or the Content Grabber to adjust the image within the frame, and you can use the Direct Selection tool to edit the frame path.
Placing a Graphic Without a Placeholder
![]() ACA Objective 4.1
ACA Objective 4.1
![]() Video 4.13
Video 4.13
Adding a Large Image with Caption
So far, you’ve placed the majority of the graphics into the magazine by first drawing a graphics frame and then, while it’s selected, placing an imported graphic into it. But that’s not the only way to place a graphic.
You can freely place a graphic, even on a completely blank page, by dragging as you place it.
To place a graphic without a placeholder:
Choose File > Place, select a graphics file, and click Open. You can also import by dragging a graphics file from the desktop and dropping it in an InDesign document window.
Drag the loaded cursor to set the size of the graphic (Figure 4.30).
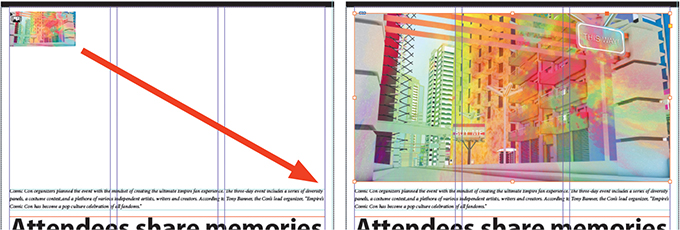
Figure 4.30 Dragging a placed graphic to set its size Tip
If you’re dragging to set the size and position of a graphic you’re placing, you can start over by releasing the mouse and choosing Edit > Undo. The place cursor will remain loaded, so you can immediately try another drag.
As you drag, a temporary rectangle appears to show you how big the graphic will be when you release the mouse button. The rectangle represents the proportions of the graphic you’re placing, so you don’t have to hold down Shift to place the graphic proportionally.
When the graphic is the size you want, release the mouse button.
The graphic is placed inside a graphics frame that InDesign created automatically.
 ACA Objective 4.2
 ACA Objective 4.4
Adding a Pull Quote
![]() Video 4.14
Video 4.14
Adding a Pull Quote
A pull quote is a text frame containing a short, provocative excerpt from a story, intended to draw reader interest to the story. It’s often implemented as a separate text frame with the excerpt in large type.
All you need is a text frame with the pull quote text in it (Figure 4.31). The pull quote text frame should not be threaded to any other text frames. You’ve already learned the techniques you’ll need to create a pull quote; you just have to put them all together:
Create a text frame and enter the pull quote text.
Format the text so that it’s large and eye-catching.
If the pull quote will overlap columns of text, apply text wrap to the pull quote text frame, and set text wrap options so that the story flows around it.
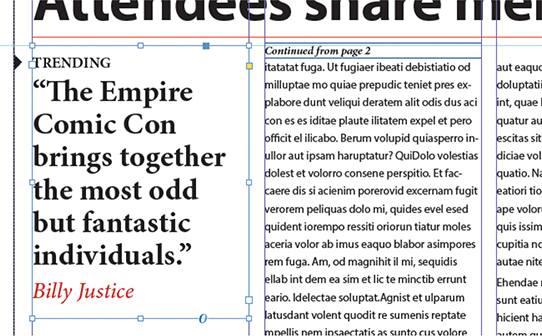
Figure 4.31 A pull quote
Using Different Page Sizes in a Single Document
![]() ACA Objective 3.2
ACA Objective 3.2
![]() Video 4.15
Video 4.15
Adding a Foldout Subscription Form
As you add more pages to your magazine layout, each new page takes on the page size set for the master being used. You can change the size of any page independently of the rest so that your document uses multiple page sizes.
Preventing Pages from Shuffling
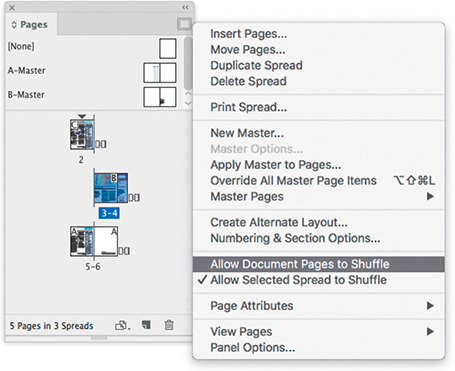
When working in a document with facing pages, odd-numbered pages are on the right and even-numbered pages are on the left. It’s normally best to add two pages at a time so that the existing pages stay on their side of the spine. When you insert an odd number of new pages, each subsequent page will change from a right to a left page, and vice versa. In other words, InDesign automatically shuffles pages between sides of a spread. Shuffling can create unwanted changes—for example, a page specifically designed for the left side of a spread could end up on the right side.
If you want to keep left and right pages in their original page positions when adding new pages to a document, you can change that behavior. Simply ensure that the Allow Document Pages to Shuffle setting in the Pages panel menu is unselected. Pages will still be renumbered as you add more pages, but a left or right page will always remain a left or right page. Additionally, you can opt to keep entire page spreads together by selecting the spread in the Pages panel and selecting Allow Selected Spread to Shuffle from the Pages panel menu (Figure 4.32).
Adding a Foldout with a Different Page Size
When Allow Document Pages to Shuffle is disabled, as discussed in the previous section, you can add a foldout of a different size to a page spread without the other pages moving.
To adjust a page size for a page in the document (Figure 4.33):
Select the Page tool
 .
.In the Pages panel, click the page icon of the page you want to resize. You can also click the page itself in the document window.
In the Control panel, change the values in the Width and/or Height fields for the selected page. Or click the Edit Page Size button at the bottom of the Pages panel, choose Custom, enter the Width and Height settings in the Custom Page Size dialog, and click OK.
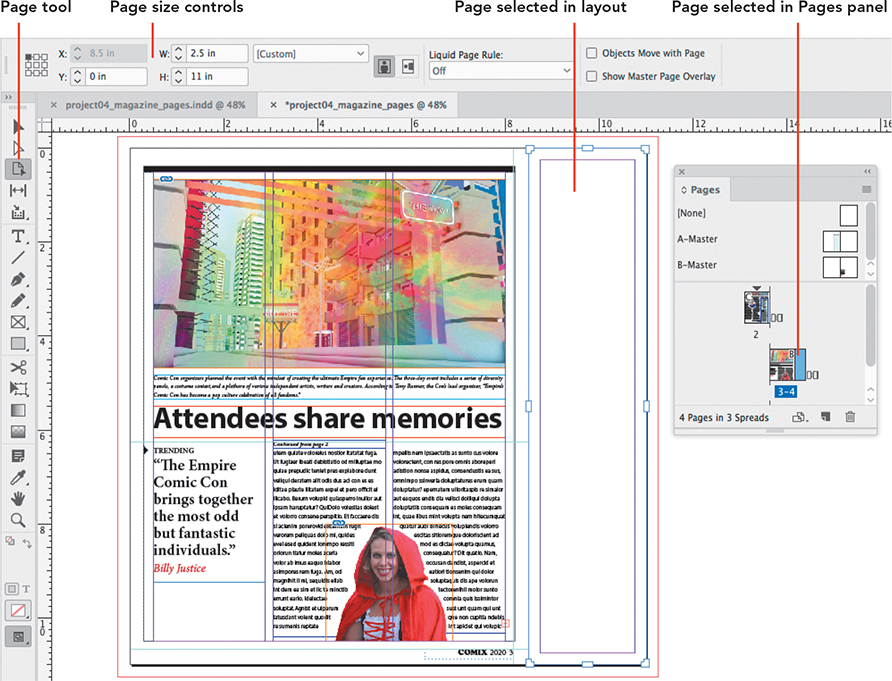
Figure 4.33 Changing the page size of a document page
Tip
You can save the foldout’s page size as a reusable page size in the Custom Page Size dialog. Enter a name for the page size, and then click OK. Once you save a page size, you can select it from any Page Size menu, such as in the New Document dialog.
Creating an Interactive Form
![]() ACA Objective 4.7
ACA Objective 4.7
An interactive form is a PDF form that you can fill out electronically. For example, you can enter text in fields, select options from menus, and click radio buttons. Many tax forms, registration forms, and contracts arrive as interactive PDFs to be completed and returned via email.
With the Buttons and Forms panel (Window > Interactive), you can add interactive form elements to an InDesign page and then export the document as an interactive PDF.
Understanding Form Elements
![]() Video 4.16
Video 4.16
Adding Text Fields, List Boxes, and Radio Buttons to a Form
InDesign supports a number of different form elements. Review the list of form elements and their typical uses before designing your form. You’ve probably used many of these elements on websites.
Text field: A rectangular box for entering one or more lines of text. This might be a first name and last name (single line) or written feedback (multiple lines).
List box: A scrollable list with options from which one or more items are selected. This might be a list of event dates to choose from.
Combo box: A menu or list of options from which only one option is chosen—for example, a list of all the states or a list of age groups.
Check box: A square box that’s either selected (marked with a check or X) or not.
Radio buttons: Round buttons that are part of a group of buttons. Only one button in a group can be selected at any time, making them mutually exclusive. An example of a radio button group is a series of buttons to select the length of a new subscription: one year, two years, or three years.
Signature field: A rectangular box for inserting an e-signature or digital signature. Signature fields are used for PDF forms that are submitted electronically.
In addition to fields, PDF forms can contain buttons, for example:
Clear button: To clear all the information entered in the form.
Print button: To print the form once it’s filled out.
Submit button: To send the completed form via email to a recipient.
Designing and Creating Form Elements
![]() Video 4.17
Video 4.17
Adding Check Boxes and Control Buttons to a Form
![]() Video 4.18
Video 4.18
Making the Form Interactive
You can create form elements with the frame tools or the Pen tool, so you can easily apply colors and styles to them. For example, you can create text fields and check boxes using the Rectangle tool. You can also use imported graphics. But don’t let form elements become too ornate or decorative. A form should have a simple, clear design so that people of all ages and abilities can enter accurate information quickly.
After you add all the design elements for the form, you are ready to convert the elements to form fields.
To convert a rectangle to a text field (Figure 4.34):
Select a rectangle you drew for a text field.
Choose Object > Interactive > Convert to Text Field. Or choose Text Field from the Type menu in the Buttons and Forms panel.
In the Buttons and Forms panel, enter a unique name for the field. If multiple fields have identical names, text entered in those fields automatically appears in any other fields with the same field name.
Click the disclosure triangle to the left of PDF Options, and set the options for the text field you converted as follows:
Description: Text you enter in the Description field appears as a tool tip in Acrobat Reader. In addition, it helps make the form more accessible to readers who rely on assistive technologies such as screen readers. As a best practice, always enter a description for each field.
Printable: Select Printable to allow printing of a filled-out form field. In most cases, this should be enabled.
Required: Select Required if someone must fill out this field before submitting the form electronically.
Password: A Password field hides the text entered and replaces it with asterisks or bullets.
Read Only: The user cannot select text in, or enter text into, a Read Only field.
Multiline: Select Multiline for fields that require more text input, such as a feedback or more information field. Make sure to increase the depth of the field’s rectangle to give enough room for multiple lines.
Scrollable: Deselect Scrollable to limit the text entered in the field to the field size. For forms that are printed, deselect this option to avoid seeing only part of the entered text on the printout.
Font Size: Select a font size for the text that is entered into the field.
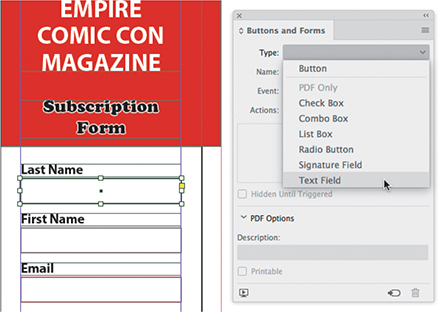
Figure 4.34 Converting a rectangle to a text field
If the document is exported to interactive PDF, the converted rectangle becomes a fillable text field.
You can use the same method to convert objects to any of the Type options in the Buttons and Forms panel.
Adding Buttons
![]() ACA Objective 4.6
ACA Objective 4.6
![]() Video 4.19
Video 4.19
Continue Making the Form Interactive & Animating Buttons
Buttons are interactive elements that can cause actions to take place. If you have ever placed an online order, you have clicked a Place Order button. When you clicked that button, your credit card details were checked and the order details were sent.
Making a button work involves two general steps:
Set the event: How does the user need to interact with the button for something to happen? Is it a tap on the button on a tablet device, or is it enough to roll your mouse pointer over the button?
Set the action: After the event, what should happen? Does a print dialog appear so that you can print a form? Does a movie start playing? Maybe you’re taken to the web browser to look at a web page.
The most commonly used event is On Release Or Tap, which happens when you click and release the mouse button while the pointer is over the button, or tap the button on a tablet device or phone.
Various design elements can become a button:
Use a graphic or image as a button.
Use a simple text frame with a fill color and text.
Group multiple objects (Object > Group), such as shapes, text in frames, and images.
Once you know how you want to set up your buttons, you can put it all together with steps such as the ones below, which were used to create the Print button for the magazine form:
To add a print button (Figure 4.35):
Using the Selection tool, select the object or group that will serve as the button.
Choose Object > Interactive > Convert to Button. Or, in the Buttons and Forms panel, select Button from the Type menu.
In the Buttons and Forms panel, enter a name for the button.
Leave Event set to On Release Or Tap.
Select Print Form from the Action menu (+).
Click the disclosure triangle to the left of PDF Options.
To prevent the button from printing on the form, but have it remain visible when viewing the form onscreen, deselect Printable.
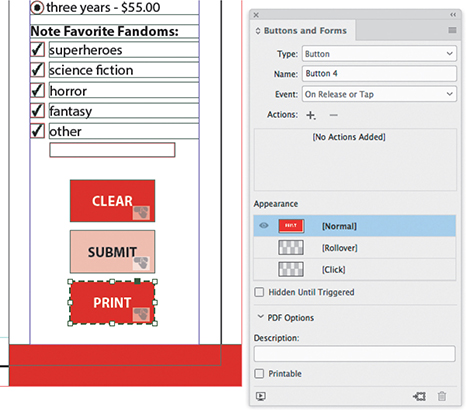
Figure 4.35 Converting a text frame to a Print button
Setting Up Button Appearances
You’ve probably used buttons that change their appearance depending on whether you’re hovering over the button or clicking the button. You can create InDesign buttons that respond in the same way: A button can have different appearances depending on its state (what’s happening to it at the moment).
The Normal appearance is what you see when a PDF form is first opened in Adobe Acrobat Reader. The Rollover appearance happens when the mouse moves over the button itself. The Click appearance happens when you click the mouse button or tap the button on a tablet device.
To add a different appearance to a button (Figure 4.36):
Select the button.
In the Buttons and Forms panel, click the appearance you want to add, such as Rollover.
To be able to change the graphic formatting of the button for this appearance, such as changing the fill color, double-click the button.
When you’re finished editing the appearances of all buttons, set them all to the Normal appearance so that the form appearance in InDesign matches what you would first see in Acrobat Reader.
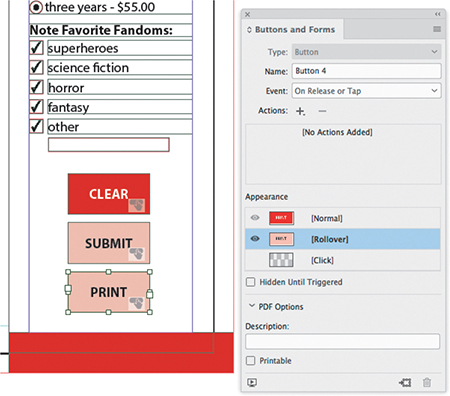
Figure 4.36 Adding an alternate appearance to a button
Numbering and Sections
![]() ACA Objective 3.2
ACA Objective 3.2
![]() Video 4.20
Video 4.20
Adding Transitions & Exporting as Animated PDF
An InDesign section consists of one or more ranges of pages. As you design different publications, such as magazines, books, and reports, you’ll probably need to define different ranges of pages as multiple sections. For example:
A printed magazine might have a cover that’s printed on different paper from its inside pages. The cover itself might not require any page numbering; however, the first of the inside pages needs to start on page 1.
The front matter in a book (the pages that precede the core text such as a preface or table of contents) might use Roman numerals (i, ii, iii, iv, and so on) instead of Arabic numbers (1, 2, 3, 4, and so on).
You might want to add to a spread in a magazine a foldout page that doesn’t affect the page numbering of the other pages.
The magazine foldout is one example of using a section. The magazine pages are numbered 1 through 4. With the foldout page added between pages 3 and 4, the page number of the last page increases to 5. Because you don’t want the foldout to change the page numbering of the magazine, start by creating a new section for the foldout page. Then you can change the numbering style for this page (for example, to A, B, C) so that it does not clash with the Arabic numerals. Finally, you can start a new section after the foldout page to pick up where the sequential page numbering left off. Start the page numbering at page 4 and change the style back to Arabic numbers.
To start a new section and change the page numbering for that section (Figure 4.37):
In the Pages panel, double-click the page that marks the start of the section.
Choose Layout > Numbering & Section Options.
In the New Section dialog, select Start Section.
To adjust the page number on which that section starts, enter a number in the Start Page Numbering at field.
From the Style menu, select the preferred page numbering style, and click OK.
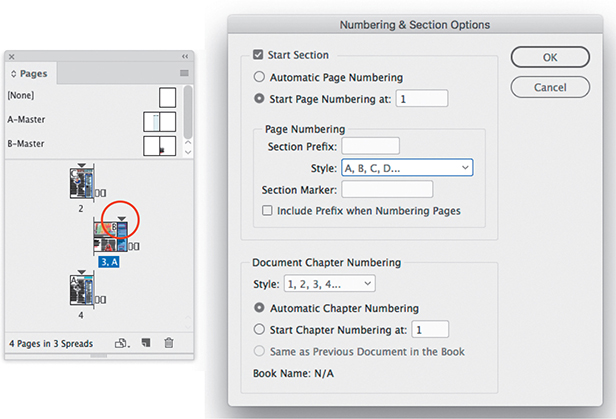
Figure 4.37 In the Pages panel, a section indicator marks the new section started for the foldout page.
A section indicator icon (a small triangle) appears at the top of the page to indicate a section start.
Tip
To quickly create a section, right-click (Windows) or Control-click (macOS) a page icon in the Pages panel. Select Numbering & Section Options from the context menu.
For the magazine design, you’ll need to do this twice, first to set the foldout page as its own section with a non-Arabic numbering system (such as A, B, C, D), and again to set page 4 as another section that restarts Arabic page numbering at 4.
To edit the Numbering & Sections Options at any stage, do one of the following:
Double-click the section indicator icon in the Pages panel.
Select the page and select Numbering & Section Options from the Pages panel menu.
Select the page and choose Layout > Numbering & Section Options.
 ACA Objective 4.7
Adding Page Transitions
![]() Video 4.20
Video 4.20
Adding Transitions & Exporting as Animated PDF
Page transitions, such as a dissolve, take place when you navigate from page to page. You can apply different page transitions to each page spread in an InDesign document.
To add transitions to page spreads (Figure 4.38):
Select a spread in the Pages panel.
Choose Layout > Pages > Page Transitions > Choose to display the Page Transitions dialog.
To preview the transition, move the cursor over a thumbnail in the dialog.
Note
Page transitions work only when readers view the PDF in full-screen mode.
To apply the transition only to the selected spread(s), deselect Apply to All Spreads.
Select one of the transitions and click OK.
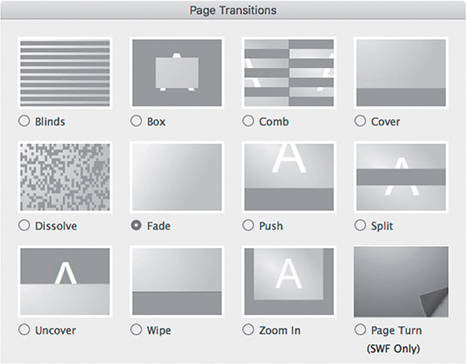
Figure 4.38 Applying a page transition to a selected spread
A small icon appears next to the spread in the Pages panel to indicate that the page has a transition applied to it. To change the transition, right-click (Windows) or Control-click (macOS) this icon and select Choose from the context menu.
To edit a transition, its duration, or the timing, do one of the following:
Right-click (Windows) or Control-click (macOS) the transition icon in the Pages panel, and select Edit from the context menu.
Select a page spread and choose Layout > Pages > Page Transitions > Edit.
 ACA Objective 4.7
 ACA Objective 5.2
Creating an Interactive PDF
![]() Video 4.20
Video 4.20
Adding Transitions & Exporting as Animated PDF
To complete this project, there’s only one more thing to do: Create a PDF so that you can test the transitions and the form elements.
To create an interactive PDF (Figure 4.39):
Choose File > Export.
From the Save As Type menu (Windows) or Format menu (macOS), select Adobe PDF (Interactive).
Enter the name for the PDF and navigate to the save location on your system.
Click Save. The Export to Interactive PDF dialog appears.
Ensure that the following settings are enabled:
View: Select Fit Page so that the document opens to fit the size of the viewer’s screen, not zoomed in or out.
View After Exporting: This opens the PDF in Adobe Acrobat DC or Acrobat Reader DC so that you can test it.
Open In Full Screen Mode: This enables you to view and test transitions.
Page Transitions: Select From Document to retain each spread’s different transition.
Include All: Select Include All so that forms and media elements are working and interactive.
Create Tagged PDF and Use Structure for Tab Order: To make the PDF more accessible for those relying on assistive technologies, enable Create Tagged PDF and Use Structure for Tab Order.
Click OK to save the PDF. You can now test it in Adobe Acrobat or Adobe Acrobat Reader.
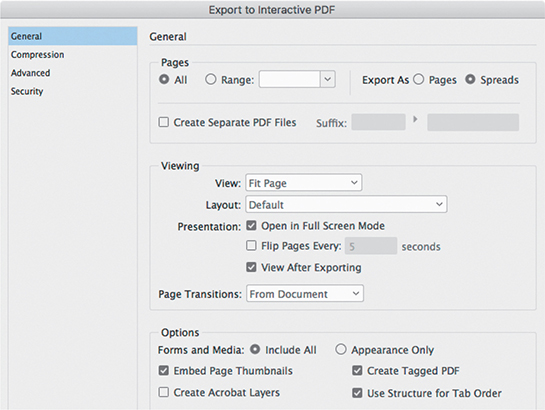
Figure 4.39 Exporting the interactive PDF
To learn more about accessibility and accessible PDFs, see “Structuring PDFs” in InDesign Help (Help > InDesign Help).
Congratulations! You have just completed the magazine pages and interactive PDF project. In the next project you’ll learn how to put a recipe book together, and how to speed up the production side of the design process using styles to format text, tables, and objects.