CHAPTER 2
Library and List Smart Management
In the previous chapter, we discussed all the SharePoint sites. Let’s continue with Site Content in this chapter. SharePoint site consists of site contents or content types, which hold the actual content or information on the site. Depending on the type of SharePoint site, you will notice a difference in default contents or content types available on the site. You will notice a few additional contents or content types available or missing for different types of sites. It does not mean you can’t add any contents or content types to your current site. You can edit the site to add or remove any content or content type at any moment to manage your site content.
Structure
In this chapter, we will discuss the following topics:
- Default site contents and site features
- Upgraded new features for smart management
- Apps management
- Understand list and library settings is must
Objective
During the end of the chapter, you will get a clear understanding of the following topics:
- Different types of contents available in the site
- Site features or site collection features activated by default
- What are the new features in SharePoint Online?
- Information about apps in SharePoint
- All about the library and list settings
Default Site Contents and Site Features
Here we will discuss the default site contents available in each SharePoint site collection. In the subsite level, you might find few content or content type not there, but site collection you will find more. Also, we will share information about the default site collection features and site features activated, once a site collection is created, for each site collection template. When you access site contents, you will find the contents of the type List or Library. Now it comes into mind, what is the difference between list and library. Simply can say the library is used to upload and store documents, files whereas list is a type of table where you can save multiple items. Think about one excel file as an example. Each row in an excel file is considered as a list item, so all rows within that excel file constitute one SharePoint List. When you upload this excel to a container, that is called the library, which stores this excel file. So multiple excel file stored in a container is called Library. Different types of libraries are used to upload and store specific type files each. Similarly, different types of lists are used to store a specific type of item which is pre-identified. Let’s discuss what the default site contents available in each type of site template are.
Modern Team Site Contents
Once the site is created, there are specific default contents created on site. Specific contents are created/enabled after activating site collection features or site features. Here we will discuss the default site contents available after site creation.
Let us perform the following steps to check default site contents available and default feature activated for Modern Team Site:
- Access the modern site collection URL (https://spmcse.sharepoint.com/sites/BPB-ModernTeamSite) that we created previously.
- Click on Site Contents from left navigation. Alternatively, you can open site content by adding
_layouts/15/viewlsts.aspxafter the site URL (http://<site url>/_layouts/15/viewlsts.aspx). Here will be the link for site contentshttps://spmcse.sharepoint.com/sites/BPB-ModernTeamSite/_layouts/15/viewlsts.aspx. You will notice default contents (Documents, Form Templates, Site Assets, Style Library, Site Pages) of type list or library available, as seen in the following screenshot: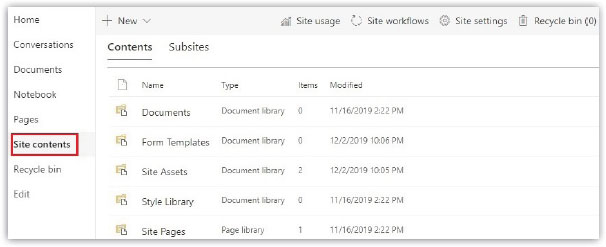
Figure 2.1: Site contents in the team site default
- We already discussed how to open site settings before. So open site settings for site collection (
_layouts/15/settings.aspx). - Click on Manage Site Features (
https://<site url>/_layouts/15/Manage Features.aspx) present under Site Actions. - You will find below features in Active state by default, as shown in Figure 2.2, and the feature is limited to site level only.
Site features activated by default:
- Following Content
- SharePoint Recommendations
- Site Notebook
- Site Pages
- Team Collaboration Lists
- Workflow Task Content Type
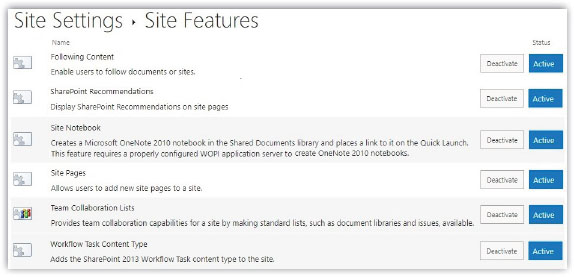
Figure 2.2: Site Features in Active State by default
- Click on Site Collection Features (
https://<site url>/_layouts/15/Manage Features.aspx?Scope=Site) present under Site Collection Administration, and you will find few features activated by default which are applicable for all subsites present under that site collection.Site collection feature activated by default as seen in the following screenshot:
- Three-state workflow

Figure 2.3: Site Collection Features in Active State by Default
- Three-state workflow
Modern Communication Site Contents
Similarly, when you open site content (http://<site url>/_layouts/15/viewlsts.aspx) for Modern Communication Site, you will find contents Events, Documents, Style Library, Form Templates, Site Pages available by default as seen in the following screenshot:

Figure 2.4: Site Contents in Communication Site default
Site Features and Site Collection Features in Active state, by default, as seen in the following table below.
|
Site Features |
Site Collection Feature |
|
|
Table 2.1: Default Site Features and Site Collection Features activated in Communication Site
Blog Site Contents
Open site content for Blog Site, you will find contents Categories, Comments, Posts, Style Library, Form Templates, Photos available by default as seen in the following screenshot:

Figure 2.5: Site Contents in Blog Site Default
Site Features and Site Collection Features in Active state, by default, as seen in the following table:
|
Site Features |
Site Collection Feature |
|
|
Table 2.2: Default Site Features and Site Collection Features activated in Blog Site
Developer Site Contents
Open site content for Developer Site, you will find contents MicroFeed, Apps in Testing, App Packages, Documents, Form Templates, Site Assets, Style Library, Site Pages available by default as seen in the following screenshot:

Figure 2.6: Site Contents in Developer Site Default
Site Features and Site Collection Features in Active state, by default, as seen in the following table:
|
Site Features |
Site Collection Feature |
|
|
Table 2.3: Default Site Features and Site Collection Features activated in Developer Site
Project Site Contents
Open site content for Project Site, you will find contents Calendar, MicroFeed, Tasks, Documents, Form Templates, Style Library, Site Assets available by default as seen in the following screenshot:

Figure 2.7: Site Contents in Project Site default
Site Features and Site Collection Features in Active state, by default, as seen in the following table:
|
Site Features |
Site Collection Feature |
|
|
Table 2.4: Default Site Features and Site Collection Features activated in Project Site
Community Site Contents
Open site content for Community Site, you will find contents Categories, Community Members, Discussions List, Style Library, Form Templates, Site Assets, Site Pages available by default as seen in the following screenshot:

Figure 2.8: Site Contents in the Community Site default
Site Features and Site Collection Features in Active state, by default, as seen in the following table:
|
Site Features |
Site Collection Feature |
|
|
Table 2.5: Default Site Features and Site Collection Features activated in Community Site
Document Center Site Contents
Open site content for Document Center Site, you will find contents Content and Structure Reports, Reusable Content, Tasks, Workflow Tasks, Documents, Form Templates, Site Collection Documents, Site Collection Images, Style Library available by default as seen in the following screenshot:

Figure 2.9: Site Contents in Development Center Site default
Site Features and Site Collection Features in Active state, by default, as seen in the following table:
|
Site Features |
Site Collection Feature |
|
|
Table 2.6: Default Site Features and Site Collection Features activated in Document Center Site
eDiscovery Center Contents
Open site content for eDiscovery Center Site, you will find contents Data Loss Prevention Queries, Exports, Sources, Style Library, Form Templates, Site Assets available by default as seen in the following screenshot:

Figure 2.10: Site Contents in eDiscovery Center Site default
Site Features and Site Collection Features in Active state, by default, as seen in the following table:
|
Site Features |
Site Collection Feature |
|
|
Table 2.7: Default Site Features and Site Collection Features activated in eDiscovery Center Site
Record Center Site Contents
Open site content for Record Center Site, you will find contents Form Templates, Record Library, Drop Off Library, Site Assets, Style Library available by default as seen in the following screenshot:

Figure 2.11: Site Contents in Record Center Site default
Site Features and Site Collection Features in Active state, by default, as seen in the following table:
|
Site Features |
Site Collection Feature |
|
|
Table 2.8: Default Site Features and Site Collection Features activated in Record Center Site
SharePoint Online Configuration Site Contents
Open site content for SharePoint Online Configuration Site, you will find contents MicroFeed, Style Library, Documents, Site Assets, Form Templates, Site Pages available by default as seen in the following screenshot:
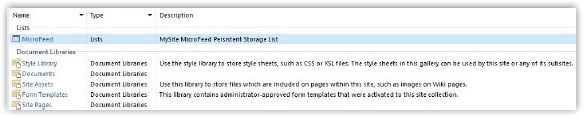
Figure 2.12: Site Contents in SharePoint Online Configuration Site default
Site Features and Site Collection Features in Active state, by default, as seen in the following table:
|
Site Features |
Site Collection Feature |
|
|
Table 2.9: Default Site Features and Site Collection Features activated in SharePoint Online Configuration Site
Business Intelligence Center Site Contents
Open site content for Business Intelligence Center Site, you will find contents Content and Structure Reports, Reusable Content, Workflow Tasks, Images, Site Collection Images, Site Collection Documents, Style Library, Form Templates, Dashboards, Data Connections, Documents, Pages, Site Assets available by default as seen in the following screenshot:
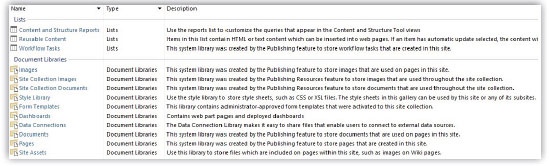
Figure 2.13: Site Contents in Business Intelligence Center Site default
Site Features and Site Collection Features in Active state, by default, as seen in the following table:
|
Site Features |
Site Collection Feature |
|
|
Table 2.10: Default Site Features and Site Collection Features activated in Business Intelligence Center Site
Compliance Policy Center Site Contents
Open site content for Compliance Policy Center Site, you will find contents Container Settings, Dar Tasks, Dynamic Scope Binding, Policy Assignments, Policy Bindings, Policy Definitions, Policy Events, Policy Rules, Form Templates, Site Assets, Style Library available by default as seen in the following screenshot:

Figure 2.14: Site Contents in Compliance Policy Center Site default
Site features and site collection Features in Active state, by default, as seen in the following table:
|
Site Features |
Site Collection Feature |
|
|
Table 2.11: Default Site Features and Site Collection Features activated in Compliance Policy Center Site
Community Portal Site Contents
Open site content for Community Portal Site, you will find contents Style Library, Form Templates, Site Assets available by default as seen in the following screenshot:

Figure 2.15: Site Contents in Community Portal Site default
Site Features and Site Collection Features in Active state, by default, as seen in the following table:
|
Site Features |
Site Collection Feature |
|
|
Table 2.12: Default Site Features and Site Collection Features activated in Community Portal Site
Visio Process Repository Contents
Open site content for Visio Process Repository Site, you will find contents Form Templates, Style Library, Process Diagram, Site Assets available by default as seen in the following screenshot:

Figure 2.16: Site Contents in the Visio Process Repository Site default
Site Features and Site Collection Features in Active state, by default, as seen in the following table:
|
Site Features |
Site Collection Feature |
|
|
Table 2.13: Default Site Features and Site Collection Features activated in the Visio Process Repository Site
Publishing Portal Site Contents
Open site content for Publishing Portal Site, you will find contents Content and Structure Reports, Workflow Tasks, Reusable Content, Site Collection Documents, Documents, Form Templates, Style Library, Images, Site Collection Images, Pages, Site Assets available by default as seen in the following screenshot:

Figure 2.17: Site Contents in Publishing Portal Site default
Site Features and Site Collection Features in Active state, by default, as seen in the following table:
|
Site Features |
Site Collection Features |
|
|
Table 2.14: Default Site Features and Site Collection Features activated in the Publishing Portal Site
Enterprise Wiki Site Contents
Open site content for Enterprise Wiki Site, you will find contents Content and Structure Reports, Workflow Tasks, Reusable Content, Site Collection Documents, Documents, Form Templates, Style Library, Images, Site Collection Images, Pages, Site Assets available by default as seen in the following screenshot:
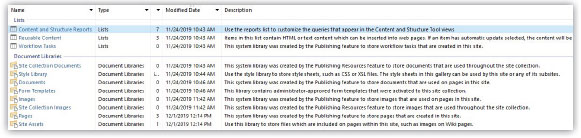
Figure 2.18: Site Contents in Enterprise Wiki Site default
Site Features and Site Collection Features in Active state, by default, as seen in the following table:
|
Site Features |
Site Collection Feature |
|
|
Table 2.15: Default Site Features and Site Collection Features activated in Enterprise Wiki Site
Creating a New Document Library
We can create a document library in multiple ways. Follow the step by step process to create a document library:
- Once a modern site is created, you will find an option New in the command bar.
- Click on New. You will see multiple options from which you can click on either Document library or App to create a document library. If you open Site contents, the same two options are available to create a library. You can navigate to these options either way from the home page or site contents, either by clicking Document library or by clicking App. Click on Document library from the site home page.
- Another dialog box will open. Enter Name (
Project Documents 2020) and Description of the document library. - Select the checkbox Show in site navigation to add this library into site navigation.
- Click on Create will create a document library in site with library URL
https://<site url>/Project Documents 2020and you see library also added to the left side navigation on site as seen in the following screenshot:
Figure 2.19: Create a Document library from the dropdown option Document library
- If you are clicking on the App instead of the Document library, you will be redirected to the app store. Select the app Document Library.
- Another dialog box will open. Enter Name (
Project Documents 2020) of the document library. You can either click on Create to create a document library with the rest of the options as default or click on Advanced Options to choose other options. - Click on Advanced Options as seen in the following screenshot:

Figure 2.20: Create Document Library from the dropdown option App
- You will get options to enter Name, Description. Choose options from Create a version each time you edit a file in this document library? (Yes by default) and Document Template.
- You can select any of the document template present under Document Template so that when you will create any document in the library, the file of this type template will be created by default.
- Then click on Create the document library as seen in the following screenshot:

Figure 2.21: Document Library Default Document Template
Creating New List
The way we created a document library, we can create a list in multiple ways. Follow the step by step process to create a list:
- Once a modern site is created, you will find an option New in the command bar.
- Click on New. You will see multiple options from which you can click on either List or App to create a SharePoint list. If you open Site contents, the same two options are available to create a list. You can navigate to these options either way from the home page or site contents, either by clicking List or by clicking App. Click on List from the site home page.
- Another dialog box will open. Enter Name (
Custom List) and Description of the list. - Select the checkbox Show in site navigation to add this list into site navigation.
- Click on Create will create SharePoint list in the site and you see list also added to the left side navigation on site as seen in the following screenshot:
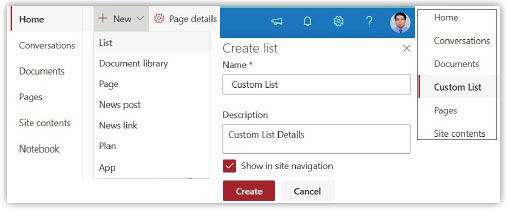
Figure 2.22: Create SharePoint List
- If you are clicking on App instead of List, you will be redirected to the app store. Select the app Custom List.
- Another dialog box will open. Enter Name (
Custom List) of the list. You can either click on Create to create a list with the rest of the options as default or click on Advanced Options to choose other options. - Click on Advanced Options will show additional option to enter Description of list apart from Name as seen in the following screenshot:
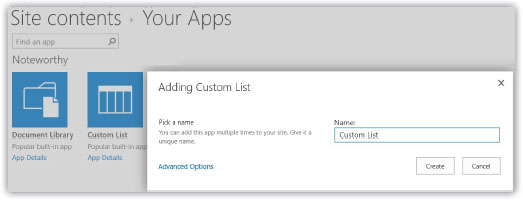
Figure 2.23: Create List from App
- Navigate to Site contents from the left navigation of the site. Click on New and select List from there will drive you towards the new experience of creating a list, as seen in the following screenshot. Enter name of the list under Create a list and click on Create as seen in the following screenshot:
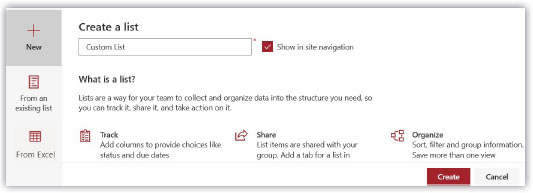
Figure 2.24: Create a list of modern experience
- We can create a list from an existing list present under any other site. Click on the option From an existing list, as shown in Figure 2.24 above. You notice all sites under the option Select a site appears.
- Select any one of the sites, will make you available all lists present under that site.
- Select any of the list present under that selected site. Enter Name (
Customer List) of the list that you want to give under Create a list and click on Create as seen in the below screenshot. - It will create a new list with same template or schema as of that selected list template, but no content of that list is included in the newly created list:
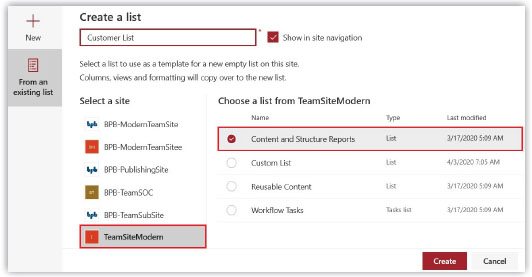
Figure 2.25: Create a list from an existing list
- If you want, all items should be available under the newly created list while creating a list from an existing list; then, we need to make available another option Save list as template. This option can be enabled by PowerShell script only. You can take the help of Microsoft support or administrator to run one PowerShell command as below.
Set-SPOSite -Identity <site url> -DenyAddAndCustomizePages 0Set-SPOSite -Identity https://spmcse.sharepoint.com/sites/BPB-ModernTeamSite-DenyAddAndCustomizePages 0 - Now open one List (contents should be present in it) present in Site Content. Click on Settings
 from top right corner and select List settings from drop down.
 - Identify the category Permissions and Management and see the option Save list as template available now as seen in below screenshot:

Figure 2.26: Save list as template
- If you click on that option Save list as template, you see options to fill like File name (
Custom List Template), Template name (Custom List Template App), Template description, and a checkbox to select like Include Content. - Select the checkbox Include Content and click on OK finally to create a template as seen in below screenshot:
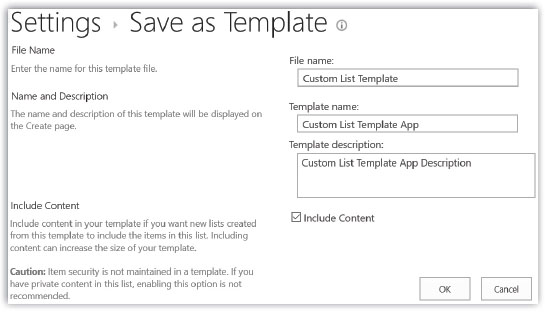
Figure 2.27: Save list as template Include Content
- You will get a confirmation once the template is created successfully, as seen in the below image. Click on link list template gallery as seen in below screenshot:

Figure 2.28: List template gallery
- You will be redirected to the list template gallery where all list templates are stored. URL of that will be of format as below which can enter directly to navigate:
https:// <Site URL>/_catalogs/lt/Forms/AllItems.aspx - You can also find the list template by navigating to Site Settings (
https://<site url>/_layouts/15/settings.aspx) and click the option List templates present under Web Designer Galleries as seen in below screenshot:
Figure 2.29: List Template Gallery Under Site Settings
- You see the created list template including content will be available here as seen in below screenshot:

Figure 2.30: List template details
- Now you can use this template to create a list. If you click on App from dropdown option present under New, then you can find this template, as seen in the below screenshot, which includes content. Follow the same steps discussed before to create a list:
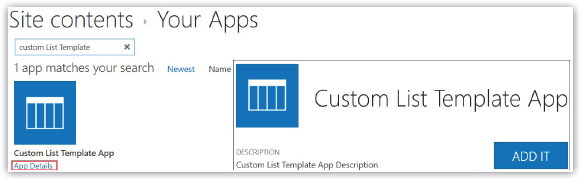
Figure 2.31: Created List App Details
- The new feature introduced to create list from Excel. Click on the last option From Excel. Enter name of the list under the field Create a list, as seen in the below screenshot.
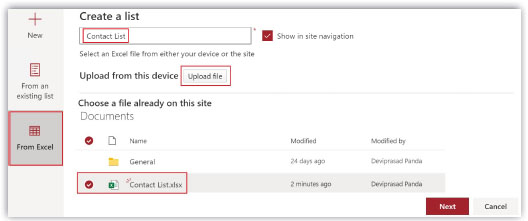
Figure 2.32: Create List From Excel
- Select any Excel file having table in it, present in the library, which you want to import, or you can upload an Excel file from computer by clicking the button Upload file and click on Next.
- From the filed Select a table from this file, select table. Items present in the Excel will be populated here. Click on Create will create the list in site contents, as seen in the below screenshot:
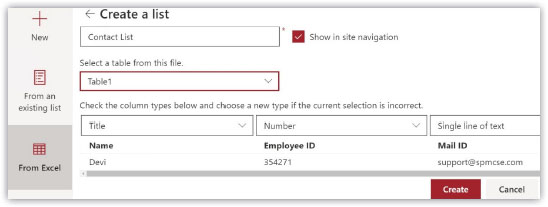
Figure 2.33: List From Excel Created
Upgraded new features for smart management
We discussed default site contents available and features activated, once the site is created as well as discussed a new smart way of creating document library and list. Over time where content grows too fast, representation of the content plays a primary role, storing content securely in the proper category and managing these contents effectively, smartly is very important to get the right content at the right time that ultimately will improve productively, Microsoft keeps on rolling out smart features for end-users. In this section, we will discuss some of the new smart features added to the SharePoint Library and List that give an ultimate exiting user experience in terms of content management, better collaboration that in turn results in better productive work culture.
Modern Document Library Smart Features
If you compare the document library between the new modern team site and classic SharePoint site, you will find the modern library come up with a fantastic user interface that will make you feel something new, exciting as well. Let’s discuss what those new features are and how it helps in better collaboration experience among employees. Let’s open a document library:
- Click on Site Contents from left navigational menu link or add
_layouts/15/viewlsts.aspxafter the site URL to open all site contents. - Click any one of the document libraries, for example, Documents.
Command Bar
Once you opened document library, you will notice, the classic site Tool Bar is replaced with a brand new Command Bar with options like New  , Upload
  , Quick edit
  , Sync
  , Export to Excel, PowerApps
  , Automate
  , Alert me, Manage my alerts, Switch view options, Filters pane
  , Details pane
  , Expand pane
  , as seen in the following screenshot. Each option provides new features which we will discuss in detail next:

Figure 2.34: Command Bar
New
The first option in command bar you will find as New  which is used to create new documents, folders, links, templates. If you remember in the classic site, this option was mentioned as New Document. Let us discuss the following steps to see all actions that can be taken under this option:
- Click on the option New from the modern command bar. You will get drop down with options like Folder to create a folder, document templates like Word document, Excel workbook, PowerPoint presentation, OneNote notebook, Forms for Excel to create respective documents and few more new options like Link, Edit New menu, Add template as seen in the following screenshot:

Figure 2.35: Create New
- Click on Link; you will get another dialog box, Create link to all documents below that. If you select any one of the documents, that document will be stored in that library as a URL or Link. Clicking on that link will open the document in a new tab. Means link to any document can be stored in the library, and there is no need to uploading the same document in multiple libraries.
- If you are entering any URL in the box instead of selecting a document, you will get another option below that filed as a File name as per the screenshot above, which displays file name with the same name by default (for example, SharePointTechnicalSupport.com) as you typed above. You can change the File name (for example, SharePointTechnicalSupport instead of SharePointTechnicalSupport.com) as per your wish and click on Create button present below. The link will be saved in the library with a file name ending with .url. The Link provides an option to add any URL (document URL or list/library URL, site URL) as a link to the library.
- Next, click on the Edit New menu from dropdown New. Another window will open with the same templates present under option New as seen in the above screenshot Figure 2.35. Uncheck any one of the office files or any folder and click on Save. Next time when you open dropdown option New, you will not find those templates.
- Next, clicking on Add template from dropdown New, pop up window opens to select any custom document template from local computer and add to under New. It will help to create documents with custom format easily at any time.
- If Allow management of content types is enabled in the document library, and we add any content type (Link to a Document) in the library, then that content type will be available under New to create the content of that content type template as seen in the following screenshot. How to add content type is described under the section Content Types later in this chapter:

Figure 2.36: Content Type Added Under Drop Down Option New
All document templates under New will be replaced by content type Document, and selecting this content type template to create content will create a default document template that we discussed in the section Creating New Document Library.
Upload
As the name suggests, the Upload  option from the command bar is used to upload files in the document library. It provides options to upload Files, Folder, Template, as seen in the following screenshot. Let us perform the following steps to understand each option:
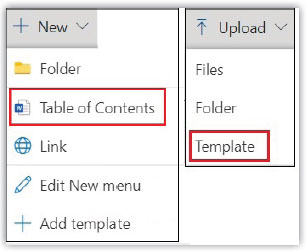
Figure 2.37: Upload
- Selecting the option Files from the dropdown option will open a pop-up window to select a single file or multiple files from the local desktop and upload it to the library. Similarly, selecting the option, Folder will upload the folder in the library.
- You can upload files and folders directly by dragging from your local computer into the document library. It depends on which you process you feel comfortable.
- Next, select the option Template, newly introduced, will open a pop-up window to choose one custom template (For example, Table of Contents) form local desktop. Once you select and upload that template, this will be added under the dropdown option in New. Next time when you need to create a document of type of similar kind (Table of Contents), you can just select that template and create.
Note:
- The limit for a number of list items by default is 30 million, and for the document, the library is also the same 30 million, which includes files and folders.
- The default file upload size limit is increased to 100 GB from 15 GB, and the limit for the file attached in the list is set as 250 MB, OneNote files upload size limit is 2 GB.
- If you are uploading files by drag and drop, limit the file selection as 100 at max.
- The limit for a number of characters, including path and file name length, should not cross 400 characters.
Quick edit
Another option in the command bar is Quick edit that displays the library as a datasheet view and allows users to edit multiple items, in the library, from the rows or columns at a time and can save the changes. Select one of the cells from any row or column (for example, Approval Status), modify and click on Exit quick edit, as seen in the following screenshot. Changes will be reflected:
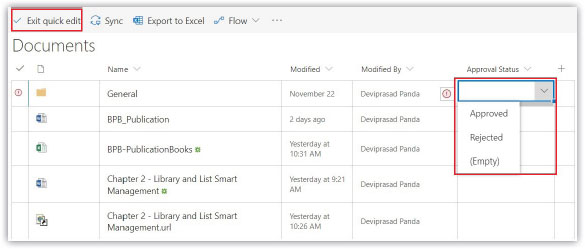
Figure 2.38: Quick edit
Currently you can see 30 items per page in this quick edit mode. New features are rolling out by end of June after which user can see 100 items per page in list or library.
Sync
Option Sync  in command bar allows users to sync document library with a local computer, to access the file offline, and do the needful from file explorer at any time. It improves the friendly experience for end-users to work offline from the local system and sync at any moment. Let us perform the following steps to configure Sync:
- Click on Sync from the command bar. Pop up window will open for Sign in. Click on button Sign in as seen in the following screenshot:

Figure 2.39: Configure Sync click on Sync from the command bar
- Sign-in will proceed with your account, and Your OneDrive folder path under the local system will be displayed where documents will be stored. You can change Your OneDrive folder path by clicking the option Change location. Click on Next once file storage location under the system is set. From next window Share files and folders click on Next as seen in the following screenshot:
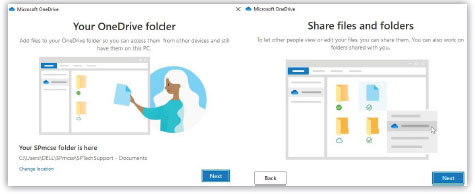
Figure 2.40: Configure Sync local system file saved location
- From the next window, All your files, ready and on-demand, click on Next. Then you will get confirmation that Your OneDrive Folder is ready for you with button Open my OneDrive folder. Click on Open my OneDrive folder as seen in the following screenshot:

Figure 2.41: Open OneDrive folder
- You will be redirected to the local system document library OneDrive sync folder SPTechSupport - Documents, which will be in the format like
<Site Name (SPTechSupport)> - <Document Library name (Documents)>as seen in the following screenshot. Documents will be synced to this local folder which you can access anytime as per requirement: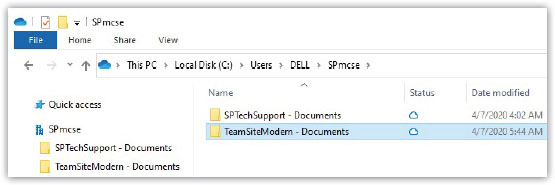
Figure 2.42: Sync folder location
Export to Excel
Clicking the option Export to Excel  from command bar will download an Excel file with field columns like Name, Modified (Date and Time), Modified By, Item Type, Path, and other custom columns if available in detail of the document library as seen in the following screenshot. So, we can export document library inventory as a report in Excel format. Column Name in Excel file has a file name with a link to that file. Clicking the link under Name will open the file directly in the browser:

Figure 2.43: Export to Excel
PowerApps
PowerApps option from the command bar provides an option to customize the document library form by clicking Customize forms. It also used to create an app. PowerApps is the replacement of the InfoPath form, as seen in the following screenshot. We can customize the library form using PowerApps:
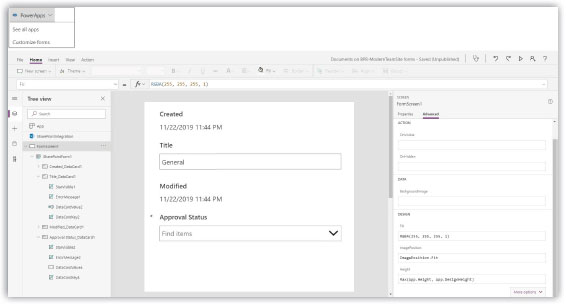
Figure 2.44: Customize forms PowerApps
Automate
There is an option Automate  in the command bar, also called as Power Automate, which is newly introduced and used to automate a series of tasks by creating flows connecting multiple services. Previously it was named Flow but renamed to Power Automate recently. Power Automate is integrated with the document library to provide automated tasks. Let us perform the following steps to create a basic flow:
- Click on Automate from the command bar.
- You get dropdown option Power Automate and under that few more options like Create a flow, See your flows, Configure flows. Click on Create a flow to start creating flow in the document library as seen in the following screenshot:
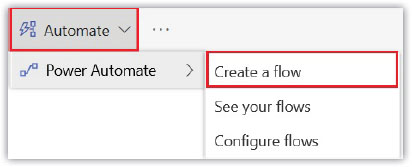
Figure 2.45: Create a flow
- You will get the option to select the default template of flow creation out of multiple predefined templates. Clicking Show more options below that will display al templates present under power automate for flow creation. Clicking See your flows option below that will display all created flows.
- Click on one template Send a Customized email when a new file is added, as per requirement, will redirect you to Power Automate window for creating flow based on the template selected as seen in the following screenshot:

Figure 2.46: Create a flow
- You will notice services Office 365 Outlook, SharePoint, Office 365 Users are involved in the creation of flow for the selected type of template as per the requirement will be available. The side to each service status is showing a Valid connection. Click on Switch account option to change the account for the connection as seen in the following screenshot:
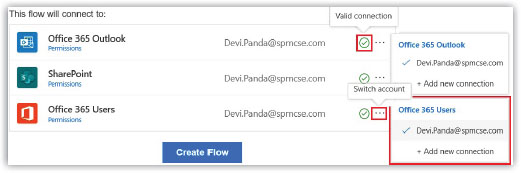
Figure 2.47: Services involved in the flow
- Finally, click on Create Flow will create a new flow, as seen in the following screenshot. When a new item added to the document library, the user will receive a mail. It is the operation which this flow will complete:

Figure 2.48: Created flow
Switch view options
Switch view options  in command bar provides a way to show the document library contents in a different view. By default, the view is All Documents that show all documents. You can create a view to filter show specific contents in that view. Let us perform the following steps to see items in different views:
- Click on Switch view options form the command bar; you will see different views under the dropdown like List. Compact List, Tiles, All Documents, Save view as, Edit current view, Format Current view with a view All Documents as a default view. The default view (All Documents) will be displayed in the command bar for the option Switch view options.
- As shown in the following screenshot, you can notice the contents of the document library in the form of List, Compact List, Tiles respectively:
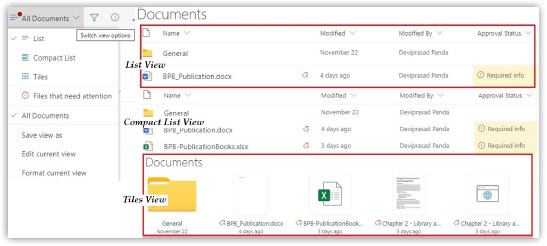
Figure 2.49: Display content in the form of List, Compact List, Tiles view
- Newly introduced option Save view as provides a way to save the default view (All Documents) with another name (Admin View), as per your requirement, so that can be used for different business requirements.
- You will notice the newly created view (Admin View) under the dropdown of Switch view options with additional option Set current view as default to save this view as default as seen in the Figure 2.50 below, so that next time you access the document library, you will find this new view under command bar as default:
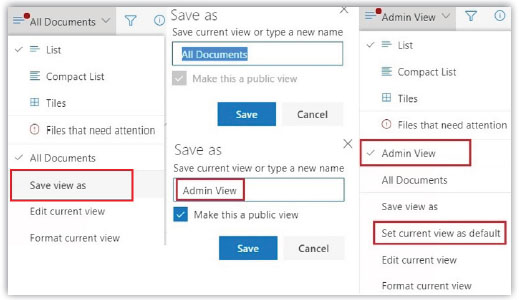
Figure 2.50: Switch view options
- Option Edit current view provides a way to edit the view as per your requirement.
- Option Format current view enables users to add JSON codes to make changes in the Document library content view.
- Another new feature is Files that need attention. If you have added any column that is marked as required field and information is not selected/filled for that column or columns, then this option will be marked red error message. Also, the red mark will be available side to default view present in the command bar, as shown in Figure 2.50. You need to fill missing properties. The steps for filling this are discussed under the section Details pane next.
- New features are rolling out by end of June after which user can save the quick edit mode of library or list as a view. Just click on Quick edit from ribbon and save that as view following the same procedure as discussed above. Benefits of this is, when user switch to this Quick edit view, items present in library or list will be rendered as quick edit mode for easy and quick editing.
Filters pane
Filter pane  option is newly introduced that includes metadata-based filtering to find content in a modern document library. You must be thinking, what is metadata. If you see Figure 2.49, each document library column Modified (November 22, 4 days ago, 3 days ago), Modified By (Deviprasad Panda, X, Y) contains information. So, this information in each column is called metadata. I mean, metadata is data about data or information about information.
New features in SharePoint Online provides an option to pin library columns to filter pane. Let us perform the following steps to pin library column to filter pane:
- Click on the library column (Modified By).
- From dropdown option, select Column settings.
- Under column settings, you will find the option to Pin to filters pane.
- You will find this column (Modified By) with all information (name of all users Deviprasad Panda, X, Y) present under filter pane. You can filter by selecting any one user. If you Unpin this column Modified By, it will be removed from filter pane. The following figure helps in understanding it:

Figure 2.51: Filters pane
Details pane
Details pane  is a new feature introduced in the command bar that provides an option of inline metadata details for the document in that library. The metadata details include File Preview with several views (3) of that file, Manage access (users having permission in that file), Properties (Content Type, Name, Title), Activity (detail actions are taken on that file like editing), Type (extension of file), Modified (last modified), Path (storage location of the file in site), Size (size of the file), as seen in the following screenshot:

Figure 2.52: Details pane
Users can edit Properties of one document by clicking on each of the fields directly one by one else click on Edit all to enable all fields under properties in edit mode and edit all the fields at a time.
Similarly, it allows us to edit the properties of multiple documents at a time. Select multiple documents from the library and click on Details pane  . You will find the fields that can be modified, select your changes, and apply changes by clicking Save.
As discussed under the above section, All Documents (Switch view options) -> Files that need attention, when you select Files that need attention and click on Details pane  you will get the same options to fill missing details of the document properties. Fill those missing filed properties and save as seen in the following screenshot:
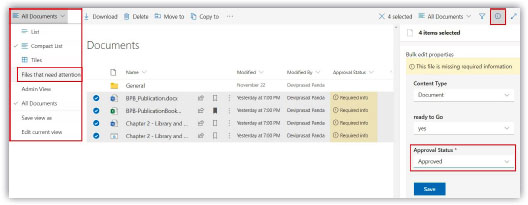
Figure 2.53: Files that need attention
Expand content
If you are mostly working on documents present in the library, then you should try this new option to Expand content  . Click on Expand content from the command bar. You will see command bar and files in the library available, and rest options like left navigation, the header will hide. So, you can focus on documents and their options for work. You can revert the changes by clicking Collapse content
  from command bar as seen in the following screenshot:
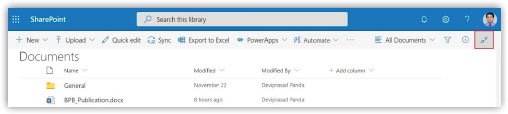
Figure 2.54: Expand content
Add column simplified
Adding columns to the library is simplified. Click on any one of the columns (For example, Modified) in the library, drop down option will appear. Then select Column settings will show options to do actions on that selected column like rename, format this column, move right or left, pin or unpin from filters pane, show or hide and at the bottom you will get option to Add a column. Clicking on Add a column will show type the column you want to create, and selecting one type of column will initiate to create a new column, as seen in Figure 2.55 below. If you hover between any two columns, you will find a sign +, clicking on that will initiate the step for column creation:
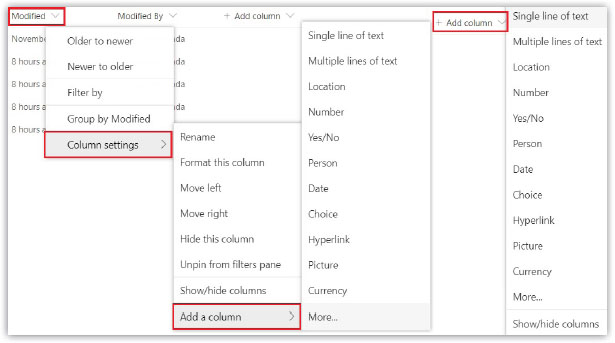
Figure 2.55: Add column
Move to/Copy to option
It is one of the newly added options in the modern bar. Selecting one file in the document library will enable multiple options in command bar like Open, Share, Copy link, Download, Delete, Move to, Copy to, Pin to top, Version history, Check out as seen in the following screenshot:

Figure 2.56: Options after selection of one file
Click on Move to  ; you will get an option to choose the destination to move the file, which can be within the same library or folder present in the same library or library present in other sites or folder present in other sites. The user needs to select the destination library or folder and click on Move here, which will remove the file from the current location and will save at destination location, as seen in Figure 2.57 below. During selecting the destination location, the option is there to create a new folder on the spot to move the file:

Figure 2.57: Move to
Similarly, if you select Copy to  , a copy of the file will be created at the destination location without any impact on the source file.
Pin to top option
Pin to top  is a newly introduced feature that allows users to add files or folders at the top of the library in Tiles format. Users can Pin files or folders critical to a business, or they want to highlight. Let us perform the following steps to see various actions taken related to pin:
- Select any one file or folder from the library that will enable an option Pin to top in the command bar. Click on Pin to top from the command bar. You see, the file or folder will be added at the top of the library in Tiles view. Currently, it’s not supported to Pin multiple files or folders at a time.
- Select one file from pinned files that will enable an option Edit pin in the command bar. Click on Edit pin
 will show action like Unpin
  , Move left, Move right.
 - Click on Unpin to remove from pinned files. Click on Move left or Move right to rearrange the file place as seen in the following screenshot:

Figure 2.58: Pin to top
Saved for later
Saved for later  is a type of bookmark in SharePoint, which is introduced to save any page that can be accessed later. Click one news post in the SharePoint site will open that news page. At the bottom of that news page, you will find options to mark that news post as Saved for later, as seen in the following screenshot. When you create new site pages at the bottom, you will find this option:

Figure 2.59: Saved for later
Check out/Check in multiple files
Check out multiple files in a single click is supported now, so you don’t need to check out each file at a time when there is a requirement of multiple files check out. Select the files that you want to check out and click the option, Check out from the command bar. Once the file is checked out, other users cannot edit that file, so those files need to be check in again. Select multiple files and click on Check in will save the changes. Selecting Discard check out will not save the modification done in the document as seen in the following screenshot:

Figure 2.60: Bulk file check out check-in
Submit for approval
Selecting a single document or multiple documents from the library will make enable an option Submit for approval  in command bar if Require content approval for submitted items is enabled for the library.
Click on Submit for approval will send the document for approval, and the status column will be updated as Pending from Draft. Then you will find the submit for approval as seen in the following screenshot:

Figure 2.61: Submit for approval
Now selecting the file pending for approval will make available another option Cancel approval  to cancel the approval process and make the file back to draft again so that you can submit again.
Publish
Navigate to Library Page. You may create and save as draft multiple site pages so that can-do future change. In that case, selecting site pages will enable an option Publish  in the command bar to publish the page directly, which is a new feature in SharePoint. Bulk action like publishing multiple pages is supported by which you can select all draft site pages and click on
 Publish from command bar as seen in the following screenshot:
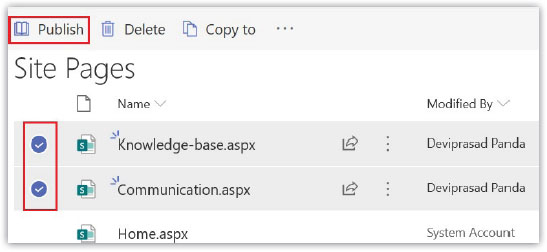
Figure 2.62: Publish documents
New feature is rolling out by end of June after which you will find another option in command bar Republish. Also, you will find an icon  side to the page having unpublished changes.
Change the document file group
Users can change the document file group easily by drag and drop. If document library files are in a group, the user can quickly move the file from one group to another by drag and drop. Select the file that you want to change the group. Drag the file and put it over another group, as seen in Figure 2.63 below. It will update the metadata associated with the file automatically. This action will trigger the flow to change the metadata associated with that. You see below image the metadata Modified of the moved file is updated:
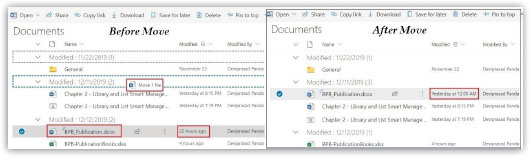
Figure 2.63: Change in the metadata of the file
You see below image the metadata Approval Status updated once the file is moved to a different group:

Figure 2.64: Change in the metadata of a file
Hover card
Hover card is a new feature introduced in SharePoint that shows quick information about the file details present in the library. If you put your mouse over any document present in the library that we call as hover on file, you will see the properties and actions like the number of View (1), number of Viewers (1), Time to read (12 min) under inside look, actions pending underflow under Your conversations, and so on, in the form of card which we call as hovercard, as seen in the following screenshot, that gives quick details about usage, traffic, action on the file to analyze and manage better:

Figure 2.65: File hovercard
Similarly, if you hover over the site name BPB-ModernTeamSite, you will see hovercard with site details like site description under About, Microsoft Teams group mail ID (BPB-ModernTeamSite@spmcse.com), Follow in inbox to get an update with group emails triggered, group Members, Apps, Emails, Files as seen in the following screenshot:
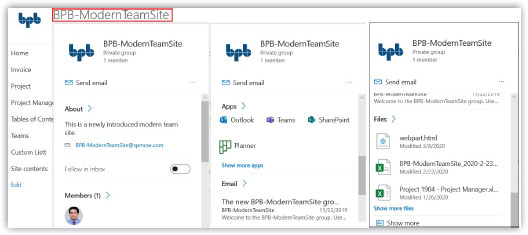
Figure 2.66: Hover card site
Modern list smart features
Branding for the SharePoint list is the same as the library. You will get a modern command bar with options like New, Quick edit, Export to Excel, PowerApps , Automate, Alert me, Manage my alerts, Switch view options, Filters pane, Details pane  , Expand pane. Let’s discuss a few options next.
Create new item
As we already discussed, SharePoint List gives an experience of the table where you are filling all rows and columns; you will get a similar experience to fill all fields when you create a new list item. Let us perform the following steps to create one list item and will see the new experience in it:
- Open one List (for example, BPB-Contact) from site contents.
- You will notice the branding is the same for both lists and libraries. You will see command bar with similar options that are applicable for list items:

Figure 2.67: List command bar
- Click on New
 from command bar; you will get options to fill details for an item like the Last Name, First Name, Full Name, Email Address, Phone Number like this. Fill all details as per requirement and click on Save as seen in the following screenshot:
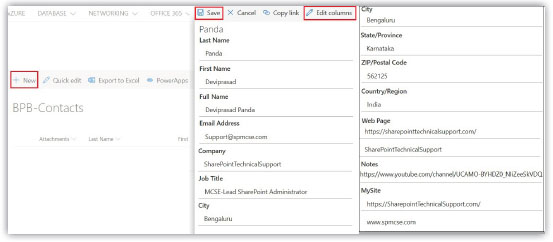
Figure 2.68: Create an item
- Once the item is created, select the list item and click on Edit
 from the command bar. Click on Edit columns
  will display all list columns. Columns with checkbox selected will be displayed in the current view. You can check or uncheck the columns which you want to add or remove from the current view. Columns marked check-in will be displayed in the list:
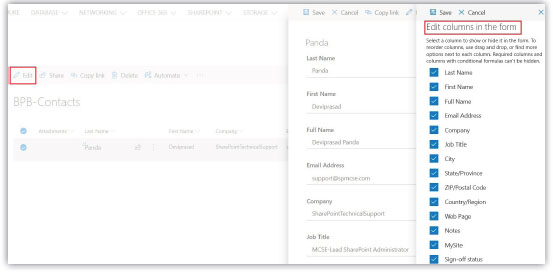
Figure 2.69: Edit view column new experience
- Like document library, the list provides an option to edit the metadata details from Details pane
 as seen in the following screenshot:
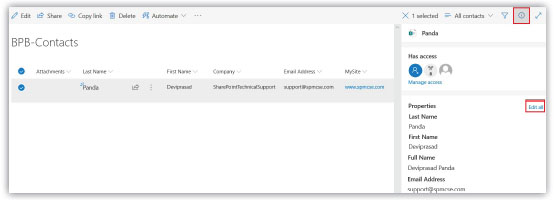
Figure 2.70: Edit properties from Details pane
- Users can adjust the width of the cell of each filed by dragging right or left. When you hover between two columns, the adjusting option will appear to make it adjust.
Request sign-off
Request sign-off is a new feature introduced that allows quick approval of a single list item or file in the document library and gets sign-off from the approver. It is applicable for both single list item and library file but not supported for folder present library. Previously we were able to create flow for the whole list or library that is applicable for all items present in it but unable to create flow for a single item. Now the new feature introduced that supports creating flow at the item level. There are situations where you need to focus sign-off for critical files or items, whether that is approved or not, and you might not give equal importance for the rest of the files or items, then this would be the best option for those users. Let us perform the following steps to create Request sign-off flow for a single list item which also applicable for single files in the library:
- Open one list BPB-Contacts from site contents presents in site BPB-ModernTeamSite.
- Select one item from the list and click on Automate from the command bar.
- Click on option Request sign-off from the drop down:

Figure 2.71: Request sign-off
- Another dialog box Create a flow that will appear on the right side. Expand the option, See details will display services involved in this flow like SharePoint, Approvals, Notifications as below.
- Click on Create flow will another dialog box. Enter Approver name, Message and click on Run flow will start the flow:

Figure 2.72: Run flow
- You see an additional column Sign-off status column will be added to the list that will show the current status of the item as Pending:

Figure 2.73: Sing-off status Pending
- Approver will receive one mail, which needs to be approved or rejected with the comment:

Figure 2.74: Approve the request from mail
Once the action is done by the approver, the status will be updated in the list column Sign-off status, either Approve or Reject.
Apps Management
As shown in Chapter 1, Introduction and Site Information under Figure 1.5: Content Templates, there are multiple content templates in the form of Apps available. We can add Apps by navigating to Site Contents and selecting New | App from the command bar. Then select the type of App you want to create, fill the details, and click on Create. You will get a lot of options to select and create App, but after the creation of, you will get the same settings to manage. As we are going to discuss in the below section.
Understand List and Library Settings is Must
We discussed all actions that can be taken on a document or list item. In this section, we are going to discuss the settings related to the library and list. There is always an option called Settings, available for either list or library or site that is used for managing properties of list or library or site. We can control configure actions or features from this setting which we will discuss below:
- You can open library settings in different ways. Click on Site contents (
https://<site url>/_layouts/15/viewlsts.aspx) from left navigation, open one document library, click on the Gear button present at top right corner, you will find Library settings (
https://<site url>/_layouts/15/listedit.aspx?List=**) from the drop-down options:
Figure 2.75: Library settings from Settings
- In another way, open site contents from the site. Click on Show actions button of any library and click on Settings from the dropdown options, will open the library settings as seen in below:
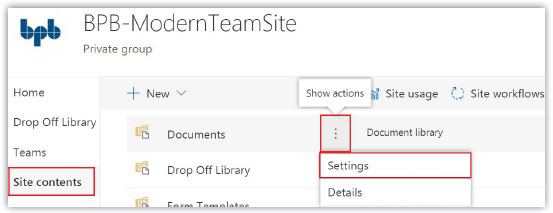
Figure 2.76: Library settings from show action site contents
- You will notice multiple options categorized into General Settings, Permission and Management, Communications, Columns, Views as shown in the image below:
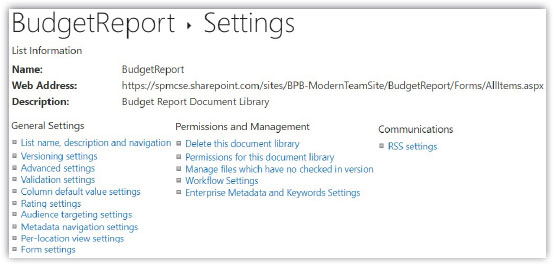
Figure 2.77: Library settings
- Similarly, when you open List settings as seen in Figure 2.78 below, you will notice similar categories/options under the settings with a slight difference in non-availability of option like Manage files which have no checked in version as compared to library settings:

Figure 2.78: List settings
Let’s have an overview of all options available under the library or list settings.
General Settings
General setting includes options like List name, description and navigation, Versioning settings, Advanced settings, Validation settings, Column default value settings, Rating settings, Audience targeting settings, Metadata navigation settings, Pre-location view settings, Form settings, which we will discuss in details below.
List name, description and navigation
The first option under the General Settings category is List name, description and navigation. We can change library or list name, description, navigation following the steps below:
- Click on List name, description and navigation (
https://<site url>/_layouts/15/listedit.aspx?List=**) present under category General Settings. - Another dialog box will open where you can find fields like a library or list Name. If you need to change the name of the library, this is where you need to navigate, as seen in Figure 2.79 below. If you compare this setting between the library and the list, you will not find any difference. Both libraries and lists provide a similar user interface for action.
- There is an option related to navigation like Display this document library/list on the Quick Launch is available, selecting Yes will show this list or library under Quick Launch, and selecting No will not show this list or library under Quick Launch.
- Changing the name of the library or list will not change the URL of the library for your information. I mean, if you change the name of the library from BudgetReport to any other name still the library URL remains unchanged:

Figure 2.79: General Settings
Versioning settings
Versioning provides an option by which every change in a document is stored as a separate version so that the user can track the changes, view previous version file or item, also can restore any of the file or Item version during need. Follow the step by the information below to get more details on this:
- When a document is uploaded or created, one version of that file is created. There are some other scenarios when a new version of the file is created like:
- When a file is edited and saved or when a file with the same name is uploaded again and replaced with existing file
- If there is any change in document properties and saved
- If you have auto Save option is enabled then open the file, try some changes but undo the changes and close the document will create a document version
Files checked out once uploaded; the first version is created once checked in, as seen in the following screenshot:

Figure 2.80: Version history created
- Similarly, when an item is created in the list for the first time, one version is created for that item. If any changes in that item happen, that will create a separate version for that item. You can notice the type of changes happened in each version, modified date and time, modified by with person name and the most important the version number as seen in the following screenshot:
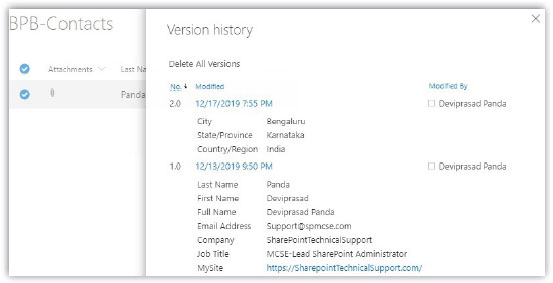
Figure 2.81: Modified properties in the version history
- When you open the version settings (
https://<site url>/_layouts /15/LstSetng.aspx?List=**), you will find different options like Content Approval, Document Version History, Draft Item Security, Require Check Out to control this document versioning. If you compare versioning settings option between library and list, you will find document library versioning settings contains an additional option Require Check Out since we upload documents. It needs to check out to lock the file during the edit. Below image you see, left part of the image indicates Versioning Settings for library and right part indicates Versioning Settings for the list:
Figure 2.82: Versioning Settings
- Versioning for document library is enabled by default, whereas for the list, it’s disabled. You need to make it enabled from the settings under Item version history | Create a version each time you edit an item in this list by selecting Yes. Versioning numbers are categorized into two types, Major version, Minor version. So, users can track either Major versions or Major and Minor (draft) versions.
- For the Major version, document version numbers are created automatically as a whole number like 1.0, 2.0, 3.0, and so on. By default, Create major versions are enabled for the library, and the number of document versions to keep is 500 by default, which can be modified to 100 as a minimum. Limit for document library major version ranges from minimum 100 to 50000 maximum.
- For Minor version, document version numbers are created in the decimal format like 1.1, 1.2, 1.3, and so on. Once the document is published as a major version, the version becomes the next whole number 2.0. After that, the versioning number starts from 2.1, 2.2, and so on. If any file is marked as Discard checkout, there is no change in version number, and you will notice the same most recent version number in the version history. Similarly, deleting any one of the minor versions removes that version only and keeps the rest of the version unaffected. Deleted file version moved to Recycle bin and option is there to restore that version as well as seen in the following screenshot:

Figure 2.83: Delete version history
- If you are tracking minor versions by selecting option Create major and minor (draft) versions then you will find the option Keep drafts for the following number of major versions enabled which stores how many recent major versions (Out of default 500 major versions) will store minor versions as seen in the following screenshot. Default minor version for a single major version is 511:

Figure 2.84: Minor version
We will discuss Content Approval in detail in the next Chapter 3, Content Approval Concept.
Advanced Settings
Advanced Settings (https://<site url>/_layouts/15/advsetng.aspx? List=**) provide multiple advanced options to manage content in library or list as seen in Figure 2.85 below. Let’s discuss different options step by step below:
- The first option you will find is Content Types, and user needs to select whether to Allow management of content types as Yes or No:
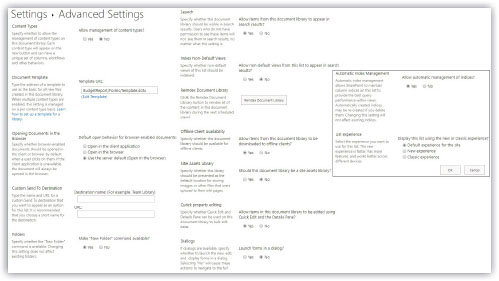
Figure 2.85: Advanced Settings library
- Selecting Yes from Content Types -> Allow management of content types will add another section Content Types under Library Settings as seen in the following screenshot:
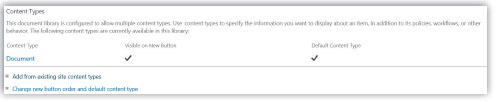
Figure 2.86: Content Types
- The next option under advanced settings is Document Template that provides an option to edit the default document template for the library. When you are adding a document library app, you will find Advanced Options in the dialog box. Clicking on that, you will get an option Document Template at the bottom of the page. By default, Microsoft Word document is the default Document Template if you are creating Document Library without clicking Advanced Options. So, from option Library Settings | Advanced Settings | Document Template, when user click on Edit Template under Template URL will open the default template (Microsoft Word document), which can further be modified. The following figure helps in understanding it:
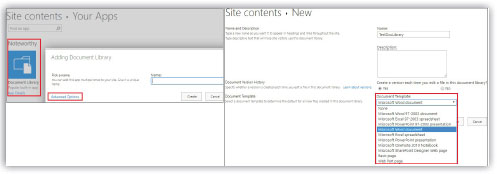
Figure 2.87: Default document template
- The next option under advanced settings is Opening Documents in the Browser that provides two options like Open in the client application and Open in the browser. Using this, we can set to open the document in the browser or client application installed in the user system. The default setting is to open the document in the browser on clicking any of the documents present under the library.
- We will discuss the next option Custom Send to Destination in the next Chapter 7, Content Organizer Feature.
- There is an option Folders to Make “New Folder” command available that is selected Yes as default. It enables to create New Folder in Document Library from Command Bar | New. You can disable the option of creating a folder in the library by selecting No.
- The next option under the Advanced Settings is Search (Allow items from this document library to appear in search results). Whether you want to make documents under this library to be searchable or not can be controlled from here by selecting Yes or No. Although this library is searchable, but users having no permission to this library cannot see documents in the search results. By default, items under this library are searchable, so the option selected is Yes.
- Next Index Non-Default Views provides an option whether to Allow non-default views from this list to appear in search results or not by selecting Yes or No.
- Next option Reindex Document Library provides the option to reindex document library contents on the next crawl schedule. Indexing is a part of the search that is responsible for making content searchable. So, clicking the button, Reindex Document Library will recreate index properties for the contents in the document library to make it searchable.
- Next option Offline Client Availability allows document library to enable or disable sync feature with OneDrive and local system by selecting Yes or No. The default option selected is Yes means the library is in sync enabled. Configuring sync features can allow users to download files, work offline, and access from a local system file, once connected to the internet. Selecting No will disable sync option from the command bar and disable this feature. We already discussed how to configure sync and how it works in the above section Sync.
- Site Assets Library is used to store images, media files, or any other digital assets. Option to make the current library as Site Assets Library is there. Selecting Yes will enable this library as a site asset library. The default selected is No.
- Option Quick property editing is selected by default as Yes, which enables the option Quick edit under document library command bar for bulk editing items. Selecting No will disable Quick edit options, and you will find missing from the command bar.
- Option Dialogs controls to open the Microsoft form in the form of Dialog or Full page by selecting Yes or No. By default, the option selected is No.
- The next option under Advanced Settings is Automatic Index Management that manages indexing of columns automatically based on the queries to improve performance.
- Last option List experience provides the option to display a library or list in new modern experience or old classic experience. Users can switch from new modern experience to old classic experience and vice versa.
- Below Figure 2.88 is the Advanced Settings option for List that has additional options Item-level Permissions, Attachments and missing options Document Template, Opening Documents in the Browser, Custom Send to Destination compared to library advanced settings as seen in the following table below:
Library Advanced Settings
List Advanced Settings
Content Types
Content Types
Document Template
Item-level Permissions
Opening Documents in the Browser
Attachments
Custom Send To Destination
Folders
Folders
Search
Search
Index Non-Default Views
Index Non-Default Views
Reindex Document Library
Reindex List
Offline Client Availability
Offline Client Availability
Site Assets Library
Quick property editing
Quick property editing
Dialogs
Dialogs
Automatic Index Management
Automatic Index Management
List experience
List experience
Table 2.16: Library Advanced Settings and List Advanced Settings comparison
- Item-level Permissions under list advanced settings are used to set permission for list items. Permission for the list item can be refined by allowing users to Read all items or Read items that were created by the user. Similarly, editing permissions can be refined by allowing users to Create and edit all items or Create items and edit items that were created by the user:
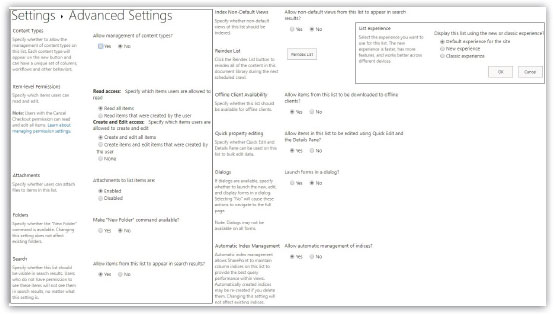
Figure 2.88: Advanced Settings List
Validation Settings
We can apply validation on any column using this option, Validation Settings. We have to apply the formula for validation. Let’s create an example and will apply validation for a column DueDate. We need to set validation so that user should select a due date, a future date greater than today’s date else will get the message Due date Must be greater than today:
- Open Validation Settings (
https://<site url>/_layouts/15/VldSetng. aspx? List=**). - Select the column DueDate that you want to validate from Insert Column.
- Click on Add to formula and then enter
>TODAY(). - Under User Message, enter the message you want to display user as Due date Must be greater than today and click on Save.
- Finally, opening Validation Settings again, you will see the formula as
=DueDate>TODAY(). - Now when you create a new item and choose the DueDate field as the current date, you will get validation error Due date Must be greater than today and will not allow saving the item as seen in the following screenshot. An only future date will be accepted as per validation settings.
You can find more formulas from the link https://support.office.com/en-us/article/examples-of-common-formulas-in-sharepoint-lists-d81f5f21-2b4e-45ce-b170-bf7ebf6988b3 to apply.
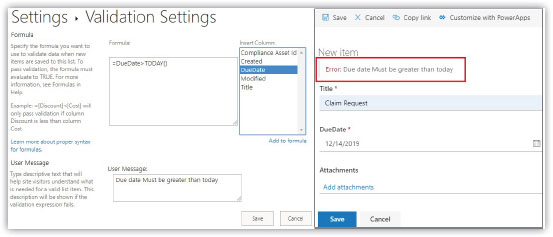
Figure 2.89: Column Validation Settings
Rating Settings
Rating Settings (https://<site url>/_layouts/15/RatingsSettings.aspx? List=**) allows to enable or disable ratings in the form of Star Ratings or Likes for items in library or list as seen in the following screenshot:
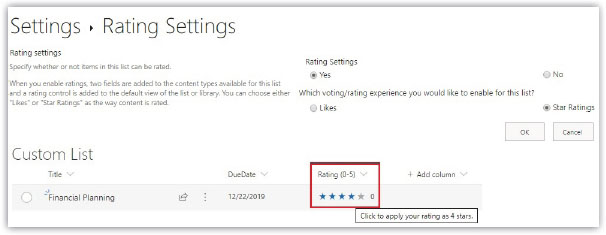
Figure 2.90: Rating Settings
Audience Targeting
Audience Targeting (https://<site url>/_layouts/15/ListEnableTargeting. aspx?List=**) enables to target specific File or specific modern webparts like News, Highlighted content or classic webparts like Content Query relevant to specific groups of users so that contents can only be visible users of those targeted group. The following screenshot displays were to enable Audience Targeting:

Figure 2.91: Audience Targeting
Form Settings
Form Settings (https://<site url>/_layouts/15/FormSettings.aspx? List=**) allows to edit the form in PowerApps . In command bar option is there like Customize Forms, which redirects to PowerApps for editing form. The following screenshot displays were to enable Form Settings:
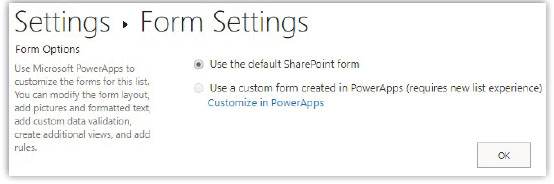
Figure 2.92: Form Settings
Permissions and Management
Next category after Advanced Settings is Permissions and Management under which you will find options like Delete this document library, Permissions for this document library, Manage files which have no checked in version, Workflow Settings, Enterprise Metadata and Keywords Settings. Let’s discuss each option one by one.
Delete this document library
Click on Delete this document library will generate one dialog box with a message like All files will be deleted and will be moved to recycle bin. Once you confirm, the library will be deleted and moved to the recycle bin. The document library can be restored by navigating to the recycle bin and clicking Restore from the command bar as well, if required. Same actions applicable for List, the user can delete the list following the same process as the library.
There will be a new feature File Delete Lockout override will be rolled out. If the user is deleting any document file from the library, which is already in an open state at another location by other users, then the user will get a message like It looks like someone has the file open. Delete Anyway? with delete button below. If you click on the Delete button, it will override, and the file will be deleted.
We could restore the library to the previous time if any unwanted actions happened by mistake, following the new way. Let’s follow the steps below to do the same:
- Click on Settings (Gear icon)
 from the top right corner of the site. Click on Restore this library from the dropdown.
 - Select Custom date and time from dropdown field Select a date.
- There will be a slider below that, which you can slide to change the number of days for keeping library file versions.
- Select the files you want to restore for library and click on Restore will back the library to the previous state:
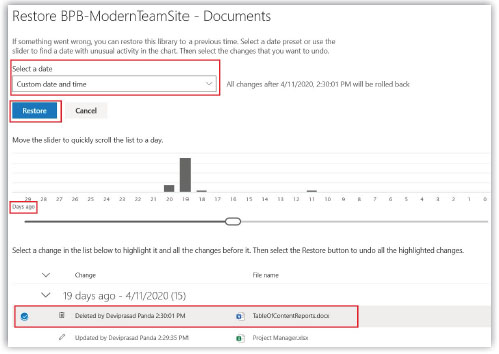
Figure 2.93: Restore Library
Note: Library Documents is a default library for the modern team site. Remember, we discussed in Chapter 1 that one Microsoft Teams Group is created in every Modern Team Site. Many services are dependent on this default library. So, this library Documents should not be deleted, and that is why there is no option to Delete this document library under Library Settings for this library.
Permissions for this document library
Permission for the library can be managed by following the option Permissions for this document library (https://<site url>/_layouts/15/user.aspx?obj =**,doclib&List=**) as seen in the following screenshot. Permission can be managed from the library level as well that is limited to this library only. We will discuss this in Chapter 8, Manage Permission:
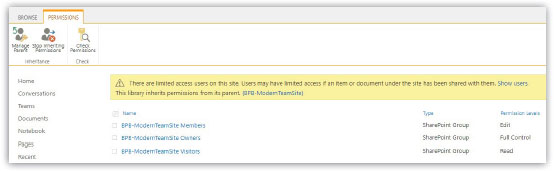
Figure 2.94: Permission for a document library
Manage files which have no checked in version
If you have set the option, Require documents to be checked out before they can be edited? Under Versioning Settings is selected Yes, then you will find the document uploaded to the document library is Checked Out To you. You need to check in the file after your upload or modifying completed. If the file is not Check-in, you will find that file under this option Manage files which have no checked in version (https://<site url>/_layouts/15/ManageCheckedOutFiles.aspx?List=**) as seen in the following screenshot:
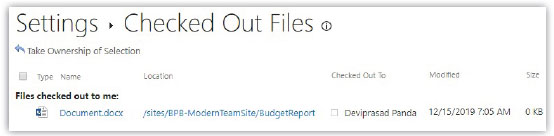
Figure 2.95: Manage files which have no checked-in version
Someone having permission needs to take ownership of this file, then only it will be moved out of this location.
Workflow Settings
Using this option Workflow Settings (https://<site url>/_layouts/15/WrkSetng.aspx?List=**), the user can create or remove workflows applicable to document library and items under the library, check the status of the workflow as seen in the following screenshot. What is a workflow and how to create other actions related to this will discuss in Chapter 3, Content Approval Concept:

Figure 2.96: Workflow Settings
Enterprise Metadata and Keywords Settings
This option enables the library to Add Enterprise Keywords and Enterprise Keywords column to the library. Similarly, list settings also have this option to apply keywords and Enterprise Keywords column on the list. The following screenshot displays where to enable Enterprise Metadata and Keywords Settings (https://<site url>/_layouts/15/metadatacolsettings.aspx?List={**}). We will discuss this more in Chapter 9, Managed Metadata Concept:

Figure 2.97: Enterprise Metadata and Keywords Settings
Communications
Under this category, you will find an option RSS Settings (https://<site url>/_layouts/15/listsyndication.aspx?List=**) by which we can subscribe RSS feed as seen in the following screenshot:

Figure 2.98: RSS Settings
Columns
Column stores properties or information of document items. When the library created, you will find default columns of different types except Column ordering. Column Ordering is present in list Columns as seen in the following screenshot:

Figure 2.99: Columns
Create column
We already discussed creating a column from the command bar option before. You can create new columns from hereunder list or library settings as well by following the steps below:
- Clicking on the option Create Column (
https://<site url>/_layouts/15/fldNew.aspx?List=**), you will be redirected to select the type of column you want to create with other options related to that as seen in the Figure 2.100 below. - Let’s say you need to create a column of type Choice, select that option, then enter the Description of that column.
- Next from the option Require that this column contains information, select Yes or No. If selected, Yes, this column must contain information and cannot be left blank.
- Next option to Enforce unique values allows to select unique value each time or can contain the same information. By default, it’s selected as No. You can keep the same information for all items.
- Then for the option Type each choice on a separate line, you need to enter choice values like Approved, Rejected:

Figure 2.100: Create Column
- The next option provides an option to choose the type of display for your choice option, whether it should be Drop-Down Menu or Radio Buttons or Checkboxes (allow multiple selections).
- Selecting Yes from option Allow ‘Fill-in’ choices provide an additional option to Specify your own value instead of the dropdown choice as seen in the following screenshot:
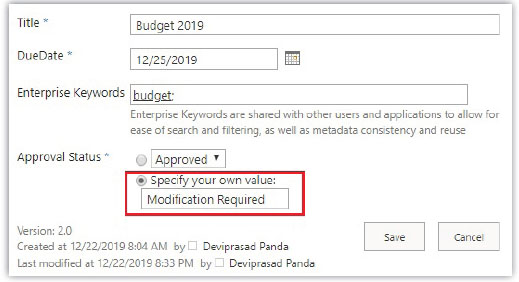
Figure 2.101: Allow ‘Fill-in’ choices
- Select the Default Value for the column out of the choice values you entered. The default value will be selected automatically when you create an item in the library. You can modify different values apart from the default value during the creation of the item. If you are setting any default value for the column, then this column will be added to Column default value settings present under Library Settings | General Settings.
- The next option is adding this column to Add to all content types, Add to default view. Selecting the checkbox will add the column. By default, it’s selected.
- Validation for the column can be set by applying formulae, as discussed before, from the next option, Column Validation.
Similarly, we can create columns of other types as well.
Add from existing site columns
You can add columns from existing site columns from the option Add from existing site columns. Let us perform the following steps to create a column from existing site columns:
- Clicking on the option Add from existing site columns (
https://<site url>/_layouts/15/AddFieldFromTemplate.aspx?List=**) will open another page where you have to select one category (for example, All Groups) from Select site columns from option. - Then select one column (for example, DueDate) from Available site columns and click on Add present side to that.
- Next, select the checkbox Add to default view, Add to all content types to add this column to the default view, content types and click OK as seen in the following screenshot:
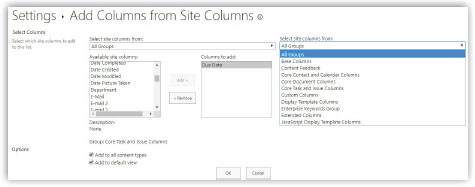
Figure 2.102: Add from existing site columns
Column ordering
Order of the columns which is displayed in library can be changed by the option Column ordering (https://<site url>/_layouts/15/formEdt.aspx?List=**). Form the option Position from Top change the numbering you want to set and click on OK as seen in the following screenshot:

Figure 2.103: Column ordering
Indexed columns
Option Indexed Columns (https://<site url>/_layouts/15/Indexed Columns.aspx?List=**) shows the number of columns that are indexed. When the number of items in the library or list crossing 5000, then Automatic index created up to items 20000. If the item is more than that, you can create an index column manually following the steps below. Indexing is created to improve items query and performance. Let us perform the following steps to create an index column:
- Click on Indexed Columns (
https://<site url>/_layouts/15/Indexed Columns.aspx?List=**). - Click in Create a new index.
- Select one column under the option. Select the primary column for this index from the dropdown and click Create as seen in the following screenshot:

Figure 2.104: Indexed Columns
- Supported Column Types for indexing are Single line of text, Choice (single value), Number, Currency, Date and Time, Person or Group (single value) (Lookup), Managed Metadata (Lookup), Yes/No, Lookup (Lookup).
- Unsupported Column Types are Multiple lines of text, Choice (multi-valued), Calculated, Hyperlink or Picture, Custom Columns, Person or Group (multi-valued) (Lookup), External data.
Views
The next option under Library settings is Views. When you open the library or list, you see an item, columns that are under default view (All Documents), as seen in Figure 2.105 below. So, the view represents how to show information, what is the information you want to show, and how to show information based on the requirement of people. Let us perform the following steps to see the options present in View:
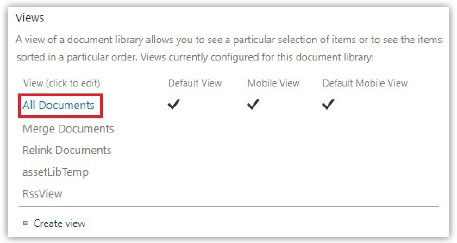
Figure 2.105: Views
- Click on the view All Documents; another page will open, which has multiple options like Name, Columns, Sort, Filter, Tabular View, Group By, Totals, Style, Folders, Item Limit, Mobile.
- You will see the Name of the file as All Documents. Next, you will see a few Columns, but only six columns are selected, as seen in Figure 2.106 below. It is where you can control what columns you want to show in the library. So only selected columns will be seen in the library view, and rest will be hidden. You can change the numbering of columns also to change the order of display:

Figure 2.106: Edit View
- Next option Sort by which we can set conditions for the column to show the order in which items will be displayed. The following figure helps in understanding it:
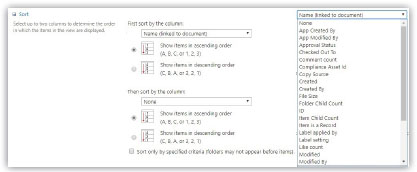
Figure 2.107: Sort
- You can apply filtering to show items based on condition. If the condition is satisfied, then only items will be displayed. The following figure helps in understanding it:
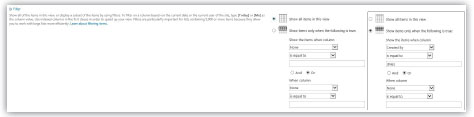
Figure 2.108: Filter
- We can enable or disable the checkbox for each item in the library by the option, Allow individual item checkboxes under Tabular View.
- Grouping of items can be done by following the option Group By. Same way, we need to select the Filter group by the column based on which items will be displayed in the group.
- We can select the default option of showing items, whether in the form of Collapsed or Expanded.
- By default, the Number of groups to display per page is 30, which can be modified as well. The following figure helps in understanding it:
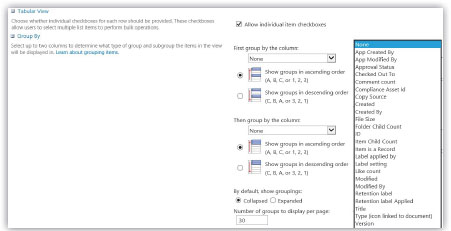
Figure 2.109: Group By
- Option to display item count by changing any column option Total to Count as seen in the following screenshot:
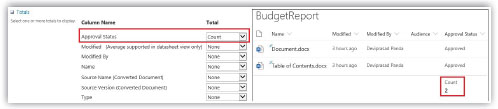
Figure 2.110: Total Count
- Users can set the Style of view, can Show items inside folders, or Show all items without folders by selecting radio buttons as per requirement.
- Number of items to display in view is 30 by default shown as batches, which can be modified as per requirement.
- Option to Adjust mobile settings for this view is there. We can Enable this view for mobile access and Make this view the default view for mobile access. Number of items to display in list view web part for this view is there by default 3, which can be modified. One column is selected for Field to display in mobile list simple view as seen in the following screenshot:

Figure 2.111: Style, Folder, Item Limit, Mobile Settings
- There are five types of views like Standard View, Datasheet View, Calendar View, Gantt View, Access View, which user can create following the option Create view (
https://<site url>/_layouts/15/ViewType.aspx?List=**) and selecting the type of view user want to create out of those five view templates.
Content Types
Content Types are a reusable collection of columns or metadata. Once you enable Allow management of content types under the settings under Advanced Settings, you will notice the Content Type option added under Library settings, as seen in the following screenshot.

Figure 2.112: Content Types
Click on the Content Type (Document) you will see few columns as seen in the following screenshot:

Figure 2.113: Content Type Settings
You will see some columns are added under Columns in Library settings, as seen in Figure 2.114 below, which are due to the content type, which is added. That’s why we call this content type as reusable columns or metadata. If you add any column in content type, then the same column will be added to library columns:
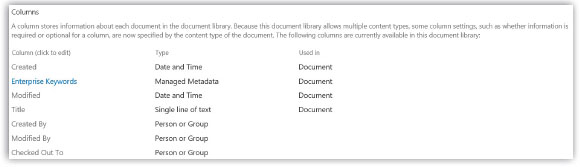
Figure 2.114: Columns
Navigate to the Site Settings (https://<site url>/_layouts/15/settings.aspx) and click on Site Content Types (https://<site url>/_layouts/15/mngctype.aspx) present under Web Designer Galleries, you will see all content types available at the site level which can be reused. Option to Create (https://<site url>/_layouts/15/ctypenew.aspx) new content type is also there to create as per your requirement as seen in the following screenshot:

Figure 2.115: Site Content Types
Enhanced Features in Quick Edit Mode
New features are rolling out by which user can edit properties of documents and list items once in the default form that’s too multiple items at a time. There will be an option Properties user will find in command bar.
Another feature will be rolled out after which user can open document library or list items within the view form under quick edit mode.
Another feature rolling out after which there will be an option New available in command bar to create a new list item in Quick Edit mode via the default form
Traditional column creation is replaced with an enhanced mode of column creation. Clicking on the plus sign during hover between two columns and selecting one type of column will display a dialog box at the right side to fill details for site column as shown in figure below.
During quick edit mode, selecting any column will add column in the list or library as shown in figure below.
Traditional hyper link column, date time column is replaced with an enhanced field in quick mode as shown in figure below.

Figure 2.116: Enhanced Column Rolled out
New features rolling out by which row height can be adjusted to either Fixed height, Autofit height. There will be some visual update which user will notice during hover of mouse also during selecting rows.
Conclusion
In this chapter, we discussed default contents in SharePoint once a site is created. Site features and site collection features activated by default after site creation based on the type of site user creating. We discussed the new smart features introduced for site content management and each option present under the library and list settings and its application. Next, in Chapter 3, Content Approval Concept will discuss what content approval is and how it works in SharePoint.
Points to Remember
- Limit for a number of list items by default is 30 million, and for the document, the library is also the same 30 million, which includes files and folders.
- The default file upload size limit is increased to 100 GB from 15 GB, and the limit for the file attached in the list is set as 250 MB; OneNote files upload size limit is 2 GB.
- If you are uploading files by drag and drop, limit the file selection as 100 at max.
- The limit for a number of characters, including path and file name length, should not cross 400 characters.
- Activating Site or Site Collection Features, add templates, more functionalities, and content types.
- There is no option Delete this document library under Library settings for the library Documents in the modern team site since it’s the default library, and many services are dependent on this.
- In this chapter, wherever its mentioned like this format
_layouts/15/****.aspx, means this section is added after the site URLhttp://<site url>/_layouts/15/****.aspx. - Regular changes are applied in Office 365 and SharePoint Online by which there may be changes happening in the template or some other features.