5
THE MASTER RECIPE
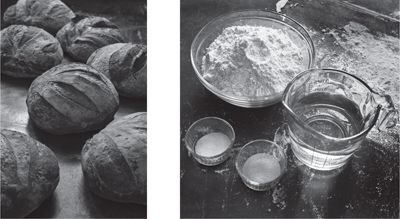
We chose an artisan free-form loaf that the French call a boule—pronounced “bool,” meaning “ball”—as the basic model for all the breads in this book (see color photo). You’ll learn a truly revolutionary approach to bread baking: Take the needed amount of pre-mixed dough from the refrigerator, shape it, leave it to rest, then pop it in the oven and let it bake while you’re preparing the rest of the meal.
The dough is made with nothing but all-purpose flour, yeast, salt, and water, and is the easiest to handle, shape, and bake. This white dough is used to make all of the recipes in Chapter 5; later chapters introduce other flours and flavors. You’ll learn how wet the dough needs to be (wet, but not so wet that the finished loaf won’t hold its shape), and how a “gluten cloak” substitutes for kneading. Wetter doughs encourage the development of sourdough character over two weeks of storage. And by omitting kneading, by mixing dough in bulk, and by storing and using it as it’s needed over time, you’ll truly be able to make this bread in five minutes a day (excluding resting and oven time).
You should become familiar with the following recipe before going through the rest of the book.
The Master Recipe: Boule (Artisan Free-Form Loaf)
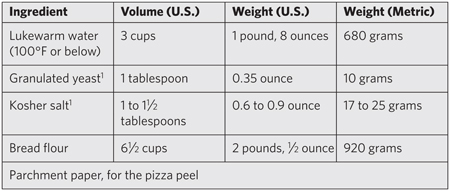
Makes four loaves, slightly less than 1 pound each. The recipe is easily doubled or halved.
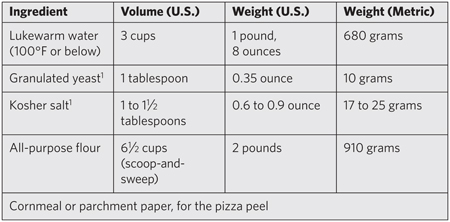
1Can decrease (see here and here)
Mixing and Storing the Dough
1. Warm the water slightly: It should feel just a little warmer than body temperature, about 100°F. By using warm water, the dough will rise to the right point for storage in about 2 hours. You can use cold water and get the same final result, but the first rising will take longer (see “Tips and Techniques,” here).
2. Add yeast and salt to the water in a 6-quart bowl or, preferably, in a lidded (not airtight) food container or food-grade plastic bucket. Don’t worry about getting it all to dissolve.
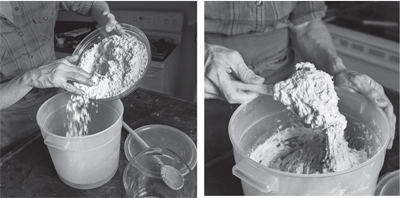
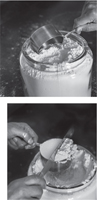
3. Mix in the flour—kneading is unnecessary: Add all of the flour at once, measuring it in with dry-ingredient measuring cups, or by weighing the ingredients. If you measure with cups, use the scoop-and-sweep method, gently scooping up flour, then sweeping the top level with a knife or spatula; don’t press down into the flour as you scoop or you’ll throw off the measurement by compressing. Mix with a wooden spoon or a heavy-duty stand mixer (with paddle) until the mixture is uniform. If you’re hand-mixing and it becomes too difficult to incorporate all the flour with the spoon, you can reach into your mixing vessel with very wet hands and press the mixture together. Don’t knead! It isn’t necessary. You’re finished when everything is uniformly moist, without dry patches. This step is done in a matter of minutes, and will yield a dough that is wet and loose enough to conform to the shape of its container.
The scoop-and-sweep method: It’s easier to scoop and sweep if you store your flour in a bin rather than the bag it’s sold in; it can be difficult to get the measuring cups into the bag without making a mess. Don’t use an extra-large, 2-cup-capacity measuring cup, which allows the flour to overpack and measures too much flour.
Other tools to use for the initial mixing: If you’re mixing by hand, a Danish dough whisk (here) is an effective alternative to a wooden spoon. It’s much stouter than a flimsy egg-beating whisk, and it incorporates the wet and dry ingredients in no time flat. Food processors also work well—just replace the standard blade with the dough attachment that comes with most machines. Make sure the machine is rated to handle dough—the motor must be heavy duty. You’ll also need the largest size made to mix a full batch—one with a 14-cup bowl. Make a half batch if your processor has a smaller bowl and stop the machine as soon as the ingredients are uniformly mixed (see Equipment, here).
4. Allow to rise: Cover with a lid that fits well to the container but can be cracked open so it’s not completely airtight—most plastic lids fit the bill. If you’re using a bowl, cover it loosely with plastic wrap. Towels don’t work—they stick to wet dough. Lidded (or even vented) plastic buckets are readily available (see here). Allow the mixture to rise at room temperature until it begins to collapse (or at least flattens on the top), about 2 hours, depending on the room’s temperature and the initial water temperature—then refrigerate it and use over the next fourteen days. If your container isn’t vented, allow gases to escape by leaving it open a crack for the first couple of days in the fridge—after that you can usually close it. If you forget about your rising dough on the counter, don’t worry: longer rising times at room temperature, even overnight, will not harm the result (though egg-enriched dough should go into the fridge after 2 hours). You can use a portion of the dough any time after the 2-hour rise. Fully refrigerated wet dough is less sticky and is easier to work with than dough at room temperature, so the first time you try our method, it’s best to refrigerate the dough overnight (or for at least 3 hours) before shaping a loaf. Once refrigerated, the dough will seem to have shrunk back upon itself and it will never rise again in the bucket—that’s normal. Whatever you do, do not punch down this dough. With our method, you’re trying to retain as much gas in the dough as possible, and punching it down knocks gas out and will make your loaves denser.
On Baking Day
5. The gluten cloak: Don’t knead, just “cloak” and shape a loaf in 20 to 40 seconds. (see sidebar). Prepare a pizza peel with cornmeal or parchment paper to prevent your loaf from sticking to it when you slide it into the oven (the parchment paper slides right onto the stone along with the loaf).
Relax. You don’t need to monitor doubling or tripling of volume as in traditional recipes.
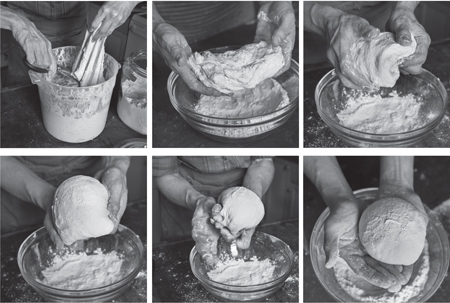
Dust the surface of your refrigerated dough with flour. Pull up and cut off a 1-pound (grapefruit-size) piece of dough, using a serrated knife or kitchen shears. Hold the dough and add more flour as needed so it won’t stick to your hands. Gently stretch the surface of the dough around to the bottom on all four sides, rotating the ball a quarter-turn as you go. Most of the dusting flour will fall off; it’s not intended to be incorporated into the dough. The bottom of the loaf may appear to be a collection of bunched ends, but it will flatten out and adhere during resting and baking. The correctly shaped loaf will be smooth and cohesive. The entire process should take no more than 20 to 40 seconds—don’t work the dough longer or your loaves may be dense.
What’s a “gluten cloak”? Just imagine a warm blanket being pulled around you on a cold night. Or, for the more technically inclined: What you are trying to do here is to add enough flour to the surface so it can be handled and the protein strands in the surface can be aligned, creating a resilient “cloak” around the mass of wet dough. Visualize a cloak being pulled around the dough, so that the entire ball is surrounded by a skin. Resist the temptation to get rid of all stickiness by incorporating flour. This could prevent the bread from developing a finished crumb with the typical artisanal “custard” (see here). See our YouTube channel for video of the gluten-cloak step (YouTube.com/BreadIn5).
Adjusting the Resting Time:
• Lengthen the resting time if your fridge or the room is particularly cold, if you’re making larger loaves, or if you just want to get a more open and airy crumb structure. You can go as long as 90 minutes for a 1-pound loaf. When increasing the resting time (especially in dry environments), cover the loaf with plastic wrap or a roomy overturned bowl—plastic wrap won’t stick if the surface is well dusted. Don’t use a damp towel—that will stick.
• Shorten the resting time by half if you’re using fresh, unrefrigerated dough.
6. Rest the loaf and let it rise on a pizza peel: Place the shaped ball on the prepared pizza peel, and allow it to rest for about 40 minutes. It doesn’t need to be covered during the rest period unless you’re extending the rest time to get a more “open” crumb (see sidebar and “Tips and Techniques,” here). You may not see much rise during this period; much more rising will occur during baking (oven spring).
Don’t have a pizza peel and baking stone? You can rest the formed loaf on a baking sheet prepared with oil, butter, parchment paper, or a silicone mat. Then just place the baking sheet on an oven rack when ready to bake.
7. Preheat a baking stone near the middle of the oven to 450°F, which takes about 20 to 30 minutes. (You may consider a longer preheat; see here). Place an empty metal broiler tray for holding water on any shelf that won’t interfere with rising bread. Never use a glass pan to catch water for steam—it’s likely to shatter.
8. Dust and slash: Dust the top of the loaf liberally with flour, which will prevent the knife from sticking. Slash a ½-inch-deep cross, scallop, or tic-tac-toe pattern into the top, using a serrated bread knife held perpendicular to the bread (see photos). Leave the flour in place for baking; tap some of it off before eating.
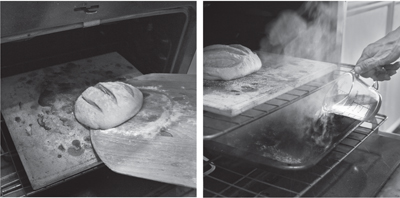
9. Baking with steam—slide the loaf onto the preheated stone: Place the tip of the peel a few inches beyond where you want the bread to land. Give the peel a few quick forward-and-back jiggles, and pull it sharply out from under the loaf. Quickly but carefully pour about 1 cup of hot water from the tap into the broiler tray and close the oven door to trap the steam (see here for steam alternatives). If you used parchment paper instead of cornmeal, pull it out from under the loaf after about 20 minutes for a crisper bottom crust. Bake for a total of about 30 to 35 minutes, or until the crust is richly browned and firm to the touch. Smaller or larger loaves will require adjustments in baking times (see here). Because the dough is wet, there is little risk of drying out the interior, despite the dark crust. When you remove the loaf from the oven, a perfectly baked loaf will audibly crackle, or “sing,” when initially exposed to room-temperature air. Allow to cool completely (up to 2 hours), preferably on a wire cooling rack, for best flavor, texture, and slicing. The crust may initially soften, but will firm up again when cooled. If you’re not getting the browning and crispness you want, test your oven temperature with an inexpensive oven thermometer (see here).
Instant-read thermometers: We’re not in love with internal-temperature food thermometers, usually sold as “instant-read” thermometers (as opposed to oven thermometers, which we love, see here). They have a pointed probe that you stick into the bread to see if it’s reached a target temperature. We find that the inexpensive ones (under $20) aren’t all that “instant,” which means that you’re never sure how long to wait before the read-out stabilizes. The truly instant (and accurate) digital units are much more expensive (but can still give misleading results if its probe isn’t well centered in the loaf). If you have confidence in your thermometer and your technique, here are some guidelines for fully baked bread:
• Lean dough (no eggs): 205°F to 210°F (96°C to 99°C)
• Egg-enriched dough, such as challah and brioche: 180°F to 185°F (82°C to 85°C)
10. Store the remaining dough in the refrigerator in your lidded or loosely plastic-wrapped container and use it over the next 14 days: You’ll find that even one day’s storage improves the flavor and texture of your bread. This maturation continues over the 14-day storage period. If you store your dough in your mixing container, you’ll avoid some cleanup. Cut off and shape more loaves as you need them. We often have several types of dough stored in our refrigerators at once. Lean doughs like this (those made without eggs, sweetener, or fat) can be frozen in 1-pound portions in an airtight container for up to 4 weeks and defrosted overnight in the refrigerator before use.
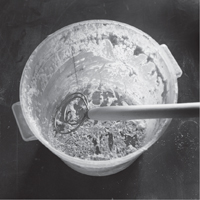
Lazy sourdough shortcut: When your dough bucket is finally empty, or nearly so, don’t wash it. Immediately remix another batch in the same container. In addition to saving the cleanup step, the aged dough stuck to the sides of the container will give your new batch a head start on sourdough flavor. Just scrape it down and it will hydrate and incorporate into the new dough. Don’t do this with egg- or dairy-enriched dough—with those, the container should be washed after each use.
You can take this even further by adding a more sizable amount of old dough from your last batch. You can use up to 2 cups; just mix it in with the water for your new batch and let it stand until it becomes soupy before you start mixing. An immersion blender is helpful for blending the old dough with water, but not required. Add the liquid to your dry ingredients as in the recipe. Professionals call this pâte fermentée (pot fair-mon-táy), which means nothing more than “fermented dough.” See safety note on immersion blenders (Equipment, here).
Amaze your friends with the “6-2-2-13” rule: If you want to store enough for seven to eight 1-pound loaves, here’s a simple mnemonic for the recipe: 6, 2, 2, and 13. Combine 6 cups water, 2 tablespoons salt*, and 2 tablespoons yeast; then mix in 13 cups of flour. Store in a 10- to 12-quart lidded container. That’s it. It will amaze your friends when you do this in their homes without a recipe—but tell them to buy this book anyway!
*Adjust to your taste, see Ingredients.
VARIATION: HERB BREAD
This simple recipe shows off the versatility of our approach. Herb-scented breads are great favorites for appetizers and snacks.
Follow the directions for mixing the Master Recipe and add 1 teaspoon dried thyme leaves (or 2 teaspoons fresh) and ½ teaspoon dried rosemary leaves (or 1 teaspoon fresh) to the water mixture. You can also use herbs with the other recipes in this chapter.

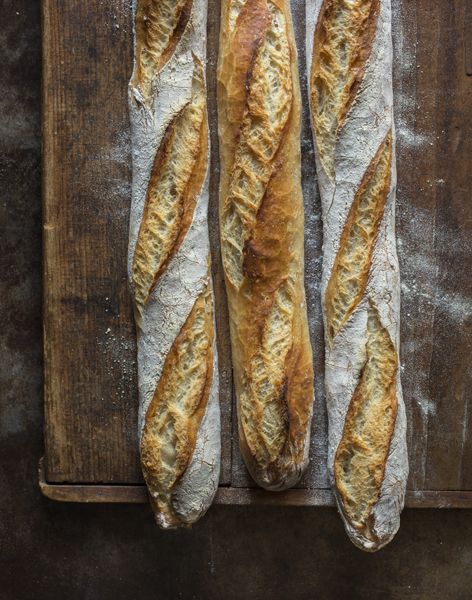
This is the quintessential thin and crusty loaf of France, served at every meal, and the symbol of an entire cuisine. Baguettes are defined as much by their crust as their crumb (interior); a crisp crust can make the loaf sensational (see color photo). Aside from the shaping, one important technique that differentiates the baguette from the boule in this chapter is that the baguette is not heavily dusted with flour, at least not traditionally. So, to keep the knife from sticking, brush water onto the surface of the loaf just before slashing. You’ll also notice that for this loaf we use flour rather than cornmeal on the pizza peel, since cornmeal would impart too strong a flavor to classic baguettes.
Traditional recipes for baguettes are high maintenance, so if you’ve done this the old-fashioned way, our approach should be a relief. A 20-minute rest after shaping is all that is needed to create this light and airy loaf. So our baguette is delicious, and very, very fast. With your fresh baguette, create a sensational meal by making the Aubergine Tartine here.
“On my honeymoon in France we survived on twenty-five dollars a day, and this included accommodations. Every morning we would go to the café for a baguette and café au lait. For lunch it was a tartine (here), and dinner was often the same with the addition of a bottle of wine and pastry to follow. We didn’t eat lavishly, but we ate well. The baguettes were essential. It’s hard to match that experience, but we’ve found we can come very close with this recipe.”—Zoë
Makes 1 baguette
½ pound (orange-size portion) Master Recipe dough (here)
All-purpose flour, for dusting
Whole-wheat flour or parchment paper, for the pizza peel
1. Preheat a baking stone near the middle of the oven to 450°F (20 to 30 minutes), with an empty broiler tray on any shelf that won’t interfere with rising bread.
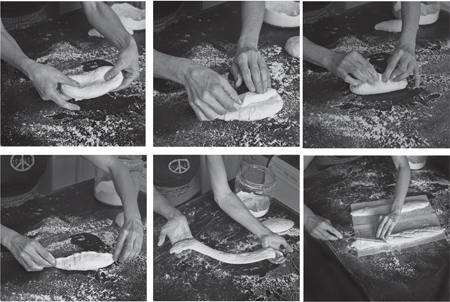
2. Dust the surface of the refrigerated dough with flour and cut off a ½-pound (orange-size) piece. Dust with more flour and quickly shape it into a ball by stretching the surface of the dough around to the bottom on all four sides, rotating the ball a quarter-turn as you go. Once it’s cohesive, begin to stretch and elongate the dough, dusting with additional flour as necessary. You may find it helpful to roll it back and forth with your hands on a flour-dusted surface. Form a cylinder approximately 1½ inches in diameter. Place the loaf on a pizza peel covered with whole wheat flour or parchment paper and allow to rest for 20 minutes (for professional shaping tips, see here).
3. After the dough has rested, paint the loaf with water, using a pastry brush. Slash the loaf with longitudinal cuts that move diagonally across the loaf, using a serrated bread knife (see photo).
4. Slide the loaf directly onto the hot stone. Pour 1 cup of hot water into the broiler tray and quickly close the oven door (see here for steam alternatives). Bake for about 25 minutes, or until deeply browned and firm to the touch.
5. Allow to cool on a rack before cutting or eating.
Fashion a perfect taper with the letter-fold technique: Our simple stretch-and-roll method will give you a decent baguette, but you might not get the skinny taper of a professional baguette. Here’s a more polished method—if you perfect this, yours will look just like the ones in the bakery window. In addition to using it for skinny baguettes, you can use the letter-fold to get professional tapered ends with your basic oval loaves, such as the Bâtard (here) or Deli-Style Rye Bread (here). Here’s what you do:
1. Gently stretch the dough into a ½-inch-thick oval. Fold in one of the long sides and gently press it into the center, taking care not to compress the dough too much.
2. Bring up the other side to the center and pinch the seam closed. This letter-fold technique puts less dough on the ends—that’s what gives you the nice taper.
3. Stretch very gently into a log, working the dough until you have a thin baguette. Again, try not to compress the air out of the dough. If the dough resists pulling, let it rest for 5 to 10 minutes to relax the gluten, then continue to stretch—don’t fight the dough. You can continue to stretch lengthwise during the 20-minute rest, until you achieve the desired thin result, about 1½ inches wide.
Aubergine Tartine (oh-ber-jean tar-teen)
This open-faced sandwich is a more sophisticated vegetarian cousin to our Croque Monsieur (here), with smoky grilled eggplant (aubergine) and roasted red pepper on a freshly baked baguette (here), topped with spicy greens and soft, ripe cheese.
Makes 2 open-faced baguette sandwiches; serves 2 to 4
Two ½-inch-thick slices of eggplant, cut lengthwise
Olive oil, for brushing the eggplant
Salt and freshly ground black pepper, to taste
½ red bell pepper, seeds and ribs removed
½ baguette (see here)
2 roasted garlic cloves (see sidebar)
1 dozen arugula leaves
3 ounces soft, ripened cheese, such as Brie or Camembert, sliced
1. Preheat a gas or charcoal grill, or a broiler. Brush the eggplant slices with olive oil. Sprinkle with salt and pepper and grill over a medium gas flame or charcoal, or under a broiler, until browned and soft but not overcooked, approximately 5 minutes on each side.
2. Flatten the half bell pepper, making additional cuts as needed to get it flat. Grill or broil the pepper under the broiler or on a gas or charcoal grill, keeping the skin side closest to the heat source. Check often and remove when the skin is blackened, 8 to 10 minutes. Drop the roasted pieces into an empty bowl and cover the bowl. As they steam, the skin will loosen over the next 10 minutes. Gently hand-peel the pepper and discard the blackened skin. Some dark bits will adhere to the pepper’s flesh, which is not a problem. Cut the roasted pepper into thin strips.
To roast the garlic cloves: Wrap, unpeeled, in aluminum foil and bake for 30 minutes at 400°F. Allow to cool and cut across the top of each clove. Squeeze out the soft roasted garlic pulp. You can even do this with an entire head of garlic.
3. Split the baguette lengthwise, spread it open, and tear out some of the inside. Smear roasted garlic over the cut surfaces. Top each half with the eggplant, red pepper strips, and arugula.
4. Top with the cheese and broil for 3 to 4 minutes until the cheese is melted, taking care not to burn the baguettes.
The bâtard, a short and wide French loaf with pointed ends, is more suitable to use for sandwiches than a baguette—it cuts into ample round slices that can accommodate sandwich fillings. You get more of the mellow-sweet crumb and less of the crispy caramelized crust. If you like, you can make the bâtard almost as wide as a sandwich loaf, but traditionally it is about 3 inches across at its widest point. Like a baguette, the bâtard is tapered to a point at each end. For a more perfectly shaped bâtard, you can use the letter-fold technique (see box, here), just don’t make it quite so skinny.
Makes 1 bâtard
1 pound (grapefruit-size portion) Master Recipe dough (here)
All-purpose flour, for dusting
Cornmeal or parchment paper, for the pizza peel
1. Follow steps 1 and 2 for the baguette here, but shape the loaf to a diameter of about 3 inches.
2. When forming the loaf on the floured surface, concentrate pressure at the ends to form the bâtard’s traditional taper.
3. Follow steps 3 through 5 for the baguette, but increase the resting time to 40 minutes, and the baking time to 30 minutes, or until deeply brown.
Ciabatta (cha-báh-tah)
The word ciabatta is Italian for slipper, and refers to the shape of the bread, which is halfway between a flatbread and a loaf. It’s made from very wet dough, and shaped as an elongated oval or rectangle—perhaps you have slippers shaped like this? (See color photo.) To achieve the very moist crumb, shape the loaf with wet hands rather than dusting with flour. The bread will be chewy and moist, with large and appealing air holes, especially if you used longer-aged dough. Ciabatta is baked without cornmeal on the bottom, so dust the pizza peel with an ample coating of white flour instead. And, since white flour is a less efficient “stick-preventer” than cornmeal, you may need to nudge the loaf off the peel with a steel dough scraper or spatula (or use parchment paper).
Makes 1 ciabatta
1 pound (grapefruit-size portion) Master Recipe dough (here)
All-purpose flour for dusting
White flour or parchment paper, for the pizza peel
1. Cut off a 1-pound (grapefruit-size) piece of refrigerated dough without dusting the surface with flour; wet hands will help prevent sticking. Using your wet hands, shape the dough into a ball by stretching the surface of the dough around to the bottom on all four sides, rotating the ball a quarter-turn as you go. With your wet fingers, flatten the ball into an elongated oval about ¾ inch thick. If you make it much thinner, it may puff like pita bread, which isn’t desirable here.
2. Preheat a baking stone near the middle of the oven to 450°F (20 to 30 minutes), with an empty metal broiler tray on any shelf that won’t interfere with rising bread.
3. Place the loaf on a flour-covered pizza peel and allow to rest for 20 minutes (increase to 40 minutes if you’re not getting the large hole-structure you want). Dust the top with flour, but don’t slash the loaf.
4. Slide the loaf directly onto the hot stone, using a steel dough scraper or spatula to nudge it off if it sticks (this won’t be necessary if you’re using parchment paper; just slide off onto the stone, paper and all). Pour 1 cup of hot water into the broiler tray and quickly close the oven door (see here for steam alternatives). If you notice puffing through the oven door, poke the air bubbles with a long-handled fork. Bake for 20 to 25 minutes until deeply brown.
5. Allow to cool on a rack before cutting or eating.

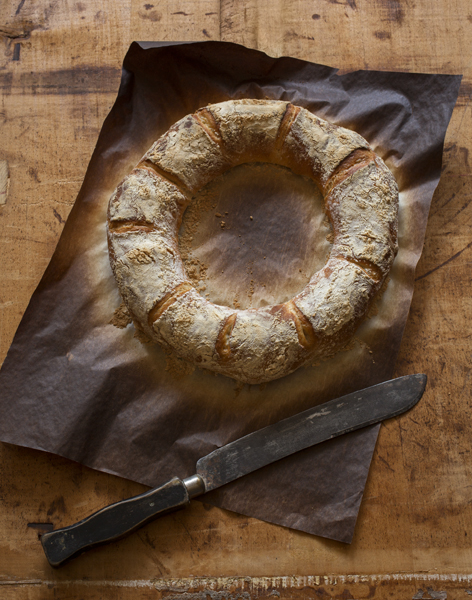
Couronne (cor-ówn)
This ring, or crown-shaped French loaf, is a specialty of Lyon. The couronne is quite simple to shape and is a beautiful, crustier alternative to the classic boule (see color photo).
Makes 1 couronne
1 pound (grapefruit-size portion) Master Recipe dough (here)
All-purpose flour, for dusting
Whole-wheat flour, cornmeal, or parchment paper, for the pizza peel
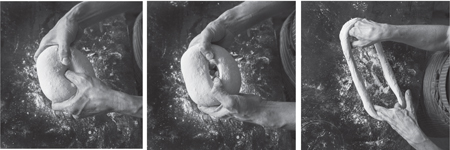
1. Dust the surface of the refrigerated dough with flour and cut off a 1-pound (grapefruit-size) piece. Dust the piece with more flour and quickly shape it into a ball by stretching the surface of the dough around to the bottom on all four sides, rotating the ball a quarter-turn as you go. When a cohesive ball has formed, poke your thumbs through the center of the ball and gradually stretch the hole so that it is about three times as wide as the wall of the ring; otherwise the hole will close up during baking.
2. Place the loaf on a pizza peel covered with flour, cornmeal, or parchment paper and allow to rest for 20 minutes.
3. Preheat a baking stone near the middle of the oven to 450°F (20 to 30 minutes), with an empty metal broiler tray on any shelf that won’t interfere with the rising bread.
4. Dust the couronne with flour and slash radially, like spokes in a wheel (see color photo).
5. Slide the loaf directly onto the hot stone. Pour 1 cup of hot water into the broiler tray and quickly close the oven door (see here for steam alternatives). Bake for about 25 to 30 minutes, or until deeply browned and firm. Smaller or larger loaves will require adjustments in baking time.
6. Allow the bread to cool before cutting or eating.
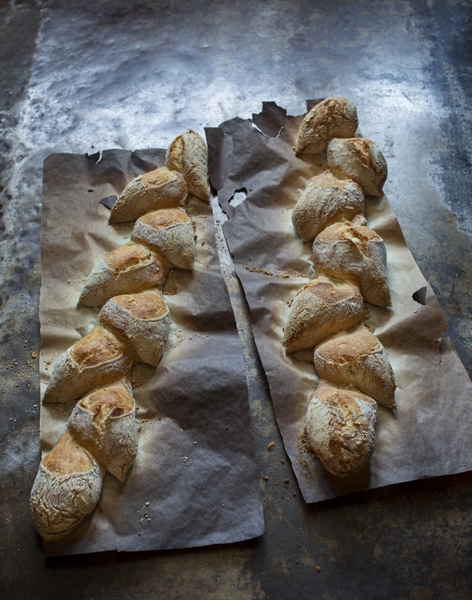
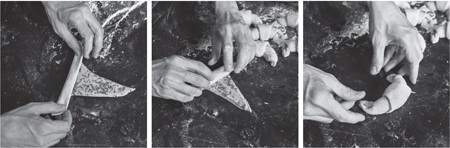
Pain d’Epí—Wheat Stalk Bread (pan deh-peé)
Fancifully shaped like a stalk of wheat with individual “grains,” the pain d’epí is a simple yet impressive bread to present to guests (see color photo). To preserve the shape of those wheat grains, we call for bread flour, which makes a stiffer dough. If you don’t have bread flour, you can use all-purpose, but increase it to 7 cups. You can make pain d’epí with many of our other doughs, but the illusion of the wheat grains won’t be so well-defined.
“I first ate pain d’epí when vacationing in the South of France. Maman, our adopted grandmother and host, had it delivered fresh every morning. I’d walk through a yard filled with fruit and herb trees to a special bread basket that hung next to the mailbox. I’d pick up this freshly baked wheat stalk and have to pinch myself to make sure it wasn’t a dream. The bread was impossibly light, crisp, and absolutely perfect with coffee and jam in the morning, or with Maman’s fish stew for dinner. It was heaven!”—Zoë
Makes seven ½-pound loaves. The recipe is easily doubled or halved.
1Can decrease (see here and here)
1. Mixing and storing the dough: Mix the yeast and salt with the water in a 6-quart bowl or a lidded (not airtight) food container.
2. Mix in the flour without kneading, using a spoon or a heavy-duty stand mixer (with paddle). If you’re not using a machine, you may need to use wet hands to incorporate the last bit of flour.
3. Cover (not airtight) and allow to rest at room temperature until the dough rises and collapses (or flattens on top), approximately 2 hours.
4. The dough can be used immediately after initial rise, though it is easier to handle when cold. Refrigerate the container of dough and use over the next 14 days.
5. Preheat a baking stone near the middle of the oven to 450°F (20 to 30 minutes), with an empty metal broiler tray on any shelf that won’t interfere with rising bread.
6. Dust the surface of the refrigerated dough with flour and cut off a ½-pound (orange-size) piece. Dust with more flour and quickly shape it into a ball by stretching the surface of the dough around to the bottom on all four sides, rotating the ball a quarter-turn as you go.
7. Using the letter-fold technique (see box, here), form a slender baguette.
8. Lay the baguette on the edge of a prepared pizza peel. For this loaf, parchment paper is preferred because it will allow sliding it into the oven without distortion or sticking. Allow to rest for 20 minutes.
9. Dust the surface of the loaf with flour. Using kitchen shears and starting at one end of the loaf, cut into the dough at a very shallow angle. If you cut too vertically, the “wheat grains” won’t be as pointy. Cut with a single snip to within ¼ inch of the work surface, but be careful not to cut all the way through the loaf or you’ll have separate rolls (see photo).
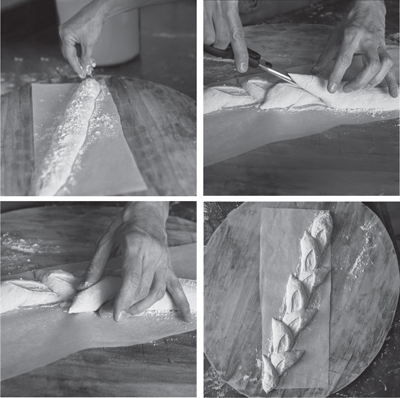
10. As you cut, lay each piece over to one side. Continue to cut in this fashion until you’ve reached the end of the stalk (see photo).
11. Slide the loaf directly onto the hot stone. Pour 1 cup of hot water into the broiler tray and quickly close the oven door (see here for steam alternatives). Bake for about 25 minutes or until richly browned and firm.
12. Allow to cool on a rack before eating.
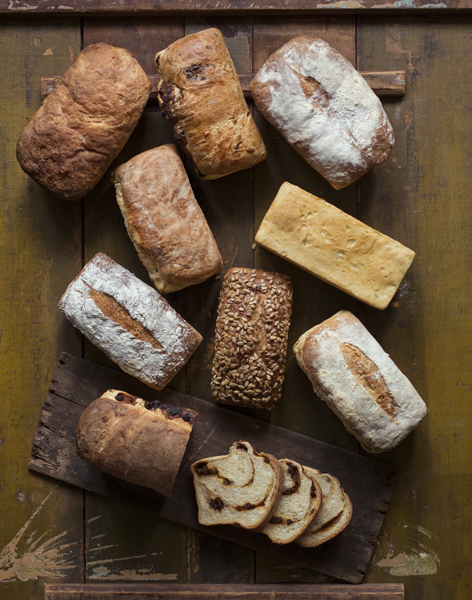
This loaf is nothing like commercial white bread, that impossibly soft stuff best used for wadding up and tossing across lunchrooms. The crust is firm if not actually crackling. If you’re looking for a flavorful, soft-crusted, and buttery loaf, try Soft American-Style White Bread (here) or Buttermilk Bread (here). The stored dough adds sourdough complexity to a traditionally plain recipe, and the steam adds crackle and caramelization to the crust. And loaf breads can be as artfully beautiful as free-form ones (see color photo).
This variation will give you some experience baking high-moisture dough in a loaf pan. Nonstick pans release more easily, but you can use a traditional loaf pan if it’s heavy gauge and you grease it well; otherwise the loaf is likely to stick.
Makes 1 loaf
2 pounds (large cantaloupe-size portion) Master Recipe dough (here)
Oil, for greasing the pan
1. Dust the surface of the refrigerated dough with flour and cut off a 2-pound (large cantaloupe-size) piece. Dust with more flour and quickly shape it into a ball by stretching the surface of the dough around to the bottom on all four sides, rotating the ball a quarter-turn as you go. Lightly grease an 8½ × 4½-inch nonstick loaf pan with oil (grease heavily if you’re not using a nonstick pan).
You don’t absolutely have to slash breads baked in a pan: A loaf pan or a close-fitting cast-iron pot will prevent shape problems. The top crust may crack open randomly but it won’t be misshapen.
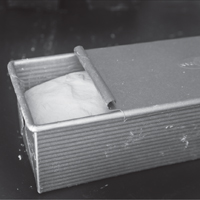
2. Elongate the ball into an oval and drop it into the prepared pan.
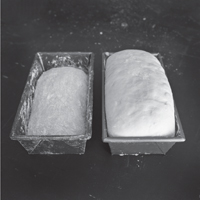
3. Cover with plastic wrap and allow to rest for 90 minutes (here). Dust with flour and slash the top crust with a serrated bread knife.
4. Preheat the oven to 450°F (20 to 30 minutes), with an empty metal broiler tray on any shelf that won’t interfere with rising bread. A baking stone is not required, and omitting it shortens the preheat.
5. Place the loaf on a rack in the center of the oven. Pour 1 cup of hot water into the broiler tray and quickly close the oven door. Bake for about 45 minutes, or until brown and firm.
6. Remove the loaf from the pan and allow to cool completely on a rack before slicing; otherwise you won’t get well-cut slices. If the loaf sticks, wait 10 minutes and it will steam itself out of the pan.
Croque Monsieur, the classic Parisian street snack, is a hearty and simple sandwich. Start with freshly baked sandwich bread, slather it with Dijon mayonnaise, add some Gruyère cheese and ham, and then grill it in butter. Serve it with a glass of light red wine and a salad for a little bit of heaven. See the panini variation below for the Italian version.
Makes 1 sandwich
1½ tablespoons mayonnaise
2 teaspoons whole-grain Dijon mustard
2 slices sandwich loaf bread (here)
1 teaspoon unsalted butter, plus more if needed
1½ ounces Gruyère cheese, grated
2 ounces ham, thinly sliced
1. Blend together the mayonnaise and mustard; set aside.
2. Butter one side of each slice of bread, and spread the other side with the mustard-mayonnaise mixture. Place one slice of bread, buttered side down, in a skillet.
3. Cover with half the cheese, then the ham. Finish with the remaining half of the cheese and second slice of bread, buttered side up.
4. Place the skillet over medium-low heat and grill the sandwich slowly for approximately 4 minutes per side, or until browned and crisp. Add additional butter to the pan if needed.
VARIATION: PANINI
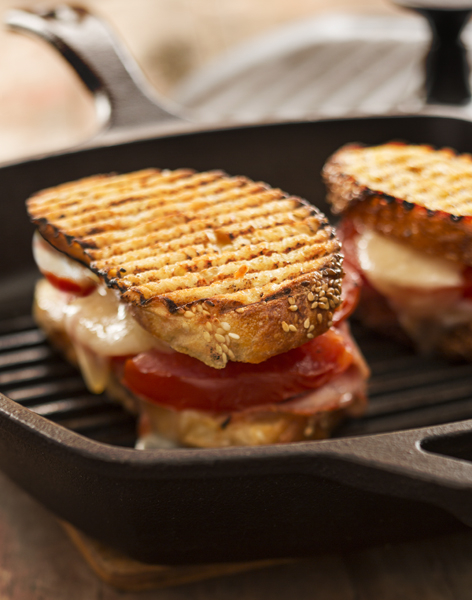
Panini (singular panino) are the Italian cousins to the French croque monsieur. Rather than flipping them in a buttered skillet, make them in a panini press prepared with olive oil. The press can be either automatic-electric or old-fashioned cast-iron (on the stovetop). Either way, you have two hot surfaces that grill the top and bottom of the sandwich simultaneously, compress it thin, and create mouthwatering caramelization in the form of beautiful sear marks (see color photo).
Health enthusiasts will appreciate the olive oil, but this is no dry toast—it’s a decadent Italian treat. We’ve found that enriched breads (see here) tend to stick to the panini press, but otherwise, anything goes. A large pita (here) works nicely too; cut it into wedges after grilling to serve four. If you have an electric press, just follow the manufacturer’s instructions for use, using olive oil rather than butter. If you love old-fashioned manual kitchen equipment, try the Lodge or Le Creuset cast-iron grill pans with matching panini press (see Sources).
1. Preheat the top and bottom surfaces of the panini press for 5 minutes over medium heat on the stovetop if you’re using a manual press; otherwise follow the preheat instructions for your electric press.
2. During the preheat, slice your sandwich bread thinly (or slit a pita). Fill with slices of cheese and whatever meat, vegetable, or other fillings you are using. Place a slice of cheese next to the bread on both sides, and don’t overstuff.
3. Stack the sandwich together and brush both sides with olive oil.
4. Once the press is hot, quickly rub both grill surfaces with olive oil, using a paper towel. Work quickly or the oil will smoke. Put the sandwich into the pan, cover with the panini press, and firmly press down.
5. Grill the sandwich over medium heat for 3 to 4 minutes, adjusting the heat as needed. If your manual press wasn’t well preheated, you may need to flip the sandwich and grill for another 2 to 3 minutes (try to match up the grill marks).
6. Serve when appetizing grill marks have appeared and cheese is melted.
If you’re finding it difficult to achieve prominent grill marks, consider using very little oil, or (in a well-seasoned pan) none at all. The grill marks will be impressive, and if you want the richness of the usual panini, you can brush olive oil onto the sandwich after the grilling is complete.
VARIATIONS:
Meat filling ideas: prosciutto, mortadella, soppressata, pancetta. Precook by searing, if raw.
Vegetable filling ideas: roasted red peppers, artichoke hearts, grilled asparagus
Cheeses: fresh mozzarella, provolone, Swiss, and ripened cheeses, such as Camembert and Brie
Crock Pot Bread (Fast Bread in a Slow Cooker)
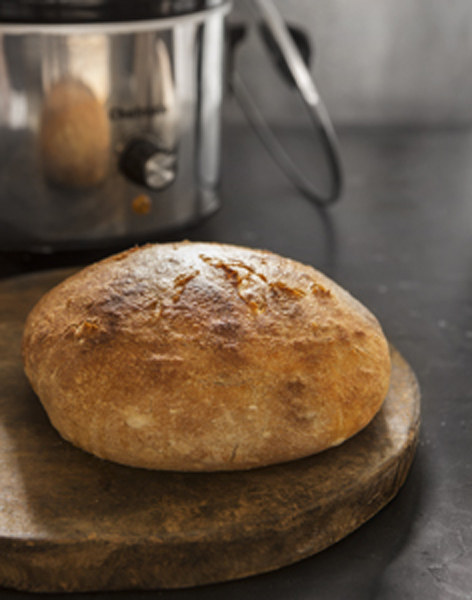
Everyone loves crock pots, bubbling away with Swedish meatballs, no-peek chicken, or chili. Over the years we’ve had requests for a method for baking our dough in one. Bread in a crock pot? We had our doubts, lots of them. We didn’t think a slow cooker could get hot enough; thought it would take too long; didn’t think it would bake through or have a nice crust. So we resisted trying it, convinced it would fail. Oh, how wrong we were (see color photo). The crock pot does indeed get hot enough, and it takes less time than using your oven because the rising time is included in the baking. Straight out of the pot, the crust is soft and quite pale, but just a few minutes under the broiler and you have a gorgeous loaf. In the summer there is no need to heat up the oven to get great bread, and at the holidays it is a perfect way to free up much needed oven space. You could even amaze your friends at work by baking a loaf under your desk.
Makes 1 loaf
1 pound (grapefruit-size portion) Master Recipe dough (here)
All-purpose flour, for dusting
Parchment paper, for baking
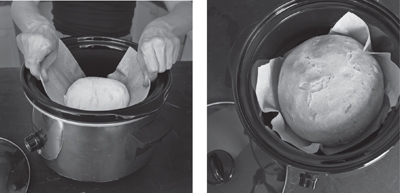
1. On baking day, dust the surface of the refrigerated dough with flour and cut off a 1-pound (grapefruit-size) piece. Dust with more flour and quickly shape it into a ball by stretching the surface of the dough around to the bottom on all four sides, rotating the ball a quarter-turn as you go.
2. Lower the dough into a 4-quart crock pot or other slow cooker. Be sure to follow the manufacturer’s instructions for proper use.
3. Turn the temperature to high and put on the cover. (Not all crock pots behave the same, so you should keep an eye on the loaf after about 45 minutes to make sure it is not overbrowning on the bottom or not browning at all. You may need to adjust the time according to your appliance.)
Check with your crock pot’s manufacturer before trying this: Some models’ instructions specify that the crock pot has to be at least partially filled with a liquid to avoid safety or durability problems. And never bake bread in a crock pot unattended.
4. Bake for 1 hour (this will depend on your crock pot, you may need to increase or decrease the time). To check for doneness, it should feel firm when you gently poke the top of the loaf.
5. The bottom crust should be nice and crisp, but the top of the loaf will be quite soft. Some folks desire a softer crust, so they’ll love this loaf. But if you want a darker or crisper crust …
6. Remove the parchment paper and place the bread under the broiler for 5 minutes or until it is the color you like, with the rack positioned in the middle of the oven.
7. Let the loaf cool completely before slicing. Cutting into a hot loaf is tempting, but it won’t slice well and may seem underbaked if you break into it before it’s cooled.
Pullman Sandwich Loaf
The beauty of a Pullman loaf is its perfectly square slices. The dough is baked in a pan with a lid, so it is forced into a neat and clean shape. This uniform style of loaf was developed by the Pullman company (of railroad car fame) to be baked in its compact kitchens and stacked in as little space as possible. It makes a great sandwich loaf or picture-perfect toast. Any of our bread doughs will work in this pan, but some rise more than others, so you may have to adjust the amounts.
Makes 1 loaf
2½ pounds (extra-large cantaloupe-size portion) Master Recipe dough (here)
Oil or unsalted butter, for greasing the pan
1. On baking day, grease a 9 × 4 × 4-inch nonstick Pullman loaf pan, including the lid, with butter or oil. Dust the surface of the refrigerated dough with flour and cut off a 2½-pound (large cantaloupe-size) piece. Dust with more flour and quickly shape it into a ball by stretching the surface of the dough around to the bottom on all four sides, rotating the ball a quarter-turn as you go.
2. Elongate the ball into an oval and drop it into the prepared pan. You want to fill the pan about three-quarters full, then cover the pan with the lid.
3. Allow the dough to rest for 1 hour and 45 minutes (see sidebar).
4. Preheat the oven to 450°F. A baking stone is not required, and omitting it shortens the preheat.
5. Place the loaf on a rack near the center of the oven. Bake for about 45 minutes, remove the lid, and bake for an additional 10 minutes.
6. Remove the loaf from the pan and allow to cool completely on a rack before slicing; otherwise you won’t get well-cut sandwich slices. If the loaf sticks, wait 10 minutes and it will steam itself out of the pan.
Soft Dinner Rolls, Brötchen, Baguette Buns, Cloverleaf Rolls, and Rosemary Crescents
Rolls are a delight to bake and adorable to look at (see color photo). They’re small, so they need very little resting time before they go into the oven. And they don’t have to cool completely like larger loaves do—it’s okay to eat them slightly warm. You can make any of the following recipes with the Master Recipe, or try these easy shapes with other lean doughs, or even the enriched challah (here) or brioche (here) doughs, which yield softer rolls. Be sure to decrease the oven temperature to 350°F when using egg-enriched dough, and increase baking time about 25 percent.
Makes five 3-ounce rolls
1 pound (grapefruit-size portion) Master Recipe dough (here) or Egg-White–Enriched Brötchen dough (see sidebar)
All-purpose flour, for dusting
Egg white, for glazing brötchen
Melted unsalted butter or oil, for brushing dinner rolls
Unsalted butter, oil, or parchment paper, for the baking sheet
Soft Dinner Rolls
1. Preheat a baking stone near the middle of the oven to 450°F (20 to 30 minutes).
2. Cut off 3-ounce (small peach-size) pieces of Master Recipe dough and quickly shape into balls. Allow to rest, 2 inches apart, on a baking sheet lined with parchment paper or a silicone mat for 20 minutes.
3. Cut a cross into the top of each roll, using a serrated knife or kitchen shears and keeping the shears perpendicular to the work surface when you cut.
4. Brush the tops with melted butter or oil and place the baking sheet in the oven. Bake for about 25 minutes, or until richly browned.
5. For the softest result, brush with more butter or oil. Serve slightly warm.
To make soft pull-apart rolls: Cut off a 1-pound (grapefruit-size) piece of challah (here), brioche (here), or buttermilk bread dough (here), then divide the dough into 8 pieces and quickly shape them into balls. Place the dough balls in a greased 8 × 8-inch baking dish; they should be touching. Rest for 30 minutes. Preheat the oven to 350°F. Brush the tops of the rolls with melted butter before and after they go into the oven. Bake for about 30 minutes, or until golden brown. Serve slightly warm.
Brötchen (bro-chin)
On our website, people asked for German-style hard rolls, so we’ve included the most common: brötchen (German for “little bread”). They’re traditionally made from dough enriched with egg whites, and then brushed with more egg white before baking at high temperature with steam. The egg white creates an incredible crust and crumb—see the sidebar (here) for an easy variation that turns the Master Recipe into brötchen dough for superb hard rolls.
1. Preheat the oven to 450°F, with an empty metal broiler tray on any shelf that won’t interfere with the rising brötchen.
2. Cut off 3-ounce (small peach-size) pieces of Egg White–Enriched Dough for Brötchen (see here) and quickly shape into balls, then pinch to form an oval shape. Allow to rest, 2 inches apart, on a baking sheet prepared with oil, butter, parchment paper, or a silicone mat for 20 minutes.
Egg White–Enriched Dough for Brötchen: Put 3 egg whites into the bottom of a measuring cup, then add water to bring the total volume to 3 cups of liquid in the Master Recipe (here). All other ingredient measurements are the same. Refrigerate for up to 5 days before freezing in 1-pound portions. This dough is great for brötchen but you can use it for other rolls or bread as well.
3. Brush the tops with egg white and cut a single lengthwise slash into the top of each roll, using a serrated knife.
4. Place baking sheet in the oven, pour 1 cup of hot water into the broiler tray, and quickly close the oven door. Bake the rolls for about 25 minutes, or until richly browned. Serve slightly warm.
Baguette Buns
1. Preheat a baking stone near the middle of the oven to 450°F (20 to 30 minutes), with an empty metal broiler tray on any other shelf.
2. Form a ½-pound baguette (see here) on a work surface; this will make about 6 buns. Using a dough scraper or a knife, make angled parallel cuts about 2 inches apart along the length of the baguette to form rolls. Allow them to rest, 2 inches apart, on a baking sheet prepared with butter, oil, parchment paper, or a silicone mat for 20 minutes.
3. Place baking sheet in the oven, pour 1 cup of hot water into the broiler tray, and quickly close the oven door. Bake the rolls for about 25 minutes, or until richly browned. Serve slightly warm.
Cloverleaf Buns
1. Preheat a baking stone near the middle of the oven to 450°F (20 to 30 minutes), with an empty metal broiler tray on any other shelf. Grease a muffin pan.
2. Cut off 3-ounce (small peach-size) pieces of dough. Cut each of these pieces into 4 smaller pieces. Shape each one into a smooth ball. Put the 4 balls together to form the cloverleaf and place in a cup of the prepared muffin pan. Continue with the remaining dough. Allow to rest for 30 minutes.
3. Slide the muffin pan into the oven, pour 1 cup of hot water into the broiler tray, and quickly close the oven door. Bake for about 25 minutes, or until richly browned. Serve slightly warm.
Rosemary Crescent Rolls
½ pound (orange-size portion) Master Recipe dough (here)
3 tablespoons olive oil
½ teaspoon kosher salt
2 tablespoons finely chopped fresh rosemary or other herbs
1. Prepare a baking sheet with parchment paper or a silicone mat.
2. Dust the surface of the refrigerated dough with flour and cut off a ½-pound (orange-size portion). Dust with more flour and quickly shape it into a ball by stretching the surface of the dough around to the bottom on all four sides, rotating the ball a quarter-turn as you go. With a rolling pin, roll out dough into a 1⁄8-inch-thick round. As you roll out the dough, use enough flour to prevent it from sticking to the work surface but not so much as to make the dough dry.
3. Spread 2 tablespoons of the olive oil over the dough and then sprinkle evenly with the salt and rosemary. Using a pizza cutter or a sharp knife, cut the dough into 8 equal-sized wedges, like a pizza.
4. Starting at the wider end, roll each wedge until the point is tucked securely under the bottom. Bend the ends in slightly to create the crescent shape. Brush the tops with the remaining olive oil and cover loosely with plastic wrap. Allow to rest about 40 minutes.
5. Preheat the oven to 450°F. A baking stone is not required, and omitting it shortens the preheat.
6. Bake about 25 minutes, until golden brown and well set in center.
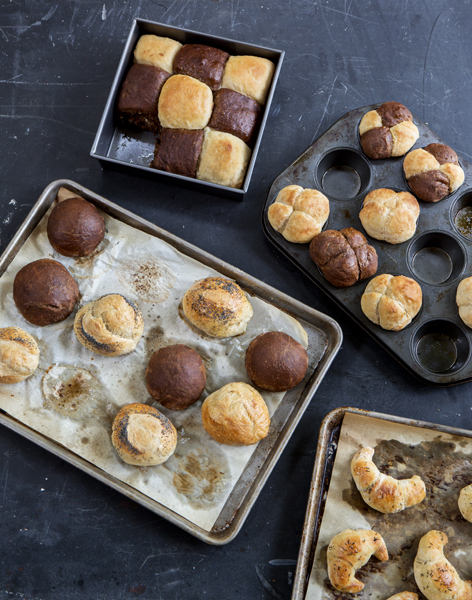
Rolls, clockwise from top: Pull-apart, Cloverleaf, Rosemary Crescent, Brötchen (see here)
Visit BreadIn5.com, where you’ll find recipes, photos, videos, and instructional material.