6
PEASANT LOAVES
The term “peasant bread” has come to mean the rougher, more rustic loaf that originated in the European countryside during the Middle Ages. These are breads made with whole-grain flours that, once upon a time, fell out of fashion with sophisticated European urbanites. How times have changed; since the 1980s, rustic breads have signaled sophistication just as surely as a perfect French baguette. Thank goodness we’ve come to realize the wonderful and complex flavors to be had by adding whole grains and rye to our bread.
Rye flour creates the tangy, slightly nutty fragrance and flavor that is basic to many of these breads, whether or not it’s blended with whole wheat or other grains. Even if rye flour is not sold as “whole grain,” it has more fiber (from rye bran) than white flours. The proteins and starches in rye flour, plus the extra boost of rye bran, mean that these breads have a substantial, chewy texture.
The round, whole-grain, country-style loaves of rural France (pain de campagne) and Italy (pane rustica) were once viewed as too rustic for stylish European tables—white flour was once an almost-unattainable luxury. Today people from all walks of life enjoy the crackling crust and moist chewy crumb that define this peasant bread.
We live in the upper Midwest, and in the wintertime we dream of Mediterranean vacations. The next best thing to being there is mixing up a batch of this bread and serving it with anchovies, a strong cheese, and a hearty fish soup with lots of garlic and fresh herbs (see here). On the next day, cut up the leftovers for Tuscan Bread Salad (here).
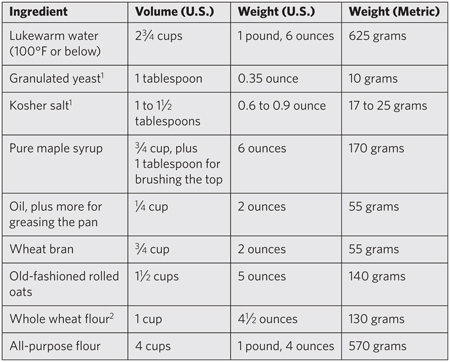
Makes four loaves, slightly less than 1 pound each. The recipe is easily doubled or halved.
1Can decrease (see here and here)
2Can substitute white whole wheat (see here)
1. Mixing and storing the dough: Mix the yeast and salt with the water in a 6-quart bowl or a lidded (not airtight) food container.
2. Mix in the remaining ingredients without kneading, using a spoon or a heavy-duty stand mixer (with paddle). If you’re not using a machine, you may need to use wet hands to incorporate the last bit of flour.
3. Cover (not airtight) and allow to rest at room temperature until the dough rises and collapses (or flattens on top), approximately 2 hours.
4. The dough can be used immediately after the initial rise, though it is easier to handle when cold. Refrigerate the container of dough and use over the next 14 days.
5. On baking day, dust the surface of the refrigerated dough with flour and cut off a 1-pound (grapefruit-size) piece. Dust with more flour and quickly shape it into a ball by stretching the surface of the dough around to the bottom on all four sides, rotating the ball a quarter-turn as you go. Allow to rest and rise on a pizza peel prepared with cornmeal or parchment paper for 40 minutes (see sidebar).
Make a Bread Bowl: Bake up a fresh loaf of bread, wait for it to cool, then scoop out the center, keeping the sides about an inch thick, to form a bowl (save the scraps for bread salad or pudding—see here and here). Then you are ready to fill the hollowed bread with your favorite stew or dip. Make sure your filling is thick enough that it won’t make the bread too soggy, but the bowl should absorb some of the chili or artichoke dip and become part of the meal—the soaked bread is the best part.
6. Preheat a baking stone near the middle of the oven to 450°F (20 to 30 minutes), with an empty metal broiler tray on any shelf that won’t interfere with rising bread.
7. Sprinkle liberally with flour and slash the top, about ½ inch deep, using a serrated bread knife (see photos).
8. Slide the loaf directly onto the hot stone. Pour 1 cup of hot water into the broiler tray and quickly close the oven door (see here for steam alternatives). Bake for about 35 minutes, or until richly browned and firm. Smaller or larger loaves will require adjustments in resting and baking time.
9. Allow to cool on a rack before slicing and eating.
Tuscan Bread Salad (Panzanella)
Even great bread goes stale; here’s a delicious way to use it. European Peasant Bread is our first choice for panzanella, but other unsweetened breads will also work well. This salad is a masterpiece when made with tomatoes at the peak of the summer season. If you grow your own, here’s your chance to let them shine. If you want to turn this into a complete meal, add cannellini or Great Northern beans, or even sliced prosciutto ham.
Makes 4 servings
The Salad
10 slices stale bread (1 to 3 days old), cubed
3 medium tomatoes, cubed
1 medium cucumber, sliced
1 very small red onion, thinly sliced
1 teaspoon capers, drained
¼ cup pitted black olives, halved
2 anchovy fillets, chopped (optional)
15 fresh basil leaves, coarsely chopped
1 tablespoon coarsely grated Parmigiano-Reggiano cheese
¾ cup cooked or canned cannellini or Great Northern beans (optional)
3 ounces sliced prosciutto ham (optional)
The Dressing
1⁄3 cup olive oil
3 teaspoons red wine vinegar
1 garlic clove, finely minced
Salt and freshly ground black pepper (don’t be stingy)
1. Prepare the salad ingredients and combine in a large bowl.
2. In a small bowl, whisk all the dressing ingredients until well blended.
3. Toss the dressing with the salad, and allow to stand for at least 10 minutes, or until the bread has softened.
This savory bread pudding reminds us of quiche, but is so much easier to make. Take your favorite loaf of bread, anything from a crusty boule to a soft brioche, soak it in a rich, savory custard, and layer it with caramelized onions, spinach, and cheese. It makes a simply elegant breakfast or side dish.
Makes 8 servings
1 pound day-old bread, cubed
5 large eggs
4 cups whole milk
2 cups half-and-half
Pinch of freshly grated nutmeg
½ teaspoon salt
Freshly ground black pepper
½ teaspoon dried thyme
½ cup chèvre and/or cream cheese, cut into small pieces
½ cup caramelized onions (see here)
¾ cup chopped spinach, fresh or frozen, thawed and well drained
1 cup shredded cheddar, Swiss, Gruyère, or other firm cheese
1. Preheat the oven to 325°F.
2. In a large mixing bowl, whisk together the eggs, milk, half-and-half, nutmeg, salt, pepper, and thyme until well combined.
3. Arrange the bread cubes in an 8 × 12 × 2-inch baking dish. Sprinkle the chèvre, cream cheese, onions, and spinach over the bread, then top with the shredded cheese. Pour the custard slowly over the bread; let sit about 15 minutes. You may have to press the bread into the custard to make sure it’s all soaked.
4. Tent loosely with aluminum foil, and poke a few holes in the top to allow steam to escape. Place on the center rack. Bake for 1 hour, or until the center is just firm.
5. Remove from the oven and allow to stand for 10 minutes. Serve warm.
Pan Bagna (Provençal Tuna and Vegetable Sandwich)
This sandwich loaf is a specialty of Provence, where it’s a time-honored way for families to use day-old country bread. Pan bagna (pan ban-ya) literally translated from the Provençal dialect means “bathed bread.” The sandwich is similar to the New Orleans muffuletta, which is based on cold cuts rather than tuna steak (see variation below). In New Orleans, they use a concoction called “olive salad” rather than sliced olives, and you’ll never find arugula on a traditional muffuletta.
You’ll have an easier time making pan bagna if you shape a slightly flattened boule, rather than a high-domed one.
Makes 4 sandwich wedges
1-pound loaf European Peasant Bread (here), or Boule (here) dough
4 tablespoons olive oil
1 small garlic clove
1 tablespoon red wine vinegar
Salt and freshly ground black pepper
¼ pound soft goat cheese (chèvre)
6 Mediterranean-style olives, pitted and sliced
1 cup arugula leaves, rinsed and well dried
6 ounces cooked fresh tuna steak, thinly sliced, or substitute canned tuna in a pinch
3 small tomatoes, thinly sliced
10 large, fresh basil leaves, stacked, rolled, and cut crosswise into a chiffonade
1. Slice the bread in half horizontally and slightly hollow out the top and the bottom. Make fresh bread crumbs out of the discarded centers and reserve for another use. Drizzle the cut surface of the halves with 1½ tablespoons of the oil.
2. In a blender, combine the remaining 2½ tablespoons oil with the garlic, vinegar, and salt to taste. Blend until smooth.
3. Spread the goat cheese on the bottom shell, top it with the olives and arugula, and season with salt and pepper to taste. Drizzle with one-third of the dressing, top with the tuna, season with salt and pepper to taste. Drizzle half of the remaining dressing over the tuna, top the tuna with the tomatoes and basil, and season with salt and pepper to taste. Drizzle with the remaining dressing, and cover with the top of the loaf.
4. Wrap the sandwich in plastic wrap, place it on a plate, and cover it with another plate with approximately 1 to 2 pounds of weight on top. Refrigerate for 1 hour, if possible (or eat right away if you can’t wait). The sandwich may be made up to 6 hours in advance and kept covered and chilled.
5. Cut the pan bagna into 2-inch slices, and serve.
VARIATION: MUFFULETTA
Make a New Orleans muffuletta sandwich by substituting sliced ham, salami, and mortadella for the tuna steak; provolone for the goat cheese; and lettuce for the arugula and basil leaves. In New Orleans, locals use a regional product called “olive salad” in place of the sliced olives.
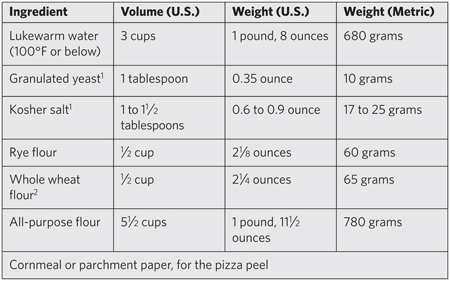
This bread is associated with the countries of the Mediterranean, especially Italy and France, where the olives are abundant and have incredible flavor (see color photo). Use the best-quality olives you can find; the wetter Kalamata variety work as well as the dry Niçoise type, so it’s your choice. The rich salty flavors of the olives make this a perfect accompaniment to cheeses, pasta tossed with fresh tomatoes, or our Tuscan White Bean Dip (here).
This recipe is a great showcase for the versatility of our basic doughs—the recipe introduces a technique that shows how you can roll flavorful ingredients into a single loaf if you want to introduce some zest. But if you want a whole batch of olive dough, just mix a cup of halved olives into the initial mix of any of the doughs that we list.
Makes 1 loaf
1 pound (grapefruit-size portion) Master Recipe (here), European Peasant Bread (here), Olive Oil (here), Light Whole Wheat (here), or Italian Semolina (here) dough
¼ cup high-quality olives, pitted and halved
Cornmeal or parchment paper, for the pizza peel
Cornstarch wash (see sidebar) or water, for brushing the loaf
Cornstarch Wash: Using a fork, blend ½ teaspoon cornstarch with a small amount of water to form a paste. Add ½ cup water and whisk with a fork. Microwave or boil until the mixture appears glassy, about 30 to 60 seconds on high. It will keep in the refrigerator for 2 weeks.
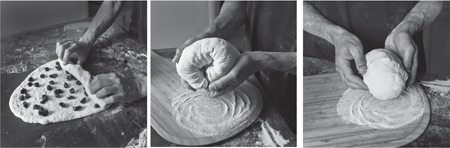
1. Dust the surface of the refrigerated dough with flour and cut off a 1-pound (grapefruit-size) piece. Using your hands and a rolling pin, flatten the dough to a thickness of ½ inch. Cover with the olives and roll up to seal inside the dough. Crimp the ends shut and tuck them under to form an oval loaf. Cover with plastic wrap or an overturned bowl and allow to rest for 90 minutes on a pizza peel prepared with cornmeal or parchment paper (see sidebar).
2. Preheat a baking stone near the middle of the oven to 450°F (20 to 30 minutes), with an empty metal broiler tray on any shelf that won’t interfere with rising bread.
3. Paint the surface of the loaf with cornstarch wash or water, and slash the top, about ½ inch deep, using a serrated bread knife (see photos).
4. Slide the loaf directly onto the hot stone. Pour 1 cup of hot water into the broiler tray and quickly close the oven door (see here for steam alternatives). Bake for about 35 minutes, or until the top crust is richly browned and firm. Smaller or larger loaves will require adjustments in resting and baking time.
5. Allow to cool on a rack before slicing and eating.
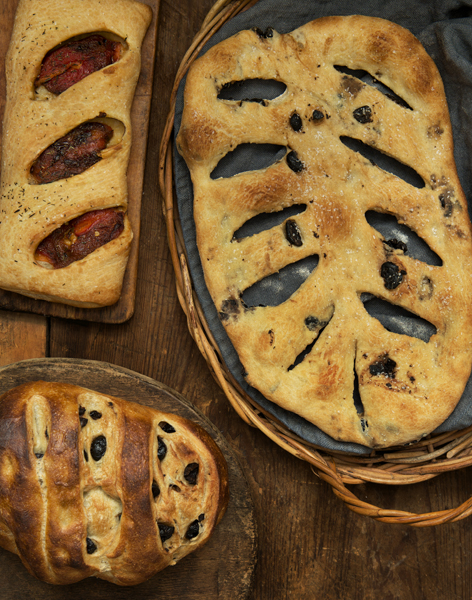
From top left, Fougasse with Roasted Red Pepper (see here), Olive Fougasse (see here), and Olive Bread (see here)
We created this dip in the spirit of simplifying our lives and eating foods with rich, wonderful flavors. Simply puree beans with the aromatics and spread it over our Olive Bread (here) to make a delicious rustic hors d’oeuvre.
It’s probably easier to find dried Great Northern white beans than the more authentic cannellini beans, so go with whatever you can find. And if you don’t have time to roast the garlic, raw is fine, though it will have a stronger kick. Jarred roasted red peppers can be substituted, but the flavor is less intense.
Makes about 2 cups dip
1 cup dried Great Northern or cannellini beans (or one 16-ounce can, drained)
1 large roasted garlic clove (see sidebar)
2 tablespoons olive oil
1 teaspoon salt
Freshly ground black pepper
10 fresh basil leaves
1 small red bell pepper, roasted and peeled (see step 2)
1. Pick over the dried beans for stones, dirt, and debris. Rinse, drain, and then cover with water and soak overnight. Bring to a simmer and cook for 2 to 3 hours until soft, adding water as needed to keep the beans covered. Drain and reserve about 2 cups of the cooking liquid (though you probably won’t need all of it). If using canned beans, discard the canning liquid and use plain water later in the recipe.
2. Peel the roasted garlic and place it in the food processor along with the cooked beans, olive oil, salt, and black pepper to taste. Process until smooth, adding some of the reserved cooking liquid or water until you achieve a medium consistency.
3. Add the basil and roasted red pepper and pulse until coarsely chopped; taste and adjust seasonings as needed.
4. Refrigerate and serve with Olive Bread (here), European Peasant Bread (here), or a Baguette (here).
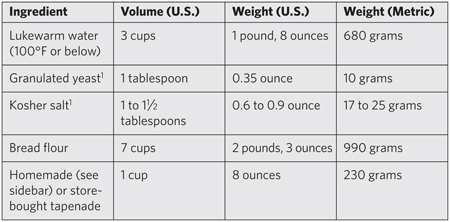
We enjoy tapenade, the delightful spread made from olives, anchovies, and capers. This recipe was originally developed with store-bought tapenade, but then we started making our own. It is easy and has a freshness that the commercial product can’t match. But if you have a jar of great tapenade on hand, by all means use it. This bread is great with cheeses or grilled with tomato, basil, and garlic into mouthwatering Bruschetta (here).
Makes four 1-pound loaves. The recipe is easily doubled or halved.
1Can decrease (see here and here)
1. Mixing and storing the dough: Mix the yeast and salt with the water in a 6-quart bowl or a lidded (not airtight) food container.
2. Mix in the remaining ingredients without kneading, using a spoon or a heavy-duty stand mixer (with paddle). If you’re not using a machine, you may need to use wet hands to incorporate the last bit of flour.
3. Cover (not airtight) and allow to rest at room temperature until the dough rises and collapses (or flattens on top), approximately 2 hours.
Making your own tapenade: In a food processor, coarsely chop ½ pound pitted black olives, 4 teaspoons drained capers, 4 anchovy fillets, 1 garlic clove, pressed through or very finely chopped, ¼ teaspoon dried thyme, and ¼ cup olive oil.
4. The dough can be used immediately after the initial rise, though it is easier to handle when cold. Refrigerate the container of dough and use over the next 7 days.
5. On baking day, dust the surface of the refrigerated dough with flour and cut off a 1-pound (grapefruit-size) piece. Dust the piece with more flour and quickly shape it into a ball by stretching the surface of the dough around to the bottom on all four sides, rotating the ball a quarter-turn as you go. Allow to rest and rise on a pizza peel prepared with cornmeal or parchment paper for 1 hour (see sidebar).
6. Preheat a baking stone near the middle of the oven to 450°F (20 to 30 minutes), with an empty metal broiler tray on any shelf that won’t interfere with rising bread.
7. Sprinkle the loaf liberally with flour and slash the top, about ½-inch deep, using a serrated bread knife (see photos).
8. Slide the loaf directly onto the hot stone. Pour 1 cup of hot water into the broiler tray and quickly close the oven door (see here for steam alternatives). Bake 35 to 40 minutes until deeply browned and firm. Smaller or larger loaves will require adjustments in baking time.
9. Allow to cool on a rack before slicing and eating.
Here’s one more way to use stale bread, which, like Tuscan Bread Salad (here), comes from Italy. The Italians continually rearrange and reconstruct a limited number of delicious ingredients: bread, tomato, garlic, olive oil, and herbs. Every family seems to have its own take on the combo.
“This was first made for me by my friend Marco, who was a visiting student from Livorno, Italy. He wanted to show off his family specialties, so he made a pasta dish with Parmigiano-Reggiano that he’d carried from Italy in his luggage, and to accompany it, this simple but memorable bruschetta.”—Jeff
Makes 4 bruschetti
4 thick slices of day-old Boule (here), European Peasant Bread (here), Tapenade Bread (here), or other non-enriched bread
1 garlic clove, halved
¼ cup seeded and chopped tomato, well drained
8 torn or chopped fresh basil leaves
Coarse salt
4 teaspoons olive oil
1. Preheat the oven to 400°F. Meanwhile, toast or grill the bread slices until crisp and browned.
2. Rub the crisped bread on both sides with the garlic, grating the garlic down into the toasted bread. Rub as much or as little as you like.
3. Place the bruschetti on a baking sheet and top with the tomato, basil, and a sprinkling of coarse salt. Finish with a liberal drizzling of olive oil; about a teaspoon per slice.
4. Bake for about 5 minutes, or until hot. Serve as an appetizer.
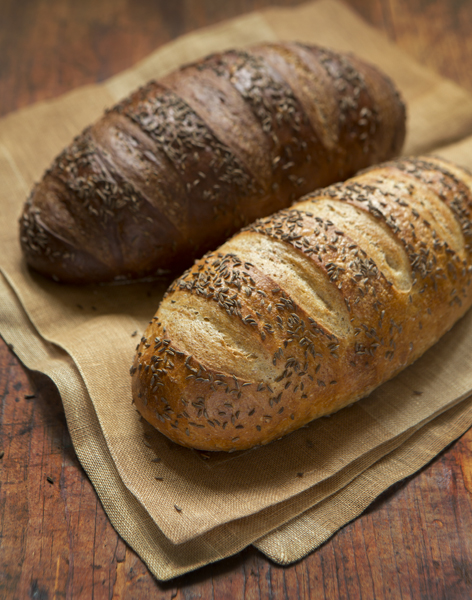
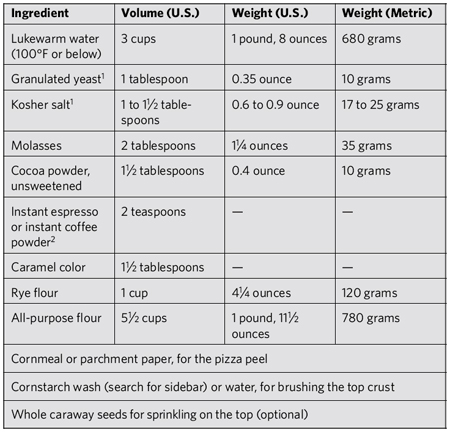
This loaf, our version of a classic sourdough rye, started Jeff’s twenty-five-year obsession with bread baking (see color photo). The recipe produces a traditional rye comparable to those made with complicated starters—the kind that need to be “fed,” incubated, and kept alive in your refrigerator. It’s terrific on day one of the batch, but will be even better on day two or three. Along with the caraway seeds, which are part of the classic flavor, what sets this rye apart from other rustic breads is that there is no flour on the top crust; instead it’s glazed with a cornstarch wash, which serves the triple function of anchoring the caraway seeds, allowing the slashing knife to pass easily without sticking, and adding flavor and color to the crust. If you’re pressed for time, you can use plain water.
“My grandmother truly did believe that this rye was better than cake. It turns out that elder immigrants from all over Europe felt the same way about ‘a good piece of bread.’ Friends of Dutch and Scandinavian heritage also recall older relatives shunning ordinary desserts in favor of extraordinary bread.”—Jeff
Makes four loaves, slightly less than 1 pound each. The recipe is easily doubled or halved.
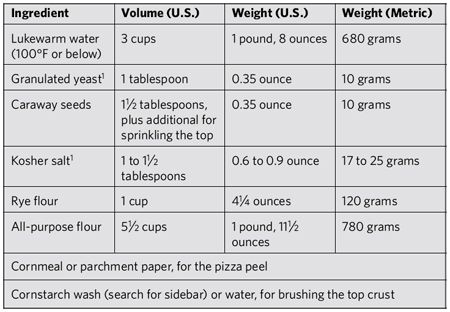
1Can decrease (see here and here)
1. Mixing and storing the dough: Mix the yeast, salt, and caraway seeds with the water in a 6-quart bowl or a lidded (not airtight) food container.
2. Mix in the flours without kneading, using a spoon or a heavy-duty stand mixer (with paddle). If you’re not using a machine, you may need to use wet hands to incorporate the last bit of flour.
3. Cover (not airtight) and allow to rest at room temperature until the dough rises and collapses (or flattens on top), approximately 2 hours.
4. The dough can be used immediately after the initial rise, though it is easier to handle when cold. Refrigerate the container of dough and use over the next 14 days.
5. On baking day, dust the surface of the refrigerated dough with flour and cut off a 1-pound (grapefruit-size) piece. Dust the piece with more flour and quickly shape it into a ball by stretching the surface of the dough around to the bottom on all four sides, rotating the ball a quarter-turn as you go. Elongate the ball to form an oval loaf—do it roughly or use the letter-fold technique (see sidebar). Allow to rest and rise on a pizza peel prepared with cornmeal or parchment paper for 40 minutes (see sidebar).
6. Preheat a baking stone near the middle of the oven to 450°F (20 to 30 minutes), with an empty metal broiler tray on any shelf that won’t interfere with rising bread.
7. Using a pastry brush, paint the top crust with cornstarch wash or water and then sprinkle with additional caraway seeds. Slash with ½-inch-deep, parallel cuts across the loaf, using a serrated bread knife.
8. Slide the loaf directly onto the hot stone. Pour 1 cup of hot water into the broiler tray and quickly close the oven door (see here for steam alternatives). Bake for about 30 to 35 minutes until deeply browned and firm. Smaller or larger loaves will require adjustments in baking time.
9. Allow to cool on a rack before slicing and eating.
VARIATION: SAUERKRAUT RYE
Add 1 cup (5 ounces/140 grams) well-drained sauerkraut to the initial mix, decrease the water by 3 tablespoons, and don’t store the dough longer than 7 days. Decrease the salt if you’re sensitive to it as sauerkraut is already salty. If you don’t want to commit to a whole batch of sauerkraut dough, roll in ¼ cup of well-drained sauerkraut to each loaf as it is being formed from plain rye dough (see here for roll-in technique). If you use the roll-in technique, allow a 90-minute resting time after shaping, and cover with plastic wrap or an overturned bowl. Bake for about 35 minutes.
Pumpernickel (see here) and Deli-Style Rye (see here)
Reuben Sandwich
This sandwich is the king of the American delicatessen: home-baked rye or pumpernickel bread (here and here) grilled in butter, dripping with rich cheese and Russian dressing, and piled high with corned beef. It towers above the common sandwich. But Reuben’s no snob—cold beer (or a Dr. Brown’s cream soda) is the perfect accompaniment. The Reuben also works well when made as a panino (see here).
Makes 1 sandwich
1 teaspoon unsalted butter, plus more if needed
2 slices rye or pumpernickel bread
2 teaspoons Russian dressing
1 ounce thinly sliced Swiss or Emmenthaler cheese
2 ounces thinly sliced corned beef
2 tablespoons sauerkraut, well drained
1. Butter 1 side of each slice of bread. Place 1 slice of bread, buttered side down, in a skillet. Spread 1 teaspoon of Russian dressing on the face-up side of the bread.
2. Cover with half the cheese, the corned beef, and then the sauerkraut. Finish with the remaining half of the cheese.
3. Spread the remaining Russian dressing on the dry side of the second slice of bread to complete the sandwich.
4. Place the skillet over medium-low heat and grill slowly for about 4 minutes per side, or until browned and crisp. Add additional butter to the pan if needed.
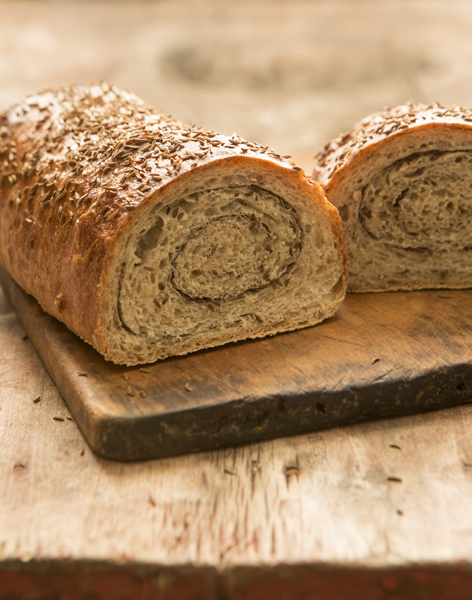
An extra jolt of caraway is swirled through this rye bread, producing a beautiful and flavorful crunch (see color photo).
Makes 1 loaf
1 pound (grapefruit-size portion) Deli-Style Rye dough (here)
2 tablespoons caraway seeds, plus more for sprinkling on the top
Cornmeal or parchment paper, for the pizza peel
Cornstarch wash (see sidebar) or water, for brushing the top crust
1. Dust the surface of the refrigerated dough with flour and cut off a 1-pound (grapefruit-size) piece. Dust the piece with more flour and quickly shape it into a ball by stretching the surface of the dough around to the bottom on all four sides, rotating the ball a quarter-turn as you go. Using your hands and a rolling pin, flatten the ball into a ½-inch-thick oval (avoid using too much flour here or you might get dry patches in the caraway swirl).
2. Sprinkle the dough with caraway seeds. The amount can vary according to your taste; reserve some for the top crust. Roll up the dough like a jelly roll, forming an oval loaf. Be sure that the end of the roll is at the bottom of the loaf, and allow to rest on a pizza peel prepared with cornmeal or parchment paper for 90 minutes.
3. Preheat a baking stone near the middle of the oven to 450°F (20 to 30 minutes), with an empty metal broiler tray on any shelf that won’t interfere with rising bread.
4. Using a pastry brush, paint the top crust with the cornstarch wash or water and then sprinkle with the additional caraway seeds. Slash with ½-inch-deep, parallel cuts across the loaf, using a serrated bread knife.
5. Slide the loaf directly onto the hot stone. Pour 1 cup of hot water into the broiler tray and quickly close the oven door (see here for steam alternatives). Bake for 30 to 35 minutes until deeply browned and firm. Smaller or larger loaves will require adjustments in baking time.
6. Allow to cool before slicing and eating.
Onion Rye
The homey, comforting flavor of sautéed onion is one of life’s simplest and most satisfying pleasures, especially when combined with hearty rye bread. Be sure to brown the onion to achieve the caramelization that makes this bread so savory. This recipe can be made with or without caraway seeds. Ordinary yellow or white onions work well and are readily available, but Vidalia or red varieties produce a milder onion flavor that some may prefer.
Makes 1 loaf
1 pound (grapefruit-size portion) Deli-Style Rye (here) or Pumpernickel (here) dough
1 medium onion, halved and thinly sliced
Vegetable oil, for sautéing the onions
Cornmeal or parchment paper, for the pizza peel
Cornstarch wash (see sidebar) or water, for brushing the top crust
1. Sauté the sliced onion in the oil over medium heat in a skillet for 10 minutes, or until brown and nicely caramelized.
2. Dust the surface of the refrigerated dough with flour and cut off a 1-pound (grapefruit-size) piece. Dust with more flour and quickly shape it into a ball by stretching the surface of the dough around to the bottom on all four sides, rotating the ball a quarter-turn as you go. Flatten the ball into a ½-inch-thick oval either with your hands or a rolling pin (avoid using much extra flour here or you might get dry patches).
3. Spread the surface of the flattened loaf with a thin layer of the browned onion. Then roll up the dough from the short end like a jelly roll. Pinch the ends and tuck under to form an oval loaf. Cover with plastic wrap or an overturned bowl and allow to rest for 90 minutes on a pizza peel prepared with cornmeal or parchment paper (see sidebar).
4. Preheat a baking stone near the middle of the oven to 450°F (20 to 30 minutes), with an empty metal broiler tray on any shelf that won’t interfere with rising bread.
5. Using a pastry brush, paint the top crust with cornstarch wash or water. Slash with ½-inch-deep, parallel cuts across the loaf, using a serrated bread knife.
6. Slide the loaf directly onto the hot stone. Pour 1 cup of hot water into the broiler tray and quickly close the oven door (see here for steam alternatives). Bake for 30 to 35 minutes until richly browned and firm. Smaller or larger loaves will require adjustments in baking time.
7. Allow to cool on a rack before slicing and eating.
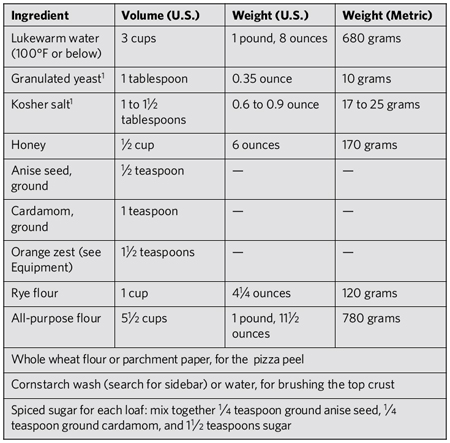
Limpa
Here’s a five-minute version of the traditional Swedish rye bread. Honey and orange zest mingle with the more exotic flavors of anise and cardamom to make a flavorful and fragrant treat. Make two loaves—the first loaf will go quickly, and you can use the second one for bread pudding (here).
Makes four 1-pound loaves. The recipe is easily doubled or halved.
1Can decrease (see here and here)
1. Mixing and storing the dough: Mix the yeast, salt, honey, spices, and orange zest with the water in a 6-quart bowl or a lidded (not airtight) food container.
2. Mix in the remaining dry ingredients without kneading, using a spoon or a heavy-duty stand mixer (with paddle). If you’re not using a machine, you may need to use wet hands to incorporate the last bit of flour.
3. Cover (not airtight) and allow to rest at room temperature until the dough rises and collapses (or flattens on top), approximately 2 hours.
4. The dough can be used immediately after the initial rise, though it is easier to handle when cold. Refrigerate the container of dough and use over the next 7 days.
5. On baking day, dust the surface of the refrigerated dough with flour and cut off a 1-pound (grapefruit-size) piece. Dust the piece with more flour and quickly shape it into a ball by stretching the surface of the dough around to the bottom on all four sides, rotating the ball a quarter-turn as you go. Allow to rest and rise on a pizza peel prepared with whole wheat or parchment paper for 40 minutes (see sidebar).
6. Preheat a baking stone near the middle of the oven to 375°F (20 to 30 minutes), with an empty metal broiler tray on any shelf that won’t interfere with rising bread.
7. Using a pastry brush, paint the top crust with cornstarch wash or water, then slash the top, about ½ inch deep, using a serrated bread knife. Sprinkle with the spiced-sugar mixture.
8. Slide the loaf directly onto the hot stone. Pour 1 cup of hot water into the broiler tray and quickly close the oven door (see here for steam alternatives). Bake for about 40 to 45 minutes, or until golden brown and firm. Smaller or larger loaves will require adjustments in baking time. Due to the honey in the recipe, the crust on this bread will not be hard and crackling.
9. Allow to cool on a rack before slicing and eating.
Pumpernickel bread is really just a variety of rye bread (see color photo). What darkens the loaf and accounts for its mildly bitter but appealing flavor is powdered caramel coloring, cocoa, molasses, and coffee, not the flour. The caramel color is actually a natural ingredient made by overheating sugar until it is completely caramelized (available as a powder from King Arthur Flour, see Sources, or see the sidebar, to make your own liquid version). Traditional recipes use pumpernickel flour (a coarse rye with a lot of rye bran), but this grain doesn’t do well in our recipes because it absorbs water unpredictably. Since it’s really the caramel, coffee, and chocolate that give pumpernickel its unique flavor and color, we successfully created a pumpernickel bread without pumpernickel flour.
This bread is associated with Russia and caviar. Or just pile on the pastrami and corned beef.
Makes four loaves, slightly less than 1 pound each. The recipe is easily doubled or halved.
Altus, literally translated means “the old stuff”: Many traditional pumpernickel recipes call for the addition of altus, which is stale rye or pumpernickel bread crumbs, soaked in water and blended into the dough. If you want to find a use for some stale rye or pumpernickel bread, you can experiment with this approach, which some say adds moisture and flavor to many traditional rye breads. Add about a cup of altus to the liquid ingredients before the flours. Adjust the flour to end up with dough of your usual consistency.
1Can decrease (see here and here)
2Can substitute brewed coffee for 2 cups of the water, keeping total volume at 3 cups
1. Mixing and storing the dough: Mix the yeast, salt, molasses, cocoa, espresso powder, and caramel color with the water in a 6-quart bowl or a lidded (not airtight) food container.
2. Mix in the flours without kneading, using a spoon or a heavy-duty stand mixer (with paddle). If you’re not using a machine, you may need to use wet hands to incorporate the last bit of flour.
3. Cover (not airtight) and allow to rest at room temperature until the dough rises and collapses (or flattens on top), approximately 2 hours.
4. The dough can be used immediately after the initial rise, though it is easier to handle when cold. Refrigerate the container of dough and use over the next 8 days.
5. On baking day, cut off a 1-pound (grapefruit-size) piece of dough. Using wet hands (don’t use flour), quickly shape the dough into a ball by stretching the surface of the dough around to the bottom on all four sides, rotating the ball a quarter-turn as you go. Then form an oval-shaped loaf. Allow to rest and rise on a pizza peel prepared with cornmeal or parchment paper for 40 minutes (see sidebar).
Make your own caramel color: Caramel color can be made at home, but as a liquid rather than a powder. Put 3 tablespoons sugar and 1 tablespoon water into a saucepan. Over low heat, melt the sugar, then increase the heat to medium-high, cover, and bring to a boil for 2 minutes. Add a pinch of cream of tartar and continue to boil, uncovered, until the mixture becomes very dark. It will start to smoke at this point. Remove from heat and allow to cool partially. Very carefully, add ¼ cup of boiling water to the pan to dissolve the caramelized sugar (it may sputter and water may jump out of the pan, so wear gloves and be sure to shield your face). Cool to room temperature and use about ¼ cup of this mixture in place of the 1½ tablespoons of commercial caramel color powder in our Pumpernickel Bread (decrease the water in your initial mix by ¼ cup).
6. Preheat a baking stone near the middle of the oven to 400°F (20 to 30 minutes), with an empty metal broiler tray on any shelf that won’t interfere with rising bread.
7. Using a pastry brush, paint the top crust with cornstarch wash or water and sprinkle with the caraway seeds, if using. Slash the loaf with ½-inch-deep, parallel cuts, using a serrated bread knife.
8. Slide the loaf directly onto the hot stone. Pour 1 cup of hot water into the broiler tray and quickly close the oven door (see here for steam alternatives). Bake for 35 to 40 minutes until firm. Smaller or larger loaves will require adjustments in baking time.
9. Allow to cool on a rack before slicing and eating.
Pumpernickel (see here) and Deli-Style Rye (see here)
Pumpernickel Date-and-Walnut Bread
The sweetness of the dried fruit and the richness of the nuts are wonderful with the aromatic pumpernickel dough. We finish the loaf with nothing but the traditional cornstarch wash, letting the fruit and nuts take center stage.
Makes 1 loaf
1 pound (grapefruit-size portion) Pumpernickel Bread dough (here)
¼ cup chopped walnuts
¼ cup chopped dates or raisins
Cornmeal or parchment paper, for the pizza peel
Cornstarch wash (see sidebar) or water, for brushing the top crust
1. On baking day, using wet hands instead of flour, cut off a 1-pound (grapefruit-size) piece of dough. Continuing with wet hands, quickly shape it into a ball by stretching the surface of the dough around to the bottom on all four sides, rotating the ball a quarter-turn as you go.
2. Flatten the dough with your wet hands to a thickness of ½ inch and sprinkle with the walnuts and dates. Roll up the dough like a jelly roll, to form a log. Crimp the ends shut and tuck them under to form an oval loaf.
3. Allow to rest and rise on a pizza peel prepared with cornmeal or parchment paper for 90 minutes (see sidebar).
4. Preheat a baking stone near the middle of the oven to 400°F (20 to 30 minutes), with an empty metal broiler tray on any shelf that won’t interfere with rising bread.
5. Using a pastry brush, paint the top crust with cornstarch wash or water and then slash the loaf with ½-inch deep, parallel cuts, using a serrated bread knife.
6. Slide the loaf directly onto the hot stone. Pour 1 cup of hot water into the broiler tray and quickly close the oven door. Bake for 35 to 40 minutes until firm. Smaller or larger loaves will require adjustments in baking time.
7. Allow to cool on a rack before slicing and eating.
Bran-Enriched White Bread
There’s no point in belaboring the value of bran in the diet. Cup for cup, wheat bran is much higher in fiber than whole wheat flour, yet it doesn’t affect the taste of bread as much. For those who don’t care for the pleasantly bitter, nutty flavor of whole wheat, this loaf is a mild-tasting, high-fiber alternative.
Makes three loaves, slightly more than 1 pound each. The recipe is easily doubled or halved.
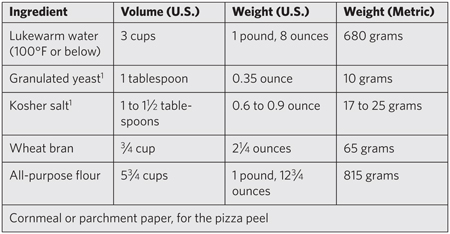
1Can decrease (see here and here)
1. Mixing and storing the dough: Mix the yeast and salt with the water in a 6-quart bowl or a lidded (not airtight) food container.
2. Mix in the remaining dry ingredients without kneading, using a spoon or a heavy-duty stand mixer (with paddle). If you’re not using a machine, you may need to use wet hands to incorporate the last bit of flour.
3. Allow to rest at room temperature until the dough rises and collapses (or flattens on top), approximately 2 hours.
4. The dough can be used immediately after the initial rise, though it is easier to handle when cold. Refrigerate the container of dough and use over the next 14 days.
5. On baking day, dust the surface of the refrigerated dough with flour and cut off a 1-pound (grapefruit-size) piece. Dust the piece with more flour and quickly shape it into a ball by stretching the surface of the dough around to the bottom on all four sides, rotating the ball a quarter-turn as you go. Then elongate to form an oval loaf. Allow to rest and rise on a pizza peel prepared with cornmeal or parchment paper for 40 minutes (see sidebar).
6. Preheat a baking stone near the middle of the oven to 450°F (20 to 30 minutes), with an empty metal broiler tray on any shelf that won’t interfere with rising bread.
7. Sprinkle liberally with flour and slash the top, making ½-inch-deep, parallel cuts across the loaf, using a serrated bread knife.
8. Slide the loaf directly onto the hot stone. Pour 1 cup of hot water into the broiler tray and quickly close the oven door (see here for steam alternatives). Bake for about 30 to 35 minutes until deeply browned and firm. Smaller or larger loaves will require adjustments in baking time.
9. Allow to cool on a rack before slicing and eating.
You’ll find this recipe a basic workhorse when you want a versatile and healthy light wheat bread for sandwiches, appetizers, and snacks. The blend of all-purpose flour and whole wheat creates a bread that is lighter in texture, taste, and appearance than our other whole-grain breads.
Makes four loaves, slightly less than 1 pound each. The recipe is easily doubled or halved.
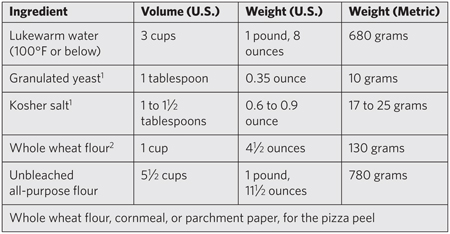
1Can decrease (see here and here)
2Can substitute white whole wheat (see here)
1. Mixing and storing the dough: Mix the yeast and salt with the water in a 6-quart bowl or a lidded (not airtight) food container.
2. Mix in the remaining dry ingredients without kneading, using a spoon or a heavy-duty stand mixer (with paddle). If you’re not using a machine, you may need to use wet hands to incorporate the last bit of flour.
3. Cover (not airtight) and allow to rest at room temperature until the dough rises and collapses (or flattens on top), approximately 2 hours.
4. The dough can be used immediately after the initial rise, though it is easier to handle when cold. Refrigerate the container of dough and use over the next 14 days.
5. On baking day, dust the surface of the refrigerated dough with flour and cut off a 1-pound (grapefruit-size) piece. Dust with more flour and quickly shape it into a ball by stretching the surface of the dough around to the bottom on all four sides, rotating the ball a quarter-turn as you go. Allow to rest and rise on a pizza peel prepared with cornmeal, whole wheat flour, or parchment paper for 40 minutes (see sidebar).
6. Preheat a baking stone near the middle of the oven to 450°F (20 to 30 minutes), with an empty metal broiler tray on any shelf that won’t interfere with rising bread.
7. Sprinkle liberally with flour and slash the top, about ½ inch deep, using a serrated bread knife (see photos).
8. Slide the loaf directly onto the hot stone. Pour 1 cup of hot water into the broiler tray and quickly close the oven door (see here for steam alternatives). Bake for about 35 minutes, or until deeply browned and firm. Smaller or larger loaves will require adjustments in baking time.
9. Allow to cool on a rack before slicing and eating.
VARIATION: SPELT BREAD
Substitute spelt flour for the 1 cup of whole wheat—spelt, an ancient variety of wheat, has all the nutrition of whole grain but less of the bitter earthy flavor that some, particularly kids, don’t like.
VARIATION: MORE WHOLE WHEAT
For a heartier loaf, increase the water by 1⁄8 cup (2 tablespoons). Then, increase the whole wheat to 3 cups and decrease the all-purpose flour to 3½ cups. Don’t try to store this dough longer than 10 days. If you’re using spelt flour, don’t increase the water. For even more whole grains, see 100% Whole Wheat Sandwich Bread (here). And check out Healthy Bread in Five Minutes a Day (2009), where we use vital wheat gluten to get airier results with very high levels of whole grain.
100% Whole Wheat Sandwich Bread
Whole wheat flour has a nutty, slightly bitter flavor, and it caramelizes very easily, yielding a richly browned and flavorful loaf. We’ve used milk and honey as tenderizers, but the honey’s sweetness also serves as a nice counterpoint to whole wheat’s bitter notes. Although we’ve showcased a loaf-pan method here, this dough also makes lovely free-form loaves using the baking stone. If you want a lighter result in 100 percent whole-grain breads, see our Healthy Bread in Five Minutes a Day (2009), where we use vital wheat gluten to get airier results with very high levels of whole grain.
Makes two 1½-pound loaves, with another pound left over for rolls (see here). The recipe is easily doubled or halved.
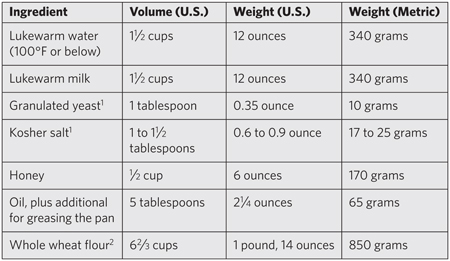
1Can decrease (see here and here)
2Can substitute white whole wheat (see here)
1. Mixing and storing the dough: Mix the yeast, salt, honey, and oil with the water and milk in a 6-quart bowl or a lidded (not airtight) food container.
2. Mix in the remaining dry ingredients without kneading, using a spoon or a heavy-duty stand mixer (with paddle). If you’re not using a machine, you may need to use wet hands to incorporate the last bit of flour.
3. Cover (not airtight) and allow to rest at room temperature until the dough rises and collapses (or flattens on top), approximately 2 hours.
4. The dough can be used immediately after the initial rise, though it is easier to handle when cold. Refrigerate the container of dough and use over the next 5 days.
5. On baking day, grease an 8½ × 4½-inch nonstick loaf pan. Using wet hands, scoop out a 1½-pound (small cantaloupe-size) handful of dough. This dough is pretty sticky, and often it’s easiest to handle with wet hands. Quickly shape it into a ball by stretching the surface of the dough around to the bottom on all four sides, rotating the ball a quarter-turn as you go. Elongate the ball to form an oval loaf.
6. Drop the loaf into the prepared pan.
7. Cover with plastic wrap and allow to rest for 90 minutes (see sidebar).
8. Preheat the oven to 350°F, with an empty metal broiler tray on any shelf that won’t interfere with rising bread. A baking stone is not required and omitting it shortens the preheat.
9. Flour the top of the loaf and slash, using the tip of a serrated bread knife. Place the loaf on a rack in the middle of the oven. Pour 1 cup of hot water into the broiler tray and quickly close the oven door (see here for steam alternatives). Bake for 50 to 60 minutes until deeply browned and firm.
10. Remove from the pan and allow to cool completely before slicing; otherwise you won’t get well-cut sandwich slices. If the loaf sticks, wait 10 minutes and it will steam itself out of the pan.
American-Style Whole Wheat Sandwich Bread
Here’s a classic American-style whole-grain sandwich bread—a blend of grains, some sweetener, and butter that makes for a tender and flavorful loaf. Even though this bread is soft-crusted, we bake it with steam to improve the color and appearance. If you really want to dive into the world of whole-grain breads, see Healthy Bread in Five Minutes a Day (2009), where we use vital wheat gluten to get airier results with very high levels of whole grain.
Makes two loaves, slightly less than 2 pounds each. The recipe is easily doubled or halved.

1Can decrease (see here and here)
2Can substitute white whole wheat (see here)
1. Mixing and storing the dough: Mix the yeast, salt, honey, and butter or oil with the water in a 6-quart bowl or a lidded (not airtight) food container.
2. Mix in the remaining dry ingredients without kneading, using a spoon or a heavy-duty stand mixer (with paddle). If you’re not using a machine, you may need to use wet hands to incorporate the last bit of flour.
3. Cover (not airtight) and allow to rest at room temperature until the dough rises and collapses (or flattens on top), approximately 2 hours.
4. The dough can be used immediately after the initial rise, though it is easier to handle when cold. Refrigerate the container of dough and use over the next 5 days.
5. On baking day, lightly grease an 8½ × 4½-inch nonstick loaf pan. Dust the surface of the refrigerated dough with flour and cut off a 1½-pound (small cantaloupe-size) piece. Dust with more flour and quickly shape it into a ball by stretching the surface of the dough around to the bottom on all four sides, rotating the ball a quarter-turn as you go. Elongate to form an oval loaf and place it into the prepared pan. Cover with plastic wrap and allow to rest for 90 minutes (see sidebar).
6. Preheat the oven to 400°F, with an empty metal broiler tray on any shelf that won’t interfere with rising bread. A baking stone is not required and omitting it shortens the preheat.
7. Flour the top of the loaf and slash, using the tip of a serrated bread knife. Place the loaf on a rack in the center of the oven. Pour 1 cup of hot water into the broiler tray and quickly close the oven door (see here for steam alternatives). Bake for about 50 to 55 minutes until richly browned and firm. Smaller or larger loaves will require adjustments in resting and baking time.
8. Remove from the pan and allow to cool completely before slicing; otherwise you won’t get well-cut sandwich slices.
Cornell Bread: Healthy and Protein Packed
During World War II, food rationing had parents panicking about whether they would be able to provide nutritious food for their families. Back then, most Americans believed that you couldn’t be healthy without eating meat, which was strictly rationed. The shortages prompted Cornell University nutrition professor Clive McKay to develop a homemade bread recipe that included nonfat dry milk, wheat germ, and soy flour—to provide protein and vitamins. Along with Victory Gardens, “Cornell Bread” was promoted to stretch budgets at a time of national emergency.
What’s so surprising about Cornell Bread is that it was made almost entirely from white flour—there was no whole grain in the original recipe at all. Americans still hadn’t embraced the nutritional value (and good taste) of whole grains, and McKay needed something that would appeal to everyone. So here’s a whole-grain version of McKay’s idea, and maybe the best news of all: the ingredients for a 1-pound loaf cost less than 70 cents.
Makes four 1-pound loaves. The recipe is easily doubled or halved.

1Can decrease (see here and here)
2Can substitute white whole wheat (see here)
1. Mixing and storing the dough: Mix the yeast, salt, honey, and skim-milk powder with the water in a 6-quart bowl or a lidded (not airtight) food container. The honey and skim-milk powder will not completely dissolve.
2. Mix in the wheat germ and the flours without kneading, using a spoon or a heavy-duty stand mixer (with paddle). If you’re not using a machine, you may need to use wet hands to incorporate the last bit of flour.
3. Cover (not airtight) and allow to rest at room temperature until the dough rises and collapses (or flattens on top), approximately 2 hours.
4. The dough can be used immediately after the initial rise, though it is easier to handle when cold. Refrigerate the container of dough and use over the next 7 days.
5. On baking day, dust the surface of the refrigerated dough with flour and cut off a 1-pound (grapefruit-size) piece. Dust with more flour and quickly shape it into a ball by stretching the surface of the dough around to the bottom on all four sides, rotating the ball a quarter-turn as you go. Cover with plastic wrap or an overturned bowl and allow to rest for 40 minutes (see sidebar).
6. Preheat a baking stone near the middle of the oven to 350°F (20 to 30 minutes), with an empty metal broiler tray on any shelf that won’t interfere with rising bread.
7. Paint the top crust with cornstarch wash or water. Sprinkle with seeds and slash the top, about ½ inch deep, using a serrated bread knife.
8. Slide the loaf directly onto the hot stone. Pour 1 cup of hot water into the broiler tray and quickly close the oven door (see here for steam alternatives). Bake for about 40 minutes, or until richly browned and firm. Smaller or larger loaves will require adjustments in resting and baking time.
9. Allow to cool on a rack before slicing and eating.
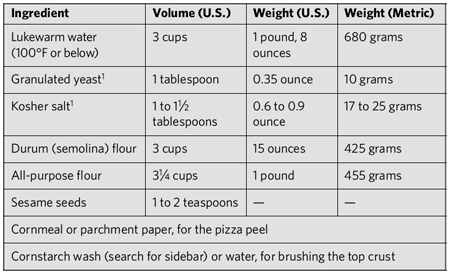
This white free-form loaf, flavored with semolina and sesame seeds, is a fragrant masterpiece of southern Italian baking (see color photo). Semolina is a high-protein wheat flour that gives loaves a sweetness, and an almost winey aroma. In our minds, the flavor of the sesame seeds is inextricably linked to the semolina flavor (like caraway to rye). Try to use semolina flour that’s labeled “durum”—other semolinas won’t do as well in our method and can create a dry result because of their coarser grind. If you can’t find durum, decrease the semolina to 1½ cups, and increase the all-purpose to 5 cups.
Makes four loaves, slightly less than 1 pound each. The recipe is easily doubled or halved.
1Can decrease (see here and here)
1. Mixing and storing the dough: Mix the yeast and salt with the lukewarm water in a 6-quart bowl or a lidded (not airtight) food container.
2. Mix in the flours without kneading, using a spoon or a heavy-duty stand mixer (with paddle). If you’re not using a machine, you may need to use wet hands to incorporate the last bit of flour.
3. Cover (not airtight) and allow to rest at room temperature until the dough rises and collapses (or flattens on top), approximately 2 hours.
4. The dough can be used immediately after the initial rise, though it is easier to handle when cold. Refrigerate the container of dough and use over the next 14 days.
5. On baking day, dust the surface of the refrigerated dough with flour and cut off a 1-pound (grapefruit-size) piece. Dust the piece with more flour and quickly shape it into a ball by stretching the surface of the dough around to the bottom on all four sides, rotating the ball a quarter-turn as you go. Elongate the ball to form an oval-shaped, free-form loaf. Allow to rest and rise on a cornmeal-covered pizza peel for 40 minutes (see sidebar).
6. Preheat a baking stone near the middle of the oven to 450°F (20 to 30 minutes), with an empty metal broiler tray on any shelf that won’t interfere with rising bread.
7. Paint the surface with cornstarch wash or water, sprinkle with sesame seeds, and slash the surface with ½-inch-deep, parallel cuts, using a serrated bread knife.
8. Slide the loaf directly onto the hot stone. Pour 1 cup of hot water into the broiler tray and quickly close the oven door (see here for steam alternatives). Bake for 30 to 35 minutes until deeply browned and firm. Smaller or larger loaves will require adjustments in resting and baking time.
9. Allow to cool on a rack before slicing and eating.

Broa is a very rustic recipe from the Portuguese countryside. It’s a dense, part-corn loaf that’s perfect for sopping up hearty soups like our Portuguese Fish Stew (here). It bears little resemblance to American Southern cornbread, which is usually pretty sweet, and leavened with baking soda and powder.
Form the loaf as a relatively flattened ball, so that you’ll get lots of crust. The flattened loaf is truer to the original and helps to prevent denseness from the corn.
Makes four loaves, slightly less than 1 pound each. The recipe is easily doubled or halved.

1Can decrease (see here and here)
1. Mixing and storing the dough: Mix the yeast and salt with the water in a 6-quart bowl or a lidded (not airtight) food container.
2. Mix in the remaining dry ingredients without kneading, using a spoon or a heavy-duty stand mixer (with paddle). If you’re not using a machine, you may need to use wet hands to incorporate the last bit of flour.
3. Cover (not airtight) and allow to rest at room temperature until the dough rises and collapses (or flattens on top), approximately 2 hours.
4. The dough can be used immediately after the initial rise, though it is easier to handle when cold. Refrigerate the container of dough and use over the next 10 days.
5. On baking day, dust the surface of the refrigerated dough with flour and cut off a 1-pound (grapefruit-size) piece. Dust the piece with more flour and quickly shape it into a ball by stretching the surface of the dough around to the bottom on all four sides, rotating the ball a quarter-turn as you go. Flatten slightly and allow to rest and rise on a pizza peel prepared with cornmeal or parchment paper for 40 minutes (see sidebar).
6. Preheat a baking stone near the middle of the oven to 450°F (20 to 30 minutes), with an empty metal broiler tray on any shelf that won’t interfere with rising bread.
7. Sprinkle liberally with cornmeal and slash the top, about ½ inch deep, using a serrated bread knife (see photos). Leave the cornmeal in place for baking; tap some of it off before eating.
8. Slide the loaf directly onto the hot stone. Pour 1 cup of hot water into the broiler tray and quickly close the oven door (see here for steam alternatives). Bake for about 30 minutes, or until deeply browned and firm. Smaller or larger loaves will require adjustments in baking time.
9. Allow to cool on a rack before slicing and eating.
Portuguese Fish Stew (Caldeirada de Peixe)
We include this simple and delicious recipe that was born to have Broa (here) dipped into it. The distinctive character of the soup comes from the orange zest and hot red pepper flakes, which make it quite different from French or Italian versions. Cod is a typical Portuguese choice, but the dish works well with any combination of boneless white-fleshed, non-oily fish and/or shellfish.
Makes 6 to 8 servings
¼ cup olive oil
1 large onion, chopped
2 leeks, well washed to remove interior soil and coarsely chopped
1 fennel bulb, white parts only, trimmed and coarsely chopped
5 garlic cloves, finely chopped
1 cup diced tomatoes, canned or fresh
1 red bell pepper, cored, seeded, and diced
1 bay leaf
Zest of 1 orange, grated with a microplane zester (here)
1 quart fish stock or water, or an 8-ounce bottle of clam juice plus 3 cups water
2 cups dry white wine
Scant ¼ teaspoon hot red pepper flakes
1 tablespoon salt
Freshly ground black pepper
3 pounds mixed white, non-oily boneless fish and shellfish, or just fish
1. Heat the olive oil in a large stockpot over medium heat, add the onions and leeks, and sauté until softened. Add the fennel and garlic and sauté until aromatic.
2. Add all of the remaining ingredients, except for the fish and shellfish, and bring to a boil. Cover, lower the heat, and simmer for 20 minutes.
3. While the stock is simmering, cut the fish into bite-size portions. Bring the stock back to a rapid boil, add the fish, and cook for 1 minute.
4. Add the shellfish, if using, and return to a simmer. Continue to simmer until the shells open, 1 to 2 minutes, shaking the pan occasionally to encourage clams and mussels to open. If using shrimp, turn off the heat as soon as all the shrimp lose their gray translucency; any longer and they quickly become tough and overcooked.
5. Serve hot with wedges of Broa.
Yeasted Thanksgiving Cornbread with Cranberries
Traditional American cornbread is a butter or lard-enriched quick bread, risen with baking powder and baking soda. We make ours with yeasted Broa dough (here). For Thanksgiving, we stud the dough with sweetened cranberries. Playing on the American cornbread theme, we baked the loaf in a heated cast-iron pan, liberally greased with butter, lard, bacon grease, or oil, creating a rich and flavorful crust.
Like a baking stone, cast iron absorbs and retains heat well, and radiates it very evenly to the dough, promoting a nice brown crust (see color photo).
Makes 1 loaf
1½ pounds Broa dough (here), approximately 1 small cantaloupe-size piece, or enough to fill a 12-inch, cast-iron pan to a depth of about 1½ inches
½ cup fresh cranberries or 1⁄3 cup dried
¼ cup sugar
Zest of half an orange, grated with a microplane zester (here)
3 tablespoons softened unsalted butter, lard, bacon grease, or oil, for greasing the pan
1. Dust the surface of the refrigerated dough with flour and cut off a 1½-pound (small cantaloupe-size) piece. Dust the piece with more flour and quickly shape it into a ball by stretching the surface of the dough around to the bottom on all four sides, rotating the ball a quarter-turn as you go.
2. Flatten the ball with your hands and a rolling pin to a thickness of ½ inch. Sprinkle the dough with the cranberries, sugar, and orange zest. Roll up the dough, jelly-roll style, to incorporate the cranberries. Shape into a ball again, then flatten until it is about the size of your pan.
3. Grease a cast-iron pan with the butter, lard, bacon grease, or oil, being sure to coat the sides of the pan as well. Place the dough into the pan. Cover with plastic wrap or the pan’s lid and allow the dough to rest for 90 minutes (see sidebar).
4. Preheat the oven to 425°F, with an empty metal broiler tray on any shelf that won’t interfere with rising bread. A baking stone is not required, and omitting it shortens the preheat.
5. Just before baking, uncover and heat the pan over medium heat for 1 or 2 minutes to jump-start the baking process and promote caramelization of the bottom crust.
6. Place the pan on a rack near the center of the oven. Pour 1 cup of hot water into the broiler tray and quickly close the oven door (see here for steam alternatives). Check for browning in about 20 minutes. The time required will depend on the size and weight of pan, but will probably be about 30 minutes. The loaf should be a rich yellow-brown when done.
7. Carefully turn the hot loaf out of the pan onto a serving plate, or just cut wedges directly from the pan.

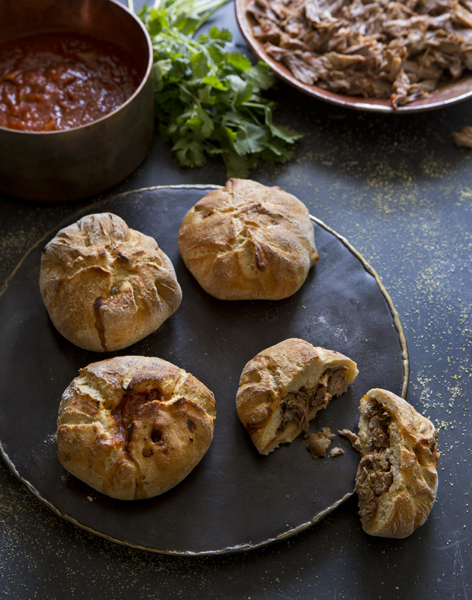
Spicy Pork Buns
We’d been searching for a simple way to re-create and reconstruct some of the flavor combinations in great tamales (see color photo). Here’s a simple recipe combining the sweet flavor of corn from the Broa dough, meat, and two kinds of chili peppers. Children devour these, but if your kids won’t eat spicy food, you may want to tone down the chipotles in adobo sauce (which are the really hot ones), or leave them out altogether. We serve this dish as a main course, with added sauce on the side. You can put more sauce inside the buns, but don’t overdo it or the result may be soggy.
Makes 4 large buns
The Meat Filling
4 to 5 pounds pork roast (shoulder or butt), or beef brisket
One 28-ounce can crushed tomatoes
2 chipotle peppers from a can of chipotles in adobo sauce, finely chopped
2 dried chili peppers (New Mexico red, guajillo, or ancho variety), or substitute 1 tablespoon of your favorite chili powder
1 medium onion
1½ teaspoons cumin seeds
2 teaspoons salt
1 tablespoon cornstarch
2 tablespoons chopped fresh cilantro
The Wrappers
1 pound (grapefruit-size portion) Broa dough (here)
1. Prepare the meat filling: If you’re grinding your own chili pepper, briefly toast the dried peppers in a 400-degree oven until fragrant but not burned, 1 to 2 minutes; they’ll remain flexible. Break up the toasted peppers and discard the stems and seeds. Grind with the cumin seeds in a spice grinder (or coffee grinder used just for spices).

2. Place all of the ingredients for the meat filling, except for the cornstarch and cilantro, in a roomy pot on the stovetop. The pot should be large enough to hold the meat and still allow the cover to seal. The liquid should not come higher than about one-third of the way up the meat. Bring to a simmer and cook, covered, until very soft, approximately 3 hours, turning occasionally. Separate the meat and sauce and chill in the refrigerator.
3. Trim the meat of hardened fat; shred with knife, fork, and your fingers, pulling strips off the roast or brisket along the direction of the grain. You’ll have plenty of meat left over for additional buns or other meals.
4. Skim the fat from the surface of the sauce. Anytime before assembling the buns, reheat the meat with the sauce. Mix the cornstarch with a small amount of sauce in a little cup to make a paste; then add to the pot. Simmer for 2 minutes, or until thickened.
5. Preheat a baking stone near the middle of the oven to 450°F (20 to 30 minutes), with an empty metal broiler tray on any shelf that won’t interfere with the rising bread.
6. Dust the surface of the refrigerated dough with flour and cut off a 1-pound (grapefruit-size) piece. Divide the dough into four equal balls. Briefly shape, flattening out each ball with your fingers. Using a rolling pin, roll out 8- to 10-inch rounds, about 1⁄8 inch thick. Use minimal white flour on the work surface as you roll so that the dough sticks to it a bit.
7. Assemble the buns: Place approximately ½ cup of shredded meat in the center of each round of dough. Add about a tablespoon of sauce and ½ tablespoon of chopped cilantro. Wet the edges of the dough round with water. Gather the edges of the dough around the meat to form a pouch, pinching at the center to seal. Repeat with the remaining dough and filling.
8. Using a dough scraper, if necessary, transfer the finished buns to a cornmeal-covered pizza peel. No resting time is needed.
9. Slide the buns directly onto the hot stone. Pour 1 cup of hot water into the broiler tray and quickly close the oven door (see here for steam alternatives). Check for browning in 15 minutes and continue baking, if needed, until the buns are medium brown.
10. Serve immediately, with the remaining sauce, and Mexican hot pepper sauce.
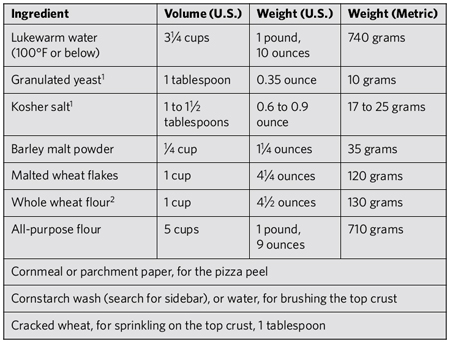
The English have created a great new cuisine based on super-fresh local ingredients, but when it comes to English bread, we’re traditionalists. To accompany those new dishes, here is a staple of the old village bakery: a multi-grain loaf that includes malted wheat and barley malt powder (choose non-diastatic if you have a choice). The combination of grains creates a slightly sweet and old-fashioned flavor. Malted wheat flakes and barley malt powder can be ordered from King Arthur Flour (see Sources).
Makes four loaves, slightly less than 1 pound each. The recipe is easily doubled or halved.
1Can decrease (see here and here)
2Can substitute white whole wheat (see here)
1. Mixing and storing the dough: Mix the yeast, salt, and barley malt powder with the water in a 6-quart bowl or a lidded (not airtight) food container.
2. Mix in the wheat flakes and the flours without kneading, using a spoon or a heavy-duty stand mixer (with paddle). If you’re not using a machine, you may need to use wet hands to incorporate the last bit of flour.
3. Cover (not airtight) and allow to rest at room temperature until the dough rises and collapses (or flattens on top), approximately 2 hours.
4. The dough can be used immediately after the initial rise, though it is easier to handle when cold. Refrigerate the container of dough and use over the next 10 days.
5. On baking day, dust the surface of the refrigerated dough with flour and cut off a 1-pound (grapefruit-size) piece. Dust the piece with more flour and quickly shape it into a ball by stretching the surface of the dough around to the bottom on all four sides, rotating the ball a quarter-turn as you go. Allow to rest and rise on a cornmeal-covered pizza peel for 40 minutes (see sidebar).
6. Preheat a baking stone near the middle of the oven to 400°F (20 to 30 minutes), with an empty metal broiler tray on any shelf that won’t interfere with rising bread.
7. Brush the loaf with cornstarch wash or water and sprinkle with cracked wheat, then slash the top about ½ inch deep, using a serrated bread knife (see photos).
8. Slide the loaf directly onto the hot stone. Pour 1 cup of hot water into the broiler tray and quickly close the oven door (see here for steam alternatives). Bake for about 35 minutes. Smaller or larger loaves will require adjustments in baking time.
9. Allow to cool on a rack before slicing and eating.
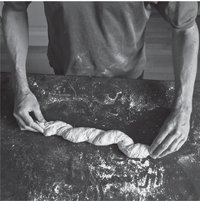
Wurzelbrot (Swiss Twisted Bread)
“Wurzel” is German for “tree roots,” and this particular “brot” from Switzerland, Germany, and Austria is distinctive for its rustic twisted look (see color photo). If you make a bunch of wurzelbrot (vóor-tsel-brot) they’ll look like a pile of oak tree roots. It’s supposed to look sloppy and rough-hewn, so forget about careful shaping. In Switzerland, wurzelbrot is a rustic white baguette, but in our version, molasses and just a little rye flour make for terrific deep browning and flavor.
“The truth is, I almost never make a completely white baguette—even a little rye enhances the flavor of white bread—as little as 2 tablespoons changes the character of the batch.”—Jeff
Makes four loaves, slightly less than 1 pound each. The recipe is easily doubled or halved.

1Can decrease (see here and here)
1. Mixing and storing the dough: Mix the yeast, salt, and molasses with the water in a 6-quart bowl or a lidded (not airtight) food container.
2. Mix in the flours without kneading, using a spoon or a heavy-duty stand mixer (with paddle). If you’re not using a machine, you may need to use wet hands to incorporate the last bit of flour.
3. Cover (not airtight) and allow to rest at room temperature until the dough rises and collapses (or flattens on top), approximately 2 hours.
4. The dough can be used immediately after the initial rise, though it is easier to handle when cold. Refrigerate the container of dough and use over the next 14 days.
5. On baking day, dust the surface of the refrigerated dough with flour and cut off a 1-pound (grapefruit-size) piece. Dust the piece with more flour and quickly shape it into a ball by stretching the surface of the dough around to the bottom on all four sides, rotating the ball a quarter-turn as you go. Elongate the ball and continue to stretch until you have a long 1½-inch-wide rope. Cut the rope into thirds.
6. Hold one end in your hand and twist the other end to create an irregular twisted shape—it usually takes about 6 twists to create the effect (see photo). Sprinkle with more dusting flour after you finish the twist, and repeat with the other ropes.
7. Preheat a baking stone near the middle of the oven to 450°F (20 to 30 minutes), with an empty metal broiler tray on any shelf that won’t interfere with rising bread.
8. Allow to rest and rise on a pizza peel prepared with cornmeal or parchment paper for 40 minutes (see sidebar). Or, for a more rustic dense crumb and to preserve the twisted shape, bake immediately with no rest.
9. Slide the loaf directly onto the hot stone (no need for slashing). Pour 1 cup of hot water into the broiler tray and quickly close the oven door (see here for steam alternatives). Bake for about 30 minutes, or until deeply browned and firm. Smaller or larger loaves will require adjustments in baking time.
10. Allow to cool on a rack before slicing and eating.

This high-fiber loaf is lightly sweetened with maple syrup and tastes great cut into thick slices and then slathered with butter and Laura’s Three-Citrus Marmalade (here). It also makes a great sandwich with smoked turkey and cheese.
Makes two loaves, slightly less than 2 pounds each. The recipe is easily doubled or halved.
1Can decrease (see here and here)
2Can substitute white whole wheat (see here)
1. Mixing and storing the dough: Mix the yeast and salt with the water, the ¾ cup maple syrup, and the oil in a 6-quart bowl or a lidded (not airtight) food container.
2. Mix in the remaining dry ingredients without kneading, using a spoon or a heavy-duty stand mixer (with paddle). If you’re not using a machine, you may need to use wet hands to incorporate the last bit of flour.
3. Cover (not airtight) and allow to rest at room temperature until the dough rises and collapses (or flattens on top), approximately 2 hours.
4. The dough can be used immediately after the initial rise, though it is easier to handle when cold. Refrigerate the container of dough and use over the next 7 days.
5. On baking day, grease an 8½ × 4½-inch nonstick loaf pan. Dust the surface of the refrigerated dough with flour and cut off a 2-pound (large cantaloupe-size) piece. Dust the piece with more flour and quickly shape it into a ball by stretching the surface of the dough around to the bottom on all four sides, rotating the ball a quarter-turn as you go.
6. Elongate the ball to form an oval loaf and place it into the prepared pan. Cover with plastic wrap and allow to rest for 90 minutes (see sidebar).
7. Preheat the oven to 350°F. A baking stone is not required, and omitting it shortens the preheat.
8. Using a pastry brush, paint the top crust with the remaining 1 tablespoon maple syrup.
9. Place the loaf on a rack near the center of the oven. Bake for 50 to 60 minutes or until browned and firm. Smaller or larger loaves will require adjustments in resting and baking time.
10. Remove from the pan and allow to cool on a rack before slicing and eating.
Laura’s Three-Citrus Marmalade
Here’s a traditional English preserve—something sweet yet startlingly tart to put on your English Granary-Style Bread (here), Oatmeal Maple Bread (here), or just about anything else. Citrus is available year-round but, if you wait until the height of the season, the selection increases. Try substituting blood oranges or tangerines for the navel oranges when in season.
“My wife, Laura, does the canning at our house, and she makes a marmalade that everyone loves. I wish I could say that the recipe was whispered to her in an Italian citrus grove, but Laura enjoys telling foodies that it’s adapted from the instruction sheet inside the Sure-Jell box. But she is too modest. Laura made it her own by adding pink grapefruit, which brings a touch of extra tartness.”—Jeff
If you don’t want to bother canning, you can just refrigerate or freeze (see step 8).
Makes 7 cups marmalade
4 navel oranges
1 lemon
½ pink grapefruit
2½ cups water
1⁄8 teaspoon baking soda
5½ cups sugar
One 1.75-ounce box Sure-Jell fruit pectin
1. Using a vegetable peeler, remove the colored zest from the fruits and discard the white pith. Chop the zest coarsely.
2. Chop the fruit, discarding any seeds and reserving the juice.
3. Put the zests, water, and baking soda in a saucepan and bring to a boil. Reduce the heat; cover, and simmer for 20 minutes, stirring occasionally. Add the fruit and juice and simmer another 10 minutes.
4. Measure the sugar and set aside. Do not reduce the amount of sugar, or the marmalade may not set properly.
5. Stir the fruit pectin into the fruit mixture and bring to a full, rolling boil.
6. Stir in the sugar quickly, return to a full rolling boil, and cook for 1 minute. Remove from the heat and skim off any foam.
7. Pour the hot marmalade into sterilized canning jars. Process according to the canner’s and U.S. Department of Agriculture (USDA) recommendations.
8. If you’re intimidated by canning, simply skip the sterilization procedure in the final step and refrigerate the marmalade for up to 2 months or freeze for up to 1 year.
Raisin-Walnut Oatmeal Bread
Full of the flavors we associate with oatmeal—raisins, walnuts, and a touch of maple syrup—this will remind you of the breakfast your mother made you when you were a kid. If not, it will be the breakfast your kids beg you to make.
Makes 1 loaf
Oil, for greasing the pan
1½ pounds (small cantaloupe-size portion) Oatmeal Maple Bread dough (here)
1 cup raisins
¾ cup walnuts
Egg wash (1 egg beaten with 1 tablespoon of water)
1. On baking day, grease an 8½ × 4½-inch nonstick loaf pan. Dust the surface of the refrigerated dough with flour and cut off a 1½-pound (small cantaloupe-size) piece. Dust the piece with more flour and quickly shape it into a ball by stretching the surface of the dough around to the bottom on all four sides, rotating the ball a quarter-turn as you go.
2. Flatten the dough with your hands and roll out into a ½-inch-thick rectangle. As you roll out the dough, use enough flour to prevent it from sticking to the work surface but not so much as to make the dough dry.
3. Sprinkle the raisins and walnuts over the dough and roll it up, jelly-roll style, to incorporate them. Shape into a ball.
4. Place the loaf in the prepared pan, and allow to rest for approximately 90 minutes (see sidebar).
5. Preheat the oven to 350°F. A baking stone is not required, and omitting it shortens the preheat.
6. Using a pastry brush, paint the loaf with the egg wash.
7. Place the loaf on a rack near the center of the oven. Bake for approximately 45 minutes, or until golden brown. Smaller or larger loaves will require adjustments in baking time.
8. Remove from the pan and allow to cool on a rack before slicing and eating.
Here’s a great use for leftover pumpkin puree. Roasting the pumpkin caramelizes the sugars and intensifies the flavors, so it’s worth the effort to make your own rather than substituting with canned pumpkin puree. If you do roast your own, be sure to use the smaller “pie” pumpkin and not the watery and flavorless decorative pumpkin.
“In the fall at my house, there is almost always a pumpkin roasting for pie and a batch of oatmeal cooking for breakfast. This is Minnesota and these are the things that keep us warm and happy. One day I had both going, and decided to try combining them into a bread. Well, it worked beautifully and is now one of my family’s favorites. For obvious reasons I tend to make a lot of it right around Thanksgiving. It’s perfect with leftover turkey.”—Zoë
Makes two loaves slightly less than 2 pounds each. The recipe is easily doubled or halved.

1Can decrease (see here and here)
2Can substitute white whole wheat (see here)
1. To roast the pumpkin: Preheat the oven to 350°F. Split the pumpkin in half starting at the stem and place cut side down on a silicone mat–lined or a lightly greased baking sheet. Bake for 45 minutes. The pumpkin should be very soft all the way through when poked with a knife. Cool slightly before scooping out the seeds.
2. Scoop out the roasted flesh of the pumpkin and mash it with a fork, or puree it in the food processor. Set aside 1 cup for the dough and use the rest in your favorite pie recipe.
3. Mixing and storing the dough: Mix the yeast and salt with the water, melted butter, and honey in a 6-quart bowl or a lidded (not airtight) food container.
4. Mix in the rolled oats, pumpkin puree, and flours without kneading, using a spoon or a heavy-duty stand mixer (with paddle). If you’re not using a machine, you may need to use wet hands to incorporate the last bit of flour.
5. Cover (not airtight) and allow to rest at room temperature until the dough rises and collapses (or flattens on top), approximately 2 hours.
6. The dough can be used immediately after the initial rise, though it is easier to handle when cold. Refrigerate the container of dough and use over the next 7 days.
7. On baking day, grease an 8½ × 4½-inch nonstick loaf pan. Dust the surface of the refrigerated dough with flour and cut off a 2-pound (large cantaloupe-size) piece. Dust the piece with more flour and quickly shape it into a ball by stretching the surface of the dough around to the bottom on all four sides, rotating the ball a quarter-turn as you go.
8. Elongate the ball to form an oval loaf and place into the prepared pan. Allow to rest and rise for 90 minutes.
9. Preheat the oven to 350°F. A baking stone is not required, and omitting it shortens the preheat.
10. Place the loaf on a rack in the center of the oven. Bake for 50 to 60 minutes until browned and firm. Smaller or larger loaves will require adjustments in resting and baking time.
11. Remove from the pan and allow to cool on a rack before slicing and eating.
Oatmeal–Pumpkin Seed Bread
To jazz up the Oatmeal Pumpkin Bread (here), roll in pumpkin seeds and dried cranberries. They add both a sweet and a tart element that is wonderful with the other flavors, and nothing could be more appropriate for Thanksgiving. You can buy shelled, toasted pumpkin seeds in most groceries, usually in the Mexican food aisle, where they might be labeled pepitas.
Makes 1 loaf
Oil, for greasing the pan
2 pounds (large cantaloupe-size portion) Oatmeal Pumpkin dough (here)
1⁄3 cup hulled, toasted pumpkin seeds
1⁄3 cup dried cranberries
Egg wash (1 egg beaten with 1 tablespoon of water)
1. On baking day, grease an 8½ × 4½-inch nonstick loaf pan. Dust the surface of the refrigerated dough with flour and cut off a 2-pound (large cantaloupe-size) piece. Dust the piece with more flour and quickly shape it into a ball by stretching the surface of the dough around to the bottom on all four sides, rotating the ball a quarter-turn as you go.
2. Flatten the dough with your hands and roll out into a ½-inch-thick rectangle. As you roll out the dough, use enough flour to prevent it from sticking to the work surface but not so much as to make the dough dry.
3. Sprinkle the seeds and cranberries over the dough and roll it up, jelly-roll style, to encase them. Fold the dough over again and gently knead for 20 seconds to work in the seeds. Then form into a ball.
4. Using a small amount of flour, elongate the ball to form an oval loaf and place into the prepared pan. Allow to rest and rise for 90 minutes, covered with plastic wrap.
5. Preheat the oven to 350°F. A baking stone is not required, and omitting it shortens the preheat.
6. Using a pastry brush, paint the top crust with egg wash.
7. Place the loaf on a rack in the center of the oven. Bake for 50 to 60 minutes until browned and firm. Smaller or larger loaves will require adjustments in resting and baking time.
8. Remove from the pan and allow to cool on a rack before slicing and eating.
Oat Flour Bread
If you’re looking for a delicious way to get kids to eat more fiber, here’s a simple recipe with a milder flavor than most whole-grain breads. Oat flour has more soluble fiber than whole wheat flour.
Makes two loaves, slightly less than 2 pounds each. The recipe is easily doubled or halved.

1Can decrease (see here and here)
1. Mixing and storing the dough: Mix the yeast and salt with the water in a 6-quart bowl or a lidded (not airtight) food container.
2. Mix in the flours without kneading, using a spoon or a heavy-duty stand mixer (with paddle). If you’re not using a machine, you may need to use wet hands to incorporate the last bit of flour.
3. Cover (not airtight) and allow to rest at room temperature until the dough rises and collapses (or flattens on top), approximately 2 hours.
4. The dough can be used immediately after the initial rise, though it is easier to handle when cold. Refrigerate the container of dough and use over the next 10 days.
5. On baking day, lightly grease an 8½ × 4½-inch nonstick loaf pan. Dust the surface of the refrigerated dough with flour and cut off a 2-pound (cantaloupe-size) piece. Dust the piece with more flour and quickly shape it into a ball by stretching the surface of the dough around to the bottom on all four sides, rotating the ball a quarter-turn as you go. Elongate to form an oval loaf and drop into the prepared pan. Cover with plastic wrap or an overturned bowl and allow to rest for 90 minutes (see sidebar).
6. Preheat the oven to 400°F, with an empty metal broiler tray on any shelf that won’t interfere with rising bread. A baking stone is not required, and omitting it shortens the preheat.
7. Place the loaf on a rack near the center of the oven. Pour 1 cup of hot water into the broiler tray and quickly close the oven door (see here for steam alternatives). Bake for about 45 minutes, or until richly browned and firm. Smaller or larger loaves will require adjustments in baking time.
8. Allow to cool on a rack before slicing and eating.
Great cheese bread is a wonderful American specialty, and a complete meal in a slice. The success of this loaf will depend on the cheese you use, so go with a great one.
“I grew up in Vermont, where eating sharp, aged cheddar is a birthright. Every Vermont bakery offers its own version of cheddar bread, using cheese from local dairies. We lived near Shelburne Farms, and I’m still loyal to their cheddar even since moving to the Midwest. It can be found at Whole Foods and other grocers with a good cheese counter. Feel free to substitute your favorite cheddar or other sharp-flavored hard cheese.”—Zoë
Makes four loaves, slightly less than 1 pound each. The recipe is easily doubled or halved.
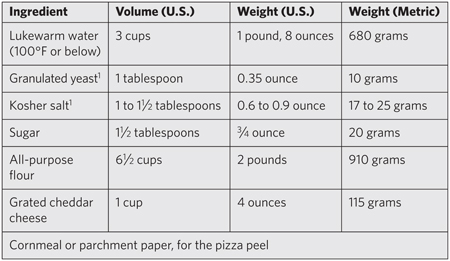
1Can decrease (see here and here)
2Can substitute white whole wheat (see here)
1. Mixing and storing the dough: Mix the yeast, salt, and sugar with the water in a 6-quart bowl or a lidded (not airtight) food container.
2. Mix in the dry ingredients and the cheese without kneading, using a spoon or a heavy-duty stand mixer (with paddle). If you’re not using a machine, you may need to use wet hands to incorporate the last bit of flour.
3. Cover (not airtight) and allow to rest at room temperature until the dough rises and collapses (or flattens on top), approximately 2 hours.
4. The dough can be used immediately after the initial rise, though it is easier to handle when cold. Refrigerate the container of dough and use over the next 7 days.
5. On baking day, dust the surface of the refrigerated dough with flour and cut off a 1-pound (grapefruit-size) piece. Dust the piece with more flour and quickly shape it into a ball by stretching the surface of the dough around to the bottom on all four sides, rotating the ball a quarter-turn as you go. Allow to rest and rise on a cornmeal or parchment paper–covered pizza peel for 1 hour (see sidebar).
6. Preheat a baking stone near the middle of the oven to 450°F (20 to 30 minutes), with an empty metal broiler tray on any shelf that won’t interfere with rising bread.
7. Sprinkle liberally with flour and slash the top, about ½-inch deep, using a serrated bread knife (see photos).
8. Slide the loaf directly onto the hot stone. Pour 1 cup of hot water into the broiler tray and quickly close the oven door (see here for steam alternatives). Bake for about 30 minutes or until richly browned and firm. Smaller or larger loaves will require adjustments in resting and baking time.
9. Allow to cool on a rack before slicing and eating.
VARIATION: CRISP CHEESY BREAD STICKS
To make thin crispy bread sticks (see color photo), follow the directions below with Vermont Cheddar Bread dough or any lean dough in the book:
1. Preheat the oven to 400°F. Grease a baking sheet with oil or butter, or line with parchment paper. Roll out the dough into an 8 × 13-inch rectangle, about 1⁄8 inch thick, then cut along the long side into 1⁄8-inch-wide strips, using a pizza cutter or sharp knife.
2. Lay the strips on the prepared baking sheet, spacing them about ½ inch apart. Using a pastry brush, daub olive oil over each strip and sprinkle with coarse salt.
3. Bake the bread sticks in the center of the oven for 10 to 16 minutes. The bread sticks are done when nicely browned and beginning to crisp; they will firm up when cool.
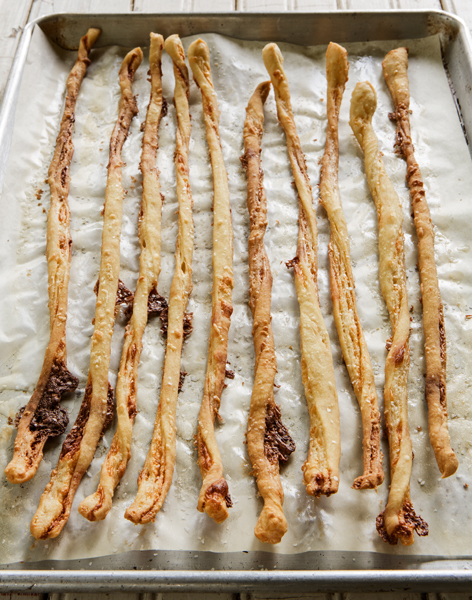
Wisconsin Beer-Cheese Bread
Anyone who has been to Wisconsin knows beer and cheese were meant to be paired. Cross the border into the “Cheese State” and you’ll find this combo on every menu. Be sure to use a strong-tasting beer and a sharp cheese, so you can savor both. We find the flavor of the bread gets even better when the dough has had a couple of days to brew.
Makes four 1-pound loaves. The recipe is easily doubled or halved.
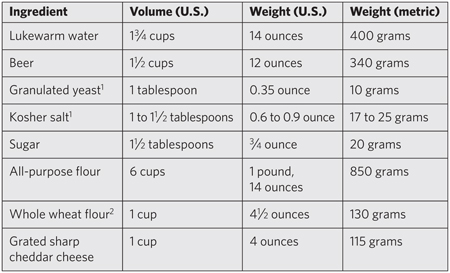
1Can decrease (see here and here)
2Can substitute white whole wheat (see here)
1. Mixing and storing the dough: Mix the yeast, salt, and sugar with the water and beer in a 6-quart bowl or a lidded (not airtight) food container.
2. Mix in the flours and the cheese without kneading, using a spoon or a heavy-duty stand mixer (with paddle). If you’re not using a machine, you may need to use wet hands to incorporate the last bit of flour.
3. Cover (not airtight) and allow to rest at room temperature until the dough rises and collapses (or flattens on top), approximately 2 hours.
4. The dough can be used immediately after the initial rise, though it is easier to handle when cold. Refrigerate the container of dough and use over the next 7 days.
5. On baking day, dust the surface of the refrigerated dough with flour and cut off a 1-pound (grapefruit-size) piece. Dust the piece with more flour and quickly shape it into a ball by stretching the surface of the dough around to the bottom on all four sides, rotating the ball a quarter-turn as you go. Allow to rest and rise on a pizza peel prepared with cornmeal or parchment paper for 1 hour (see sidebar).
6. Preheat a baking stone near the middle of the oven to 450°F (20 to 30 minutes), with an empty metal broiler tray on any shelf that won’t interfere with rising bread.
7. Sprinkle liberally with flour and slash the top, about ½ inch deep, using a serrated bread knife (see photos).
8. Slide the loaf directly onto the hot stone. Pour 1 cup of hot water into the broiler tray and quickly close the oven door (see here for steam alternatives). Bake for about 30 minutes, or until richly browned and firm. Smaller or larger loaves will require adjustments in resting and baking time.
9. Allow to cool on a rack before slicing and eating.
Caramelized Onion and Herb Dinner Rolls
“My friend Rey once told me she times her cooking so that the onions are caramelizing as her guests arrive, claiming there is nothing more aromatic and inviting. I can’t help but agree with her.”—Zoë
Caramelizing onions is easy and rewarding, and they can be used to dress up any of our savory doughs. Another favorite is to add Manchego cheese to the onion mixture, which also makes a great pizza topping (here). Because it takes some time to achieve perfectly caramelized onions you may want to double the recipe to have some on hand; they freeze for months.
Makes 6 dinner rolls
1 pound (grapefruit-size portion) Master Recipe (here), Vermont Cheddar (here), or European Peasant (here) dough
3 tablespoons olive oil
2 large onions, chopped
1 teaspoon salt
1 tablespoon vermouth or white wine
1 teaspoon white wine vinegar
2 tablespoons brown sugar
1 teaspoon dried thyme or oregano (or 2 teaspoons chopped fresh thyme or oregano leaves)
4 tablespoons water
Freshly ground black pepper
Cornmeal or parchment paper, for the pizza peel.
1. To prepare the onions: Heat the olive oil in a large skillet on medium-low heat. Add the onions, salt, vermouth, vinegar, brown sugar, herbs, and water and cook for about 25 minutes, stirring occasionally, until the onions are nicely caramelized. Add more water, as needed, to prevent burning. Season with pepper to taste.
2. On baking day, dust the surface of the refrigerated dough with flour and cut off a 1-pound (grapefruit-size) piece. Dust with more flour and quickly shape it into a ball by stretching the surface of the dough around to the bottom on all four sides, rotating the ball a quarter-turn as you go.
3. To form the dinner rolls, divide the ball into 6 roughly equal portions (each about the size of a plum). Shape each one into a smooth ball. Arrange on the prepared baking sheet so that the rolls have plenty of space to rise without touching. Allow to rest for 20 minutes.
4. Preheat the oven to 450°F, with an empty metal broiler tray on any shelf that won’t interfere with rising rolls. A baking stone is not required, and omitting it shortens the preheat.
5. Cut a ½-inch-deep cross into the top of each roll, using a serrated bread knife or sharp kitchen shears. Fill the resulting space with about 1 tablespoon of the caramelized onion mixture.
6. Slide the baking sheet into the oven. Pour 1 cup of hot water into the broiler tray and quickly close the oven door (see here for steam alternatives). Bake for 25 minutes, or until deeply browned and firm.
7. Allow to cool slightly before eating.
Spinach Feta Bread
Spinach and feta cheese are usually seen wrapped in flaky phyllo pastry dough as savory Greek spinach pies. Our bread version is hearty, satisfying, and much easier to make (see color photo). Serve with tapenade (here) for a fantastic and easy appetizer.
Makes four loaves, slightly less than 1 pound each. The recipe is easily doubled or halved.
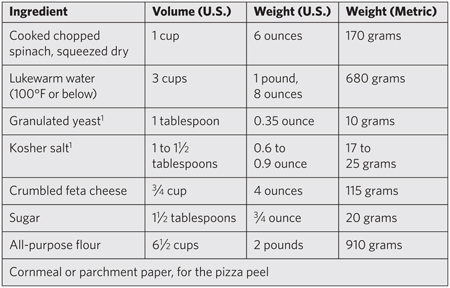
1Can decrease (see here and here)
1. Mixing and storing the dough: Mix the yeast, salt, spinach, cheese, and sugar with the water in a 6-quart bowl or a lidded (not airtight) food container.
2. Mix in the flour without kneading, using a spoon or a heavy-duty stand mixer (with paddle). If you’re not using a machine, you may need to use wet hands to incorporate the last bit of flour.
3. Cover (not airtight) and allow to rest at room temperature until the dough rises and collapses (or flattens on top), approximately 2 hours.
4. The dough can be used immediately after the initial rise, though it is easier to handle when cold. Refrigerate the container of dough and use over the next 7 days.
5. On baking day, dust the surface of the refrigerated dough with flour and cut off a 1-pound (grapefruit-size) piece. Dust the piece with more flour and quickly shape it into a ball by stretching the surface of the dough around to the bottom on all four sides, rotating the ball a quarter-turn as you go. Allow to rest and rise on a pizza peel prepared with cornmeal or parchment paper for 1 hour (see sidebar).
6. Preheat a baking stone near the middle of the oven to 450°F (20 to 30 minutes), with an empty metal broiler tray on any shelf that won’t interfere with rising bread.
7. Brush the top of the loaf with water and slash the top, about ½ inch deep, using a serrated bread knife (see photos).
8. Slide the loaf directly onto the hot stone. Pour 1 cup of hot water into the broiler tray and quickly close the oven door (see here for steam alternatives). Bake for about 35 minutes, or until richly browned and firm. Smaller or larger loaves will require adjustments in resting and baking time.
9. Allow to cool on a rack before slicing and eating.

Sun-Dried Tomato and Parmesan Bread
Bright and intense tomato flavors harmonize with the richness of aged Italian cheese. That’s a combination we love in pasta dishes, so we created a bread with those flavors. If you can get authentic Parmigiano-Reggiano cheese, use it here; if not, use whatever hard Italian-style grating cheese you use on your pasta.
Makes 1 loaf
1 pound (grapefruit-size portion) Master Recipe (here), European Peasant (here), Olive Oil (here), Light Whole Wheat (here), or Italian Semolina (here) dough
Olive oil, for brushing the loaf
½ cup oil-packed, sun-dried tomatoes, roughly chopped
½ cup grated Parmigiano-Reggiano cheese (or other Italian-style grating cheese)
Cornmeal or parchment paper, for the pizza peel
1. On baking day, dust the surface of the refrigerated dough with flour and cut off a 1-pound (grapefruit-size) piece. Dust the piece with more flour and quickly shape it into a ball by stretching the surface of the dough around to the bottom on all four sides, rotating the ball a quarter-turn as you go.
2. Roll out the ball into a ¼-inch-thick rectangle. As you roll out the dough, use enough flour to prevent it from sticking to the work surface but not so much as to make the dough dry.
3. Brush the dough with olive oil. Scatter the sun-dried tomatoes evenly over the dough and sprinkle the cheese over the tomatoes. Starting from the short end, roll the dough into a log and gently tuck the ends under to form an oval loaf. Allow to rest and rise on a cornmeal or parchment paper–covered pizza peel for 90 minutes (see sidebar).
4. Preheat a baking stone near the middle of the oven to 450°F (20 to 30 minutes), with an empty metal broiler tray on any shelf that won’t interfere with rising bread.
5. Brush the top of the dough lightly with olive oil and slash ½-inch-deep, parallel cuts across the loaf, using a serrated bread knife.
6. Slide the loaf directly onto the hot stone. Pour 1 cup of hot water into the broiler tray and quickly close the oven door (see here for steam alternatives). Bake for 30 to 35 minutes until deeply browned and firm.
7. Allow to cool on a rack before slicing and eating.
The key to great granola bread is—surprise—great homemade granola (recipe follows). You can use packaged granola for this bread, but it won’t have quite the same flavor. Make lots of your own granola and there’ll be plenty left over for breakfast.
“As a small child, I lived on a commune in the Northeast Kingdom of Vermont with my dad and my aunt Melissa, where they made granola and bread to sell at the local co-op. My main contribution was to eat great quantities of the granola. I still remember the sweet earthy smell of the house when Melissa would bake. Aunt Melissa has since passed away, and with her went the original recipe, but this is a very close approximation.”—Zoë
Makes about two 1½-pound loaves. The recipe is easily doubled or halved.

1Can decrease (see here and here)
2Can substitute white whole wheat (see here)
1. Mixing and storing the dough: Mix the yeast, honey, vegetable oil, cinnamon, and salt with the water in a 6-quart bowl or a lidded (not airtight) food container.
2. Mix in the flours and granola without kneading, using a spoon or a heavy-duty stand mixer (with paddle). If you’re not using a machine, you may need to use wet hands to incorporate the last bit of flour.
3. Cover (not airtight) and allow to rest at room temperature until the dough rises and collapses (or flattens on top), approximately 2 hours.
4. The dough can be used immediately after the initial rise, though it is easier to handle when cold. Refrigerate the container of dough and use over the next 5 days.
5. On baking day, grease an 8½ × 4½-inch nonstick loaf pan. Dust the surface of the refrigerated dough with flour and cut off a 1½-pound (small cantaloupe-size) piece. Dust the piece with more flour and quickly shape it into a ball by stretching the surface of the dough around to the bottom on all four sides, rotating the ball a quarter-turn as you go.
6. Elongate the ball into an oval and place into the prepared pan. Cover with plastic wrap or an overturned bowl and allow to rest for 90 minutes (see sidebar).
7. Preheat the oven to 350°F. A baking stone is not required, and omitting it shortens the preheat.
8. Brush the loaf lightly with egg wash, sprinkle with granola, and place in the center of the oven, and bake for about 45 minutes, or until richly browned and firm. Smaller or larger loaves will require adjustments in resting and baking time.
9. Allow to cool on a rack before slicing and eating.
Homemade Granola for Granola Bread
Use this granola in Aunt Melissa’s Granola Bread, or enjoy it with milk for breakfast.
Makes about 6 cups granola
1⁄3 cup honey
1⁄3 cup maple syrup
1⁄3 cup vegetable oil
2 tablespoons water
½ teaspoon pure vanilla extract
¼ teaspoon ground cinnamon
¼ teaspoon salt
4 cups rolled oats
¼ cup sesame seeds
¾ cup chopped pecans, or the nut of your choice
¾ cup shredded sweetened or unsweetened coconut
½ cup raisins
½ cup dried cherries, chopped dried apricots, or dried cranberries (or a combination)
1. Preheat the oven to 350°F. Prepare a high-sided, rimmed baking sheet or a lasagna pan with parchment paper, oil, butter, or a large silicone mat.
2. Mix together the honey, maple syrup, oil, water, and vanilla extract in a large measuring cup.
3. In a large bowl, combine the liquid mixture with the dry ingredients, except for the dried fruit, and mix until everything is coated. Spread out the mixture evenly in the prepared baking sheet. Bake for about 30 minutes, stirring every 10 minutes, until the granola is golden brown. The baking time will vary, depending on the depth of granola in the baking sheet or pan.
4. After the baking is complete, add the dried fruit.
5. Allow to cool, store in jars, and use in Aunt Melissa’s Granola Bread (here).
Roasted Garlic Potato Bread
Skin on and roughly mashed is the way we prefer our potatoes, but if you want yours peeled and perfectly pureed that will work as well. The roasted garlic is sweet and pungent; this bread explodes with aroma when you break into it.
Makes four 1-pound loaves. The recipe is easily doubled or halved.

1Can decrease (see here and here)
1. Mix the yeast, salt, sugar, mashed potato, and roasted garlic with the water in a 6-quart bowl or a lidded (not airtight) food container.
2. Mix in the flour without kneading, using a spoon or a heavy-duty stand mixer (with paddle). If you’re not using a machine, you may need to use wet hands to incorporate the last bit of flour.
3. Cover (not airtight) and allow to rest at room temperature until the dough rises and collapses (or flattens on top), approximately 2 hours.
4. The dough can be used immediately after the initial rise, though it is easier to handle when cold. Refrigerate the container of dough and use over the next 7 days.
5. On baking day, dust the surface of the refrigerated dough with flour and cut off a 1-pound (grapefruit-size) piece. Dust the piece with more flour and quickly shape it into a ball by stretching the surface of the dough around to the bottom on all four sides, rotating the ball a quarter-turn as you go. Allow to rest and rise on a pizza peel prepared with cornmeal or parchment paper for 60 minutes (see sidebar).
6. Preheat a baking stone near the middle of the oven to 450°F (20 to 30 minutes), with an empty metal broiler tray on any shelf that won’t interfere with rising bread.
7. Sprinkle liberally with flour and slash the top, about ½ inch deep, using a serrated bread knife (see photos).
8. Slide the loaf directly onto the hot stone. Pour 1 cup of hot water into the broiler tray and quickly close the oven door (see here for steam alternatives). Bake for 30 to 35 minutes until deeply browned and firm. Smaller or larger loaves will require adjustments in baking time.
9. Allow to cool on a rack before slicing and eating.
Eastern European Potato-Rye Bread
Here’s another potato bread, but one with an Eastern European accent—hold the roasted garlic and bring on the caraway seeds. This rustic beauty will still be fresh the day after baking, thanks to the moisture-holding potato and rye.
Makes four 1-pound loaves. The recipe is easily doubled or halved.
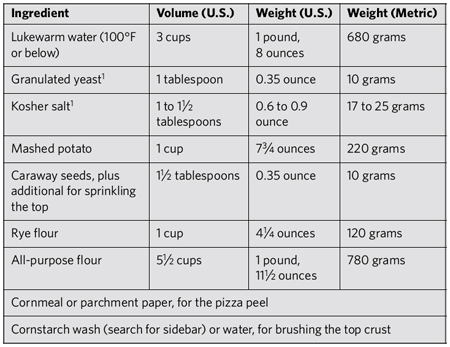
1Can decrease (see here and here)
1. Mixing and storing the dough: Mix the yeast, salt, mashed potato, and caraway seeds with the water in a 6-quart bowl or a lidded (not airtight) food container.
2. Mix in the flours without kneading, using a spoon or a heavy-duty stand mixer (with paddle). If you’re not using a machine, you may need to use wet hands to incorporate the last bit of flour.
3. Cover (not airtight) and allow to rest at room temperature until the dough rises and collapses (or flattens on top), approximately 2 hours.
4. The dough can be used immediately after the initial rise, though it is easier to handle when cold. Refrigerate the container of dough and use over the next 9 days.
5. On baking day, dust the surface of the refrigerated dough with flour and cut off a 1-pound (grapefruit-size) piece. Dust the piece with more flour and quickly shape it into a ball by stretching the surface of the dough around to the bottom on all four sides, rotating the ball a quarter-turn as you go. Allow to rest and rise on a pizza peel prepared with cornmeal or parchment paper for 60 minutes (see sidebar).
6. Preheat a baking stone near the middle of the oven to 450°F (20 to 30 minutes), with an empty metal broiler tray on any shelf that won’t interfere with rising bread.
7. Using a pastry brush, paint the top crust with cornstarch wash or water and then sprinkle with the additional caraway seeds. Slash ½-inch-deep, parallel cuts across the loaf, using a serrated bread knife.
8. Slide the loaf directly onto the hot stone. Pour 1 cup of hot water into the broiler tray and quickly close the oven door (see here for steam alternatives). Bake for 30 to 35 minutes, until deeply browned and firm. Smaller or larger loaves will require adjustments in baking time.
9. Allow to cool on a rack before slicing.
Bagels get their traditional texture and flavor from a brief trip into a malty boiling pot before baking (see color photo). You can substitute sugar for the malt in both the dough and the boiling water, but the flavor won’t be quite as authentic. Bagels are meant to be chewy, so we use bread flour. This dough stores as well as any of our other recipes and can be used for soft pretzels (here), bialys (here), or even free-form loaves.
Makes about 20 bagels. The recipe is easily doubled or halved.
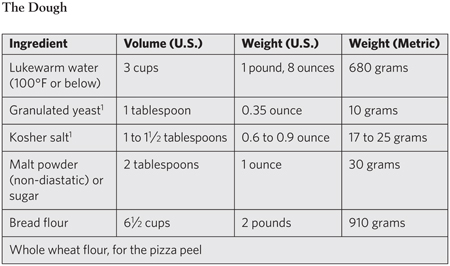
1Can decrease (see here and here)

1. Mixing and storing the bagel dough: Mix the yeast, salt, and malt powder or sugar with the water in a 6-quart bowl or a lidded (not airtight) food container.
2. Mix in the flour without kneading, using a spoon or a heavy-duty stand mixer (with paddle). If you’re not using a machine, you may need to use wet hands to incorporate the last bit of flour.
3. Cover (not airtight) and allow to rest at room temperature until the dough rises and collapses (or flattens on top), approximately 2 hours.
4. The dough can be used immediately after the initial rise, though it is easier to handle when cold. Refrigerate the container of dough and use over the next 14 days.
5. Preheat a baking stone near the middle of the oven to 500°F (20 to 30 minutes), with an empty metal broiler tray on any shelf that won’t interfere with the bagels.
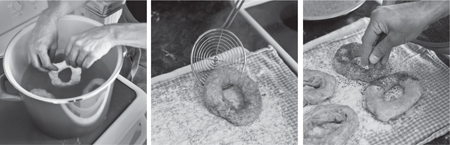
6. Dust the surface of the refrigerated dough with flour and cut off a 1-pound (grapefruit-size) piece. Divide the dough into 5 equal pieces. Dust each piece with more flour and quickly shape it into a ball by stretching the surface of the dough around to the bottom on all four sides, rotating the ball a quarter-turn as you go.
7. Repeat to form the rest of the bagels. Cover the balls loosely with plastic wrap and allow to rest at room temperature for 20 minutes.
8. Prepare the boiling-pot: Bring a large saucepan or stockpot full of water to a boil. Reduce to a simmer and add the malt powder or sugar and baking soda.
9. Punch your thumb through each dough-ball to form a hole. Ease the hole open with your fingers and stretch until the diameter is about triple the width of the bagel wall.
10. Drop the bagels into the simmering water one at a time, raising the flame as necessary to continue at a slow simmer. They need enough room to float without crowding or they will be misshapen (though they may touch a little). Let them simmer for 1 minute and then flip them over with a slotted spoon to cook the other side for another 30 seconds.
11. Remove them from the water using the slotted spoon, and place on a clean kitchen towel that has been dusted with flour. This will absorb some of the excess water. After they’ve drained a bit, place them on a peel covered with whole wheat flour. Sprinkle the bagels with poppy seeds or sesame seeds.
12. Slide the bagels directly onto the hot stone. Pour 1 cup of hot water into the broiler tray and quickly close the oven door (see here for steam alternatives). Bake for 15 to 20 minutes until deeply browned and firm.
13. Break the usual rule for cooling, and serve these a bit warm.

“Bialys have always been something of an obsession for my mother. When I was a little girl, we’d visit my great aunts in Brighton Beach, Brooklyn, and my mother would always stop to pick up bialys and knishes, two things that couldn’t be found anywhere in Vermont, where we lived. Mom’s obsession was in full bloom during a recent trip to New York City with her best friend, Barbara. As they left the ballet at Lincoln Center, my mother decided that late-night bialys would make the evening truly perfect. They jumped onto a bus and headed for Kossar’s Bakery in lower Manhattan, one of the world’s last great bastions of “bialydom.” One can only imagine the sight of two women dressed for the ballet getting out of a bus at midnight in front of Kossar’s. Only someone obsessed with fresh bialys would understand. Now my mother can make bialys at home.”—Zoë
Makes about 5 bialys
1 pound Bagel dough (here)
1 tablespoon vegetable oil
½ onion, finely chopped
¾ teaspoon poppy seeds
Salt and freshly ground black pepper
Whole wheat flour, for the pizza peel
1. On baking day, dust the surface of the refrigerated dough with flour and cut off a 1-pound (grapefruit-size) piece. Divide the dough into 5 equal pieces. Dust each piece with more flour and quickly shape it into a ball by stretching the surface of the dough around to the bottom on all four sides, rotating the ball a quarter-turn as you go. Press the balls into 3-inch disks and let rest on a floured surface for 30 minutes.

2. Preheat a baking stone near the middle of the oven to 450°F (20 to 30 minutes), with an empty metal broiler tray on any shelf that won’t interfere with the rising bialys.
3. While the dough is resting and the oven is preheating, in a skillet over medium heat, sauté the onions in the vegetable oil until they are translucent and slightly golden. Don’t overbrown at this stage, or they will burn in the oven. Remove from heat and add the poppy seeds, and salt and pepper to taste.
4. Press the center of each bialy to flatten it, working your way out until there is a ½-inch rim of dough that is not pressed flat, and the bialy is about 4 inches wide. Fill the center of each bialy with 1 tablespoon of the onion mixture and press it firmly into the bialy dough.
5. Transfer the bialys to a pizza peel dusted with whole wheat flour, and slide them directly onto the hot stone, making sure they are spaced about 1 inch apart so they have room to expand. Pour 1 cup of hot water into the broiler tray and quickly close the oven door (see here for steam alternatives). Bake for about 12 minutes, until golden brown. Do not overbake the bialys or they will lose their chewy, soft texture.
6. Allow to cool slightly before eating.
Pretzels are closely related to bagels, and you can make fantastic ones using our standard Bagel dough, and twisting it into the pretzel shape—an ancient symbol of earth and sun (see color photo). A brief bath in a boiling alkaline solution (we use baking soda) transforms ordinary bread crust into the essence of pretzels. We love them warm, with mustard.
“Food writer Mimi Sheraton wrote a newspaper article on homemade pretzels about thirty-five years ago, and it stuck in my teenage mind—I was taken by her description of the crusty pretzels baked by her Stuttgart hosts. I still have the original clipping from 1978, so we’ve adapted her recipe here.”—Jeff
Makes about 5 pretzels
The Pretzels
1 pound (grapefruit-size portion) Bagel dough (here)
Extra flour, for dusting the kitchen towel
Coarse salt or “pretzel” salt
Whole wheat flour, for the pizza peel

The Boiling Pot
8 quarts boiling water
¼ cup baking soda
2 tablespoons sugar
1. On baking day, dust the surface of the refrigerated dough with flour and cut off a 1-pound (grapefruit-size) piece. Divide the dough into 5 equal pieces. Dust each piece with more flour and quickly shape it into a ball by stretching the surface of the dough around to the bottom on all four sides, rotating the ball a quarter-turn as you go. Elongate the ball, dusting with additional flour as necessary. Roll it back and forth with your hands on a flour-dusted surface to form a long rope about 20 inches long, approximately ½ inch in diameter at the center, and tapered on the ends.
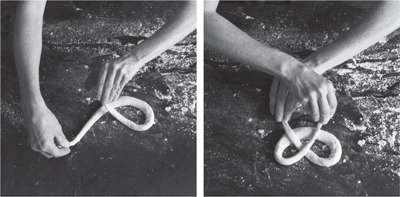
2. Twist the dough rope into a pretzel shape by first forming a horseshoe with the ends facing away from you. Fold the tapered ends down to the thick part of the rope, crossing them, one over the other. Extend the ends an inch beyond the bottom loop and gently press them together.
We didn’t use lye in the boiling pot: When we published our pretzel recipe in the first edition, a few people wrote to express their dismay that we didn’t use lye in the boiling pot—that’s right, the same chemical used in drain cleaner. They claimed that it’s the crucial ingredient to get the absolutely authentic German-style pretzel crust they craved. They may have a point, but we doubted we’d be able to convince home bakers to try this particularly wacky ingredient. For this edition, we actually went so far as to purchase food-grade lye, but then we read the label: “… wear chemical-resistant gloves. Wear protective clothing. Wear goggles…” And our favorite, advising users to watch out for “digestive tract burns” (though the manufacturer helpfully advises against swallowing the lye). We found that baking soda makes a terrific substitute—it’s alkaline enough. We must admit, we never opened that container of lye.
3. Preheat a baking stone near the middle of the oven to 450°F (20 to 30 minutes), with an empty metal broiler tray on any shelf that won’t interfere with rising pretzels.
4. Keep the pretzels covered loosely with plastic wrap as you repeat the process to shape the remaining dough. Let the pretzels rest at room temperature for 20 minutes.
5. Prepare the boiling pot: Bring a large saucepan or stockpot full of water to a boil. Reduce to a simmer and add the baking soda and sugar. Drop the pretzels into the simmering water one at a time, making sure they are not crowding one another. They need enough room to float without touching or they will be misshapen. Let them simmer for 1 minute and then flip them over with a slotted spoon to cook the other side for another 30 seconds.
6. Remove them from the water using the slotted spoon, and place on a clean kitchen towel that has been dusted with flour. This will absorb some of the excess water from the pretzels. Then place them on a peel covered with whole wheat flour. Sprinkle with coarse salt.
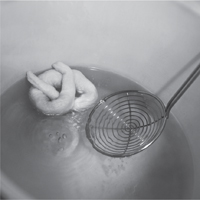
7. Slide the pretzels directly onto the hot stone. Pour 1 cup of hot water into the broiler tray and quickly close the oven door (see here for steam alternatives). Bake for about 15 minutes, until deeply browned and firm. If you want crisp pretzels, bake 5 to 10 minutes longer.
8. Serve these a bit warm, with a hefty stein of beer.
VARIATION: PRETZEL BUNS
Divide a 1-pound ball of Bagel dough (here) into 8 smooth balls, then allow to rest for 20 minutes. Boil as above but shorten the boil to 20 seconds on each side, drain as above, and space 2 inches apart on a baking sheet prepared with oil, butter, parchment paper, or a silicone mat. Sprinkle with coarse salt and bake with steam for 20 minutes at 450°F.

Montreal Bagels
These differ from American bagels—they’re sweeter, and they have toppings on both sides (poppy seed and sesame are the classics). In Montreal, bagels are traditionally baked in a wood-fired oven, which imparts a wonderful smokiness, but the ones made on the baking stone at home are excellent as well. This recipe calls for bread flour to ensure that the bagels are nice and chewy.
“One of the first dates with my husband was to visit his hometown, Montreal. As soon as we arrived, we drove to Fairmont Bagels and got a dozen fresh from the oven—I was in love. Several years later, after a New Year’s Eve party in Montreal, Graham proposed to me while we were eating Fairmont bagels. Now we live in the Midwest with no easy way to get our favorite bagels, so I create my own. They may not be baked in a wood-fired oven but they are close, really close, to what I remember.”—Zoë
Makes about 1 dozen bagels. The recipe is easily doubled or halved.

1Can decrease (see here and here)
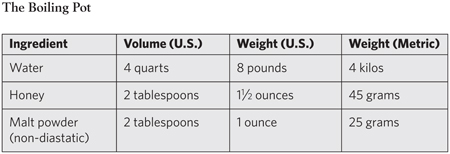
1. Mixing and storing the bagel dough: Mix the yeast, salt, sugar, honey, egg, oil, and malt powder with the water in a 6-quart bowl or a lidded (not airtight) food container.
2. Mix in the flour without kneading, using a spoon or a heavy-duty stand mixer (with paddle). If you’re not using a machine, you may need to use wet hands to incorporate the last bit of flour.
3. Cover (not airtight) and allow to rest at room temperature until the dough rises and collapses (or flattens on top), approximately 2 hours.
4. The dough can be used immediately after the initial rise, though it is easier to handle when cold. Refrigerate the container of dough and use over the next 7 days.
5. Preheat a baking stone near the middle of the oven to 500°F (20 to 30 minutes), with an empty metal broiler tray on any shelf that won’t interfere with the bagels.
6. On baking day, dust the surface of the refrigerated dough with flour and cut off a 1-pound (grapefruit-size) piece. Divide the dough into 5 equal pieces. Dust each piece with more flour and quickly shape it into a ball by stretching the surface of the dough around to the bottom on all four sides, rotating the ball a quarter-turn as you go.
7. Cover the balls loosely with plastic wrap and allow to rest at room temperature for 20 minutes.
8. Prepare the boiling pot: Bring a large saucepan or stockpot full of water to a boil. Reduce to a simmer, and add the honey and malt.
9. Punch your thumb through each dough ball to form a hole. Ease the hole open with your fingers and stretch until the diameter is about triple the width of the bagel wall.
10. Drop the bagels into the simmering water, one at a time, raising the flame as necessary to continue at a slow simmer. They need enough room to float without crowding or they will be misshapen (though they may touch a little). Let them simmer for 30 seconds and then flip them over with a slotted spoon to cook the other side for another 30 seconds.
11. Remove them from the water, using the slotted spoon, and place on a clean kitchen towel that has been dusted with flour. This will absorb some of the excess water.
12. Dredge both sides of each bagel in poppy seeds or sesame seeds and place on a pizza peel. (If making plain bagels, cover the peel with whole wheat flour.) Slide the bagels directly onto the hot stone. Pour 1 cup of hot water into the broiler tray and quickly close the oven door (see here for steam alternatives). Bake for about 15 to 20 minutes until richly browned and firm.
13. Break the usual rule for cooling and serve these a bit warm.
Visit BreadIn5.com, where you’ll find recipes, photos, videos, and instructional material.