

Taking your new computer out of the box and connecting all the parts
You are now in all likelihood the proud owner of a computer. Congratulations on the new addition to your home! Give yourself a pat on the back (or a pink cigar) from me. Not unlike the arrival of a newborn, you might be feeling a little nervous about whether you’ll have what it takes to be a good computer parent. Don’t give it another thought. You’re a natural… you just don’t know it yet.
From this point forward, we’ll be doing hands-on work with your computer. Don’t worry, I know you’ll do great. You can read through the chapter if you want, but then come back to the beginning and follow the instructions step by step. Illustrated setup instructions may also be included with your new computer. (Be forewarned—these may be harder to follow than your tax return.) The instructions here will help simplify the process. Read them along with the instructions that come with your computer.
“Some people may feel comfortable setting up their own computer, but I would rather spend the money to have someone come and do it for me.”
—Kathy
There are three things that you must do before you even open your computer boxes.
1. Find a large (at least 8” × 12”) mailing envelope or a gallon self-sealing plastic bag that can be closed securely. Label it “Computer Information.” Put all your sales receipts and any other paperwork from the computer store into the envelope or bag. If your salesperson filled out the Test-Drive Form when you made your purchase, you can skip the next steps. If you don’t have a filled-out computer Test-Drive Form, take a clean piece of paper and write down the following information on it:
• The date of purchase. (If you do have a Test-Drive Form, write the date of purchase at the top.)
• The store where you made your purchase, as well as the phone number and name of your salesperson (or staple the salesperson’s card to the piece of paper).
• The length of the warranty and extended warranty, if you purchased one.
• Look on the outside of your computer’s packing box. It will probably have a description of your computer. If it does, copy down the brand name of your computer and any numbers or letters that follow—this indicates the model. Most likely the speed of your CPU, size of your hard drive, and speed of your RAM will also appear on the outside of the box. Note these as well. Next, write down the speed of your modem. Last but not least, write down any peripherals you bought—printer, scanner, or modem (include brand and model). If this information isn’t on the packing boxes, you can get the details when you set up the computer.
Put all this documentation inside your “Computer Information” packet.
2. The next thing you have to do is make space. Don’t try to set up the computer in an area where there’s a lot of clutter. A clean, open workspace not only makes for a pleasant work environment, but the computer also needs proper ventilation. Look at the workspace that you want to use for the computer, and move everything that’s in your way to the other end of the room. You can move things back eventually, but it’s much easier to keep track of what you’re doing (and much less frustrating) if you have plenty of space to work in. If you are unsure of your workspace, go back to Chapter 5 for a quick review of some factors to consider in choosing one.
3. Finally, have a pair of scissors, box of rubber bands, wastebasket, roll of masking tape, and small box or an available section of a bookshelf at the ready.
Before you connect all the parts, feel free to ask a computer-owning friend or family member to help you. This is not a test of your ability to last four days in the forest alone. If someone in the know is willing to set up your computer, it’s perfectly fine to let them do it. Maybe you’ve even convinced someone from the computer store—or a high school student—to help. Just be sure that you pay attention to what’s done. Take notes if you want to. There may come a time when you’ll move the computer, and it will be helpful to understand how it’s all connected.
“I wanted to put it together myself. I figured it was the best way to get to know the machine. I did it very slowly.”
—Ralph
If you’ve bought a laptop computer, the unpacking stage is quite simple. There will only be your computer, an electrical cord, and a few incidental items to unpack. However, if you’ve bought a desktop, there will be several large items—a monitor, the computer case, the keyboard, and several cords to connect everything.
1. Use scissors to cut open the box. Be gentle. Not only is your investment inside, but if you do have buyer’s remorse, you’ll have to return the computer in its original package. Try not to destroy the box or the big pieces of packing materials. My sister saves all her equipment boxes. She has moved several times, and it gives her great comfort to have her computer happily secure in its original boxes—safe from the dangers of careless movers.
2. If you’ve bought a desktop, be aware that the computer case and the monitor can be quite heavy and unwieldy. It is a good idea to set the box gently on its side and drag the piece of equipment out of the box along the floor. If you think it’s too heavy for you, do not try to take it out of the box yourself. You don’t want to hurt yourself or damage the computer. If it all seems manageable, gently remove the computer parts from their boxes and set them carefully on the floor.
3. Each packing box will also contain the proper cords. As an extra precaution, you can stop now and label each cord with masking tape. For example, mark “Monitor to outlet” on the cord that plugs into the wall and “Monitor to computer case” on the other cord. “Keyboard to computer case,” and so on. That way, if you move the computer, there’ll be no confusion about which cord goes to which part.
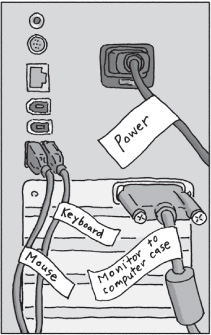
• Labeling the cords that connect the parts of the computer proves helpful if you ever have to move the computer.
4. Until all the parts are situated, it’s safest to have them where they can’t be knocked over. The instructional books, warranties, installation disks, and small parts included with your computer should be placed by the parts they came with and kept together with a rubber band. It’s very important that you don’t misplace any of the CDs or DVDs that came with your equipment. These are the installation disks for the operating software and are used as backup if your computer breaks down. It is unusual, but there is always the chance that your computer might have a major failure and lose everything stored in its memory. If for some reason the software (either operating or application) is affected, you will use these disks to reinstall. Eventually all these things will be stored in the box that you set aside or on the available space on your bookshelf. If there is anything really tiny that might get lost, put it in your “Computer Information” envelope.
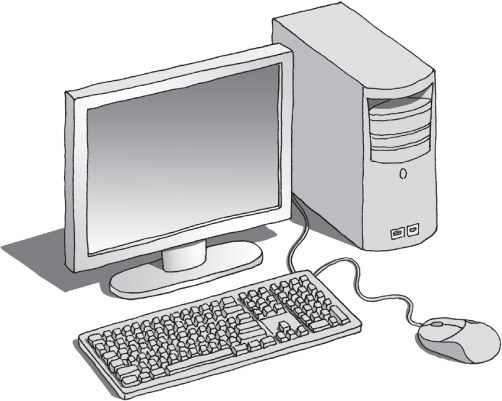
• The main components of your desktop computer are the computer case, monitor, keyboard, and mouse.
5. On each piece of equipment (whether it is a laptop or a desktop) there is a serial number (usually on the back or bottom). Take the piece of paper with all your computer information on it and jot down these serial numbers. Be clear about which serial number goes with which item. It’s much easier to record these numbers now than after the computer has been set up. This is also the time to record the brand and model if it wasn’t on the box.
Once all the parts of your computer are out of the box, sit down. Take a few minutes and just look at everything. Admire your purchase. Soon you’ll be working with it.
Also set aside any registration cards that came with your equipment. They should be filled out and sent in after you’re sure everything is in working order. The piece of paper where you recorded all the serial numbers will be your resource to complete the registration cards.
Take time to look over the written material that came with your computer, including the illustrated brochure on how to set everything up. No matter how tempting it is to forge ahead and hook everything up, don’t. It is very important that you follow the instructions that the manufacturer has given, along with the steps here. Once a mistake has been made and something is hooked up improperly, it is a bear to backtrack and make a correction.
Before you plug anything in, get acquainted with the ports at the back of your computer. Notice that the cords and ports are designed as pairs; the number of holes in one port corresponds to the number of prongs on one of the cords. If, when you begin plugging things in, you feel any resistance, remove the cord and confirm that it matches the port.
Be aware that the prongs on the cords are very delicate. If you bend one of the prongs, gently, very gently, urge it back to its original position.

• The ports at the back of the computer case are where the cords plug in.
If you have chosen a laptop computer, setup is very simple: Set the computer on your desk and plug the electrical cord into the back of the computer. Do not plug it into the wall yet.
If you have a desktop, the procedure for attaching all the parts of the computer is the same, whether you have purchased a Mac or a PC. Before you follow these directions, read the manufacturer’s instructions.
1. Gently and carefully pick up the computer case and place it where you want it. (Remember: Don’t place the computer case directly on carpeting because it may generate static electricity that can harm the unit.) Don’t forget you’re going to want the computer case where you can easily reach it. Position it so that the ports at the back are still within reach. You will swing it into its final position once everything is plugged in. Attach the electrical cord to the back of the computer case, but do not plug it into the wall outlet yet.
2. The monitor should be placed either on top of your desk or on top of the computer case on your desk. The monitor is very fragile. If you can’t manage it, leave it where it is and ask someone to help you. Attach the cord that connects the monitor to the computer case. Then take the electrical cord for the monitor and plug it into the back of the monitor. Do not plug it into the outlet yet.
3. The keyboard should be placed on your desk or pull-out shelf and plugged into the appropriate port on the computer case.
4. Set the mouse to the right of the keyboard and plug it in. Usually the mouse plugs into the computer case. If it doesn’t, it will plug into the keyboard or sometimes even the monitor. Refer to the setup page in the instruction book that came with your computer to be sure. If you have a mouse pad, place it under the mouse.
5. If the modem is not built into your machine or you are using a high-speed modem, connect the modem according to its instruction sheet. If you are using a dial-up connection to the Internet, the computer should have come with a phone cord for your internal modem. Plug this phone cord into the hole that looks like a phone jack on the modem. Plug the other end of the phone cord into the phone jack on your wall. If the phone cord isn’t long enough to reach the jack, you may have to buy a longer one.
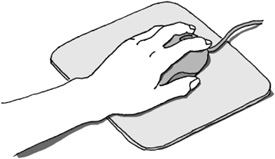
• The mouse is positioned with the “tail” pointing away from you.
6. If you have bought a printer, a scanner, or any other peripheral, place it where you want it to be. Follow the manufacturer’s instructions for proper installation. It is important that you plug in the cords to the computer only when instructed.
Before you plug anything into the electrical outlet, let’s review what we have done so far.
• The monitor and keyboard are plugged into the back of your computer case.
• The mouse is plugged into either the computer case, monitor, or keyboard.
• The monitor and computer case also have cords that will eventually plug into an electrical source.
Sit back and view your creation. Take a break now and do something else, or if you’re up to it, you can take the next big step of plugging it in, as described in the next section.
Okay, are you ready to take the final steps before turning the computer on? Here goes.
• Take the surge protector and position it near all the power cords. Do not plug it into the wall yet.
• Plug the monitor, computer case, printer, and any other peripherals into the surge protector.
• Finally—plug the surge protector into the wall outlet! There may be an indicator light on the surge protector to let you know that it is connected. If that light is not lit, there should be an on/off switch on the surge protector; flip the switch and the light should go on.
At this point all the parts of the computer are attached and they are plugged into a power source. In the next chapter you will turn the computer on and begin to learn what an incredible resource it really is. Congratulations!
In the next chapter, we’re going to begin working on the computer. For your well-being and good health, keep the following ergonomic guidelines in mind:
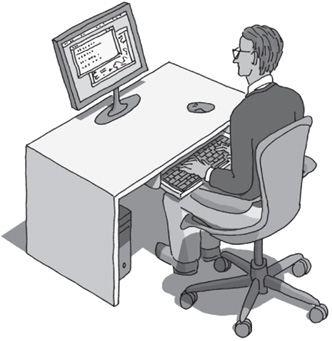
1. Your knees, hips, and elbows should be at 90-degree angles.
2. There should be an unbroken line from your elbows to your fingertips—no breaking at the wrists.
3. Your hand should be relaxed when using the keyboard and the mouse—no claws or strain.
4. Be very aware of your posture—it is easy to “sink into” the machine over time.
5. The monitor should be an arm’s length away. This may require a special prescription if you wear glasses.
6. Take a break! Do not sit at the computer for more than 45 minutes without taking a break to stretch and rest your eyes.
Q: I didn’t save the original boxes, and unfortunately I want to return the computer. What can I do?
A: Each store has a different policy, but if you are within the window of time for returning a purchase, the boxes (or lack thereof) shouldn’t be a deal breaker.
Q: My computer came with a phone cord. Why?
A: Computer manufacturers still include phone cords in case you are going to use a dial-up connection to the Internet. If that is the case, you will need a phone cord.
Q: Help! I can’t find the cable to connect the printer to the computer.
A: That’s because neither the printer nor the computer comes with that cable. You need to buy it separately. Return to the store where you bought the printer, with receipt in hand, to be sure they sell you the correct cable. Make a point, before going to the store, of measuring how long the cable needs to be.