Experimenting with what you can do on the computer
In the last chapter you were introduced to the mouse. This chapter will introduce you to the Mac and PC operating systems, as well as to some other features that your computer has to offer. Mac users, turn to page 153. PC users, continue reading. And remember: Don’t sit at the computer too long without taking a break. Also check the position of your back, arms, and legs in relation to the computer and review the ergonomic safety tips on page 96.
Turn on your computer. Let’s open some of the icons on the desktop screen and see specifically what they have to offer. If you don’t have the icons I refer to on your desktop screen, click on Start  or
or  (bottom left of your screen) and find them in the Start menu that opens.

First we’ll open the icon labeled  Computer. The Computer window allows access to both the software and hardware on your computer. From here you can get to all the information stored on your hard drive, as well as the drives that hold your CD and DVD disks.
Move the mouse arrow onto the Computer icon and double-click. If the icon is highlighted in blue but the window didn’t open, your double click wasn’t successful. Place the mouse arrow on the icon again and depress, release, depress, release the mouse button in as rapid succession as you can. Think knock, knock. Keep trying, and eventually you will get the timing.
As I describe each icon contained in the Computer window, feel free to double-click on the icon to open it and see what’s inside. To get back to the Computer window, move the mouse arrow to the word Back or to a left-facing arrow on the upper left side of the Menu Bar and click once. If you have somehow closed the window, simply find the Computer icon on the desktop screen or in the Start menu.
The (C:) icon allows access to anything on your computer’s C: drive. Because the C: drive is the storage space for everything on your computer, you can find anything you need through this icon.

• The “Computer” window. Notice that it has a Title Bar, and Minimize, Maximize, and Close Boxes. Most PC windows have these features.
Find a folder titled Documents in the C: drive. You may find the Documents folder in the sidebar of the Computer window. That folder will store whatever writing you eventually do on the computer. You may not be able to see all that is contained in the C: drive, but if you click on the  Maximize Box, you will be able to see more of what’s in the window. Later I will explain how to view the entire contents of a window utilizing the Scroll Bar (page 142).
The (D:) icon (also referred to as E:) allows you to hear and/or see a compact disc (CD) or DVD on your computer. When a music CD is in the D: drive, this icon will offer you choices about which track you may want to listen to and the volume you prefer. We will experiment with this later in the chapter.
To navigate between these windows you can close each window when you are done and start from scratch. You may also notice an arrow in the top left of the window. That arrow, when clicked on, will also send you back to the previous window viewed.

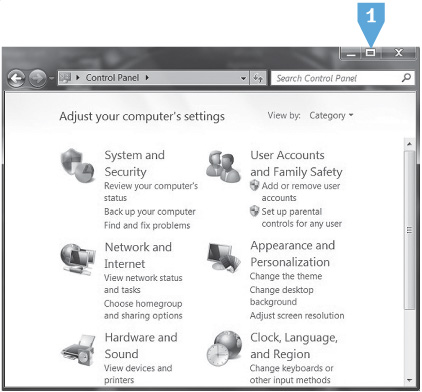
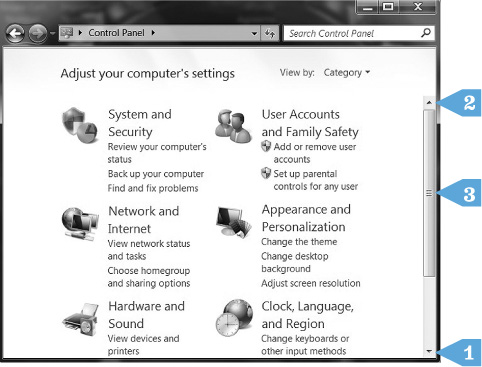
Now let’s visit the Control Panel and see what it has to offer. If there isn’t an icon on the Desktop for the Control Panel, click on  or
or  and then click on Control Panel.
The Control Panel is where you get to customize certain aspects of your computer. I’m only going talk about the features that you’ll use most in the Control Panel window.
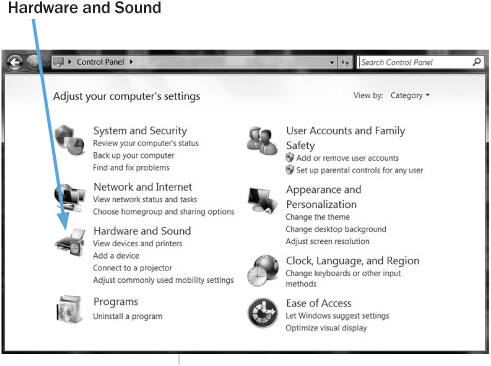
The Hardware and Sound  icon allows you access to both the printer you’re already using and a new printer that you might add at any time. This is also the place to go if you change your mind once you start printing a document and want to stop the printer (or “purge print documents” in computer-speak).
The Network and Internet  icon is something you will probably never use. This is where you set up your access to the Internet. If at some point you decided to reconfigure your Internet connection, you would double-click on this icon to access the area where you would make those changes.
The Clock, Language, and Region  icon allows you to adjust the date and time. We’re going to do that together in a bit, but first I want you to experiment with the parts of this window now that it is open.
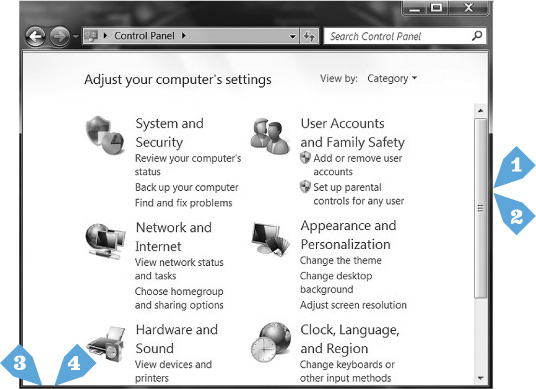
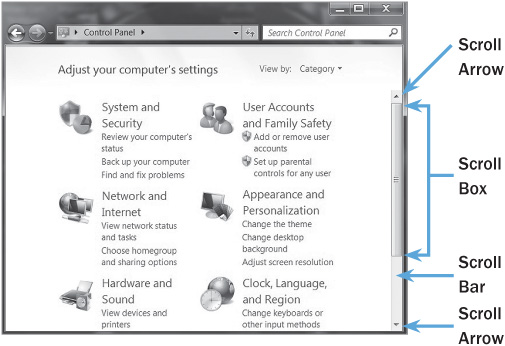
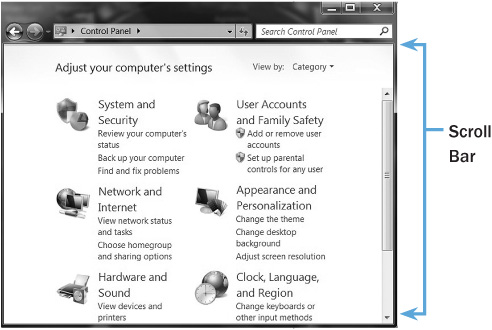
The size of the window dictates how much of the information it contains is visible to you. This is where the Scroll Bar comes in handy. The Scroll Bar allows you to move the information in the window up and down for full viewing.
You will notice that this window has the same features as the Solitaire window. It has a Title Bar,  Minimize Box,
  Maximize Box, and
  Close Box. What we haven’t discussed yet is the Scroll Bar on the bottom and right side of the window.
If you see a Scroll Bar on the right edge or bottom of a window, it tells you that there is more in the window than you can see. (If there is no Scroll Bar on the window of your screen, don’t worry. On page 142 there are instructions on how to make a Scroll Bar appear.) You can increase the size of the window or scroll the window to see what else it contains. Students often call me in distress because they can’t find an item that they know is supposed to be in a certain window. Usually it is right where it should be, but they didn’t see all the contents of the window. The Scroll Bar is your clue that there is more to be unveiled.
• You can customize certain parts of your computer using the Control Panel.
CLICK AND GO
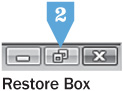
1. Click on the Maximize Box.
2. Click on the Restore Box.
Enlarging the Window The most efficient way to see all the contents of a window is to increase its size. You can do that in a number of ways. For the sake of experimentation, try each option. Once you have seen how one choice works, follow the instructions in italics to restore the window and go on to the next option. We will experiment with scrolling after you have tried the following options.
Option 1. There is a box above the Title Bar that will increase the size of the window. As you may remember, it’s the Maximize Box. Move the mouse arrow into the and click once. To restore it back to its original form, move the mouse arrow to the  Restore Box and click once.
Option 2. Move your mouse arrow to the bottom right corner of the Control Panel window. Your arrow will become a two-ended arrow at an angle  . (If the double arrow eludes you it is because you are moving the mouse too quickly. Slow down.) As you did with the Solitaire cards, click and drag the arrow to the bottom right of your screen, then release the mouse button. To restore, place the mouse arrow in the bottom right corner of the window to activate the two-ended arrow. Now click and drag the corner to the left and up until the window is the size it was when you first opened it.
Option 3. Move the mouse arrow to the right side of the Control Panel window. The arrow now becomes an arrow going right and left  . Click and drag the arrow to the far right edge of the screen and then release the mouse button. This increases the width. (The same can be done with the left side of the window.) To increase the height, move the right-left arrow to the bottom of the window. Now the mouse arrow becomes an up-and-down arrow
  . Click and drag the arrow to the far bottom edge of the screen and then release the mouse. (The same can be done with the top of the window.) To restore, place the mouse arrow on the right of the screen to activate the arrow going right and left. Now click and drag the edge to the left until the window is about the width it was when you first opened it. Do the same with the bottom edge of the window.
CLICK AND GO
1. Click and drag the corner of the window to enlarge.
2. Click and drag the corner of the window to restore to previous size and shape.
CLICK AND GO
1. Increase the width by clicking and dragging right edge out.
2. Click and drag back to restore to previous size/shape.
3. Click and drag bottom edge to increase window height.
4. Click and drag back to restore previous size/shape.
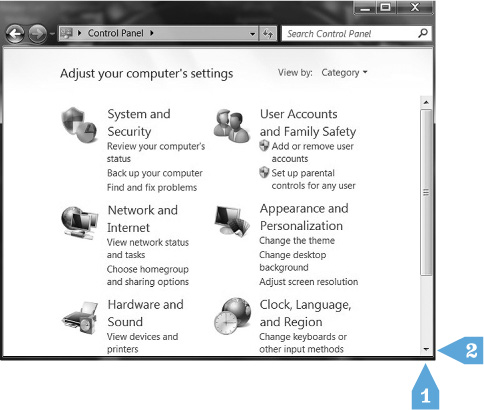
Sometimes there can be more icons contained in a window than you can see, no matter how large you make the window. In this case, you will have to use the Scroll Bar to see all that is available. The Scroll Bar is similar to an elevator: A button is pressed to activate it, it moves up and down, and you can get off anyplace you want.
Does your window look something like the window seen here? Make sure a Scroll Bar is on the right side of the window. If there isn’t a Scroll Bar, move the mouse arrow onto the lower right corner of the window. It will now be the two-sided arrow at an angle. Click and drag the corner up and left to create a Scroll Bar on the right side and bottom of the window.
There should be a set of arrows at the top and bottom of the Scroll Bar positioned on the right edge of the window. If there is a Scroll Bar at the bottom of the window, it will also have a set of arrows positioned at the right and left. Now let’s take a scroll…
• Place the mouse arrow on the bottom scroll arrow on the right edge of the window and click a few times. With each click the image on the screen moves down. Be careful that the mouse arrow stays within the box that contains the scroll arrow. If your mouse wanders, you will not be able to activate the Scroll Bar, or the window may scroll in increments larger than you desire.
• If you see a Scroll Bar, it indicates that there’s more to see in the window.
• The contents within the window will move up if you place the mouse arrow on the top  scroll arrow and click.
• The window will scroll left or right with the bottom  left and
  right scroll arrows.
• If you hold down the mouse button rather than depressing and releasing it, the window will scroll very quickly. This technique is more difficult to control but faster than individual clicks.
• You can also reveal what’s inside the window by placing the mouse arrow on the Scroll Box within the Scroll Bar and clicking and dragging the Scroll Box up or down. This is faster than using the scroll arrows and is most convenient if you’re in a very large document wanting to get from, for example, page 1 to page 40.
CLICK AND GO
1. Click on bottom arrow repeatedly.
2. Click on top arrow and hold mouse down until scroll box is at the top of the scroll bar.
3. Click and drag the scroll box within the scroll bar to reveal the contents of the window again.
Scroll Bars play a big role in viewing websites on the Internet. I strongly recommend that you spend time maneuvering a Scroll Bar every time you play on the computer until you have the technique down.
“For the longest time I couldn’t use the Scroll Bar. I kept moving the mouse off the arrow or clicking too fast. Eventually it became easier. You really can’t take advantage of websites without it.”
—Dan
Maximize the Control Panel window if you can’t see all the icons contained in it. (Remember, you do that by clicking on .) We’re going to be sure that the date and time are set properly on your computer. Once set, the computer, even when it is shut off, will keep perfect time and the current date. Open the Date and Time window by double-clicking on the Clock, Language, and Region icon.
At the bottom of the Date and Time window there are three buttons: OK, Cancel, and Apply. These are your action choices. Sometimes a window will offer you Help, Yes, or No as choices. When you click on any of these buttons, you’re instructing the computer to take that action. You must be very sure of the action you want to take—sometimes it is irreversible.
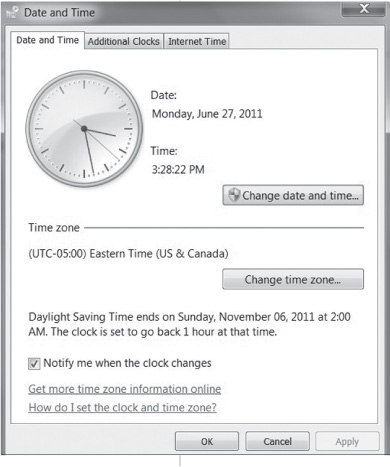
• This window allows you to set the date and time.
The box containing OK may have a slightly darker outline. In this case the computer assumes OK to be the choice you’ll most likely make and has preselected it for you. (You can always choose a different option—it’s just trying to make life easier for you.) Be forewarned: If you depress the Enter key on your keyboard, whatever action the computer has preselected will be taken. That is why it is so important not to depress theEnterkey arbitrarily; you may unwittingly take an action that cannot be reversed. (Note: It may not be OK that the computer preselects for you. It could be any action button that the computer deems will be your likely choice.) In the case of what we are playing with here, not to worry—nothing is irreversible.
PATIENCE, PLEASE
Remember that if there is a spinning circle  or an hourglass
  , sit back and let the computer finish what it’s doing before you use the mouse or keyboard.
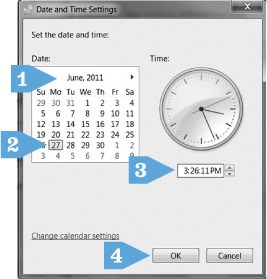
Setting the Date and Time Follow these steps to adjust the date and time on your computer:
• Click on the Change date and time.
• Is the month correct? If not, click on the  arrow to the right of the month until you are in the correct month.
• Is the date correct? If not, click on the correct date.
• Is the hour correct? If not, move the mouse arrow onto the hour display, then click and drag over the hour to select it. It should be highlighted in blue. You can either type the correct hour using the number keys on your keyboard or use the  arrows to the right of the time to increase or decrease the hour.
CLICK AND GO
1. If month is not correct, click on the back or forward arrow and select the correct month.
2. If date should be changed, click on correct date.
3. If the hour or minutes are not correct, click on each and use the arrows to adjust.
4. Click OK to keep the changes.
• Do the same for the minutes and seconds—highlight them and make the necessary changes.
• Once the correct hour, minute, and second are visible on the screen, click on OK. The window should close, accepting your changes and putting you back in the Control Panel window.
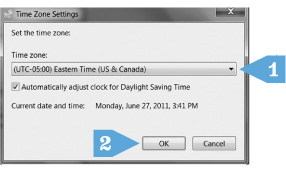
• Click once on the Change Time Zone button.
• There is a box with a down  arrow to the right. Is the time zone that is visible your time zone? If not, click on the arrow. Find your time zone (you may have to use the Scroll Bar), point on it with the mouse arrow, and click once.
CLICK AND GO
1. Click on down scroll arrow. Click on your time zone (you may have to use the Scroll Bar).
2. Click OK.
• Does Automatically adjust clock for daylight saving changes have a check  in the box to the left? If not, move the mouse arrow to the box and click once. Yes, like magic your computer will make the adjustment for daylight saving time from now on! Adjust your screen brightness if you have difficulty seeing the map.
• At this point click once on the word OK.
Now we’ll customize the mouse to suit you. If you prefer to have the mouse to your left, you can also reverse the functions of the mouse buttons here (see “Attention Again, Southpaws” box below). Let’s adjust the double-click speed.
• Click in Search Control Panel box in upper right corner.
• Type mouse.
• Click change mouse setting in the list that appears.
• You may click on all the file tabs and read what each contains, but the one we’ll focus on is Buttons.
• Click on the Buttons tab to adjust the double-click timing.
• Look at the pointer that indicates how slow or fast the clicking is set. If you find you need some extra time to double-click, then click and drag the pointer toward “Slow.” If you naturally double-click faster than where it’s set at present, click and drag the pointer toward “Fast.”
ATTENTION AGAIN, SOUTHPAWS
If you’re a lefty, this is your chance to have the mouse cater to your needs. Some of my students who are left-handed are quite content to place the mouse to the right of their keyboard, but you can also swap it to the other side. It depends on what works better for you.
As the mouse is now configured, the left button is set up for Click/Select and the right button for Context Menu/Alternate Select. If you have an external mouse and want to position it to the left of the keyboard, these buttons are in the reverse position of how they might work best for you. See “Reversing the Buttons” box on the next page.
• When you have found the right timing, move the mouse arrow to Apply and click once. (This means that your change has been accepted and the window will remain open.)
• Now let’s click on the Pointer Options tab.
• Here we’re interested in the Motion. There is a pointer that indicates the speed with which the mouse arrow will move across the screen (the computer may refer to the mouse arrow as a cursor here). Move the mouse arrow onto that pointer. Click and drag the pointer to the speed where you think it should be based on how quickly or slowly the mouse arrow currently moves across your screen. Mine is set on the slowest speed, which is easiest for me, but only you can judge what’s best for you. You can always come back to this window and readjust it at a later date.
• Once you’ve selected your preferred speed, click on OK. Your changes will be made and the window will close.

• This window allows you to adjust your mouse settings.
CLICK AND GO
1. Click on Buttons tab.
2. Click and drag “double-click speed” pointer to what suits you best.
3. Click on Apply to keep your setting.
4. Click on Pointer Options tab.
5. Click and drag the “pointer speed” to what suits you best.
6. Click on OK to keep the changes.
The background on your desktop screen is also referred to as wallpaper. Your operating software comes with several different styles of wallpaper, and you can personalize your desktop by selecting one that appeals to you.
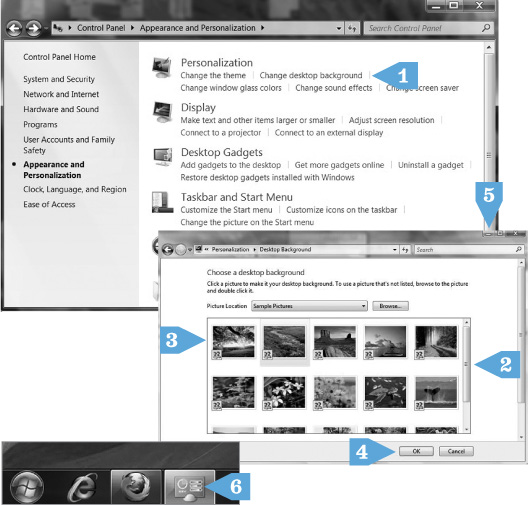
• Click on the Appearance and Personalization  section in your Control Panel window. (If you are using Windows XP, double-click on Display and follow along. Things may appear differently on your computer screen, but if you use your intuition you’ll likely be able to follow along.) Here we can choose your wallpaper, change the look of the screen, and create a screen saver.
CLICK AND GO
1. Click on Change Desktop Background.
2. Use scroll bar to reveal your choices.
3. Click on a background that appeals to you.
4. Click Save Changes or OK to accept your choice.
5. Minimize the window to see your handiwork.
6. Click on Control Panel icon to restore window to previous size.
• Click on Change Desktop Background. This is where you decide the background for the desktop screen. Click on the background choice that appeals to you. Remember to use the scroll bar to reveal all of your choices. Then at the bottom of the window, click Save Changes or OK. Then minimize the Desktop Background window. This allows the wallpaper to be viewed in its actual size.
• The Control Panel is now minimized on the Task Bar at the bottom of the screen. Click on the icon in the Task Bar to restore it to the screen. You can now try selecting a different wallpaper. Keep repeating this process until you find the wallpaper that suits you. And remember, you can select different wallpaper whenever you please.
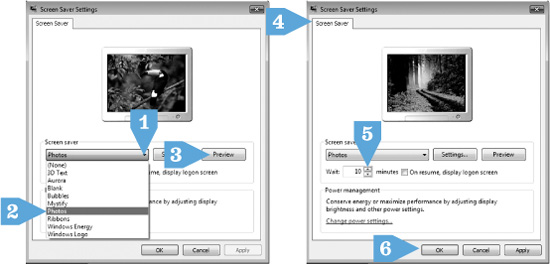
Now, let’s select a screen saver. A screen saver is an image that appears on the screen when the computer is on and has sat unused for a period of time. This choice allows you to decide what the screen saver will look like and when it will appear.
CLICK AND GO
1. Click on arrow.
2. Click on your choice of screen saver.
3. Click on Preview to see screen saver in action.
4. Click to get back to settings window.
5. Adjust timing by using up and down arrows.
6. Click OK to accept your changes.
• Click on Appearance and Personalization to expose Change Screen Saver among other options.
• Click on ChangeScreen Saver.
• Under the words Screen Saver is a box with an  arrow to the right. Click on the arrow to expose the screen saver options. You may have to use the Scroll Bar to see everything that is available. Click on the screen saver you want to see displayed and then click on OK.
• Click on Settings to see the options available to customize your choice. Some screen savers offer a choice of colors or images.
• Click on Preview to see your screen saver choice displayed in its actual size without having to close the window. Click the mouse button to get back to the Screen Saver window.
• The last decision that you need to make is how much time should elapse before the screen saver is activated. Do this by changing the number next to the word Wait. Click on the up and down arrows to the right of the number. Once you have decided on the length of time (I have mine set at ten minutes), click on OK. Your changes have been made and the window will be closed.
• Close the Control Panel window. Now you’re back at the Desktop screen.
This might be a fine time to take a break. Just leave your computer as it is and come back when you’re ready. When you return, we’ll go over some more features.
The Task Bar is the gray or blue bar at the bottom of your screen. It offers an alternative way to access application software and other areas of the computer.

• The Task Bar.
The computer usually offers more than one way to skin a cat. By that I mean that there is usually more than one way to accomplish a task or complete an action on the computer.
For instance, move the mouse arrow onto the time in the right-hand corner of the Task Bar and click the right mouse button. Now move the arrow to Adjust Date/Time and click once with the left mouse button. You’ve just opened the same Date and Time window that we accessed from the Control Panel. All the date and time changes that we made before can also be done by opening the window this way.
Close the Date/Time window. (Remember, use the Close Box.) Now with the mouse arrow on a blank spot on the desktop screen, click once with the right mouse button. Move the arrow to the word Personalize (in Windows XP, click on Properties) and click once with the left mouse button. Ta-da! It’s the Personalize window that we used to pick your wallpaper and screen saver. Click on the Minimize box. It appears that the Personalization window has closed, but in fact it is waiting for you in the Task bar. Click on Personalization icon in the Task Bar and voilà! the window is back on the screen.
Experiment with what happens when you click the left or right mouse button on an item. You can open all the icons on the desktop screen and see what they contain. For that matter, you can click on anything on the computer screen as long as you don’t press the Enter key, which instructs the computer to take an action, or you don’t click on an action key (OK, Yes, Apply…). If you open a window and are concerned that you’re heading into unknown territory, simply close it by using the  Close Box or click on the word Cancel, Finish, or Exit, or click on a blank area of the screen.
It’s a lovely thing to listen to music while working (or playing) at the computer. Grab a CD that you enjoy, and let’s learn how to play music.
• Open the D: drive on your computer case by pressing the button near the drive.
• Place the CD, label side up, into the CD tray and press the button again to close the tray. You don’t ever want to force the tray closed by pushing the tray in—it is a very delicate component of the computer.
• A window will appear on the screen with options for the track you want to play and what volume you prefer. Here you will use the mouse to choose your options. For example, move the mouse onto the volume arrow. Click and drag the arrow either up or down to increase or decrease the volume.
• After you’ve set your preferences, click on the  Minimize Box. To maximize the window, click once on the box that contains the minimized window in the Task Bar. You can also access the D: drive through the Computer icon. Double-click on Computer. The D: drive is accessed by double-clicking on the D: icon.
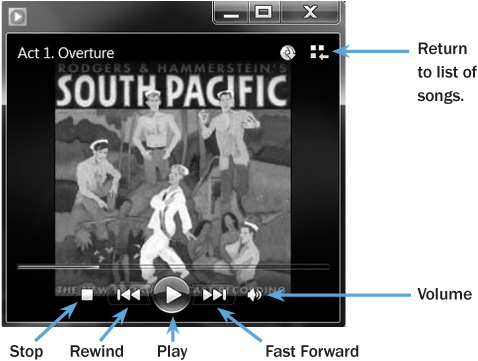
There are a couple of other options for controlling the volume. If your computer came with speakers, they may have controls, or your monitor may have a volume control. Fiddle around until you find a comfortable volume. The other place where the volume can be adjusted is the speaker icon (it looks like a little horn)  on the right side of the Task Bar near where the actual time is displayed. Left-click on the symbol and a box will appear where you can control the CD’s volume.
When the CD has stopped (either by your choice or because it came to an end), simply press the button near the D: drive on your computer case to “eject” the CD. Remove the CD and press the button again to close the now-empty drive.
If you’ve been using this book sequentially, at this point you should see a light at the end of the tunnel. The computer is more and more under your control. Stick with the book, and by the end you’ll be in total control. You can repeat any part of this chapter and the previous one until you are ready to go on the Internet in Chapter 13.
Turn on your computer. In this chapter we will customize some features on your computer and investigate a few others. Feel free to move at your own pace. You can stop and start wherever and whenever you want.
Let’s investigate what the desktop screen has to offer. First, move the mouse arrow onto the  Hard Drive icon (probably in the top right of the screen). Double-click on the icon. If you have trouble with the double click, you can single-click on the icon to highlight it, then click on the word File at the top left of the screen and single-click on the word Open, or you can single-click on it and then hold down the
  Command key and the letter O simultaneously. Your Hard Drive window should now be open.
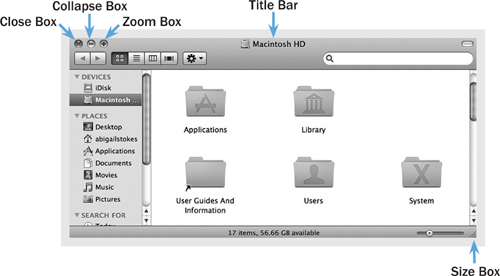
Notice that the Hard Drive window has the same features as the untitled folder window. It has a Title Bar,  Close Box,
  Zoom Box,
  Collapse Box, and a
  Size Box. Almost every window you open will contain these elements. Remember, if you get overwhelmed and want to start from scratch, close any open windows by moving the mouse arrow into the Close Box and clicking once. What we haven’t discussed yet on this window is the Scroll Bar on the bottom and the right side of the window.
• You can access different parts of your computer using the hard drive.
The size of the window dictates how much of the information in the window you will be able to see. This is when the Scroll Bar comes in handy. The Scroll Bar allows you to move the information in the window up and down for full viewing.
A Scroll Bar indicates that the window has more to offer than what’s on your screen. You can increase the size of the window or scroll the window to see what else it contains. Students often call me because they can’t find an item that they know is in a certain window. Usually it is right where it should be, but they didn’t see all the contents of the window. An active Scroll Bar is your clue that there is more to be unveiled. Be sure to use a Scroll Bar whenever you see one or you may miss all that the window has to offer. We’ll experiment with this shortly.
Enlarging the Window The most efficient way to see all the contents of a window is to increase its size. You can do that in two ways. Once you have seen how each choice works, follow the instructions in italics to restore the window to its original form and go to the next option. We will experiment with scrolling after you have tried the following options.
CLICK AND GO
1. Click on Zoom Box once to change size of window.
2. Click on Zoom Box again to restore the previous size.
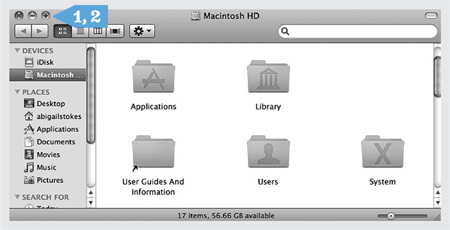
Option 1. There is a box in the Title Bar that will increase the size of the window. As you may remember, it’s the Zoom Box. If you don’t see a plus symbol in any of the three circles in the top left corner of the window, move your mouse arrow closer to the circles. Voilà! The symbols appear. Now move the mouse arrow into the Zoom Box and click once. (As I said in Chapter 11, sometimes the window thinks it is maximized, but it isn’t taking up the entire screen. In that case the window can be maximized by using the Size Box as described in Option 2.) To restore, place the mouse arrow on the Zoom Box and click.
Option 2. Move the mouse arrow to the Size Box at the bottom right corner of the Macintosh HD window. As you did with the untitled folder window, click and drag the corner down and to the right, so it fills the entire screen. The Size Box allows you to click and drag the window to the exact size you desire. To restore, place the mouse arrow in the bottom right corner of the window. Click and drag the corner to the left and up until the window is the size it was when you first opened it.

CLICK AND GO
1. Increase the size by clicking and dragging bottom right edge out.
2. Click and drag back to restore to previous size.
Sometimes there can be more icons contained in a window than you can see no matter how large you make the window. In this case, you will have to use the Scroll Bar to see all that is available. The Scroll Bar is similar to an elevator: A button is pressed to activate it, it moves up and down, and you can get off anyplace you want.
Does your window look like the window in the illustration below? Make sure that the Scroll Bar on the right side of the window is active. If the Scroll Bar isn’t active, double-click on Applications  and a window should open in place of the Hard Drive that will have a Scroll Bar on the right (and even maybe on the bottom). If a window opens up that is too big to reveal the Scroll Bar, click and drag the bottom right corner until a Scroll Bar appears.
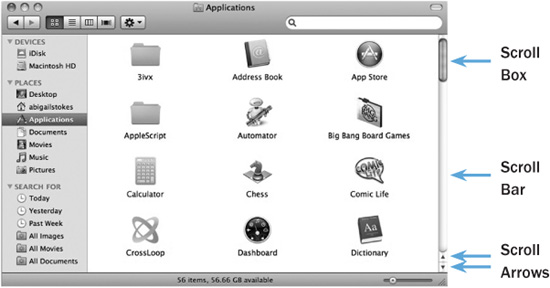
• The appearance of a Scroll Bar indicates there’s more to see in the window. Mastering the Scroll Bar is critical when you’re on the Internet.
There should be a set of arrows at the bottom of the Scroll Bar positioned on the right edge of the window. If there is also a horizontal Scroll Bar there will be a set of arrows on the bottom of the window positioned at the right. Let’s take a scroll…
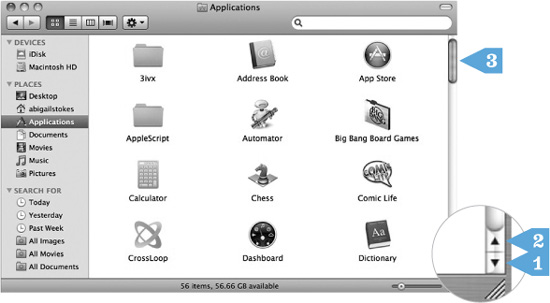
• Place the mouse arrow on the bottom scroll arrows on the right edge of the window and click the bottom of the two arrows (the one pointing down) a few times. With each click the screen moves down. Be careful that the mouse arrow stays within the box that contains the bottom scroll arrow. If your mouse wanders, you will not be able to activate the Scroll Bar, or the window may scroll in increments larger than you desire.
CLICK AND GO
1. Click on bottom arrow repeatedly.
2. Click on top arrow and hold mouse down until scroll box is at the top of the scroll bar.
3. Click and drag the scroll box with the scroll bar to also reveal the contents of the window.
• The image within the window will move up if you place the mouse arrow on the top  scroll arrow and click.
• The window will scroll left or right with the bottom left and right  scroll arrows.
• If you hold down the mouse button rather than depressing and releasing it, the window will scroll very quickly. This technique is more difficult to control but faster than individual clicks.
• You can also move what’s in the window by placing the mouse arrow on the Scroll Box within the Scroll Bar and clicking and dragging the Scroll Box up or down. This is faster than using the scroll arrows and is most convenient if you’re in a very large document wanting to get from page 1 to page 40, for example. Be sure to keep your mouse arrow on target when you scroll. It is easy to lose aim when you are looking at the contents of the window, especially when the contents are moving. Try to hold your hand as steady as you can.
• Close the Applications window by clicking in the Close Box.
Scroll Bars play a big role in viewing websites on the Internet. I strongly recommend that you spend time maneuvering a Scroll Bar every time you play on the computer until you have the technique down.
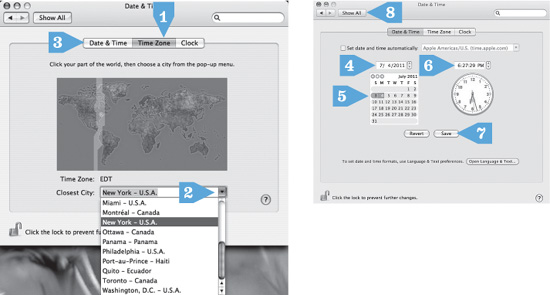
Move the mouse onto the  in the top left corner of the screen and click once. A box with a lot of options will open. Move the mouse arrow down onto the words System Preferences and click once. The System Preferences window will open.
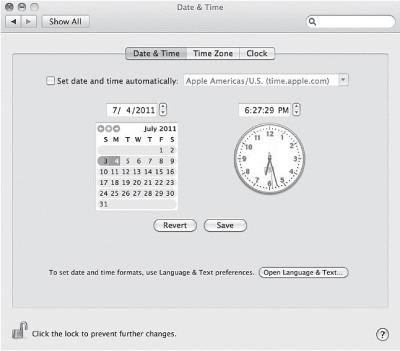
• This window allows you to set the date and time.
We’re going to check to be sure that the date and time are set properly on your computer. Open the Date & Time window by single-clicking on the  icon found in the System Preferences window.
Is there a check in the box to the left of “Set time & date automatically”? If so, click in the box to remove the check. At the bottom of the window are two buttons: Revert and Save. These are your action choices. Sometimes a window will offer you Help, Yes, or No as choices. When you click on any of these buttons, you’re instructing the computer to take that action. You must be very sure of the action you want to take—sometimes it is irreversible.
You might notice that the Save button has a slightly darker outline. In this case, the computer assumes Save to be the choice you’ll most likely make and has preselected it for you (you can always choose a different option—it’s just trying to make life easier for you). Be forewarned: If you depress the Return key on your keyboard, whatever action the computer has preselected will be taken. This is why it is so important not to depress theReturnkey arbitrarily; you may unwittingly take an action that cannot be reversed. (Note: It may not be Save that the computer preselects for you. It will be any action button that the computer deems will be your likely choice.) In the case of what we are playing with here, not to worry—nothing is irreversible.
PATIENCE, PLEASE!
Remember that if there is a spinning round ball  (jokingly referred to by a friend as the “spinning beach ball of death”), sit back and let the computer finish what it’s doing before you use the mouse or keyboard.
CLICK AND GO
1. Click on the Time Zone tab.
2. Click on down arrow and select a city in your time zone.
3. Click Date & Time tab.
4. If month is not correct, click on arrows to choose correct month.
5. If date should be changed, click on correct date.
6. If the hour or minutes are not correct, click on each and use the arrows to adjust.
7. Click Save to keep the changes.
8. Click Show All to return to System Preferences.
Follow the steps below to adjust the Time Zone:
• Click on the Time Zone tab.
• Click on the down arrow to the right of the city listed.
• Scroll to the city nearest where you live and click once on that city’s name.
Follow the steps below to adjust the Current Date:
• Click on the Date & Time tab.
• If the month is not correct, move the mouse arrow onto the arrows to the left of the month and click until the present month is displayed.
• If the date is not correct, click on the correct date.
Experiment
As I describe some of the many icons contained in the System Preferences window, feel free to double-click on the icon to open it and see what’s inside. To get back to the System Preferences window, simply close the window you’ve opened. (Remember the Close Box?) If somehow you have closed the System Preferences window, move the mouse onto the and down to the words System Preferences and click once.
• Is the hour correct in the Current Time box? If not, move the mouse onto the hour and click to select it. Hit the number on your keyboard to type in the correct hour or use the  arrows.
• Do the same for the minutes and seconds.
• Click on AM or PM to switch between the two.
• Click on Save to have the clock display the current time.
• Move the arrow to Show All and click to get back to the System Preferences window.
Now we’ll customize the mouse to suit you.
• Single-click on the Mouse  icon.
icon.
• Click on Mouse (Trackpad, if you have a laptop) in the tabs.
• Tracking Speed has an arrow indicating the speed with which the mouse arrow will move across the screen. Click and drag the arrow to the speed you think it should be. Mine is set on the slowest speed, which is easiest for me; only you be the judge can what’s best for you. You can always come back to this window and readjust it at a later date.
• You can also adjust the double-click timing. Click and drag the arrow to whatever point on the continuum you think best represents how you double-click. This, too, can be changed easily if you find you need the timing adjusted.
• Once the Mouse or Trackpad window is closed, your changes will be made. You can always come back to this window and change these preferences whenever you wish.
This is a fine time to take a break. Just leave your computer as it is and come back when you’re ready.
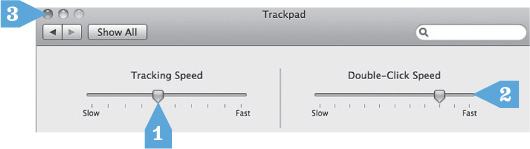
• This window allows you to adjust your mouse settings.
CLICK AND GO
1. Click and drag “tracking speed” pointer to what best suits you.
2. Click and drag the “double-click speed” to what best suits you.
3. Click to close the window and save the changes.
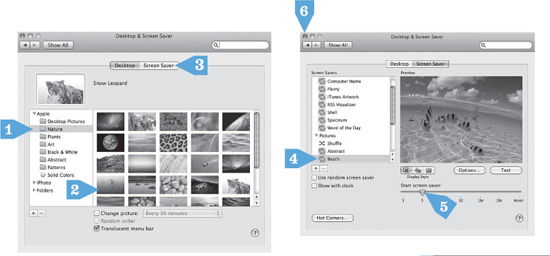
The background on your desktop screen is also referred to as wallpaper. Your operating system comes with several different styles of wallpaper, and you can personalize your desktop by selecting one that appeals to you.
CLICK AND GO
1. Click on Nature folder.
2. Click on wallpaper that appeals to you.
3. Click on Screen Saver.
4. Click on screen saver of your choice. Or click on Options to see more choices.
5. Click and drag arrow to adjust when screen saver will appear.
6. Click Close Box to close window and save the changes.
• Is the System Preferences window still open on your screen? If not, go to the and access the System Preferences or you might only have to click on Show All to get there, if your Keyboard & Mouse window is still open (start on page 158 for how to open the System Preferences). Find the Desktop & Screen Saver  icon. Single-click on the icon to see its contents.
• You will see a menu of image folders to the left. For this exercise, click on the Nature folder.
• If a Scroll Bar is available, scroll using the arrows at the bottom of the image to see what other images are available.
• When you find an image you like, click on it with the mouse.
• Bingo! There’s your background.
Now, let’s select a screen saver.
• Click on Screen Saver icon.
• Click on any of the screen savers in the left side of the window. You will see a sample appear in the right side of the window.
• Click on the Options button to view a list of Display Options. To activate one of the choices, click in the box to the left. A check will appear. To deactivate an option, click in the box to remove the check.
• There is an arrow you can click and drag to indicate how many minutes or hours should elapse before the screen saver is activated. (Mine is set for ten minutes.)
• If you click on Test the entire screen will show your choice of screen saver. You can simply move the mouse or click anywhere on the screen to return to the Desktop & Screen Saver window.
• Click on to close the window and save changes.
You can open all the items in the System Preferences to see what they contain. For that matter, you can click on anything on the computer screen as long as you don’t hit the Return key, which instructs the computer to take an action, or you don’t click on an action key (OK, Yes, Apply). In fact, it is a good idea to return to the System Preferences window and make changes to the mouse and the background whenever you feel inspired. It is only through practice that you will really become comfortable with your computer. Play around here as often as you would like. If you open a window and are concerned that you’re heading into unknown territory, simply close it by using the Close Box or clicking on the word Cancel, Finish, or Exit.
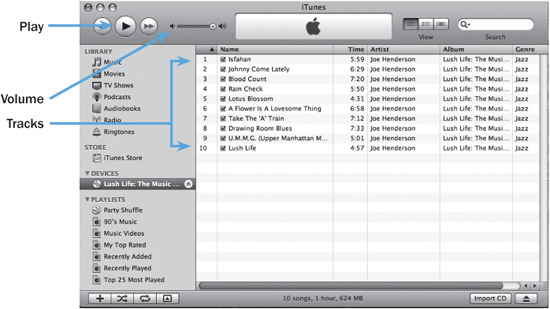
It’s a lovely thing to listen to music while working (or playing) at the computer. Grab a CD that you enjoy, and let’s learn how to play music.
• Place the CD, label side up, into the CD slot and give it a gentle push. The computer will pull the CD into the slot.
• Wait a moment and an image of a CD will appear on the Desktop.
• Next, a window containing the software iTunes should open automatically.

• Click on the  arrow to play the CD.
• The songs (or “tracks”) on the CD are listed in the largest pane of the iTunes window. To play a specific track, move your mouse over the one you want to play and double-click it.
• There is an arrow at the top of the iTunes window that you can click and drag to increase or reduce volume.
There are a couple of other options for controlling the volume. Your speakers or monitor may have a volume control. Fiddle with them to set a comfortable volume for you.
• When you want to remove the CD, close iTunes by clicking in the Close Box. Then simply click and drag the CD icon into the  Trash on the desktop, which now that you’re dragging the CD may look like
  for Eject. If that doesn’t expel the CD, you might have to depress and release the button on the top right of the keyboard.
• When you insert an audio CD, a window may appear that looks something like this. It allows you to choose a CD track and adjust the volume.
If you’ve been using the book sequentially, at this point you should see a light at the end of the tunnel. The computer is more and more under your control. Stick with the book, and by the end you’ll be in total control. Repeat any part of this chapter and the previous one until you are ready to go on the Internet in Chapter 13.
Q: The Task Bar at the bottom of my computer screen has moved from the bottom of the screen to the side. It works where it is now, but how did it get there and can I move it back?
A: Click and drag is the answer for both how it moved and for how you can move it back to its original position. Believe it or not, at some point you accidentally clicked and dragged the Task Bar (some call it a System Tray) to the side of the screen. Place your mouse anywhere on the Task Bar and now click and drag to the bottom of your screen. Release the mouse. The task bar should be back where you like it.
Q: Is there a way to open an icon without double-clicking?
A: Yes. If double-clicking is really a struggle for you, you can single-click on the icon and then depress and release the Enter/Return key.
Q: Is there a way to scroll without using the mouse?
A: Yes, you can also move up and down a page using the arrow keys located on the bottom right of your keyboard. Sometimes it helps to click on the web page first, then use the arrow keys. But I would like you to practice with the mouse because the arrow key option does not work on all websites.
Q: What does PBKC stand for?
A: PBKC is a charming acronym to tease computer users. You ask a technician, “What’s wrong with my computer?” He responds, “It’s a PBKC (pronounced pebkack).” It stands for “problem between keyboard and chair”!