

The time has come to turn on your new arrival. It may seem unnecessary to have part of a chapter devoted to turning on the computer, but it is a bit involved and can be a little confusing. You’re about to embark on a wonderful new adventure, and I will be by your side through the whole process. However, feel free to have a friend or family member also join you during any part of this journey.
My experience with students is that most people ask too much of themselves during the learning process. If I’m teaching you how to use the computer, here are my rules for you to follow.
• Do not try to memorize what we do. Eventually it will become second nature. Just follow the instructions—time and repetition will take care of the rest.
• Do not get hung up on understanding everything. I don’t understand exactly how the computer works, but I follow the formula of how to make it work.
• Trying can be trying. If you’ve hit your saturation point or you’re frustrated, simply stop. Put down the book. Leave the computer as it is and go do something else. If you don’t return to the computer for an hour or a few days, it doesn’t matter. The computer isn’t going anywhere. Eventually your computer is where you’ll go for fun, but at the beginning it can seem more like work.
“For three months I was afraid to turn my computer on. I would sit facing the ominous black screen and feel increasingly defeated. How times have changed—I just set up a friend’s computer without a glitch!”
—Mark
There is no hard-and-fast rule about which parts of the computer should be turned on in what order, but I always turn on the monitor, then any peripherals, and finally the computer case. Refer to the instructions included with your computer to confirm the precise procedure for your machine.
Instructional manuals may have been provided to you by the computer manufacturer and enclosed with your new purchase, but more likely you’ll have nothing more than a diagram of how to connect the parts. Feel free to sit back and read whatever was provided to you at this time. Don’t be surprised if you find the information confusing—most people do. You might want to read what you’ve been given in tandem with my instructions that follow.
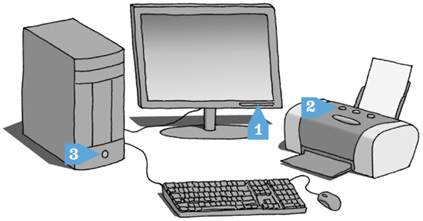
CLICK AND GO
1. Turn on monitor.
2. Turn on printer.
3. Turn on computer.
“I knew I had time for the computer, but I was terrified of the technology. We don’t even have an answering machine. But now, I’ve been scanning family photos to design a website. My grandchildren love it when I e-mail them pictures of when their dad was their age… and so skinny!”
—Margaret
1. If the monitor is not on, turn it on. A monitor’s “on” switch is often, but not always, located in its lower front right corner. A light should indicate it’s on, but nothing will show on the monitor until the brain of the computer in the computer case is up and running. So sit tight and eventually something will appear. If you’ve bought a laptop or notebook computer there will be one “on” switch that turns on the computer as well as the monitor. If you can’t find the “on” switches, refer to the instruction information that came with your machine.
2. If you bought yourself a printer, turn it on. The “on” switch can be located at the front, back, top, or side. Again, refer to the machine’s literature if necessary.
3. Find the “on” switch for your computer case. The “on” switch can usually be found on the front of the computer case under the CD-ROM (D:) drives. This switch will activate the operating system, keyboard, and mouse. Press it, slide it, toggle it—whatever is the proper way to activate the switch. An indicator light, usually located on the front of the computer case, will light up when the unit is on (the keyboard may also have an indicator light, but the mouse may not). Give each computer component time to warm up—they don’t always come to life immediately. Repeatedly pressing the “on” switch will only cause you and the computer to lose track of whether it’s supposed to be on or off.
You may hear a sort of whirring or soft grinding sound as the hard drive in the computer case warms up. This can also be true throughout the time that you use the computer—the hard drive will periodically make a noise as it works. It’s less disconcerting than it sounds and indicates that the computer is hard at work, which is a good thing.
If at any time you need to step away from the computer to answer the phone or run an errand, you can leave everything on without harming the machine. Some people never turn their computer off. Computers do, however, generate a certain amount of heat, and leaving them on unnecessarily is a waste of energy. If you plan to leave your machine on most of the time, make sure the area around the computer has good ventilation.
With a laptop, that means making sure there is circulation under the machine. If there are retractable legs on the bottom of the computer, use them to raise the computer. If not, use a small paperback or something similar under the back of the laptop to allow air circulation. This also angles the keyboard in a way that may be slightly more comfortable for you. Try it and see. However, I don’t suggest leaving a laptop turned on indefinitely, as you might a desktop. A laptop just doesn’t get the same circulation as a desktop.
Note: The screen may appear different after you let it sit for a while. It may even seem that the computer has shut off. Computer screens go into a standby, or “sleep” mode, or a screen saver may appear. (We’ll talk more about screen savers in Chapter 12.) Simply move the mouse or hit any keyboard key to bring the screen back to life.
As I explained in Chapter 6, Macs and PCs have different operating systems (the mastermind that organizes everything in your computer), but all computers can do the same things—create documents, connect to the Internet, send e-mail, and so on. However, there are different computer instructions for PCs and Macs. If you’ve bought a Mac, turn to page 115, and I’ll join you there. If you’ve bought a PC, stay right where you are and keep reading. We’ll all meet again on page 128.
As your computer starts up, the background of your screen may remain dark as a series of startup messages appears. They might appear and disappear so quickly that you can’t read what they say. That’s okay. If by chance you can read what they say, they won’t make any sense anyway. This is a process the computer goes through to make sure everything is in working order.
If you’re turning on a new PC for the very first time, there are some one-time-only setup procedures that you must go through.
Consult the Getting Started guide if one came with your PC for what to do at this point. Read it along with these simplified instructions. You will most likely be instructed to type in the “Product ID” or “Product Key” number located on your Microsoft “Certificate of Authenticity” on the cover of the Microsoft book enclosed with your computer. Don’t confuse the “Product ID” with the “Product Key.” These are two different numbers. This information has to be exactly correct, so take your time as you type it in.
The appearance of an hourglass or a spinning circle in place of or along with the mouse’s indicator arrow tells you that the computer is working on something and it is best not to use the keyboard or mouse until the hourglass goes away. For example, if you have just typed in your Product ID or Product Key number, the computer may take a moment to process that information—hence the hourglass or circle, indicating that time is needed.
If you have Windows 7 or Vista, the next thing to appear on your screen may ask you to accept the license terms and then choose a time zone and confirm the date and time. The computer may ask you to choose a user or computer name. The machine will lead you through the process—follow the instructions step by step. Once you’ve completed a step, you move on to the next, clicking on either an arrow, the word Next, or the word Continue in the bottom right hand corner of the screen. If any of this becomes too much for you, call a friend to walk you through the steps, but I suspect you’ll do just fine. For example:
Type whatever name you want to give the computer. If you want to have the first letters of the name capitalized, you need to use the Shift key, as you would on a typewriter. (There are two Shift keys—one near the bottom left of your keyboard, next to the Z key, and one on the right, next to the ?/ key. It doesn’t matter which one you use.) Depress Shift and hold it down as you type the letter that you want capitalized. If you make a mistake, use BkSp or the Backspace key. Remember to use the space bar to add a space between words.
If you are asked to enter a password, you don’t have to. The password feature is really designed for computers that are part of a network or if you’re going to have confidential information on your computer that you don’t want anyone else to access. For the average at-home user, using a password means having to remember it and type it in every time you turn on the computer, which is unnecessary. So instead of typing anything in the box, click on Skip. This will instruct the computer to accept that there is not a password. If you choose to have a password, please be sure to write it down and include it in the packet where you plan to store all your computer information. No one will be able to help you recover your password if you forget it.
Wait patiently while this setup process takes place. There may be times that several minutes will go by while the computer is working. You may be asked to register your computer or to set up your Internet connection; skip both of these steps for now.
As your computer starts up you may hear a sort of ping. That’s the computer’s way of saying “hello.” Several different screens may appear briefly before the computer comes to a rest at the Desktop screen.
Learning how to use the mouse is not unlike learning how to drive a standard-shift automobile. Do you remember how awkward it was trying to figure out when the clutch was in the right position to give the car gas or hit the brake? And do you remember how many times the car stalled before you got the clutch timing right? Well, welcome to the mouse. As you eventually conquered the clutch, you will eventually conquer the mouse. I promise.
Here we go:
• If you bought a desktop computer, gently rest your hand on the mouse with your index finger positioned over the button on the upper left side of the mouse. If you bought a laptop with a touch pad, trackball, or touch point, place your index or middle finger on the pad, ball, or point.
• Slowly move the mouse around on the mouse pad or your finger on the laptop mouse, and you’ll notice that the arrow on the screen moves according to your manipulation of the mouse. If you have a desktop computer, lift the mouse off the mouse pad and move it around. You’ll notice that when the ball or light on the bottom of the mouse doesn’t have contact with a surface, there’s no movement of the arrow on the screen. Place the mouse back on the mouse pad. If you find yourself without enough surface space on the mouse pad, simply lift the mouse off the pad (your arrow will stay in place on the screen) and reposition it on the center of the pad.
• Do not press any of the buttons on the mouse yet, and be careful not to accidentally put pressure on the mouse buttons while you move it around or you may click on and activate something unintentionally. If the mouse seems out of control, use very small hand or finger movements to make it move much slower. Over time you can go faster, but for now we are striving for optimum control of movement.
• Slowly move the mouse arrow to the upper left corner of your screen. Now move it to the upper right, lower left, and lower right corners. Did the arrow ever disappear off the edge of the screen? Sometimes that happens when you get close to the edge of the screen. No harm done—gently move the mouse around a bit and the arrow will reappear on the screen. Don’t ask me where it goes when this happens—it is the computer’s version of hide-and-seek.

• Whatever type of mouse you use, try to keep your hand relaxed and tension-free. It takes very little physical effort to move the mouse.
• Now slowly move the mouse arrow onto the little picture  (which is called an icon) above the words Recycle Bin. The tip of the mouse arrow needs to be right on the icon, not on the edge of the icon or the words below. If you’re using a desktop or an external mouse, push on the button under your index finger and release. This is clicking the mouse. There may also be a button on the upper middle and right. I want you to depress only the button on the upper left. If you’re using a touch pad or trackball mouse, use your thumb to depress the button to the left of the pad or ball (above or below it) and release. If you’re using a touch point, use your thumb to depress the left of the two buttons at the base of your computer. There is no need for the mouse to move when you depress the button. Keep your eye on the screen and your hand steady so the arrow won’t move from its position. If you’re having trouble hitting your mark, take your hand off the mouse. Give your hand a rest; maybe shake it a bit. For some people manipulating the mouse is easy, and for others it takes a few tries. When you’re ready, try again.
• Keep your eye on the mouse arrow on the screen and do not move the arrow when you depress the left button of the mouse. It’s very common to move the mouse as you depress the button. That will unfortunately make the mouse click off-target. Keep trying—you’ll get it eventually. Remember, it is like driving a car—keep your eye on the road (the screen), not the steering wheel (the mouse).
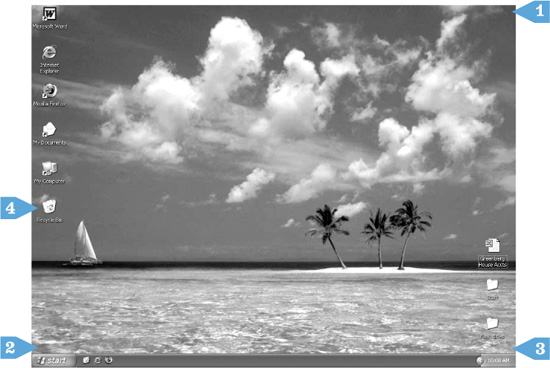
CLICK AND GO
1. Move mouse to upper right corner.
2. Move mouse to lower left corner.
3. Move mouse to lower right corner.
4. Click on Recycle Bin icon.
“In the beginning all sorts of things would appear on the screen and I couldn’t figure out how they got there. As I calmed down and got more proficient with the mouse I realized I had been clicking on things without knowing it.”
—Fred
For now I want you to depress only the upper left button of the mouse. The other buttons perform advanced actions that we aren’t ready for. Be very careful not to let your fingers depress the buttons in the center or right by accident. Nothing bad will happen, but unfamiliar things will appear on your screen.
If something appears on your screen that you didn’t intend to have there, either click on the  Close Box or, if there is no Close Box, move the mouse to a blank space on the screen and click once with the left mouse button. That should get rid of whatever happened when you hit the wrong button.
A non-laptop computer is called a “desktop” computer. The main screen display of your computer (whether it is on a desktop or laptop) is also called the “Desktop.” Isn’t the English language a beautiful thing?
Your screen is now displaying the Desktop. Think of it as the top of your desk in a virtual office. From this screen you can access everything that your computer has to offer, just as you can access what you need on your office desk. The Desktop is your home base.
First, find the brightness control on your monitor. It is most likely a dial or button somewhere on the bottom or side edge of the monitor. (Refer to your computer manual to locate it if you can’t find it. It may be that you use the computer to adjust the monitor.) Fiddle with the control until the brightness of the screen is right for you. On a laptop the brightness control may be indicated on the keys of your keyboard. Look for a small image on a key that resembles a sun.
Your Desktop screen may not exactly match the screen in the illustration on the next page. Each manufacturer configures how the Desktop looks, so yours may have some of the same components, but they may appear slightly different.
The small pictures on your Desktop are referred to as icons. These icons offer access to different programs and parts of your computer. They are like doors but instead of knock, knocking to open the doors, you click, click, or “double-click” on them. You will get to know each of these icons and their capabilities in due time. But for now let’s learn more about how to move about the computer.
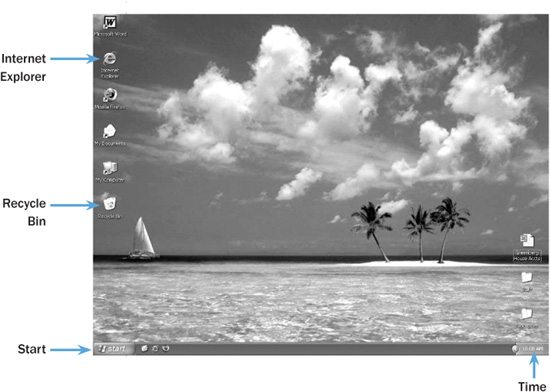
• Your Desktop screen may appear slightly different from this one, but it will offer the same basic features.
The mouse has a variety of functions. All of the tasks that the mouse performs are accomplished by moving the mouse to the designated area and depressing and releasing the button on the mouse.
In some ways it is more chameleon than mouse. You won’t see its many mutations until later, but in the box on the right are the different faces and what they mean.
As I’ve said, to click the mouse means to depress and release one of its buttons. Clicking the mouse instructs the computer to perform a task (such as to open a document). You can click either the left button or the right button on the mouse, but you will never click them simultaneously. For now, however, unless I instruct you otherwise, you will use only the left button.
With the left button you can either single-click or double-click. A single click is accomplished by depressing and quickly releasing the button. To double-click, you depress, release, depress, release in quick succession. (The right button will only require a single click.)
There’s no clear way to explain when to single- or double-click. Generally, you double-click on an icon to open it, allowing you to access an application software program. Remember, think of it as a knock, knock to allow entry to the program. Usually when you’re in a program (typing a letter or playing a game), you single-click on something to perform a task. You’ll get the feel for what’s best to do when. If you single-click when a double click is necessary, you’ll know because you won’t accomplish your desired task. If you double-click when a single click is called for, nine times out of ten nothing is affected. On occasion the double click opens another window unexpectedly, but you can press Esc (Escape key—upper left on the keyboard) to correct things or click on the  Close Box or a blank area on the screen to get rid of the unwanted window.
It’s time to experiment with the mouse arrow on your Desktop screen and become familiar with its movement.
1. Place your hand on the mouse (with the tail or cord of the mouse pointing away from you), and move the mouse arrow to a blank space on the Desktop screen. (Don’t click on an icon yet.)
2. Click the left mouse button by depressing and releasing it with your finger.
3. Now depress and release the left button two times. Do it again as fast as you can. Continue double-clicking until you’re comfortable with the action. For some people, double-clicking can be tricky.
4. Once you’ve had enough of that, click once on the right mouse button just for fun. The little gray box that appeared on the screen has advanced options that we don’t want to get into yet. To get rid of the box, move the mouse arrow anywhere on a blank area of your Desktop screen and click once with the left button.
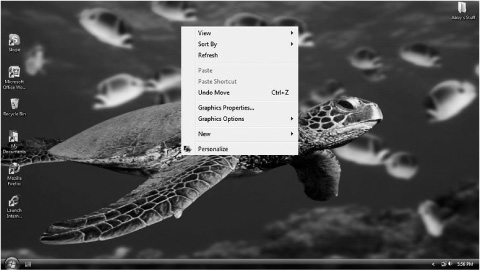
• If you right-click by accident, a box will open. To get rid of the box, move the mouse arrow anywhere on a blank area of your Desktop screen and click once with the left button.
If you get lost along the way or make an error, go back to step 1 and try again. You can also “click and drag” with the mouse. I don’t want you to try this yet, but when it’s time, we’ll move the mouse arrow onto an item and “drag” the item to a new position on the screen. We’ll practice this movement when we play Solitaire. But first we need to learn how to open the Solitaire window.
We’re now going to open your Solitaire program, which is included in many Microsoft PC operating systems. The Start button (at the bottom left of your screen)  or
or  offers you access to everything on your computer, including any of your application software programs. It is also where you go to shut down the computer. Yes, you go to Start to stop the computer… don’t ask me why.
Follow these steps to access Solitaire:
• Move the mouse arrow to the Start button or  , located at the bottom left corner of your screen, and click once. Remember, unless I instruct you otherwise, always click with the left button on your mouse. What has now appeared on the screen is called the Start Menu. The Start Menu lists what is available on the computer.
• To access Solitaire, you open a series of menu boxes. What appears on your screen may be slightly different from what you see here.
CLICK AND GO
1. Click Start or.
2. Click All Programs.
3. Click Games.
4. Click Solitaire.
• Slowly move the mouse arrow up to the words All Programs. You’ll notice that if the mouse arrow lingers as it passes over a word, that word becomes highlighted in blue, and if there is an arrow to the right of the word, a small menu box appears. Don’t let this confuse you—keep moving the arrow up to the word Programs. Stop when the arrow gets to the word Programs. (You don’t need to click the mouse. The blue highlighting shows the computer where you want to take an action.) In this case, we’re going to open Programs.
• When a menu box appears next to the word Programs, slowly move the mouse arrow across the word Programs until it’s in the menu box, or use the scroll bar to find Games.
• Move the arrow to the word Games. Don’t click the mouse yet. If a menu box appeared, you’ll notice that if you move too far up or down you lose the desired menu box. Simply move the mouse back onto the area where you were and the box will reappear.
• When the mouse arrow is on the word Games click on it or slowly move it across and into the menu box that contains the names of the games on your computer. Move to the word Solitaire and click the left button on the mouse once. At this point the Solitaire window should open.
If at any point you goof up and your mouse careens around the screen, don’t worry. Just relax and try again. Move the mouse arrow to a blank spot on your desktop and click the left button once. That will make everything you opened from the Start button disappear. Return to step 1 on page 110 and begin again. If you opened another program by accident, move the mouse arrow to the  Close Box and click once to get rid of it.
If that was rough going, don’t despair. This is your first time playing with the mouse and accessing a program. It’s all about practice, practice, practice. Keep repeating the steps just listed until you have opened the Solitaire window.
Look at the Solitaire window. The top blue bar, or the Title Bar, contains the name of the program you are now in. In this case it indicates that we are in the Solitaire window. The words in gray below the Title Bar are contained in the Menu Bar.
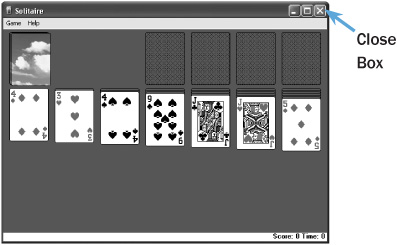
At the far right corner of the Title Bar are three small boxes. You remember that the  to the far right is the Close Box. The box in the middle
  is the Maximize Box. And the box to the left
  is the Minimize Box.
These same features will appear on nearly every window that you open on your computer. There will be a Title Bar at the top that tells you which window you are viewing. There will be a Menu Bar, and a Close, a Maximize, and a Minimize Box. Once you learn how to use these features within the Solitaire window, you will be able to use them on any window you open.
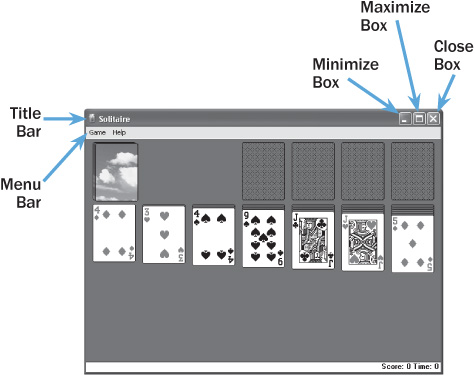
• Most PC windows have a Title Bar, Menu Bar, Minimize Box, Maximize Box, and Close Box.
“I thought I would never be able to control the mouse. It took me a long time to feel comfortable with the clicking and the movement. I made a lot of mistakes along the way, but eventually it got easier. Sometimes I don’t even think about it now—I just do it.”
—Eileen
To maximize a window is to make the size of the window as large as possible. The advantage of this is that you will see more of what is contained in that window.
Move the mouse arrow into the  Maximize Box and click once. It’s a little tricky to position the arrow exactly inside the box. If the Solitaire window disappears, you probably clicked the
  CloseBox by accident. No harm done. Just go back to step 1 (page 110) and follow the instructions until you’ve reopened the Solitaire window. That’s what we were going to do soon anyway—you get a little extra practice.
If you have clicked successfully on the  Maximize Box, the Solitaire window will now take up the whole screen. It is maximized! Now look at the
  Maximize Box. It has changed to look like this:
  . It has now become the Restore Box.

To restore a window is to bring it back to its original size, which is smaller than when it is maximized. This allows you to view other items on the screen at the same time that you view part of what is contained in the restored window.
Move the mouse arrow onto the  Restore Box, and click once to restore the Solitaire window to the size it was before you maximized it. Did the Solitaire window return to the size it was when you started? If the window disappeared, you might have clicked on one of the other boxes on the Title Bar instead. To catch up to where we are, go back to step 1 (page 110) and follow the instructions to reopen the Solitaire window. If it didn’t disappear, you did it right.

To minimize a window is to shrink the window to its smallest form and store it in the Task Bar at the bottom of your screen. The advantage of this is that you can access the window quickly, but it isn’t taking up space on your screen.
Let’s see the Minimize Box in action. Move the mouse arrow onto the  and click once. If you click on the correct button, the box seems to disappear, but it doesn’t really. You’ll find a small gray box in the Task Bar at the bottom of your screen that contains the word Solitaire or the Solitaire icon. This is the Solitaire window minimized.

The advantage of minimizing a window is that you can, in one click, get the window off the screen so you can view other items, then just click on it in the Task Bar to open it again. Return the window to its original size by moving the mouse arrow onto the word Solitaire and clicking once. The Solitaire window is back on your screen.
Now, we’re going to use the Close Box. Move the mouse arrow to the  Close Box and click once. Good-bye, Solitaire window. Now go back to step 1 on page 110 and bring the Solitaire window back up on your screen, then meet me on page 128. It is the repetition and practice that will make you master of your computer.

• The Solitaire game is now minimized onto the Task Bar.
As your computer starts up, you will hear a “ding,” perhaps more of a “bing”—you get the idea. That’s the Mac’s way of saying “hello.” The first thing to appear on your screen will probably be the Mac logo with a spinning circle below it.
If you’re turning on a new Mac for the very first time, there are some one-time-only setup procedures that you must go through.
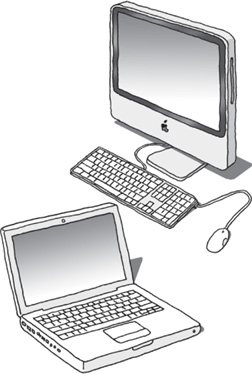
• As the Mac starts up, the screen looks something like this.
If an Everything Mac guide came with your Mac, consult it. Read it along with these simplified instructions. The appearance of a round spinning ball  in place of the mouse’s indicator arrow tells you that the computer is working on something and it is best not to use the keyboard or mouse until the spinning ball goes away.
The next thing to appear on your screen may ask you to accept the license terms, then choose the location of the computer (i.e., U.S.). The computer may ask you to choose an Apple ID. Follow the instructions step by step. Once you’ve completed a step, move to the next by clicking on an arrow, the word Next, or the word Continue found on the bottom right of the screen. If any of this becomes too much for you, call a friend over to walk you through the steps, but I suspect you’ll do just fine. For example:
Type whatever ID you want to have on the computer. (You can name it after yourself or your cat—anything you want.) If you want to have the first letters of the name capitalized, you need to use the Shift key, as you would on a typewriter. (There are two Shift keys—one near the bottom left of your keyboard, next to the Z key, and one on the right, next to the ?/ key. It doesn’t matter which one you use.) Depress Shift and hold it down as you type the letter that you want capitalized. If you make a mistake, use the Delete key.
If you are asked to enter a password, you don’t have to. The password feature is really designed for computers that are part of a network or if you’re going to have confidential information on your computer that you don’t want anyone else to access. For the average at-home user, having a password means having to remember it and type it in every time you turn on the computer, which is unnecessary. You can instruct the computer to accept that there is not a password. If you choose to have a password, please be sure to write it down and include it in the packet where you will be storing all your computer information. No one will be able to help you rediscover your password if you forget it.
Wait patiently while this setup process takes place. There may be times that several minutes will go by while the computer is working. You may be asked to register your computer or to set up your Internet connection. Skip both of those steps for now.
A non-laptop computer is called a “desktop” computer. The main screen display of your computer is also called the “desktop” (whether it is on a desktop or laptop). Isn’t the English language a beautiful thing?
Your screen is now displaying the desktop. Think of it as the top of your desk in a virtual office. From this screen you can access everything that your computer has to offer, just as you can access what you need on your office desk. The desktop is your home base.
While you are here, find the brightness control on your monitor. If you have a desktop the brightness control could be a dial somewhere on the bottom or side edge of the monitor. (Refer to your computer manual to locate it if you can’t find it.) The brightness control could also be located on one of the keys of your keyboard (it is on laptops). Look for a small image on a key (usually found above the row of number keys) that resembles a sun. Fiddle around with the control until the brightness of the screen is right for you. There is no standard about what is the appropriate brightness—it’s what you find comfortable.
What you see in this illustration may not exactly match your screen. The small icons offer access to different programs and parts of your computer. They are like doors but instead of knock, knocking to open the doors, you click, click, or “double-click” on them. You will get to know each of these icons and their capabilities in due time. But for now let’s learn more about how to move about the computer.
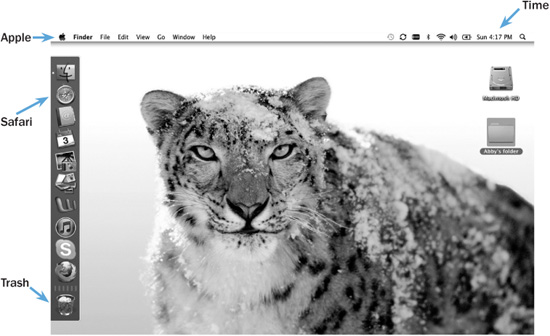
• Your Desktop may appear slightly different from this one, but it will offer the same basic features.
Learning how to use the mouse is not unlike learning how to drive a standard-shift automobile. Do you remember how awkward it was trying to figure out when the clutch was in the right position to give the car gas or hit the brake? And do you remember how many times the car stalled before you got the clutch timing right? Well, welcome to the mouse. As you eventually conquered the clutch, you will eventually conquer the mouse. I promise. Let’s try.
• If you bought a desktop computer, gently rest your hand on the mouse with your index finger positioned on the upper portion of the mouse. If you bought a laptop with a touch pad, place your index or middle finger on the pad.
• Slowly move the mouse or your finger around, and you’ll notice that the arrow on the screen moves according to your manipulation of the mouse. If you have a desktop computer, lift the mouse off the mouse pad and move it around. You’ll notice that when the bottom of the mouse doesn’t have contact with a surface, there’s no movement of the arrow on the screen. Place the mouse back on the mouse pad. If you find you don’t have enough surface space on the mouse pad, simply lift the mouse off the pad (your arrow will stay in place on the screen) and reposition the mouse on the center of the pad.
• Do not press down on the mouse yet, and be careful not to put pressure accidentally on the mouse while you move it around. If the mouse seems out of control, use very small hand or finger movements to make it move much slower. Over time you can go faster, but for now we are striving for optimum control of movement.

• Whatever type of mouse you use, try to keep your hand relaxed and tension-free. It takes very little physical effort to move the mouse.
CLICK AND GO
1. Move mouse to upper right corner.
2. Move mouse to lower left corner.
3. Move mouse to lower right corner.
4. Click on File.
5. Click on New Folder.
• Slowly move the mouse arrow to the upper left corner of your screen. Now move it to the upper right, lower left, and lower right corners. Did the arrow ever disappear off the edge of the screen? Sometimes that happens when you get close to the edge of the screen. No harm done—gently move the mouse around a bit and the arrow will reappear on the screen. Don’t ask me where it goes when this happens—it’s the computer’s version of hide-and-seek.
• Now slowly move the mouse arrow to the word File at the top left of your screen. If you’re using a desktop computer or an external mouse, depress and release the button under your index finger. If you’re using a touch pad, use your thumb to depress the button below the pad and release. There is no need for the mouse to move when you depress the button. Keep your eye on the screen and your hand steady.
• Now move the mouse arrow onto the words New Folder, and then release the button. Keep your hand very steady so the arrow won’t move from its position. If you’re having trouble hitting your mark, take your hand off the mouse. Give your hand a rest; maybe shake it a bit. For some people this is easy, and for others it takes a few tries. When you’re ready, try again.

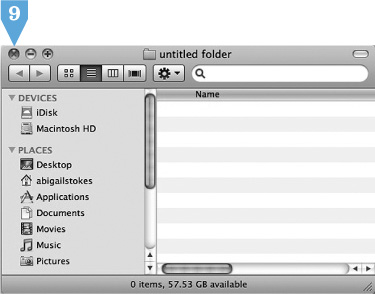
CLICK AND GO
6. Click on Untitled Folder.
7. Click on File.
8. Click on Open.
9. Click on Close.
• When you release the mouse button, a new icon looking like a file folder with the words Untitled Folder enclosed in a box below should appear on the screen. We need to open this folder to produce a window. Move the mouse arrow onto the folder itself (not the words below) and depress the mouse button and release. The folder should now be highlighted.
• Move the mouse arrow back up to the word File (at the top left of the screen). Depress and release the mouse button. Now move the mouse arrow down to the word Open and depress and the mouse button. You have just opened a window on your computer screen!
• Now we’re going to close the window. Find the  red circle box in the upper left corner of the window. This is the Close Box. Move the mouse arrow inside the
  Close Box. An X appears in the circle. It is important that the tip of the arrow is inside the Close Box, not on the edge of the box. Keep your hand steady so the mouse won’t move from its position. Depress and release your mouse button. The Untitled Folder window has now disappeared. Well done.
If the box hasn’t disappeared, there is nothing wrong with you or the computer; you simply didn’t click the mouse correctly inside the  Close Box. Keep your eye on the mouse arrow on the screen and do not move the arrow when you depress the left button of the mouse. It’s very common to move the mouse as you depress the button. That will unfortunately make the mouse click off-target. Keep trying—you’ll get it eventually. Remember it is like driving a car—keep your eye on the road (the screen), not the steering wheel (the mouse).
The mouse has a variety of functions. All of the tasks that the mouse performs are accomplished by moving the mouse to the designated area and depressing the button.
In some ways it is more chameleon than mouse. You won’t see its many mutations until later, but the chart on the next page shows the different faces and what they mean.
“I thought I would never be able to control the mouse. It took me a long time to feel comfortable with the clicking and the movement. I made a lot of mistakes along the way, but eventually it got easier. Sometimes I don’t even think about it now—I just do it.”
—Eileen
As I’ve said before, to click the mouse means to depress and release the button. Clicking the mouse instructs the computer to perform a task (such as open a document). This can take a single or a double click. A single click is accomplished by depressing and then quickly releasing the button. To double-click, you depress, release, depress, release in quick succession.
There is no clear way to explain when to single- or double-click. Generally, you double-click on an icon to open it, allowing you to access an application software program. Remember, think of it as a knock, knock to allow entry to the program. Usually when you’re in a program (typing a letter or playing a game), you single-click on something to perform a task. You’ll get the feel for what’s best to do when. If you single-click when a double-click is necessary, you’ll know because you won’t accomplish your desired task. If you double-click when a single click is called for, nine times out of ten nothing is affected. On occasion the double click opens another window unexpectedly, but you can press Esc (Escape key—upper left on the keyboard) to correct things or click on the  Close Box or a blank area on the screen to get rid of the unwanted window.
It’s time to experiment with the mouse arrow on your desktop screen to become familiar with its movement.
1. Place your hand on the mouse (with the tail or cord of the mouse pointing away from you) and move the mouse arrow to a blank space on the desktop screen. (Don’t click on an icon yet.)
2. Click the mouse button by depressing and releasing it with your finger.
3. Now depress and release the mouse button two times. Try it again and do it as fast as you can. Continue double-clicking until you’re comfortable with the action. For some people, double-clicking can be kind of tricky.
Reopen the Untitled Folder that you created on page 121 by moving the mouse onto the folder (not the words below) and double-clicking. If you are having trouble with the double click, you can single-click on the folder to highlight it, then click on the word File at the top left and single-click on the word Open. Your Untitled Folder window should now be open.
Look at the window. The words at the top of the screen are contained in the Title Bar. In the far left corner of the Title Bar is the  Close Box. In the left corner of the Title Bar are two more circles. The green circle on the right is the
  Zoom Box, and the yellow circle in the middle is the
  Collapse Box. There is also the
  Size Box (sometimes called the Grow Box) in the bottom right corner. (We’ll go over this later.)
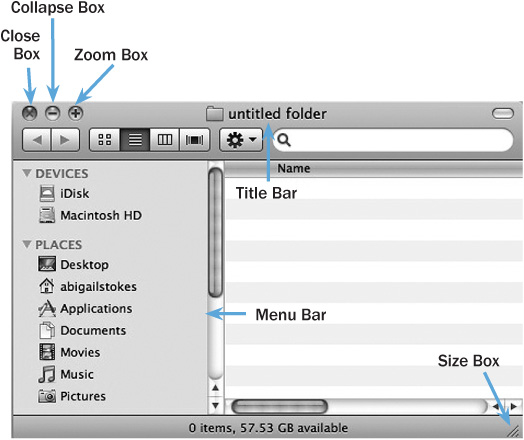
These same features will appear on most windows that you open on your computer. There will always be a Title Bar at the top that tells you which window you are viewing. There will always be a Menu Bar, a Close Box, Zoom Box, and Collapse Box. Once you learn to use these features in this window, you will be able to use them on any window.

When you use the Zoom Box, it makes the size of the window as large as possible. The advantage of this is that you will see more of what is contained in that window.
Move the mouse arrow to the  Zoom Box and click once. It’s a little tricky to position the arrow exactly inside the box. If you’ve clicked successfully on the Zoom Box, you’ll see that the Untitled Folder window now takes up more of the screen. Note: Sometimes the window thinks it’s maximized, but it isn’t taking up the entire screen. In that case the window can be maximized by using the
  Size Box. We’ll play with the Size Box later.
To restore the Untitled Folder window to the size it was when you started, move the arrow back onto the  Zoom Box and click once. If the window is now the original size, you did it right.

When you use the Collapse Box, it shrinks the window to its smallest form on the Dock at the bottom or left of your screen next to the Trash. The advantage of this is that you can access the window quickly but it isn’t taking up space on your screen.
Let’s see the Collapse Box in action. Move the mouse arrow onto the  Collapse Box and click once. If it seems as though the box has disappeared, leaving behind only the Title Bar, you have successfully collapsed the window. To restore the window to its original size, move the mouse arrow onto the Dock and click on the Untitled Folder once. The Untitled Folder window is back on your screen.

To close the window completely, move the mouse arrow into the  Close Box and click once. Good-bye, Untitled Folder window. If that was rough going, don’t worry. This is your first time playing with the mouse. It’s all about practice, practice, practice.
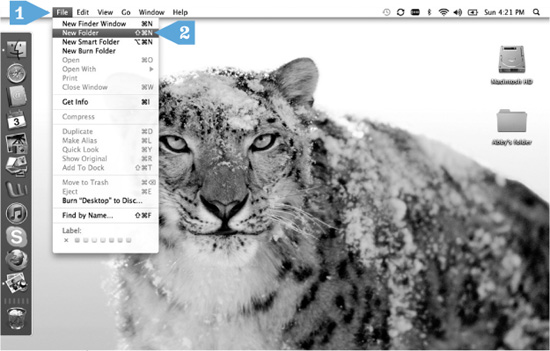
CLICK AND GO
1. Click File.
2. Click New Folder.
Unlike a PC with a Microsoft operating system, a Mac doesn’t come with Solitaire preinstalled on the hard drive. If you purchased Solitaire software when you bought your computer, you can either follow the steps below or skip this section and go directly to “Place Your Bets” (page 128) to play Solitaire.
It isn’t my intention for you to become a game nut. What I really want you to do is master the mouse. Your homework is either to play solitaire or follow the steps here as often as you can. Once the mouse is your slave, go on to the next chapter. Remember, it is practice and only practice that will allow you to conquer the mouse or any other aspect of the computer.
To access a new folder:
• Move the mouse arrow up to the top of the screen.
• Click on the word File at the top of the screen.
• A menu will have opened. Move the mouse down into the menu and click on the words New Folder.
• Take a look at the desktop and you will notice that there is now a folder there with the name Untitled Folder.
CLICK AND GO
1. Double-click on Untitled Folder.
2. Move mouse onto title bar.
3. Click and drag untitled folder window.
My goal here is to have you learn to click and drag the mouse. It is a mouse tool that you will use later when you are on the Internet.
Here’s what I would like you to do:
• Double-click (as you did on page 124) on the Untitled Folder.
• The folder has now opened to a window. Move your mouse onto the title bar where it says Untitled Folder.
• Depress the mouse button and keep it depressed while you move the Untitled Folder to the left, then to the right.
• Release the mouse. You’ll notice the folder remains where you moved it.
Good! Before you know it you will have mastered the mouse. Remember, it is practice that allows you to conquer the mouse or any other aspect of the computer. Repeat this exercise every time you visit your computer.
If you aren’t going to play Solitaire, skip to Ready to Call It a Day? on page 132.
You can try to install the Solitaire software following the instructions that came with it. But if it seems too hard, don’t hesitate to call and ask someone who has a computer to help you.
Once the software is installed, open your Solitaire program using the following steps:
1. If there is a Solitaire icon on your desktop screen, move the mouse arrow onto the icon and double-click. It is important that the arrow be on the icon and not on the words below.
2. If there isn’t an icon, move the mouse arrow to your Hard Disk icon and double-click.
3. Find the Application folder. Move the mouse arrow onto that folder and double-click.
4. Now find the Solitaire folder. Move the mouse arrow onto that folder and double-click. The Solitaire window is now opened.
So here we are with the Solitaire window opened. Let’s review the rules of Solitaire, and then we can play a hand. If you already know how to play Solitaire, skip this section and we’ll catch up with you at “How Do the Cards Get Moved?” (page 130).
• The ultimate goal of Solitaire is to have all the cards in four piles in the empty spots of the Solitaire window. Each stack must be of a single suit and in ascending order, with the ace on the bottom and the king on top (ace, 2, 3… jack, queen, king).
• Along the way, your challenge is to build on the cards that are face-up in the seven piles. You add cards to these piles moving down in value (10, 9, 8…), but you must alternate in color (black, red, black, red).
• A PC Solitaire window.
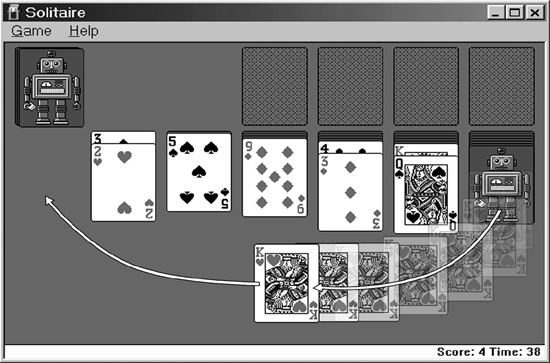
• A king is the only card that can be moved to an empty space.
• You can play the top card in any of the seven piles or play the card that is faceup in the draw pile. When you take a card from the draw pile, the card below will be revealed and may then be played.
• As you use a card from the seven piles, the card below it can be played. If an empty space is created, only a king can be moved to that spot; then you can start building on the king in the same way the other piles are built (king, queen, jack… alternating red and black).
• Aces are moved to the spaces at the top right of the window.
• If you come upon an ace, move it to one of the open four spots and build up your stacks by suit (ace, 2, 3…).
• A series of cards can be moved together. For example, if you have a black queen revealed in one pile and in another stack you have built a series with a red jack, black 10, and red 9, you can move the series, starting with the red jack, onto the black queen.
• Keep in mind, the strategy in Solitaire is to try to expose as many facedown cards as possible.
Don’t get frustrated if you don’t often win. If you win one out of five games you’re doing quite well. Remember: It isn’t whether you win or lose, it’s how you control the mouse.
To move a card, you must click and drag it. Place the mouse arrow on the card that you want to move. Press the mouse button, and, without lifting your finger, drag the card to where you want it to be. Then let go of the button on the mouse.
To flip over a card from the draw pile, move the mouse arrow onto the card and click once. If you double-click here you will turn over two cards, so be careful.
• A series of cards can be moved together by clicking on the highest card of the series and dragging it to the appropriate spot. All the cards in the series will move together.
Look at the cards that are faceup in your seven piles.
If there is an ace, move the mouse arrow onto the ace. Press down the mouse button. With the mouse button held down, move the card onto one of the four designated blank spots. Take your finger off the mouse button. If this didn’t work, give it another try.
Look for a card one less in number than any of the cards faceup in the seven piles. Is the color different? (The cards must alternate black and red or vice versa.)
• If you have a card to move, move the mouse arrow to that card and click and drag the card to its new position.
• If you don’t have a card to move, can you play the faceup card in the draw pile?
• If you can’t play that card, click once on the facedown pile. Can you use that card? Keep flipping cards until there’s a card to play. If the draw pile is depleted, click once on the empty area so you can go through the pile again.
The game continues like this until you can’t play any of the cards available to you. Unfortunately, that means you’ve lost. But if you manage to complete the four piles by suit from ace to king, that means you’ve won.
If you want to play again, move the mouse arrow onto the word Game in the Menu Bar and click once. Now move the arrow down to the word Deal and click again.
Play Solitaire for at least half an hour every day for a week. If you choose to play more, make sure you take five-minute breaks every half hour or so. What you are really doing is mastering the mouse. Once the mouse is your slave, go on to the next chapter. Remember, it is practice and only practice that will allow you to conquer the mouse or any other aspect of the computer.
If you have a PC, move your mouse arrow to the  Close Box of the Solitaire window and click once.
If you have a Mac, move your mouse arrow to the  Close Box of the Solitaire window and click once.
Get into the habit of shutting down your computer properly. You must try to avoid simply turning the power off instead of going through the shut-down process. If you do not go through the proper shut-down procedures, you can damage the computer. It is best to close all the windows that are open and quit any programs that you are in. If you forget to do this, the computer will remind you.
If you have a PC:
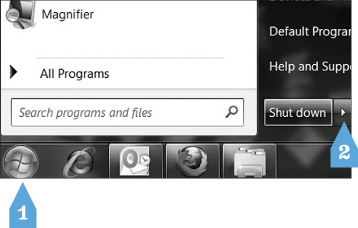
1. Move your mouse arrow to the Start button or symbol  in the bottom left corner of your screen and click once.
2. Move your mouse across to the arrow and click once.
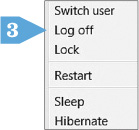
3. Now click Shut Down or Log Off.
4. Your computer will now turn off.
5. Turn off any peripherals that may still be on—your monitor, the printer, and so on.
CLICK AND GO
1. Click Start or  .
.
2. Click arrow.
3. Click Shut Down or Log Off.
If you have a Mac:
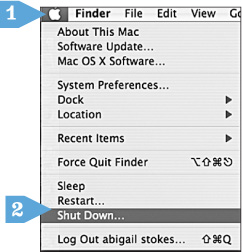
1. Move your mouse arrow to the in the top left corner and click once, then to the words Shut Down and click once.
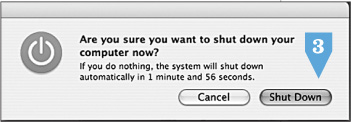
2. Click on Shut Down in the little window that has opened. This will instruct the computer to shut down.
3. Turn off any peripherals that may still be on—your monitor, the printer, and so on.
CLICK AND GO
1. Click on Apple logo.
2. Click Shut Down.
3. Click Shut Down.
If You Have a Laptop:
Be sure to close the cover after completing the preceding steps.
That was a huge amount to accomplish! If you are bleary-eyed, you are not alone. We covered a lot of material for your initiation, but initiated you are!
When you want to come back to the computer, you can repeat any or all of this chapter. What you must do is open the Solitaire window (or Untitled Folder for Mac users) and practice for at least half an hour every day for a week. I want you to be skilled with the mouse and have an understanding of your options within a window. At the end of that time, you’ll never have to do it again unless you want to.
Q: Why does it take my computer so long to shut down?
A: Computers can take a bit of time to start up and shut down because they need to check that everything is working properly and to put data in its proper place. If this start up and shut down time has lengthened dramatically, you made need to have someone do some housecleaning on your computer. (See Chapters 20 and 25.)
Q: Do I need to turn off my monitor, speakers, and/or printer when I turn off the computer?
A: You don’t need to turn them off, but to leave the monitor, speakers, and printer on is an unnecessary waste of energy.
Q: I seem not to have enough space on my desk for the mouse. Do I need a bigger desk?
A: You definitely do not need a bigger desk. You need to harness your use of the mouse. Instead of sweeping all over your desk, lift the mouse up to reposition it on your desk. You’ll notice that when the mouse does not make contact with the desk’s surface, the arrow on the screen will stay in place.
Q: I love my laptop, but not the built-in mouse.
A: Don’t despair. If you purchased a laptop computer and you continue to have trouble manipulating the built-in mouse, you have the option of purchasing an external mouse. Make sure that your new mouse is compatible with either your PC or Mac.