Create a filing system, organize, and maintain all that lives on your computer
You don’t need to be a neatnik for the sake of your buddy, the computer. It couldn’t care less whether you can find the documents you “penned.” Nor does it have any investment in whether your photographs are organized in a folder on the Desktop or if they live higgledy-piggledy all over your machine. Your computer will not lose sleep over whether you’ve copied your photos and documents onto CDs for safekeeping or not. You are the sole beneficiary of an organized computer. Knowing where things are stored on it makes your computing experience manageable and more pleasant. Don’t you deserve that?
As for the computer, what matters is that you do some regular housekeeping to help it function at its best. First, let’s take care of your needs. Unless the computer is misbehaving, it can wait.
Files and folders have been referred to several times in the book. Let’s get to the nitty-gritty of exactly what the difference is between the two and how you can make use of both.
A file can be a word-processing document, a digital or scanned photograph, a video clip, an audio or music recording, a PowerPoint slide show, or a movie. It could be a multipage document containing text, graphics, and photos. In every case, a file must have a name. Ideally, that name clearly describes the contents of the file, thereby eliminating the need to open the file to reveal the gist of its contents. It’s a good idea to include the date in the filename (i.e., smile May 12.doc). A file name can contain spaces, may be uppercase and lowercase but punctuation can sometimes be tricky. You can’t use slashes or question marks. If you must have a means to divide text, to be safe use the hyphen key (i.e., accountant final letter 4-14-11.doc).
• One folder containing three files.
In Chapter 15, I described how to use File and Save As to name a Microsoft Word (MS Word) document. Using File and Save As as file-naming devices is not exclusive to MS Word. Both options appear in many different software programs. Feel free to click on File in any program when curiosity calls to see if Save As appears in the drop-down menu.
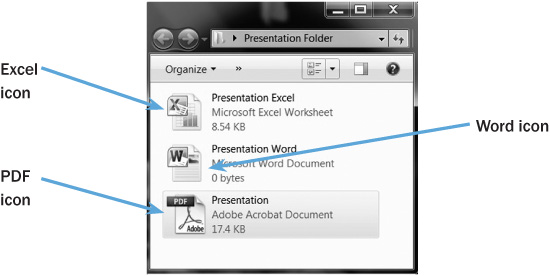
At the end of a file name is a suffix or extension that identifies the software program used to create the file. On the next page is the same list from our discussion on attachments in Chapter 17.
 .doc or .docx = Microsoft Word document
 .xls or .xlsx = Microsoft Excel spreadsheet
 .pdf = Adobe Acrobat portable document file
 .ppt = Microsoft Power Point Presentation
 .cwk = Apple Works document
 .mov = QuickTime movie
 .wav = sound file
 .jpg = a graphic or image
 .zip = compressed data
“My actual desk is a mess, yet somehow I’m able to keep my computer quite organized. Who knows why I can do it with the computer and nowhere else, but it definitely eliminates computer confusion for me.”
—Daniel
Notice there is an icon beside the suffixes listed in the above box. The icon represents each software program. Becoming familiar with these different icons helps identify the types of files on your computer. There are many more extensions than those shown here. The ones listed are ones you’ll see most often.
A folder is not a file. I know it’s confusing, but to the computer a file is a file and a folder is a folder. There is no such thing as a “file folder” on the computer. A folder is a means to store and organize one or more files. (For example, you might have a folder called “travel” and in it a document titled “packing list” and another called “Italy itinerary.” Those two items are files contained in the folder “travel.”) To assist in the identification of the contents, you will assign the folder a name. Again, specificity counts. The icon for a folder  helps clarify things because it looks like a manila folder and it functions like one.
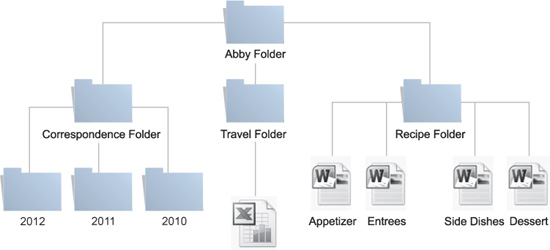
You can even have a folder system within a folder, similar to a family tree, as in the illustration here. On my computer, the main folder is named “Abby.” Within that folder are folders titled “correspondence,” “travel,” and “recipes,” to name a few. Inside the correspondence folder are folders designated by year that store the correspondence of each year. Within the travel folder are various itineraries and conversion charts. The recipe folder contains separate folders for appetizers, entrees, and desserts—each folder with recipes in it. Starting to get the picture?
• The Abby Folder branches out into sub-folders that contain folders and documents.
Essentially, there is no limit to the number of files or folders a single folder can store, as long as your computer has enough memory. Here’s the rule of thumb to keep things organized: If you have three or more files that can be grouped, make a folder to store them.
Let’s create a folder on the Desktop, so you can see what this business is all about.
If you have a PC:
• Move your mouse to a blank spot on the Desktop.
• Click with the right button of the mouse.
• Left-click on New (all other clicks will be with the left button after this point).
• Move the mouse into the menu that opened next to New.
• Click on Folder at the top of the list. A folder will now appear on the Desktop.
• Do not click the mouse at this stage. Instead type the desired name of the folder. For this exercise, simply type your first name. (If you did click the mouse, even though I told you not to, your folder is now officially named New Folder. Don’t worry. We will learn how to rename a folder next. Sit tight.)
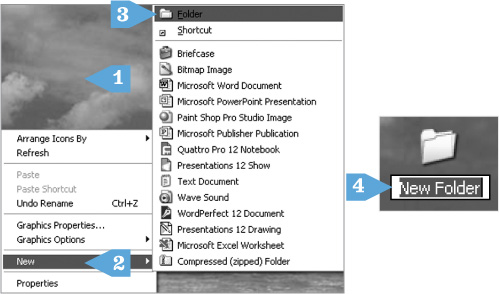
• Creating a New Folder on a PC.
CLICK AND GO
1. RIGHT-click on Desktop.
2. LEFT-click on New.
3. LEFT-click on Folder.
4. Do not click mouse; type desired folder name.
5. Hit Enter key.
• Hit the Enter key to save the new name.
• Double-click on the folder to open it.
If you have a Mac:
• Click on the Desktop.
• Click on File at the top of the window.
• Click on New Folder.
• Do not click the mouse at this stage. Instead type the desired name of the folder. For this exercise, simply type your first name. (If you did click the mouse, even though I told you not to, your folder is now officially named New Folder. Don’t worry. We will learn how to rename a folder next. Sit tight.)
• Hit the Return or Enter key to save the new name.
• Double-click on your folder to open it.
Well done! Repeat these steps anytime you want a new folder to appear on your Desktop. These are the same steps you would follow to create a folder within a folder anywhere on your computer. Open the existing folder where you would like a new one to appear. If you have a PC, right-click inside the folder where you want the new folder to appear and then follow the preceding steps. With the Mac, open the existing folder and then click on File.
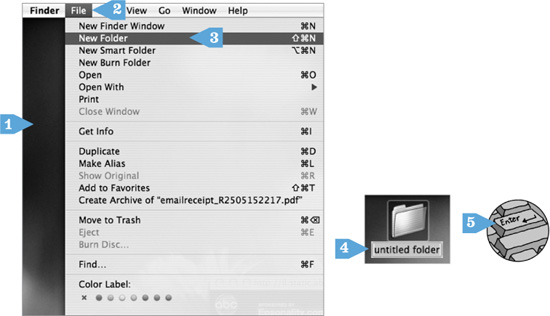
• Creating a New Folder on a Mac.
CLICK AND GO
1. Click on Desktop.
2. Click File.
3. Click New Folder.
4. Do not click mouse; type desired folder name.
5. Hit Return or Enter key.
You can change the name of an existing folder or file (aka document, photograph, etc.) at any time. The same steps apply to both a file and a folder. A folder and/or file must be closed while changing the name.
• Place your mouse on the text below the icon of the file or folder to be renamed.
• Click once on the file or folder name. The computer now knows what item you want to modify.
• Click once, again, on the file or folder name. Only the name is now highlighted. You can either click within the name, if you want to modify only part of the name, or start typing to replace the entire name. For this exercise, replace your first name with your last name.
• Hit the Enter or Return key to save the change.
Pretty good, huh? If that didn’t work, don’t fret. Try it again slowly and carefully. You’ll get it.
Let’s say you’ve been saving all of your attachments or new documents on the Desktop. (A good place to save them at the onset of your computer learning because you can find them easily.) But now you have so many on the Desktop that you want to tidy things up. You can easily move a file or a folder into an existing folder.
First, let’s open a new document so we have something to play with.
• Open Microsoft Word.
• Click on File. (An older version of Word may require that you open a New Document. If that is the case, click on New Document.)
• Click on Save As.
• Choose the Desktop as your destination.
• Name the document “move me.”
• Click Save.
• Close Microsoft Word.
Great! Now we have a document on the Desktop titled “move me” and a folder with your name.
• Move your mouse onto the “move me” document (aka file).
• Depress the mouse and keep it depressed (poor sad mouse) while you drag the “move me” file on top of the folder with your name.
• When the “move me” is smack on top of the other folder, highlighting both of the icons and text, release the mouse.
• Double-click on the folder with your last name. Shazam! There is your “move me” document (aka file) inside the folder. Close the folder.
• Repeat the steps in Create a Folder on page 307. Name the new folder Bertha. Then keep reading.
Let’s move the Bertha folder into the folder with your last name. It’s as easy as click, drag, and drop. (You can sneak a peek at the previous instructions, if you want. They are there to help you.)

• Moving a file into a folder.
CLICK AND GO
1. Move mouse onto “move me.”
2. Click and drag onto folder.
3. Release mouse.
The Bertha folder should no longer exist on the Desktop. Now you can open the folder with your name. Bertha and “move me” should be inside. Click and drag “move me” into “Bertha.” Get it now? I thought so.
Because you can also use this method of moving items for moving files into a folder, it makes tidying up the Desktop very easy. When you’re not sure where to save a photo, document, or folder, why not save it to the Desktop? You now know you can move it from there into an already existing folder or one you create.
Nice work so far! Now, close whatever folders you have open on the Desktop.
I apologize for what you’re about to do, but I’d like you to practice deleting a folder. Don’t feel that all of your hard work has gone for naught because we’re about to throw it away. You can repeat the preceding steps to create as many folders as you like. But what if one of your folders and its contents become obsolete? You want to be able to clean up your Desktop or any other area of your computer, don’t you? I thought so.
First, find your target for where to put unwanted files and folders. On a PC, it is the Recycle Bin  . On a Mac, it is the Trash
  . Let’s get rid of the Bertha folder. Make sure it’s closed. Click, drag, and drop the folder onto the Recycle Bin or Trash. Simple as that. Gone!
Be aware that there is more than one method available to create, rename, move, and delete a file or folder. As it is true with so many actions on the computer, there are several ways to accomplish each of these tasks. The more you experiment with your computer, the more easily you can decide the method you prefer. You may choose to mix and match, as I do. You can also choose to store things anywhere on the computer that you desire. There is a Documents or My Documents folder that already exists on your computer. You may want to store documents you’ve written there instead of creating a new folder with your name. How you decide to organize is your choice. I just strongly suggest that you do organize as you begin your journey rather than having to do a massive cleanup further down the line.
• If you delete a folder, you will also be deleting all files and folders within that folder.
• If you move a folder, you will also be moving all the files and folders within that folder.

What happens to the file and folders you’ve thrown away? They remain stored in the trash or recycle bin until you or the computer, if scheduled to do so automatically, empties it. If you have a Mac, and you want to empty the Trash, click Finder, then click Empty Trash. If you have a PC, right-click on the Recycle Bin, then left- click on Empty Recycle Bin.
If you feel remorse about something you threw away, you can roll up your sleeves and retrieve it from the trash unless it has been emptied. Double-click on the Recycle Bin or the Trash to open it. Click and drag the desired item out of the folder back onto the Desktop. (You may want to wash your hands afterward!)
What do you do when the message below appears on your screen?
The safest thing to do is to move your hands away from the keyboard and mouse. A hand hovering over the mouse, with its owner in an agitated state, can lead to an accidental click. The result of that click may be irreversible. In the case of this example, if you chose Yes and later realized your error, the item in question could be retrieved from the trash, but in other situations you might not be so lucky.
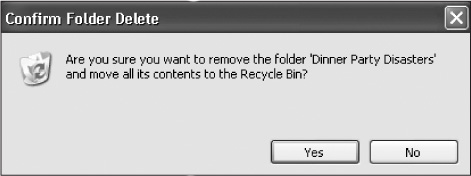
• The computer may ask you to confirm that you want to throw something away.
More than one student has come to my class with the same sad story. Their computer seemed to be running slower than usual. So, they decided to delete items they didn’t think were necessary in the hope that it would make the computer run more smoothly. Much to their disappointment the computer stopped working entirely. What they did was delete items they didn’t think they used on their computer. The number of files and/or folders on your computer doesn’t make a big difference in the operation of the machine, unless you have an older computer with little memory. Unwittingly, a program that works in the background of the computer can get tossed in the purging process. By deleting this necessary but unfamiliar element, you risk negatively impacting how the computer functions. Files ending in .exe, .config, .sys, .bak, and .dll should never be altered, modified, renamed, copied, moved, or deleted. I don’t expect anyone to commit that list to memory. So, instead, here is the policy I suggest: If you didn’t create it or receive it as an attachment, don’t delete it. When in doubt, don’t throw it out!
Keep your computer free of dust, animal hair, and far away from liquids. I mentioned this back in Chapter 5, but it warrants repeating. The computer will also benefit from some routine maintenance.
PCs and Apple computers differ in what regular maintenance you should provide. If you have a PC, read on. If you have a Mac/Apple, you can skip the disk cleanup and defrag section because Macs do this automatically.
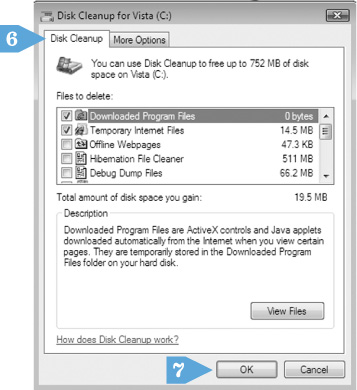
Disk Cleanup is a tool built in to the computer to help the computer remain as lean and smooth-running as possible. When activated, Disk Cleanup sweeps your computer to find unnecessary files it can safely delete to free up space on your hard drive. Rest assured the Disk Cleanup would not suggest deleting any files you added to the computer. Primarily it finds temporary Internet files and the like. The frequency that one should perform Disk Cleanup is directly related to the amount of computer use, not the calendar.
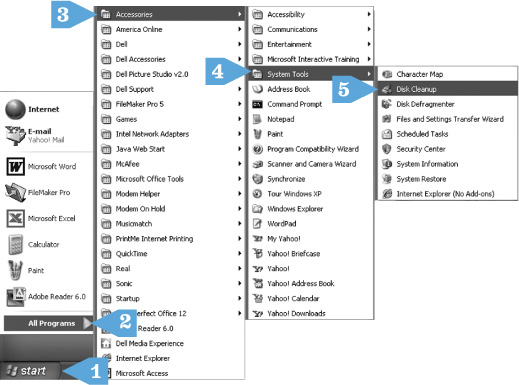
• The steps to take to perform a Disk Cleanup on your PC computer.
CLICK AND GO
1. Click Start.
2. Click All Programs.
3. Click Accessories.
4. Click System Tools.
5. Click Disk Cleanup.
6. Click to remove any checks for files you do want to keep.
7. Click OK.
However, because that’s hard to judge, you could perform a disk cleanup between once a month and once every three months. (I’ll bet you a new ream of paper that most people you ask may do it once a year, but most have never done it at all!)
Here are the steps to clean up your PC computer:
• Close all programs that are open.
• Click on Start  .
.
• Click on All Programs.
• Click on Accessories.
• Click on System Tools.
• Click on Disk Cleanup. Wait while it evaluates your computer.
• A window opens indicating what files the computer proposes to be deleted with a check mark. If there are any files you do not wanted deleted, click in the box with the check to remove the check.
• Click on OK.
Every time you open or close a program, bits of the data used in the program move from their place of origin to another location in the computer. This is called fragmenting. When fragmenting occurs, it slows down the process of the computer because now the computer has to search for all the fragments scattered hither and yon on the computer. To return these bits of data to where they belong, the computer must be defragmented. Why not defrag your computer every time you perform a Disk Cleanup? Choose your computer housecleaning day to be something you can remember… perhaps the first of the month or when you pay your quarterly taxes.
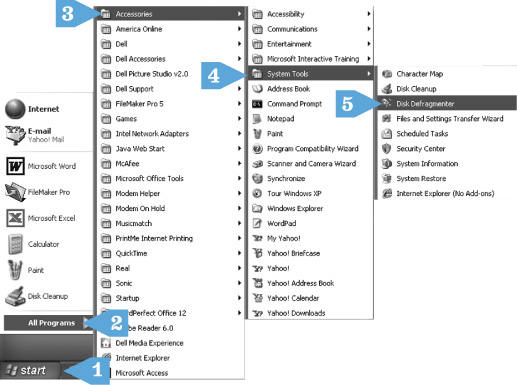
• The steps to take to defrag your PC computer.
CLICK AND GO
1. Click Start.
2. Click All Programs.
3. Click Accessories.
4. Click System Tools.
5. Click Disk Defragmenter.
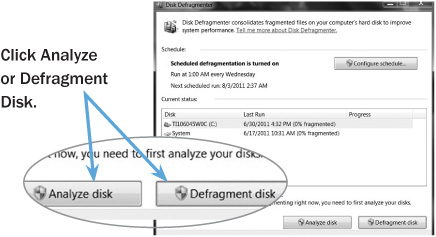
Here are the steps to defrag your PC computer:
• Close all programs that are open.
• Click on Start .
• Click on All Programs.
• Click on Accessories.
• Click on System Tools.
• Click on Disk Defragmenter.
• Click on Analyze. If the analysis says you don’t need to defrag, close both windows. Otherwise, click Defragment and wait… this could take minutes or hours.
• Eventually, it will notify you that the defragging is complete and you can close all windows.
If you have a PC, the Microsoft operating system regularly offers updates. These updates are fixes or patches from Microsoft to make your computer run more smoothly. It’s a good idea to allow these updates to occur.
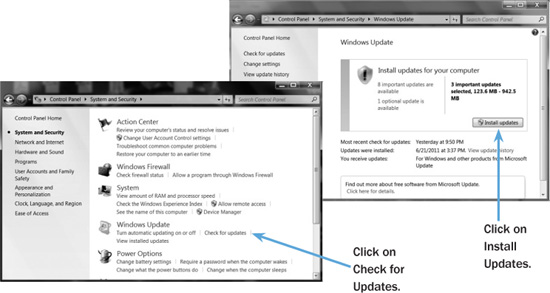
• System and Security on Windows 7.
• Windows Update on Windows.
To instruct the computer to do just that, follow these steps:
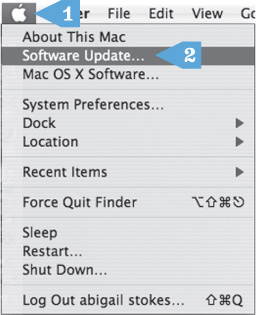
CLICK AND GO
1. Click  .
.
2. Click Software Update.
3. Click install (not shown).
• Click on Start.
• Click on Control Panel.
• Click on System and Security.
• Click on Windows Updates.
• From here you can check for updates and schedule when the updates will be downloaded and installed.
Apple also offers updates, but you access them differently.
• Click on the Apple in the top left of the screen.
• Click on Software Update.
• The Software Update program will evaluate what is on your computer. If it determines there are updates available, click Install to download and install what is suggested for your computer.
Remember, if you take care of your computer, it will take care of you.
With both PCs and Apples, be cautious, if when on the Internet, you are offered to update software on your computer. How does the website know what’s on your computer or what you need? Resist the temptation to download anything unless you know what it is and that you want it.
Q: I can’t seem to locate documents that I’ve written. How can I find them?
A: If you have a PC, you can click on Start  and then click on Search. Follow the instructions on where to type all or part of the name of what you’re looking for. A window will eventually open with a list of items containing the keywords you typed. Take note of the Folder column that tells you the location of the item. If you have a Mac, click on the Desktop, then click File, and finally click Find. Type in what you’re looking for. The window that opens will indicate the location of the file at the bottom of the window. To prevent losing a document or file, always make a conscious decision about where it should live during the File, Save As stage.
Q: I’ve decided I don’t want a folder to be inside another folder. How do I get the one folder onto the Desktop?
A: It’s as easy as click and drag. Just click and drag the desired folder out of its present home onto the desktop and release the mouse.
Q: Somehow when I click and drag, the document never goes inside the folder. What am I doing wrong?
A: It’s all about the aim. Use a steady hand and don’t release the mouse until the target (the folder) is highlighted. Then, without moving the mouse, release your finger. You can also open the target folder and drag the document into the folder rather than onto the icon.
Q: I’ve tried a few times to rename a document, but the computer keeps refusing the name.
A: Be sure there’s no punctuation in the name. Instead of punctuation, use spaces to divide up characters in a file or folder name.
Q: If I buy a new computer, how do I get all my files from one to the other?
A: After you’ve backed up your documents, photos, and files onto a CD or a DVD, you can then take that CD or DVD and copy all the information from the old computer into the new one. There is also a device that is perfect for moving information from one computer to another—a USB flash drive (aka a thumb drive or a memory stick).
• A USB flash drive.