An introduction to word processing
Many of my students now have their lives stored on their computers. Some use word-processing software for correspondence, others are working on their memoirs, and others use it to keep track of dinner parties, birthdays, or travel plans. Even if you don’t see yourself as a “writer,” at some point it’ll come in handy and you’ll be glad to know how to use it.
Microsoft Word dominates the word-processing software market. It used to be computers came with Microsoft Word preinstalled. Now you must buy the software either through a trial version (which lasts 30 days before you are required to give it up or pay) or when you buy the computer. If you choose the latter, the store may be willing to install it before you bring the computer home. All computers come with either Notepad, WordPad, or Text Edit, which are pared-down versions of word processing software but will not ultimately serve your needs if you are doing anything more than simple note taking.
“Software suites” are integrated software programs that combine word processing, spreadsheets, a database, and graphics and/or communication options. Leading the market are Microsoft Office, Microsoft Works, and PerfectWorks. If you think that you won’t be doing a great deal more than word processing, there’s no need to spend the extra money for a software suite. Stick with basic word-processing software.
Even if you’re not planning on doing a lot of writing, some of the editing tips in this chapter will come in handy when you’re writing an e-mail. So take frequent breaks, but do complete the chapter.
Word-processing software is used to write letters, make lists, and do whatever else a typewriter was used for in the past. We’re going to open your word-processing program, create a document, and then play around with the options available to you.
Owing to its ubiquitousness, I am talking about Microsoft Word here. Most other word-processing software is similar. Do your best to follow along.
Look at your desktop. Is there an icon for Microsoft Word  or
or  ? If so, double-click on the icon.
If not and you are using a PC, click on Start (bottom left) or  , then up to Programs. A large menu opened for you. Move your mouse onto Microsoft Office or Word and click.
If there was no Word icon on the dock and you are using a Mac, double-click on the Hard Drive  , then double-click on the Applications folder, then double-click on the Microsoft Office or Word folder. Once you see the Microsoft Word icon, double-click on that.
If you don’t see an option for Microsoft Word (or perhaps WordPerfect), it may be that you don’t have any word-processing software on your computer. That means you will need to purchase the software and install it. Don’t hesitate to ask someone to help with this.
Now we have a blank slate in front of us. Let’s see what the Menu Bar and Toolbar have to offer, and then we’ll work with an actual document.
Make Word 2010 Look More Familiar
For those of you who already own a computer and have now purchased Microsoft Word 2010, the format of the program has changed from past versions. (Those of you who are new to Microsoft Word can skip this box entirely.) Take the following steps to customize it to be less confusing to view:
1. Click on the  Customize Quick Access Toolbar.
2. Click on New.
3. Click on Open.
4. Click on Quick Print.
5. Click on Print Preview.
6. Click on Spelling and Grammar.
This will place an icon shortcut for each of these features in the title bar.
Slowly move the mouse arrow over the icons in the Toolbar. As the mouse rests on each icon, a small box or bubble, as it can be referred to, may appear that describes the task associated with that icon. Almost every task in the Menu Bar can also be accomplished with an icon in the Toolbar. This allows you to take an action through a text format (the Menu Bar) or through a graphic format (the Toolbar). Go with whatever suits you. I switch between the Menu and Toolbar randomly.

• Here are three samples of a Microsoft Word window. All contain a Menu Bar and Toolbar. These will be used to edit, format, and print documents.
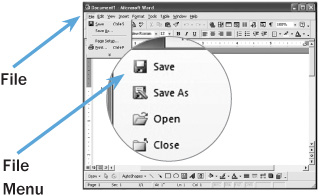
Click File to see what the File menu offers.
• The File menu allows you to save your document, alter the page layout, and print, among other features. The icons in the Toolbar are shortcuts to items in the Menu Bar.
Move the mouse arrow onto the word File on the Menu Bar and click. Read the commands available in this box. You may not know what each of these many instructions refer to, but it’s valuable to be familiar with what’s available. When the time comes that you need one of the tasks offered in the menu bar, a bell may ring in your head that you saw it listed when you first got to know the software. (I don’t expect you to remember where you saw it, just that it exists.) Do the same for each word in the Menu Bar. Click on the word and read what is contained in the box below.
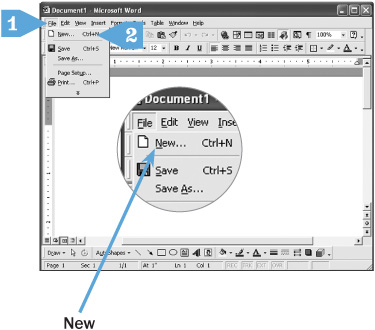
Let’s try creating a new document:
• Move the mouse arrow onto the  New (document) icon and click. Or you can move the arrow up to the word File, click, and move down to the word New or New Blank Document and click. A fresh clean page will now present itself. Type the word hi.
• The next thing we’re going to do is name the document. In the Title Bar the name of your software package appears, and next to it are the words Document 1 (or possibly Document 2). Keep your eye on the Title Bar. After we rename this document, the new name will appear there.
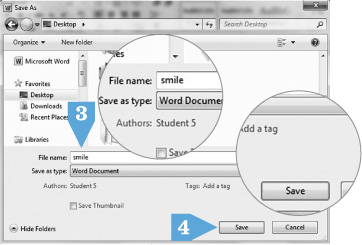
• Move the mouse arrow up to the word File, click, and move it down to the words Save As and click. A window will appear where you can rename the document. (Take notice of where the window says it will save the document. My bet is it says “My Documents” to the right of Save. It’s important to notice the location so we can go find your document at a later date.)
CLICK AND GO
1. Click on File in the menu bar.
2. Click on New.
or
1. Click on New Document icon in the toolbar.
• Type the word smile, and hit Enter, Return, or click on the Save button. The Title Bar has now changed to reflect the new name of the document. Nicely done.
It’s always best to name the document right at the beginning. If you get distracted or exit the program quickly and forget to name the document, you’ll be stuck sifting through a bunch of Documents 1, 2, 3, and so on. It’s easier to sort through documents whose names give a clue as to what they contain rather than a generic name.

CLICK AND GO
1. Click File.
2. Click Save As.
3. Type smile.
4. Click on Save.
I want you now to close the document that you renamed “smile.” I’m having you do this so that you experience what it’s like to open an existing document.
• Close the document by using the Close Box  or
or  . On some word-processing programs there are two sets of Close Boxes. You’ll have to be careful where you place the mouse arrow. The bottom (in the Menu Bar) is for the document; the top (in the Title Bar) is for the software program itself. Don’t close the software, but do close the document. Or, you can move the mouse to the word File, click, and move down to the word Close and click. Poof! Your “smile” document is stored.
To open your “smile” document back up, do the following:
• Move the mouse arrow onto the  Open icon and click. Or move the arrow to the word File, click and move it down to the word Open and click again.
• Now you need to double-click on the document titled “smile.” If the double-clicking still proves troublesome, you can single-click on “smile” and then hit the Enter or Return key or click Open. Your “smile” document should appear.
• Another way to open your document with some programs is to move the mouse arrow to the word File, click and move down to the bottom of the file box. The most recent documents that you’ve worked on may be listed here. Click once on “smile,” and it will open on the screen. If you want to try this technique, you can close the “smile” document and reopen it this way.
ICON ALERT!
may be at the top left, instead of File, depending on which generation of Word is installed on your computer.
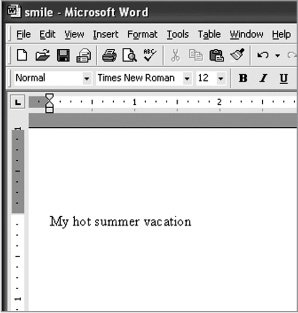
Open your “smile” document if it isn’t already on the screen. You will see a flashing vertical line in the left corner of the window. This is called the cursor. It indicates where typing will begin.
• Please type the following:
My summer vacation
Make sure that the M is in uppercase. To do this, use the Shift key.
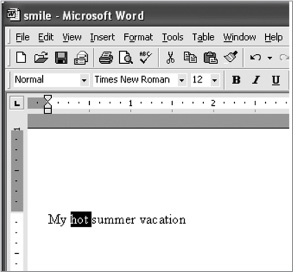
• Notice that when the mouse arrow is in the text box, it changes to an I-beam (vertical cursor—see What It Means, page 109) instead of the arrow; this makes it easier to position between characters. Now insert the word “hot” before the word “summer” by moving the mouse just before the “s” of “summer” and clicking once. The cursor is now before the “s” of “summer.” Another way to change the location of the cursor is to use the arrow keys beside the right Shift key.
• Once the cursor is properly positioned, type the word “hot.” Did you notice that “summer” wasn’t typed over but instead moved to the right to accommodate the new letters? (If this is not the case, depress and release the Insert key located on the top right of the keyboard.)
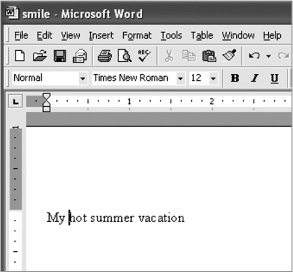
Now your screen should read:
My hot summer vacation
As I mentioned earlier in the book, it’s very important that you regularly save the document you’re working on. If the computer shuts off unexpectedly, the “Smile” document would exist, but the new text that we just typed would be lost.
• Move the mouse arrow onto the word File, click and move the arrow down to the word Save and click, or click on the Save icon  in the Toolbar. Such an important task and such an easy thing to execute.
Now we’re going to move on to some editing tools. This is where the computer proves much more efficient than a typewriter. If you made a mistake with a typewriter or changed your mind about how you wanted your document to look, you would have no choice but to retype it. Not with a computer; it allows you to edit within the document before you print it out.
• The word “hot” is now highlighted. This means the computer is waiting for your instructions for what to do with the word “hot.”
What if you decided that you wanted to move the first paragraph of a letter to the end of the letter? This would be accomplished by “cutting” the text from where it is and “pasting” it to a different location. Follow along and you’ll see what I mean.
• Move the cursor to the left of the word “hot.” Do this with the mouse (remember to click) or with the arrow keys. Before the text can be altered, you must inform the computer of what text you want to change. This is accomplished by highlighting the text.
You can highlight the word “hot” several different ways:
Option 1. Click and drag the mouse arrow over the word “hot” and then release the mouse button. (This is tricky at first, but it becomes easier with practice.)
Option 2. Set the cursor at the start of the word “hot,” depress the Shift key (on the left side of your keyboard), and hold it down. While the Shift is held down, use the arrow keys (on the right side of the keyboard) to move across the word.
Option 3. Move the mouse to the center of the word and double-click.
Using one of these methods, the word should now be highlighted. Of the three options, number 2 is the easiest to execute, but try them all and see which you prefer. You can highlight a single word, several words, or entire paragraphs and pages. Whatever you highlight will take on the changes that you instruct the computer to perform.
Now that you have highlighted the word “hot,” you are able to either cut and paste text or copy and paste text.
• Move the mouse arrow to the word Home or Edit in the Menu Bar, click, and then move it down to the word Cut and click. Right now the word “hot” has disappeared because the computer is storing the word until you tell it where to paste it. Now comes the paste!
• Move the cursor one space after the “n” of “vacation” by clicking the mouse after the “n” and then using the space bar.
• Move the mouse arrow to the word Home or Edit and click.
• Then move it down to the word Paste and click. The word “hot” will now reappear after the word “vacation.”
Instead of using the Menu Bar, you could have accomplished all of that with the icons in the Toolbar.  is the icon for Cut and
  is the icon for Paste. Try cutting and pasting again using the icons instead.
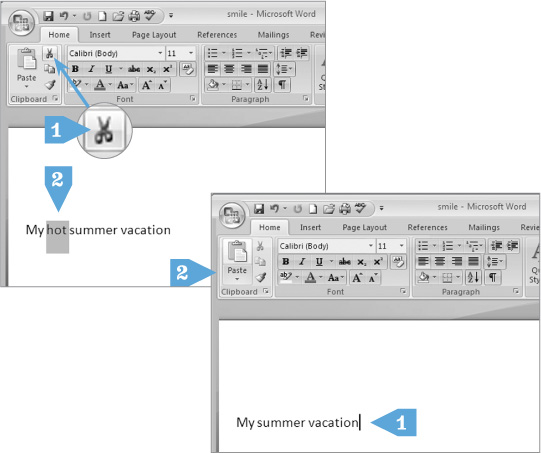
• When you cut and paste text, the original text disappears and is held in the brain of the computer until you tell the computer where to paste it.
• The word “hot” will now appear after “vacation.”
CLICK AND GO
1. Click cut .
2. The word “hot” has disappeared.
CLICK AND GO
1. Click after “n.” Hit the space bar.
2. Click paste .
Instead of cutting the text and pasting it, you might want to repeat a section of your document in another location. This is accomplished by copying and pasting the selected text.
Let’s try to copy and paste:

• When you copy and paste, the original text stays in place and a copy of it appears wherever you choose to paste it. You can paste that copy as many times as you like.
CLICK AND GO
1. Highlight entire sentence.
2. Click edit.
3. Click copy.
• Go back to highlighting Options 1 through 3, pick one of the techniques, and highlight the entire sentence. If you choose number 3 it takes a little practice, but place the cursor in the middle of the sentence and click the mouse three times in rapid succession. Double-click highlights a word—triple-click highlights the whole line.
CLICK AND GO
1. Click after “hot.”
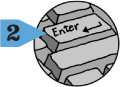
2. Hit Enter or Return key.
3. Click Paste. Repeat five times.
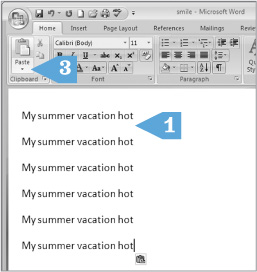
• Move the mouse arrow to the word Home or Edit in the Menu Bar, click, and then move it down to the word Copy and click. The sentence is still on the screen, but the computer has a copy of it stored until you tell it where you want it pasted.
• Place the cursor at the end of the sentence and click.
• Move the mouse to the word Home or Edit and click.
• Then move down to the word Paste and click.
• Repeat the three preceding actions five times. You should have a total of seven sentences on your screen. We’ll use them next to show how many ways you can change the look of your text.
Copying and pasting can also be done with the icons in the Toolbar.  represents Copy. represents Paste. Give it a try.
We’re going to make this into a complete sentence.
• Place the cursor just to the left of the “h” of “hot” in the first sentence, click to activate, and type the word “was.” Your screen should now read:
My hot summer vacation was hot.
• Put a period at the end of the sentence by placing the cursor after the last word and hitting the period key. Alternatively, you could get to the end of the sentence by holding down the arrow key or the End key on the keyboard, and then add the period.

CLICK AND GO
1. Hit arrow keys to move the cursor.
2. Hit End to move to the end of a line.
3. Hit Home to move to the beginning of a line.
There are so many different things that can be done to change the look of the text. All are done by highlighting text, which is a fundamental element with word processing. I’ll run through a series of editing choices. Try each one now. Then come back later and repeat the process until it starts to jell.
• Using whichever option you prefer (page 204), highlight the word “My” in the first sentence. Move the mouse arrow up to the BBold icon in the Menu Bar and click once (click on Home in Word 2007 and 2010). The word My is now bold.
• Highlight the word “vacation” in the same sentence, move the mouse arrow to the IItalics icon in the Menu Bar, and click once. The word vacation is now in italics.
• Highlight the word “hot” in the same sentence and move the mouse arrow to the UUnderline icon in the Menu Bar. The word hot is now underlined.

CLICK AND GO
1. Highlight “My.”
2. Click on B for bold.
3. Highlight “vacation.”
4. Click on I for italics.
5. Highlight “hot.”
6. Click on U for underline.
• Play around with your document to try out all of the many editing and formatting possibilities.
CLICK AND GO
1. Highlight second sentence.
2. Click on  for Center.
3. Highlight third sentence.
4. Click on  for Align Right.
Note: You can change each word back to its original state by highlighting it and then reclicking on the icon you used to make the change.
• Using whichever method you prefer (page 204), highlight the entire second sentence. Click on the Center icon in the Menu Bar.
The sentence is now in the center of the page.
• After you highlight text, the font can also be changed by clicking on Format, then Font.
CLICK AND GO
1. Click down arrow.
2. Use scroll bar
3. Click on desired font.
• Highlight the entire third sentence. Click on the Align Right icon in the Menu Bar.
The sentence remains flush right on the page.
• Highlight the entire fourth sentence. Click on the  Align Left icon in the Menu Bar.
The sentence is now flush left on the page.
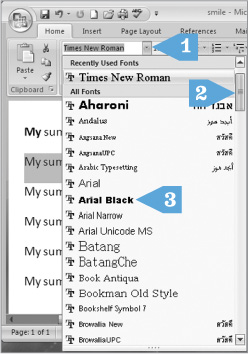
• Highlight the entire fifth sentence. Click on the arrow  to the right of Font in the Toolbar. This will reveal the different fonts (typefaces) available to you. Use the Scroll Bar to view the fonts. Click on whichever font appeals to you.
The sentence could look like this My summer vacation was hot, or this My summer vacation was hot, or countless other ways, depending on which font you choose to use.
• Highlight the entire sixth sentence. Click on the arrow  to the right of the font size box in the Menu Bar. Click on whichever size you want to see. This sentence could be My summer vacation was hot or My summer vacation was hot.
Play with the different styles and sizes of fonts. But if you’ve been at the computer for a long time, sit back, take a breath, and look around the room. When you’ve been focusing on the computer screen for a while, it’s a good idea to give your eyes a break.
Repeat the exercises in this chapter as often as you can. It’s only through repetition that you will become comfortable with your word-processing software.
Your word-processing software is designed to make life easier. It even checks your spelling! Highlight the word “vacation” and retype it, spelling it “vaction.” Note that when a word is highlighted and you start typing, the highlighted word disappears and the new word replaces it.
With some word-processing programs, a potentially misspelled word will have a red squiggly line under it. This is a heads-up that the word doesn’t appear in the software’s vocabulary list. You may also notice that some text may be underlined in green. This lets you know that the computer is questioning your grammar. Cheeky!
Let’s perform a spell check on your document.
• Microsoft Word (and most other word-processing programs) lets you spell-check a document. Miraculous!
CLICK AND GO
1. Misspell “vacation” as “vaction.”
2. Click on Spell Check.
3. Click change.
• Move the mouse arrow onto the  Spell Check icon in the Menu Bar and click. The spell-checker will review the document for errors. In this case it will pick up that “vaction” is not in the dictionary and it will suggest “vacation.”
• Click on the word Change or Replace in the sidebar. The computer will make the change and then either continue the spell check or let you know the spell check is complete.
The computer’s dictionary may not contain a word that you have typed (such as a person’s name or a technical term) and will signal that it appears to be wrong and should be corrected. However, if you know it’s correct and should not be changed, you would click on Ignore or Skip.
You’ve been alternating between using the Menu Bar (where you find File, Edit, View, etc.) and the Toolbar (where you find B, I, U, etc.) throughout the previous exercises. As we’ve seen, the Toolbar is a series of shortcuts for actions that can also be performed using the Menu Bar, but the Menu Bar usually requires more clicks of the mouse than items in the Toolbar. Use whichever bar you prefer or a combination of both—whatever suits you.

• The Menu and Toolbars of Microsoft Word 2003.
When you’re getting to know Microsoft Word, I suggest you click on every item in the Menu Bar and read each menu that drops down. You’re going to find all kinds of goodies, such as page formatting, a thesaurus, and the ability to set up bullet points, to name just a few. Don’t expect to remember what each menu has to offer. It’s kind of like window-shopping—you can go back and look at what really appeals to you again later.


• The Print window allows you to choose which pages to print and the number of copies you want.
CLICK AND GO
1. Click File.
2. Click Print.
3. Click OK.
The last thing we’ll do in this chapter is to print your first document.
• Make sure your printer is on.
• Move the mouse arrow to the word File in the Menu Bar, click. and move it down to the word Print and click.
• There are several print options available in the Print window. You can print the current page that you’re working on, all the pages of the document, or select individual or groups of pages. You can also print as many copies of the document as you want. If you want to have one copy of all the pages in your document and the print window is open, simply hit the Enter or the Return key or click on Print. The Print icon won’t offer all the choices that the Print window does, but it is a fast way to print the entire document.
A Cautionary Tale
Here’s the scenario: You’ve been writing for hours. So transfixed by your own words that you neglected to click File, then Save to save your work periodically. (A bad habit you must break—it’s essential to save regularly.) The phone rings—it’s your neighbor and she desperately needs you because her toe is stuck in the bathtub drain. (Strangely, this is not the first time you received this SOS, but that’s another book.)
In your haste to attend to her, you click to close the document you’ve toiled over. This question is posed to you: (“Do you want to save the changes to…”) What do you do? Hmmm… the right answer is stay calm, move your hands away from the computer, and read the question. If you want to save the changes, you click Yes. However, let’s say that because you were in a rush to go to the aid of your neighbor, you clicked No. Tragically, all of your work you did since the last time you saved your changes is irretrievably lost. Gone. The fact is it would have been better to walk away from the computer and not answer the question at all, rather than to answer it without thinking it through. The option of Cancel would bring you back to the document, neither saving nor not saving changes. It cancels the action of you closing the document.

Here’s the drill for the future: When the computer warns, notifies, or asks you about something and you don’t know best how to respond, don’t respond at all. If you’re really flummoxed, leave the computer alone and call someone who might know the best action to take. If they aren’t home, leave a message. Wait for them to call you back. The computer isn’t going anywhere.
It’s time to close the document. Move the mouse arrow to the word File, click, and move down to the word Exit or Quit and click. You will now be asked if you want to save the changes made to the document. Click on either Yes or Save. Now your document is saved on your hard drive.
These are just the basic tools that your word-processing program offers. As you work more in the program, you will get better acquainted with what else it can do. If you ever get stuck, you can try to call the software manufacturer’s number for technical support. If your call isn’t fruitful, ask a friend, family member, or look in the local paper for computer groups or classes.
At this juncture in the book I want you to take a break. It’s been a pleasure joining you thus far on this exciting adventure. Try to get on the computer every day for at least half an hour to keep from getting rusty. There’s also a lot of very helpful information in the back of this book. Be sure to give it the once-over so you know what resources are available to you. Visit my website abbyandme.com for additional guidance. If you haven’t visited my website yet, please do; you can simply stop by to say “Hi,” or you can check out the site that will help you get accustomed to your computer. When you’re feeling at home with your computer and game for more, turn the page. I’ll be waiting for you whenever you’re ready.
Q: I tried to edit a document I wrote, but when I typed, the computer kept deleting/replacing the old text instead of just inserting the new text where I wanted to type. What is happening?
A: It is a simple fix for what can be a very frustrating problem. Depress and release the Insert key on your keyboard, and all will be remedied.
Q: What is the Toolbar? I don’t see one.
A: At the top of every window there is a Title Bar; below it there is usually a Menu Bar and a Toolbar. If the Toolbar is missing, click on View, then click on Toolbars. Now click to the left of Standard. Repeat the same steps and click on Formatting. A check should appear by both.
Q: Where can I get more instruction on using Microsoft Word?
A: Unfortunately, the manufacturer does not provide a manual. You may notice the word Help in the Menu Bar. Help isn’t always helpful, but sometimes it can be. Try it. Microsoft Word doesn’t typically come with a tutorial, but if your version offers one, watch it. Lots and lots of instructional books are available for purchase, but before you buy one, sit down and see if it speaks your language or that of a computer geek. If you can’t understand the book, it won’t help you understand the computer. Another option is to contact your local library, senior or community center, or community college to see if they offer Microsoft Word classes. Also, be brave and click on the items in the Menu Bar to see how much you can understand on your own.
Q: My document keeps printing over and over again. Why and how do I stop it?
A: You control your computer and printer. The document is printing multiple times because you instructed the printer to do so. My guess is that when the printer didn’t immediately spit out your document you clicked on Print again and, maybe, again and again. The printer is just doing what you asked it. The simplest way to stop a print job is to turn off the printer. See Chapter 25 for how to delete print jobs from the computer.
Q: Every time I print a single-page document a second blank page prints. Why?
A: If you look at the very bottom of the page you’ll see a reference to how many pages your document actually is (i.e., 1/1 or 1/2—one of one, one of two). I bet your document is actually two pages, but the second page has no text on it. Click at the end of your text. Hold down the Shift key and the down arrow key (bottom right of keyboard). A thickish black line appeared. Release those keys and hit the Delete key. Save your changes. Only one page should print. Try it.