
Digital and scanned photos from A to Z
Gone are the days of Instamatic cameras, drugstore runs to drop off film and pick up photos, and costly photocopies at your local copy store. I can even remember back to flashbulbs and carbon paper. Thank heavens that is all behind us. Nowadays modern technology offers us a digital answer to taking pictures and copying documents. None of that would be possible without our good friend the computer. Your computer, along with a digital camera, a scanner, and photo-editing software, lets you play professional photographer and copy shop owner at a relatively reasonable price and all in the comfort of your own home.
You were introduced to the concept of a scanner on page 20. Now we’re going to put one to use! As a refresher, a scanner works much like a copy machine. Lift the lid of the scanner, place an item on the scanner glass face down, and the scanner makes a copy. The difference is that rather than the copy being printed, it is stored in the brain of your computer. From there you can print the scan, e-mail it as an attachment, or store it to refer to at a later date. The scan lives on as a file in your computer until you decide to throw it away. If you haven’t already purchased a scanner, keep in mind that a flatbed scanner gives you more options because it offers the ability to make copies from a book or other bulky item, not just a single sheet of paper. I’ll tell you a secret, but you have to promise not to tell my publisher. I used to tear pages out of my cookbooks to scan and send recipes as attachments (a very bad habit). Now, with a flatbed scanner, my cookbooks remain intact and I can still share recipes with friends as e-mail attachments.
“I no longer have to gather my newspaper clippings and make trips to the library copy machine with my change in hand. Having a scanner at home has saved me so much time and money. I can also make my own copies in color!”
—Arlene
When you purchase a scanner or a combination scanner, printer, and copier, it comes with installation software. The machine will not work unless you install the necessary software and connect a cable from the scanner to the computer. Some stand-alone scanners do not require an electrical cord—they use the electricity of the computer. Follow the sequence of the installation instructions included with the scanner. Don’t hesitate to ask a friend to help. I believe you can install it on your own, but there’s no harm in having someone by your side.
Find a photograph, document, or page from a book that you would like to scan. Place the object face down on the scanner glass. There are usually arrows to guide the placement of an object to be scanned. Most scanners have a button that you push to initiate scanning. My experience is that if you have a choice between using the button on the scanner or initiating the scan through the software, you should go with the latter. (There’s not enough room here to explain why, but trust me: the process is more intuitive and less problematic when I go through the software first.) An icon probably appeared on your desktop screen during the installation of the software—it is the pathway to the scanner’s software.
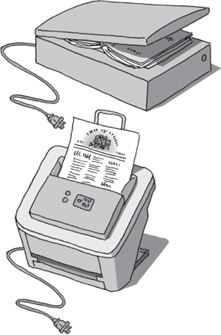
• A flatbed scanner (top) allows a book to be scanned. A single-feed scanner can scan individual pages only.
I don’t know what brand or model scanner you own, so these scanning instructions will be general to all scanners. When you open your scanner software, look at what’s on your computer screen and patiently try to find the equivalent of what is in the illustration of a scanner window in the steps to follow. Remember the rental car analogy? All scanners have similar components and essentially function in the same way, but your screen may look different than what you see here. Don’t let that throw you for a loop. Any time you use the computer, it’s important for you to be flexible and develop intuition about how you decipher what’s on the screen because there may be no consistency from one program or website to another. Adaptability and patience help you conquer something like your scanner. You’re in no rush, so take your time reading everything on the screen before clicking. Take a break whenever you need one.

• Double-click on the icon for your scanner/printer. If there is no icon on the desktop, go to your Programs/Applications and open it from there.
• Click on Scan, Scan Picture, or Scan Document. If you don’t see the word Scan, click on File and it should appear in the menu. If you don’t see the word Scan anywhere, look for the word Import. You’ll be given a chance at some point to let the scanner know whether you’re scanning a picture or a document and in color or in black and white. The scanner will scan the item differently according to the nature of the item to be scanned. Text can be scanned with less definition than a photo.

• A preview of your scan will appear.
CLICK AND GO
1. Click and drag edges to crop image.
2. Customize the image.
3. Click Accept.
• Most scanners at this point will show you a preview of the image being scanned. Often there will be a dotted line around the image. You can click and drag this dotted line to establish the edges of the item (or portion of the item) to be scanned. You’ll likely also be offered a variety of options for customizing your image (e.g., resizing, lightening/darkening).
• A few examples of complete scans.
• Be patient when scanning. The scanner may make some bumping and grinding noises while it calibrates preparing itself to scan. Don’t try to speed things up… wait.
• Before accepting the Preview of your image, check the resolution. Resolution is measured in dots per inch (dpi). The higher the number of dpi, the more detailed or clearer the image will be. However, the higher the dpi, the more space the image will take in bytes, and the larger size may make it difficult or slow to send as an attachment. Look for the word Resolution on the screen. If it isn’t visible in the window you’re viewing, click on each item in the Menu Bar to reveal where you can customize the resolution. I suggest you scan images at 100 dpi, especially if you want to e-mail the image.
• Now is the moment of truth. Click Scan, Accept, OK, or whatever else makes sense to continue the scanning process. Again, you’ll have to wait because this step may take a minute or two.
• If you’re asked whether you have another item to scan, click No. (Let’s not get into multiple pages on your maiden voyage.)
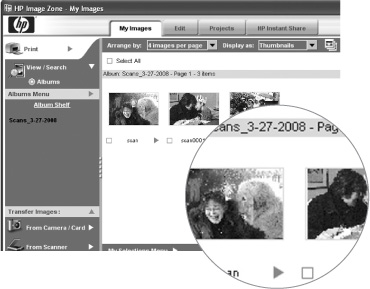
• Again, wait. At this juncture, another part of the scanning software will open revealing your fabulous new scan, but it may take a moment to appear. Look at the Title Bar of the new window. This may give you a clue as to where to find the scan later. See if somewhere you can click on the name of this new file. (Probably it is scan.jpg or scan1.jpg.) Click on the name and see if you can change it to whatever would make sense to you. This is important so you can identify your scan later.
Congratulations! You created a scan of a photo or document.
While you’re viewing the scanner’s software, click on every item listed in the Menu Bar. Read the drop-down menus for each item. Even if you don’t understand most of what you see, some of it will look familiar to you (i.e., Print, Save As, etc.). A little investigation goes a long way in becoming familiar and comfortable with your computer and its programs.
If your first attempt didn’t work properly, don’t be hard on yourself (or your friend, the computer). You are learning. It is inevitable that things won’t always go your way along this journey of discovery. Don’t be discouraged. Try again. Write down the steps you take so you can follow them or amend them as necessary. A week or longer may pass before you have the need to scan again. It’s always helpful to have clear notes at the ready to assist you next time, in case you forget the sequence of steps that worked.
The popularity of digital cameras is no surprise. There isn’t any film to buy, you view your photos almost instantaneously, and you can share them with friends and family without a middle man. Long ago before digital cameras, I stopped taking pictures entirely because my photos always looked like they were taken during an earthquake. I’d be so frustrated because I wouldn’t know for a week that the pictures were lousy, and the disappointing discovery was expensive. So, I threw in the photography towel. Now, however, I’m back in the game. If you haven’t played with one yet, most digital cameras have a display screen, so you can view the photo seconds after you shoot it, to see if a retake is necessary. Amazing technology!
Instead of film, a digital camera has a memory card on which to store the photos. You can view, edit, and delete photos on the camera, but that can be a drain on the batteries. Most people transfer the photos to their computer and do the edits and purge from there. When you buy a camera, it will come with software, as the scanner did. Once the software is installed on the computer, the camera and computer communicate through a cable included with the camera that you’ll plug into both pieces of equipment when you want to transfer your photos.

Digital cameras come in a wide spectrum of designs, styles, and prices. Consult with friends and family who are already taking digital photos, and ask what they recommend you purchase. Thankfully, all digital cameras come with simple, but detailed instruction manuals (unlike your computer!). Start snapping away as soon as you buy the camera because you can delete any bad pictures, but promise yourself that at some convenient time, you’ll sit down with the camera in hand and go through the features in the instruction manual. There are so many options about the quality and size of the images you take as well as editing tricks when you take the photo.

Your digital camera will come with a memory card, which stores the photographs taken by your camera, instead of storing the photos on film. When the memory card is full you transfer the photographs to your computer and then delete the transferred photos from the memory card, so it can be used again and again and again.
Usually the memory card that comes with the camera doesn’t store very many photos and isn’t adequate for your long-term use of the camera. I suggest that you purchase an additional memory card—one that offers more storage capacity—so you won’t worry about filling up the smaller memory card that came with your camera before you’re done taking pictures of your white water rafting trip. Think about purchasing a memory card with at least 2 GB (gigabytes) of storage. You may even want to have an additional memory card in case something goes wrong with the first or you fill the card before you get a chance to transfer the images to your computer.

• A memory card.
You may want to purchase a memory card reader. It is a device that plugs into your computer by way of a USB cable. You take the memory card out of your camera and place it in the reader. Now you can transfer images from the memory card onto the computer. Transferring images from the camera to the computer directly can be a real strain on the camera’s batteries.
Pixel is an abbreviation of Picture Element. Digital images are made up of hundreds and thousands of small squares called pixels. Pixels establish not only the quality of the photo (more pixels equal a clearer image) but the color, as well as the size when viewed on a computer.
This can get confusing, so hang in there. (Keep in mind that you can take great pictures without ever truly understanding any of this. However, the information here allows you to be more specific about the size and quality of photographs taken.) DPI (dots per inch) is the quality of how your printer prints, not the quality of the photo it is printing. Think of it this way: The more dots per inch the clearer the image. PPI (pixels per inch) will affect the quality of the image you are printing. If your digital photograph is 800 pixels wide and 600 pixels high and you print it with a PPI setting of 100 pixels per inch, your print will be 8 inches wide by 6 inches high. If you print that same image at 200 PPI, you’ll get a printed photograph that is 4 inches wide by 3 inches high. So the results at 200 PPI will be better quality, but the actual printed photograph will be smaller. In most cases 320 PPI is the highest number you’ll really need. The most commonly used is 240 PPI, and even that can be higher quality than you need. I wouldn’t suggest going below 180 PPI—that’s when you really notice a drop in quality.
When buying a digital camera, keep in mind that the pixels of the camera itself will affect the quality of the photographs it can deliver.
A 1 megapixel camera setting delivers images good enough for e-mail, or to put on a website, or to look at on your computer screen, but they do not make good prints.
Nowadays it’s unusual to find a new digital camera with only 1 megapixel. Even the lower-priced digital cameras offer at least 5 MP (megapixels)—enough for any size print.

• Digital images are made up of hundreds and thousands of pixels.
Once you have an image living on your computer, whether it came there by way of a cable from your digital camera, from a scan you made, or because someone e-mailed it to you, you must give it a name that you’ll recognize down the line. Why? Imagine how many photographs you’ll accumulate over the time you have your computer. Now imagine if all of them had different numbers as their names. How on earth would you be able to quickly find that adorable photograph of Samantha with birthday cake all over her face?
In Chapter 20 we’re going to create folder systems for what you have stored on your computer. That way you can organize your photos and documents to access them readily, but for now let’s rename an image on your computer.
Often when you receive photographs as attachments from someone, the name of each image is a random number designated by their camera to the picture. You can rectify the situation after the image has been downloaded to your computer. (If you skipped the previous chapter, go back and read it to find out how to download attachments.)
The easiest way to rename an image is to move your mouse onto the icon for the image. Click once to highlight the icon, wait a second or two, and then click once directly on the name of the image. Now all the text below the image should be highlighted. Whatever you type will replace the current name. Once you’ve typed the new name, depress and release the Enter or Return key on the keyboard. May I suggest that you include in the name the subject of the image and the date (at least the year) and perhaps something about where it was taken or what they are doing? The ideal name is a name that tells you all you need to know about the photo without having to open it to see what it is.


CLICK AND GO
1. Click on the image.
2. Wait a second and click on the name. Type new name to replace highlighted text.
3. Hit the Enter or Return key on the keyboard.
Now that you’ve renamed your photos, feel free to send them to friends or family as e-mail attachments following the steps in Chapter 17. Whoever you send them to will appreciate that you have given the images a name rather than sent them on with the random numbers the camera gives each image.
“I didn’t even know I wanted to take photographs, but when I was given a digital camera for my sixtieth birthday from my grandkids a whole new world opened up for me. I’m now the official family photographer.”
—Oliver
Let’s talk about some safety measures for your treasured memories. After you transfer your photos from the camera to the computer, you’ll want to empty the memory card so there’s plenty of room for you to snap away. The camera’s instruction manual will walk you through those simple steps. Now the photos you took live only on your computer. Right? What happens if your computer is stolen or breaks down? The family reunion you documented could be lost forever. It is crucial to back up your photographs (and all your important files) regularly.
We haven’t really discussed backing up the computer before. You should back up your computer at regular intervals, depending on how you use it. If you only use your computer for e-mail and to surf the Internet, there’s really not much to back up. If you have web-based e-mail, your e-mail service keeps your e-mails on their computers. (That’s why you can access your e-mail from any computer, not just yours at home.) However, if you use your computer to write documents, create spreadsheets, and store photographs and/or music, you’ll want to save that information onto a backup periodically, in case something happens to your computer.
Not so long ago, floppy disks were used to back up computers, but nowadays a writable CD (compact disc) is more common because it holds much more information. You may also use a writable DVD depending on what you’re backing up. A couple of different methods are available to copy data from your computer onto a CD or DVD. Here’s one method:
If you have a PC:
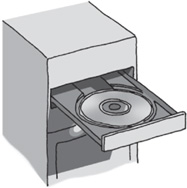
• Open the CD or DVD drawer. Be gentle as it is a fragile piece of equipment and yet be firm enough, if you have a laptop, that the CD or DVD snaps into place. Close the drawer.
• A window may automatically open. Close the window by clicking on the Close Box  in the top right corner.
• Make sure any documents or photos you want to backup are closed. You can’t back up something if it’s open.
• Move your mouse onto the icon of the folder or file you want to back up.
• Your mouse has two buttons, one on the left and one on the right. Up until now you’ve only been using the left mouse button (see Southpaw note). For the first time, you’re going to use the right button. The right button on the mouse opens up an advanced menu allowing you to perform tasks in fewer steps—kind of like a shortcut. Try it now.

CLICK AND GO
1. Right-click on folder icon.
2. Left-click on Send To.
3. Left-click on CD or DVD Drive.
• Right-click on the item to back up.
• A menu opens. Move your mouse onto Send To and left-click.
• Another menu has opened to the side. Move your mouse into that menu and left-click on the CD-RW Drive or it may read DVD/CD-RW Drive. Give the computer a minute to copy.
• To remove the CD or DVD, open the drawer.
DEAR SOUTHPAW
If you reversed the features of the mouse, as described on page 146, reverse the instructions here.

If you have a Mac:
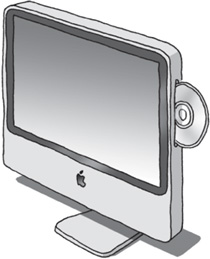
• Push the CD or DVD into the slot. The computer will grab the CD or DVD from you. An icon for the CD or DVD will appear on the Desktop.
• Click and drag the folder or file you want to back up onto the CD or DVD icon. Release the mouse.
• Give the computer a minute to copy.
• To remove the CD or DVD click and drag it to the Trash.
That’s all it takes to copy something from your computer onto a CD or DVD! At some point, you’ll back up your entire system, but for now we’ll stick with the simple method to back up desired files such as the first draft of your memoir or those adorable photos of Fido.
You may get so into digital photography that to take a picture, print it, and send it on an attachment may not be enough for you. You may decide you want to enhance or manipulate your photographs. What inspired me to buy my first scanner was a friend’s impending nuptials. With the scanner I was able to scan existing childhood photographs of the soon-to-be bride and groom onto my computer. Once the images were on my computer I copied the bride (sitting Indian style at about age 5) from her photo and pasted her on the handlebars of the groom’s picture (riding a bike also at about age 5). It was so much fun!
The scanner transferred the images onto my computer like a camera transfers images onto a computer. It was photo-editing software, not the scanner, that enabled the copying and pasting of the images. If you’re interested in altering the images you’ve brought onto your computer, ask friends and relatives who do the same what software they recommend. Some well-known programs are iPhoto (for the Mac), Adobe Photoshop, Corel Paint Shop, and Microsoft Digital Image Suite.
You’ll be able to draw that mustache you miss so much back onto Uncle Charlie’s face and erase the unfortunate one on Aunt Charlene. The sky is the limit with what you can do with photo editing. If you’re really gung ho about it, you may want to track down an adult education program in your area to jump-start your photo-editing abilities.

• An image can be altered once it is on the computer.
Do you remember the original fax paper? It was shiny and thin. What a shock to discover faxes disappeared off the paper before our very eyes a few years after their composition. No one can be sure about the flaws or longevity with new technology. I say this as a warning about printing photo images at home. It’s very satisfying to take a picture of a memorable event, race home, attach the camera to the computer, and transfer the image onto the computer. Seconds later, the image is printed on photo paper with your home printer. It really is incredible. But what do we know about how long that image will last on that paper? Ten years? Twenty years? It may be more, but maybe not. I tell my students if it’s a really important photo, bring the backup CD to a professional photo shop and have them process a set of pictures as they would from a set of negatives. I could be wrong. Your printed image could last until the next ice age, but why take a chance?
There’s another way you can save your images. Some websites offer to store and process your photos if you upload them onto their website. Again, be sure to choose a reputable company. It would be tragic if the company went out of business with all your pictures stored on their computer.
Q: I’m usingkodakgallery.com to store my digital pictures. What happens if they close up shop?
A: Kodakgallery.com is unlikely to be going out of business any time soon. But it’s important to choose a website that’s been around for a while (and that will stay around) to store your images. Flikr.com and picasa.com are two other well-known sites. Having said that, regardless of what website you store your images on, always burn (or copy) the pictures onto a CD or DVD for safekeeping, since there’s no guarantee that a website will always exist.
Q: If I delete all the photos on my camera, is there any way to get them back?
A: Unfortunately not. If you haven’t transferred them to your computer and you delete them from the camera, they are gone.
Q: Will my camera lose the photographs I’ve taken if the batteries run out?
A: No. The photographs are stored on the memory card inside the computer. The memory card holds the photographs regardless of the battery power. However, low batteries can affect the memory card’s ability to do its job, so change the batteries as soon as you see that they are running low. Using rechargeable batteries is both environmentally and economically smart.
Q: What is the difference between a scanned image and a photo?
A: Well, they are both images in the mind of the computer. The only difference is how they got onto the computer. One is a photograph taken by a camera. The other is a photo taken by a scanner.