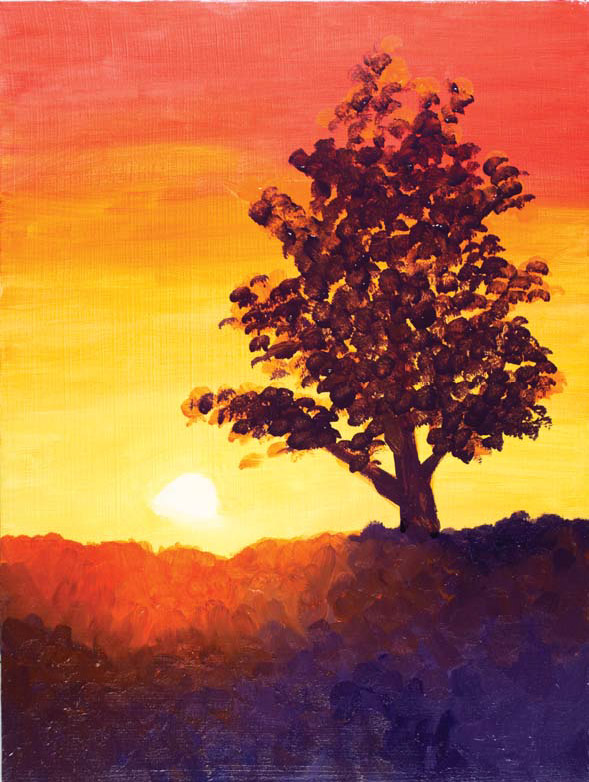
Summer's End
Mary Willenbrink oil on Masonite
12" × 9" (30cm × 23cm)
It's time to put what you have gleaned from the first three chapters of this book into practice. Enjoy the creative process and expect to be pleasantly surprised by the success you have with each finished painting. Each demonstration has its own materials list. Your studio should be set up by now, but make sure you have the suggested materials before you begin. In each demonstration we've also listed the art principles and painting techniques taught in other parts of this book. You may want to refer to these before and during your painting session.
If your family and friends are like ours, they are excited about the artwork you are completing and would love to see photos of your paintings. Consider sending digital images or making note cards to send to your favorite people.
Every painting you complete may not be a masterpiece, but every time you paint can be a learning experience.

Mary Willenbrink oil on Masonite
12" × 9" (30cm × 23cm)
Mary painted Summer's End while taking my Oil Painting for the Absolute Beginner class. As an absolute beginner, Mary likes demonstrations that promise the most encouraging and rewarding results.
Painting is a special experience because each person is unique, and your own personality and style will show through your paintings. I am always amazed that a class of students painting the same subject, using the same techniques, will yield wildly different results, with every painting expressing the unique style of the artist. Cultivate your talent and experience so that you can express your unique creativity through your art.
We want you to be as successful as possible while using this book. Here are a few more tips before you get started.
If painting big feels overwhelming, start with smaller paintings. Also start with a simple subject and composition. We have laid out this book so that the easier demonstrations are at the beginning and the more challenging ones are at the end.
Some of the complex, detailed paintings that we admire in museums took years to complete. Others were done quickly, in one painting session. Go at a pace that is comfortable for you with the understanding that the pace you choose will also influence your end results. For paintings that require more than one session, list the colors in each mixture along with a swatch of the mixture. This will be a useful reference for the completion of that painting.
Gauge your progress by writing the completion date on the back of each painting. As time goes by, take out your paintings and examine your growth. After setting aside a painting for a while, you may be able to view it more objectively and with new appreciation.
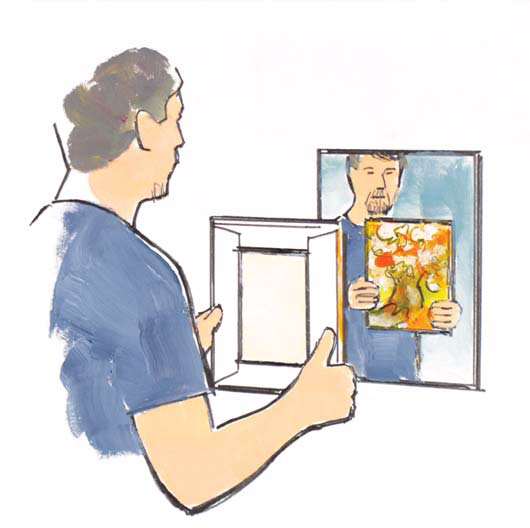
Staring at a painting from the same distance and viewpoint can cloud your perception of your painting. Step back from your easel now and then to help you discern the progress of your painting. Another way to detach yourself and observe the colors and composition of your painting more objectively is to look at your art through the reflection in a mirror.
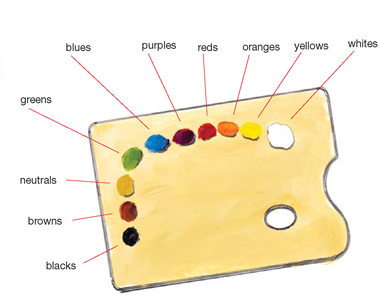
When placing the paints on the palette, consider putting them in an order similar to the arrangement of the color wheel, with white at the end, next to yellow. With this setup, the colors graduate in an orderly and familiar manner, leaving room for mixing the paint in the center. The space at the top can be used for mixture swatches so that you can compare these mixtures to the colors you are trying to match.
A ground is a thinned wash of paint put down as a base color for a painting. Grounds provide tone and color so that you don't have to start with a stark white painting surface. Grounds can be painted on with a brush or smeared on with a rag.
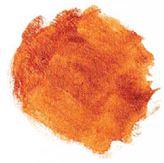
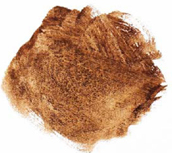
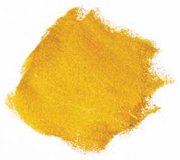
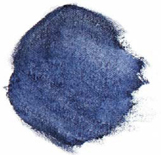
Browns and neutral colors are commonly used as grounds, but any color can be used.
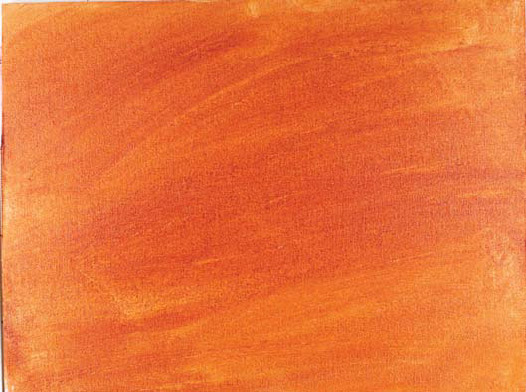
You can let a ground dry before painting over it, or try painting into it while it's still wet. Water-soluble oils work well for dry grounds because they dry quickly. Water-soluble oils dry faster than traditional oils but slower than acrylics.
Colors that are complementary to the dominant color of your painting subject can be used as ground colors. For example, a painting of green trees may start with a ground color of red. This technique will make the dominant color seem less overwhelming and easier to vary.
Underdrawings and underpaintings are like road maps that help you plan a painting before adding the finished painting layers. To create an underdrawing, draw the basic structure of the subject on a dry painting surface with pencil, charcoal or paint. An under-painting goes beyond the basic structure, developing the lights and darks. Erase or wipe away to make adjustments. For pencil or charcoal, spray your drawing with a fixative before painting to keep the graphite or charcoal from smearing into and dirtying your paint.
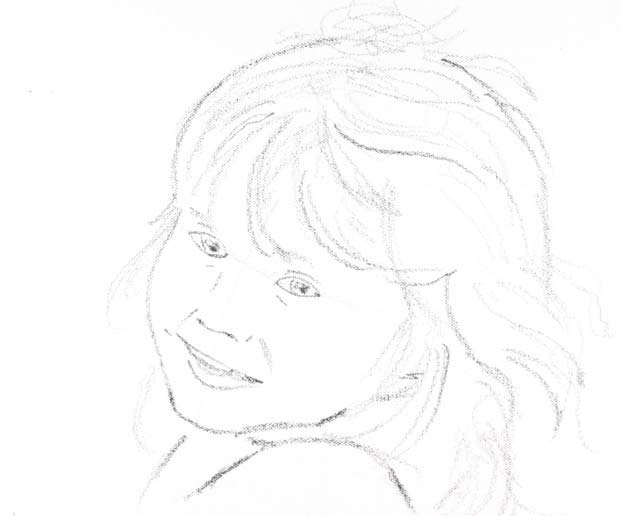
Underdrawing can be used with or without a ground. The great thing about an underdrawing is that it can be wiped off or erased away until you have a satisfactory structure for the foundation of the painting.
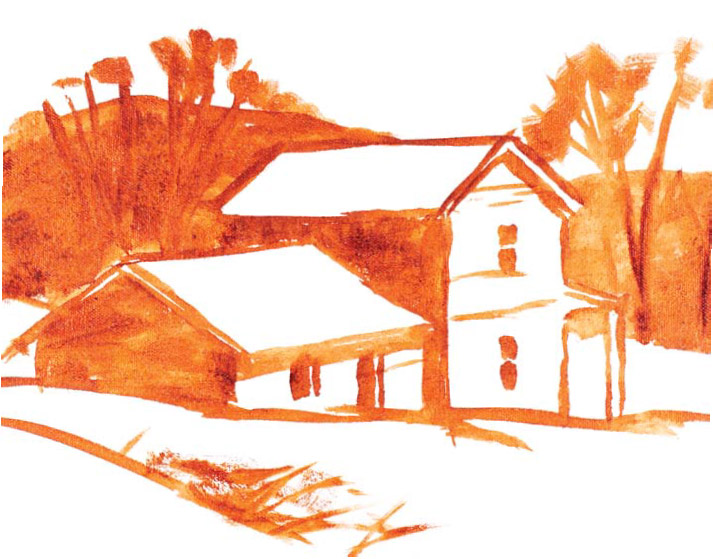
Similar to an underdrawing, an underpainting involves painting the basic structure and dark areas of the subject with a dark color. Apply the paint thinly so it can be wiped away easily for corrections and so that it dries quickly. Underpainting can be used with or without a ground. If underpainting is used over a wet ground, light areas can be made by lifting or wiping away the ground color to expose the lighter painting surface.
You can let an underpainting dry before painting over it, or try painting over it while it is still wet. If you apply paint to a wet underpainting, expect the underpainting to mingle with and darken the newly applied colors.
Monochromatic painting offers an exceptional opportunity to focus on values and painting techniques. By developing a range of lights and darks, you will see that a painting can be complete without relying on color.
8" × 10" (20cm × 25cm) canvas on board
Payne's Gray, Titanium White
no. 8 or 1⁄2-inch (12mm) filbert
no. 2 or 1⁄4-inch (6mm) filbert
no. 4 rigger
palette, brush wash with water, palette knife, rag or paper towel, easel
thinner, medium, palette cups, mahlstick, smock or apron
The light source for this scene is coming from the upper left. This makes the rocks generally appear lightest at their upper left and darkest toward the lower right.
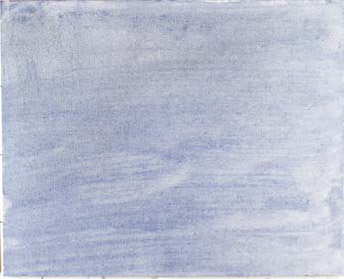
Use a rag to apply diluted Payne's Gray over the painting surface to create a light, transparent ground. Don't worry about making the ground completely even since you will paint over it.
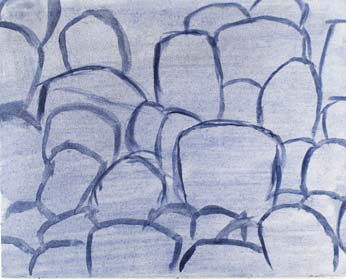
Using a no. 2 filbert, draw the shape of the rocks with Payne's Gray. Start with the big central rocks and work out.
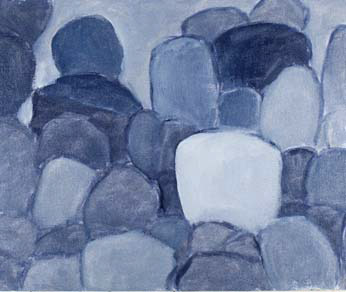
With mixtures of Titanium White and Payne's Gray, begin filling in each rock with its general value using a no. 8 filbert. Adjust the values by lightening some rocks and darkening others to enhance the composition.
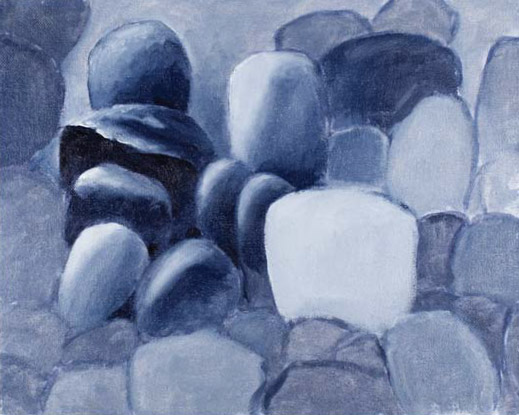
Start adding and blending lights and darks, using both nos. 2 and 8 filberts. Work rock by rock and start filling the background with values.
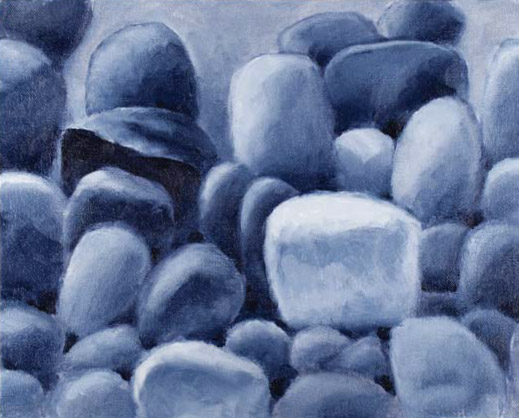
Finish blending the values of the rocks with nos. 2 and 8 filberts.
With a no. 2 filbert, make adjustments and add more darks between the rocks to give them better definition.
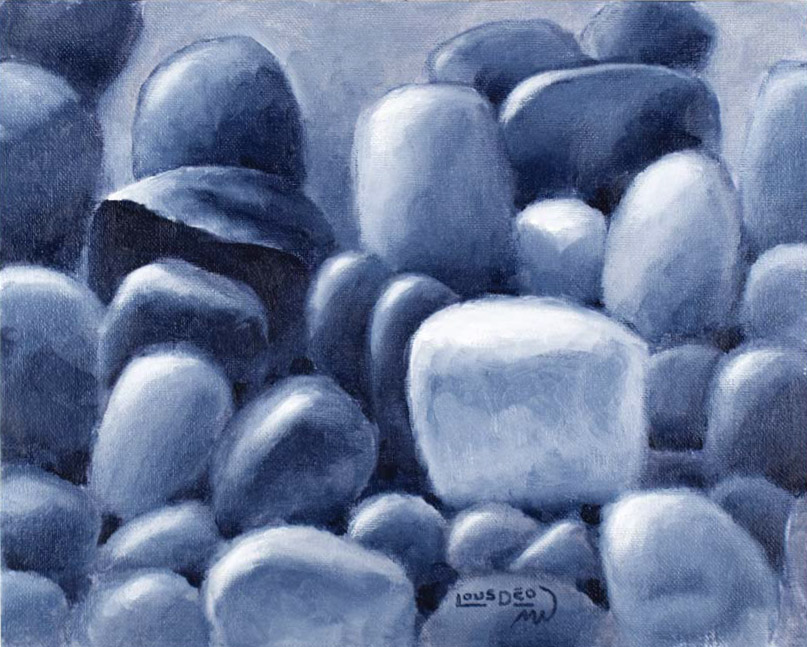
oil on canvas mounted on board
8" × 10" (20cm × 25cm)
To finish, add Titanium White for highlights with a no. 2 filbert. Sign and date your painting.
There is nothing quite like being on a tropical beach as the sun is setting. Use analogous colors (colors that lie next to each other on the color wheel) in this demonstration. You'll need to blend the sky and water while the paint is still wet, so be prepared to complete Steps 1–9 in one painting session.
12" × 9" (30cm × 23cm) canvas on board
Cadmium Orange Hue, Cadmium Red Hue, Cadmium Yellow Light, Cadmium Yellow Medium, Magenta, Titanium White
no. 2 or 1⁄4-inch (6mm) flat
no. 8 or 1⁄2-inch (12mm) filbert
no. 4 rigger
palette, brush wash with water, palette knife, rag or paper towels, easel
thinner, medium, palette cups, mahlstick, smock or apron

Use a no. 8 filbert to paint a Titanium White circle for the sun. Continue using the no. 8 filbert in Steps 2–7.
Paint a light yellow mix of Titanium White and Cadmium Yellow Light around the sun and the water under the sun. Add water or thinner to allow the paint to flow better when painting.

Paint Cadmium Yellow Light around the sun and in the water. At this stage, place the paints, but don't blend them on the painting surface.
Paint Cadmium Yellow Medium around the glowing sun and water.
To paint this tropical sunset with bright, brilliant colors, use the paint colors recommended for this demonstration. If you use different colors or student grade paints, you may not achieve the same results.

Paint a mixture of Cadmium Yellow Medium and Cadmium Orange Hue around the sun and water.

Paint Cadmium Orange Hue around the sun and water. Add Cadmium Red Hue to the sky.
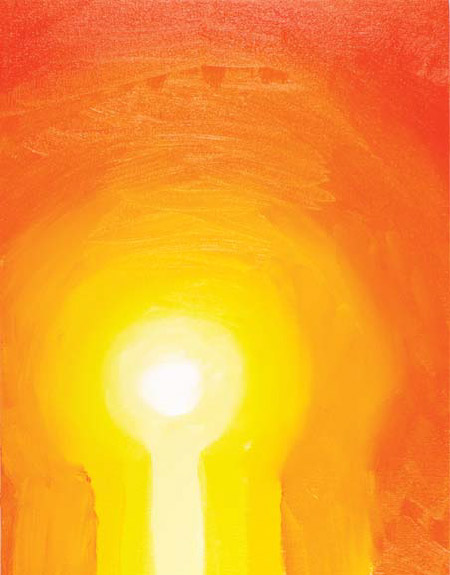
Clean the brush thoroughly, then blend the sky colors, starting at the white center and working out.
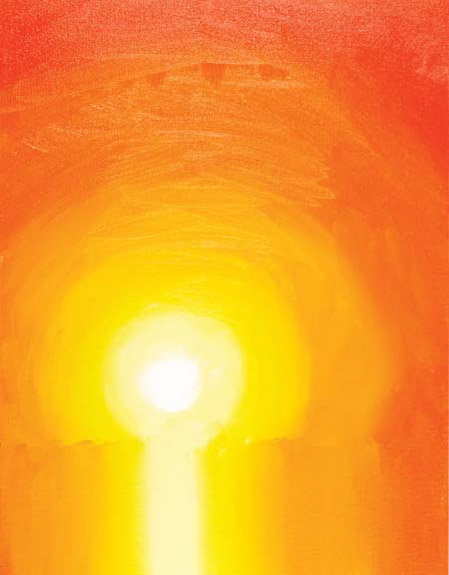
Clean the brush thoroughly. Using up-and-down strokes to blend the paint, work right to left starting at the lightest part under the sun. Clean the brush and repeat, working left to right from the lightest part under the sun.
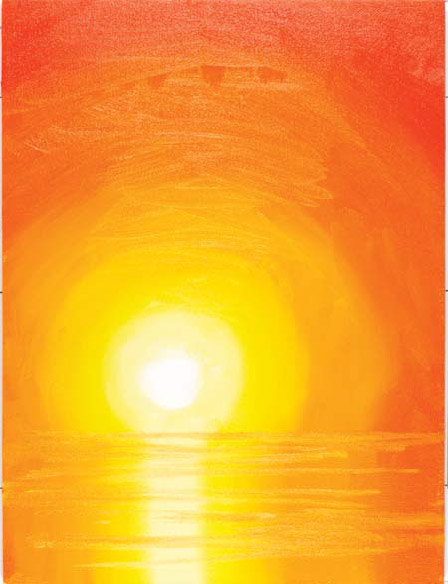
With narrow, horizontal brushstrokes, create wave lines using only the paint that is on the painting surface; brush through the paint previously laid down with thin, horizontal brushstrokes.
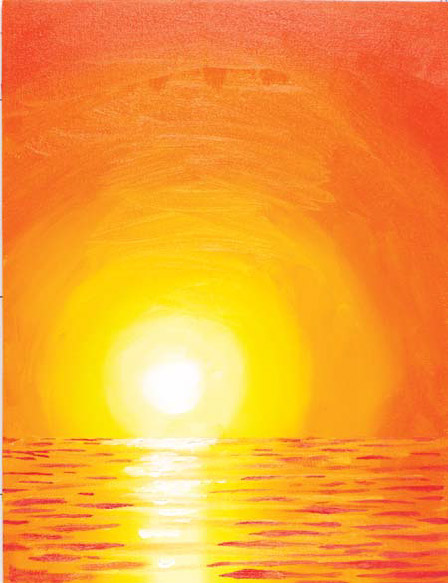
With a no. 2 flat, dab or streak Titanium White in the water under the sun. Next add Magenta streaks to the waves, making them larger the closer they get to the bottom.
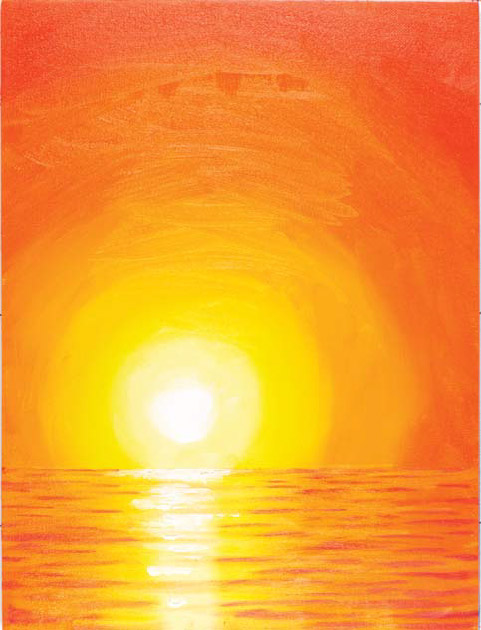
Using a no. 8 filbert, gently brush over the dark waves with horizontal strokes to soften their appearance. Let the paint dry before proceeding to the next step.
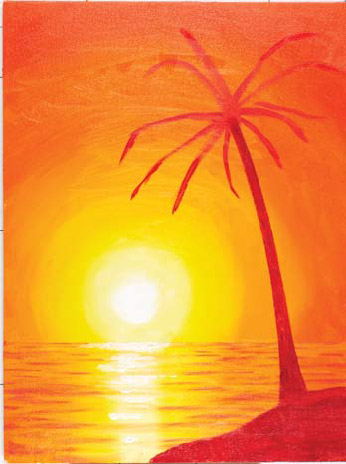
Painting wet-into-dry and starting with the trunk, use a no. 2 flat and Magenta to create the basic structure of the tree and ground.
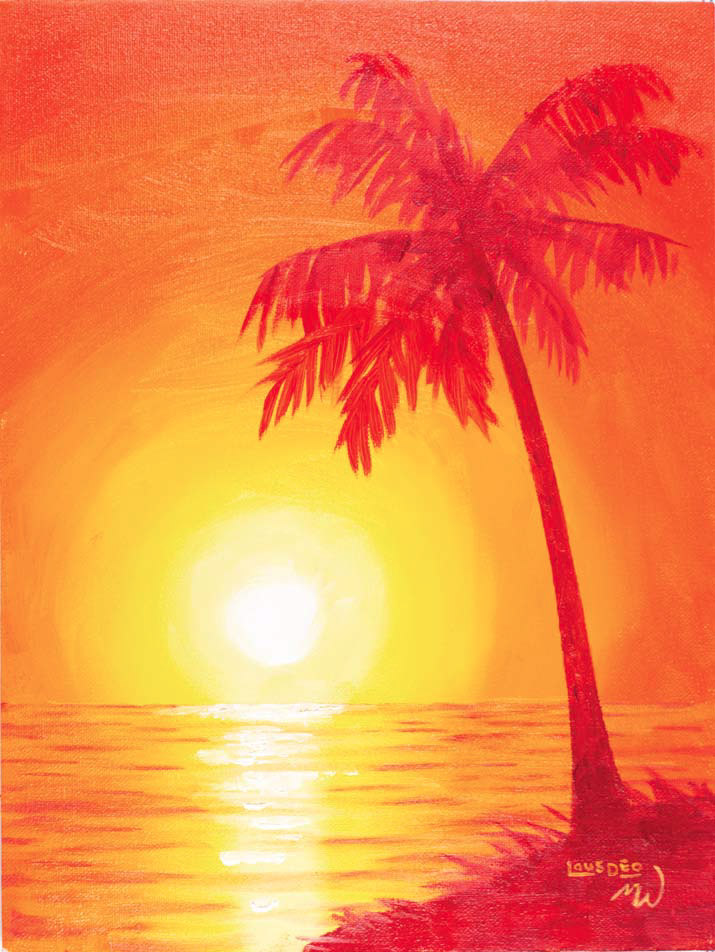
oil on canvas on board
12" × 9" (30cm × 23cm)
Paint tree leaves and grass with Magenta using a no. 2 flat. Let the painting dry, then sign and date it with a no. 4 rigger.
This demonstration will show just how much you can do with a limited palette. You'll use only the three primary colors plus white to mix all of the colors represented in this beautiful mountain scene. You'll learn how to use warm colors to suggest sunlit areas and cool colors for the shadowed regions.
You can build your scene in a horizontal or vertical format, depending on the feeling you want to achieve. The horizontal format will give the scene a calm, peaceful feeling, emphasizing the sturdiness and stability of the mountains. The vertical format emphasizes the height and power of the mountains and creates a feeling of awe.
9" × 12" (23cm × 30cm) primed canvas
Lemon Yellow, Permanent Rose, Phthalo Blue (Red Shade), Titanium White
no. 10 or fl-inch (19mm) flat
no. 2 or 1⁄4-inch (6mm) filbert
no. 8 or 1⁄2-inch (12mm) filbert
no. 4 rigger
palette, brush wash with water, palette knife, rag or paper towels, easel
thinner, medium, palette cups, mahlstick, smock or apron

Prime the canvas surface with gesso, but leave it white, without a ground. Mix Phthalo Blue (Red Shade) and Titanium White, then thin the mixture with thinner or water. Apply this to the top part of the canvas with a no. 10 flat using vertical strokes. For this stage, the paint consistency should be thin enough that you can see the canvas underneath.
When adding bright whites to a painting, let previous paint applications dry, or the white might mix with the undercolor.

Mix Titanium White and Permanent Rose with a little Phthalo Blue (Red Shade). Paint in the shape of the mountains with a no. 8 filbert. Use a somewhat thicker paint consistency than in the previous step.

Mix Titanium White and Lemon Yellow with Permanent Rose to make a yellow-orange. Add this mixture to the foreground with a no. 8 filbert. The light source is coming from the upper left, so add some of this warm color to the sunlit side of the mountains.
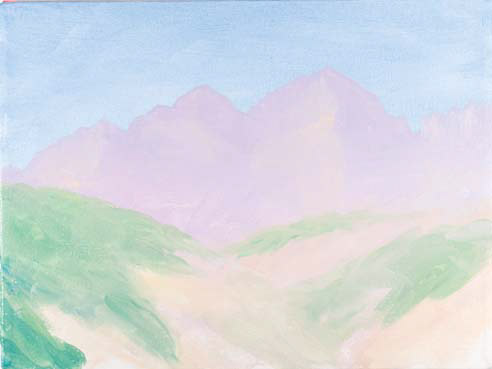
Mix Titanium White, Lemon Yellow and Phthalo Blue (Red Shade) to make green. With a no. 8 filbert, add this green to the foreground, following the contour of the hills.
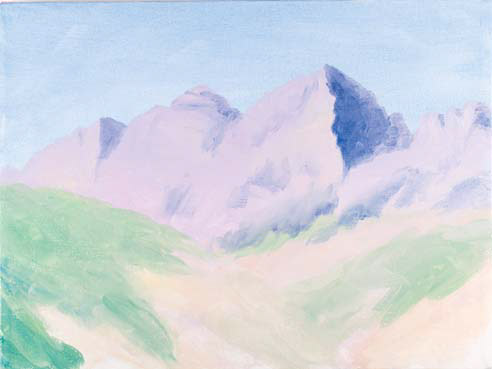
Add shadows to the right sides of the mountains with a mixture of Phthalo Blue (Red Shade), Permanent Rose and Titanium White applied with a no. 2 filbert.
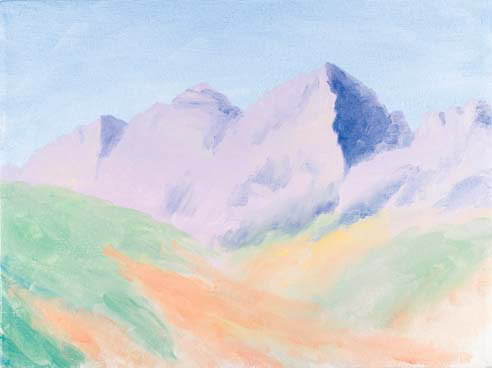
With a no. 2 filbert, add a yellow-orange mixture of Lemon Yellow and Permanent Rose to the foreground. The bright, vibrant colors will enhance the depth of your painting.
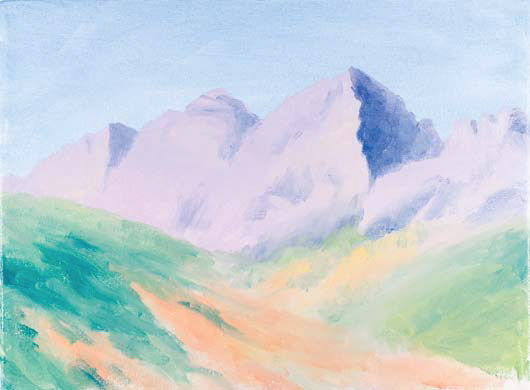
Mix Lemon Yellow and Phthalo Blue (Red Shade) to make a dark green. Add this green to the foreground areas with a no. 2 filbert.
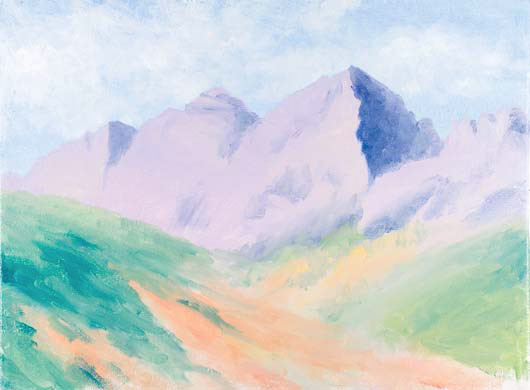
With a no. 2 filbert, add Titanium White to the sky to suggest clouds. Use soft, white shapes for the clouds. Sharply defined edges would change the composition of the painting, drawing unnecessary attention to the sky.
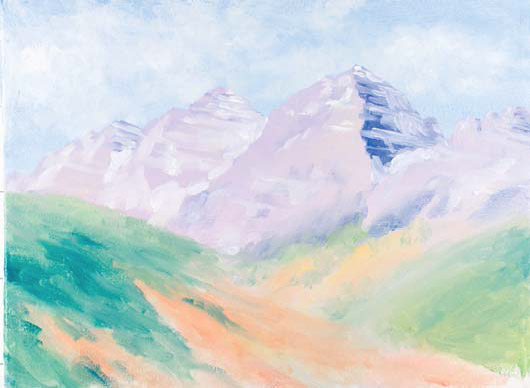
Add white to the mountains, using the edge of a no. 2 filbert to apply the paint.
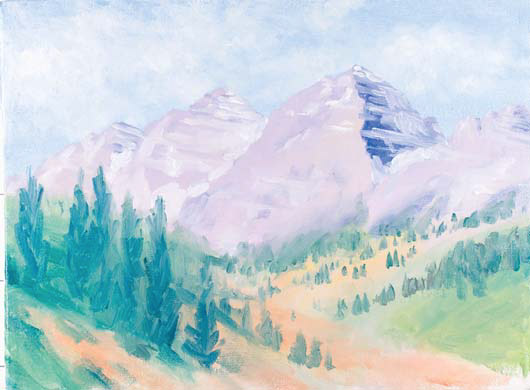
Use a mixture of Phthalo Blue (Red Shade), Lemon Yellow and Permanent Rose for the green of the trees. To paint the small trees, hold the no. 2 filbert so that the narrow surface of the bristles is vertical. Start at the base and pull the brush upward, tapering from thick to thin.
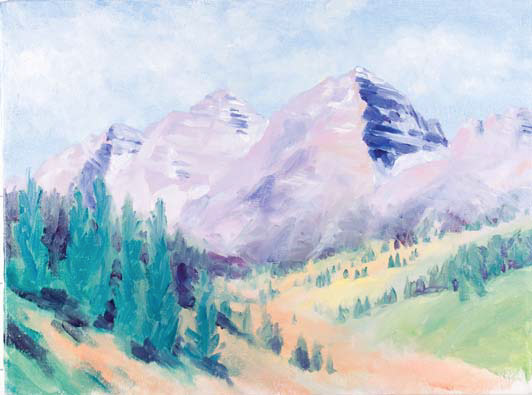
With a no. 2 filbert, add a yellow-orange mixture of Lemon Yellow, Permanent Rose and Phthalo Blue (Red Shade) as accents to the distant hills. Add pink to the mountains with a mixture of Permanent Rose and Titanium White. Add shadows to the foreground and background trees with purple mixtures of Permanent Rose, Phthalo Blue (Red Shade) and Titanium White.
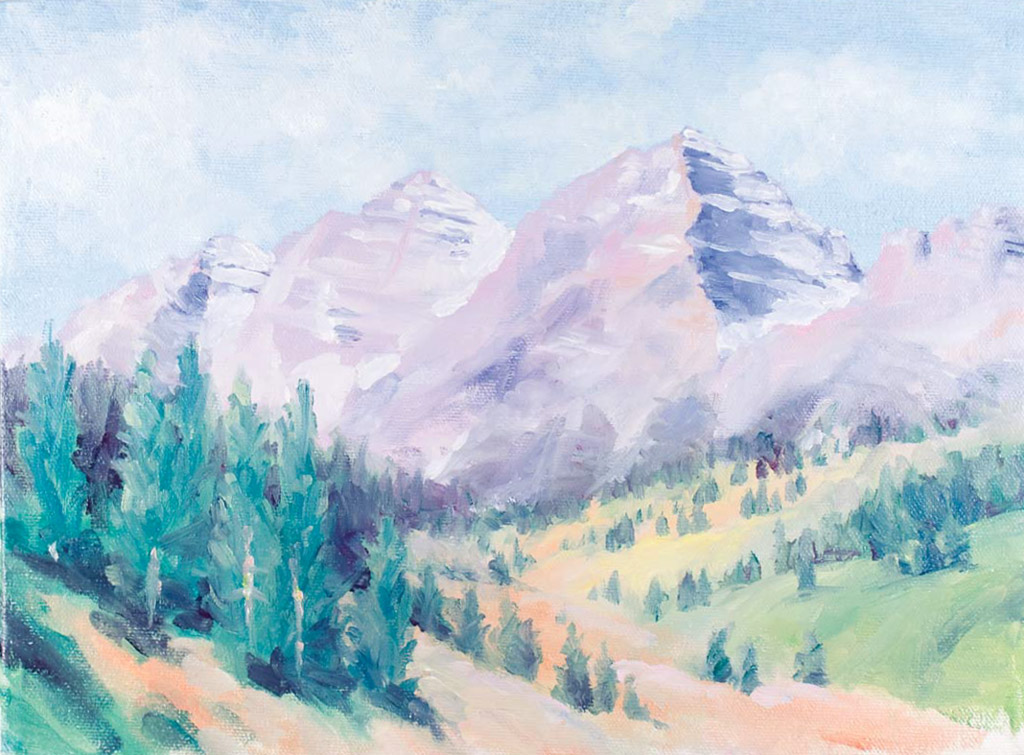
oil on stretched canvas
9" × 12" (23cm × 30cm)
Take a step back to observe your painting, then add finishing touches and adjustments. At this point, I lightened the dark of the mountains but kept the snow and also added more trees. The painting should feel complete with a depth expressed through contrasts and colors. Let the painting dry, then sign it with a no. 4 rigger.
Painting a simple still-life arrangement is a good way to examine the effects of light and shadows. A cardboard box or wood panels can be used to form the walls for your still life. An adjustable desk lamp is useful for creating a clear light source. In this demonstration, the light source is from the extreme left, casting long shadows to the right.
Once you have painted pears, consider setting up other still-life studies. Here are some ideas to try: floral arrangements, an assortment of antiques, candles, glass vases or other knick-knacks. The ideas are endless. Each new arrangement offers a play of light and shadows with textures.
9" × 12" (23cm × 30cm) canvas on board
Burnt Sienna, Cadmium Yellow Light, Cerulean Blue, Magenta, Sap Green, Titanium White, Yellow Ochre
no. 8 or 1⁄2-inch (12mm) flat
no. 2 or 1⁄4-inch (6mm) filbert
no. 4 or 5⁄16-inch (8mm) filbert
no. 4 rigger
palette, brush wash with water, palette knife, rag, easel, 3 pears, 3 wood panels or a cardboard box, adjustable desk lamp
thinner, medium, palette cups, mahlstick, smock or apron

Use a rag to apply diluted Burnt Sienna over the painting surface to create a light, transparent ground.
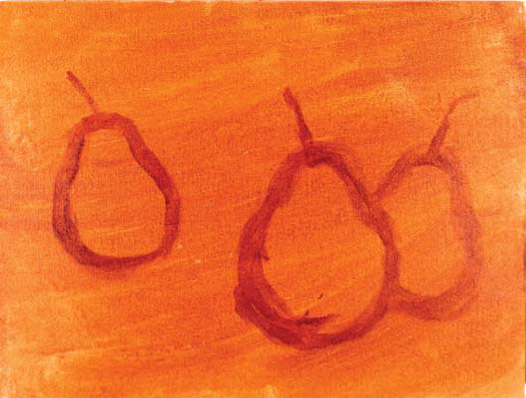
Use a no. 4 filbert and Burnt Sienna to sketch the shape of the pears including the stems.
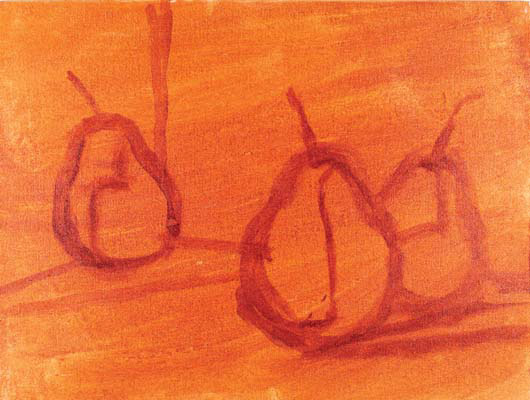
Add lines indicating the box structure and lines for the shadows including those on the pears.
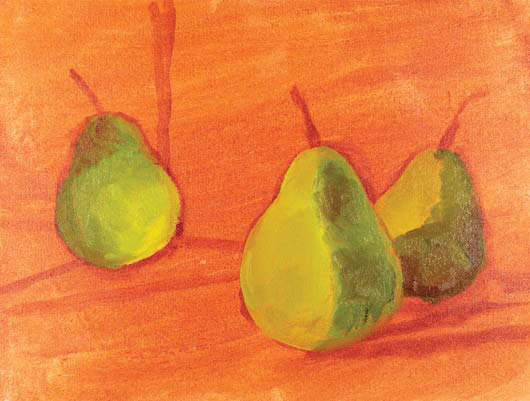
Mix Cadmium Yellow Light, Sap Green, Cerulean Blue, Titanium White, Magenta and Burnt Sienna to create a range of warm green colors. Use a no. 4 filbert to paint the pears.

Mix Yellow Ochre, Burnt Sienna, Titanium White, Cerulean Blue and Magenta to create a range of warm brown colors. Use a no. 8 flat to paint this color in the individual regions of the shadows.
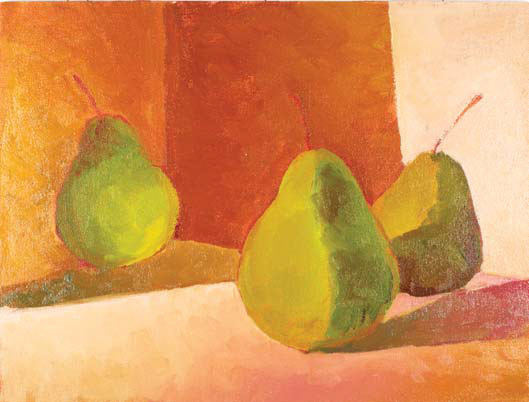
Mix a range of tan colors with Titanium White, Yellow Ochre, Magenta and Burnt Sienna, then paint the bottom and sides with a no. 8 flat and no. 4 filbert.
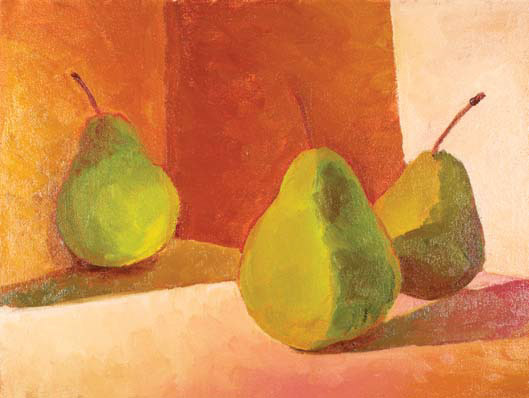
With a no. 4 filbert, add Burnt Sienna in the shadows. Use a no. 2 filbert for the pear stems.

Add warm greens to the pears with mixtures of Titanium White, Cadmium Yellow Light and Sap Green and a no. 4 filbert. Smooth the form of the pears during the process.
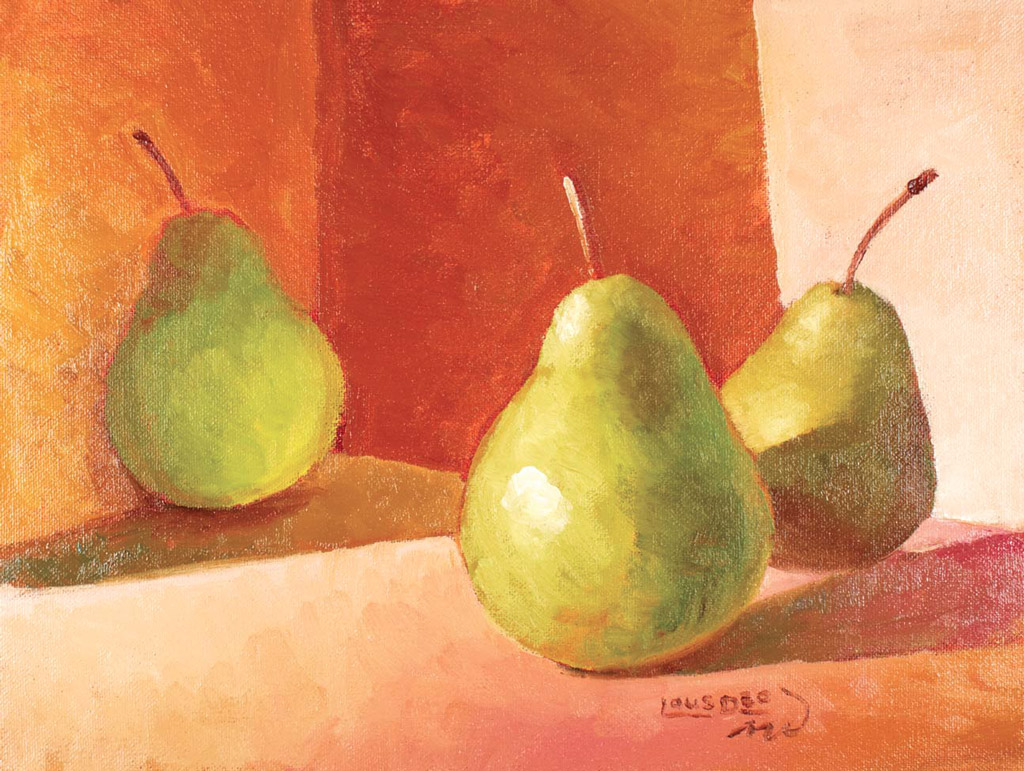
oil on canvas mounted on board
9" × 12" (23cm × 30cm)
Add highlights to the pears with Titanium White and make minor adjustments such as adding highlights and lights to the nearest stem. Let the paint dry, then add your signature with a no. 4 rigger.
You can approach this demonstration in one of several ways: paint the flowers over the background (positive painting); or try painting the surface yellow, then fill in the rest of the background around the flowers (negative painting); or try a combination of the two techniques.
For this composition, the stalks and leaves are more implied and less detailed than the flowers. Keep in mind while you are painting that the light source is coming from the upper left.
20" × 16" (51cm × 41cm) stretched canvas
Burnt Sienna, Cadmium Orange Hue, Cadmium Yellow Hue, Cadmium Yellow Light, Cerulean Blue, Sap Green, Titanium White
no. 4 or 5⁄16-inch (8mm) flat
no. 8 or 1⁄2-inch (12mm) filbert
no. 4 rigger
palette, brush wash with water, palette knife, rag or paper towels, easel, kneaded eraser, 2B pencil or charcoal pencil, spray fixative
thinner, medium, palette cups, mahlstick, smock or apron

Using a 2B or charcoal pencil, sketch the placement of the flower shapes with circles.
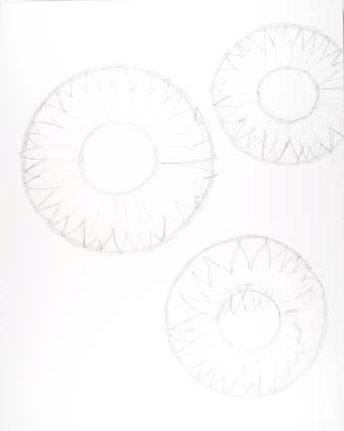
Sketch the center portion and petals of the flowers.
After you've completed this demonstration, try another painting using your own silk or live sunflowers as visual reference. You will notice subtle differences that are not as easily seen when looking at a photo. Try setting up other floral arrangements if you like painting flowers.
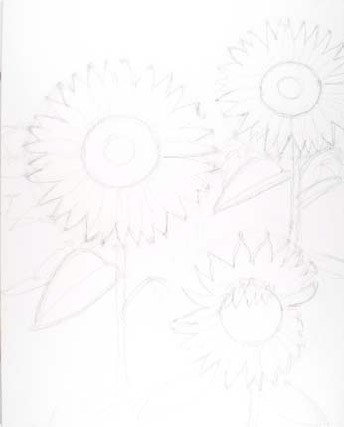
Add more details to the scene and erase unwanted lines with a kneaded eraser. When finished, spray with fixative to prevent the paint from smearing the graphite.
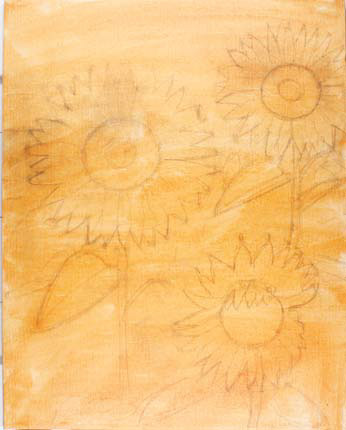
With a rag, smear Burnt Sienna diluted with water to create a ground. To keep the pencil lines visible, the paint needs to be transparent.
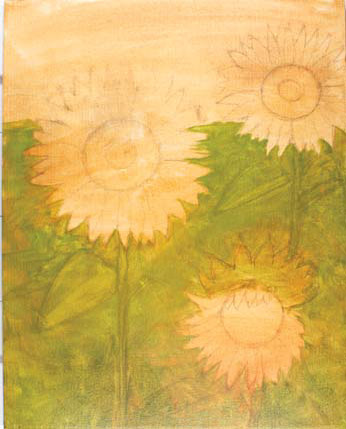
With a no. 8 filbert paint the green areas with a mix of Sap Green, Cadmium Yellow Hue, Titanium White and Cerulean Blue. Thin the paint with water or thinner so the pencil lines remain visible.
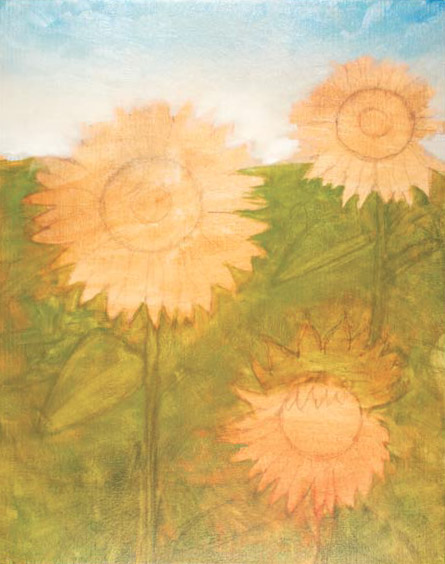
Using a no. 8 filbert, paint the sky with Cerulean Blue and Titanium White. The lower portion of the sky is mostly white, the top mostly blue.
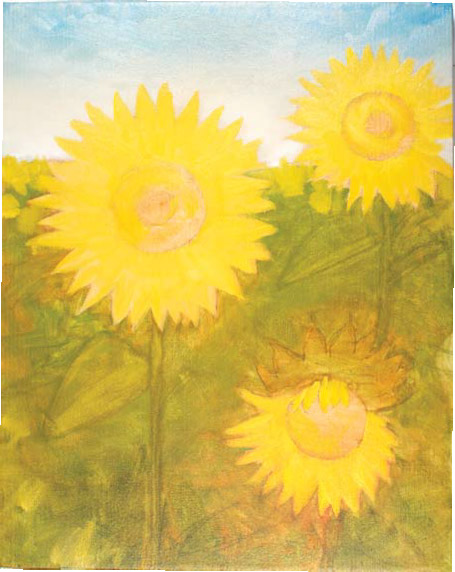
With a mixture of Cadmium Yellow Hue and Titanium White, paint in the petals using a no. 8 filbert. Roughly paint the distant sunflowers using the same colors.
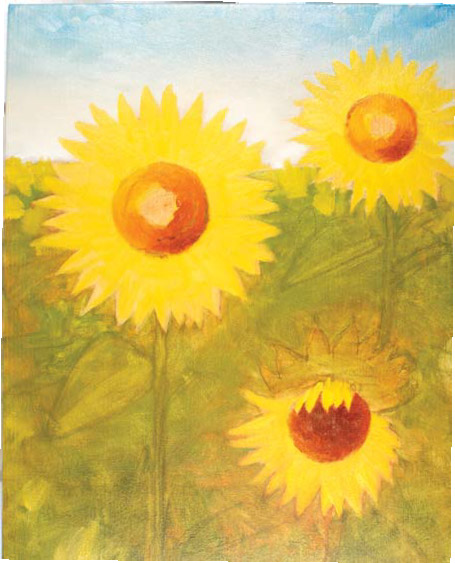
With mixtures of Cadmium Orange Hue, Burnt Sienna, Titanium White and Sap Green, begin painting the flower centers. The light source for this subject is coming from the upper left. This will noticeably affect the shading of the convex centers of the top two flowers.
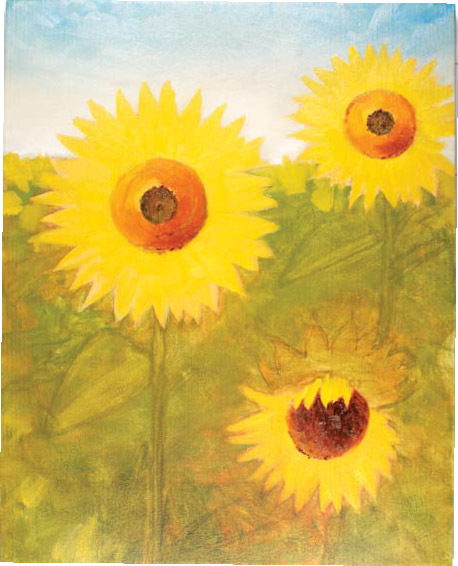
Using the no. 4 flat, apply a mix of Burnt Sienna and Sap Green.
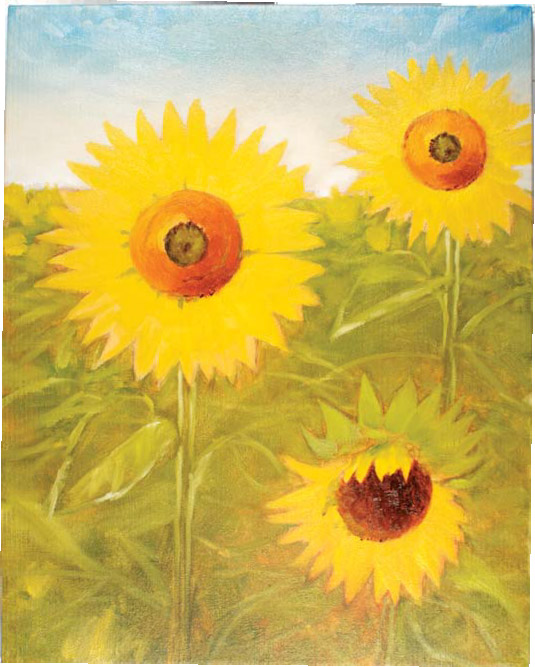
Using both a no. 8 filbert and a no. 4 flat, apply mixtures of Sap Green, Cadmium Yellow Light and Titanium White to the leaves and stalks. Also add these light green colors to the flower centers and between the petals.
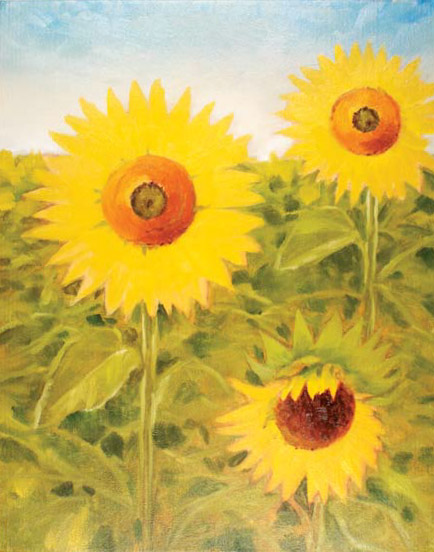
Using a no. 8 filbert, apply a mix of Sap Green, Cerulean Blue and Burnt Sienna to the leaves and stalks.
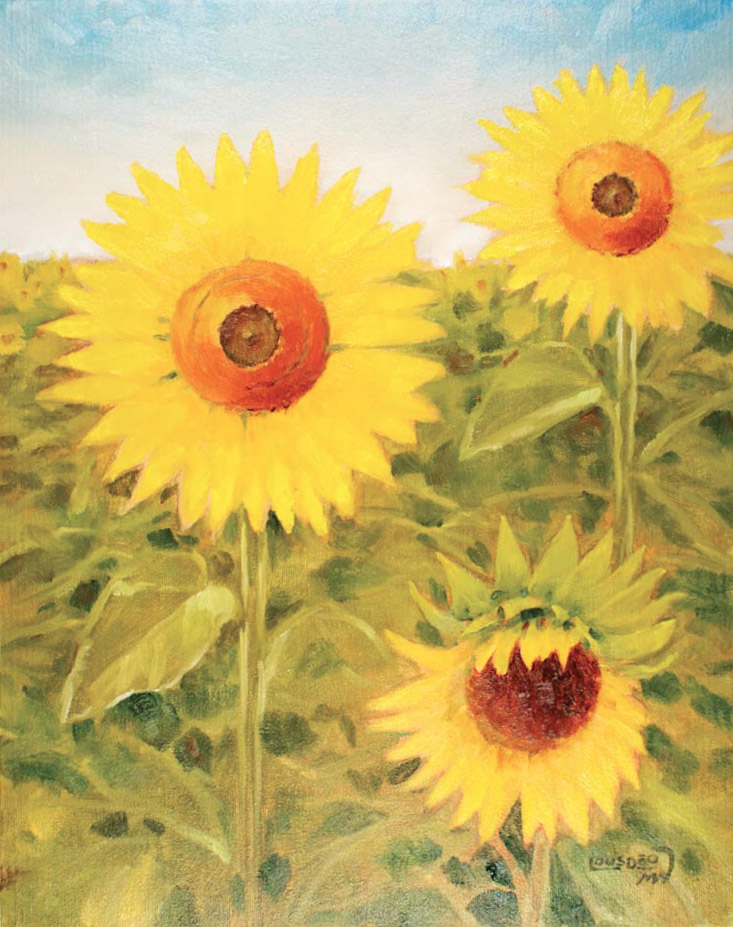
oil on stretched canvas
20" × 16" (51cm × 41cm)
Using a no. 4 flat, make finishing adjustments of lights and darks. Add Cadmium Yellow Light to the outer parts of the petals, and Cadmium Yellow Hue to the inner petals. Let the painting dry, then sign and date it with a no. 4 rigger.
It's fun to try to capture clouds' ever-changing character. Keeping in mind the placement of the light source in the top right will help you create clouds with a three-dimensional quality. A photographed sky may look like a single flat color, but a painting expresses a sky best as an expanse of space that changes in both value and color. In this demonstration the sky is a midvalue French Ultramarine at the top graduating to light Cerulean Blue and Sap Green at the bottom.
8" × 10" (20cm × 25cm) canvas on board
Cerulean Blue, French Ultramarine, Permanent Rose, Sap Green, Titanium White
no. 12 or 1-inch (25mm) flat
no. 4 or 5⁄16-inch (8mm) filbert
palette, brush wash with water, palette knife, rag or paper towel, easel
thinner, medium, palette cups, mahlstick, smock or apron

With a mixture of Titanium White, Cerulean Blue and Sap Green, paint the sky using a no. 12 flat. Start at the bottom of the canvas and paint just past the middle. To mix the colors, start with Titanium White because the dominant blue and green will want to take over, making the sky color hard to tame. Add a drop or two of water or thinner to the paint to improve the flow. Create a thin application, but not as thin as a wash.

With a mix of Titanium White and French Ultramarine, start painting from the top down, gradually adding Cerulean Blue as you work down to meet up with the bottom half of the sky. With a clean brush, work over the entire sky, top to bottom, to blend it more evenly.

Using a no. 4 filbert, add the cloud shapes with a mixture of Titanium White, Cerulean Blue, French Ultramarine, Sap Green and a hint of Permanent Rose. As you apply the paint, it's OK if this mixes with the paint previously laid down for the sky.

Mix the Step 3 colors using less white to create a darker bluish gray, then paint the shadowed areas of the clouds. The light source is coming from the upper right, so the clouds will be mostly dark in the lower left areas.

With Titanium White, mix in the lighter areas of the clouds. The brightest areas will be in the upper right of individual clouds. Clean your brush and replace the brush wash water for the best results.
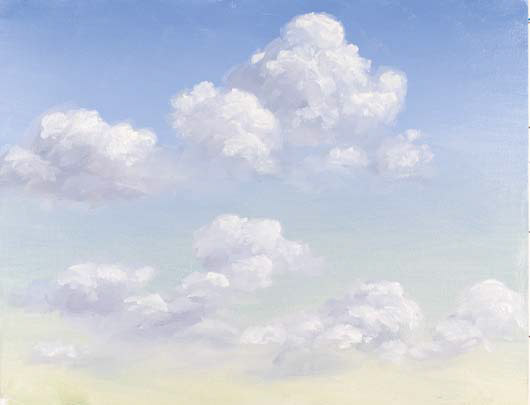
Apply thick Titanium White for highlights in the top right of the individual clouds. Do not mix the white highlight with the previously laid colors. The Titanium White should remain pure.
Click or tap to see this painting completed with a foreground. Mark mixed the same colors in different proportions to create the foreground.
This landscape scene is from a photo I took of farmland not far from where we live. I added the cottage for interest and drew upon my experience painting plein air landscapes to create a sense of believability even though the scene was painted indoors.
9" × 12" (23cm × 30cm) canvas on board
Burnt Sienna, Cadmium Orange Hue, Cadmium Red Hue, Cadmium Yellow Hue, Cerulean Blue, Dioxazine Purple, French Ultramarine, Permanent Rose, Sap Green, Titanium White, Yellow Ochre
no. 2 or 1⁄4-inch (6mm) filbert
no. 8 or 1⁄2-inch (12mm) filbert
no. 2 round
no. 4 rigger
palette, brush wash with water, palette knife, rag or paper towels, easel, 2B pencil or charcoal pencil, kneaded eraser, spray fixative
thinner, medium, palette cups, mahlstick, smock or apron

Begin with a 2B pencil by drawing the horizon and the water's edge as the basis for the scene.
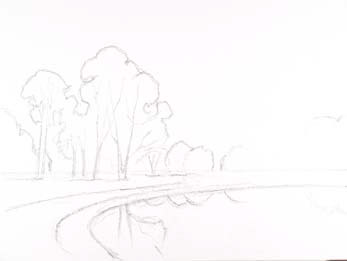
Draw the trees and their reflections in the water. Add the path receding into the distance.
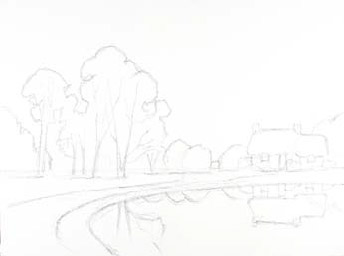
Draw the cottage along with the reflection in the water. Spray with fixative.
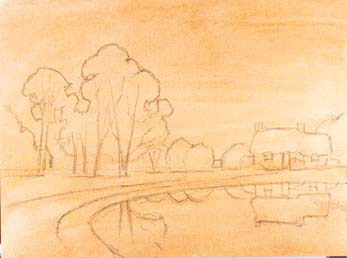
Using a rag, smear Burnt Sienna thinned with water over the entire surface as the ground.
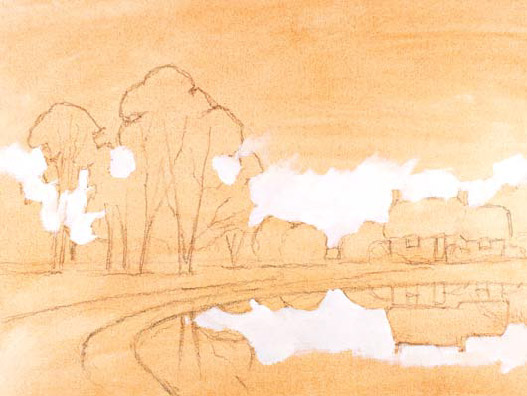
Starting near the horizon, paint the sky using a no. 8 filbert with Titanium White and a touch of Permanent Rose. Start painting the water with the same paint mixture but with the addition of Cerulean Blue. The water is a little darker and bluer than the sky that it reflects.
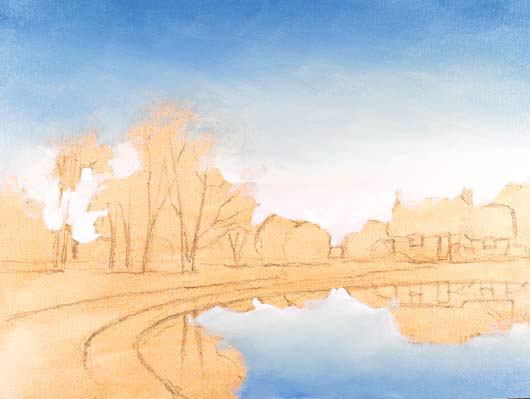
Fill in the rest of the sky with a no. 8 filbert, adding more Cerulean Blue to the paint mixture as you paint upward. Add French Ultramarine at the top. Continuing with the no. 8 filbert, paint the water. Reflecting the sky, the water is lighter at the top and darker at the bottom.

Paint the clouds using a no. 8 filbert loaded with Titanium White. The light source is coming from the upper right, so the clouds are whitest in their top right areas.
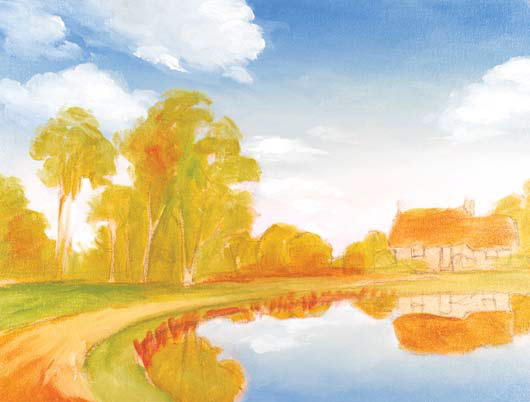
With a no. 8 filbert, paint different regions of the scene with a mixture of Yellow Ochre, Cadmium Yellow Hue, Cadmium Orange Hue, Cadmium Red Hue, Sap Green, Burnt Sienna and Titanium White.
Though images and their reflections share similar values and colors, reflections don't need as much detail and precision as the images they reflect.
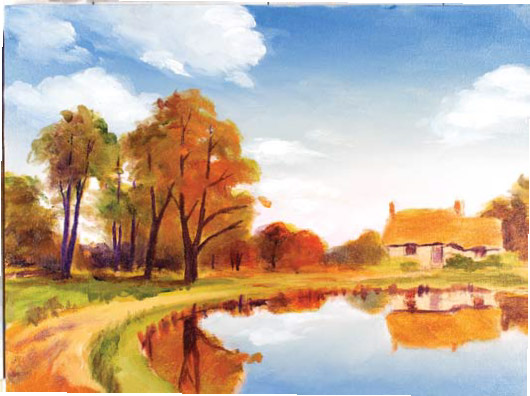
Using a no. 2 filbert, apply different combinations of the colors in the previous step plus Dioxazine Purple. For tree trunks and branches, mix Dioxazine Purple with Burnt Sienna and apply the mix with a no. 2 filbert and a no. 2 round. Scumble in places by lightly dragging the no. 2 filbert with undiluted paint.

Using a no. 2 filbert, paint lighter details such as parts of the cottage, some of the path and some of the leaves using various combinations of colors already used lightened with Titanium White. Apply a mixture of Titanium White and Permanent Rose around the cottage along the water's edge.
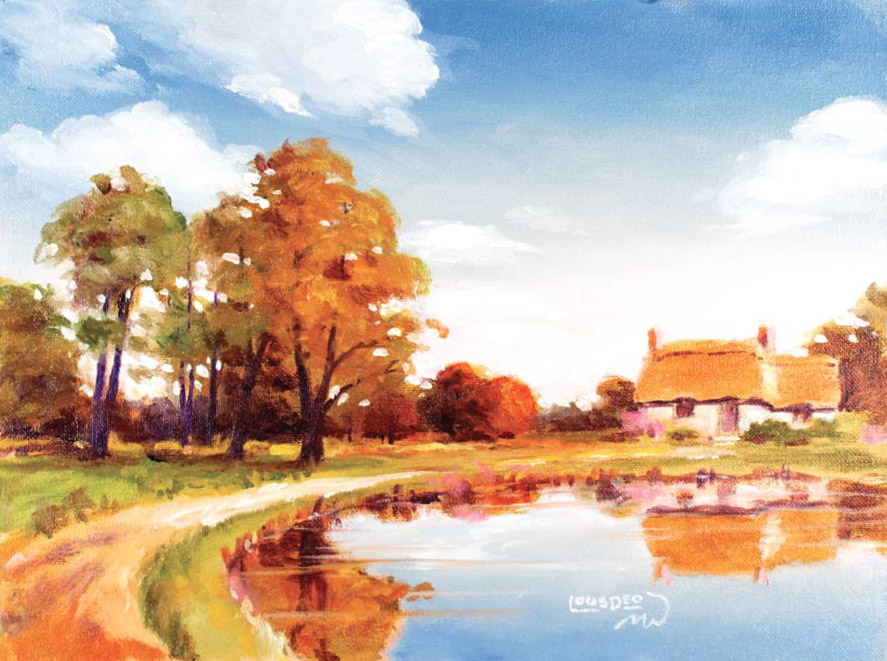
oil on canvas on board
9" × 12" (23cm × 30cm)
Darken and lighten areas around the trees and cottage, and make thin horizontal streaks on the water by dragging the no. 2 filbert through the wet paint. Let the painting dry, then sign and date it with a no. 4 rigger.
While you can just paint trees directly onto the painting surface without an underdrawing or underpainting, creating a detailed drawing first will help guide you as you paint.
5" × 3" (13cm × 8cm) canvas
Burnt Sienna, Cadmium Orange Hue, Cadmium Yellow Light, Phthalo Blue (Red Shade), Sap Green
no. 2 or 1⁄4-inch (6mm) filbert
no. 4 or 5⁄16-inch (8mm) filbert
no. 2 round
2B pencil, spray fixative
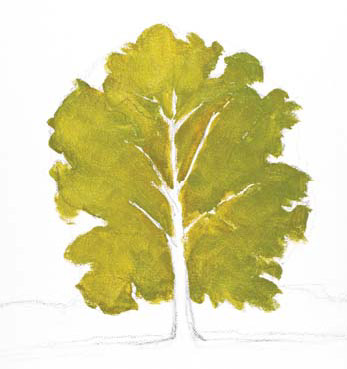
After drawing the tree and branches and spraying the surface with fixative, paint the regions of the leaves with a mix of Cadmium Yellow Light and Sap Green, using a no. 4 filbert. Avoid painting over the trunk and branches.
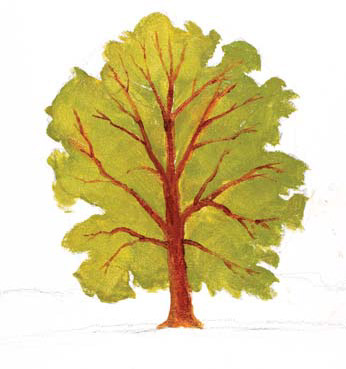
Paint over the trunk and branches with a mix of Burnt Sienna and Cadmium Orange Hue and a no. 2 filbert and a no. 2 round, improving and adding some branches as needed. Tree trunks and branches taper or become thinner as they grow outward.
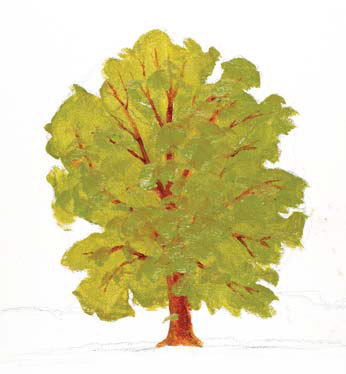
Add leaves over the previous leaves and branches with the green mix of Cadmium Yellow Light and Sap Green, using a no. 2 filbert. If there are parts of the branches you don't like, try painting over them with leaves.
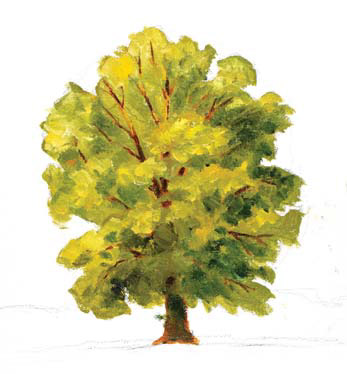
Add more Cadmium Yellow Light to the green mix to create warm light areas and add Phthalo Blue (Red Shade) to the green and brown mixes to create cool dark areas, including leaves, trunk and branches with a no. 2 filbert.
This is a simple composition, but it will make an impressive piece of artwork when you are finished. Notice the subtle transitions of colors and values from left to right in the sky, trees and water. Without these transitions, the painting might turn out flat, but, with them, you will create a beautiful, soothing water scene.
9" × 12" (23cm × 30cm) canvas on board
Cadmium Yellow Medium, Cerulean Blue, Dioxazine Purple, Magenta, Phthalo Green (Blue Shade), Prussian Blue, Titanium White, Yellow Ochre
no. 2 or 1⁄4-inch (6mm) filbert
no. 4 or 5⁄16-inch (8mm) filbert
no. 4 rigger
palette, brush wash with water, palette knife, rag or paper towels, easel, 2B or charcoal pencil, kneaded eraser, spray fixative
thinner, medium, palette cups, mahlstick, smock or apron

With a 2B pencil, start drawing the boat with a horizontal line, going slightly up on the right for the hull. Two vertical lines, leaning at the top and slightly to the left will form the masts.
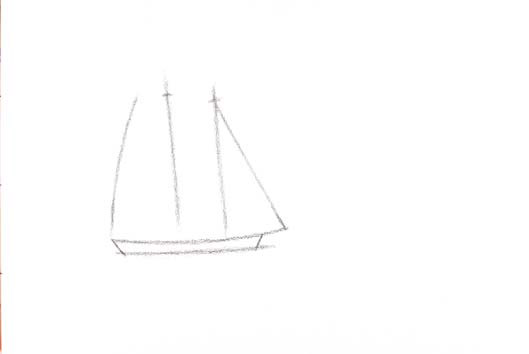
Add lines to start forming the sails and hull. Measure the length of the hull and mark the height of the masts to approximately the same length.
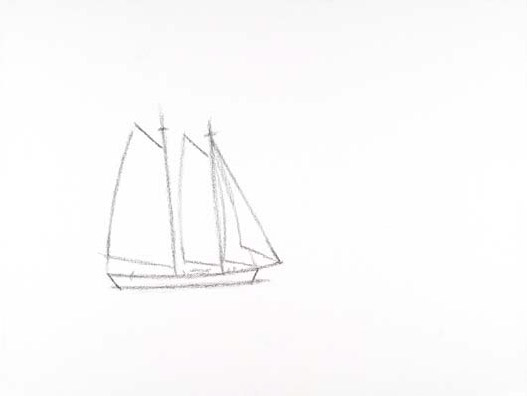
Start adding features to the boat, including the sails and the deck.
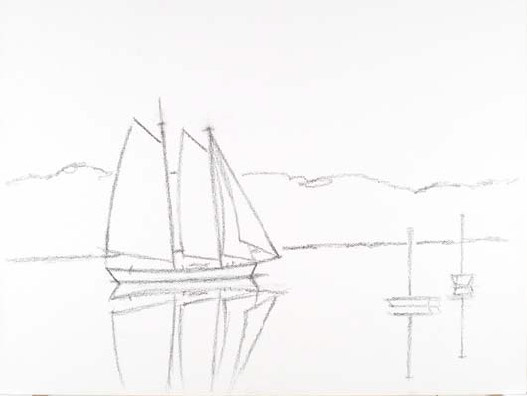
Add the background trees and shoreline. Sketch in the smaller boats and add reflections to the boats. Erase any unwanted lines with the kneaded eraser and spray with fixative.
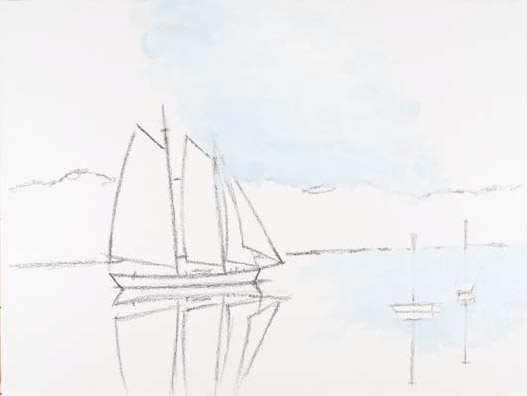
With a mixture of Titanium White and Cerulean Blue, start painting the sky and water with a no. 4 filbert. The sky and water should be noticeably lighter on the right side.
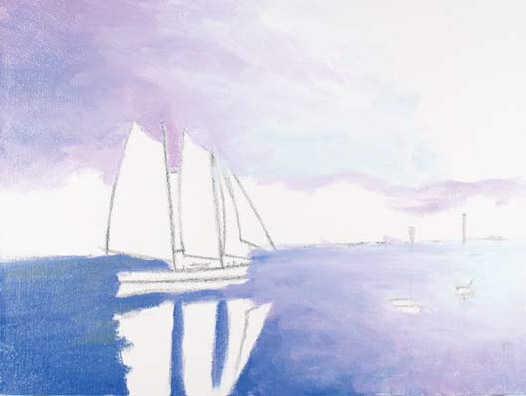
Develop the left side of the sky with a no. 4 filbert and a mix of Titanium White, Dioxazine Purple and Prussian Blue. Add to the left portion of the water with a mix of Titanium White, Dioxazine Purple, Prussian Blue and Phthalo Green (Blue Shade) and a trace of Cadmium Yellow Medium. The water should be darker than the sky above it.

With a clean brush and water, add Titanium White to the right portion of the sky and water.

Starting on the left, paint in the background trees with a mix of Phthalo Green (Blue Shade), Cerulean Blue and Dioxazine Purple using a no. 4 filbert. Work to the right, gradually adding Magenta and Titanium White to the mix so that the extreme right looks purple-gray.
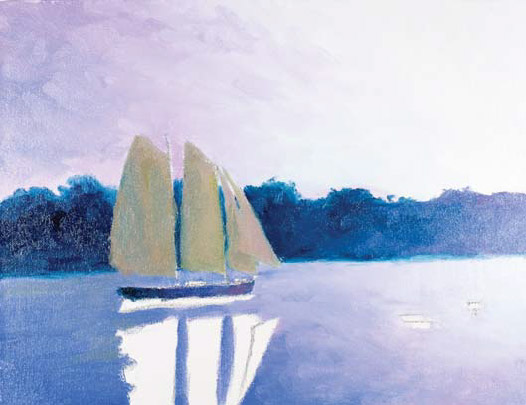
With a mix of Yellow Ochre, Magenta, Cerulean Blue, Dioxazine Purple and Titanium White, paint the sails using a no. 2 filbert. Paint the hull with a mix of Dioxazine Purple, Phthalo Green (Blue Shade), Cerulean Blue, Magenta and Titanium White. The hull is darker and cooler on the left.
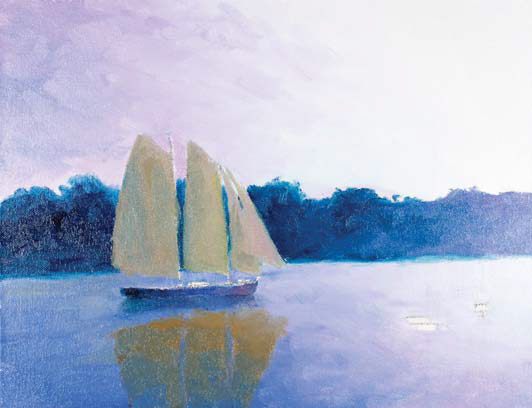
With nos. 2 and 4 filberts, add the reflections of the sails and hull with the colors used for the sails and hull in Step 9 along with the water colors. The reflections are similar to the color and value of the water, the difference between the two becoming almost indistinguishable toward the bottom.
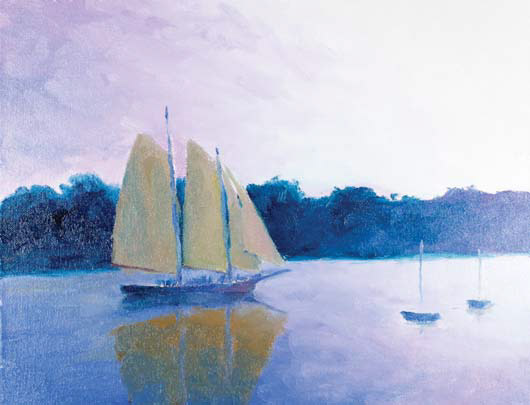
Paint the small boats, the masts of the large boat and some details with a mixture of Titanium White, Dioxazine Purple, Cerulean Blue and Prussian Blue. Use a no. 2 filbert and no. 4 rigger.
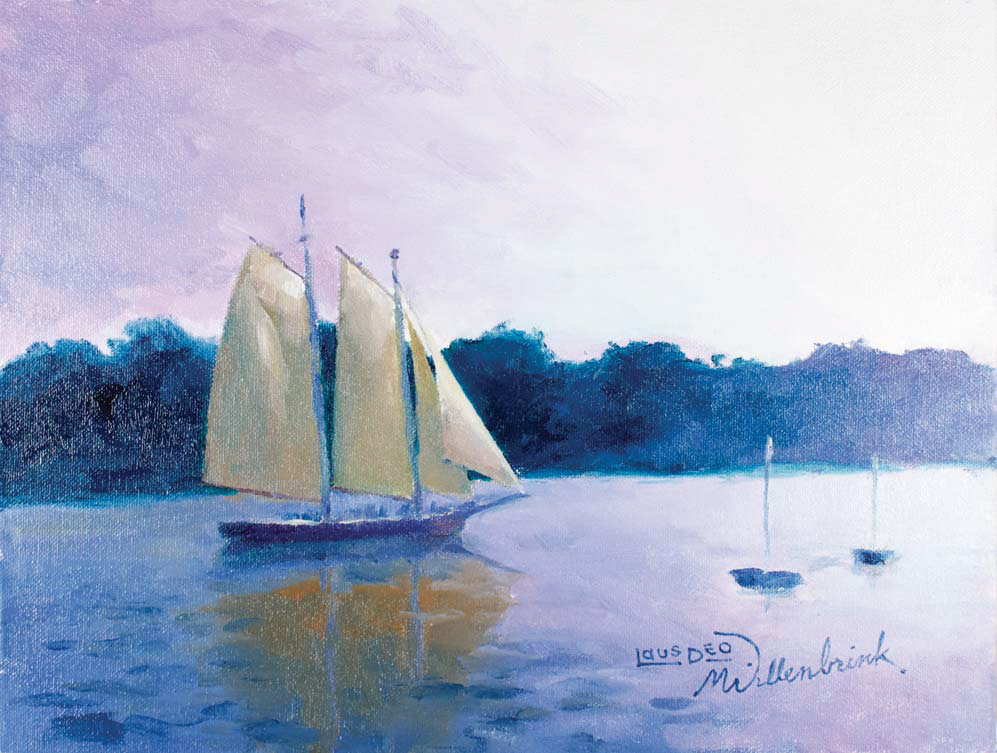
oil on canvas on board
9" × 12" (23cm × 30cm)
Add final details and elements including the boat trim and waves at the bottom with mixture of Dioxazine Purple, Cerulean Blue and Prussian Blue, using a no. 4 rigger for the thin lines and a no. 2 filbert for the wider strokes. Use a mixture of Titanium White with Cadmium Yellow Medium for the highlights of the sails. Let the paint dry, then sign and date the painting with a no. 4 rigger.
Working en plein air, whether for sketches or finished paintings, is a great way to observe a subject and become more aware of subtle color variations that may be lost in a photograph. Consider making it a goal to observe the different hues of green in nature as the sun moves across the sky and also as the seasons change.
8" × 16" (20cm × 41cm) stretched canvas
Burnt Sienna, Cadmium Orange Hue, Dioxazine Purple, Lemon Yellow, Permanent Rose, Phthalo Blue (Red Shade), Phthalo Green (Blue Shade), Titanium White, Yellow Ochre
no. 12 or 1-inch (25mm) flat
no. 4 or 5⁄16-inch (8mm) filbert
no. 4 rigger
palette, brush wash with water, palette knife, rag or paper towel, easel, 2B or charcoal pencil, kneaded eraser, spray fixative
thinner, medium, palette cups, mahlstick, smock or apron
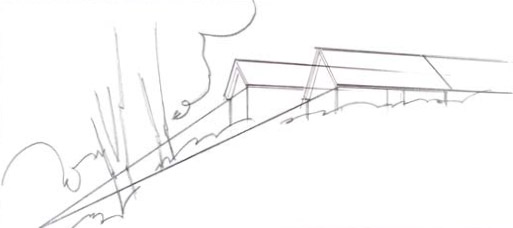
Use two-point perspective to construct the buildings. The vantage point is such that the buildings are above the horizon, giving the impression of looking up at them. The left vanishing point is within the picture area, while the right vanishing point rests on the horizon beyond the border of the picture area. Try drawing this on the painting surface with charcoal or pencil, then spray with a fixative so the drawing doesn't smear.
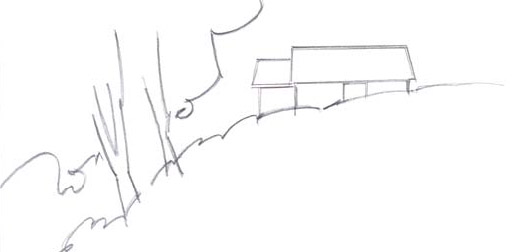
If painting the buildings in two-point perspective requires more effort than you want to exert and you feel as though your brain may explode, try repositioning the buildings to a straight-on view.

With a no. 12 flat, apply a thin wash of Burnt Sienna as a ground color. The reddishness of the Burnt Sienna will complement the greens.
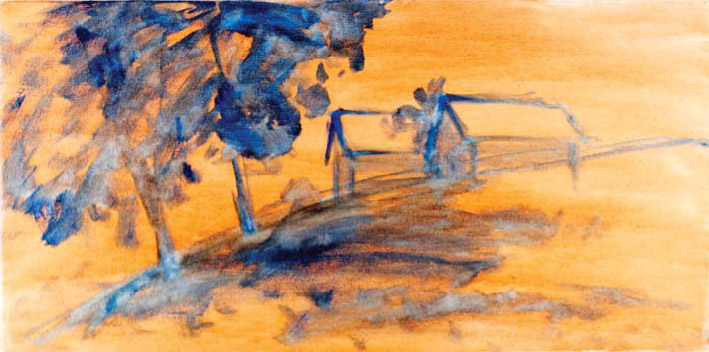
Using Phthalo Blue (Red Shade) and a no. 4 filbert, roughly sketch in the building shapes, trees and shadows. This will help you work out the placement of the elements if you haven't sketched them out ahead of time.
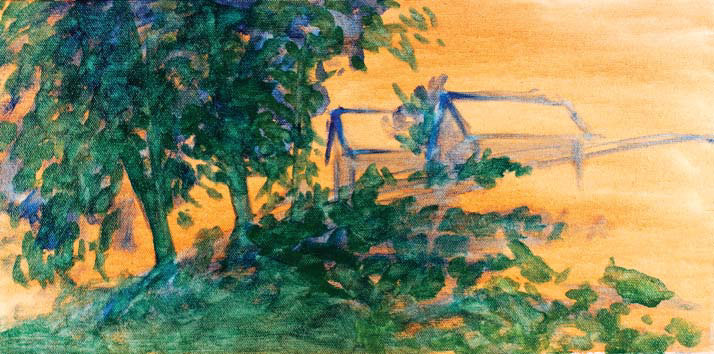
Mix Phthalo Green (Blue Shade) and Yellow Ochre and use a no. 4 filbert to brush in the shadowed areas. You can add thinner to the paint to improve the flow. Gradually apply thicker paint.
To keep the greens looking fresh and pure, mix them with analogous colors (colors adjacent to green on the color wheel, blue and yellow in this case). To make green look natural and less garish, add a touch of its complement (red).
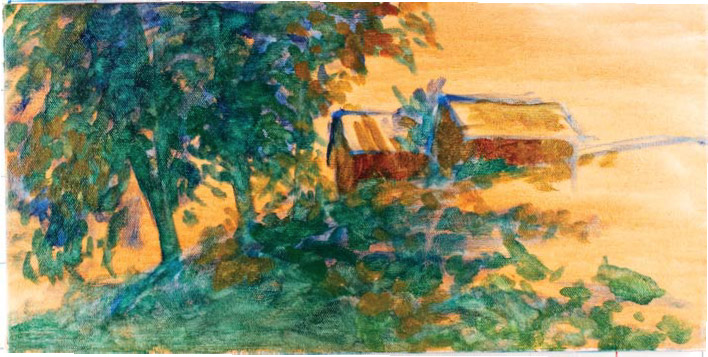
Mix Yellow Ochre with a little Permanent Rose and Phthalo Green (Blue Shade). Add paint to the building, trees and foreground grass with a no. 4 filbert.
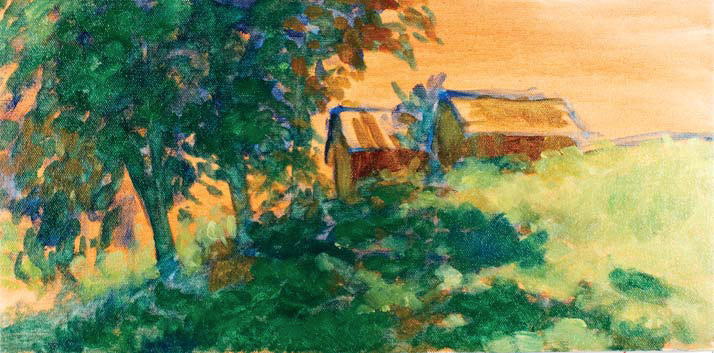
With a mix of Lemon Yellow, Phthalo Green (Blue Shade), Titanium White and Cadmium Orange Hue, paint in the bright green areas with a no. 4 filbert. Develop the shadowed areas further with a mixture of Phthalo Green (Blue Shade) and some of the other colors.
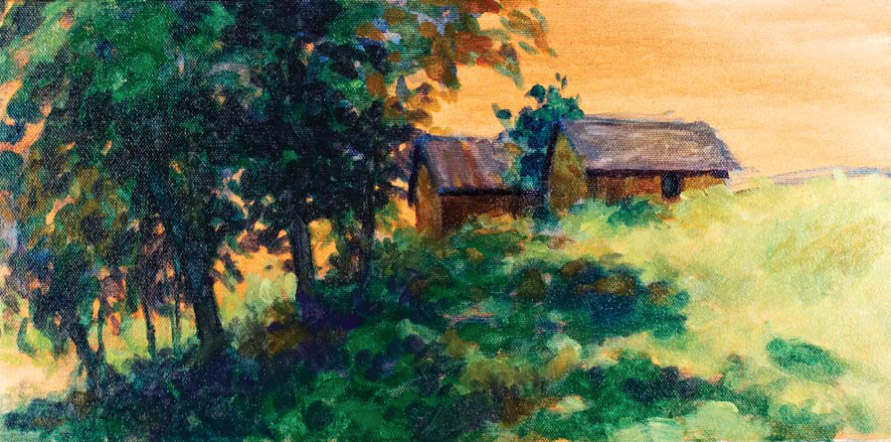
Add the dark purples with a mixture of Dioxazine Purple with a little Phthalo Blue (Red Shade) and Phthalo Green (Blue Shade) to the shadowed areas with a no. 4 filbert. Apply some purple mixtures to the buildings. Add some greens and Burnt Sienna to the trees and foreground.
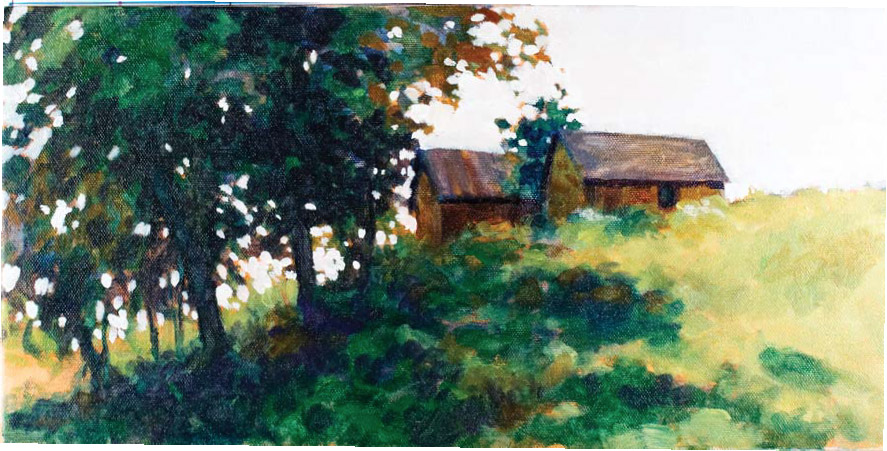
With a mix of Titanium White and a little Phthalo Blue (Red Shade), paint the sky using a no. 4 filbert. Create the small holes in the leaves of the trees by dabbing the paint onto the canvas with the edge of the brush.
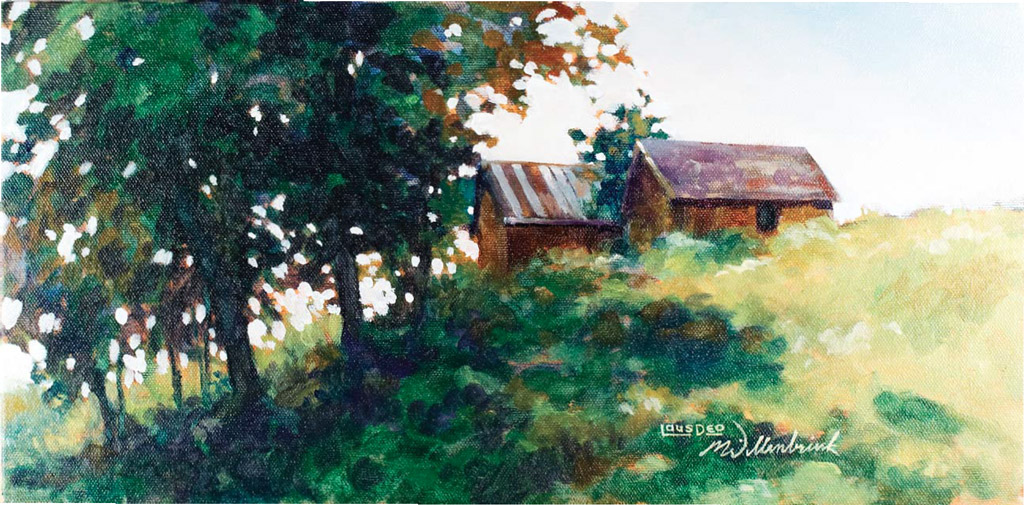
oil on stretched canvas
8" × 16" (20cm × 41cm)
Add final details and adjustments to the buildings and trees and add more blue in the upper sky. Write the date on the back of the painting. Let the paint dry, then sign the painting on the front with a no. 4 rigger.
You may recognize this subject from our previous book Water-color for the Absolute Beginner or my video workshop Drawing for the Absolute Beginner, either of which can be referred to for more detailed drawing instructions.
The use of warm and cool colors gives this snow scene a cozy feeling. You can almost imagine people inside the building, sipping hot chocolate in front of a fire.
9" × 12" (23cm × 30cm) canvas on board
Burnt Sienna, Cadmium Yellow Hue, French Ultramarine, Magenta, Titanium White
no. 12 or 1-inch (25mm) flat
no. 2 or 1⁄4-inch (6mm) filbert
no. 8 or 1⁄2-inch (12mm) filbert
no. 10 or 3⁄4-inch (19mm) filbert
no. 2 round
no. 4 rigger
palette, brush wash with water, palette knife, rag or paper towels, easel, 2B or charcoal pencil, kneaded eraser, spray fixative
thinner, medium, palette cups, mahlstick, smock or apron

Use a 2B pencil to draw the basic rectangular shapes of the structure, making sure the proportions are correct and the lines are perpendicular to one another.
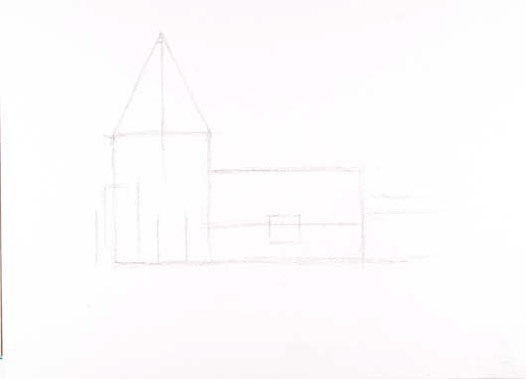
Build on the basic rectangles, adding the window, the sides to the door and a triangle for the turret roof.
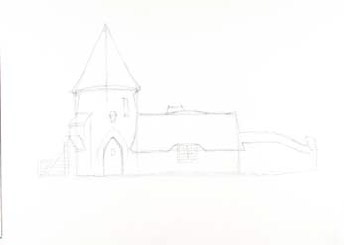
Refine the shapes. Add curves to the roof ledges and finish the door, window, gate and other elements.
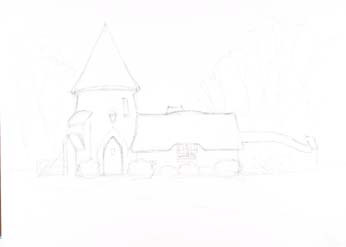
Sketch in the trees and shrubs and erase unwanted lines with a kneaded eraser. Spray with a fixative to prevent graphite from smearing as you paint over the drawing.
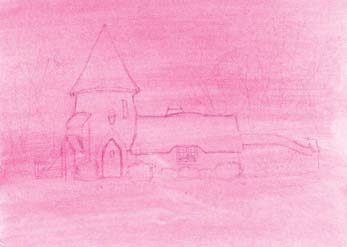
Smear diluted Magenta with a rag to form a ground. Create a transparent layer so that the pencil drawing shows through. Let the paint dry (a thin layer shouldn't take long).
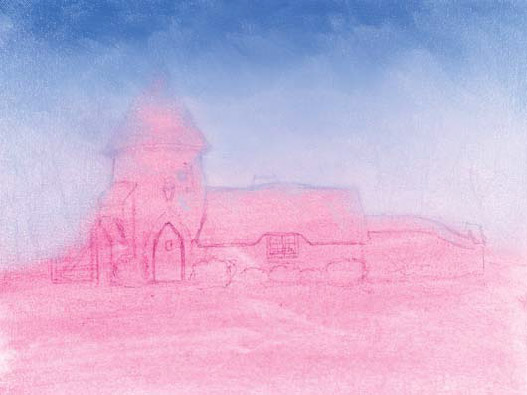
Paint the sky with a no. 12 flat and a mix of Titanium White and French Ultramarine. Work from top to bottom so that there is more French Ultramarine at the top. Wipe down the French Ultramarine layer with a rag, smoothing and removing some of the paint so that the Magenta shows through. Go back over the entire sky with a clean, dry brush to add brushstrokes.
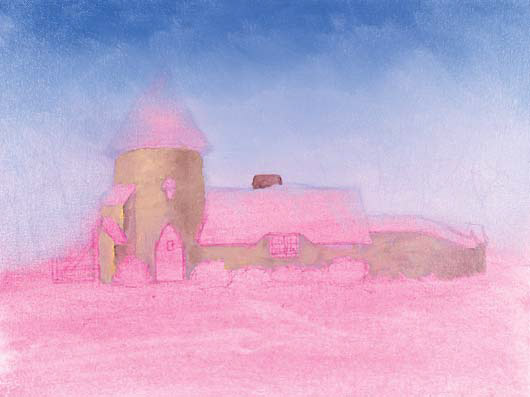
Paint a basecoat on the stonework and chimney with a mixture of Burnt Sienna, Cadmium Yellow Hue, Magenta, French Ultramarine and Titanium White. Mix in more Cadmium Yellow Hue, Magenta and Titanium White to paint the warmer light areas. Mix in more Burnt Sienna and French Ultramarine for the cooler dark areas. Don't paint the individual stones yet.

Using a no. 8 filbert, scumble in a mixture of Burnt Sienna and French Ultramarine to add background darks of the tree shapes and shrubs. In some places the scumbling can be gently smoothed.
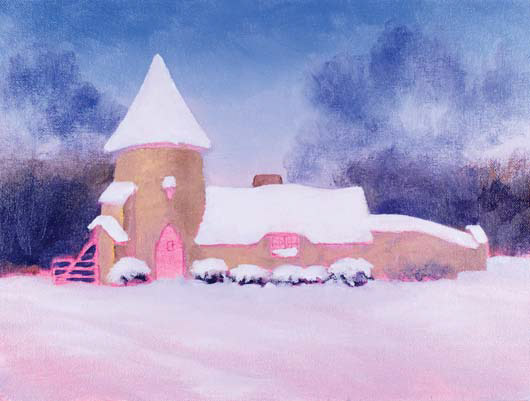
Paint the snow with a mixture of Titanium White, French Ultramarine and Magenta. Use nos. 2, 8 and 10 filberts, depending on how broad or detailed the application. Use larger brushes for larger areas. Use a rag to wipe down the paint in places such as the lower foreground to expose the Magenta ground.
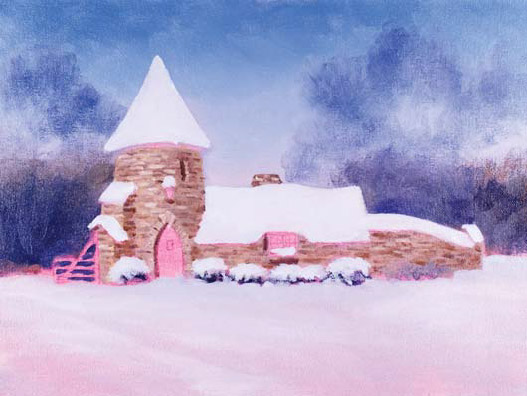
Paint the stone details with a no. 2 round and the stonework color from Step 7, making it darker in some places and lighter in others. The idea is to imply stones rather than paint every one.
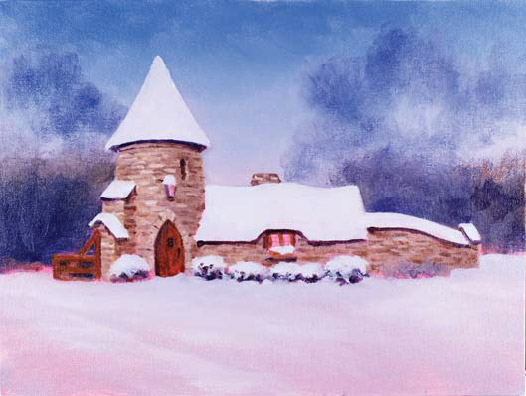
Using a no. 2 filbert and a no. 2 round, paint the gate, door and other trim work, including the shadows under the rooflines, with a mix of French Ultramarine and Burnt Sienna.

Paint tree branches in the background and vines in the front of the building with French Ultramarine and a no. 2 round.
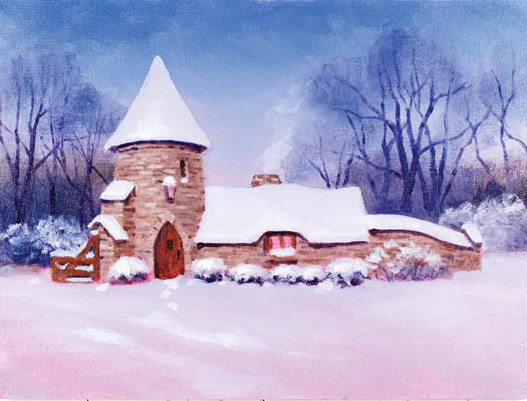
Using the snow color from Step 9, scumble smoke above the chimney and snow on the background bushes, building and vines using a no. 2 filbert. Use a no. 2 round for snow on the gate. Apply subtle highlights with pure Titanium White and a no. 2 filbert.
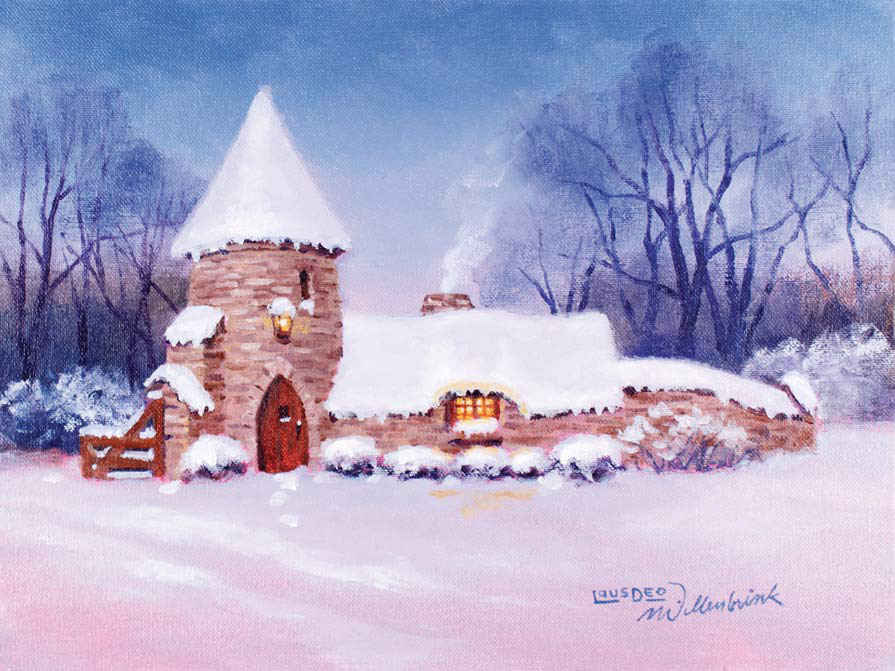
oil on canvas mounted on board
9" × 12" (23cm × 30cm)
Add snow details including icicles with Titanium White and French Ultramarine, using a no. 2 filbert and a no. 2 round. Using a no. 2 round, mix Cadmium Yellow Hue with Titanium White and paint in the lantern and window. Add some of the yellow around both the lantern and window for reflected light. Switch to Burnt Sienna to paint the mullion around the glass panes. Let the painting dry, then sign and date it with a no. 4 rigger.
When painting animals, it's fun to try to capture their attributes through their eyes or the tilt of the head or through the colors you chose to represent them. For this lion demonstration, I chose colors to show the authority and kingship that the lion symbolizes. Note that the light shining on the lion is coming from the upper right.
12" × 16" (30cm × 41cm) stretched canvas
Burnt Sienna, Cadmium Orange Hue, Cadmium Red Hue, Cadmium Yellow Hue, Magenta, Permanent Rose, Phthalo Blue (Red Shade), Titanium White, Yellow Ochre
no. 2 or 1⁄4-inch (6mm) filbert
no. 4 or 5⁄16-inch (8mm) filbert
no. 8 or 1⁄2-inch (12mm) filbert
no. 4 rigger
palette, brush wash with water, palette knife, rag or paper towels, easel, 2B or charcoal pencil, kneaded eraser, spray fixative
thinner, medium, palette cups, mahlstick, smock or apron

Using a 2B or charcoal pencil, sketch the basic shape of the profile along with a line to define the placement of the eye.

Add the shape of the mane and the ear to the profile.
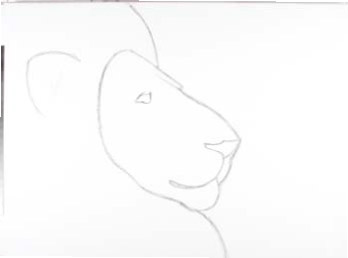
Add details such as the nose and refine the form, erasing some of the line work with a kneaded eraser.
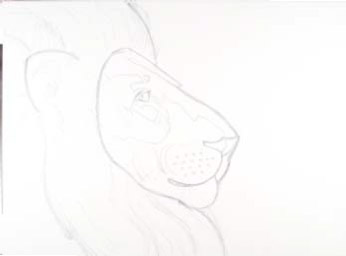
Add lines to indicate the shadows and fur along with other details including facial contours. Spray with fixative to prevent the graphite from smearing as you paint over your drawing.
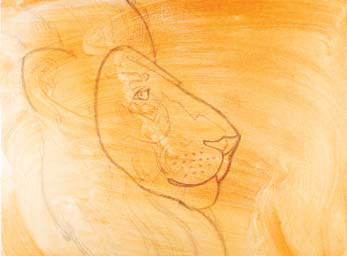
Use a rag to smear Burnt Sienna diluted with water as a ground. The paint should be transparent so that the pencil drawing is visible through the paint.
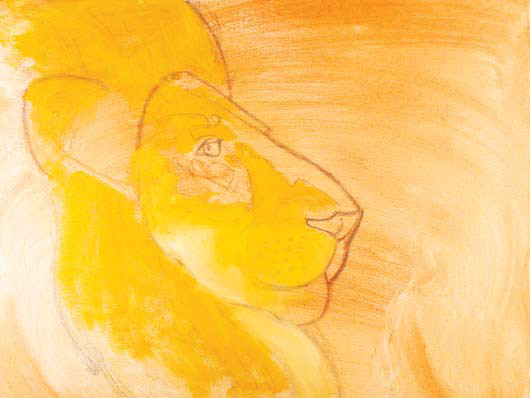
With a no. 4 filbert, start adding mixes of Cadmium Yellow Hue, Titanium White and Cadmium Orange Hue over the face, mane and ear. To keep the underdrawing slightly visible, wipe down heavy areas of paint with a rag.
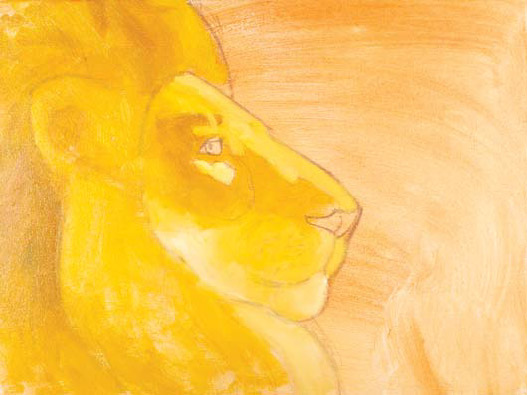
Continuing with the no. 4 filbert and the paint colors from Step 6, paint over more of the lion. For darker regions, add Magenta and Phthalo Blue (Red Shade). As you add more paint, it will become heavier and more opaque, eventually covering the pencil lines of the underdrawing.
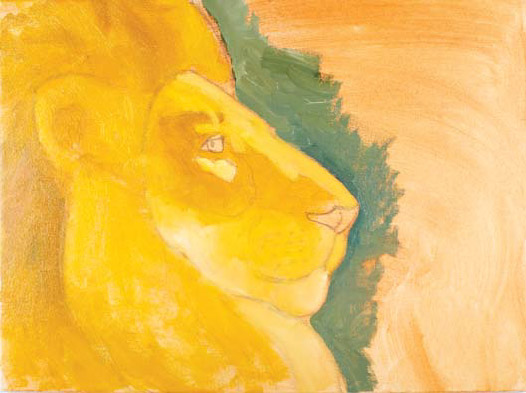
With a no. 8 filbert, start painting the background along the profile of the lion with a mix of Cadmium Yellow Hue, Phthalo Blue (Red Shade), Titanium White and Permanent Rose.
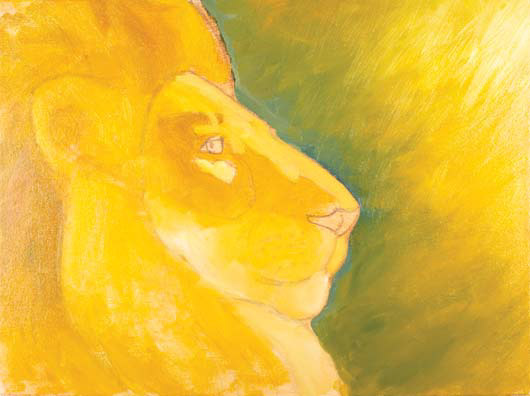
Fill in the remainder of the background by adding Titanium White at the upper right. Blend in Cadmium Orange Hue as you work down and to the left. Use a no. 4 filbert to make narrower brushstrokes for this step.
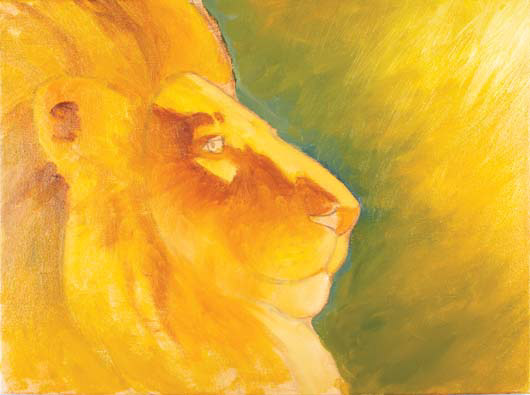
Use a no. 4 filbert and mixtures of Cadmium Yellow Hue, Titanium White, Cadmium Orange Hue, Cadmium Red Hue, Permanent Rose, Magenta, Phthalo Blue (Red Shade), Burnt Sienna and Yellow Ochre to paint in the lion.
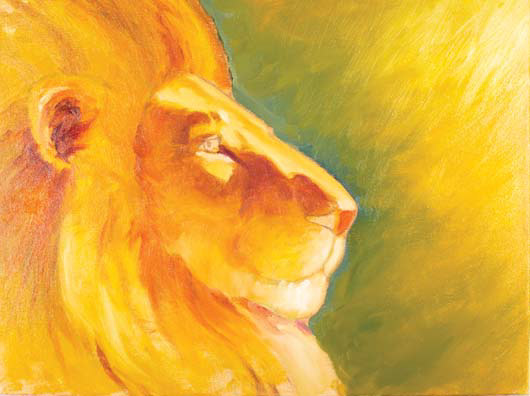
Continue building and developing the colors of the lion with a no. 4 filbert and the mixtures from Step 10. The paint can be mixed on the palette as well as mixed and moved on the canvas.
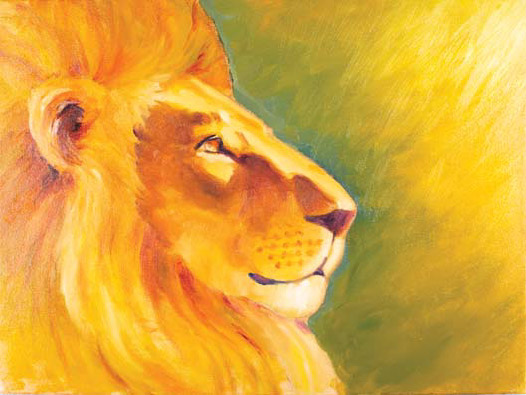
Using nos. 2 and 4 filberts, start adding details to the eye, nose and mouth, and darken the facial contours.
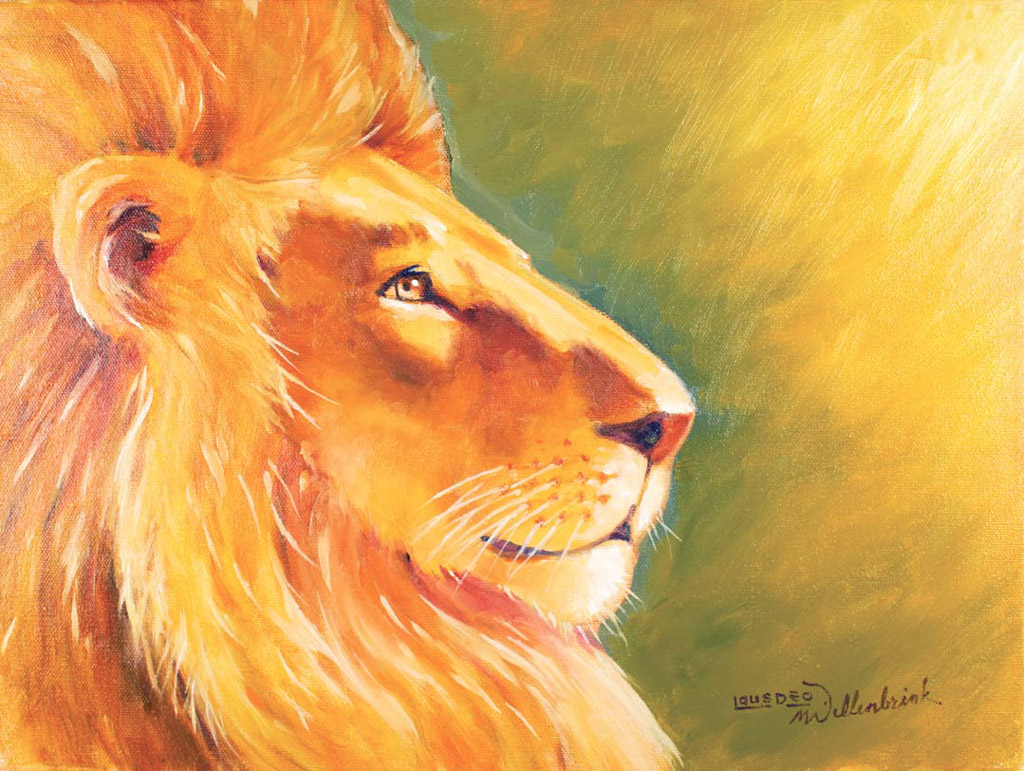
oil on stretched canvas
12" × 16" (30cm × 41cm)
Add more details and subtle adjustments by lightening and darkening some of the fur and face. Add texture to the face by scumbling. Smooth the fur in some places with a rag. Paint over the darker paint of the whiskers, hairs and fur clumps with a lighter mix of Titanium White and Cadmium Orange Hue using a no. 4 rigger and a no. 2 filbert. Add thinner to the paint to improve the flow. Let the painting dry, then sign and date it with a no. 4 rigger.
Adding people to a scene creates a sense of connection with the viewer. The figures don't need to be highly detailed, especially if the rest of the scene is painted loosely. The important part is to make sure they are proportionally accurate and easy to identify. The simplest way to achieve this is to place them in silhouette form (see mini demonstration).
9" × 12" (23cm × 30cm) canvas on board
Burnt Sienna, Cadmium Orange Hue, Cadmium Red Hue, Cadmium Yellow Hue, Cadmium Yellow Light, Magenta, Phthalo Blue (Red Shade), Phthalo Green (Blue Shade), Sap Green, Titanium White
no. 2 or 1⁄4-inch (6mm) filbert
no. 8 or 1⁄2-inch (12mm) filbert
no. 2 round
no. 4 rigger
palette, brush wash with water, palette knife, rag or paper towels, 2B or charcoal pencil, kneaded eraser, spray fixative, easel
thinner, medium, palette cups, mahlstick, smock or apron
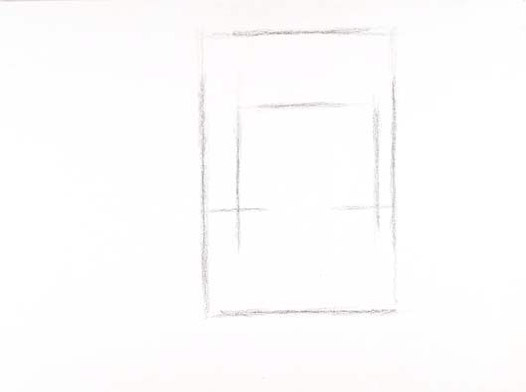
With a 2B pencil, sketch the basic shapes of the arch and building.
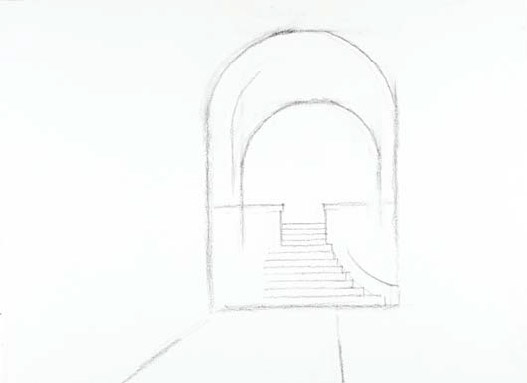
Add details to the basic building shapes. Erase unwanted lines throughout the process.
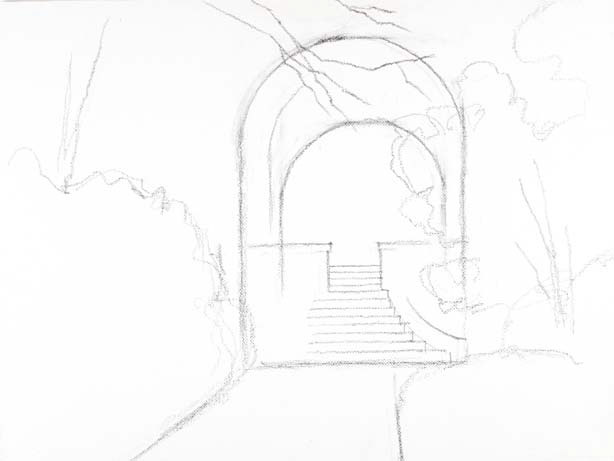
Add foliage shapes along with tree trunks and branches.
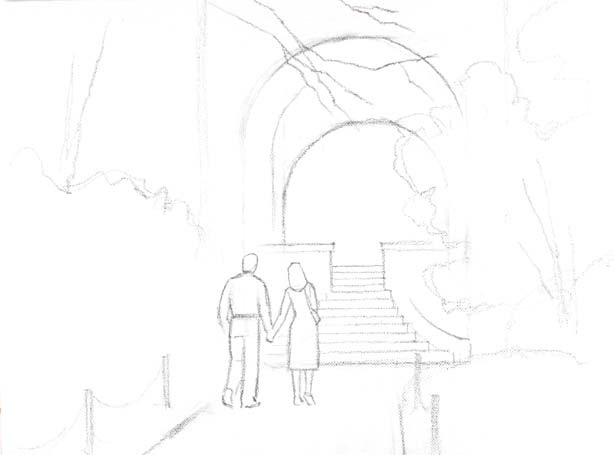
Sketch the people shapes (see mini demonstration). Add minor details, including the foreground posts. Spray with fixative.
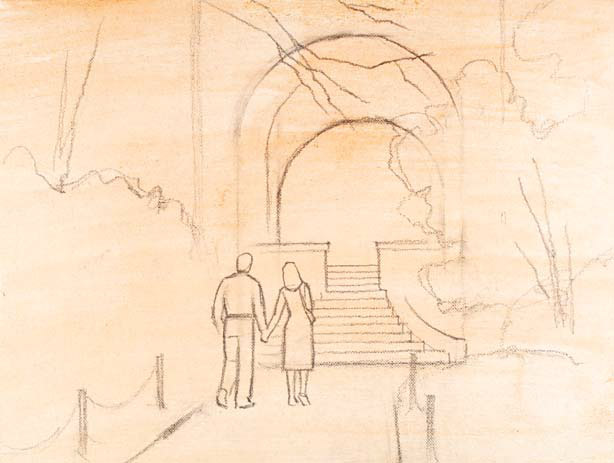
Using a rag, smear Burnt Sienna diluted with water as a light ground.

With a no. 8 filbert, underpaint most of the foliage with mixtures of Cadmium Yellow Light, Cadmium Yellow Hue, Cadmium Orange Hue and Cadmium Red Hue. Apply paint thinly enough to allow the underdrawing to show through. These thin layers will be covered over with other paint layers.
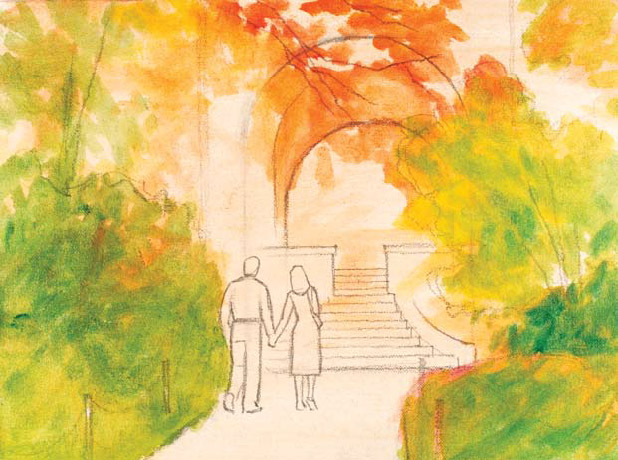
With mixtures of Cadmium Yellow Hue, Sap Green and Phthalo Green (Blue Shade), add the light and midtone greens of the foliage with a no. 8 filbert. The paint consistency is slightly thicker than that of the previous layer.
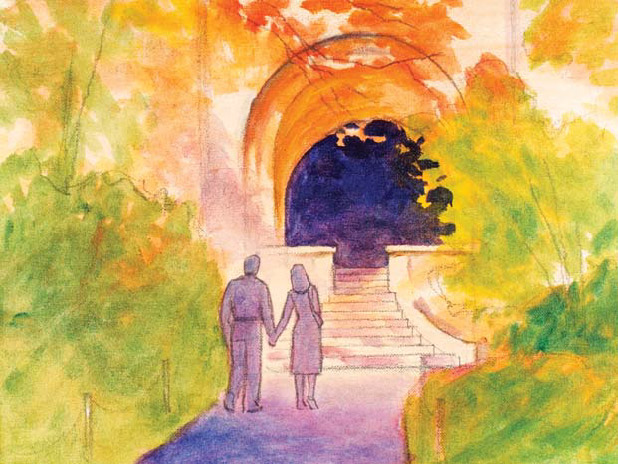
Add shadows to the foreground, building and people with a mix of Magenta and Phthalo Blue (Red Shade). Add Cadmium Yellow Hue to the mix for warm shadow colors in places such as the outer arch. There hasn't been any need to use Titanium White yet, because thinning the colors with water makes them lighter. Use a no. 8 filbert along with a no. 2 filbert for painting more precise details.
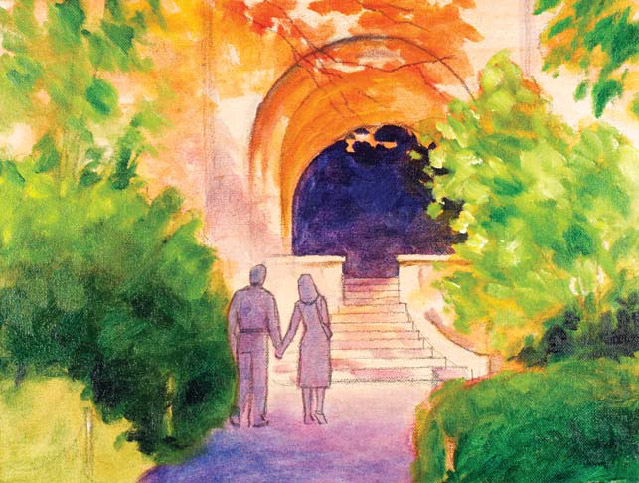
Using a no. 8 filbert, start painting over the foliage with a mix of Phthalo Green (Blue Shade), Sap Green and Cadmium Yellow Light. Add Phthalo Blue (Red Shade) to the mix for darker places. From this stage on, use thicker, more opaque paint.
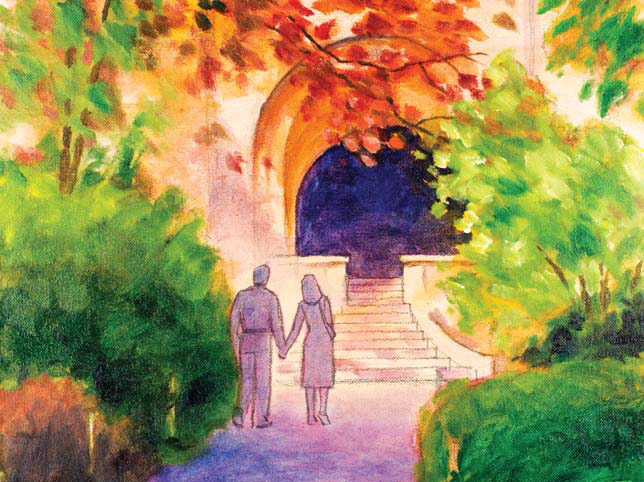
Using a no. 8 filbert, paint more foliage with the green mixtures from Step 9 along with warm mixtures of Cadmium Yellow Hue, Cadmium Orange Hue, Cadmium Red Hue and Titanium White. Paint the tree branches with a mix of Burnt Sienna and Phthalo Blue (Red Shade) using a no. 2 round.
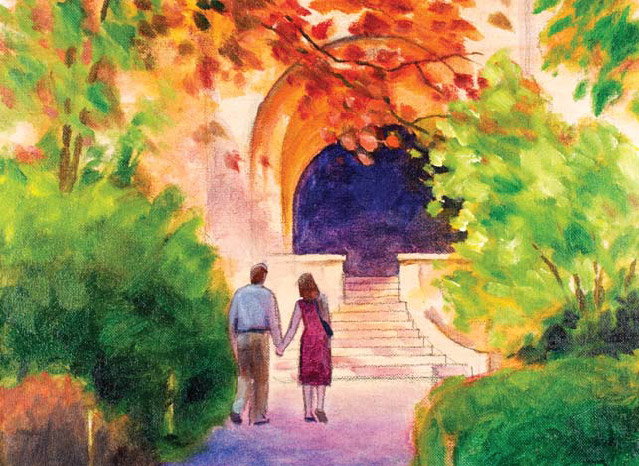
With a no. 2 filbert, place colors over the people shapes, keeping the image dark against the light background. For the shirt, use a mix of Titanium White and Phthalo Blue (Red Shade). For the dress, use a mix of Cadmium Red Hue, Magenta and Phthalo Blue (Red Shade). For the pants and hair, mix Cadmium Yellow Hue, Burnt Sienna and Phthalo Blue (Red Shade). Use a no. 2 round to add fine lines to the belt, purse and shoes with a mix of Burnt Sienna and Phthalo Blue (Red Shade).
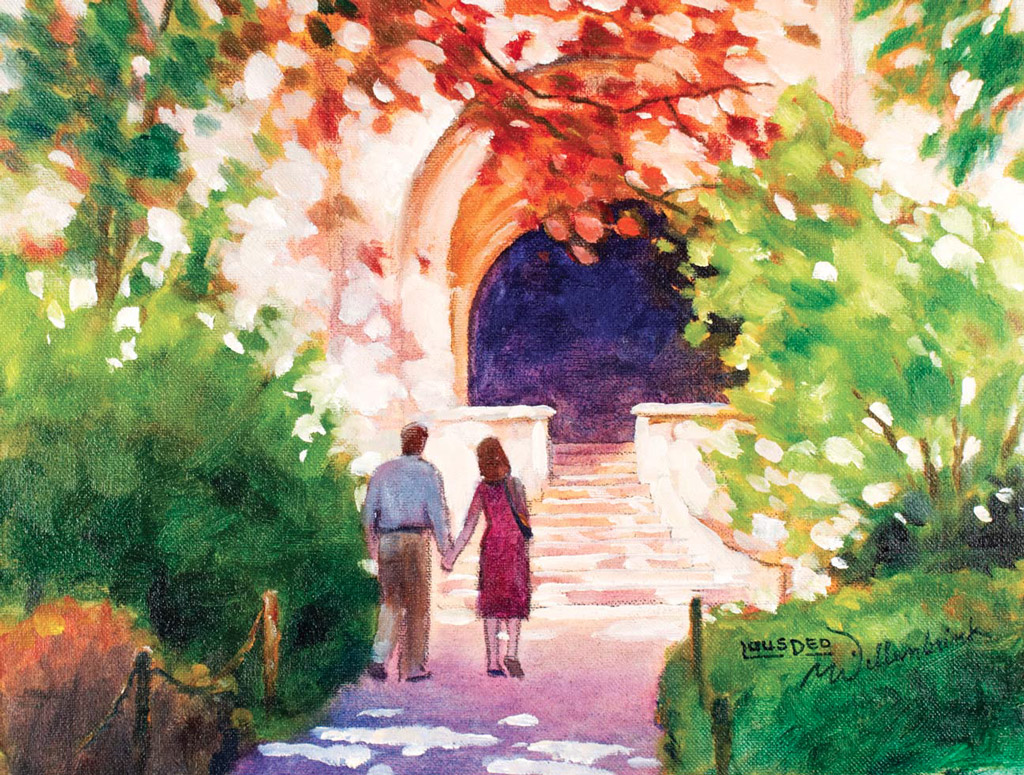
oil on canvas mounted on board
9" × 12" (23cm × 30cm)
Using a no. 2 filbert, paint over much of the building with a mix of Titanium White and Burnt Sienna. Make adjustments and add details, including the foreground posts and sunlight on the path. Let the painting dry, then sign and date it with a no. 4 rigger.
When drawing people, block in the basic features similar to a mannequin to develop the proportions and form.
drawing pad or sketchbook
2B pencil, kneaded eraser
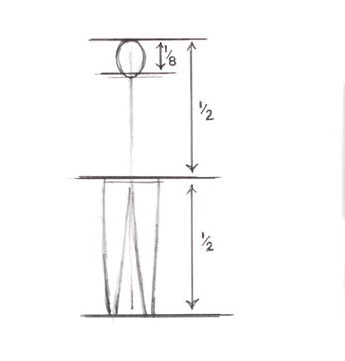
Legs make up almost half the height of the average adult. Head size is a little more than one-eighth of the overall height.
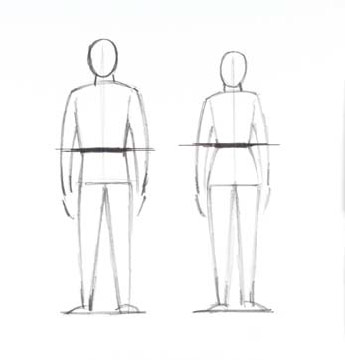
A major difference between men and women is the placement of the waist. Men have a lower waist, making for a larger torso. Women have a higher waist and fuller hips.
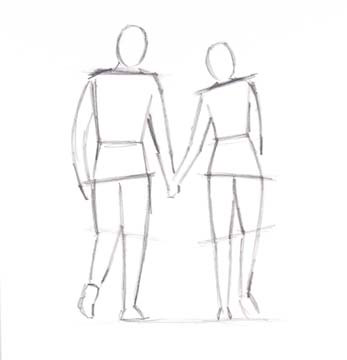
The appearance of movement, such as walking, can be added through subtle changes of the form. The straight legs are carrying the weight, and this affects the angles of the hips and shoulders, which are set at opposing angles.

Add clothes, hair and costume elements to the blocked-in figures. The end result is two silhouetted figures that are easy to identify.
Portraits are both fun and challenging. A good portrait painting starts with an interesting subject. Proper lighting will help you to observe lights and darks and the fine details of the face.
16" × 12" (41cm × 30cm) stretched canvas
Burnt Sienna, Burnt Umber, Cadmium Red Hue, Cadmium Yellow Hue, Cerulean Blue, Magenta, Permanent Rose, Phthalo Blue (Red Shade), Titanium White, Yellow Ochre
no. 4 or 5⁄16-inch (8mm) flat
no. 8 or 1⁄2-inch (12mm) flat
no. 2 round
no. 4 rigger
palette, brush wash with water, palette knife, rag or paper towels, easel, 2B or charcoal pencil, kneaded eraser, spray fixative
thinner, medium, palette cups, mahlstick, smock or apron
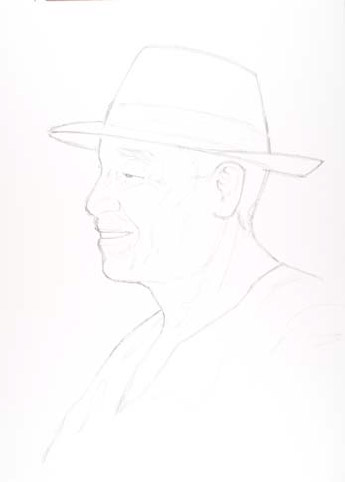
With a 2B pencil, draw the image directly onto the painting surface, following the mini demonstration. Include lines indicating features and shadow transitions.
Another method is to draw the image on a separate piece of paper, then copy it to the size you want. After that, transfer the image onto the painting surface using graphite paper.
With either method, spray with fixative to prevent the paint from smearing the graphite.
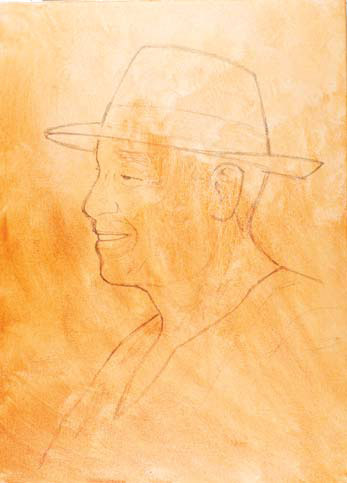
Use a rag to smear Burnt Sienna diluted with water over the painting surface. The ground should be transparent so that the pencil lines remain visible.
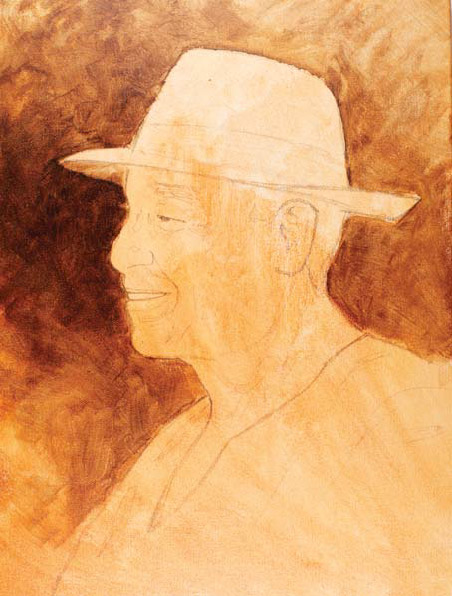
Using a no. 8 flat, add the values of the background with washes of Burnt Umber thinned with thinner or water. The background should be darkest on the left side to create contrast and emphasis on the face.
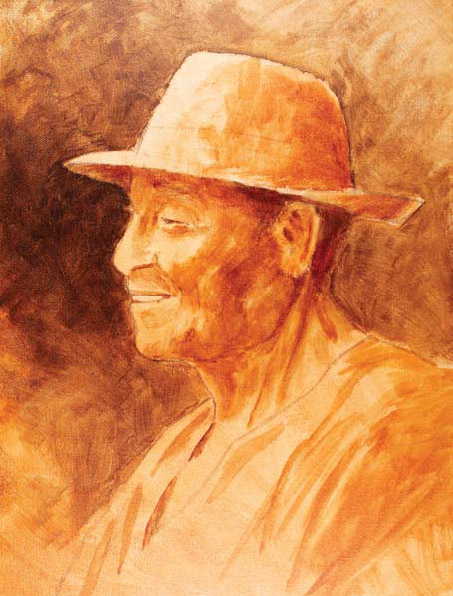
Add values with washes of Burnt Umber to the face and clothes with a no. 8 flat. Use the tip for more detailed areas. Pull up excess paint with a dry no. 4 flat or wipe it away with a rag. The light source is in the upper left, so the left side of the subject will be lighter than the right.
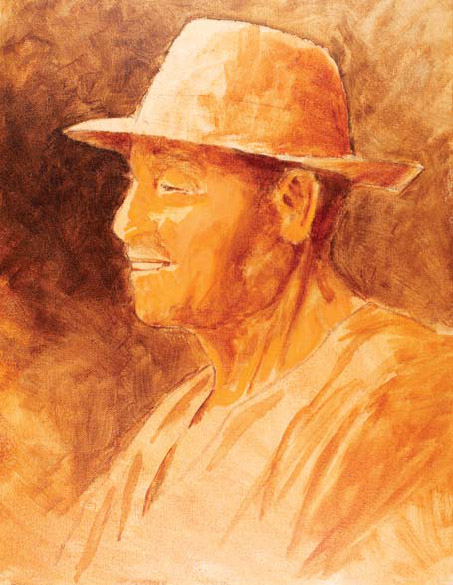
Use a no. 8 flat and mixtures of Titanium White, Cadmium Yellow Hue, Cadmium Red Hue, Permanent Rose and Burnt Sienna to paint over the lighter areas of the face. Use paint that is thicker than the wash, but just thick enough to cover the previously applied paint.
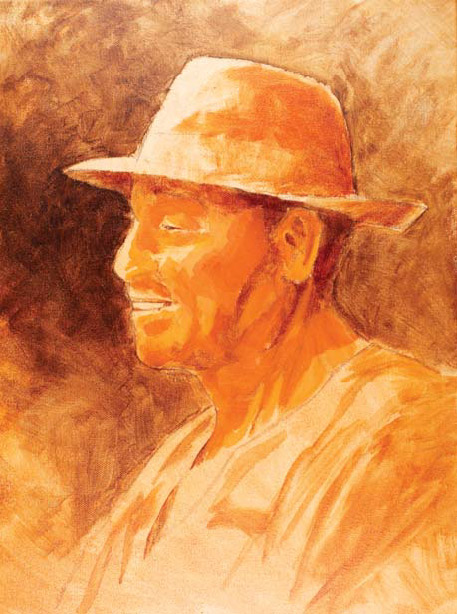
Add more Burnt Sienna to darken the color mixtures from Step 5, then paint the hat and more of the face.
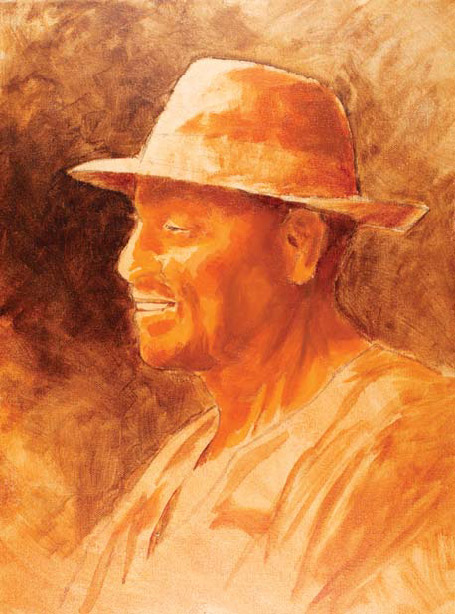
Add more Burnt Sienna and some Cerulean Blue to the color mixtures from the previous steps and apply to the face and hat. The blue addition creates the cool color for the shadows.
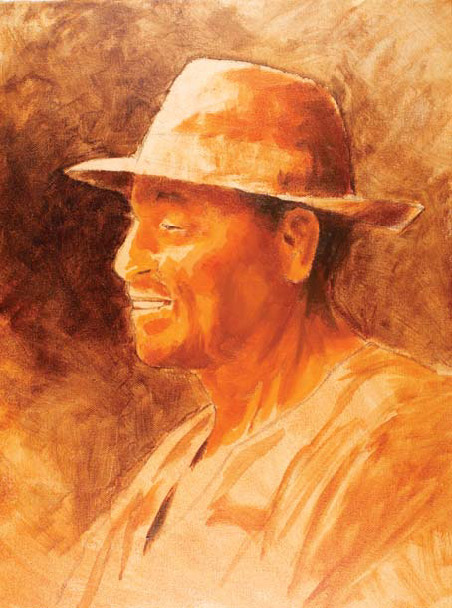
Add more Burnt Sienna and Phthalo Blue (Red Shade) to make the color mixtures even darker. For the most part, blend the paints together as you place them on the canvas.
Take a minute to look in the mirror at your own flesh coloring. There are subtle differences of color in your face. Now look at your friend's facial coloring. When painting portraits, it is both fun and a challenge to mix the right colors. Take a few minutes to practice mixing flesh tones on a scrap of heavy paper or canvas.
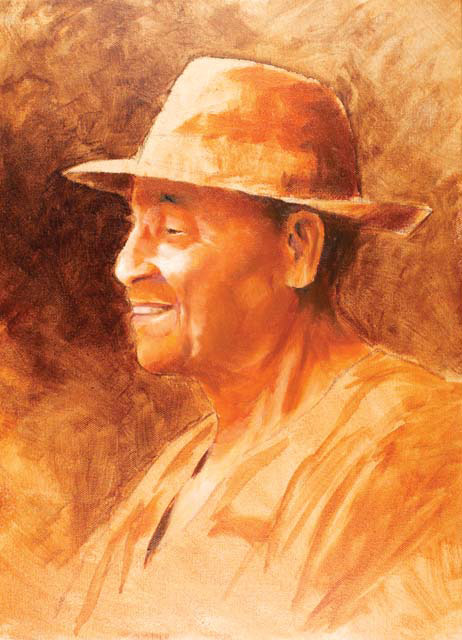
Using a no. 4 flat, add lighter areas of Titanium White and Yellow Ochre to the subject, including the hat. Blend the wet paint, smoothing out the form.
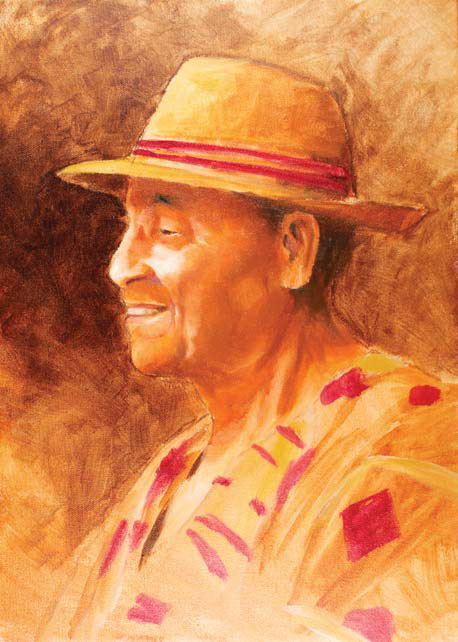
Using a no. 8 flat, apply Titanium White and Yellow Ochre. Use Magenta for the reddish areas. Paint the hat and shirt looser and with less detail to draw the focus to the more detailed face.
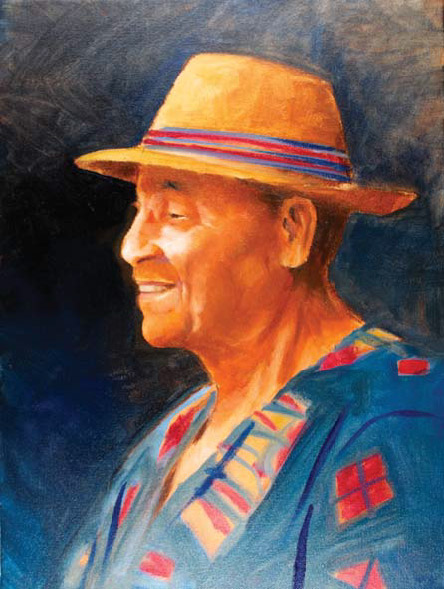
Using a no. 8 flat, apply Phthalo Blue (Red Shade), Yellow Ochre and Titanium White to the shirt and background.
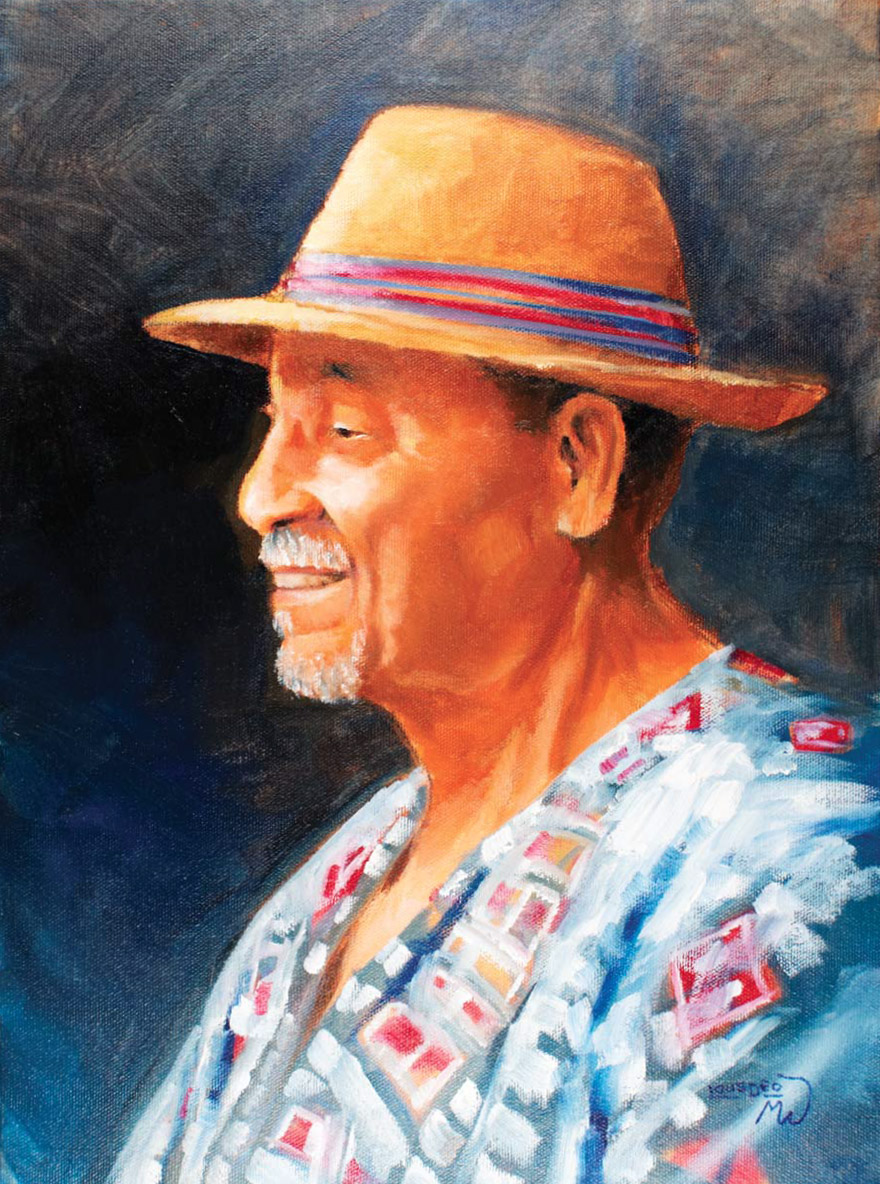
oil on stretched canvas
16" × 12" (41cm × 30cm)
Add and adjust the final lights, darks and details, including the hat, mustache, whiskers and shirt. Use nos. 4 and 8 flats and a no. 2 round for the details. Let the painting dry, then sign and date it with a no. 4 rigger.
Try using a mahlstick to steady your hand while painting the details of this portrait.
Accurate proportions are essential to drawing and painting profiles. With subtle variations, this method can be used to draw almost any adult.
drawing pad or sketchbook
2B pencil, kneaded eraser

Draw the basic profile shape slightly curved on the left side, then more curved on the top and right, then less curved at the bottom. A horizontal line halfway from the top and bottom indicates where the eye will be placed.

Add a horizontal line for the nose, placing it less than halfway down from the eye line to the chin. Add a line for the mouth, somewhat below the nose line.
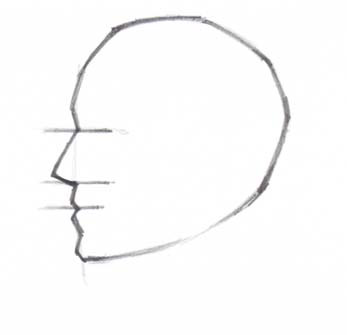
Draw the form of the profile: go in at the eye line, out for the shape of the nose and again in for the mouth.
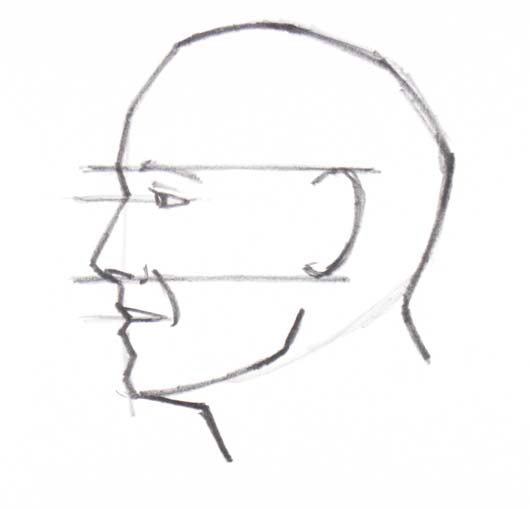
Add the individual features including the eye, nostril and mouth. The ear lines up with the eyebrow and base of the nose. The jaw is defined along with the neck. Finally, add hair and costume features.
This demonstration captures the essence of childlike innocence. The warm colors in the foreground combined with the cool colors in the background emphasize depth.
14" × 11" (36cm × 28cm) stretched canvas
Burnt Sienna, Cadmium Yellow Medium, Cerulean Blue, Dioxazine Purple, Permanent Rose, Sap Green, Titanium White, Yellow Ochre
no. 8 or 1⁄2-inch (12mm) flat
no. 2 or 1⁄4-inch (6mm) filbert
no. 4 or 5⁄16-inch (8mm) filbert
no. 2 round
no. 4 round
no. 4 rigger
palette, brush wash with water, palette knife, rags or paper towels, easel, 2B or charcoal pencil, kneaded eraser, spray fixative
thinner, medium, palette cups, mahlstick, smock or apron

Draw the basic shape of the head and shoulders using a 2B pencil. A line for the center of the face indicates the tilt of the head.

Add linework for the arms and neck. Draw circles for the hands.

Add lines for the placement of the facial features, hair and fingers.
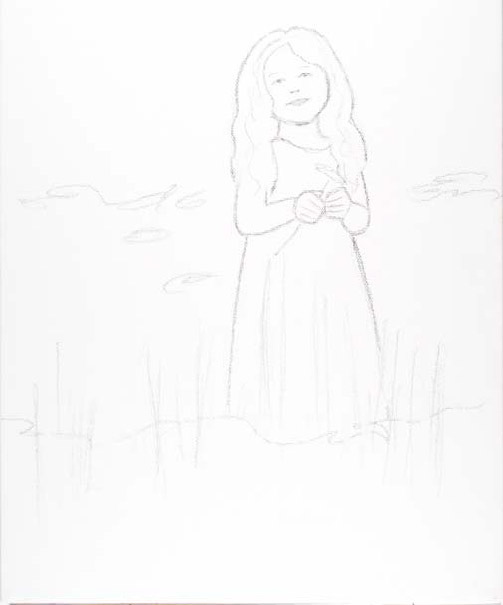
Add overall details including the face, hair, dress and flowers. Erase unwanted lines. Spray with fixative.
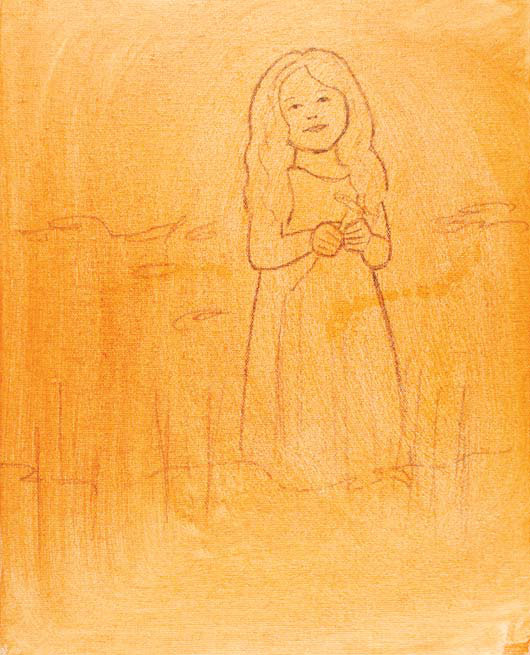
For the ground, use a rag to smear Burnt Sienna diluted with water over the painting surface. The ground should be applied thinly enough to allow the pencil lines to remain visible.
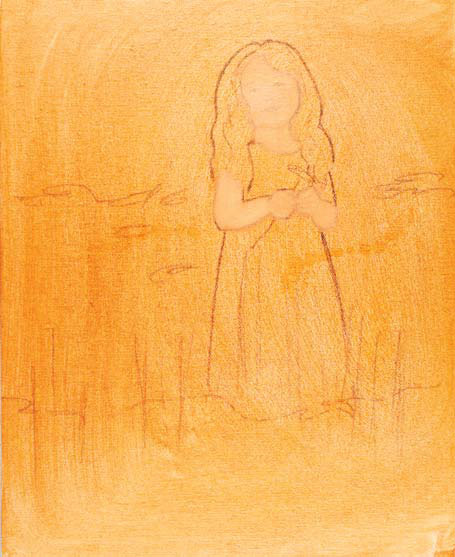
Using a mix of Cadmium Yellow Medium, Permanent Rose and Titanium White and a no. 4 filbert, paint over the face, neck, arms and hands. The paint thickness should allow the pencil lines to show through slightly.
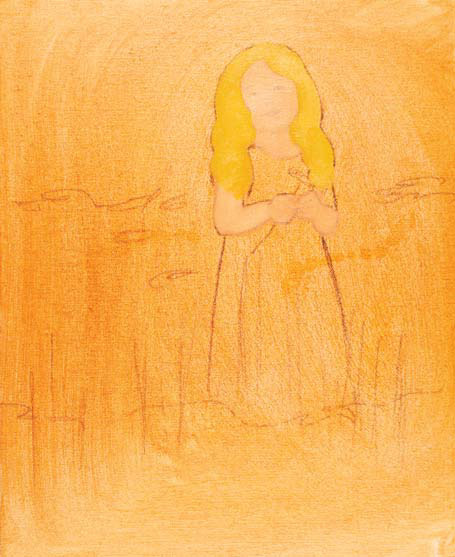
Using a mix of Titanium White, Burnt Sienna, Yellow Ochre and Cadmium Yellow Medium, paint the hair with a no. 4 filbert.
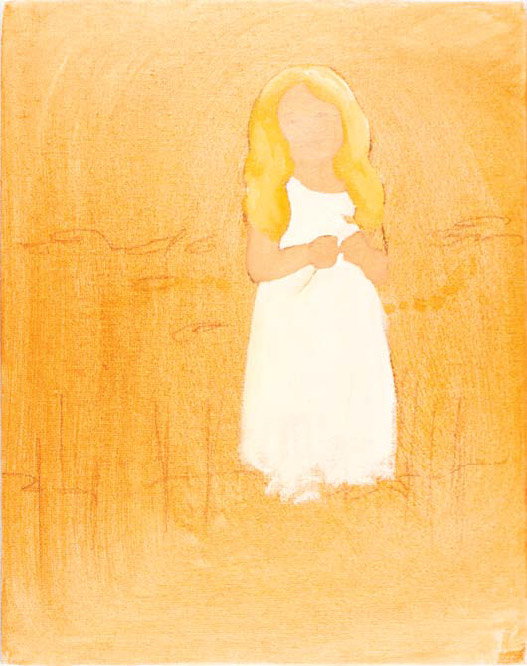
With a mix of Titanium White and Cadmium Yellow Medium, paint the dress using a no. 4 filbert. Use a no. 4 round or smaller brush for tight places. Some of this paint can be added to the hair.
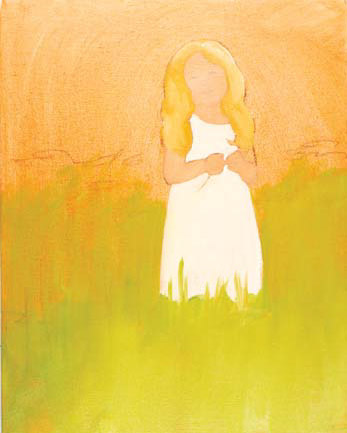
Add warm foreground greens with a no. 8 flat and a mix of Sap Green, Cadmium Yellow Medium, Titanium White and Permanent Rose.
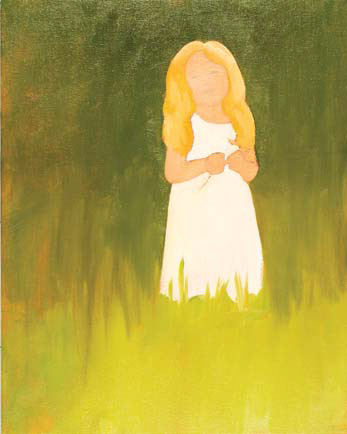
Add cool background greens with a no. 8 flat and a mix of Sap Green, Cerulean Blue, Yellow Ochre, Dioxazine Purple and Titanium White.
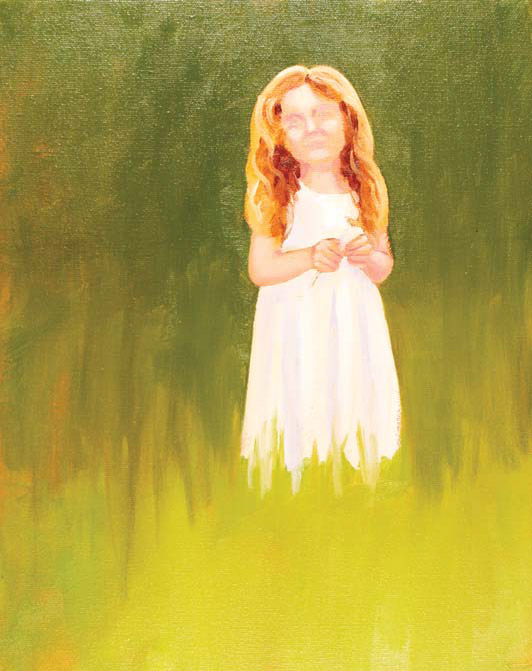
Add darks to the skin with a mix of Permanent Rose, Cadmium Yellow Medium and Titanium White, using a no. 2 filbert and a no. 4 round for details.
Add darks to the hair with a mix of Burnt Sienna and Yellow Ochre using a no. 2 filbert and a no. 4 round for details.
Add subtle darks to the dress with a mix of Titanium White and Dioxazine Purple, using a no. 2 filbert and a no. 4 round for details.
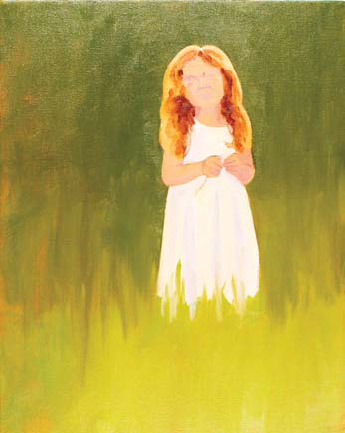
Add warm lights to the skin, hair and dress with a mix of Titanium White and Cadmium Yellow Medium, using a no. 2 filbert and a no. 4 round for details.
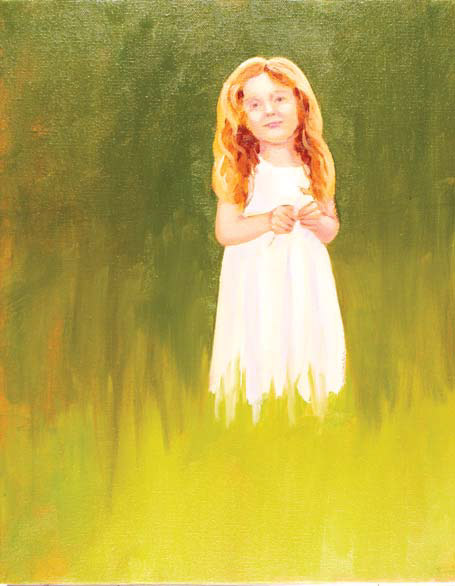
With a mix of Permanent Rose, Cadmium Yellow Medium, Titanium White and Cerulean Blue, paint the details of the face and hands using nos. 2 and 4 rounds. Avoid overworking these areas. For the following steps, you may let the paint dry between steps, painting wet-into-dry instead of wet-into-wet. If you do, add a bit of medium to the paint.
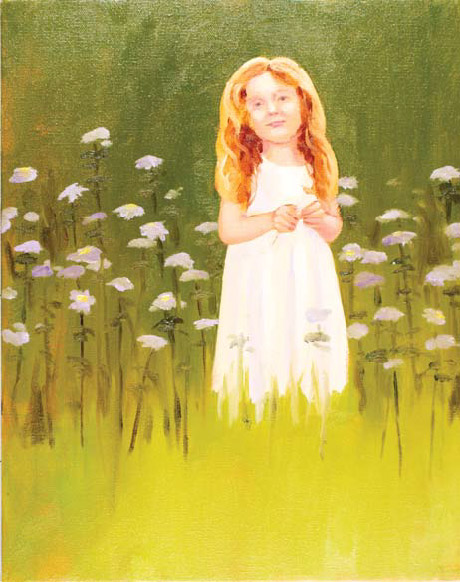
Paint the flower petals with a mix of Titanium White and Dioxazine Purple using a no. 4 filbert. Add the centers with a mix of Cadmium Yellow Medium and Titanium White using a no. 2 filbert. Paint stems and leaves with a mix of Sap Green, Cerulean Blue and Dioxazine Purple, using nos. 2 and 4 filberts.
Consider using the mahlstick when working with this portrait. It will help keep your hand steady.
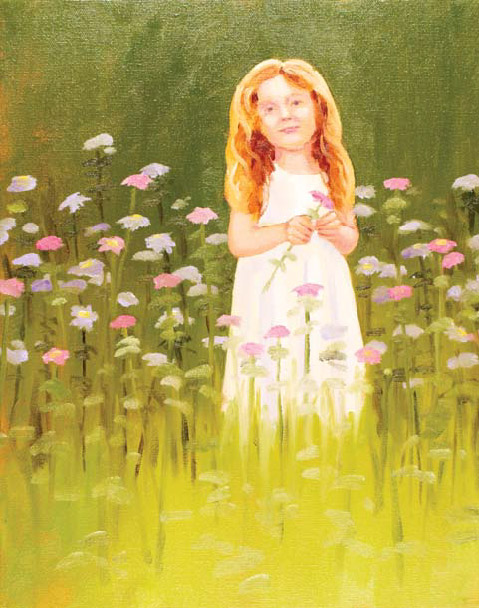
Paint the flower petals with a mix of Permanent Rose and Titanium White using a no. 4 filbert. Add the centers with a mix of Cadmium Yellow Medium and Titanium White using a no. 2 filbert. Paint the stems and leaves with a mix of Sap Green, Cadmium Yellow Medium and Titanium White, using nos. 2 and 4 filberts.
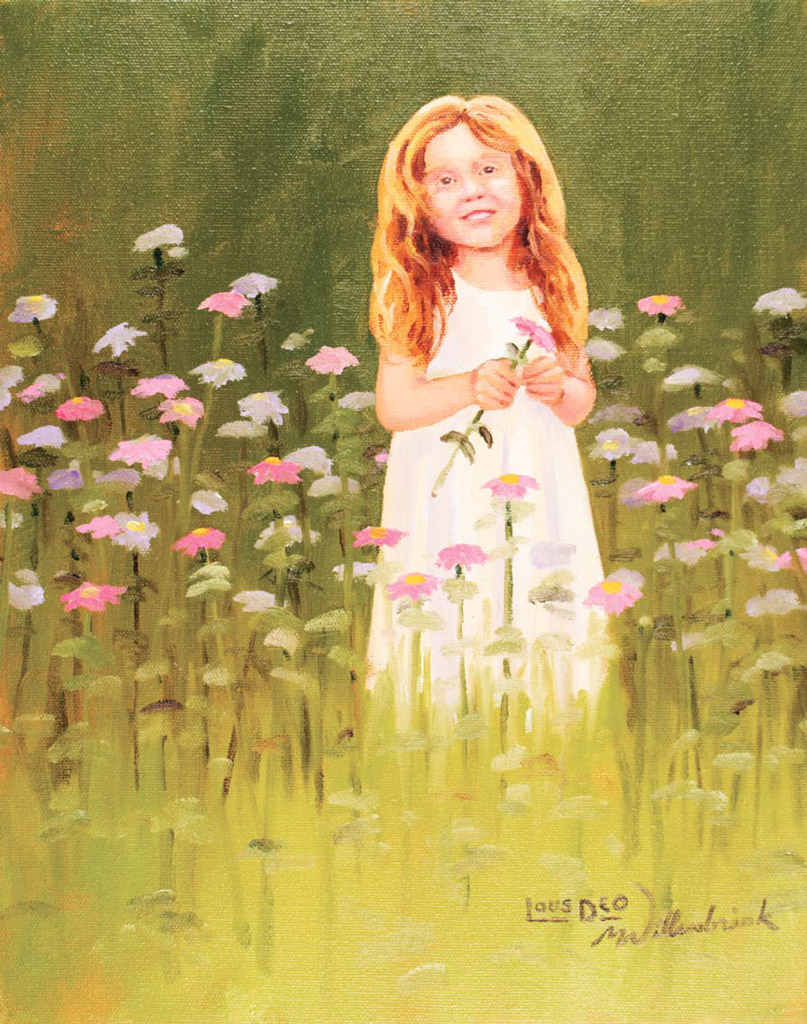
oil on stretched canvas
14" × 11" (36cm × 28cm)
Add and adjust final lights, darks and details including face, hair, flowers and foreground using a variety of brushes and colors. Let the paint dry, then sign and date it with a no. 4 rigger.
Once you have completed your fine art, you need to prepare your painting for display and longevity. Adding varnish and a frame may not seem important now, but, once you have completed these steps, you will see your painting in a whole new light. It will have a more finished, professional look that will make you proud of your masterpiece.
Before applying varnish, the painting surface must be free of dust and thoroughly dry. Drying requires six to twelve months or longer depending on the thickness of the paint. Store oil paintings vertically to prevent dust from collecting on them both before and after they've been varnished.
Varnish is a clear liquid available in both bottles and spray cans. Applied over oil paintings, varnish acts as a barrier from dust and grease and also provides a uniform finish to the painting surface. Some varnishes are removable, allowing for the option of cleaning the painting if it becomes dirty over time.
Varnish can be sprayed on or brushed on with the thin, even strokes of a wide brush. Whether spraying or brushing, always follow the manufacturer's recommendations and guidelines. If you brush on varnish, you'll need turpentine or mineral spirits to clean the application brush unless the varnish is water-soluble, in which case it will clean up with soap and water.
Frames should complement the art and express the general theme without distracting from the art itself. Some artists include a nameplate on the front of the frame that states the title of the art piece as well as their name. The back may be covered with a sheet of craft paper, which acts as a dust cover. Bumpers keep the frame from resting directly against a wall and allow air to circulate around the painting to prevent mold. You may want to place a sticker stating the artist's information on the back.
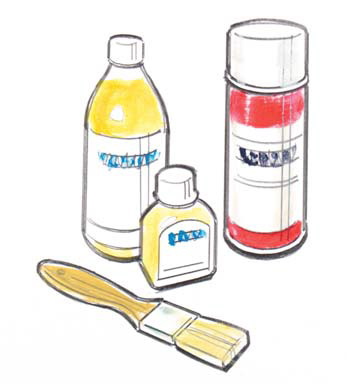
Varnish is available in bottles or spray cans. Spray cans are convenient. However, I prefer to apply water-soluble varnish with a brush because it makes cleanup easy. When using bottled varnish, designate a brush specifically for the application of the varnish so that you won't damage your good painting brushes.
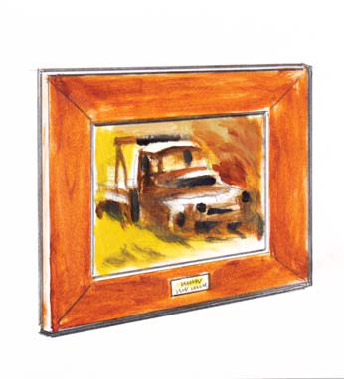
Choosing the right frame will enhance your painting's appearance and give it a more professional, finished look.
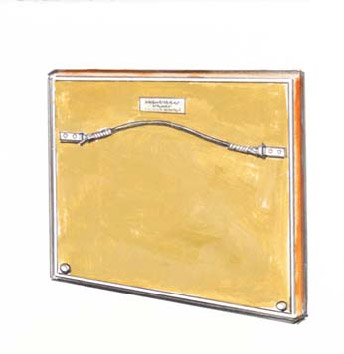
A painting that is framed well will look clean and professional, even from the back.