The Internet has come a long way since its early days in the 1960s, when it was a communications network for universities and the military. Today, that little network has morphed into an international information hub, an entertainment provider, and the world’s biggest mall. For that, we can thank the development of the World Wide Web—the visual, point-and-click face of the Internet.
Apple is obviously intrigued by the possibilities of the Internet. With each new release of Mac OS X, more clever tendrils reach out from the Mac to the world’s biggest network: Dashboard, the Wikipedia link in the Dictionary program, Web clippings, Back to My Mac, and so on.
But Apple’s most obvious Internet-friendly creation is Safari, a smartly designed window to the Web (available for Mac OS X and, believe it or not, Windows). This chapter is all about Safari; its compass icon in the Dock points the way to your Internet adventure.
If you want something done right, you have to do it yourself.
That must be what Apple was thinking when it wrote its own Web browser a few years ago, which so annoyed Microsoft that it promptly ceased all further work on the Mac version of its own Internet Explorer.
Safari is beautiful, fast, and filled with delicious features. In Snow Leopard, it’s faster than before, and badly behaving plug-ins no longer crash the whole browser; instead, the faulty plug-in just closes itself. You see an empty space on the page where that plug-in’s video or animation would have appeared, and you can reload the page if you want to try again.
Safari is not, however, Internet Explorer, and so some Web sites—a few banking sites, for example—refuse to acknowledge its existence. For these situations, you might try the Mac version of Firefox, a free browser available at www.getfirefox.com.
You probably know the drill when it comes to Web browsers. When you click an underlined link (hyperlink) or a picture button, you’re transported from one Web page to another. One page might be the home page of General Motors; another might contain critical information about a bill in Congress; another might have baby pictures posted by a parent in Omaha.
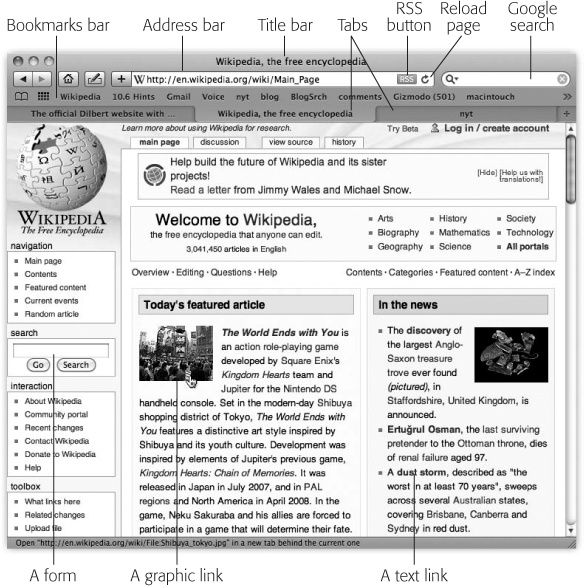
Figure 20-1. The Safari window offers tools and features that let you navigate the Web almost effortlessly. These toolbars and buttons are described in this chapter.
Tip
Text links aren’t always blue and underlined. In fact, trendy Web designers sometimes make it very difficult to tell which text is clickable and which is just text. When in doubt, move your cursor over some text; if the arrow changes to a pointing-finger cursor, you’ve found yourself a link.
Some of the other Safari tips may not be obvious:
Graphics worth saving. When you see a picture you’d like to keep, Control-click (or right-click) it and choose Save Image to Desktop (or Save Image to iPhoto, or just Save Image) from the shortcut menu. Safari stores it as a new graphics file, freed from its birthplace on the Web. (You can specify where Safari saves downloaded pictures on the Safari→Preferences→General tab. In that case, the shortcut menu’s wording changes to say, for example, “Save Image to ‘Pictures.’”)
Scroll bars. Instead of using the scroll bar to move up and down the page, it’s often easier to press the space bar each time you want to see more. Press Shift-space to scroll up. (The space bar serves its traditional, space-making function only when the insertion point is blinking in a text box or the address bar.)
You can also press your ↑ and ↓ keys to scroll one line at a time. Page Up and Page Down scroll in full-screen increments, while Home and End whisk you to the top or bottom of the current Web page. And if your mouse has a scroll wheel, it works, too. (Hold Shift while you’re rolling the wheel to scroll horizontally.)
On a laptop, drag with two fingers to scroll, as usual.
Many of Safari’s most useful controls come parked on toolbars and buttons that you can summon or hide by choosing their names from the View menu. Here’s what they do:
When you type a new Web page address (URL) into this strip and press Return, the corresponding Web site appears.
Note
If only an error message results, then you may have mistyped the address, or the Web page may have been moved or dismantled—a relatively frequent occurrence in today’s rapidly-changing Web.
Similarly, you’ll see an error message if Safari can’t connect to the Internet at all. (This error message is a masterpiece of clarity: “You are not connected to the Internet.”)
In that case, click Network Diagnostics to see if Mac OS X can track down the source of your connection trouble. Once you get back online, Safari automatically loads any pages you’ve been waiting to read.
Because typing out Internet addresses is so central to the Internet experience and such a typo-prone hassle, the address bar is rich with features that minimize keystrokes. For example:
You don’t have to click the address bar before typing; just press ⌘-L.
You can highlight the entire address (so it’s ready to be typed over with a new one) by clicking the very upper or lower edge of the address bar text box. Alternatively, you can click the small icon just to the left of the current address, or triple-click the address bar, or press ⌘-L.
You don’t have to type out the whole Internet address. You can omit the http://,www, and .com portions; Safari fills in those standard address bits for you. To visit NYTimes.com, for example, a speed freak might press ⌘-L to highlight the address bar, type nytimes, and then press Return.
Tip
You’re Web surfing, and you suddenly need to look up an appointment in iCal. What do you do?
The power user opens other programs right from within Safari by typing ical:// in the address bar—or ichat://, addressbook://, or sherlock://—and then pressing Return. (Unfortunately, Apple programs are generally the only ones that work with this URL-launching trick.)
You can also type mailto: to open a new outgoing email message in your default email program, or mailto:steve@apple.com to pre-address that outgoing message to Steve Jobs. (Of course, remember to replace that email address with that of someone you’d actually like to contact.)
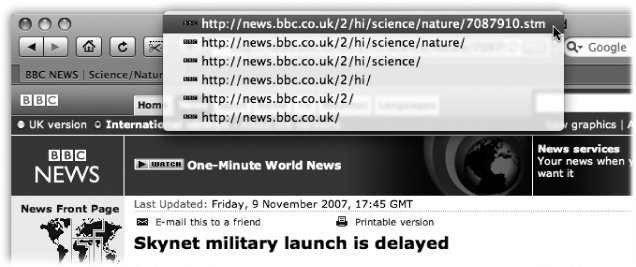
When you begin to type into the address bar, the AutoComplete feature compares what you’re typing against a list of Web sites that you’ve recently visited or that you’ve saved as bookmarks. Safari displays a drop-down list of Web addresses that seem to match what you’re typing. To spare yourself the tedium of typing out the whole thing, click the correct complete address with your mouse, or use the ↓ key to reach the desired listing and then press Return. The complete address you select pops into the address bar.
Tip
You might wonder why the View menu even offers you the chance to hide the address bar. If it were hidden, how could you use the Web?
Simple: Even with this bar hidden, you can briefly summon it by pressing ⌘-L. Type the address you want and then press Return to make the bar disappear again. That’s good news for people with small screens—and for Mac trivia collectors.
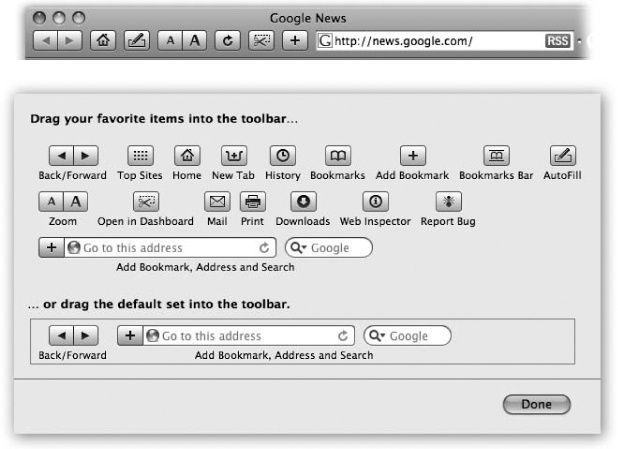
You can summon or dismiss a number of individual buttons on the address bar, in effect customizing it (Figure 20-2). It’s worth putting some thought into this tailoring, because some of these buttons’ functions are really handy. So here’s a catalog of your options:
Back/Forward. Click the Back button (
 ) to revisit the page you were just on. Keyboard shortcut: Delete, or ⌘-←.
Figure 20-2. To summon this toolbar-tailoring screen, choose View→Customize Toolbar. Then drag the buttons you want directly onto the address bar. Some of them lack text labels once installed, but all offer tooltip labels you can read by pointing to the button without clicking.
Once you’ve clicked
, you can then click the  button (or press ⌘-→ to return to the page you were on before you clicked the Back button. Click and hold the button for a drop-down list of all the Web pages you’ve visited during this online session.
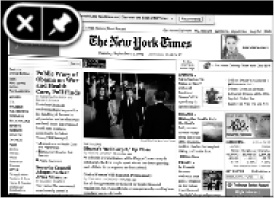
That pop-up menu lists the sites by name, as in “The New York Times—Breaking News, World News & Multimedia.” To view the actual addresses instead, Option-click (and hold the mouse down on) the Back or Forward button.
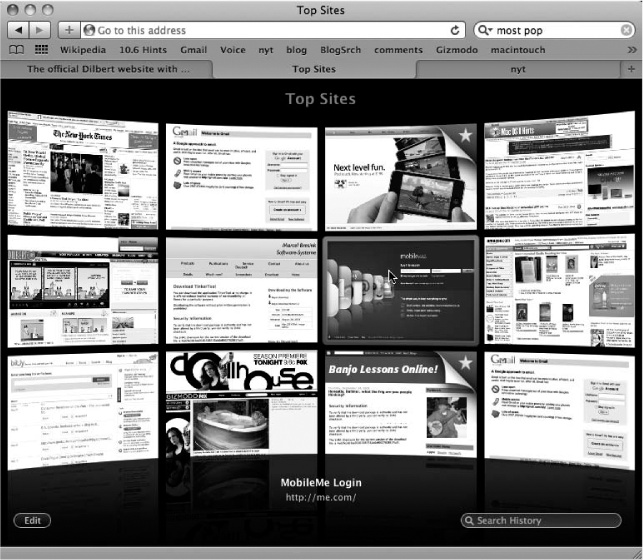
Top Sites. This new Safari 4 feature opens up the highly visual dashboard shown in Figure 20-3. These thumbnails represent what Safari has determined are your favorite Web sites, as calculated by how often and how recently you’ve visited them.
Home. Click to bring up the Web page you’ve designated as your home page (in Safari→Preferences→General tab).
New Tab. Creates a new tab (embedded window), described later in this chapter.
History. Click to open the list of Web sites you’ve visited recently in a window—a much easier-to-navigate display than the History menu.
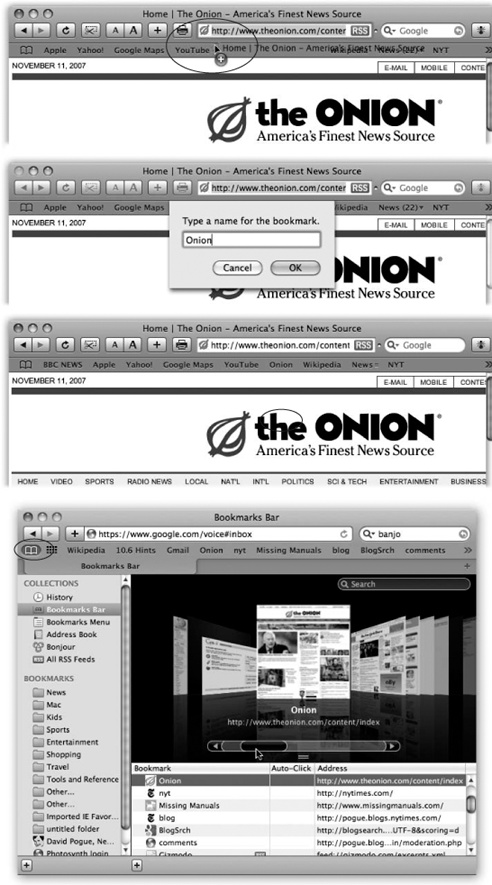
Bookmarks, Add Bookmark. When you find a Web page you might like to visit again, click Add Bookmark. You can also press ⌘-D, choose Bookmarks→Add Bookmark, or drag the tiny icon from the address bar directly onto your Bookmarks bar.
As shown in Figure 20-4, Safari offers to add this Web page’s name (or a shorter name that you specify for it) either to the Bookmarks menu or to the Bookmarks bar (described below). The next time you want to visit that page, just select its name in whichever location you chose.
Tip
Press Shift-⌘-D to add the bookmark to the menu instantly—no questions asked, no dialog box presented.
The
 (Bookmarks) button opens the Bookmarks editing window (Figure 20-4). Here you can rearrange the names in your Bookmarks menu easily, or peruse them by scrolling through their giant Cover Flow thumbnails—a great feature in a Web browser, because a visual representation of a page is a lot more helpful than some Web address.
(Even without the
button, you can get there by choosing Bookmarks→Show All Bookmarks or by pressing Option-⌘-B.)POWER USERS’ CLINIC: Customizing Top Sites
Ordinarily, the Top Sites display changes over time, as your tastes and your activity change. But you can override Safari’s attempt to curate this page in various ways. For example, you can pin a certain site so that it never leaves the Top Sites screen, or you can manually add a page.
It all happens when you click the Edit button in the lower left. Each thumbnail sprouts two buttons in the corner: the X button (this page will never again appear on Top Sites) and the thumbtack button (this page will always appear in Top Sites, even if you don’t visit it much).
To add a new page to the Top Sites display, first open that page in another Safari window. Then highlight its address in the address bar and drag it right onto the Top Sites page. You can also drag a Web link from an email message, text document, Web page, or any other source to the Top Sites page.
You can reorder the thumbnails, too, just by dragging them around on this screen.
Finally, you can change the thumb-nail size on this Edit screen, too. Use the Small/Medium/ Large control in the lower right; smaller thumbnails means more of them fit (24, 12, or six, respectively).
In the resulting organization window, drag the bookmarks up and down. Figure 20-4 also shows you how to perform more dramatic management tasks, like editing, renaming, or deleting bookmarks.
Figure 20-4. Top: Once you’ve got a juicy Web page on the screen, you can drag its tiny page-logo icon (as circled) from the address bar directly onto the Bookmarks bar or menu. Second from top: Safari realizes that you may prefer a shorter name to appear on the space-limited bar, so it offers you the chance to type in a label you prefer. Third from top: When you click OK, the new button appears on the bar, as shown here. (You can also drag any link to the bar, such as a blue underlined phrase from a Web page, or even an icon from your desktop!) To remove a button, drag it off the bar; to rearrange the icons, just drag them. Bottom: Click the
(circled) to open the Organize Bookmarks window. Here, you can drag names up or down to rearrange the list, or drag them into a “folder” that becomes a submenu in the Bookmarks menu. (Create a submenu by clicking the  button below the list.) You can edit a bookmark by clicking once on its name or URL, or delete one by pressing Delete.
Bookmarks Bar. Hides or shows the horizontal toolbar that lists your favorite bookmarks. (The equivalent of choosing View→Bookmarks Bar).
AutoFill. Click this button to make Safari fill in Web order forms with your name, address, and other information. See the box on Let AutoFill Do the Typing.
Text Size. You can adjust the point size of a Web page’s text using these buttons. When you visit a Web site designed for Windows computers—whose text often looks too small on Mac screens—you can use these buttons to bump up the size. The keyboard shortcuts are ⌘-plus or ⌘-minus.
Open in Dashboard. This icon is the key to creating Dashboard Web clips, as described on Installing a widget. Click this button, and then select the part of the page you want to widgetize. It’s the equivalent of the File→Open in Dashboard command.
Mail. Opens a new, outgoing email message in your email program. The Subject line contains the name of the site you were visiting; the body contains a link to it. You can address the message, add a comment (“Re: your comment that ‘no expert’ recommends trampolines for children”), and send it.
Stop/Reload. Click the Stop button (or Esc, or ⌘-period) to interrupt the downloading of a Web page you’ve just requested (if you’ve made a mistake, for instance).
Once a page has finished loading, the Stop button turns into a Refresh button. Click this circular arrow (or press ⌘-R) if a page doesn’t look or work quite right, or if you want to see the updated version of a Web page (such as a breaking-news site) that changes constantly. Safari redownloads the Web page and reinterprets its text and graphics.
Google Search. Here’s one of Safari’s most profoundly useful features—a Search box that automatically sends your search request to Google.com, the world’s most popular Web search page. Press Option-⌘-F to deposit your insertion point inside this rounded text box, type something you’re looking for—phony baloney, say—and then press Return. Safari takes you directly to the Google results page.
Tip
The tiny
 at the left end of the Google bar is a pop-up menu. It offers two categories of listings, in hopes of saving you time and typing. First, there are Suggested Searches (you may notice that these pop up automatically as you type into the Search box, too). These suggestions come from Google’s own Suggest feature. The second category: your most recent searches.
Bonus Tip: If you Control-click (or right-click) a highlighted word or phrase on a Web page, you can choose Google Search from the shortcut menu to search for that text. And, even cooler, this trick works in all Cocoa programs—not just Safari.
Print. You can add a printer icon to Safari for point-and-click paper action if you don’t want to bother with ⌘-P.
Downloads. This button opens your Downloads window, which shows the progress of whatever file you’re downloading, shows your history of recent downloads, and contains double-clickable icons of the downloads that let you jump right to them on the hard drive.
Report Bug. Ladies and gentlemen, this is Apple at its most humble. This insect-shaped button opens a tiny “Dear Apple” box, where you can tell Apple about a Safari feature or Web page that doesn’t work. If you click Options, you can even send Apple a screen illustration of, for example, a screwy Web-page layout that Safari delivered.
The Bookmarks menu is one way to maintain a list of Web sites you visit frequently. But opening a Web page from that menu requires two mouse clicks—an exorbitant expenditure of energy. The Bookmarks bar (View→Bookmarks Bar), on the other hand, lets you summon a few very favorite Web pages with only one click.
Tip
If you have a bunch of bookmarks stored in another Web browser, use that browser’s export feature to save them to a file, and then use Safari’s File→Import Bookmarks command to save you the time of re-entering the bookmarks by hand.
Figure 20-4 illustrates how to add buttons to, and remove them from, this toolbar.
Tip
As shown in Figure 20-4, you can drag a link from a Web page onto your Bookmarks bar. But you can also drag a link directly to the desktop, where it turns into an Internet location file. Thereafter, to launch your browser and visit the associated Web page whenever you like, just double-click this icon.
Better yet, stash a few of these icons in your Dock or Sidebar for even easier access.
The Status bar at the bottom of the window tells you what Safari is doing (such as “Opening page…” or “Done”). When you point to a link without clicking, the Status bar also tells you which URL will open if you click it. For those two reasons, it’s a very useful strip, but it doesn’t appear when you first run Safari. You have to summon it by choosing View→Show Status Bar.
Safari is filled with shortcuts and tricks for better speed and more pleasant surfing. For example:
The little orange SnapBack button ( ), which sometimes appears at the right end of the address bar or Google search bar, takes you instantly back to the Web page whose address you last typed (or whose bookmark you last clicked), or to your first Google results page.
The point here is that, after burrowing from one link to another in pursuit of some Google result or Amazon listing, you can return to your starting point without having to mash the Back button over and over again. (The SnapBack button doesn’t appear until you’ve actually clicked away from the first page you visited.)
Note
Snow Leopard Spots: What happened? Apple was so excited when it invented SnapBack—but in Safari 4, SnapBack has been snapped back a bit. There’s no longer a keyboard shortcut to snap back, no longer a way to mark any random page as your “SnapBack” page.
Still, you can always hit the Delete key (or ⌘-←) to go back a page, or Shift-Delete (⌘-→) to go forward. Those should ease the sting a bit.
The world’s smarmiest advertisers inundate us with pop-up and pop-under ads—nasty little windows that appear in front of the browser window or, worse, behind it, waiting to jump out the moment you close your current window. They’re often deceptive, masquerading as error messages or dialog boxes, and they’ll do absolutely anything to get you to click inside them.
If this kind of thing is driving you crazy, choose Safari→Block Pop-Up Windows, so that a checkmark appears next to the command. It’s a war out there—but at least you now have some ammunition.
Note
This feature doesn’t squelch small windows that pop up when you click a link—only windows that appear unbidden.
Even unbidden windows, however, are sometimes legitimate (and not ads)—notices of new banking features, warnings that the instructions to use a site have changed, and so on. Safari can’t tell these from ads and stifles them, too. So if a site you trust says, “Please turn off pop-up blockers and reload this page,” then you know you’re probably missing out on a useful pop-up message.
And one more thing: These days, the evildoers of the Internet have begun to create pop-up windows using nonstandard programming code that Safari and other browsers can’t do anything about. Fortunately, they’re still fairly rare.
If it seems as though a lot of Web sites are designed with type that’s too small to read; it’s not just you and your aging eyes. Macs and Windows come with different screen resolutions, so a site designed for one kind of computer may look too small on another.
Fortunately, Safari is extremely well equipped to help you with this problem. In fact, it offers three different solutions:
Enlarge the screen. Press ⌘-plus or ⌘-minus to enlarge or reduce the entire Web page. Or use the two-finger “spread” gesture on your laptop trackpad. Or use the Zoom button, if you’ve added it to your toolbar. The advantage of this method is that the whole Web page’s layout remains proportional.
Blow up just the text. If you turn on View→Zoom Text Only, then all those shortcuts serve to magnify or shrink only the text on your page. Graphics remain at their original size. You’re now distorting the original layout, but you’re maximizing the amount of reading you can do before you have to scroll.
Specify a minimum type size. This may be the best option of all, because it saves you all that zooming. Open Safari→Preferences→Advanced, and set the “Never use font sizes smaller than” option to, for example, 14 points. Now every Web page shows up with legible text. (Except a few oddballs that use weird coding to prevent text-size changing.)
Efficiency freaks generally prefer keyboard shortcuts to using the mouse, so Safari is filled with them.
Press Tab to jump from one text box or pop-up menu to the next on your Web page. Add the Option key to jump from one link to another (and when you highlight a link, press Return to “click” it).
Sooner or later, you’ll run into a Web site that doesn’t work in Safari. Why? When you arrive at a Web site, your browser identifies itself. That’s because many commercial Web sites display a different version of the page depending on the browser you’re using, thanks to differences in the way various browsers interpret Web layouts.
But because you’re one of the minority oddballs using Safari, your otherwise beloved Web site tells you: “Sorry, browser not supported.” (Will this problem change now that Apple has released a Windows version of Safari? We can only hope.)
In such times of trouble, you can make Safari impersonate any other browser, which is often good enough to fool the picky Web site into letting you in.
The key to this trick is Safari’s Develop menu, which is generally hidden. You can make it appear by choosing Safari→Preferences→Advanced tab. Turn on “Show Develop menu in menu bar.”
The new Develop menu appears right next to Bookmarks. Most of its commands are designed to appeal to programmers, but the submenu you want—User Agent—is useful to everyone. It lets Safari masquerade as a different browser. Choose User Agent→Internet Explorer 7.0, for example, to assume the identity of a popular Windows browser.
Tip
If you’re into Web-page coding or design, you should know that Safari’s Develop menu also houses the Web Inspector. Control-click (or right-click) any part of a Web page—image, text, link—and choose Inspect Element from the shortcut menu.
The Web Inspector highlights the element you clicked and opens a window so you can see every little bit of HTML coding that went into putting that item on the page. You also see the style sheets, images, and other files displayed in the Inspector’s window—making it really easy to see (and learn) how the page was made.
Graphics are part of what makes the Web so compelling. But they’re also responsible for making Web pages take so long to arrive on the screen. Without them, Web pages appear almost instantaneously—and you still get fully laid-out Web pages with all their text and headlines.
To turn off graphics, choose Safari→Preferences→Appearance tab. Turn off “Display images when the page opens,” and close the Preferences window. Now try visiting a few Web pages and enjoy the substantial speed boost. (If you wind up on a Web page that’s nothing without its pictures, then return to Safari→Preferences, turn the same checkbox on, and then reload the page.)
As you dig your way down into a Web site, you may wish you had left a trail of bread crumbs to mark your path. Ah, but Safari has already thought of that. See Figure 20-5.
You don’t have to be connected to the Net to read a favorite Web page. You can save it on your hard drive so you can peruse it later—on your laptop during your commute, for example—just by choosing File→Save As.
To save the entire page, along with all its images, movies, and so on, choose Web Archive from the Format pop-up menu. (Choose Page Source only if you intend to edit the raw HTML Web documents and then repost them, or if you just want to study the underlying code.)
As a handy bonus, in Snow Leopard, Quick Look now recognizes Safari sites you save in this way.
Tip
When you buy something online, don’t waste paper by printing out the final “This is your receipt” page. Instead, choose File→Print and, from the PDF pop-up button, choose Save PDF to Web Receipts folder. Safari saves it as a PDF file into a tidy folder (in your Home→Documents folder) called Web Receipts. Nice touch!
If the customer-service comment form on that corporate Web site doesn’t give you enough room to rant properly, you can resize the text box right on the page—a very welcome feature in Snow Leopard. Figure 20-6 tells all.

Figure 20-6. This trick works on a Web page’s text fields—comment boxes, forms to send a letter to the mayor, and so on. You can resize such boxes by dragging the three diagonal ribbed lines in the lower-right corner of the text field. The rest of the page adjusts itself to the new text-box size, and you have room to say what you need to say.
Safari provides two ways of telling a friend about the page you’re looking at. You might find that useful when you come across a particularly interesting news story, op-ed piece, or burrito recipe.
The send-the-whole-page method. While looking at a page, choose File→Mail Contents of This Page (⌘-I) to open a new Mail message with a copy of the actual Web page in the body. Address the message and click Send.
The send-a-link method. To send just a link to the page you’re looking at, choose File→Mail Link to This Page (Shift-⌘-I). Then proceed as usual, addressing the message and clicking Send.
Links take only a split second for your recipient to download, and they’re guaranteed to display properly in all email programs. All your recipients have to do is click the link to open it in their Web browsers.
What’s the first thing you see when you open Safari? Is it the Apple news Web site? Is it the Top Sites display (Figure 20-3)?
Actually, that’s up to you.
Choose Safari→Preferences→General tab. Here, the “New windows open with” popup menu offers choices like these:
Top Sites. The thumbnail view of your favorites sites makes a great starting point.
Home Page. If you choose this option, then Safari will open up with whatever page you’ve specified in the “Home page” box. Google—or its news page, http://news.google.com—is a good starting place. So is your favorite newspaper home page, or www.macsurfer.com, a summary of the day’s Mac news coverage around the world, or maybe www.dilbert.com for today’s Dilbert cartoon.
If you’re already on the page you like, just click Set to Current Page.
Empty Page. Some people prefer this setup, which makes Safari load very quickly when you first open it. Once this empty window opens, then you can tell the browser where you want to go today.
Bookmarks. Whenever you open a new window or launch Safari, you see your full list of bookmarks. You can then choose exactly which page you want to open.
Tabs for Bookmarks Bar. This intriguing new option creates a row of tabs in a single window—one for every icon on your Bookmarks bar. The idea, of course, is to have not just one favorite Web page waiting for you in the morning, but all the ones you visit frequently, pre-loaded and ready to go.
Choose Bookmarks folder. This option is similar to “Tabs for Bookmarks Bar,” except that it starts you off with tabs for any random bunch of Web sites—not just the ones on your Bookmarks bar. The trick is to build a folder full of bookmarks (Figure 20-4), and choose that as the basis for your auto-opening tabs.
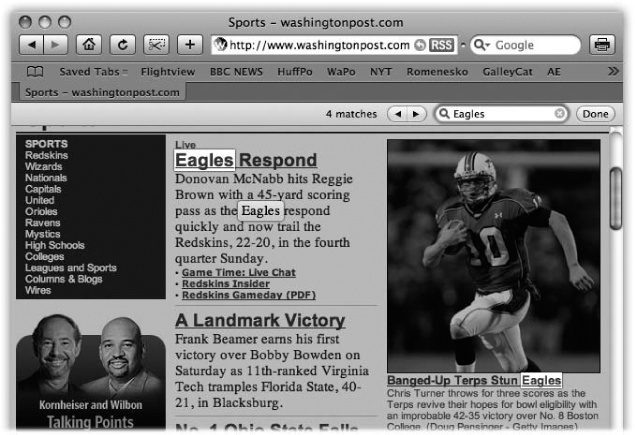
The Google search bar can help you find Web sites that match your keywords. But some pages are so long, dense, or poorly designed that finding the words on the page needs a whole ’nother search engine. Fortunately, Safari’s search-within-the-page function shines a light on the words or phrase you’re seeking.
To use it, press ⌘-F and then type your search word into the Find box (Figure 20-7). As Safari locates the word or words, it displays them within a bright yellow box and dims the background of the rest of the page. The Find bar also tells you how many times the word or phrase occurs on the page; you can jump to each instance. Click the  to start over with new search terms, or click Done to close the Find bar and return to your normal browsing activity.
The History menu lists the Web sites you’ve visited in the past week or so, neatly organized into subfolders like “Earlier Today” and “Yesterday.” (A similar menu appears when you click and hold on the Back or Forward button.) These are great features if you can’t recall the URL for a Web site you remember having visited recently.
Tip
See Safari’s Help menu? It features a Search box that lets you search all the menu commands in Safari—including Safari’s History menu. That’s just a crazy powerful feature. It means you can re-find a site without having to hunt through all the History submenus manually; just search for a word you remember in the title.
You can also view your History in a more expansive view—in Cover Flow view, in fact—by clicking the at the left end of your toolbar. You enter the Bookmarks-management view, described in Figure 20-4.
PDF files are all over the Web as, among other things, forms to download, online brochures, and scanned book pages. But they aren’t always especially readable in a browser window.
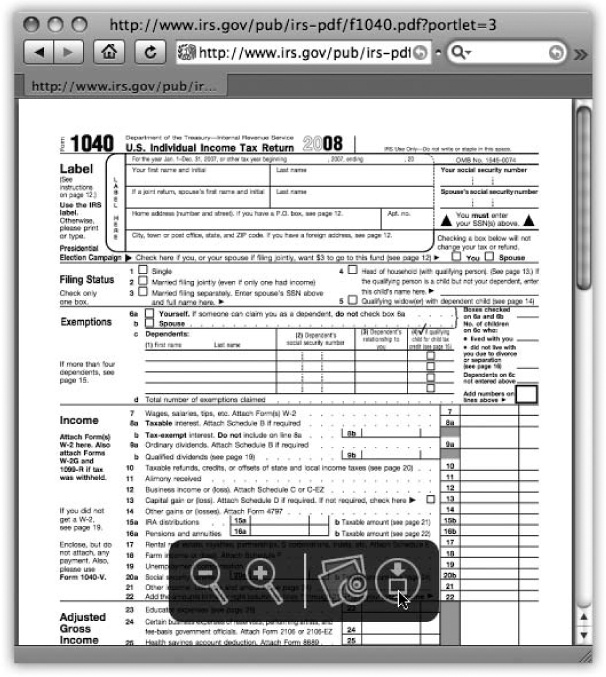
Figure 20-8. If you’re having trouble reading the tiny type in a PDF, hover your mouse at the bottom of it to invoke Safari’s PDF toolbar. You can zoom out, zoom in, open the file in the Mac’s Preview program, or even download it from the Web site with a well-placed click.
Unless, that is, you’re using Safari. The next time you’re squinting at a PDF in the window, point to the bottom edge of the document; you’ll see a toolbar appear like the one in Figure 20-8. With these four icons, you can zoom out, zoom in, open the file in Preview, or save the PDF file itself to your Downloads folder.
Beloved by hardcore surfers the world over, tabbed browsing is a way to keep a bunch of Web pages open simultaneously—in a single, neat window. Figure 20-9 illustrates.
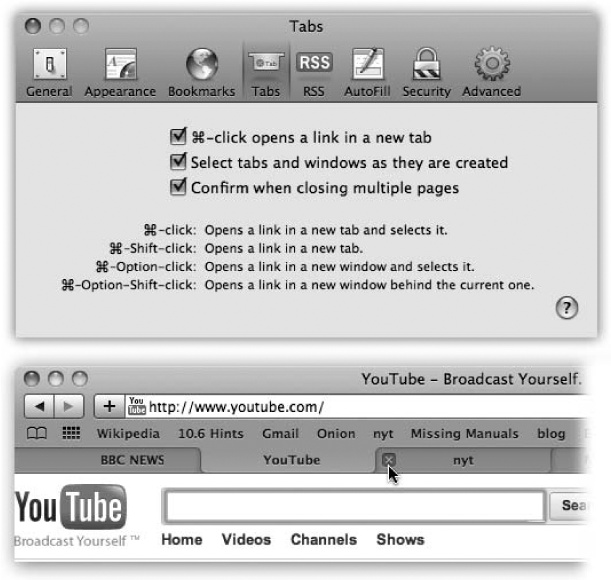
Figure 20-9. Top: Set up tabbed browsing in Safari’s Preferences→Tabs window. (For best results, turn on “Select tabs and windows as they are created.”) Bottom: Now, when you ⌘-click a link, or type an address and press ⌘-Return or ⌘-Enter, you open a new tab, not a new window as you ordinarily would. You can now pop from one open page to another by clicking the tabs just under your Bookmarks bar, or close one by clicking its button (or pressing ⌘-W).
Turning on tabbed browsing unlocks a whole raft of Safari shortcuts and tricks, which are just the sort of thing power surfers gulp down like Gatorade:
If there’s a certain set of Web sites you like to visit daily, put the bookmarks into one folder, using Bookmarks→Add Bookmark Folder and the Bookmarks organizer window (Figure 20-4). You can then load all of them into a single tabbed window, simply by selecting the resulting “folder” in the Bookmarks menu—or the Bookmarks bar—and choosing Open in Tabs from the submenu.
The beauty of this arrangement is that you can start reading the first Web page while all the others load into their own tabs in the background.
Tip
Click the
icon at the left end of the Bookmarks bar. In the Bookmarks organizer, click the Bookmarks Bar item in the left-side list. Now you can see an Auto-Click checkbox for each listed folder.If you turn on this checkbox, then you’ll be able to open all the bookmarks in that folder into tabs, all at once, merely by clicking the folder’s name in the Bookmarks bar. (If you want to summon the normal menu from the folder, just hold the mouse button down.)
A variation on a theme: When you have a bunch of pages open in tabs, you can drag the tabs across the window to rearrange the order. When you have them the way you want them, Control-click (or right-click) a tab, and then choose Add Bookmark for These [Number] Tabs from the shortcut menu. You can save your saved tabs to the Bookmarks bar and load all those pages with one click.
FREQUENTLY ASKED QUESTION: Erasing Your Tracks—and Private Browsing
So, about this History menu: I’d just as soon my wife/husband/boss/parent/kid not know what Web sites I’ve been visiting. Must that History menu display my movements quite so proudly?
Some people find it creepy that Safari maintains a complete list of every Web site they’ve seen recently, right there in plain view of any family member or coworker who wanders by.
To delete just one particularly incriminating History listing, click the
icon at the left end of the Bookmarks bar; in the resulting Bookmarks organizer window, click History. Expand the relevant date triangle, highlight the offending address, and then press your Delete key. Click again to return to normal browsing. You’ve just rewritten History!Or, to erase the entire History menu, choose History→Clear History.
Of course, the History menu isn’t the only place where you’ve left footprints. If you choose Safari→Reset Safari instead, you also erase all other shreds of your activities: any cookies (Web-page preference files) you’ve accumulated, your list of past downloads, the cache files (tiny Web graphics on your hard drive that a browser stores to save time when you return to the page they came from), and so on. This is good information to know; after all, you might be nominated to the Supreme Court someday.
That’s a lot of work just to cover my tracks; it also erases a lot of valuable cookies, passwords, and History entries I’d like to keep. Is all that really necessary just so I can duck in for an occasional look at the Hot Bods of the Midwestern Tax Preparers’ Association Web site?
No, it’s not. A feature called private browsing lets you surf without adding any pages to your History list, searches to your Google search box, passwords to Safari’s saved password list, or autofill entries to Safari’s memory. (Apple says this feature is intended for use at public Macs, where you don’t want to reveal anything personal to subsequent visitors. Ha!)
The trick is to choose Safari→Private Browsing before you start browsing. Once you OK the explanation box, Safari records nothing while you surf. (Nothing, that is, except cookies. Your tracks, in other words, are not completely hidden. You can erase cookies, if need be, in Safari→Preferences→Security.)
When you’re ready to browse “publicly” again, choose Safari→Private Browsing once more so the checkmark goes away. Safari again begins taking note of the pages you visit—but it never remembers the earlier ones.
In other words, what happens in Private Browsing stays in Private Browsing.
If you Option-click a tab’s
button, you close all the tabs except the one you clicked. The same thing happens if you hold down Option and choose File→Close Other Tabs, or if you press Option-⌘-W.If you Option-⌘-click a link, it opens in a separate window, rather than a new tab. (When tabbed browsing is turned off, you just ⌘-click a link to open a new window.)
If you find yourself with a bunch of separate browser windows all over your screen, you can neatly consolidate them all into one nicely tabbed Safari window by choosing Window→Merge All Windows.
If you Shift-⌘-click a link, Safari opens that page in a tab behind the one you’re reading. That’s a fantastic trick when you’re reading a Web page and see a reference you want to set aside for reading next, but you don’t want to interrupt whatever you’re reading.
FREQUENTLY ASKED QUESTION: Cookie Control
Help! I’m afraid of cookies! The cookies are trying to watch me!
Cookies are something like Web page preference files. Certain Web sites—particularly commercial ones like Amazon.com—deposit them on your hard drive like little bookmarks so that they’ll remember you the next time you visit. Most cookies are perfectly innocuous—and, in fact, are extremely helpful, because they help Web sites remember your tastes. Cookies also spare you the effort of having to type in your name, address, credit card number, and so on, every time you visit these Web sites.
But fear is widespread, and the media fans the flames with tales of sinister cookies that track your movements on the Web. If you’re worried about invasions of privacy, Safari is ready to protect you.
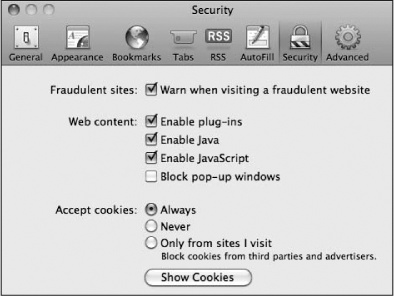
Once the browser is open, choose Safari→Preferences→Security tab. The buttons in this dialog box are like a paranoia gauge. If you click Never, you create an acrylic shield around your Mac. No cookies can come in, and no cookie information can go out. You’ll probably find the Web a very inconvenient place; you’ll have to re-enter your information upon every visit, and some Web sites may not work properly at all.
A less-drastic choice is “Only from sites I visit,” which accepts cookies from sites you want to visit but blocks cookies deposited on your hard drive by sites you’re not actually visiting—cookies an especially evil banner ad gives you, for example.
Note, too, the Show Cookies button, which reveals the shockingly complete list of every cookie you’ve accumulated so far—and offers you the chance to delete the ones that don’t look so savory.
In the beginning, the Internet was an informational Garden of Eden. There were no banner ads, pop-ups, flashy animations, or spam messages. Back then, people thought the Internet was the greatest idea ever.
Those days, unfortunately, are long gone. Web browsing now entails a constant battle against intrusive advertising and annoying animations. And with the proliferation of Web sites of every kind—from news sites to personal Web logs (blogs)—just reading your favorite sites can become a full-time job.
Enter RSS, a technology that lets you subscribe to feeds—summary blurbs provided by thousands of sources around the world, from Reuters to Apple to your nerdy next-door neighbor. You can use a program like Safari to “subscribe” to updates from such feeds and then read any new articles or postings at your leisure (Figure 20-10).
The result: You spare yourself the tedium of checking for updates manually, plus you get to read short summaries of new articles without ads and blinking animations. And if you want to read a full article, you can click its link in the RSS feed to jump straight to the main Web site.
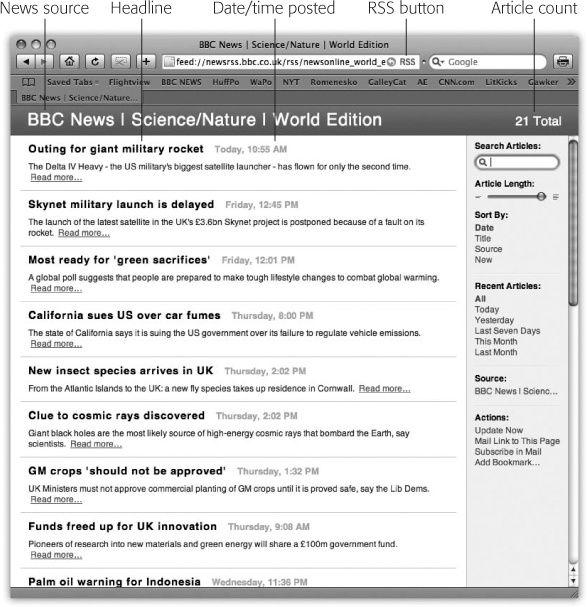
Figure 20-10. The Length slider controls how much text appears for each RSS blurb; if you drag it all the way to the left, you’re left with nothing but headlines. To change the number and order of the articles being displayed, use the sort options on the right. And if you feel a sudden desire to tell your friends about an amazing RSS feed you’ve just discovered, use the “Mail Link to This Page” link in the lower-right section of the window.
Note
RSS stands for either Rich Site Summary or Really Simple Syndication. Each abbreviation explains one aspect of RSS—either its summarizing talent or its simplicity.
So how do you sign up for these free, automatic RSS “broadcasts”? Watch your address bar as you’re surfing the Web. When you see a blue RSS button appear (identified back in Figure 20-1), Safari is telling you, “This site has an RSS feed available.”
To see what the fuss is all about, click that button. Safari switches into RSS-viewing mode. At this point, you have two choices:
Add the RSS feed as a bookmark. Use the Bookmarks→Add Bookmark command, and add the feed to your Bookmarks menu, Bookmarks bar, or Mail as you would any Web page. From now on, you’ll be able to see whether the RSS feed has had any new articles posted—without actually having to visit the site. Figure 20-11 (top) has the details.
Close the RSS feed altogether. To do so, just click the RSS button again. You’re left back where you started, at whatever Web page you were visiting.
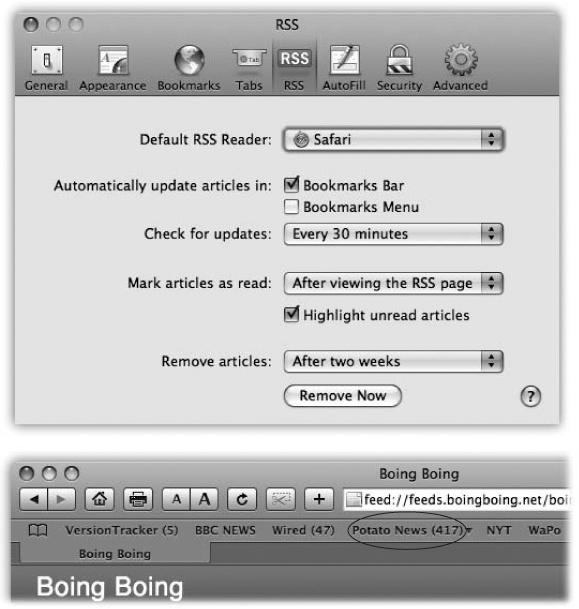
Figure 20-11. Top: Want to specify when Safari should check for updates to your RSS bookmarks? In Safari→Preferences, click RSS. Turn on Bookmarks Bar and Bookmarks Menu. (If you’re an especially impatient person, select “Every 30 minutes” from the “Check for updates” pop-up menu.) Bottom: Next to your RSS feeds’ names (in this screenshot, VersionTracker and Wired), a number tells you how many new articles are waiting for you. If you have a bookmark folder containing several RSS feeds in it (here, Potato News), the number reflects the total number of new articles in that folder’s feeds. Never again will you have to check a Web site for updates the old-fashioned way.
RSS is a tremendously flexible and powerful technology, especially in Safari. The fun never ends, as these tricks illustrate.
If you create a new bookmark folder and fill it with RSS feeds, you can see the total number of new articles right next to the folder’s name (Figure 20-11, bottom). You might create a folder of Mac news feeds, for instance, so you know whenever there’s a important event in the Mac world.
From then on, by clicking the folder’s name (and opening its pop-up menu), you can see which feeds have new articles; they’re the ones with numbers next to their names. If you ⌘-click a bookmark folder’s name—in either the Bookmarks bar or the Bookmarks menu—Safari shows you all the feeds, neatly collated into one big, easily digestible list for your perusing pleasure. (If you’re billing by the hour, you can also choose View All RSS Articles from the folder’s pop-up menu to achieve the same effect.)
The search box at the right of any RSS-viewing window works pretty much as you’d expect: It narrows down the list of articles to only those that contain your search terms.
But that’s barely scratching the surface of the search field’s power. If you’ve adopted the feed-merging trick described above, the Search box can search several feeds at once—perfect, for example, if you want to see all the news from Mac sites that has to do with iTunes.
Now how much would you pay? But get this—you can then save the search itself as a bookmark. Use the Bookmark This Search link at the lower-right corner of the window. Give the bookmark a name, choose where it should appear in Safari, and then click Add.
You’ve just turned Safari into a high-tech personal clipping service. With one click on your new bookmark, you can search all your news sources simultaneously—the feeds you’ve selected—for the terms you want. You’ve just saved yourself hours of daily searching—not to mention the expense of a real clipping service.
Tip
Mail can display your RSS feeds, too. Flip back to RSS Feeds if you skipped that chapter.
In System Preferences→Desktop & Screen Saver→Screen Saver tab, you’ll find the RSS Visualizer screen saver, an impressive display indeed. When you click Options and select an RSS feed, you set up Mac OS X to get news from that feed whenever you’re away from your Mac. When the screen saver comes on, you’re treated to a 3-D animation of the news from that site—and astonished gazes from coworkers.
If a news story grabs your interest, press the number key mentioned at the bottom of the screen. The screen saver fades out, and Safari displays the associated article.
It’s easy enough to set up any favorite Web site as your start page. But you can also make an RSS feed—or a list of feeds—your home page. Open the feeds you want, choose Safari→Preferences→General tab, click Set to Current Page, and choose “Home Page” from the “New windows open with” pop-up menu.
In other words, suppose you start by opening a list of local, national, international, business, and sports news feeds. In that case, you’ve just made yourself a fantastic imitation of newspaper headlines, but tailored to your interests with spectacular precision: The Francis J. McQuaid Times (or whatever your name is).
Tip
If you’ve turned on tabbed browsing, you can Shift-⌘-click headlines. That makes the full articles open in background tabs while you continue to read the headlines.
Articles in this arrangement are timelier than anything you could read in print—and they’re free. If you miss a day of reading the headlines, no problem; they stick around for days and disappear only once you’ve read them. Finally, when you’re done reading, you don’t have to worry about recycling your “newspaper.” No trees were harmed in the making of this publication. Welcome to the future of news: customized, free, up-to-date, and paperless.
Tip
To find more RSS feeds, visit a site like www.syndic8.com, or just watch for the appearance of the blue RSS button in the address bar. And if you want more power in an RSS reader, try out a program like NetNewsWire (http://ranchero.com/netnewswire/), which offers many more power-user features.