Chapter 12:
Warmup Exercises
MOVES THAT REALLY MATTER
You’re probably tempted to flip past this chapter. After all, who has time to warm up?
The answer is everyone. You see, over the years, fitness experts have discovered that doing the right movements before a workout is like turning on the power to your muscles. Scientists believe that exercises known as dynamic stretches—what you might think of as calisthenics—appear to enhance the communication between your mind and muscles, allowing you to achieve peak performance in the gym. Translation: faster fat loss and better results. Surely that isn’t something you want to miss out on.
That’s why this chapter provides a library of exercises that you can perform before any workout. Besides activating your muscles, the movements that have been chosen will also improve your flexibility, mobility, and posture—all critical factors for keeping your body both young and injury-free. All of this and it’ll only require 5 to 10 minutes of your time.
But wait, there’s more! You’ll find a section on foam-roller exercises, too. These are movements that help ensure your muscles are functioning like they’re supposed to. The best part: They can be done at any time—whether it’s at the gym as part of your workout or after dinner on your living room floor. Just consider it the regular muscle maintenance you need to keep your body moving like a well-oiled machine.
Warmup Exercises
In this chapter, you’ll find 49 exercises that help prepare your muscles for just about any activity, while also improving your flexibility and mobility.
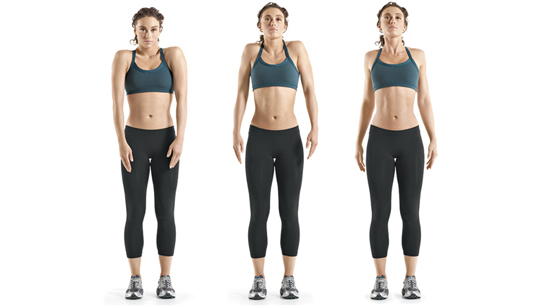
Jumping Jacks
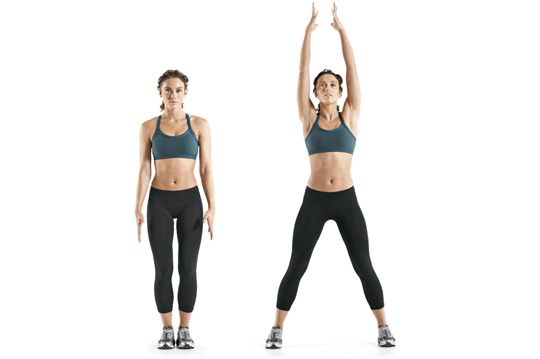
• Stand with your feet together and your hands at your sides.
• Simultaneously raise your arms above your head and jump up just enough to spread your feet out wide.
• Without pausing, quickly reverse the movement and repeat.
Split Jacks
• Stand in a staggered stance, your right foot in front of your left.
• Simultaneously jump back with right foot and forward with your left as you swing your right arm forward and above your shoulder and swing your left arm back.
• Continue to quickly switch legs back and forth as you raise and lower your arms.
• Repeat as many times as you can in 30 seconds.
Wall Slide
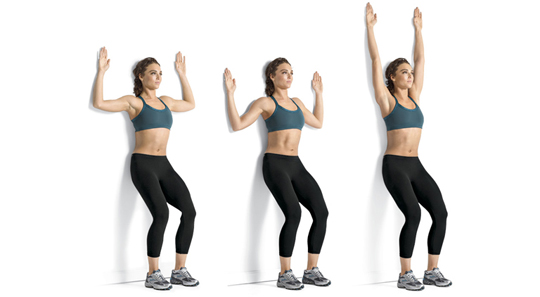
• Lean your head, upper back, and butt against the wall. (Don’t allow your head, upper back, or butt to lose contact with the wall at any point during the exercise.)
• Place your hands and arms against the wall in the “high-five” position, your elbows bent 90 degrees and your upper arms at shoulder height.
• Keeping your elbows, wrists, and hands pressed into the wall, slide your elbows down toward your sides as far as you can. Squeeze your shoulder blades together.
• Slide your arms back up the wall as high as you can while keeping your hands in contact with the wall.
• Lower and repeat.
Squat Thrusts

• Stand with your feet shoulder-width apart and your arms at your sides.
• Push your hips back, bend your knees, and lower your body as deep as you can into a squat.
• As you squat down, place your hands on the floor in front of you, shifting your weight onto them.
• Kick your legs backward, so that you’re now in a pushup position.
• Then quickly bring your legs back to the squat position.
• Stand up quickly and repeat the entire movement.
TIP
• If you want a greater challenge, do a pushup here.
Hand Crossover
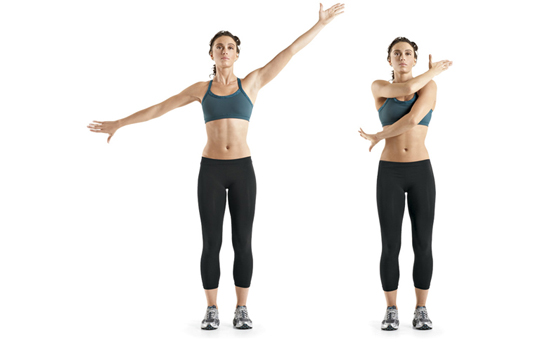
• Hold your arms so that, together, they form a straight line and a 45-degree angle with the floor.
• Your left arm should be raised, with your palm facing forward and your thumb pointing up.
• Your right arm should be held low, with your palm facing behind you and your thumb pointing down.
• Bring your arms across your body as if they were swapping positions, only keep the palm of each hand facing the same direction it was in the starting position.
• Alternate back and forth, gradually increasing the speed of the crossovers, so that you’re loosely and quickly swinging your arms across your body. Do all your reps, then switch to the starting position and repeat.
Neck Rotations
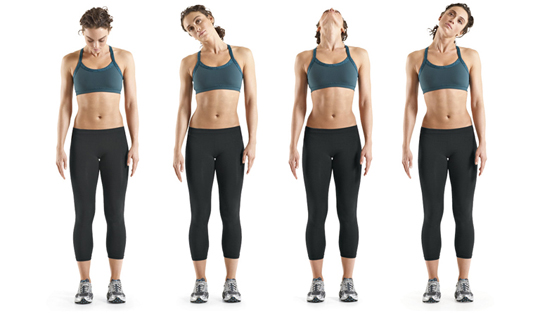
• Stand tall with your feet shoulder-width apart.
• Roll your neck in a circular motion to the right 10 times (or as prescribed).
• Reverse directions, rolling in a circular motion to the left 10 times.
Thoracic Rotation
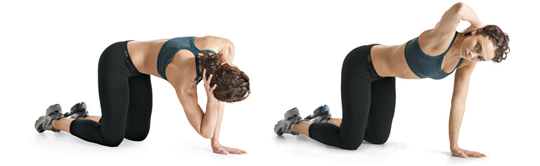
• Get down on on all fours.
• Place your right hand behind your head.
• Brace your core.
• Rotate your upper back downward so your elbow is pointed down and to your left.
• Raise your right elbow toward the ceiling by rotating your head and upper back up and to the right as far as possible.
• Complete the prescribed number of reps, then do the same number on your left.
TIP
• Bracing your abs—as if you were about to be punched in the gut—ensures that the rotation takes place at your upper back, and not your lower back.
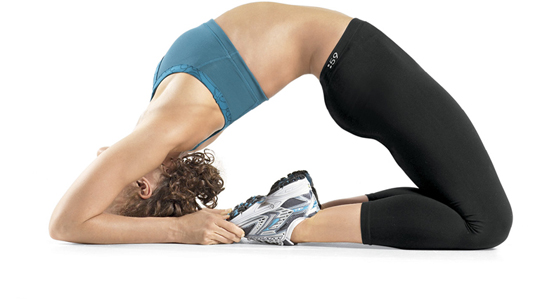
Side-Lying Thoracic Rotation

• Lie on your left side on the floor, with your hips and knees bent 90 degrees.
• Straighten both arms in front of you at shoulder height, palms pressed together.
• Keeping your left arm and both legs in position, rotate your right arm up and over your body and rotate your torso to the right, until your right hand and upper back are flat on the floor.
• Hold for 2 seconds, then bring your right arm back to the starting position.
• Complete the prescribed number of reps, then turn over and do the same number for your other side.
Reach, Roll, and Lift

• Kneel down and place your elbows on the floor, allowing your back to round.
• Your elbows should be bent 90 degrees.
• Your palms should be flat on the floor.
• Slide your right hand forward until your arm is straight.
• Rotate your right palm so that it’s facing up.
• Raise your right arm as high as you can.
• Do all your reps, then repeat with your left arm.
Bent-Over Reach to Sky
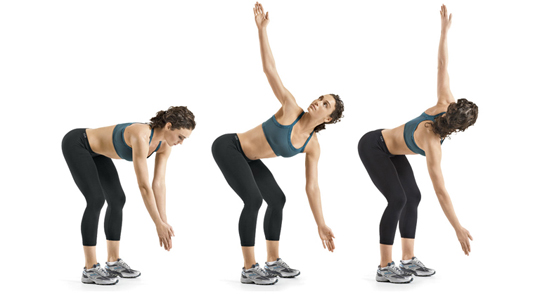
• Keeping your lower back naturally arched, bend at your hips and knees and lower your torso until it’s almost parallel to the floor.
• Let your arms hang straight down from your shoulders, palms facing each other.
• Brace your core.
• Rotate your torso the right as you reach as high as you can with your right arm.
• Pause, then return and reverse the movement to your left. That’s one rep. (For even greater benefit, touch your toes between reps.)
Shoulder Circles
• Stand tall with your feet placed shoulder-width apart.
• Without moving any other part of your body, roll your shoulders backward in a circular motion 10 times.
Over-Under Shoulder Stretch
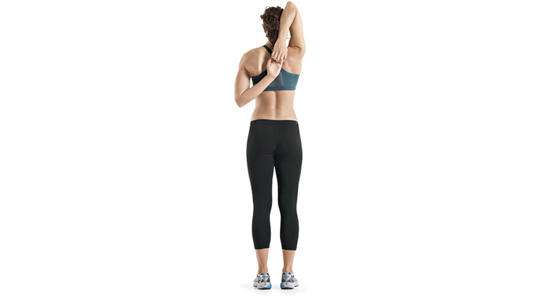
• Simultaneously reach behind your head with your right hand and behind your back with your left hand, and clasp your fingers together. Hold for 10 to 15 seconds.
• Release, and repeat with your left hand behind your head and your right hand behind your back
TIP
• Can’t touch your hands together? Hold a towel with one hand and grab onto it with the other hand.
Arm Circles
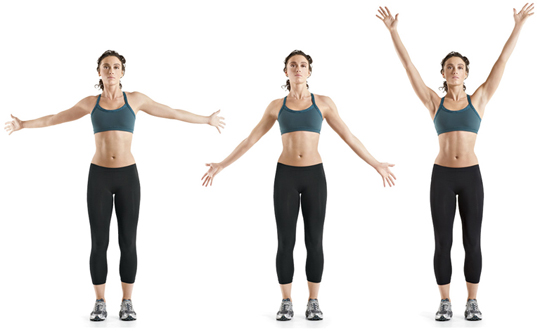
• Stand tall, holding your arms straight out to your sides, so that they’re parallel to the floor.
• Start by making small circles with your arm progressing to bigger circles. Do 10 reps forward, and 10 reps backward.
Low Side-to-Side Lunge

• Stand with your feet set about twice shoulder-width apart, your feet facing straight ahead.
• Clasp your hands in front of your chest.
• Shift your weight over to your right leg as you push your hips backward and lower your body by dropping your hips and bending your knees.
• Your lower right leg should remain nearly perpendicular to the floor.
• Your left foot should remain flat on the floor.
• Without raising yourself back up to a standing position, reverse the movement to the left. Alternate back and forth.
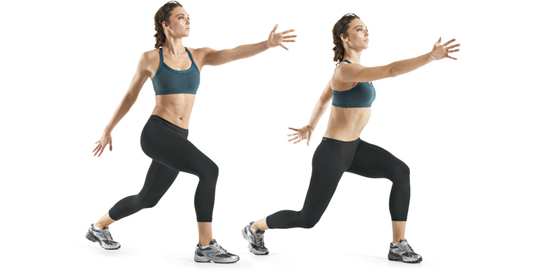
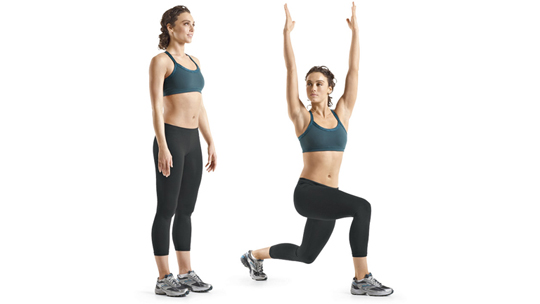
Reverse Lunge with Reach Back
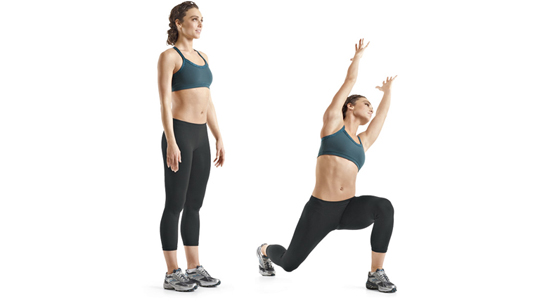
• Stand tall with your arms hanging at your sides.
• Brace your core and hold it that way.
• Lunge back with your right leg, lowering your body until your left knee is bent at least 90 degrees.
• As you lunge, reach back over your shoulders and to the left.
• Reverse the movement back to the starting position.
• Complete the prescribed number of repetitions with your left leg, then step back with your left leg and reach over your right shoulder for the same number of reps.
• Keep your torso upright for the entire movement.
Reverse Lunge with Twist and Overhead Reach
• Stand tall with your arms hanging at your sides and your palms facing the sides of your thighs.
• Brace your core.
• Step backward with your left leg, and lower your body until your right knee is bent at least 90 degrees.
• As you lunge, rotate your torso to your right as you reach high with both hands.
• Return to the starting position.
• Complete the prescribed number of repetitions with your left leg stepping back and your torso rotating right, then step back with your right leg and rotate left for the same number of reps.
Lunge with Diagonal Reach
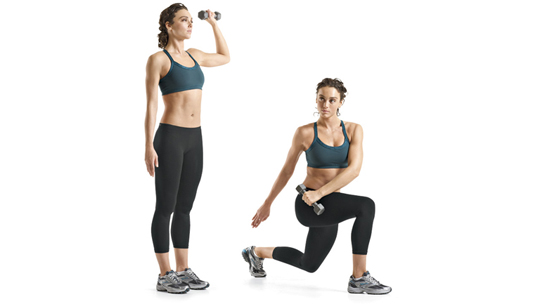
• Grab a light dumbbell in your left hand and hold it in the “high-five” position—your upper arm perpendicular to your body and your elbow bent 90 degrees.
• Lunge forward with your right leg, lowering your body until your right knee is bent at least 90 degrees.
• As you lunge, rotate your torso to the right and reach across your body with your left arm, almost as if you were trying to put the dumbbell in your right back pocket.
• Reverse the movement back to the starting position.
• Do all your reps and repeat with your right arm, lunging with your left leg.
Lunge with Side Bend
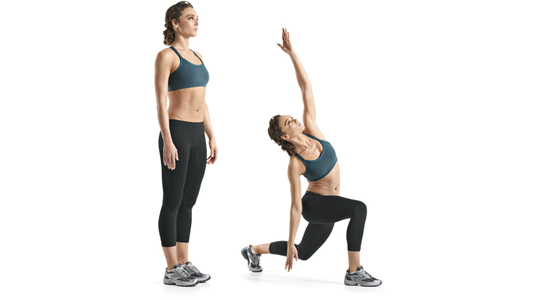
• Stand tall with your arms hanging at your sides.
• Step forward with your right leg, and lower your body until your right knee is bent at least 90 degrees.
• As you lunge, reach over your head with your left arm as you bend your torso to your right.
• Reach for the floor with your right hand.
• Return to the starting position.
• Complete the prescribed number of reps, then lunge with your left leg and bend to your left for the same number of reps.
Overhead Lunge with Rotation

• Hold a broomstick above your head with your hands about twice shoulder-width apart.
• Your arms should be completely straight, and your core braced.
• Step forward with your right leg and lower your body until your right knee is bent at least 90 degrees.
• As you lunge, rotate your upper body to the right.
• Reverse the movement back to the starting position.
• Complete the prescribed number of reps, then do the same number with your left leg, rotating to your left.
Elbow-to-Foot Lunge
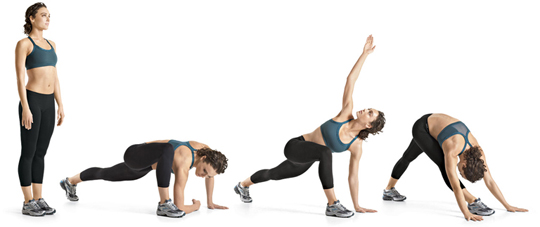
• Stand tall with your arms at your sides.
• Brace your core, and lunge forward with your right leg.
• As you lunge, lean forward at your hips and place your left hand on the floor so that it’s even with your right foot.
• Place your right elbow next to the instep of your right foot (or as close as you can), and hold for 2 seconds.
• Next, rotate your torso up and to the right and reach as high as you can with your right hand.
• Now, rotate back and place your right hand on the floor outside your right foot, then push your hips up-ward. That’s one rep.
• Step forward with your left leg and repeat.
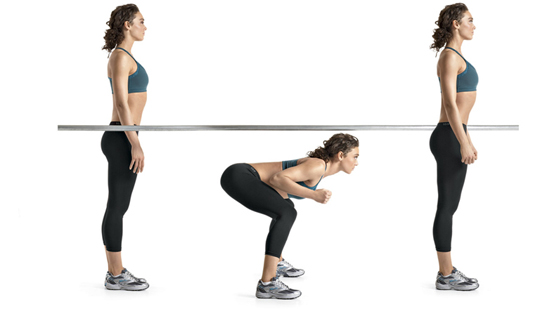
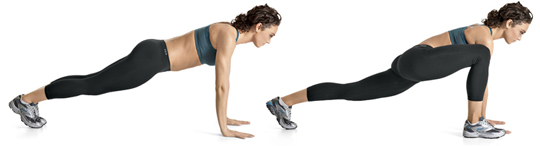
Inchworm
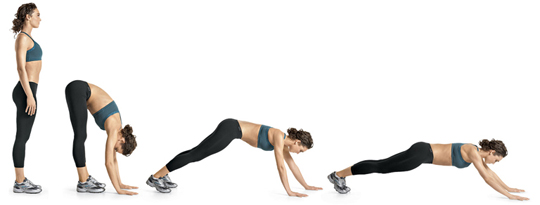
• Stand tall with your legs straight and bend over and touch the floor.
• Keeping your legs straight, walk your hands forward as far as you can without allowing your hips to sag.
• Then take tiny steps to walk your feet back to your hands. That’s one repetition.
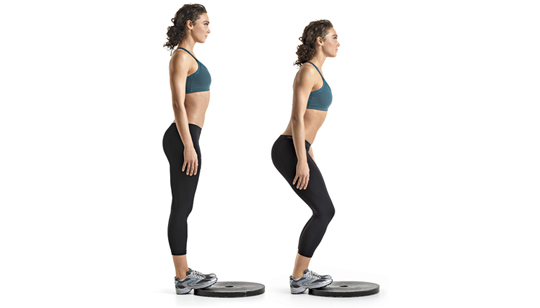
Sumo Squat to Stand
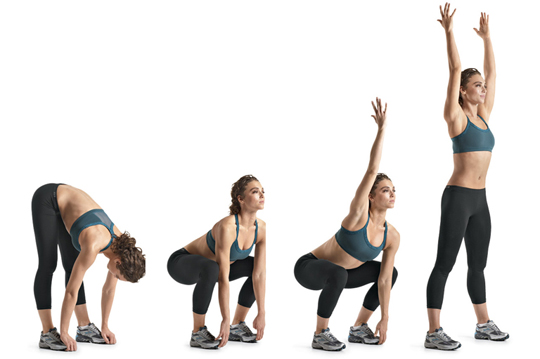
• Stand tall with your legs straight and your feet shoulder-width apart.
• Keeping your legs straight, bend over and grab your toes. (If you need to bend your knees you can, but bend them only as much as necessary.)
• Without letting go of your toes, lower your body into a squat as you raise your chest and shoulders up.
• Staying in the squat position, raise your right arm up high and wide. Then raise your left arm.
• Now stand up, and repeat.
Inverted Hamstring
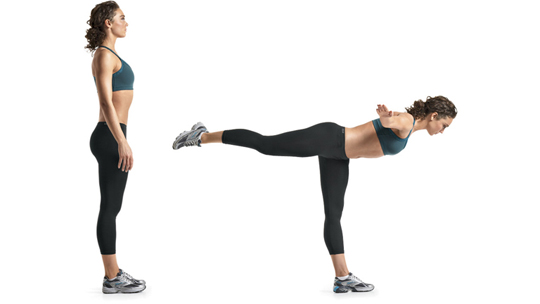
• Stand on your left leg, your knee bent slightly.
• Raise your right foot slightly off the floor.
• Without changing the bend in your left knee, bend at your hips and lower your torso until it’s parallel to the floor. (Don't round your lower back.)
• As you bend over, raise your arms straight out from your sides until they’re in line with your torso, your palms facing down.
• Your right leg should stay in line with your body as you lower your torso.
• Return to the start. Complete the prescribed number of reps on your left leg, then do the same number on your right.
Lateral Slide
• Stand with your feet just beyond shoulder width.
• Push your hips back, bend your knees, and lower your body until your hips are just slightly higher than your knees.
• Shuffle to your left by taking a step to your left with your right foot and then one with your left foot. Slide about 10 feet.
• Slide back to your right.
• Repeat for 30 seconds, or as prescribed.
Walking High Knees
• Stand tall with your feet shoulder-width apart.
• Without changing your posture, raise your left knee as high as you can and step forward.
• Repeat with your right leg. Continue to alternate back and forth.
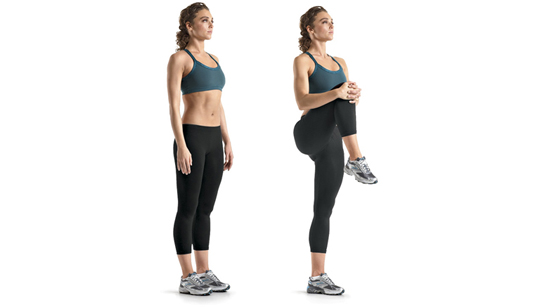
Walking Leg Cradles

• Stand with your feet shoulder-width apart and your arms at your sides.
• Step forward with your left leg as you lift your right knee and grasp it with your right hand and grasp your right ankle in your left hand.
• Stand up as tall as you can while you gently pull your right leg toward your chest.
• Release your leg, take three steps forward, and repeat by raising your left knee. Continue to alternate back and forth.
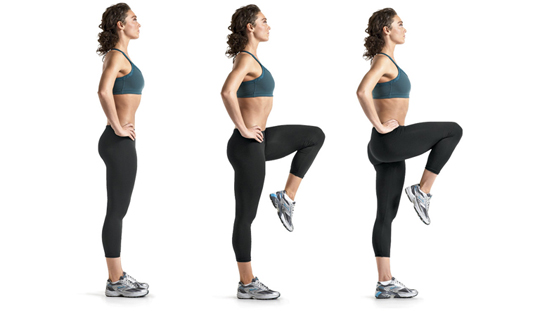
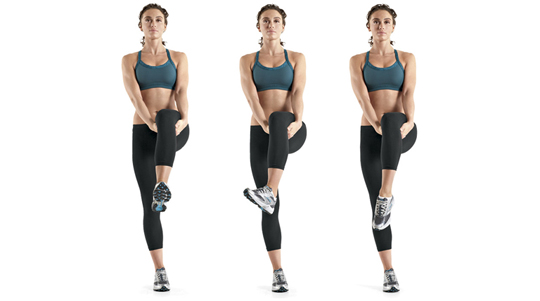
Walking Knee Hugs
• Stand with your feet shoulder-width apart and your arms at your sides.
• Step forward with your left leg, bend your knee, and lean forward slightly at your hips.
• Lift your right knee toward your chest, grasping it with both hands just below your kneecap. Then pull it as close to the middle of your chest as you can, while you stand up tall.
• Release your leg, take three steps forward, and repeat by raising your left knee. Continue to alternate back and forth.
Lateral Stepover
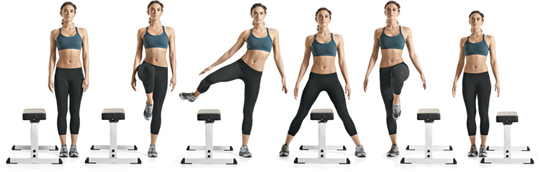
• Stand with your right side facing a bench.
• Lift your right knee in front of you, then rotate your thigh to step over the bench.
• Follow with your left leg.
• As soon as your left leg touches the floor, reverse the movement, back to the other side. That’s one rep.
Lateral Duck Under
• Set a barbell in a squat rack or Smith machine a little higher than waist level.
• Stand with your right side next to the bar.
• Take a long stride under the bar, and shift your weight toward your right leg as you squat low to duck under the bar in one movement.
• Rise to a standing position on the other side of the bar.
• Reverse the movement to return to the starting position.
• Note: You don’t actually need a bench or a bar to perform the lateral stepover or duck under. Just imagine there’s one there and perform the move.
Lying Side Leg Raise
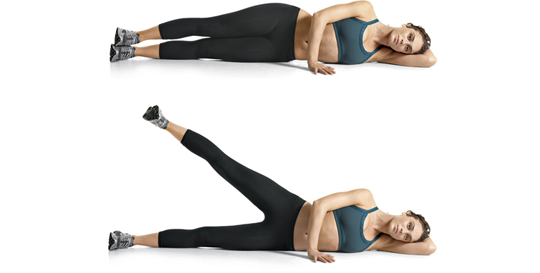
• Lie on your left side with your legs straight, your right leg on top of your left. Brace your left upper arm on the floor, and support your head with your left hand.
• Keeping your knee straight, raise your right leg as high as possible in a straight line.
• Lower your leg back to the starting position.
Lying Straight Leg Raise
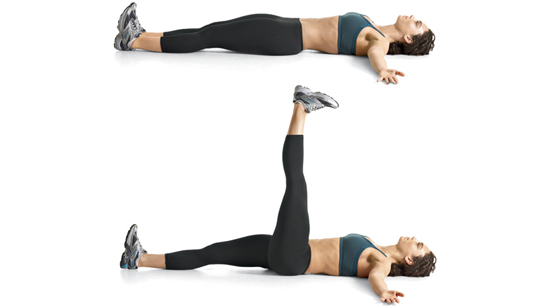
• Lie faceup on the floor with your legs straight.
• Keeping both knees straight, raise your left leg upward as far as possible. (Imagine that you’re trying to kick a ball that’s hanging over your body.)
• Complete the prescribed number of reps with your left leg, then do the same number with your right leg.
Walking Heel to Butt
• Stand tall with your arms at your sides.
• Step forward with your left leg, then lift your right ankle toward your butt, grasping it with your right hand.
• Pull your ankle as close to your butt as you can.
• Release your ankle, take three steps forward, and repeat by raising your left ankle.
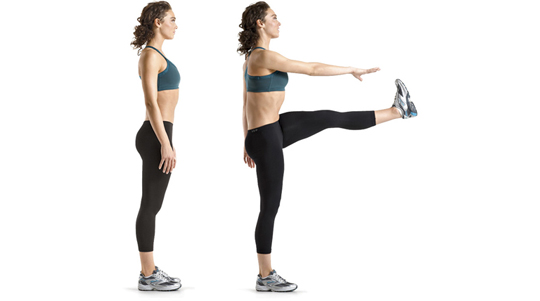
Forward-and-Back Leg Swings
• Stand tall and hold on to a sturdy object with your left hand.
• Brace your core.
• Keeping your right knee nearly straight, swing your right leg forward as high as you comfortably can.
• Swing your right leg backward as far as you can. That’s one rep.
• Swing back and forth continuously. Complete all your reps, then do the same with your left leg.
Side-to-Side Leg Swings
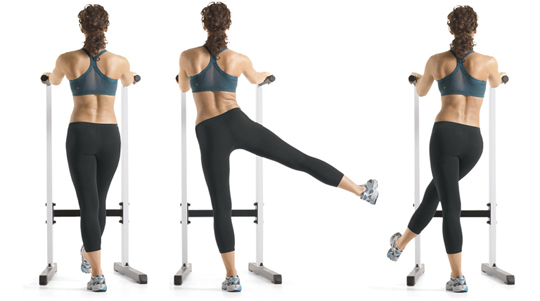
• Stand tall and hold on to a sturdy object with both hands.
• Keeping your right knee straight, swing your right leg as high out to the side as you comfortably can.
• Swing your leg back toward your body so that it crosses in front of your left leg. That’s one rep.
• Swing back and forth continuously until you complete the prescribed number of reps, then do the same with your left leg.
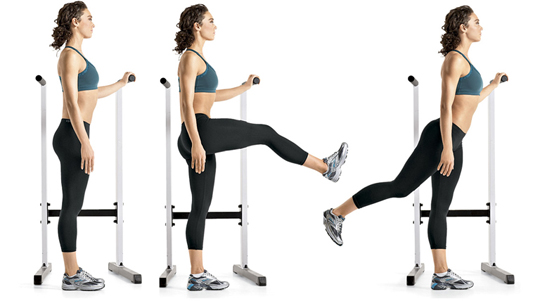
Walking High Kicks
• Stand tall with arms hanging at your sides.
• Keeping your knee straight, kick your left leg up—reaching with your right arm out to meet it—as you simultaneously take a step forward. (Just imagine that you’re a Russian soldier.)
• As soon as your left foot touches the floor, repeat the movement with your right leg and left arm. Alternate back and forth.
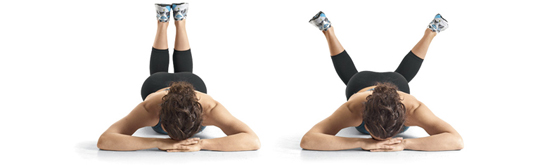
Groiners
• Get into pushup position.
• Bring your right foot forward, place it next to your right hand (or as close as you can), and lower your hips for a brief moment.
• Return to the start, and repeat with your left leg.
Prone Hip Internal Rotation
• Lie facedown on the floor with your knees together and bent 90 degrees.
• Without allowing your hips to rise off the floor, lower your feet straight out to the sides as far as you comfortably can. Hold for 1 or 2 seconds, then return to the starting position.
Ankle Circles
• Stand tall on one foot, and raise your left thigh until it’s parallel to the floor. Clasp your hands under your left knee to support your leg.
• Without moving your lower leg, rotate your ankle clockwise. Each circle is one repetition.
• Complete all your reps, then do the same number in a counterclockwise direction. Repeat with your right leg.
Supine Hip Internal Rotation
• Lie faceup on the floor with your knees bent 90 degrees.
• Your feet should be flat on the floor and about twice shoulder-width apart.
• Without allowing your feet to move, lower your knees inward as far as you comfortably can. Hold for 1 or 2 seconds, then return to the starting position.
Ankle Flexion
• Place the balls of your feet on a surface that’s about 2 inches high, with your heels on the floor.
• Stand tall with your legs nearly straight.
• Bend your knees and shift your weight forward until you feel a stretch in the backs of your heels. Hold for 2 or 3 seconds, then return to the starting position. That’s one repetition.
Hamstrings Roll
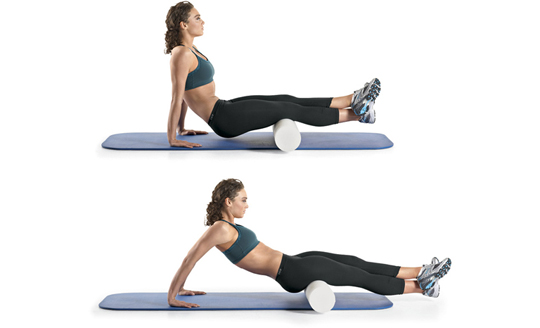
• Place a foam roller under your right knee, with your leg straight.
• Cross your left leg over your right ankle.
• Put your hands flat on the floor for support.
• Keep your back naturally arched.
• Roll your body forward until the roller reaches your glutes. Then roll back and forth.
• Repeat with the roller under your left thigh.
Glutes Roll
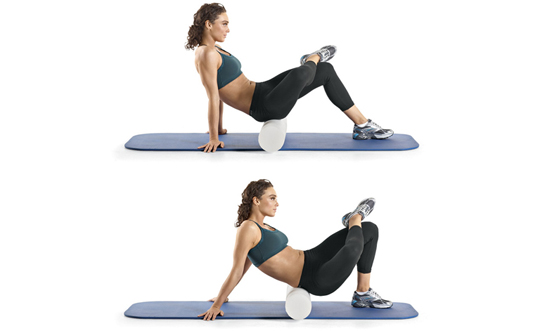
• Sit on a foam roller, with it positioned on the back of your right thigh, just below your glutes.
• Cross your right leg over the front of your left thigh.
• Put your hands flat on the floor for support.
• Roll your body forward until the roller reaches your lower back. Then roll back and forth.
• Repeat with the roller under your left glutes.
Iliotibial-Band Roll
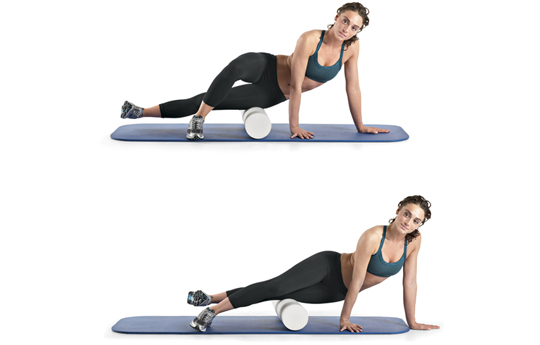
• Lie on your left side and place your left hip on a foam roller.
• Put your hands on the floor for support.
• Cross your right leg over your left, and place your right foot flat on the floor.
• Roll your body forward until the roller reaches your knee. Then roll back and forth.
• Lie on your right side and repeat with the roller under your right hip.
Calf Roll
• Place a foam roller under your right ankle, with your right leg straight.
• Cross your left leg over your right ankle.
• Put your hands flat on the floor for support.
• Keep your back naturally arched.
• Roll your body forward until the roller reaches the back of your right knee. Then roll back and forth.
• Repeat with the roller under your left calf.
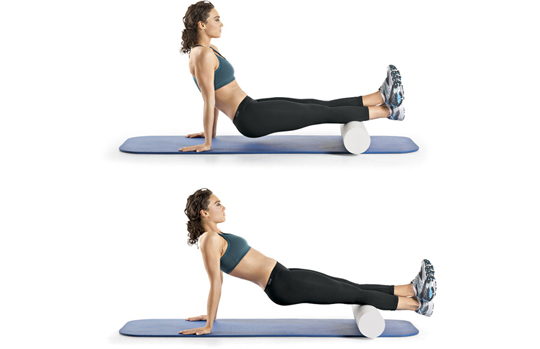
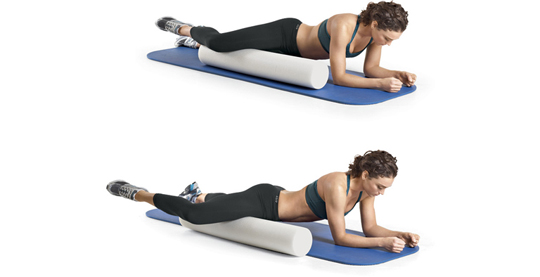
Quadriceps-and-Hip-Flexors Roll
• Lie facedown on the floor with a foam roller positioned above your right knee.
• Cross your left leg over your right ankle and place your elbows on the floor for support.
• Roll your body backward until the roller reaches the top of your right thigh.
• Then roll back and forth.
• Repeat with the roller under your left thigh.
Groin Roll
• Lie facedown on the floor.
• Place a foam roller parallel to your body.
• Put your elbows on the floor for support.
• Position your right thigh nearly perpendicular to your body, with the inner portion of your thigh, just above the level of your knee, resting on top of the roller.
• Roll your body toward the right until the roller reaches your pelvis. Then roll back and forth.
• Repeat with the roller under your left thigh.
Lower-Back Roll
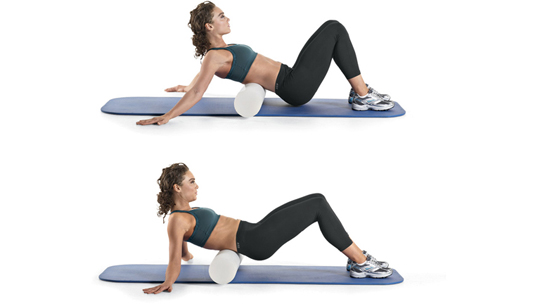
• Lie faceup with a foam roller under your mid back.
• Your knees should be bent, with your feet flat on the floor.
• Raise your hips off the floor slightly.
• Roll back and forth over your lower back.
Upper-Back Roll
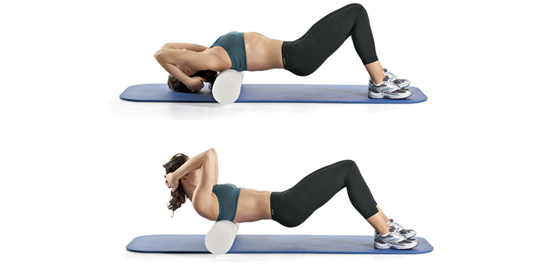
• Lie faceup with a foam roller under your mid back, at the bottoms of your shoulder blades.
• Clasp your hands behind your head and pull your elbows toward each other.
• Raise your hips off the floor slightly.
• Slowly lower your head and upper back downward, so that your upper back bends over the foam roller.
• Raise back to the start and roll forward a couple of inches—so that the roller sits higher under your upper back—and repeat.
• Roll forward one more time and do it again. That’s one rep.
Shoulder-Blades Roll
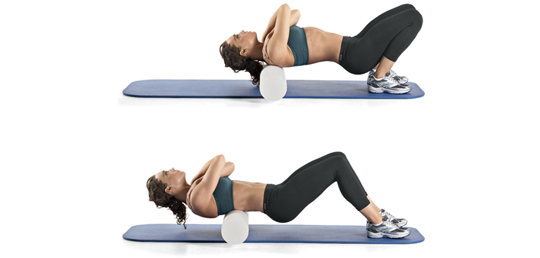
• Lie faceup with a foam roller under your upper back, at the tops of your shoulder blades.
• Cross your arms over your chest.
• Your knees should be bent, with your feet flat on the floor.
• Raise your hips so they’re slightly elevated off the floor.
• Roll back and forth over your shoulder blades and your mid and upper back.
CREATE YOUR OWN WARMUP
Besides the movements shown in this chapter, many of the exercises that appear elsewhere in this book also double as great warmup moves. They’ve been included here in order to give you a full roster of exercises to choose from. To create your own 5-minute warmup, use these guidelines from Mike Wunsch, CSCS, director of fitness programs at Results Fitness in Santa Clarita, California. Simply choose your moves from the categories that follow, using the accompanying directions. You can either do 5 to 10 reps of each exercise or perform each one for 30 seconds. Do the movements in a circuit, completing one set of each exercise without resting. One additional option: If you can’t get to the gym or don’t have time for your regular workout, do this warmup as a quickie bodyweight routine. Use the same directions for each category, only choose three exercises—instead of just one—from Category 6, and do as many sets of the three exercises in Category 7 as you have time for.
CATEGORY 1
Choose one movement from this list exercises.
CATEGORY 2
Choose one movement from this list exercises.
CATEGORY 3
Choose one movement from this list of exercises.
CATEGORY 4
Choose three movements from this list of exercises—one from each category.
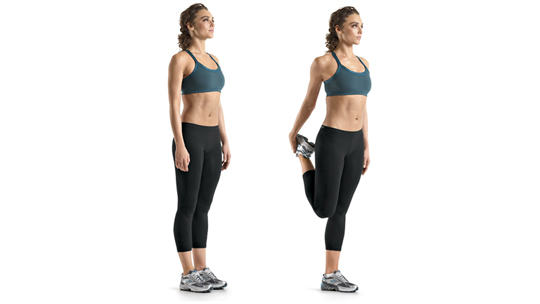
QUADRICEPS AND HIP ADDUCTORS (GROIN)
HAMSTRINGS
GLUTES AND HIP ABDUCTORS (OUTER HIPS)
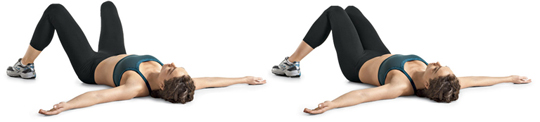
Single-leg hip raise with knee hold
CATEGORY 5
Choose any Core exercise in Chapter 10, from the section labeled “Stability Exercises.” For example, any version of the plank, side plank, or mountain climber.
CATEGORY 6
Choose one to three movements—as time allows—from this list of exercises.
CATEGORY 7
Choose three movements—one of each movement type—from this list of exercises. So you’ll select one side-to-side movement, one forward and back movement, and one rotational movement.
SIDE-TO-SIDE MOVEMENTS
FORWARD AND BACK MOVEMENTS
Reverse dumbbell crossover lunge*
ROTATIONAL MOVEMENTS
Reverse lunge with twist and overhead reach
*For these exercises, use the form shown, but perform the movement without the dumbbells.