Most runners don’t think about connective tissue until it hurts. We have a general awareness that our bodies contain support structures like bones and ligaments to prevent us from collapsing into blobs of Jell-O, but that’s where our curiosity ends.
That’s where it ends, that is, until our first case of Achilles tendinitis. Or plantar fasciitis. Or IT band syndrome. Or until we sprain an ankle, tear cartilage in our knee, or suffer a stress fracture. Then we become experts. Then we visit doctors or podiatrists, learn about the particular connective tissue we’ve injured, begin a lengthy course of physical therapy, and curse the day we overlooked the importance of strengthening this vital tissue. Because here’s the scary truth: Once connective tissue damage is done, it’s difficult—sometimes impossible—to undo.
Connective tissue is exactly what it sounds like: tissue that connects your body’s muscles, organs, blood vessels, nerves, and other parts to one another. It supports, surrounds, strengthens, stores energy for, cushions, and protects the components of your running body. It’s the glue that holds you together.
Connective tissue is a catch-all phrase for tissues that take many forms, from the gellike areolar tissue, which binds skin to muscle, to the rock-solid bones that comprise your skeleton. Whether connective tissue is gel-like or more solid is determined by the density of fibers in its extracellular matrix—the distinctive mix of fibers, proteins, carbohydrates, minerals, salts, fluids, and other elements that surrounds connective tissue cells. Examples of connective tissue with densely compacted fibers are tendons and ligaments. An example of gel-like connective tissue with a looser fiber arrangement is fat.
In this chapter, you’ll target five types of connective tissue:
Blood, fat, and skin are also connective tissues, but we’ll save them for later chapters.
Most connective tissues adapt to training, but there’s a catch: CT adapts at a much slower rate than muscle. When you allow your muscle development to outpace connective tissue adaptation, the result can be injury. Runners begin training, and their muscles improve rapidly. Encouraged, they increase the intensity and length of their workouts. Next thing they know, they’ve got Achilles tendinosis, tibial tendinitis, or a stress fracture in their foot. Their connective tissue couldn’t cope with the increased workload, even though their muscles seemed fine.
Some connective tissues won’t ever improve much with training. For these tissues, such as cartilage and ligaments, your emphasis needs to be on injury prevention. You must strengthen muscles that directly affect the tissues (often smaller muscles overlooked in traditional strength training routines) and utilize stretching and massage to reduce tissue tension.
Most of all, training connective tissue requires patience. Get-fit-quick schemes rarely produce fast fitness; they produce injury. You can’t get in shape from the couch.
Your adult body contains 206 different bones. These bones form a balanced and symmetrical skeletal structure that puts even the best Lego toys to shame. They’re also your primary defense against gravity, with your femur (thigh bone) alone capable of supporting up to 30 times your weight.
Of course, we runners tend to push gravity-defiance to the limit. A single step during a distance run creates an impact force approximately two to three times your body weight. Let’s put that into perspective. For a reasonably fit male runner weighing 150 pounds who logs one thousand steps per mile, that’s 150 to 225 tons of impact force that his skeleton must endure each mile! Add extra tons for faster running (up to seven times body weight for sprinting), then multiply by weekly mileage, and it’s no surprise that novice runners suffer injuries when they segue straight from a New Year’s Eve resolution to a hard run on the roads.
Lucky for us, bone is a living tissue that undergoes constant renewal. Under normal conditions, about 4 percent of your bone is being broken down and replaced through a process called remodeling. When you run, this process goes into overdrive. Just as your body strengthens muscle fibers by replacing damaged myofilaments, it also uses remodeling and modeling—a separate process that fortifies bone with extra bone tissue—to create bigger, stronger, better bones.
But rebuilding and fortifying your bones takes time. At the beginning of remodeling, cells called osteoclasts dig out old, damaged bone tissue, leaving tiny cavities in your bones. It then takes three to four months for other cells called osteoblasts to fill those cavities with new bone. In the interim, you’re left with porous bone that’s susceptible to injury. During this phase, runners who push too hard for too long often end up with a stress fracture as their reward.
If you do get a stress fracture, the wait begins again. It will take three to four months for your body to repair the fracture. Training too soon risks re-injury.
Tendons connect muscle to bone, transmitting the force generated by muscles to move your joints—and hence your body. But tendons are far more than organic cables. They are active, responsive, and vital partners with your muscles, so much so that the two tissues are regularly referred to as a muscle-tendon unit.
Muscles don’t end where tendons begin. There is no line drawn in the sand. Instead, there is a transition area, the muscle-tendon zone (musculotendinous zone), where muscle gradually gives way to tendon. In this zone, muscle fibers and tendons merge, operating as a unit. It is only at the outskirts of this zone that tendons finally emerge as the glistening, white, fibrous cords that eventually connect to bone.
The point at which individual muscle fibers meet tendon, the myotendinous junction, is your muscle’s weak link. It’s here that most muscle strains occur. Powerful eccentric contractions cause damage either at this junction or directly above it. If you’re lucky, damage will be limited to a few fibers and short-lived soreness. If you’re unlucky, a complete muscle tear might require surgery and physical therapy. The good news is that the muscle-tendon zone gets a rich blood supply from muscle fibers, resulting in a healing rate that almost parallels that of muscle.
Achilles tendon injuries, the plague of runners (especially runners age forty and over) range from mild tendinitis to complete rupture. Achilles tendinitis is an overuse injury that is accompanied by painful inflammation. Achilles tendinosis, on the other hand, involves degenerative damage at the cellular level that produces chronic pain without inflammation. Until the late 1990s, almost all Achilles pain was thought to result from tendinitis. Now, it’s understood that most Achilles pain is generated by tendinosis. The treatment (and best prevention) for Achilles tendinosis is eccentric Heel Dips (see page 109), a remedy discovered by Swedish orthopedist Hakan Alfredson. Alfredson was a recreational runner who developed severe Achilles pain. In a podcast with the British Journal of Sports Medicine, he explained that he’d asked his boss to perform surgery on the tendon, only to have his boss reply, “If we operate on you, you need to be on sick leave. And we cannot afford that here at the clinic. . . I won’t ever operate on your Achilles tendon.” Desperate to get the operation, Alfredson attempted to rupture his Achilles with a high-volume bout of heel dips. Instead, he got better. A 2012 study published in the British Journal of Sports Medicine investigated the long-term effects of heel dips. Researchers questioned fifty-eight patients who’d previously treated their Achilles tendinosis with 180 heel dips per day for twelve weeks. The study reported that almost forty percent of the patients remained pain-free five years later. The researchers also noted that two similar studies on the long-term effect of heel dips showed even better results, with 88 percent and 65 percent of those patients reporting little or no pain. Interestingly, it’s not calf strengthening that does the trick. It’s stress on the tendon itself, and subsequent adaptations, that lead to healing.
In the absence of proactive treatment (like heel dips), damage done to tendons in the white fibrous zone—that bloodless stretch preceding the interface with bone—has a gloomy outlook. A 2013 study from Denmark tried to determine the tissue turnover rate (the time it takes to regenerate completely new tissue) for this zone. Previous estimates ranged from two months to two hundred years. The researchers chose subjects who’d lived during the nuclear bomb testing from 1955 to 1963, when atmospheric levels of carbon-14 were highest. They then measured existing levels of radioactive carbon-14 in the subjects’ muscles and Achilles tendons. Tested muscle was clear of carbon-14. In contrast, tested tendon showed levels of carbon-14 that hadn’t changed in the decades since atomic testing. So when can you expect damaged tendon tissue to regenerate? According to this study: Pretty much never.
If runners were superheroes, elastic recoil would be our superpower. Elastic recoil occurs during runs when you convert energy stored in your tendons and fascia (see “Fascia,” page 88) into a free push. And not a little push—elastic recoil is more like a big shove that provides up to 50 percent of the propulsive force for each running stride.
The major driver of recoil is your tendons. Tendons aren’t an elastic tissue, but they have elastic properties. They’re like ropes that stretch under tension. At rest, their tough collagen fibers line up in parallel wavy lines. Under tension, these wavy patterns straighten to allow a stretch of 4–6 percent. Because your tendons are stiff, the act of stretching them requires a lot of energy. During runs, this energy is provided by the impact force each time your foot hits the ground. The impact force stretches your Achilles tendon as well as fascia in your legs. This impact energy is momentarily stored in your tendon and fascia. When your calf muscles contract, the energy is released, creating a catapult effect—elastic recoil—that multiplies the force produced by muscle alone. With proper training, it will feel like you’re running on coiled springs!
Best of all, elastic recoil costs nothing in terms of oxygen and calories. It’s completely fueled by impact energy.
The amount of recoil depends upon a tendon’s stiffness. Stiffness measures the amount of force it takes to stretch the tendon. The more force applied, the greater the recoil. That said, stretching a tendon beyond 4–6 percent is dangerous—beyond 8 percent risks rupture.
Ligaments connect bone to bone, and their prime directive is to stabilize joints. Tough and flexible, they’re composed mainly of collagen fibers. These fibers are arranged in a crisscrossed pattern that improves your ligaments’ ability to manage sideways forces. Just as bowling alley bumper rails prevent bowling balls from veering into the gutters, your ligaments guide bones—and the joints where they meet—through a normal range of motion.
Ligaments perform another essential function for your running body: They contain proprioceptive cells that signal the nervous system when the ligament is being overstretched. Not only does this keep you consciously aware of your leg’s position in space (important for landing correctly and avoiding obstacles), it also cues your nervous system when to contract muscles in order to lessen stress on your ligaments. A 2011 study found that patients recovering from anterior cruciate ligament (ACL) surgery regained greater functional knee stability when ACL remnants were salvaged rather than shaved off during surgery. Salvaging ACL remnants allowed patients to retain proprioceptive cells, a major contributor to stability. Healthy, functioning ligaments don’t just tell you where you’re at; they allow you to get where you’re going.
Runners usually suffer ligament injuries at the ankles and knees.
Most ankle injuries involve sprains, which occur when your foot lands awkwardly—rolled outward, bent inward, twisted, or tweaked by some other unnatural landing position. Sprains overstretch and tear ligaments, often leading to joint instability. Runners with poor ankle flexibility, inefficient neuromuscular activation, or any combination of weak muscles, tendons, or ligaments are more susceptible to ankle sprains. Running on uneven surfaces—or running steps or trails when overly fatigued—can increase your risk of injury.
This doesn’t mean you should never run on uneven surfaces. While too much “wobbling,” as occurs on trails, grass, and other natural surfaces, can lead to excessive stress on your ligaments and joints, some side-to-side motion can trigger strengthening in these same joints. At the opposite end of the spectrum, hard flat surfaces (e.g., sidewalks and asphalt streets) increase impact force, which can both stimulate strengthening or, in excess, lead to injury. Your best bet is to split your running between natural and manmade surfaces.
Knee injuries (that aren’t cartilage damage) tend to strike two major pairs of ligaments: The anterior cruciate ligament (ACL) and posterior cruciate ligament (PCL), and the medial collateral ligament (MCL) and lateral collateral ligament (LCL). The cruciate ligaments sit in the middle of the knee, connecting the femur to the tibia (shin bone). They control forward and backward motion. The collateral ligaments stretch vertically along the inside and outside of your knee, controlling sideways motion. Damage to any of these ligaments can disrupt the stability of your knee.
Ligaments are capable of moderate stretching, but a prolonged or sudden, forceful stretch can cause ligaments to be overstretched or torn. Since ligaments have a poor blood and nutrient supply, they are slow to heal—just as they are slow to adapt. Full repair following injury can take anywhere from months to years. And even repaired, the new ligament tissue will be inferior. You’ll be more likely to reinjure the ligament, which can lead to ligament laxity—“loose” joints (elongated ligaments) that create joint instability. It’s wise to include exercises to prevent injury and imperative that you do so after injury has occurred.
Every bone in your body began as cartilage. In the womb, this tough connective tissue allowed for a more flexible skeleton, a huge plus given your cramped quarters at the time. As you grew, from toddler to teen to adult, most of your cartilage was transformed into the rigid tissue of bone, until finally the only cartilage left was in your ears, nose, bronchial tubes, and ribs—and, of greatest importance to runners, between your joints.
When runners talk cartilage, we usually mean articular cartilage. Articular cartilage forms the smooth coating on the surface ends of bones. This low-friction coating allows bones to glide over one another, and it provides a flexible cushion within the joint. The femur, tibia, and patella (kneecap) all have articular cartilage.
While studies confirm that physically active children can increase cartilage thickness, similar research on adults shows no difference in thickness between lifelong athletes and healthy non-athletes. In contrast, lifelong couch potatoes (and those otherwise immobilized) show decreased cartilage. Athletes tend to have larger knee joint surfaces than non-athletes, but it’s unclear if this represents genetics (like height for a basketball player) or a training adaptation.
Damage to articular cartilage is bad news. Since cartilage lacks both nerves and blood supply, minor damage can go unnoticed and, more importantly, unrepaired. If the damage is allowed to progress, it can lead to significant disability. In the case of the degenerative joint disease osteoarthritis, the joint space can narrow to the point of bone-on-bone contact. The joint becomes inflamed, painful, less mobile, and partially disabled.
Most runners know someone who has suffered torn cartilage in the knee. This is usually an injury to the meniscus, not the articular cartilage. The lateral and medial menisci are two pads of fibrocartilage that provide shock absorption and structural support for your knee. In adults, treatment generally requires surgery to repair or remove the affected cartilage.
Imagine that a spider with supernatural powers lives within you. And imagine that this spider spends its days spinning a single continuous web that cocoons your body beneath the skin, a web that spreads inward, surrounding and penetrating every muscle, nerve, organ, and bone—every structure, cavity, and tissue in your body. That’d be one heck of a web! Well, minus the spider, that web—a continuous weave of collagen and elastin fibers that grows thicker and thinner and that appears as membrane, sheet, cord, and gristle—is your fascia.
Once considered the Saran Wrap of the body, fascia has recently been nominated for a status upgrade by some researchers. They view fascia as a reactive tissue. They believe it contracts and relaxes like muscles (albeit at a slower rate), recoils like tendons, provides sensory feedback like nerves, and links all 650 muscles into a single working unit. Oh, and they blame it for the vast majority of chronic pain and injury in runners.
Robert Schleip, Ph.D., head of the Fascia Research Project, in a 2009 interview for Men’s Health, described fascia as an instrument for “structural compensation.” In other words, fascia is responsible for posture. When we climb stairs or slouch at our desk, we create alterations in our posture that can become permanent. In this model, fascia is like a sweater. Tug on one part of the sweater, and the entire garment moves. Tension in one area can therefore affect every aspect of posture. Adhesions that build up between fascial surfaces due to injury can create chronic pain that radiates throughout our body. Seen this way, plantar fasciitis is no longer an injury of the foot; it could just as easily be caused by problems with the hips, back, or shoulders. Schleip and others in the field believe that myofascial release exercises and specific stretches can improve posture, reduce pain, and resolve injury.
Table 6.1 Connective Tissue Training & Effectiveness of Training Methods
|
Methods for Improvement |
Types of Connective Tissue |
|||||
|---|---|---|---|---|---|---|
|
Bone |
Cartilage |
Ligaments |
Tendon (White Zone) |
Muscle-Tendon |
Fascia |
|
|
Foam Roller |
Ø |
Ø |
Very Low |
Very Low |
High |
Very High |
|
Nutrition |
High |
Very Low |
Low |
Low |
High |
High |
|
Myofascial Release |
Ø |
Ø |
Very Low |
Very Low |
High |
High |
|
Running Workouts (25% above normal routine) |
Medium |
Ø |
Ø |
Ø |
Medium |
High |
|
Running Workouts (50% above normal routine) |
Medium |
Ø |
Ø |
Ø |
High |
Very High |
|
Bodyweight Strength Training |
Medium |
Ø |
Ø |
Medium |
High |
High |
|
Stretching |
Ø |
Ø |
Low |
Low |
Very High |
Very High |
|
Resistance Bands/Tubing |
Low |
Low |
Medium |
Medium |
High |
Very High |
|
Weight Training (25% above normal routine) |
Medium |
Ø |
Ø |
Ø |
Medium |
High |
|
Weight Training (50% above normal routine) |
Medium |
Ø |
Ø |
Ø |
High |
Very High |
|
Wobble Board |
Ø |
Ø |
Medium |
Medium |
High |
High |
TABLE 6.1 estimates the effectiveness of different training approaches when it comes to stimulating adaptations in connective tissue. For example, while a foam roller will be very effective in both strengthening and loosening fascia, it will probably have no effect on bones or cartilage.
When it comes to training connective tissue, sometimes you can and sometimes you can’t. See Table 6.1 for a breakdown of the value of different training approaches for connective tissues. Where running and weight workouts are listed, the percentage of increase above normal workout routine refers to total volume, not intensity, of single sessions (remember that you have to increase the training stress, in this case the volume of weight work, in order to trigger improvement in your body). Important photo-instruction training for CT includes:
Training from other chapters that affects connective tissue strengthening includes:
To see exactly how these workouts can be incorporated into your overall training program, skip directly to Chapter 15: Build Your Training Schedule, where sample schedules are available for runners of all fitness levels and abilities.
This wobble board routine works your entire kinetic chain (the interconnected chain of muscles, nerves, CT, and other structural components of your running body). It helps immunize your lower legs against injuries like shin splints, plantar fasciitis, Achilles tendinosis and tendinitis, patellar tracking syndrome, and IT band syndrome. Wobble boards are supported by a round “ball” projecting from the base. While a smaller ball makes for easier rocking, the Thera-Band wobble board used in the workouts below features a slightly larger ball, which ensures stability throughout the exercise. Allow 2–3 minutes for recovery between sets. Sean Brosnan, a runner who’s clocked 1:48 for 800 meters and 4:00 for the mile, demonstrates the exercises.
This is a great exercise for strengthening and stabilizing both plantarflexion and dorsiflexion, which can protect against lower leg injuries and speed recovery from the same.
 SKILL LEVEL: Intermediate, Advanced
 Hold on to a chair, counter, or other sturdy support structure. Center your weight over the middle of the wobble board (often, the best balance requires moving your heel closer to the center of the board). Rock forward and touch the front of the wobble board to the floor (or as close as you can get). Limit the bend at your knee. Focus on utilizing the ankle’s range of motion.
 Rock backward until you touch the floor (or as close as you can get). One rep includes both the forward and backward rock. Start with 5–10 reps, then increase by no more than 10 reps per week to a maximum of 100.
This exercise helps to stabilize against inversion and eversion (rotating the foot inward or outward).
SKILL LEVEL: Intermediate, Advanced

Begin as you did the previous exercise. This time, rock inward and touch the side of the wobble board to the floor (or as close as you can get).
Rock outward until you touch the floor (or as close as you can get). One rep includes both the inward and outward rock. Start with 5–10 reps, then increase by no more than 10 reps per week to a maximum of 100.
Wobbling both clockwise and counterclockwise builds on the strength and stability that you’ve developed from previous wobble board exercises.
SKILL LEVEL: Intermediate, Advanced
For this wobble board exercise, rock forward to touch the front of the wobble board to the floor (or as close as you can get), then begin a clockwise rotation, keeping the edge of the wobble board against the floor.
After one full rotation, reverse direction, doing the same exercise counterclockwise. Use the same reps progression as with the previous wobble board exercises. One rep includes both a clockwise and a counterclockwise rotation.
Resistance tubing (or resistance band) exercises for the hips and lower legs build strength to help runners maintain stability throughout the course of runs and races and provide protection for CT injuries from the hips to the toes. It’s important to use tubing or bands that provide the correct resistance for your strength and fitness. The Thera-Band tubing and bands used in these exercises utilize eight color-coded levels of resistance. Always allow at least 2–3 minutes of recovery between exercises.
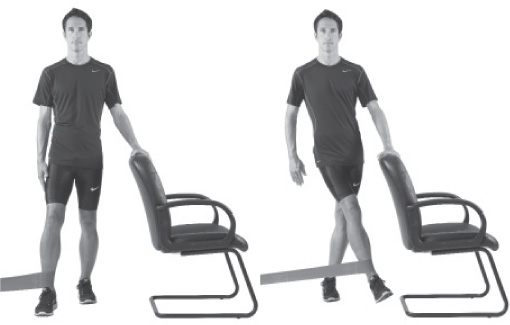
Side steps are a good workout for strengthening and stabilizing your hip abductors. Most chronic lower-leg connective tissue injuries have their genesis in weak hips. Either resistance tubing or a resistance band can be used for this exercise.
SKILL LEVEL: All Levels
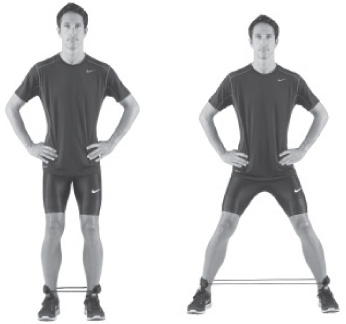
Loop the resistance tubing either above your knees (least resistance), below your knees (medium resistance), or around your ankles (greatest resistance, as shown). Bend your knees slightly with your feet hip-width apart.
Step to the side until the tubing provides significant resistance (to the point you can reasonably go). Then slide your pivot foot over to recreate your original stance. Now repeat this sidestepping movement for 10–20 feet in one direction, and then reverse direction. Do one set for each direction. Gradually add distance.
Monster walking works your hip flexors, extensors, and abductors, providing a great all-around strengthening workout for your hips. Either resistance tubing or a resistance band can be used for this exercise.
SKILL LEVEL: All levels
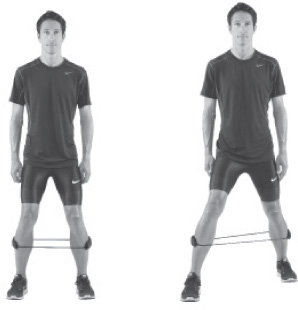
Loop the resistance tubing either above your knees for less resistance or below your knees (as shown) for more resistance. Bend your knees slightly, with your feet hip-width apart. Hang your arms loosely at your sides.
Step forward and to the side at a 45° angle, keeping the bend in your knees and your arms at your sides. Step forward and to the opposite side at a 45° angle. Keep walking for 10–20 feet, then gradually build up to longer distances.
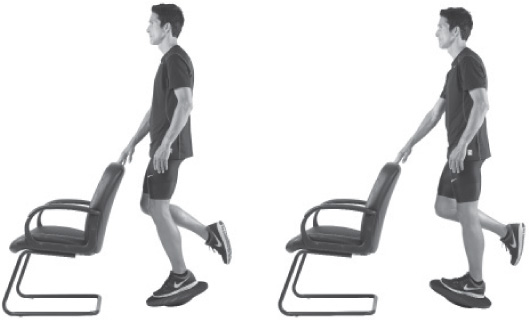
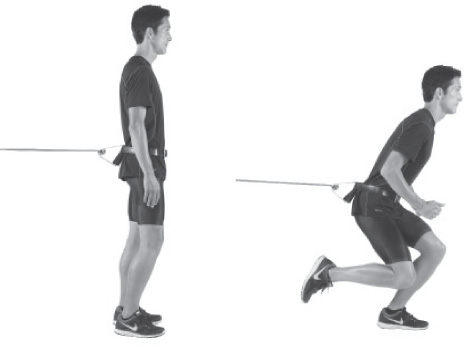
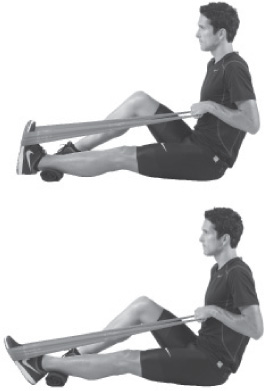
Walkouts and jogouts provide good overall kinetic-chain training and are an integral part of knee (especially ACL) strengthening.
SKILL LEVEL: All levels
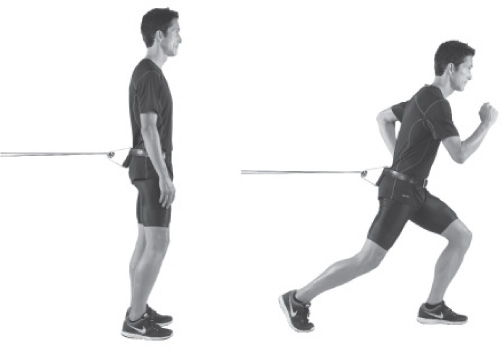
Fasten low-resistance tubing to a door anchor, doorknob, or other secure object. Fasten the opposite ends to a belt looped around your waist. Face away from the anchor.
Walk or jog a few strides forward, until the resistance interrupts your stride. Then allow the loop to pull you back as you walk/jog backward to your starting position. Repeat until fatigued (never push through pain with this exercise).
Backward walkouts and jogouts continue the strengthening work for the knee (especially the ACL) begun with forward walkouts/jogouts.
SKILL LEVEL: All levels
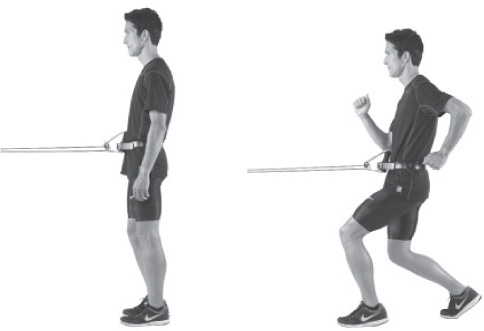
Fasten low-resistance tubing to a door anchor, doorknob, or some other secure object. Fasten the opposite ends to a belt looped around your waist. Face toward the anchor.
Walk or jog a few strides backward, until the resistance interrupts your stride. Facing the same direction, allow the loop to pull you back to your starting position. Repeat until fatigued (never push through pain with this exercise).
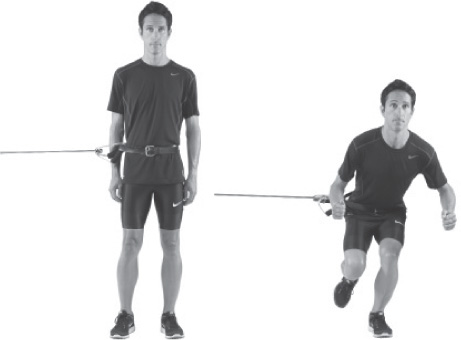
Jumpouts are a more explosive version of walkouts/jogouts. They contribute a greater stimulus to kinetic chain adaptation and knee strengthening (especially the ACL).
SKILL LEVEL: Intermediate, Advanced
Fasten low-resistance tubing to a door anchor, doorknob, or other secure object. Fasten the opposite ends to a belt looped around your waist. Face away from the anchor.
Bound (jump) forward explosively, pushing off one foot and landing on the other. Then hop backward off your same landing foot, returning to your starting position. Continue until fatigued (never push through pain with this exercise), then switch sides and repeat.
Sideways jumpouts are a more explosive version of side steps. As with other variations of this exercise, they build kinetic-chain adaptations and knee strength (especially the ACL).
SKILL LEVEL: Intermediate, Advanced
Fasten low-resistance tubing to a door anchor, doorknob, or other secure object. Fasten the opposite ends to a belt looped around your waist. Stand sideways to the anchor.
Leap sideways (away from the anchor) off the foot nearest the anchor, landing on your opposite foot. Then leap back to your starting position. Continue until fatigued (never push through pain with this exercise), then switch sides and repeat.
Hip adduction strengthening is often overlooked by runners, but it’s important to balance hip abduction strength with adduction training. This exercise will help keep your hips stable through your full stride and during foot strike.
SKILL LEVEL: All Levels
Secure a resistance band to an anchor or other secure object at ankle level. While standing, loop the band around your anchor-side leg, just above the ankle, with your opposite foot positioned slightly back. Hold on to a secure object for balance.
Keeping your knee straight, pull your leg inward, across your opposite leg. Slowly return to the start position. Continue until fatigued (never push through pain with this exercise), then switch sides and repeat.
Ankle dorsiflexion (angling your foot toward your shin) training is great for preventing front shin splints (pain along the outside of your shins).
SKILL LEVEL: All levels
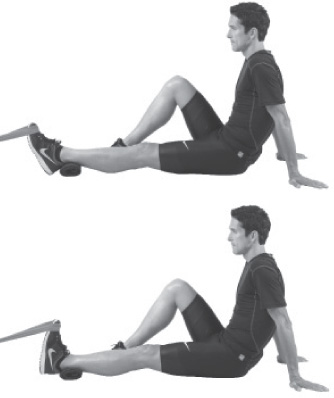
Sit on the floor with one leg extended in front of you, the other bent at the knee. Attach the resistance band around the top of your foot and anchor to a secure object. If desired, place a towel beneath your Achilles. Start in the toe-forward position.
Pull your foot backward toward your shin. When you reach maximum dorsiflexion, slowly return your foot to its original position. Continue until fatigued (never push through pain with this exercise), then switch sides and repeat.
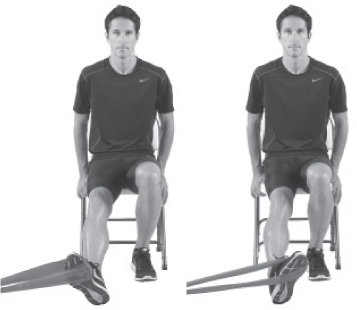
Ankle plantarflexion (pushing your foot forward) training helps treat and prevent medial shin splints (pain along the inside of your shin, also known as posterior tibial tendinitis).
SKILL LEVEL: All levels
Sit on the floor with one leg extended in front of you, the other bent at the knee. Loop the resistance band around your foot while holding on to the opposite end.
Push your foot forward until your reach maximum plantarflexion, then slowly return your foot to its original position. Continue until fatigued (never push through pain with this exercise), then switch sides and repeat.
This is the best exercise for preventing and treating medial shin splints (pain along the inside of your shin).
SKILL LEVEL: All levels
Sit in a chair with one end of the resistance band secured to an anchor or other secure object at ankle level. Loop the band’s other end around the arch side (inside) of your foot.
Keep your knee straight as you pull your foot inward, limiting motion to your lower leg. When your foot reaches its maximum range of motion, slowly return to your starting position. Continue until fatigued (never push through pain with this exercise), then switch sides and repeat.
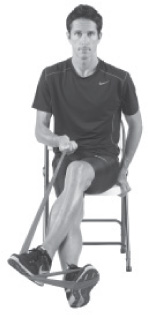
Variation As an alternative, cross your non-working leg over the leg being trained, then secure the band both by holding it with your hand and stabilizing it with your non-working foot (as pictured).
Ankle eversion exercises are used to strengthen ankles post-sprain and can also be used as a preventive measure.
SKILL LEVEL: All levels
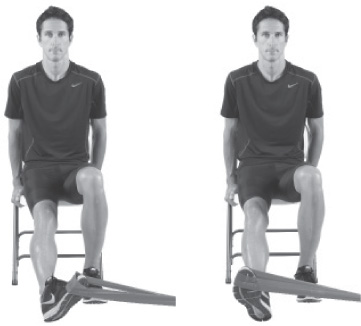
Sit in a chair with one end of the resistance band secured to an anchor or other secure object at ankle level. Loop the band’s other end around the little-toe side (outside) of your foot.
Keep your knee straight as you pull outward with your foot, limiting motion to your lower leg. When your foot reaches its maximum range of motion, slowly return to your starting position. Continue until fatigued (never push through pain with this exercise), then switch sides and repeat.
Variation As an alternative, secure the band by stabilizing it with your non-working foot and holding the end of it with your hand (as pictured).
While we included lunge exercises in the muscles chapter, two more lunge workouts serve as the perfect remedy for many hip and knee problems. Like much of our CT work, these exercises also work the whole kinetic chain. Always allow 2–3 minutes (or more, if necessary) of recovery between exercises.
Lunge walks build both endurance and strength, improving your stability during runs.
SKILL LEVEL: Intermediate, Advanced
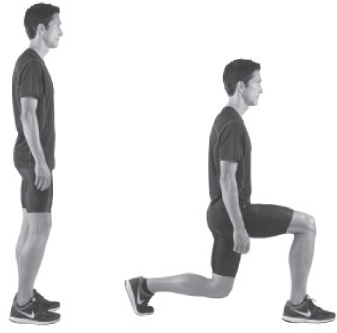
Start from a standing position, arms hanging at your sides.
Take a big step forward, bending at the knee until your thigh is roughly parallel the ground, keeping your knee lined up over your foot. From this lunge position, step forward into another lunge with the opposite leg. Start with 20–30 feet of lunge walks, then gradually increase the distance (some athletes actually get up to 100 meters!).
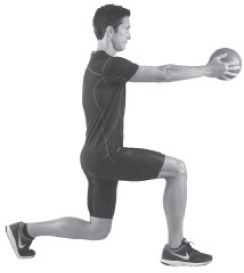
Variation As an alternative, hold a medicine ball in front of you as you walk. This helps you to maintain form.
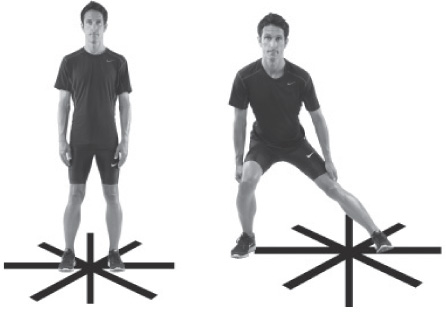
Lunge clock training provides strengthening and stability in all directions. A lunge clock is best performed on a prepared mat, with tape used as markers to mimic the hours of the clock.
SKILL LEVEL: Intermediate, Advanced
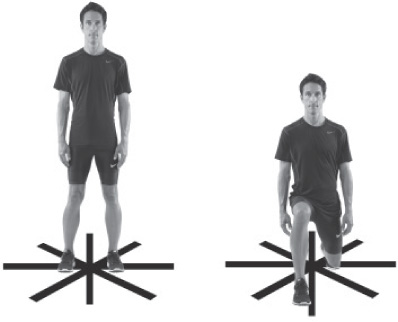
Stand straight, arms hanging loosely at your sides, in the middle of the lunge clock.
Step forward toward “12 o’clock,” bending at the knee until your thigh is roughly parallel the floor (performing a lunge).
 Step backward, assuming your original position.
 Now step toward the various “hours” of the clock, lunging forward and to the side, sideways, backward and to the side, backward, etc. Never change the direction you’re facing while lunging around the clock. Do 1–2 sets with each leg.
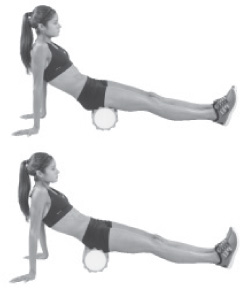
Foam rolling is about as close as you can get to a deep-tissue massage. It’s a way to self-myofascial release—to release tension in the fascia and break down adhesions that are thought to form between fascia, muscle, and skin. All exercises are being performed on Thera-Band foam rollers, which allow gradual increases from extra-cushioned to stiff rollers. Roll each muscle group 60 to 90 seconds, 1–2 reps. These exercises are safe and effective for all training levels. Tanya shows how it’s done.
Begin your foam rolling with your hamstring, releasing tension that will free up your calves and lower back for better rolling in the next exercise.
Sit on the floor with the foam roller beneath your knees. Place your hands behind you for support.
Lift your glutes off the floor, extending your legs straight in front of you.
Roll all the way up to your glutes and then back toward your knees.
Variation As an alternative, increase pressure by stacking your legs. Do shorter, repetitive strokes in areas of greater tension.
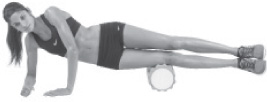
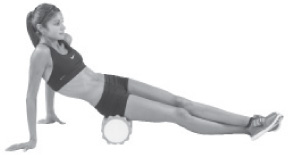
This is a great way to relieve the pain and pressure of knots, sore spots, and tension in your calves (both gastrocnemius and soleus muscles).
Place the foam roller on the floor in front of you, then lay both calves over the roller. Keep your hands on the floor behind you for support.
Lift your glutes off the floor and roll up toward your knees.
Reverse direction and roll down toward your ankles.
Variation As an alternative, stack your legs, then roll back and forth, working shorter strokes over tight areas. Rotate your leg outward and then inward to release different areas of the calf.
The IT band runs from your hip all the way down the outside of your leg and knee. Many runners experience tightness of the IT band, which leads to pain on the outside of the knee or hip, as well as snapping at the hip. This is a good way to keep the IT band loose.
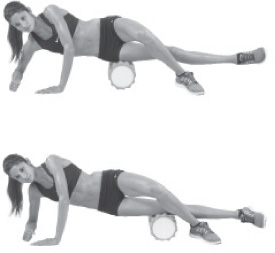
Lie sideways with the foam roller beneath your hip. Bend your top leg at the knee and drape it over your target leg; your top-leg foot should be flat on the floor. Your down-side forearm and opposite-side hand should also be on the floor.
Using your foot, elbow, and hand to push and pull, gently roll back and forth over the outside of your leg from hip to knee. Maintain tight abs and straight alignment throughout.
Variation As an alternative, increase pressure by stacking your legs. Do shorter, repetitive strokes in areas of greater tension.
Your quadriceps (thigh muscles) take a beating from hill running (especially downhill running) and speed work. This is a nice way to reward them for all the impact they absorb.
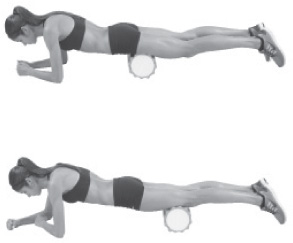
Lie facedown with your quads resting on your foam roller and your forearms on the floor.
Use your forearms and elbows to power your roll from the top of your quadriceps to the top of your knees.
Variation As an alternative, increase pressure by stacking your legs. Do shorter, repetitive strokes in areas of greater tension.
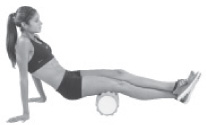
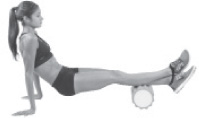
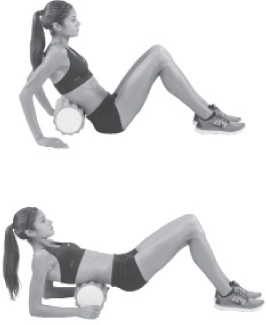
Rolling your glutes is a good way to relieve pressure on your piriformis (a small muscle in your glutes that sits atop the sciatic nerve), which in turn releases pressure on your sciatic nerve.
Sit on your foam roller with your legs extended in front of you. Place your hands behind you for support.
Roll back and forth over your glutes.
Variation As an alternative, stack your legs and focus on one side at a time. Use the ridges of the foam roller (if yours has them) to mimic pressure point therapy to your piriformis.
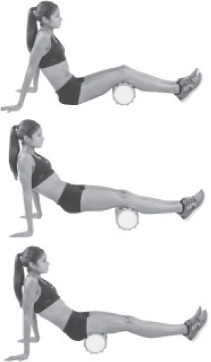
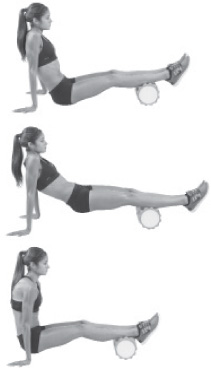
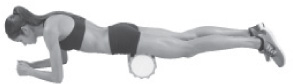
For many runners, lower-back tightness limits stride and stability. Finish your foam rolling session by working out the tension in your lower back.
Sitting on the floor, lean back until your lower back is resting against the foam roller. Stabilize your position with your hands. Your feet should be flat on the floor.
Press down with your heels to raise your glutes. Roll back onto your elbows if it helps stabilize your position, and then bend and straighten your knees to control movement as you roll back and forth over your lower back.
Active Isolated Stretching strengthens your muscles and increases your range of motion while avoiding the stretch reflex (a protective contraction that occurs when a muscle is stretched for more than 2–3 seconds), thereby providing a safer and more effective stretch for the muscle-tendon area. The following routine was created by Phil Wharton, who has worked with Olympians and world record holders including Shalane Flanagan, Bernard Lagat, Mo Farah, Khalid Khannouchi, Meb Keflezighi, and Moses Tanui. For more information and video demonstrations of stretches, visit Phil’s website at whartonhealth.com. When performing AIS, remember these three rules:
Ten reps on each side of the body should be enough for all of these AIS exercises, which are safe and effective for all training levels, although new runners should limit volume and intensity for the first 1–2 weeks.
The following five stretches, from Hamstring—AIS to Trunk Extensors (Lower Back)—AIS, can be performed individually or as part of one continuous session.
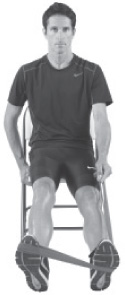
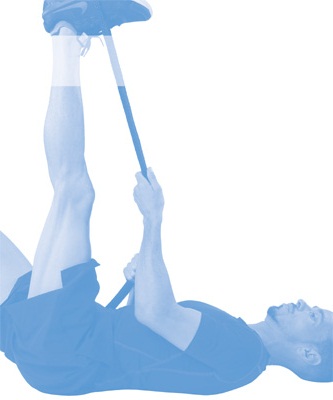
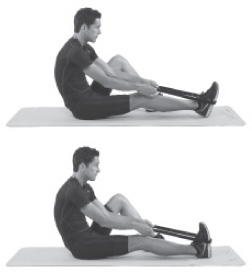
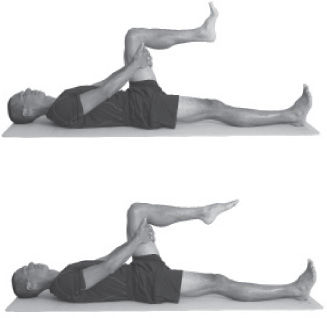
Focus on lifting your leg with your quadriceps during this stretch. Your rope should be used to facilitate no more than a small, incremental range-of-motion increase at the end of the stretch.
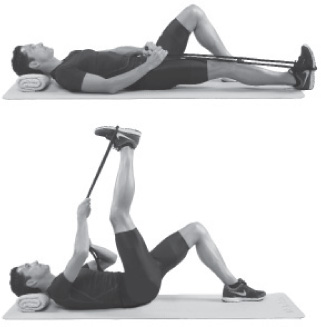
Lie on your back with a pillow beneath your head. Bend your non-stretching leg, while keeping your exercising leg flat. Loop your rope around the arch of your foot (exercising leg).
Inhale as you lift your exercising leg using your quadriceps. Keep your pelvis down during the stretch. Slow down as you near your full range of motion and use the rope to help reach that range. Don’t hold the stretch. Exhale as you return your leg to the start position. Repeat for 10 reps, then switch sides.
Increasing range of motion in your calves is vital for preventing Achilles injuries and calf soreness. The gastrocnemius is the large muscle in your calf.
Sit with one leg extended in front of you, the other bent. Loop the rope around the ball of your foot.
Using the muscles on the front (outside) of your shins, pull your foot toward your shin (dorsiflexion). Use your rope to aid the last bit of the stretch and reach your full range of motion. Don’t hold the stretch. Return to your starting position. Repeat for 10 reps, then switch sides.
Variation
As an alternative, turn the foot inward to isolate the outer calf and repeat the exercise.
To continue with this alternative stretching, turn the foot outward and repeat the exercise.
Stretching your quadriceps increases your range of motion with each stride and decreases tension on connective tissue at your hips and knees.
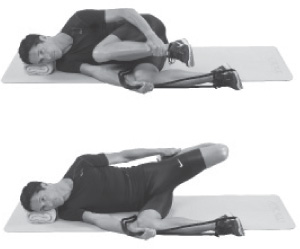
Lie on your side with your lower leg bent beneath you (stabilize with your rope, as pictured). Bend your lifted leg and grab the base of your shin.
Use your glutes and hamstrings to pull your lifted leg backward. Use your hand to aid the last bit of the stretch (don’t overstretch, as that can lead to lower abdominal soreness). Keep your pelvis forward to protect your back throughout the exercise. Return to the start position. Repeat for 10 reps, then switch sides.
Tight glutes and hips are two of the biggest impediments to stride length—and two major contributors to injuries up and down your legs. Work this exercise for stability and power.
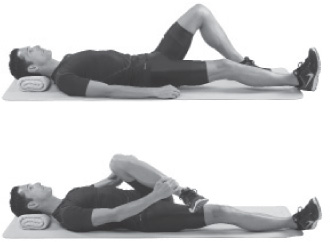
Lie on your back with one leg straight and the other bent.
Use your abdominals to pull your knee toward the opposite shoulder. Grab your bent leg at the base of the outer shin (with your opposite-side arm) and on the outer thigh (with your same-side arm). Use your hands to aid the last bit of the stretch. Don’t hold the stretch. Return to your starting position. Repeat for 10 reps, then switch sides.
Lower-back tightness will chop your stride, rob you of your speed, and take the joy out of easy distance running. Spend a minute reducing tension to ensure hours of enjoyable running.
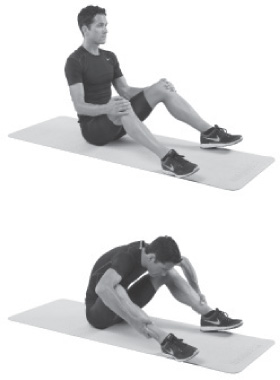
Sit with your knees bent, heels placed a little wider than shoulder width in front of you.
Slide your hands to your ankles and tuck your chin to your chest as you use your abdominals to pull yourself forward, head aimed between your knees. Use your hands to facilitate no more than a small, incremental range-of-motion increase at the end of the stretch. Don’t hold the stretch. Return to your starting position. Repeat for 10 reps, then switch sides.
Some runners have neither the time nor the props for more complex post-run CT exercises. For these runners, the following set of exercises might be the answer. This fast routine provides the ounce of prevention you’ll need for plantar fasciitis, Achilles tendinosis, tibial tendinitis, lower back pain, and more. These exercises are safe and effective for all training levels. They’re demonstrated here by Christian Cushing-murray, a former sub–four-minute miler and current masters national record-holder (age forty-five to forty-nine) for 1,500 meters.
The following seven exercises, from towel Toe Curls to The Daydreamer, are all part of the same continuous workout.
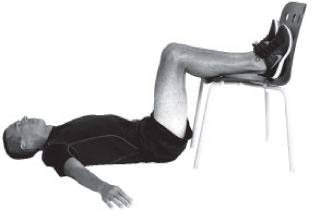
This exercise is a simple way to stave off plantar fasciitis, an injury that’s usually felt as pain in your heel (often mistaken for a bruise) or your arch.
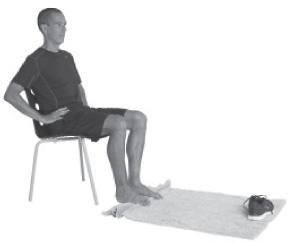
Sit barefoot in a chair with a towel spread on the floor in front of you. Put a shoe or an item of similar weight on the towel’s opposite end to create minor resistance. Keeping your heels on the floor, pull the towel toward you by scrunching your toes. Bunch the towel beneath your arch (or behind your heels) until you’ve reeled in its entire length. Repeat 1–2 times.
These simple foot exercises add stability to your ankles and help prevent both shin splints and plantar fasciitis. This foot work should be fluid and low exertion—don’t strain.
Orbits: Lie on your back with one leg straight, toes pointed upward, and one leg raised and bent 90° at the knee. Prop up the raised leg with your hands, then make circular orbits with your foot, doing 10 rotations clockwise and then 10 counterclockwise. Limit motion to the ankle and foot.
Gas Pedals: From the same position, point your foot away from your shin (plantarflexion) and then pull it toward your shin (dorsiflexion). Perform 10 reps with each foot. As an alternative to both orbits and gas pedals, use your foot to draw the alphabet and write numbers from 1 to 10.
Big-toe taps are an easy way to build strength in your arch, which makes this exercise a frontline defense against plantar fasciitis.
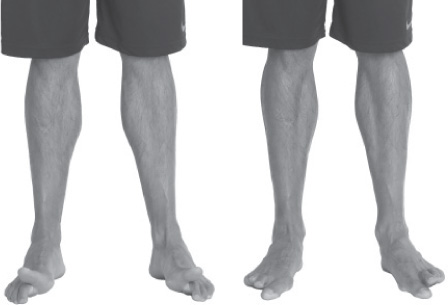
Stand barefoot with feet hip-width apart. Lift your big toes as you simultaneously press down with the other four toes of each foot.
Now reverse the motion, pressing down with your big toes as you raise your remaining toes. Start with a few repetitions and work up to 30 seconds or more.
Seated toe taps are a good defense against shin splints.
Sit in a chair with your legs bent 90° at your knees, feet flat on the floor.
Lift and lower your toes quickly and repeatedly, keeping your heels on the floor, until you feel a “burn” in the muscles outside your shins. This could take from a few seconds to 2–3 minutes. Do one or more sets.
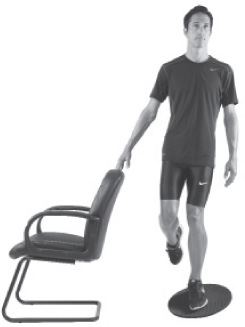
This exercise is great for strengthening hip flexors and building stability in the hips and knees. It’s also great for preventing and rehabbing knee injuries.
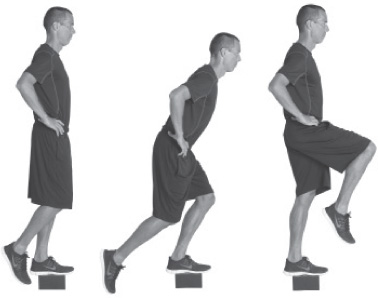
Balance on one foot, standing on a step or low platform. Your free leg should be bent slightly at the knee, with your knees aligned at the start of the exercise.
Lower your hips, keeping all your weight on your front foot. To avoid injury, you must keep your weight-bearing knee in line with your front foot. The angle of your suspended lower leg should line up with your spine. Bend down just far enough to tap the ground behind you.
Now straighten your weight-bearing leg while bringing your suspended leg forward, lifting the knee in front of you (mimic the forward drive of your stride). Keep your down foot flat throughout the exercise. Do 5–10 reps with each leg.
This is an eccentric exercise for the calves, and it’s used to prevent and rehabilitate Achilles tendinosis. Although heel dips strengthen calves, their main benefit derives from creating movement within the tendons themselves (cells rubbing against cells).
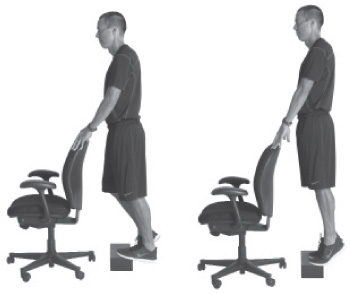
Use the balls of your feet to balance on a platform or step with your heels extending over the edge. Use a chair or other sturdy support for balance. Put all your weight on one foot and slowly lower the heel of that foot through its full range of motion.
Use both feet to rise back up, then repeat. The benefit from this exercise doesn’t come from rising on your toes; it comes from slowly lowering your heel. Start with 2–5 repetitions for each foot, then build up to 15–20. As an alternative for beginners (or for runners who are experiencing pain at the heel rather than in the mid-range of the Achilles tendon), perform heel dips on a flat surface. For treating tendinosis, perform 3 sets of 15 reps (each heel) up to twice per day, up to three months; add weight (a backpack or weights) as your strength increases.
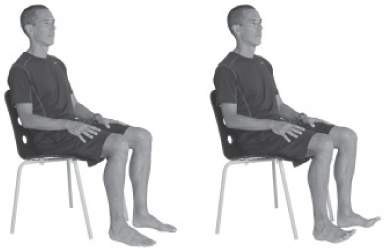
There’s no better way to release tension in your lower back than to spend a few minutes in the daydreamer position. This is a great way to finish your Household Props Post-Run Injury Prevention Routine.
Lie on your back with your arms out to the side, hands at approximately waist level, with your lower legs and feet propped on a chair. Keep a 90° bend in your knees and try to prop your feet so that they don’t roll outward. Take slow, deep breaths while relaxing. Don’t “do” anything else. Hold for 5–10 minutes.