Good communication skills aren’t just about conveying information to the outside world. They’re also the key to utilizing your body’s vast internal messaging network—the billions of neurons and trillions of neural pathways that comprise your nervous system. In the Mary Shelley novel Frankenstein, published in 1818, rogue scientist Victor Frankenstein jolts his monster to life with electrical current harnessed from a storm. In no less dramatic fashion, the electrochemical current of your nervous system animates your movements, delivers sensations, and constructs your thoughts. As a runner, you rely upon your nervous system to control every aspect of your running body. But this bioengineered software is only as good as your neural wiring, a network that stretches to the far reaches of your body and everywhere in between. Wiring this network for maximum efficiency—and then rewiring it to meet new challenges—is your job. And a properly trained nervous system makes the difference between good and great running.
Your nervous system is one of two principal communications networks within your body (your endocrine system, which produces hormones, is the other). It’s comprised of the central nervous system (CNS), which includes your brain and spinal cord, and the peripheral nervous system (PNS), which contains all the nerves outside the CNS.
Your CNS is the command center of your nervous system. It’s tasked with coordinating all physical activity and processing all sensory data. There are eighty-five billion neurons (nerve cells) in your brain and another billion in your spinal cord. Compare those numbers with the neurons possessed by a sponge (zero), a cockroach (one million), a cat (one billion), a chimpanzee (seven billion), and an elephant (twenty-three billion). That’s right, elephants have more neurons than chimps. Don’t forget that. You know elephants won’t.
Motor neurons in your CNS send messages along axons (nerve fibers) to the muscles in your body, where the neurons trigger contraction and relaxation, as well as to organs and glands. In return, sensory neurons relay stimuli detected by your senses throughout your body via the PNS back to the CNS.
Neurons can fire off messages up to one thousand times per second, although most operate at a more manageable rate of between one and four hundred per second. These messages are called impulses, and they travel at varying speeds along different types of nerves. Kick your toe while running and you’ll feel pressure almost immediately, since touch travels at 250 feet per second. Pain impulses, on the other hand, take twice as long because they travel on slower nerve fibers. Dull, throbbing pain inches along at two feet per second, giving you a two- to three-second delay before you’ll need to start hopping on one foot and cursing your toe for its clumsiness.
As you can probably guess from those speeds, it’s not electric current running through your nervous system. Instead, you have electrochemical impulses that travel several million times slower than the current feeding your television or toaster (see sidebar, “What’s a nerve impulse?” for more on impulses).
On the other hand, your CNS can fire between 1013 and 1016 total impulses per second. That’s roughly equivalent to the capability of the world’s largest supercomputer, Oak Ridge National Laboratory’s Titan, which covers 4,300 square feet, cost $97 million to build, and performs 17.59 petaflops per second (more than seventeen quadrillion operations), a feat requiring enough energy to power seven thousand homes. That’s some pretty impressive company your CNS is keeping.
When it comes to running, an untrained nervous system doesn’t know what to do. Imagine if every time you switched on the light in your living room, the garbage disposal turned on in the kitchen. You’d call an electrician to rewire your house. An untrained nervous system is like that switch. You and your workouts must become the electrician. You’ll need to rewire:
You’ll accomplish this rewiring with a combination of traditional running workouts, technique drills, plyometrics, hill sprints, balance exercises, and more.
Running begins when you “tell” your body to run. The message originates in your brain, travels to motor neurons in your spinal cord, and then is transmitted along the motor neurons’ axons to your muscles. Each motor neuron controls a specific group of muscle fibers within a single muscle—together, the neuron and the fibers it controls are called a motor unit.
A motor unit might contain only a few fibers (ten to one hundred) if it’s responsible for intricate movement, such as control of your fingers while pinning a race bib to your shirt. Or it might boast up to two thousand muscle fibers for less coordinated movement, like contracting your quads as you blast off the start line.
All muscle fibers within a single motor unit must be the same fiber type (e.g., all slow-twitch), and a motor unit’s fibers always fire simultaneously. Your CNS recruits groups of motor units within a muscle so that they can work together to contract the muscle. When contraction occurs, two mechanisms govern the force of that contraction:
You use both rate coding and recruitment when you run—you generate force by increasing the rate of impulses (thereby increasing the strength and duration of your muscle fibers’ contractions) and by recruiting larger motor units (and faster fibers), which produce more power.
Of course, there’s more to muscle fiber recruitment than generating force. Let’s look at a few other factors.
To run efficiently, you need to coordinate contraction and relaxation of muscles across multiple joints. Hardwiring better neural pathways is the key. Think of a postal carrier with a new route. Until the carrier learns all the streets and homes on the route, delivery will be slow. But once the carrier has the route down pat, it takes less time to deliver the mail—and the letters and packages all go to the right addresses! It’s the same with neuromuscular adaptation. Your nervous system learns the best new pathways for delivering impulses to muscle fibers in order to power a particular movement, and then these pathways get hardwired as recruitment patterns.
Nervous system adaptations are responsible for most early strength gains. While it’s hard to measure strength gains in runners, it’s easy to observe in weightlifters. Research suggests it takes between four to twenty weeks before muscle growth overtakes neural adaptations as the prime factor in strength gains from weightlifting. So important is neural adaptation that a 2007 study on cross education found an 8 percent strength increase in untrained limbs when opposite limbs are resistance trained. That’s the nervous system applying what it’s learned from one limb to another.
When one muscle contracts, its opposing muscle must relax. When Popeye flexes his biceps, he relaxes his triceps. That’s because a contracting muscle has to work harder when an opposing muscle doesn’t fully relax. Try flexing your own biceps while simultaneously contracting your triceps—you can’t do it! Untrained (and undertrained) muscles have a hard time coordinating contraction and relaxation. Training can change that. A 1992 study found that just one week of quad-burning knee extension exercises led to a 20 percent reduction in hamstring co-contraction.
Proper training can increase the contraction velocity of your muscle fibers. Contraction velocity measures the time it takes a muscle fiber to reach peak contraction (shortening). Average contraction velocities are:
Faster contraction velocities allow you to generate more power, which translates to faster running. A 2008 study found that highly competitive distance runners had slow-twitch contraction velocities that were 70 percent faster than their couch-potato peers and intermediate rates that were 18 percent better. An earlier study at Ball State found that marathon-type training increased slow-twitch contraction velocity up to 50 percent and intermediate velocity by 29 percent.
It’s a cliché to say that “practice makes perfect.” But it’s a cliché with legs. By incorporating multiple paces, terrains, and exercises into your workout schedule, you’ll increase your ability to recruit the full range of useful muscle fibers, increase the force of your contractions, coordinate different fiber types and muscles at varying pace and fatigue levels, and create the most efficient running movements possible.
Proprioception is your body’s ability to track its position relative to the outside world and then to adjust accordingly. Think of an Olympic gymnast as she dismounts from the balance beam. Her nervous system must process a whir of motion as she rotates her trunk and hips, adjusts the bend in her limbs, and positions her feet for landing. It’s proprioception that guides her movements.
You use proprioception every day. You use it to walk without watching your feet. Or to type at the computer without looking at the keys. Or when you run—a motion that requires your feet to leave the ground completely and then land safely time and time again.
Your proprioceptive system includes your inner ear and the nerves connecting your CNS to your muscles, tendons, and ligaments. Proprioceptive nerves relay position, tension, and stretch sensations to your CNS. Your CNS responds by triggering muscle contractions that hold or alter your body’s position. These impulses travel on the fastest nerves in your body, reaching speeds up to 390 feet per second!
Your stride is governed by proprioceptors, which regulate posture, joint movement, balance, stride length, and foot strike. If you step awkwardly during a trail run, proprioceptors immediately inform your CNS, which instructs muscles to correct the problem before you roll an ankle.
Balance plays a far larger role in running that most runners realize. After all, balance is what keeps us on our feet instead of tumbling to the ground! Think that’s easy? Then watch a child just learning to walk. Better yet, try the activities from the sidebar, “Check your balance and proprioception.” In fact, every step you take as a runner is a challenge to your balance. While in motion, you have to land on one foot, stay upright, recruit the proper muscles to ensure stability, and then launch into another stride—often over uneven surfaces. That’s an incredible feat! So incredible, in fact, that it took tens of millions of dollars and decades of research and experimentation before Boston Dynamic’s 6’2”, 330-pound Atlas, in 2013, became the first two-legged robot to walk over rough terrain.
Balance plays an especially large role every time you change direction or avoid obstacles. A 2013 study by Spanish researchers tested balance by having runners do strides that finished with a 90° sideways cut (change of direction) on a moveable platform. When the platform was allowed to wobble on the eleventh repetition, the runners showed reduced activation of the muscles that stabilize the hips and knees—the runners’ muscles were incapable of adjusting quickly to the unstable platform. They weren’t able to balance.
Luckily, balance is easy to improve. A 2006 experiment had football players spend four weeks balancing on each leg for five minutes, five days a week. The result was 77 percent fewer ankle sprains during the season. And wobble board training (as mentioned in Chapter 5) reduces the reoccurrence of ankle sprains by 50 percent.
You can’t learn new skills when your nervous system is run-down. Your CNS loses its capacity to efficiently deliver the brain’s orders to your body. And your PNS likewise loses its ability to efficiently report the outcome of those orders, as well as relevant sensations. Acquiring new skills becomes impossible because your nervous system simply can’t figure out how to perform them.
The only realistic way to deal with nervous system fatigue is to avoid it. You can’t beat it. As the Borg of Star Trek: The Next Generation always told soon-to-be assimilated races, “Resistance is futile.”
Your goal should be to identify the signs of nervous system fatigue and then dial back your effort when you experience any of them. Symptoms include:
Your grip strength is a good measurement of nervous system fatigue. You can test grip strength with a dynamometer. If your grip strength goes down, your nervous system fatigue has likely gone up. Decreased vertical jump is another good indicator, as is dropping your keys post-workout while trying to unlock your car.
Chart 11.1 A Comparison of Two Economy Curves
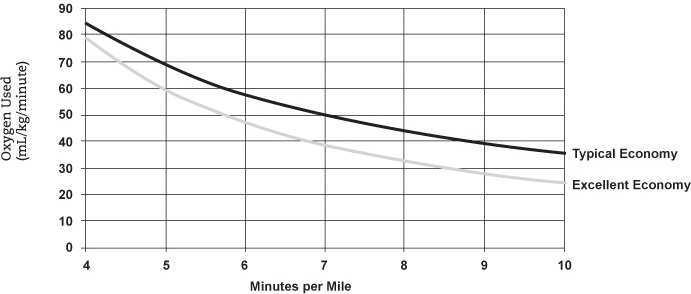
CHART 11.1 shows the performance curves of two runners, one with typical running economy, and one with excellent economy. The excellent-economy runner can maintain a faster pace at the same oxygen cost (“Oxygen Used”) as the typical runner. For example, at 50 mL/kg, the excellent-economy runner runs under six-minute-mile pace, while the typical runner manages only seven-minute pace. In fact, the runner with excellent economy uses only 40 mL/kg of oxygen at the same seven-minute-mile pace that requires the typical runner to use 50 mL/kg. Since fatigue increases as runners approach VO2 max, a runner using 40 mL/kg will feel far less fatigued than the one using 50 mL/kg at the same pace.
High-intensity, short-duration exercises are especially fatiguing for your nervous system. The closer to 100 percent effort you train at, the more stress your nervous system endures. For example, your nervous system is maxed out during sets of five reps or fewer for heavy lifts (weightlifting), where the reps represent a near-maximum effort, but you can shift the burden to your muscles by doing sets of six to twelve reps with lighter weights. The same principle holds true for running workouts.
Running economy measures how efficiently you use oxygen at a given running speed. This becomes extremely important at submaximal running speeds. A “submaximal speed” is a running effort below 100 percent of VO2 max. All races of 5K and longer (and most workouts) are run at submaximal speeds. There are three things about VO2 max and running economy that you should keep in mind:
3. The less oxygen you need to maintain a given speed, the less fatigue you’ll feel and the greater your advantage will be over someone with a similar VO2 max but inferior running economy.
Confused? Then compare running economy to gas mileage in a car. The 2013 Chevrolet Cruz Eco and the 2013 Toyota Prius both have gas tanks that hold about twelve gallons. Traveling at fifty mph, the Cruz Eco gets forty-two miles per gallon, and the Prius gets forty-eight miles per gallon. So traveling at fifty mph, the Cruz Eco will run out of gas long before the Prius, even though both cars started with the same amount of fuel. Not only that, but the Prius can travel faster than fifty mph while still using a smaller amount (or the same amount, depending upon the speed) of gas than the Cruz Eco. If the cars were runners, the Toyota Prius would have better running economy. It can go farther at the same pace, or it can go faster using the same amount of fuel. See Chart 11.1 for a comparison of the running speeds that can be maintained by runners with different levels of running economy.
Running economy is determined by a variety of factors, with genetics and nervous system efficiency at the top of the list. Genetics can include, among other things, your height, percentage of slow-twitch fibers, calf size (smaller is better), and body type—an ectomorph body type, with long, thin limbs, flat chest, equal shoulder and hip width, and low body fat, tends to be most economical. But if that’s not you, don’t despair; runners come in all sizes and shapes. As for nervous system efficiency, that refers to trainable elements like recruitment, pace, and stride.
Becoming economical involves a multi-pronged approach. There’s no magic bullet, no single strategy, like doing sets of heavy curls when your goal is big biceps. Instead, you’ll need to build better slow-twitch fibers, increase elastic recoil, rewire your nervous system, and practice, practice, practice. It’ll all part of the equation. Some types of training to focus on include:
Training for better economy might sound like a lot of work, but the truth is that all of the above elements should be included in any solid, all-around training schedule.
Table 11.2 The Effect of Running Economy on 10K Performance
|
Runner’s VO2 max |
*Projected 10K Time Based Upon Running Economy |
|||
|---|---|---|---|---|
|
(mL of O2/kg/minute) |
Poor Economy |
Average Economy |
Good Economy |
Excellent Economy |
|
30 |
1:05:24 |
1:02:13 |
1:00:37 |
59:21 |
|
35 |
58:46 |
55:54 |
54:28 |
53:19 |
|
40 |
53:09 |
50:33 |
49:16 |
48:13 |
|
45 |
48:25 |
46:04 |
44:53 |
43:56 |
|
50 |
44:28 |
42:18 |
41:13 |
40:21 |
|
55 |
41:11 |
39:10 |
38:10 |
37:22 |
|
60 |
38:25 |
36:33 |
35:37 |
34:52 |
|
65 |
36:05 |
34:19 |
33:27 |
32:44 |
|
70 |
34:03 |
32:23 |
31:33 |
30:53 |
|
75 |
32:11 |
30:37 |
29:50 |
29:12 |
|
80 |
30:23 |
28:54 |
28:09 |
27:34 |
|
85 |
28:31 |
27:08 |
26:26 |
25:53 |
|
90 |
26:29 |
25:12 |
24:33 |
24:02 |
TABLE 11.2 compares the predicted time for a runner based on VO2 max and running economy. It also illustrates how runners with lower VO2 max scores but good/excellent economy can defeat runners with higher VO2 max scores but poor/average economy. For example, a runner with a VO2 max of 70 mg/kg and good economy is predicted to run 31:33 for 10K, a time that beats a runner with a higher VO2 max of 75 mg/kg but poor economy (estimated time of 32:11). All times in the table represent 10K race times. *Times are approximations and will vary from runner to runner.
Recently, there’s been a big debate over whether VO2 max or running economy plays a bigger role in performance. The answer is that they each play a big role, so you shouldn’t ignore either. Within groups of runners with similar VO2 max measurements, the runner with the best running economy will theoretically run faster. But this doesn’t mean that an elite runner with a high VO2 max and average economy will lose to a runner with an average VO2 max and excellent economy. Table 11.2 offers approximations for what runners with different VO2 max measurements can expect to run for 10K based on their running economy.
Developing your nervous system involves exercises to improve form, balance, proprioception, and the development of neural pathways that aid muscle fiber recruitment. Important training in this chapter’s photo instruction includes:
Training from other chapters that affects the nervous system includes:
To see exactly how these workouts can be incorporated into your overall training program, skip directly to Chapter 15: Build Your Training Schedule, where sample schedules are available for runners of all fitness levels and abilities.
Technique drills train your nervous system to recruit your maximum amount of available muscle fibers rapidly and explosively. They train opposing muscles to relax and contract in unison. Drills with a plyometric component improve running economy for all races. They also contribute to tendon stiffness and fascia strength, increasing elastic recoil. You don’t have to do all the following technique drills every session. Find a routine that works for you, and repeat often (at least once every week or two) during base building, pre-season, or even off-season. Do 1–3 repetitions of each drill per workout. There are two ways to do drills:
Remember that your CNS can’t learn new skills when it’s tired. So don’t add drills to a hard workout. Follow drills with a short distance run (3–7 miles). Jessica Ng, a triple jumper currently competing for Claremont McKenna College in Claremont, California, demonstrates all drills.
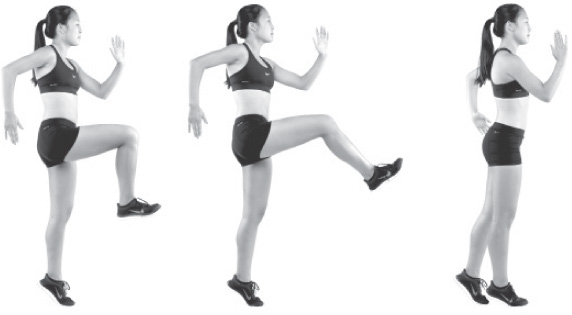
This drill is performed on the balls of your feet. For this drill, as with most in this chapter, get used to keeping your heels off the ground. When you’ve mastered this drill, you can move on to the A Skip.
 SKILL LEVEL: Beginner
 Walk forward on the balls of your feet, taking short strides while lifting your knee to hip level and swinging your opposite arm in a running motion. Your lifted knee should be at approximately 90°, with your lifted foot parallel to the floor.
 Alternate knees for 20–50 meters.
This drill works the hip flexors and quadriceps, developing range of motion, power, and coordination during quick movements.
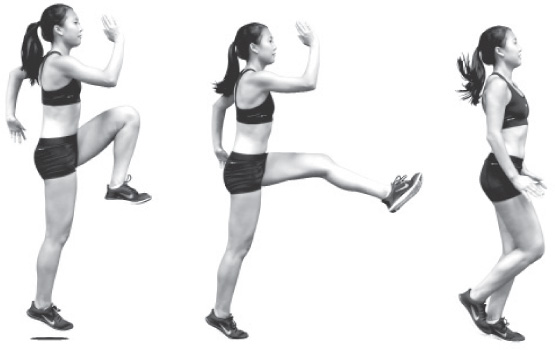
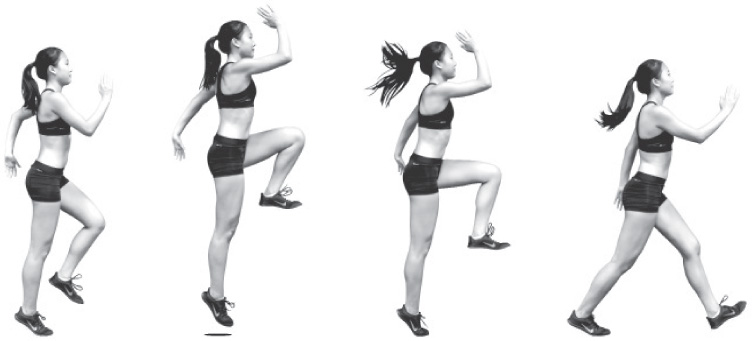
SKILL LEVEL: Intermediate, Advanced
Move forward on the balls of your feet (note: the goal is not the speed of forward movement but rather correct form), lifting your knee to 90° or more and swinging the opposite arm in a running motion. Look ahead, not down at your feet.
Keep your arm and knee raised as you execute a short skip with your lower foot.
 Drive down the raised leg, landing on the ball of your foot.
 Simultaneously raise the opposite knee and the arm on the same side as your landing foot, then perform another short skip with the lower foot. Repeat for 20–50 meters.
This drill finishes what the A March started, adding leg extension into the motion. Runners with tight hamstrings should exercise caution. When you’ve mastered this drill, move on to the B Skip.
SKILL LEVEL: Beginner
Walk forward on the balls of your feet, lifting your knee to hip level. Your lifted knee should be at approximately 90° (more if you’re flexible).
Extend your lower leg (of the lifted leg), swinging it forward.
Then actively pull your extended leg and foot to the ground, using your glutes and hamstrings to create a gentle pawing motion (as of a horse pawing the ground with its hoof in a digging motion) with your foot. Repeat with your opposite leg, then continue for 20–50 meters.
This drill finishes what the A Skip started, adding a forceful glute- and hamstring-driven pawing motion to the end of each skip. Runners with tight hamstrings should exercise caution.
SKILL LEVEL: Intermediate, Advanced
Move forward on the balls of your feet, lifting your knee to hip level. Your lifted knee should be 90° or more. Execute a short skip, as in the second step of the A Skip.
Extend your lower leg (of the lifted leg), swinging it forward.
Use your glutes and hamstrings to forcefully pull your foot back toward the ground in a pawing motion. Repeat with the opposite leg, then continue for 20–50 meters.
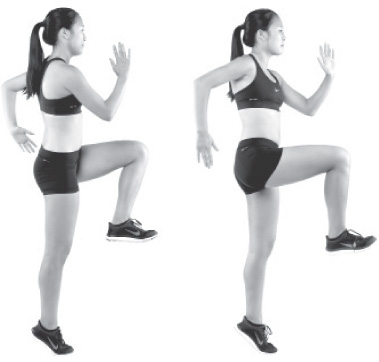
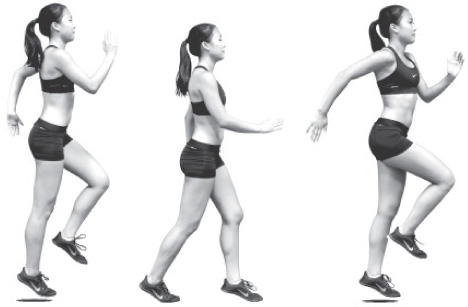
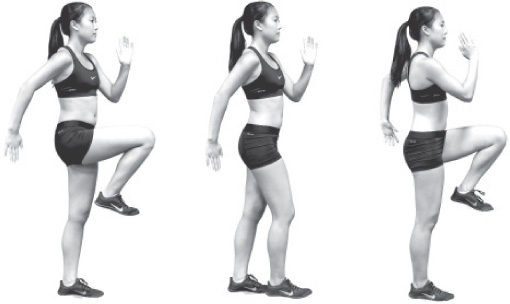
This drill exaggerates the trigger motion of your stride, when you cock your heel high, near your glutes, before extending your leg forward.
SKILL LEVEL: All levels
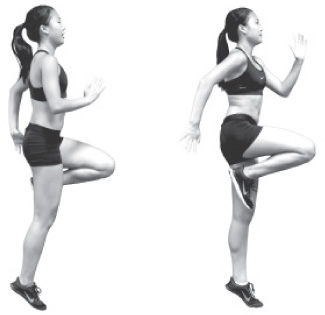
Stay on the balls of your feet while kicking your heels up underneath your buttocks. Don’t worry if you don’t touch, as less-flexible runners have trouble accomplishing this.
Make sure to pull your heels straight up to your buttocks while lifting the knee of your same leg in front of you. Move forward at a slow, steady pace for 20–50 meters.
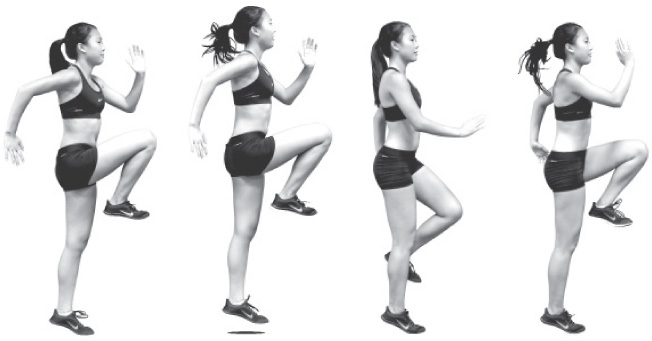
In this version of butt kicks, you’re actually trying to kick the back of your butt. It’s a great way to stretch out and warm up the quadriceps, but don’t work the drill too hard.
SKILL LEVEL: All levels
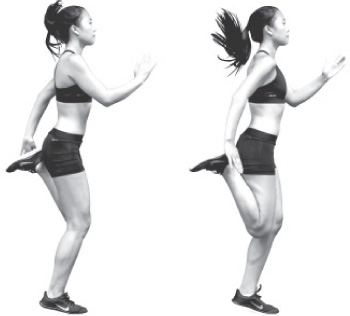
Stay on the balls of your feet. Stand tall and keep your thighs relatively perpendicular to the ground as you kick one heel back toward your buttocks. Move your arms in a running motion.
Kick your other heel backward. Don’t worry if you can’t touch your buttocks, as less flexible runners have trouble accomplishing this. Focus on the kicks, not forward motion, and do 20–50 meters.
It’s a good idea to try walking through this drill before doing it at full speed. This drill is great for developing hip abductors and adductors, as well as better coordination for your lower body.
SKILL LEVEL: All levels
Start by bringing one leg across and behind the other leg. Move your arms in a motion that mimics a slightly wider version of your running arm movement.
Use a hopping motion and lift the knee of your forward leg as you step laterally.
Bring your other leg across the front of your body, this time using a slight jump to help lift your knee high.
Land laterally to your back foot.
 Step out with the back foot and begin the drill again. Do 20–60 meters, then switch legs.
This is a simple drill for developing neuromuscular coordination associated with foot plant—it generates faster foot speed and reduced foot-plant time. It also gives your tibialis anterior and peroneal group (both outside shin muscles) a good burn.
SKILL LEVEL: All levels
Stay on the balls of your feet and take quick “steps” forward, lifting your foot 1–3 inches off the ground. Use an abbreviated running arm motion (and don’t worry if your arms don’t match pace with your feet).
Move forward 2–4 inches per step. Lift and plant quickly, but not so quickly that you lose control. To increase speed, drive the ball of your foot into the ground. 20–40 meters is good.
This simple version of skipping—think of skipping back in the schoolyard—begins an alternative trio of skipping drills to the A/B Skip routine. The focus of these skips is more on calves, quadriceps, and explosion (rather than the glute/hamstring emphasis of A/B Skip).
SKILL LEVEL: All levels
Begin skipping forward. Take off on one foot . . .
. . . then land on the same foot, after which you switch to the opposite foot . . .
. . . and skip off that foot, too. Skip for 20–60 meters.
This is a variation of normal skipping, working your calves, elastic recoil in your Achilles tendons, and lower-leg fascia. It trains your body to explode off your toes.
SKILL LEVEL: Intermediate, Advanced
Begin your skip as in normal skipping, only this time . . .
. . . spring upward, driving off your toes while lifting the opposite knee high. Swing your arms in an exaggerated motion.
Land on your takeoff foot.
Step forward into a similar spring/skip off the opposite foot. The object is to spring high, not to move forward quickly. Do 20–60 meters.
In this variation of skipping, you’ll skip for distance. This is like the “hop” part of the triple jump (the “hop, skip, and jump”). You’ll take off with one foot, land on the same foot, then quickly step into a similar takeoff and landing with the opposite foot. This drill is not for beginners.
SKILL LEVEL: Advanced
You’ll need to initiate your skip with a forceful drive forward off one foot.
Extend your back leg as you get air. Some runners find that a quick double-pump of the arms while in flight helps to align the hips (facing forward) for the imminent landing.
Land on your same takeoff leg, then do a quick stride forward into a skip on the opposite side. This in-between stride is not for length; it’s just a switchover. Do 30–80 meters.
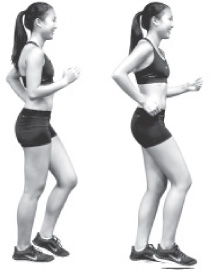
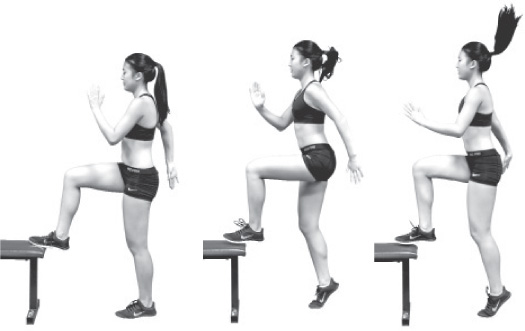
Flat-footed marching takes your calves out of the picture, forcing your nervous system to focus on contributions from your quadriceps and hip flexors.
SKILL LEVEL: All levels
Stand tall and start marching forward. Lift your knees to at least hip height.
Forcefully bring your foot back down, using a flat-footed plant—don’t bring your foot down so forcefully that you increase impact (you just don’t want to let it float down).
Lift the opposite knee, then repeat for 20–50 meters.
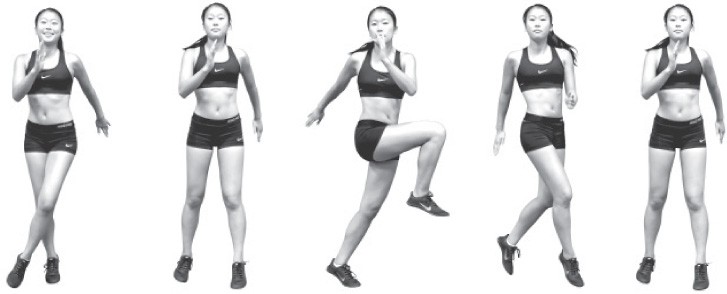
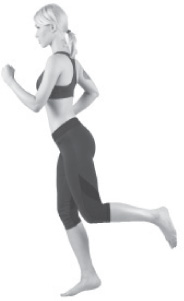
High knees requires rapid nervous system recruitment of slow-twitch, intermediate, and fast-twitch muscle fibers in your legs and core.
SKILL LEVEL: All Levels
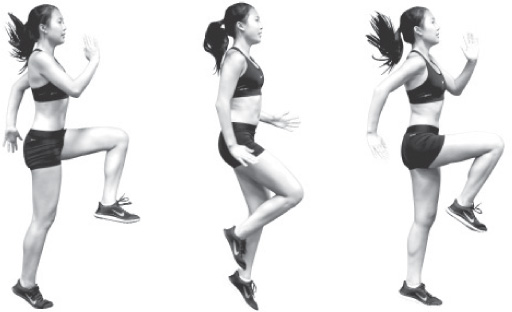
Drive one knee upward, swinging your arms high, hands at face level. Stay on the balls of your feet throughout the drill.
Forcefully bring your leg down, landing on the ball of your foot, while simultaneously beginning to drive your opposite knee upward.
Lift your knee high. Then repeat the drill for 20–60 meters.
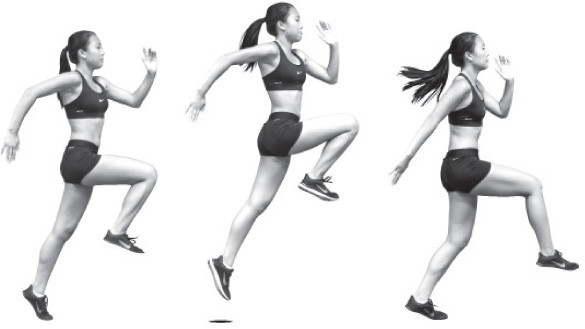
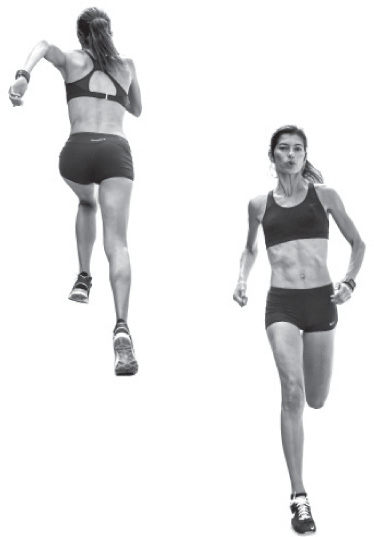
Bounding has you spring from one foot to the other. Imagine that you’re Superman or Supergirl as you take off in flight, aiming for the sky.
SKILL LEVEL: Intermediate, Advanced

Build into bounding with a couple of short hops from one foot to the other, then drive off the ball of one foot, leaping forward at about a 20–30° angle, getting some hang time in the air.
Land on your opposite foot (don’t skip!), quickly absorbing the impact and then bounding again. Repeat for 20–60 meters.
Although drills like high skipping, long skipping, and bounding all have plyometric components, actual plyometrics will further improve explosive recruitment of fibers, elastic recoil, and running economy. Rest 1–3 minutes between sets. Unlike with technique drills, you won’t want to do strides between these. Make sure you’re warmed up before attempting a plyometrics session.
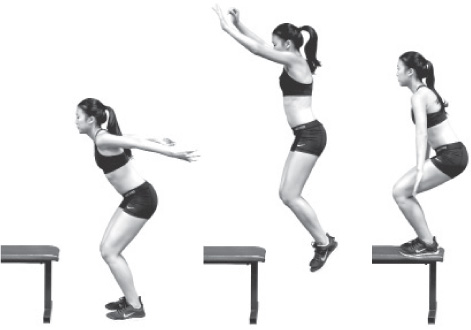
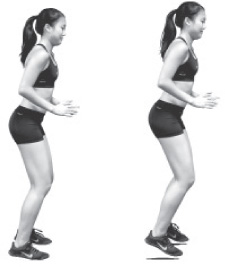
Double-leg hops are a great introduction to plyometrics. This exercise is very demanding on your quads, glutes, hamstrings, calves, etc., so focus on form and don’t skimp on recovery.
SKILL LEVEL: Intermediate, Advanced
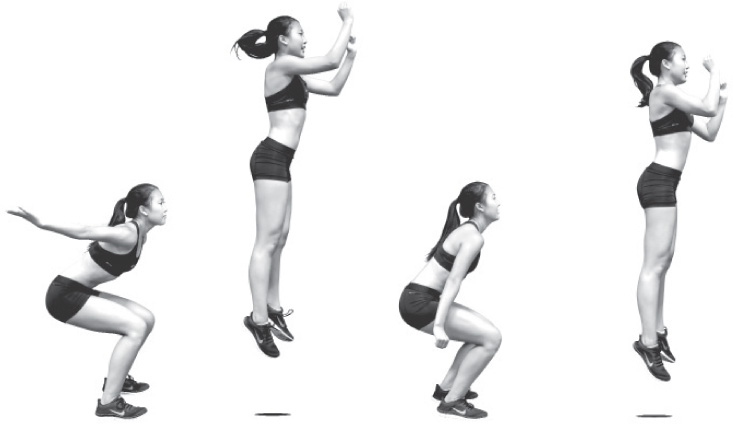
Stand up straight, feet hip-width apart, with your toes aimed forward or angled out slightly to each side. Now squat as you pull your arms down and behind you. Your quads should be almost parallel to the ground.
Explode upward, leaping as high as you can.
Let your knees bend as you land, absorbing the force of this eccentric contraction (the goal of plyometrics is to marshal this force for the coming concentric contraction).
Explode upward again. Do 1–3 sets of 3–5 reps (maximum 10 reps), with 3–5 minutes of rest between sets.
Single-leg hops increase the force of the eccentric contraction when you land. You must do double-leg hops for several sessions before including these in your program.
SKILL LEVEL: Advanced

Stand up straight, feet hip-width apart, with your toes aimed forward or angled out slightly to each side. Squat as you pull your arms down and behind you.
Explode upward, leaping as high as you can.
Land on one foot, tucking the other slightly behind you. Let your landing knee bend, absorbing the downward eccentric force.
Leap upward off one foot. Swing one arm (or both) forward and above your head to aid the jump. Do 1–3 sets of 3–5 reps (maximum 10 reps), with 3–5 minutes of rest between sets.
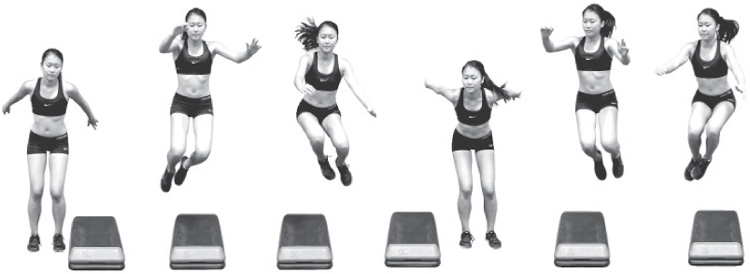
The depth jump, like the double-leg hop, improves power and economy by marshaling the force of a concentric contraction of your quads and glutes.
SKILL LEVEL: Intermediate, Advanced
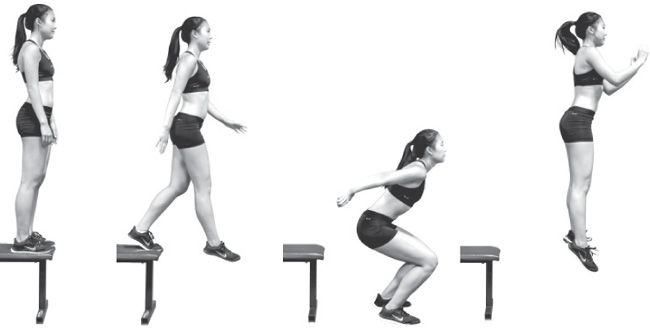
Stand on a box or other platform—20–30 inches in height—with your feet at the front edge of the platform.
Step (don’t jump!) off the edge of the platform.
Land on both feet, letting your legs bend as you absorb the downward, concentric forces.
Rebound with an explosive leap upward. Some runners use a vertical leap marker to measure height. Do 1–3 sets of 3–5 reps (maximum 10 reps), with 3–5 minutes of rest between sets.
Single-leg depth jumps increase the force factor of double-leg depth jumps. These are perfect for sprinters, jumpers, and some middle-distance runners.
SKILL LEVEL: Advanced
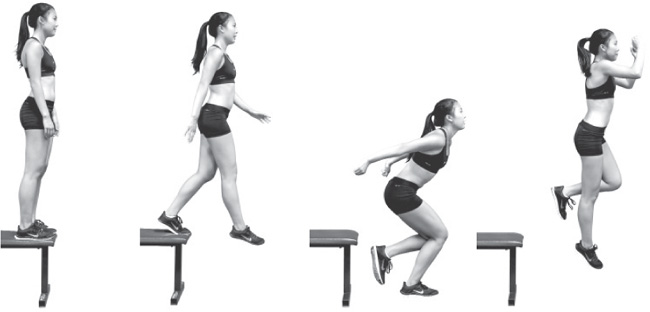
Stand on a box or other platform—20–30 inches in height—with your feet at the front edge of the platform.
Step (don’t jump!) off the edge of the platform.
Land on one foot, letting your leg bend as you absorb the downward, concentric forces. Tuck the other leg slightly behind you.
Rebound off that single leg with an explosive leap upward. Do 1–3 sets of 3–5 reps (maximum 10 reps), with 3–5 minutes of rest between sets.
Box jumps are a great all-around workout for the lower body, enhancing nervous system recruitment of explosive fibers, improving elastic recoil, and increasing strength.
SKILL LEVEL: Intermediate, Advanced
Stand in front of a box or other platform that’s at least one foot high.
Using both feet, jump up onto the platform.
Make sure both feet land squarely on the platform (for stability), then immediately jump backward to the start position, marshaling the eccentric force to jump up on the platform again. Do 1–3 sets of 5–10 reps, with 3–5 minutes of easy walking between sets.
Toe taps develop quick and nimble legs and feet. Plus they’re fun to do!
SKILL LEVEL: All levels
Stand in front of a box or platform (1–3 feet high). Place one foot on the platform.
Quickly drop the foot from the platform to the floor while lifting your opposite knee and tapping the top surface of the platform with your foot.
Just as quickly, drive your other knee back up, again tapping the top surface. Use a quick, high-step running motion for this drill. Repeat for 1–3 sets of 5–10 reps (each foot), with 3–5 minutes of easy walking between sets.
These aren’t for the beginner. You’ll need some strength background (work The Runner 360 or a weight routine from Chapter 5). Lateral barrier jumps work hip flexors, extensors, abductors, and adductors. They’re a great hip tune-up!
SKILL LEVEL: Advanced
Stand to the side of a modest barrier (one foot in height or less).
& Using both feet, jump sideways over the barrier.
Land on the opposite side, letting your knees bend slightly to absorb the eccentric force.
&  Immediately repeat the motion going the opposite direction. Do 1–3 sets of 2–10 reps (each direction), with 3–5 minutes easy walking between sets.
This drill increases foot speed, decreases foot-plant time, and delivers a plyometric burn to your quads. It’s a good exercise for the end of a session of plyometrics—not the beginning.
SKILL LEVEL: Intermediate, Advanced
Start with both feet hip-width apart and with a slight bend at the knees.
Jump forward, landing as fast as you can. Don’t jump higher than an inch or two. The object is speedy jumps, not distance. Keep going until you’ve covered 20–40 meters.
Training for balance and proprioception is important for all runners, from fans of rugged trails to those who do all their running on the local track. Every runner makes an occasional incorrect step, and it’s balance/proprioception training that teaches your body how to correct its position before injury occurs and to navigate any terrain. Begin training with simple balance exercises and then work up to the wobble board. Remember that barefoot running should be eased into slowly and then practiced sparingly (unless you’re making a transition to barefoot running, in which case you should read Scott Douglas’s book, The Runner’s World Complete Guide to Minimalism and Barefoot Running).
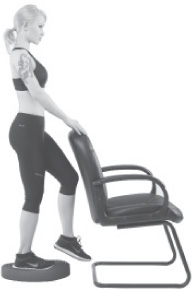
This is the simplest balance exercise of all. Close your eyes, and it becomes the simplest proprioceptive exercise, too! Beginners can wear their shoes. Advanced balancers (if you can balance on one foot for 30–60 seconds) will want to try this barefoot.
SKILL LEVEL: All levels

Stand straight, knees slightly bent. Lift one foot off the floor and hold it. When you can’t balance any longer, put the foot down. Work up to 30–60 seconds. For working proprioception, close your eyes during this exercise, but immediately open them when balance falters.
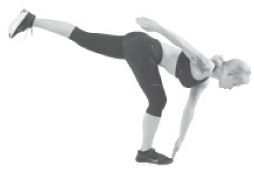
Variation When balancing itself becomes too easy, straighten your lifted leg behind you and bend down to touch your toes—do one set of 5–10 reps on each side.
Adding object control and movement to your balancing act increases the demand on your nervous system.
SKILL LEVEL: Intermediate, Advanced
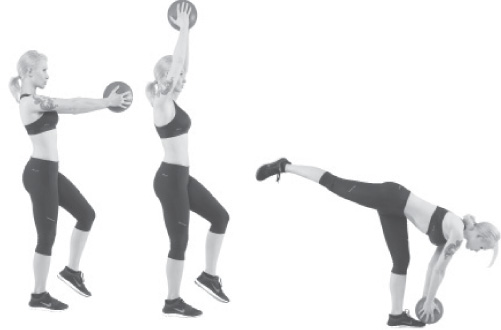
Balance on one foot while holding a medicine ball (or other ball) in front of you.
Remain balanced while moving the ball over your head.
Perform other movements with the ball, including touching your toes, holding it over each shoulder, and swinging it from side to side. Keep all movements smooth and controlled. There is no time limit for this exercise, so let fatigue be your guide.
Using a stability trainer (like the Thera-Band trainer pictured) adds instability to the surface you’re standing on, requiring advanced nervous system adjustment—utilizing both balance and proprioception.
SKILL LEVEL: Intermediate, Advanced

Balance on one foot while standing on a stability trainer. Use shoes for the first few sessions, then switch to bare feet. Work up to 30–60 seconds.
Variation If you’re having any trouble (or anxiety) balancing on the trainer, do the exercise with a chair within easy grasp. If you try this exercise with closed eyes, definitely use the chair!
This simple balance exercise prepares your legs for the instability you’re likely to encounter on trails and other uneven terrain.
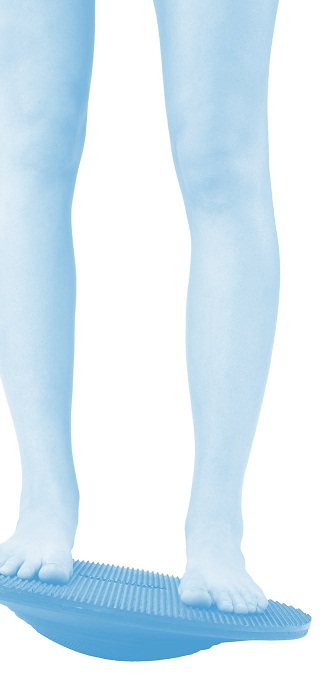
SKILL LEVEL: All levels

Stand with both feet centered on your wobble board and balance as long as you can, up to a minute. Keep your back straight, but use a slight bend in your knees—and be careful not to hyperextend them!

Variation As you become more proficient, balance on one foot. Remember to balance with your center of gravity situated over the center of the wobble board (for many exercisers, this will mean their heel, rather than their arch, is closer to the center).
Nothing feels better than running barefoot on the grass or sand. But be careful! If you’re not accustomed to running barefoot, you’ll need to start slow—no more than a mile, once or twice a week.
Run easy over grass or soft sand. The uneven surface forces your body to rely on proprioceptive senses to navigate the terrain. If you’re running on grass, watch out for potholes. If you’re running on soft sand, be careful not to dig too deep, as you can strain tendons and ligaments in your feet.
Short hill sprints are the most effective workout for recruiting the maximum amount of muscle fiber types and muscle fibers in the minimum amount of time, for coordinating muscle fiber contraction and relaxation, and for triggering stride-length adaptations in muscle spindles. Runners who are deficient in nervous system training can shed between seconds and minutes from their race times with a single session of these sprints.
SKILL LEVEL: Intermediate, Advanced
Find a hill that’s steep, but not so steep that you can’t maintain a rough approximation of your normal stride. Sprint uphill at 95 percent of max effort for 6–10 seconds. Do 4–8 reps. Walk down the hill for recovery, with additional rest creating 1–5-minute total recovery periods.
Sprint down the hill at 85–95 percent of max effort. Downhill’s eccentric contractions further challenge your nervous system, simultaneously creating protection against future quad soreness. Run 8–15 seconds (build into these reps more slowly than with uphill sprints, as you’ll need to limit your pace to one in which you are stable and in control). Do 4–8 reps. Walk back up the hill for recovery, with additional rest creating 1–5-minute total recovery periods. But a word of caution: Don’t overdo your initial downhill sessions; until your body adapts to this workout, there is a risk of injury.