6 Navigating in the SAP System
Chapter 5 taught you how to log on to and log off from the SAP system. After logon, you use the applications that belong to your task area. You fulfill different tasks by editing all screens that belong to the respective action and filling the necessary fields with content.
This chapter discusses the following:
- How to navigate in the SAP system
- How to use transaction codes
- How to enter data in the system
- Which options are available to call an application
6.1 Overview of the Navigation Options
Directly after you've logged on to the SAP system, it displays the initial screen shown in Figure 6.1.
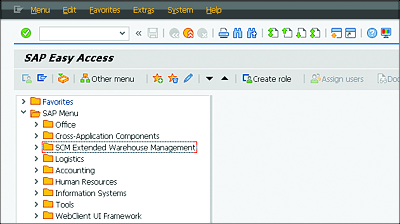
Figure 6.1 Initial Screen of the SAP System
The SAP system provides you with three options to navigate to the desired application:
- SAP Easy Access menu
- Transaction codes
- Favorites and links
You can customize the SAP Easy Access menu to your specific needs and set whether transaction codes are shown in the menu tree or in favorites. To make these modifications, select Extras • Settings in the menu bar. You can also use the key combination (Shift)+(F9) to set the following:
- Display transaction codes in the SAP Easy Access menu
- Show or hide the SAP logo
- Display favorites at the end of the menu
- Hide the SAP Easy Access menu and display favorites only
To display the transaction codes in the SAP Easy Access menu, follow these steps:
-
Choose Settings under Extras (Figure 6.2).
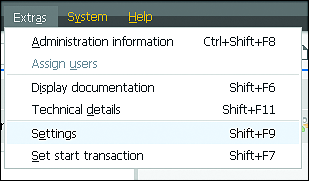
Figure 6.2 Extras Menu
-
The Settings window is now open. In this window, activate the Display Technical Names checkbox to map the transaction codes in the tree structure of the SAP Easy Access menu (Figure 6.3).
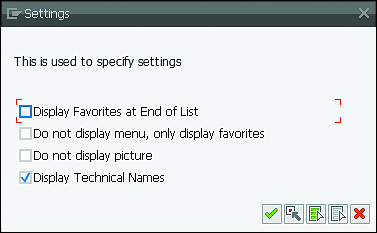
Figure 6.3 Settings Window
Here you can also set whether the favorites are displayed in the SAP Easy Access menu (via the Display Favorites at End of List checkbox).
The following two sections provide more information on the navigation options via the SAP Easy Access menu and via transaction codes. Favorites and links are discussed in Chapter 7.