CHAPTER 1 ENTRADAS
There’s nothing quite like that moment when the first platter of food comes out of the kitchen, and friends begin toasting and tasting. The recipes in this section make a fantastic first impression and are just enough to take the edge off a crowd’s hunger while the grill heats up for dinner.
Because no one wants to be in the kitchen plating finger food as the party is starting, many of these dishes can be prepared in advance, and you can get as rustic or refined as you want when it comes to the presentation. Our usual strategy is to set out a few dishes, napkins, and forks when—or even before—guests arrive, and let our hungry friends and family graze at will.
The evening’s adventure and fun really begin with the starters you choose. If you know you are going to eat a fat steak as an entrée, the perfect starter could be a chilled seafood salad or some fresh oysters. Conversely, if you’re going light with your main dishes, a fried, spicy beef empanada will start off the meal with a bang. Of course, any and all of the so-called starters in this chapter can be moved around on your menu, to be used as sides, snacks, or even light meals.
Let some components of these dishes inspire courses or meals to come. Toss some leftover Foie Gras Terrine into hot pasta in lieu of butter or olive oil. Slice up extra portions of the Smoked Beef Tongue, top with Chimi Mayo, and use in lunch sandwiches the next day. Play around with these recipes and suggestions to suit your own personal style—we’re all for it. If you’re having fun, your guests will, too.

with olives and raisins
It just feels right to kick off this book with a recipe for empanadas, not only because it is the first dish we planned for our restaurant menu but also because it epitomizes South American cooking and was a treat Gabi loved while spending summers in Ecuador as a child. Whether her grandmother made them in the late afternoon as a snack, or someone was selling them at a soccer game, the warm, hefty pockets of chopped beef or other fillings were irresistible.
Beef empanadas are the ultimate drinking food and ideal for keeping guests happy while you get the grill going. In Argentina, the beef is often hand-chopped and mixed with inexpensive fillers like hard-boiled eggs or potatoes. We make ours by using 100 percent ground beef chuck (and in the restaurant, we add a little smoked bone marrow fat to our filling to heighten the unctuousness). Cumin, paprika, and chiles add heat and smokiness, and raisins counterbalance with sweetness. Finally, a dash of vinegar helps cut the richness.
A small stock of either this filling (a picadillo, or minced beef hash) or this dough in the freezer is a host’s secret weapon. You can freeze the filling for weeks in advance and serve with fried egg and potatoes, with rice and beans, or tucked into quesadillas. For greatest ease on the day of serving, do some advance prep work: One day—even a week before—roll out the dough and cut the disks. Another day, make the filling. When you’re ready to party, all you have to do is stuff and fry. Speaking of which, you can make these easily without a deep-fryer—just heat the oil in a large pot.
MAKES FIFTEEN 6-INCH-LONG EMPANADAS
¼ cup unsalted butter
1 tablespoon chopped garlic
2 cups diced onion (from about 1 medium onion)
2 pounds ground beef chuck
2 teaspoons Hungarian sweet paprika
2 teaspoons ají amarillo powder (see Note), espelette pepper, or a pinch of cayenne pepper
2 teaspoons ground annatto seed (see Note) (optional)
2 teaspoons dried marjoram or oregano, or a combination
1 teaspoon ground cumin
1½ teaspoons freshly ground black pepper
1½ tablespoons kosher salt
1 tablespoon plus 1 teaspoon red wine vinegar
½ cup sliced pimiento-stuffed green olives
½ cup raisins
3½ pounds (2 batches) Empanada Pastry
1 egg
Neutral-flavored vegetable oil, for deep-frying
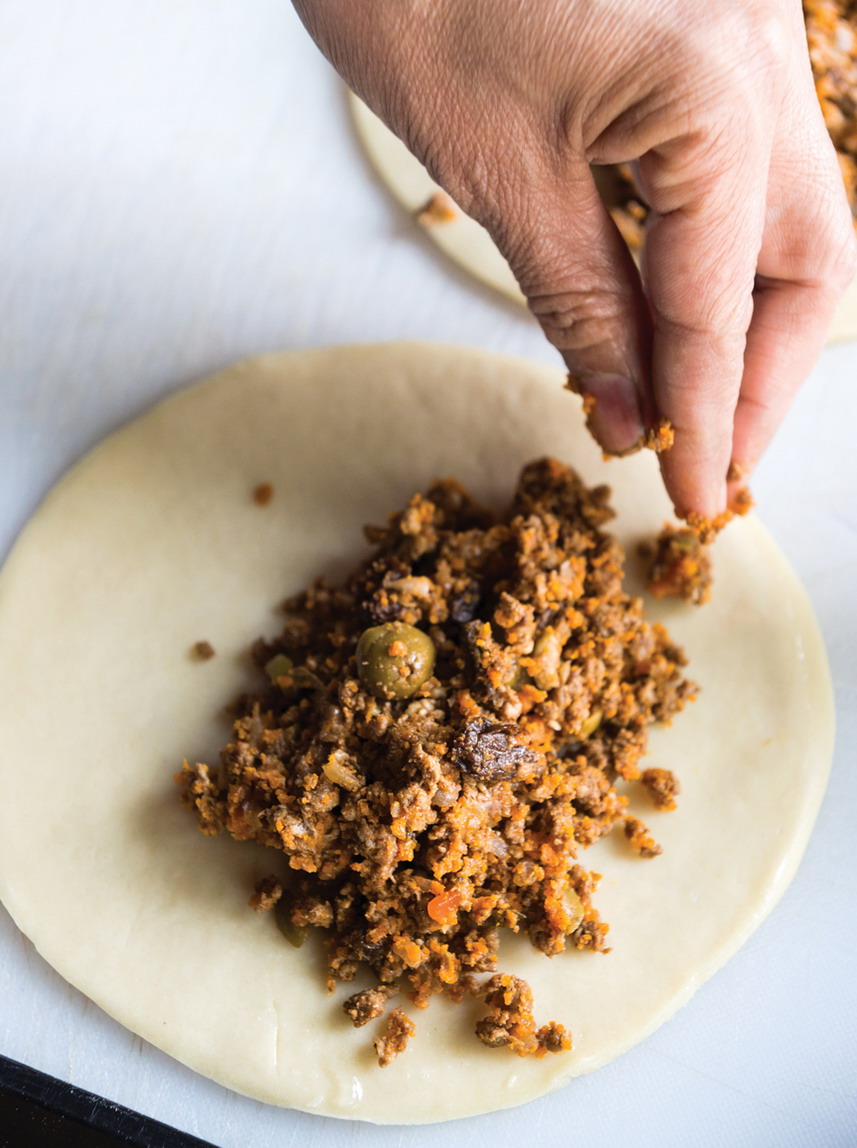
In a wide, heavy pot over medium heat, melt the butter. Add the garlic and cook, stirring, until lightly toasted, 1 to 2 minutes. Immediately add the onion and cook, stirring occasionally, until softened, about 3 minutes. Add the beef and cook, stirring until broken up, until no pink remains, about 8 minutes. Add the paprika, chile, annatto seed, marjoram, cumin, black pepper, salt, and vinegar. Decrease the heat to low and simmer, stirring occasionally, until the liquid has been absorbed and the meat is tender, about 5 minutes more. Add the olives and raisins and simmer for 5 minutes more. Adjust the seasoning, if necessary, then let cool completely. Stir from time to time while it cools to disperse the fat throughout the mix. You should have about 5 cups of filling.
While the filling cools, roll out the empanada pastry on a lightly floured surface to about ⅛ inch thick. Using a round cutter or a small inverted bowl, cut out round disks about 6 inches in diameter. Stack the disks separated by parchment paper or waxed paper.
Chill pastry for at least 20 minutes, until firm. If not using immediately, wrap the stack in plastic wrap and freeze for up to 1 month or refrigerate for up to 24 hours (after which the dough will start to oxidize and turn gray).
Crack the egg into a bowl and whisk briefly with a fork. Dip a pastry brush into the egg and paint a 1-inch circle around the outer edge of an empanada disk. Place ⅓ cup of filling onto the center of each dough round. Fold the dough in half around the filling; press the edges together. Working on a flat surface, crimp the edges with the tines of a fork or with your fingers (see photos). Transfer to a parchment paper–lined baking sheet and refrigerate the empanadas as you assemble them.
Pour about 3 inches of oil into a large pot and heat over medium heat to 375°F on a deep-fry thermometer. Set an oven to warm, about 200°F. Set a warm wet towel near the stove to wipe down any splattered oil.
Gently lower two or three empanadas at a time into the hot oil, being careful not to splash and avoiding crowding. Fry, turning over once, until the dough is browned and crispy and the inside is likely heated through, 4 to 5 minutes.
Using a slotted spoon, carefully remove empanadas from the fryer and blot with a kitchen towel or paper towel. Transfer to a baking sheet. Store in the warm oven until all the empanadas are ready to be served.
Note Ají amarillo powder, ground from a South American chile, has a medium level of heat—similar to a serrano—and a beautiful floral quality. If you can’t find it, substitute espelette pepper or a small amount of cayenne pepper. Ground annatto seed is something you’ll see all over South America. You warm up the seeds in oil and they leach out a brilliant orange color. (They call it color in Ecuador.)
HOW TO FILL AND SEAL EMPANADAS
Practice makes perfect, but don’t worry about perfection. There’s more than one way to do this (the simplest is crimping the edges of each empanada together with the tines of a fork). Empanadas are like snowflakes in that each one will be a little different no matter how well you’ve nailed down your technique. To start, try this traditional method before developing your own:
Step 1 Set the disks of pre-rolled dough near a clean work surface. Crack an egg into a bowl and whisk it briefly with a fork. Working with one disk at a time, dip a pastry brush into the egg and paint a 1-inch circle around the outer edge of the dough. Place ⅓ cup of filling into the center.

Step 2 Fold the dough in half to completely cover the filling, bringing the edges together and lining them up against one another. Press the edges of the dough together to seal.
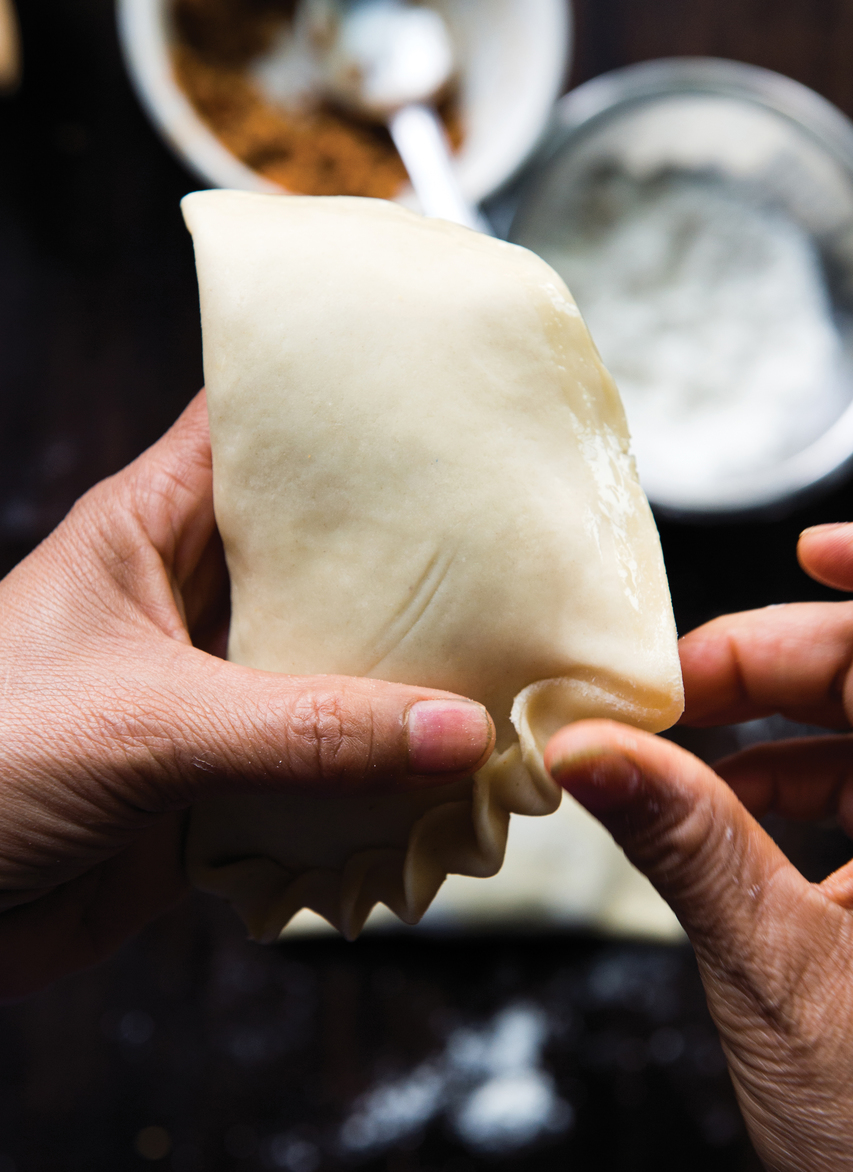
Step 3 Raise the empanada off the work service and hold it in your nondominant hand with the flat side facing vertically (as pictured). Starting at the bottom pointy end, grab the empanada dough between your thumb and forefinger, pressing your fingers together and pulling slightly to thin out and stretch the dough a little in that spot. Fold the small piece of dough inward, pressing in with your thumb while bringing your forefinger around towards you, to make a wavy crimp.

Step 4 Continue pressing and crimping small sections of dough along the length of the curved side of the empanada. Transfer to a parchment-lined baking sheet and refrigerate the empanadas as you assemble them. Empanadas can be filled and rolled up to a day in advance before frying.

with poblano and gruyère
This is our summertime go-to. We wait all year for sweet corn to come back, then combine it with char from the grill and a little kick from the poblano chiles in this smoky, spicy filling. We like it with Gruyère cheese for the added touch of funk it lends, but any melty cheese will do.
A batch of these makes a stellar beginning to almost any menu. One of these empanadas and a couple of grilled sausages, and you can go to bed happy.
MAKES ABOUT TEN 6-INCH-LONG EMPANADAS
2 ears fresh corn, husks and silks removed
2 tablespoons extra-virgin olive oil
Kosher salt
3 poblano chiles
4½ ounces Gruyère cheese, shredded (1½ cups)
2 ounces mild domestic Fontina cheese (or substitute Jack cheese), shredded (½ cup)
Kosher salt and freshly ground black pepper
1¾ pounds (1 batch) Empanada Pastry
1 egg
Neutral-flavored vegetable oil, for deep-frying
Prepare a grill to medium-high heat.
In a large bowl or on a baking sheet, toss the ears of corn with the oil; season with salt, then transfer to the grill. Let cook without disturbing until the kernels begin to look unevenly golden brown and roasted, 3 to 4 minutes. Rotate the corn slightly and continue cooking, rotating every 3 to 4 minutes, until all the sides of the corn are grilled, 12 to 15 minutes total; remove. Let cool to room temperature.
Let the poblanos cook undisturbed on the grill until the skin is completely blackened on the first side, 3 to 4 minutes, then continue cooking, rotating them every 3 to 4 minutes until they are completely charred black, about 12 minutes total. Transfer to a bowl, cover it tightly with plastic wrap, and let cool. Peel away the charred skin and remove the seeds and the stem. (Rinse under cold water if you are having a hard time cleaning off the charred skin.)
Slice the kernels off the corn using a sharp knife. Dice the poblanos into ¼-inch pieces. Set aside 1 cup of the corn kernels and ¾ cup of the diced poblanos for the filling; reserve the rest for another use.
In a large bowl, combine the 1 cup of the grilled corn kernels, ¾ cup diced poblano, and the cheeses; season with salt and pepper and toss to combine. Chill until ready to use; you should have 3½ cups of filling. Taste and adjust the seasonings, if necessary, before filling empanadas.
Fill and fry the empanadas following the instructions in How to Fill and Seal Empanadas.
Seasonal Vegetable Variations
FALL, sweet potato: Substitute small cubes of roasted sweet potato for the corn; mix with Gruyère or cheddar.
WINTER, broccoli: Substitute small pieces of roasted broccoli for the corn; mix with equal parts ricotta and blue cheese.
SPRING, chard or morels: Substitute blanched, chopped Swiss chard (excess water squeezed out) or sautéed morel mushrooms for the corn; mix with Jack and chèvre cheeses.

with espelette mayo
Any artichoke lover would be more than happy to eat a boiled one accompanied by either a butter- or mayonnaise-based dip. But brushing a little olive oil on an artichoke and searing it on the grill makes it otherworldly, adding crispiness and smokiness that go even better with creamy dips.
You don’t want to deal with boiling artichokes while guests are waiting. Precook these a day ahead, then reheat and char them on the grill just before serving.
Espelette, which adds kick to our creamy mayonnaise sauce, is a dried red chile from the southwestern region of France that’s growing in popularity here in the States. It has a moderate level of heat and a nice citrus quality. You can find it at gourmet markets.
SERVES 4 TO 8
1 cup mayonnaise, homemade or store-bought
1 tablespoon ground espelette pepper
1 tablespoon fresh lemon juice
⅛ teaspoon garlic powder
⅛ teaspoon kosher salt
Artichokes
4 cloves garlic
1 lemon, halved
4 large artichokes
Kosher salt
Freshly ground black pepper
Extra-virgin olive oil
Edible flowers, for garnish (optional)
To make the espelette mayo, in a bowl, whisk together the mayonnaise, espelette pepper, lemon juice, garlic powder, and salt until combined. Chill until ready to serve.
To cook the artichokes, bring a large pot of salted water to a boil. Add the garlic cloves. Squeeze the lemon juice into the pot and drop in the halves. Add the artichokes, bring the water back to a simmer, and cook until the artichokes feel tender, about 25 minutes. Test for doneness by piercing the heart with a paring knife; the knife should release easily. Drain and transfer to a cutting board to cool. This can be done up to 2 days in advance. Store wrapped in the refrigerator.
To finish the artichokes, cut them in half lengthwise, then scoop out the choke and some of the soft inner leaves from around each heart. Liberally season the remaining parts with salt and pepper and drizzle with oil.
Prepare a grill to high heat and be sure to carefully oil the grates.
Transfer the artichokes flat side up to the grill; cook until golden brown and lightly charred on one side, about 10 minutes. Flip and continue to cook until grill marks appear, 5 minutes more. Remove, drizzle with more oil, and season with salt and pepper. Garnish with edible flowers and serve with the espelette mayo for dipping.
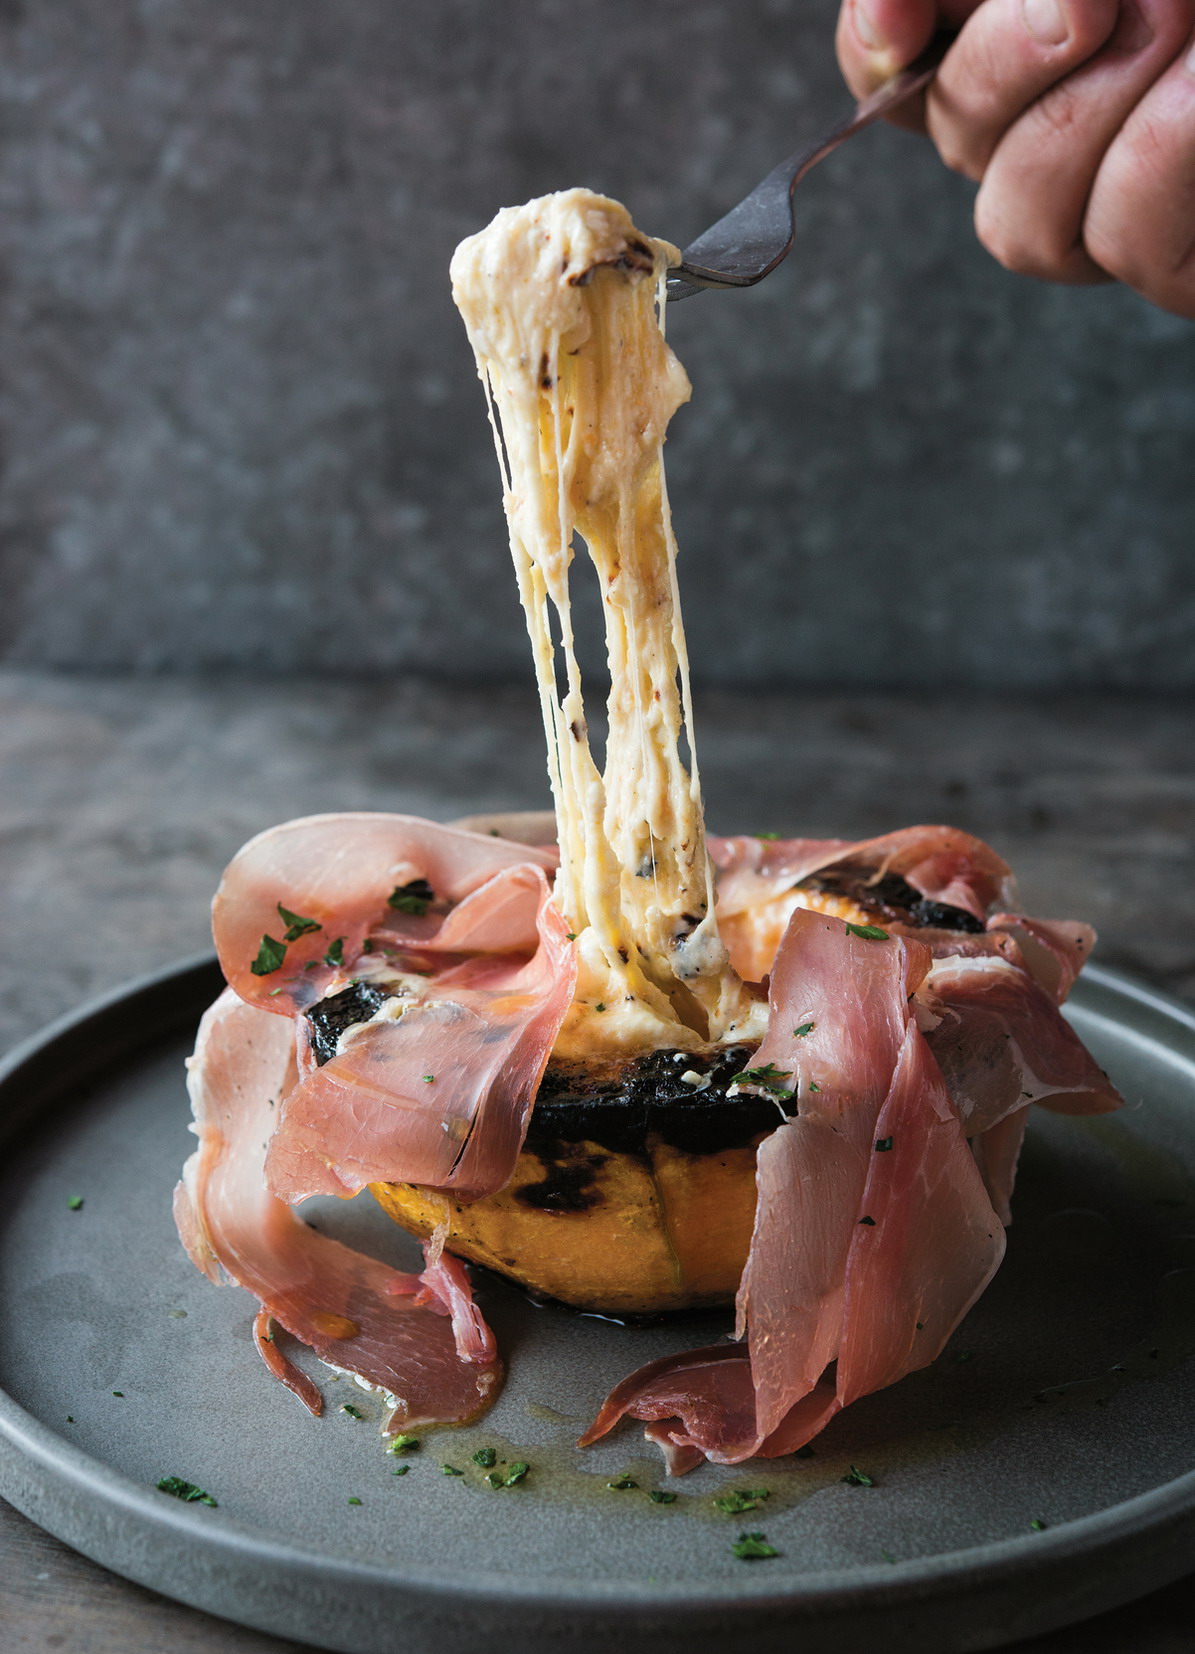
with hand-stretched mozzarella curds and prosciutto
A fun take on the classic pairing of raw melon and prosciutto, this recipe works one of two ways. The first requires inferno-like heat levels, which you can achieve either under a kitchen broiler as instructed in the recipe, or by tucking the melon under the fire cage of an Argentinian-style grill. The high heat helps the cheese to start bubbling almost immediately, before the cantaloupe has a chance to get mushy.
If you’re determined to start up the grill, though, try this second option, which will yield great results and similar flavor profiles: Prepare a grill to high heat, then slice the peeled melon into 2-inch-thick wedges. Brush the wedges with oil, season with salt and pepper, and grill them on both sides until lightly charred (about 4 minutes total). Plate and top with the prosciutto and ¾ pound thinly sliced fresh mozzarella (instead of the mozzarella curds—which you can find online or at specialty cheese chops—or dry pizza mozzarella listed in the recipe). Garnish as described.
SERVES 4
1 small, firm cantaloupe (about 4 pounds)
½ cup extra-virgin olive oil
Kosher salt and freshly ground black pepper
8 ounces mozzarella curds (or substitute low-moisture mozzarella)
4 ounces thinly sliced prosciutto
1 tablespoon chopped fresh flat-leaf parsley leaves
Preheat a broiler and set a rack in the top of the oven. Place the cantaloupe on a cutting board and slice off the stem end and its opposite end to create two flat surfaces. Make a parallel slice to cut the melon in half; remove and discard the seeds.
Place each half, cut side down, on a work surface; trim away the skin with a sharp chef’s knife. Flip the halves over and rub each inside and out with 2 tablespoons of the oil; season all over with salt and pepper.
Crumble the mozzarella curds (or break up the mozzarella cheese into small pieces, if substituting) into a bowl; season generously with salt, pepper, and ¼ cup of the oil and toss well. Fill the inside of the melon halves with the mixture. Place the melon in a 10-inch cast-iron pan (or any other heat-resistant pan) to fit snugly.
Set the pan that holds the cantaloupe on the top rack just below the broiler. Cook for 3 to 4 minutes, until the cheese curds start to brown. Stir with a spoon, flipping the melted part under and the uncooked cheese on top. Broil another 3 minutes, then stir again, pulling and stretching the cheese to look like melted mozzarella. If the curds are not melting in this time, flip the cheese inside the cantaloupe again and continue cooking and flipping the cheese as needed, no more than 12 minutes total.
Place the melon halves on a cutting board and let rest for 3 minutes so the cheese can firm up slightly. Slice each in half and transfer to four serving dishes. Drape each melon quarter with two to three slices of prosciutto, then drizzle with the remaining 2 tablespoons of oil. Garnish with parsley and serve.

with button mushroom confit and balsamic brown butter
We’re big fans of any cheese plate, but a warm, roasted cheese dish offers an element of surprise and comfort that no standard cheese board could hope to deliver. This particular version is our spin on provoleta, an Argentinian starter that consists of a thick slice of provolone grilled or broiled until just gooey. We wanted a cheese that would stay creamy at any temperature and not get rubbery, which is why this recipe requires homemade ricotta (it is easier to make than it sounds and offers a better texture and flavor in this dish than any commercial version can deliver). Pop it under the broiler and watch it puff up until light and airy with a gorgeous golden-brown cap.
A drizzle of vinegary butter sauce makes this even more of a masterpiece for little effort. In the summer, try the ricotta and sauce topped with halved cherry tomatoes and basil. In the fall, replace the tomatoes and basil with diced roasted squash and sage. In the spring, try fresh favas or English peas. This dish works great not just as a starter or small meal but also as an accompaniment to any grilled protein.
SERVES 4
Button Mushroom Confit
½ cup extra-virgin olive oil
½ teaspoon red pepper flakes
2 tablespoons chopped garlic
1 pound button mushrooms
½ cup white wine
½ teaspoon kosher salt
¼ teaspoon freshly ground black pepper
½ cup unsalted butter
2 tablespoons balsamic vinegar
¾ teaspoon kosher salt
¼ teaspoon freshly ground black pepper
2 cups Homemade Ricotta
½ teaspoon flaked sea salt
1 tablespoon chopped fresh flat-leaf parsley leaves, for garnishing
Grilled Bread or sliced baguette, for serving
To make the button mushroom confit, in a nonreactive medium pot over medium heat, combine the oil, red pepper, and garlic. Cook, stirring, until the garlic is lightly toasted, 1 to 2 minutes. Add the mushrooms and wine and cover. Adjust the heat to medium-high and bring to a simmer; let cook for 5 minutes, until the mushrooms have softened. Uncover and let cook until the wine has evaporated, about 5 minutes. When the mushrooms start to sizzle and brown, remove from the heat. Stir in the salt and pepper and keep warm until ready to serve.
Preheat the broiler.
To make the balsamic brown butter sauce, in a small pot, melt the butter over low heat and cook, stirring, until deep brown, about 6 minutes. Remove from the heat and let cool for 2 minutes. Add the vinegar, salt, and pepper. Keep warm.
To serve, divide the ricotta among four small (2-cup) baking dishes or one large (2-quart) baking dish, slightly mounding the cheese in the center. Broil until browned across the top and heated all the way through, 5 to 8 minutes for the small dishes, and 14 to 20 minutes for the large baking dish. Sprinkle with the sea salt, top with the mushrooms, and drizzle each portion with a spoonful or two of the brown butter sauce. Garnish with parsley and serve with grilled bread and extra brown butter sauce on the side.
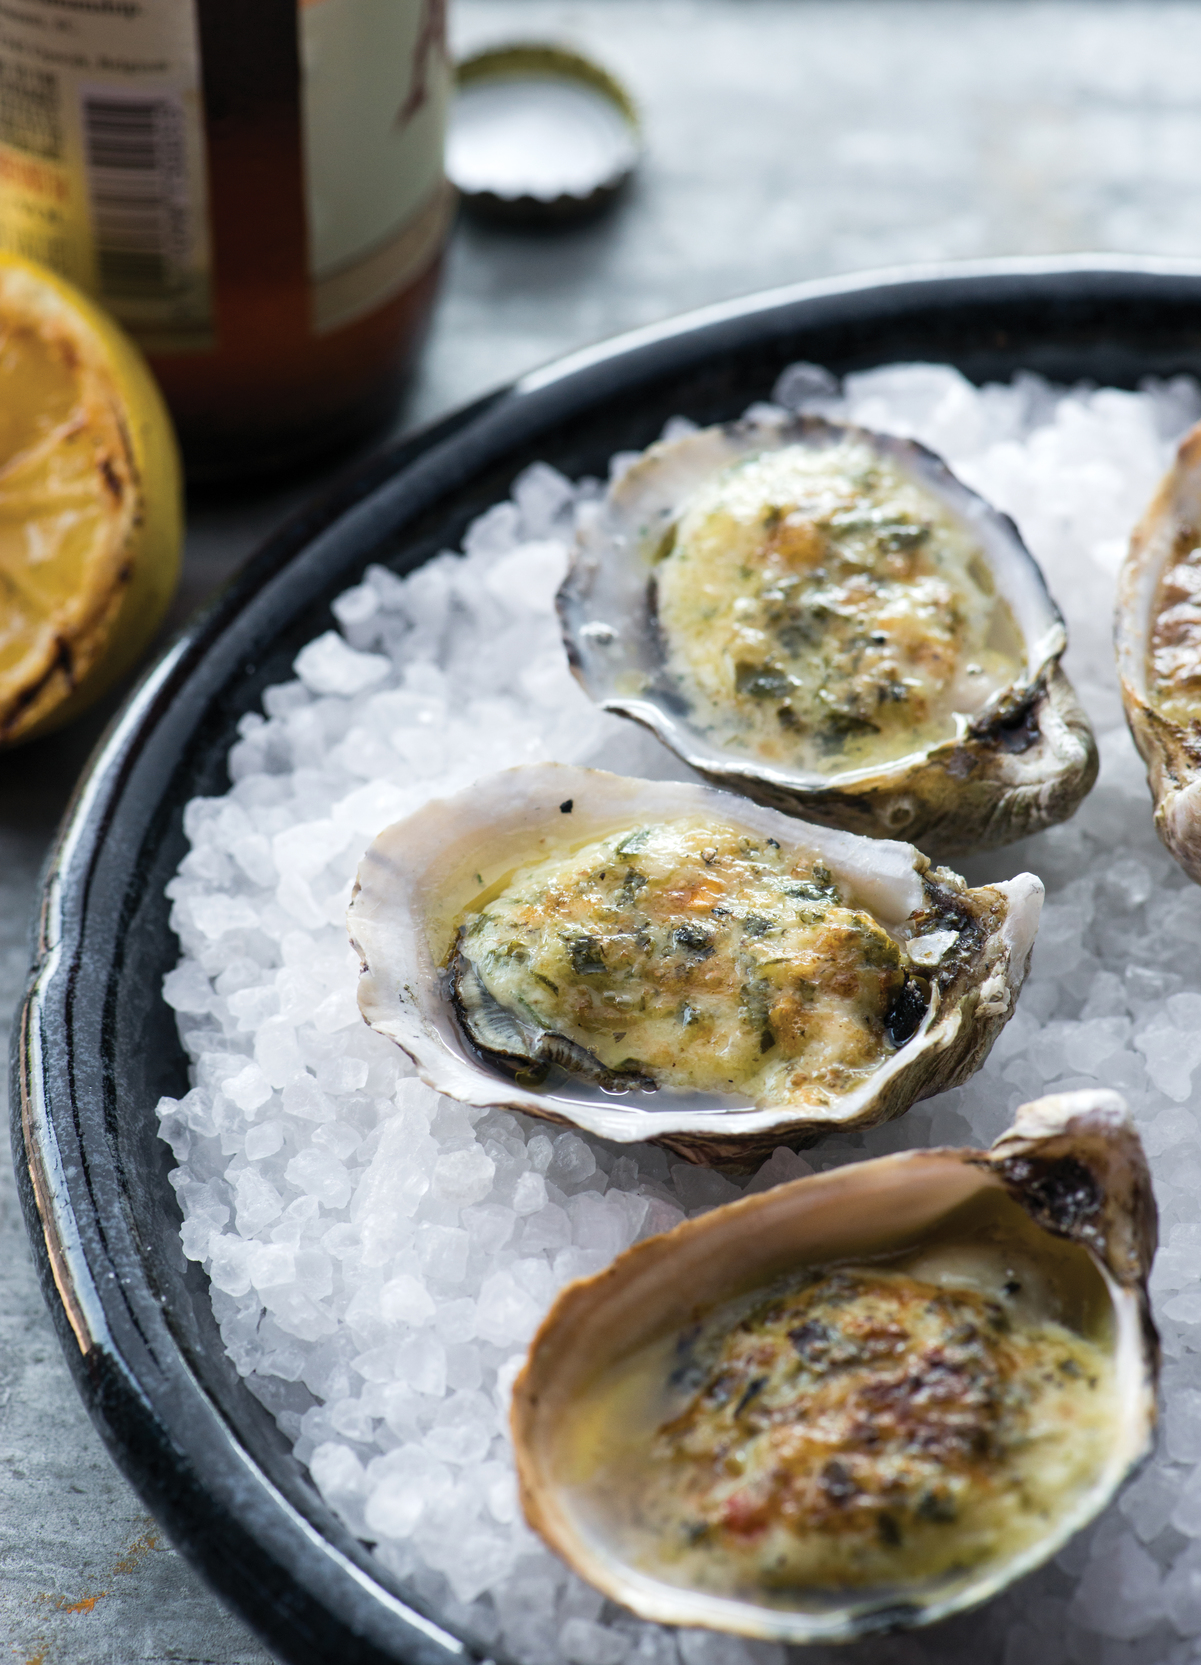
with chimi mayo and manchego
Put us near a raw bar, and Gabi will happily eat oysters by the dozen. Greg, not so much: he prefers the transformed texture of a cooked oyster. This grilled preparation is the best of both worlds—it maintains all of the fresh oceanic flavor of raw oysters and complements that inimitable flavor with satisfying char, fire, fat, and a meatier texture. Because of the richer flavor, you can get away with buying and shucking far fewer of these oysters to feed your clan.
For such a limited cook time on the grill, the oysters pick up an impressive amount of smokiness. But the real surprise is how well the Manchego cheese works with them. We recommend having some good crusty bread on hand to dab at the savory juices and bits left behind in the shell.
MAKES 24
1 cup Chimi Mayo
2 tablespoons fresh lemon juice
2 ounces Manchego cheese, finely grated (½ cup firmly packed)
24 live oysters, scrubbed clean
Coarse rock salt, for lining the pan
Crusty bread, for serving
In a bowl, combine the chimi mayo, lemon juice, and Manchego and mix well.
Prepare a grill to high heat. Meanwhile, shuck the oysters (see How to Shuck an Oyster), preserving their juices in the shells.
Line the bottom of a cast-iron or other heavy-duty skillet with coarse rock salt and nestle the oysters on top. If you don’t have rock salt, set down a bed of uncooked lentils or lightly crumble some aluminum foil and nestle the shells into it to keep them in place. Place a dollop of the mayo-Manchego mixture onto each.
Flatten the surface of the hot coals and place the pan directly on the coals. Close the lid of the grill. Roast the oysters until they are just warmed through and the mayo begins to brown, about 5 minutes. Serve immediately with oyster forks and crusty bread.
How to Shuck an Oyster
You’ll need a shucking knife and a clean hand towel for this.
Place the oyster on a small folded towel with the flat side facing up. Grip the oyster on its wider end with your nondominant hand, using the towel to protect your hand. Dig the tip of the oyster knife into the hinge of the oyster shell (it’s located on the narrower end), and apply firm, steady pressure, slowly wiggling the knife back and forth to help loosen the hinge. Once the shell cracks open, slide the knife between the top and bottom layers to completely separate them, pressing the knife along the top shell to detach the oyster cleanly. Discard the top shell and detach each oyster from its bottom shell using the oyster knife. Clean away any grit or broken shell, being careful not to spill the juices.

with avocado, radish, and shiso
When December strikes in the Pacific Northwest, it’s Dungeness crab season. Compared to Maryland blue crabs, Dungeness have huge bodies with unbelievable amounts of meat, all of which is good for cooking and eating. They are also, in our opinion, some of the sweetest and most delicious crabs anywhere. The season is long, so the meat is pretty consistently available wherever you are, but if you can’t find it, you can substitute any lump crabmeat.
Here, we give the crab a hint of umami, then pair the crab with toasts, radishes, and cucumber for crunchy contrast. For a gluten-free option, omit the bruschetta and serve the crab salad atop a ripe avocado half or a bed of sliced avocado.
Shiso and tobiko are usually found in Japanese or other Asian markets. Make the soy dashi and vinaigrette before starting on the other elements.
SERVES 4
8 ounces fresh Dungeness crab, picked clean of shells
2 tablespoons finely chopped chives
2 fresh shiso leaves, thinly sliced (or substitute fresh basil)
1 tablespoon yuzu-flavored tobiko, mixed with 2 tablespoons extra-virgin olive oil
3 tablespoons Soy Dashi (or substitute an additional 1 to 2 teaspoons soy sauce in the crab salad)
5 tablespoons Citrus-Soy Vinaigrette
Bruschetta
Grilled Bread or toasted, thickly sliced bread
12 very thin slices English cucumber
2 small radishes, thinly sliced
1 ripe avocado, pitted and diced
Kosher salt and freshly ground black pepper
To make the crab salad, combine the crabmeat, half of the chives, half of the shiso, and half of the tobiko mixture in a medium bowl. Add the dashi and vinaigrette; stir to combine. Adjust the seasoning as needed.
To make the bruschetta, while the bread is still warm, top with the crab salad, dividing evenly among the toasts. Overlap three slices of cucumber on top of each, then four to five slices of radish and some of the avocado (season it lightly with salt and pepper). Drizzle the remaining tobiko mixture over the top of each bruschetta. Garnish with the remaining chives and shiso.

with smoked beef marrow bones, green onion, and jalapeño
People lose their minds over this chowder. Greg is from New England, so we wanted to serve a creamy version on our menu, and we sought to make a gluten-free version that still delivered on richness and texture. We go through a lot of this chowder, regardless of the time of year or weather.
The base starts off loose and brothy, so the clams can open inside the broth and release all their juices. To fortify the body of the chowder later, we add silky, unctuous smoked bone marrow.
At the restaurant, we garnish the marrow bones with toasted garlic bread crumbs for crunch, but you can leave them off to keep the soup gluten-free. For balance against all the richness, go heavy on the fresh herbs and green onions. Lacing each marrow bone with sliced jalapeño helps, too.
SERVES 6
Chowder
6 tablespoons unsalted butter
½ cup diced bacon, homemade or store-bought (from about 4 slices)
2½ teaspoons chopped garlic
½ teaspoon red pepper flakes
1 cup diced onion (¼-inch cubes)
½ cup peeled and diced carrot (¼-inch cubes)
½ cup diced celery (¼-inch cubes)
2 cups white wine
2 cups heavy cream
1 cup milk
2 teaspoons sambal olek (or substitute a few dashes hot sauce such as Tabasco)
Kosher salt and freshly ground black pepper
1½ cups peeled and diced russet potato (¼-inch cubes)
2½ pounds fresh, purged manila clams in the shell (see How to Purge Live Clams, at right)
Garnish
Flaked sea salt
Toasted Garlic Bread Crumbs (optional)
1 large jalapeño pepper, very thinly sliced
⅓ cup thinly sliced green onion (green parts only)
2 tablespoons chopped fresh flat-leaf parsley leaves
To make the chowder base, in a large, heavy pot over medium heat, combine the butter and bacon; cook until the bacon starts to brown, about 5 minutes. Add the garlic and red pepper flakes and cook, stirring occasionally, until the garlic is lightly browned, about 2 minutes. Immediately add the onion, carrot, and celery and cook, stirring occasionally, until the onion is translucent, about 5 minutes. Stir in the wine. Bring to a boil, skimming away any impurities or foam that rise to the top, then add the cream and milk. Bring to a boil, then add the sambal olek; season with 2½ teaspoons salt and ½ teaspoon pepper. Add the potatoes and bring the mixture up to a simmer. Taste and adjust the seasoning, if necessary, then remove from heat. At this point you can cool the chowder base in the pot and refrigerate for up to 4 days until ready to use.
To prepare to serve, preheat the oven to 450°F. Place the prepared smoked marrow bones on a baking sheet and roast until heated through, 10 to 15 minutes. (Watch carefully to avoid overheating, which would cause too much of the marrow to render out of the bones.) Keep warm.
Meanwhile, add the clams to the chowder base; cover and bring to a boil over medium heat. Reduce to a simmer and cook until the shells have all opened, about 5 minutes. (Discard any clams that do not open.) Taste and adjust the seasoning, if necessary.
To serve, divide the chowder among six warmed soup bowls. Sprinkle each warm marrow bone with sea salt, then sprinkle with the bread crumbs to cover. Line each bone with jalapeño slices, slightly overlapping. Place one bone on the side of each bowl, then garnish bowls with the green onions and parsley. Serve immediately, encouraging guests to scrape the marrow into the chowder before eating, jalapeños and all.
Place the clams in a large bowl or container and run cold water over them, stirring them around with your hands; drain off the dirty water. Repeat two more times, then cover the clams with fresh cold water. Add enough salt to mimic the saltiness of the sea. Cover the container completely so that it’s dark in the bowl and refrigerate for a couple of hours or up to 12 hours. Drain off the salty water, then rinse clams three more times to wash away any salty water or dirt that was purged from their shells.
MAKES 6
6 (4-inch) beef marrow bones, split lengthwise by your butcher (or substitute 2-inch pipe marrow bones)
Cover the marrow bones in water and refrigerate overnight. The next day, remove from water and pat dry.
Prepare a smoker with mesquite wood chips and preheat to 200°F. Smoke the bones until caramel colored, about 1 hour. Refrigerate until ready to use.
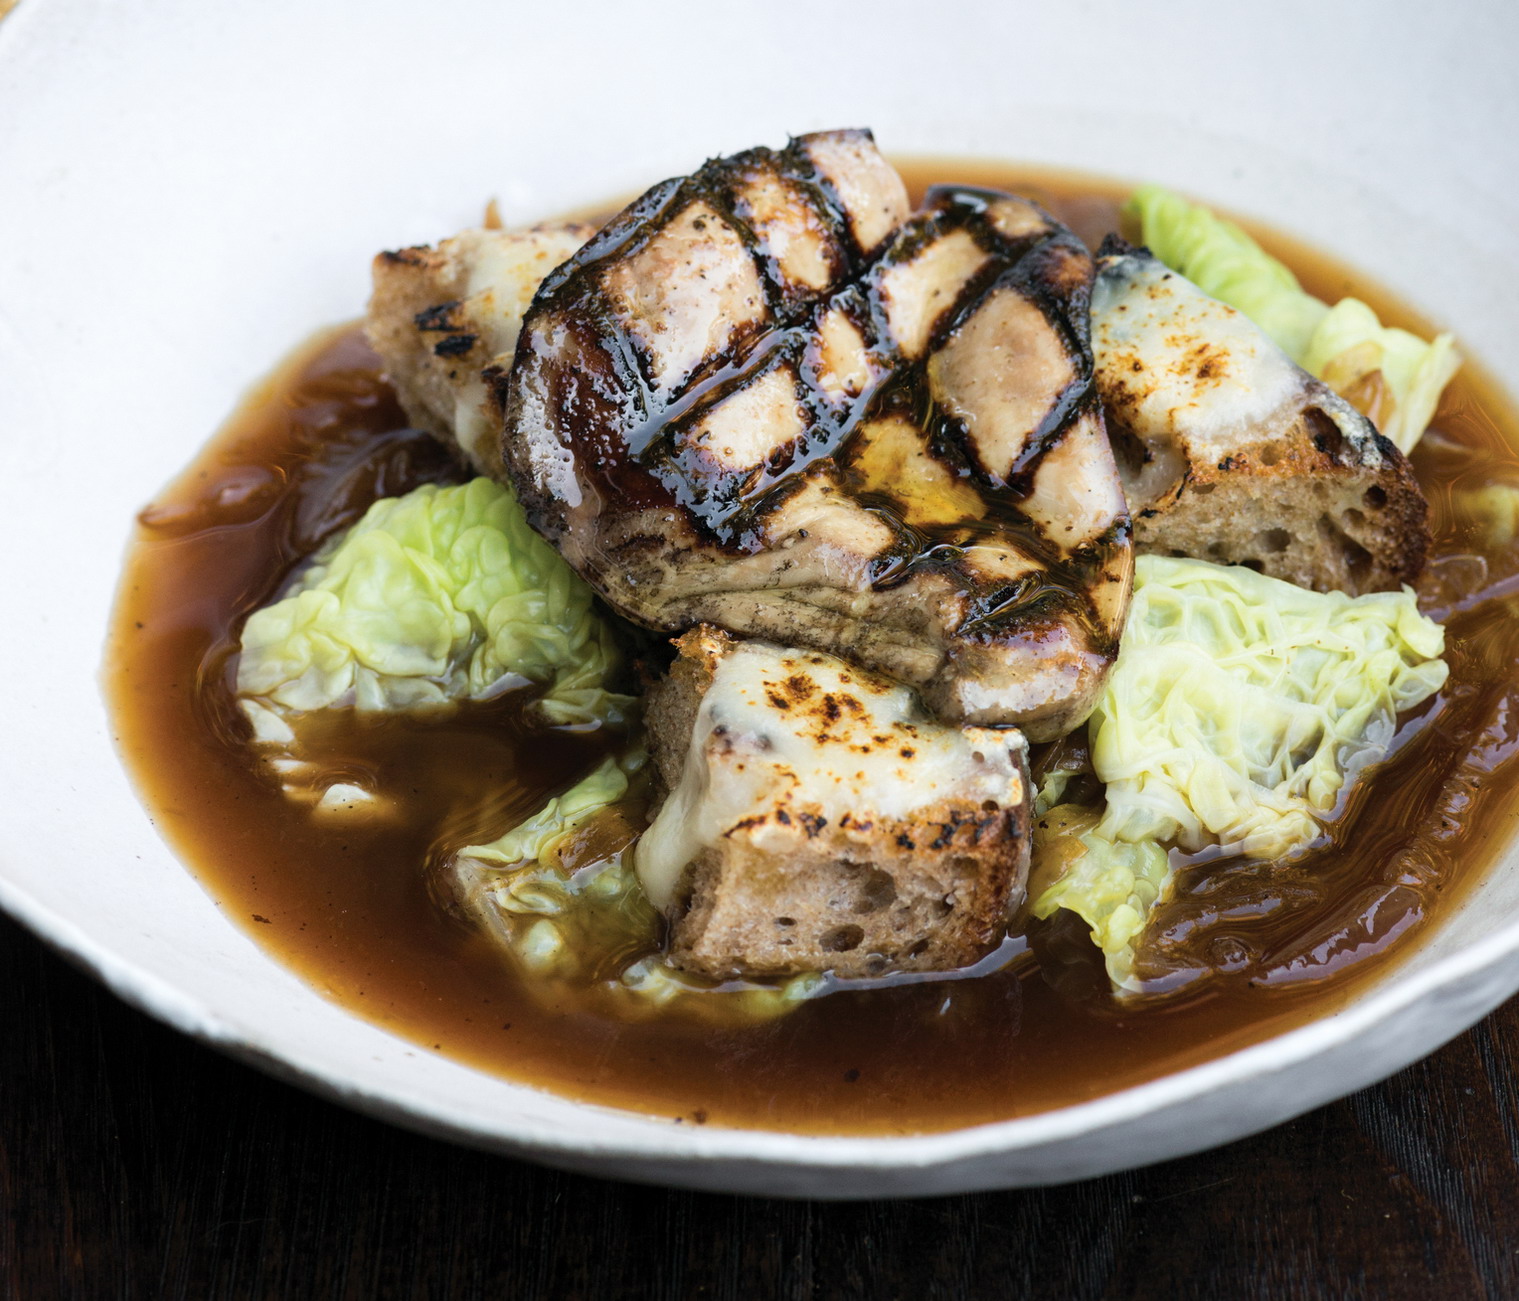
with caramelized onion–sherry broth, savoy cabbage, and gruyère toasts
Lots of restaurants offer a French onion soup on their menu. But during a trip we took to Chamonix, France, we tasted what we found to be a slightly lighter, brothier alternative to the soup, made with silky pieces of green cabbage. The simplicity of it really struck us—especially the sweetness and texture that the cabbage added. We thought, what would make this even better? Some sherry and a piece of grilled foie gras just made sense. The soup keeps the foie warm as you eat it, so much so that the liver and its smoky flavors continue to render into the broth as you spoon away. The toast—which stays crispy because it’s not overladen with cheese—helps soak up every last drop.
SERVES 4
Caramelized Onion–Sherry Broth
2 tablespoons unsalted butter
1 large onion, halved through the stem, then sliced into ¼-inch-thick slivers (about 3 cups)
1 teaspoon sugar
Kosher salt
1 cup Manzanilla sherry
4 cups water, plus more as needed
¼ teaspoon freshly ground black pepper, plus more to taste
4 sprigs fresh thyme
4 cups savoy cabbage leaves cut into 2-inch pieces (about half a head’s worth)
Grilled Foie Gras and Gruyère Toasts
4 (1-inch-thick) slices sourdough bread, crusts removed
4 ounces Gruyère cheese, grated (1½ cups)
Kosher salt and freshly ground black pepper
4 (2-ounce) slices Grade A foie gras (about ½-inch thick)
To make the broth, melt the butter in a large, heavy nonreactive pot over high heat. Add the onion, sugar, and 1 tablespoon salt. Cook, stirring frequently, until softened, being careful to avoid burning, about 6 minutes. Reduce the heat to medium and cook until the mixture starts to brown and stick to the pot, 2 to 3 minutes more. Using a wooden spoon, stir vigorously, scraping up as much as you can off the bottom of the pot. Pour in ¼ cup of the sherry to deglaze, stirring to help loosen the brown bits from the bottom of the pan. Continue cooking until the onion begins to stick and grow darker, and deglaze with another ¼ cup of the sherry. Continue cooking and deglazing until the onion turns a uniform dark caramel color, 20 to 30 minutes total. (If you have used up all your sherry and the onions are still too pale, continue to deglaze using some water instead.)
Add the water and bring to a simmer, skimming off any foam with a spoon or ladle. Simmer until the liquid reduces by about 1 cup, about 15 minutes. Stir in the pepper and thyme sprigs; taste and adjust the seasoning, if necessary. Remove the pot from the heat and let sit for 20 to 30 minutes to help the new flavorings incorporate. Discard the thyme sprigs. The broth can be refrigerated for up to 5 days before serving.
Bring a medium pot of salted water to boil. Meanwhile, set a bowl of ice water next to the stove. Drop the cabbage pieces into the boiling water and cook until just tender, about 2 minutes. Remove and immediately drop into the ice water; let cool completely, then remove and squeeze out the excess water. Set aside.
Prepare a grill to medium-high heat. Preheat a broiler. Bring the onion-sherry broth to a simmer; add the cabbage and return to a simmer. Taste and adjust the seasoning, if needed. Keep warm.
Place the slices of bread on the grill and cook until lightly toasted on one side; flip and repeat. Transfer to a baking sheet and top with the Gruyère; broil until the cheese is melted. Sprinkle with pepper and keep warm.
To grill the foie gras, season the first two slices with salt and pepper. Carefully oil the grate, then immediately add the slices two at a time to prevent flare-ups, transferring them directly to the hottest section of the grill. Cook until grill marks form, about 30 seconds. Rotate 60 degrees (to form a crosshatch pattern) and cook for 30 seconds more. (If flare-ups do occur, don’t be too concerned: the foie gras will render enough fat as it cooks that any acrid taste from flare-ups will render away.) Using long grill tongs, carefully flip and cook for about 30 seconds on the second side, then remove and keep warm while you season and grill the remaining two slices. Keep warm.
To serve, divide the broth among four warm serving bowls. Cut each of the toasts into three pieces, and place the three pieces over the top of the cabbage and broth in each bowl. Place one slice of grilled foie gras on top of the cheese toasts, and serve.

Foie gras terrine is the one food Greg must order if he sees it on a menu.
Commitment-wise, making foie gras terrine is definitely more of an advanced recipe. But if you’re up for the challenge, it is a matchless way to dress up a dinner party and really is the gift that keeps on giving.
A terrine is a French country–style preparation in which chopped seasoned meat is preserved under a fat cap and served chilled or at room temperature (it is also the name for the ceramic dish in which the meat is classically cooked and preserved). This version is made with fattened duck liver, which you can purchase at a specialty market or online. Capping it with fat preserves it for at least two weeks, and a little goes a long way to satisfy your gluttonous desires.
MAKES ABOUT 24 OUNCES; SERVES 12 TO 16
1½ pounds Grade A duck foie gras
1½ teaspoons kosher salt
½ teaspoon freshly ground white or black pepper
1 teaspoon sugar
Pinch freshly grated nutmeg
1½ teaspoons bourbon
1½ teaspoons brandy
1½ teaspoons port wine
1 teaspoon maple syrup, preferably Grade B
Grilled Bread, for serving
Bring the foie gras to room temperature, about 1 hour; transfer to a large cutting board. Each lobe contains a large and a small section; separate the two. Turn each section so that the smooth side of the foie is facing down on the cutting board and the narrower end of the lobe is at the top of the cutting board. The goal is to remove the veins from the foie without completely melting the foie with the heat of your hands or breaking it up into too-small pieces. (You won’t be able to avoid breaking some pieces off, but just handle it gently.) In each of the two sections of the lobe, there are two layers of veins webbing from the center outward. Begin by placing your fingers in the center of the lobe and pressing down gently to start to expose the web of veins. Press the foie away from the veins with your fingertips, attempting to leave the veins intact without breaking them. As you expose the veins, gently place your fingers underneath them and lift the veins away from the foie until separated. Continue exposing and separating as many veins as you can find.
Spread the pieces of foie out in a 9 by-12-inch (or rough equivalent) stainless steel or glass pan and evenly distribute the salt, pepper, sugar, nutmeg, bourbon, brandy, port, and maple syrup over the foie. Gently flip the foie pieces to help distribute the marinade. Cover with plastic wrap, pressing it directly against the foie. Wrap the pan tightly with plastic wrap and refrigerate for 24 hours.
Bring the foie to room temperature, about 1 hour.
Meanwhile, preheat the oven to 200°F and set a rack in the center. Place the pieces of foie gras into a 1½-quart terrine mold, starting with half of the larger pieces on the bottom, then the smaller pieces throughout the middle, and the rest of the larger pieces on top. Cover the terrine with its lid and place it in a larger deep pan that will allow you to create a water bath for the terrine. Pour hot water from the tap into the pan so that it reaches three quarters of the way up the side of the terrine vessel. Gently place onto the middle oven rack. Cook until a thin layer of rendered fat visibly coats most of the foie gras (about ⅓ cup), 9 to 12 minutes. Remove from the water bath to stop the cooking process, then use a soup spoon to gently press on the foie and gather up the rendered fat; reserve the fat.
Loosely cover the terrine with plastic wrap so that it can be pressed into the corners. Measure the length and width of the inside of the top of the terrine. Cut a sheet of aluminum foil to those dimensions. Cover the foie with the aluminum foil, then place up to 2 pounds of weight evenly distributed across the top. (We use a few pounds of butter.) Refrigerate overnight.
The next day, remove the foie from the refrigerator and remove the weight, foil, and plastic wrap. Level the top of the foie gras by scraping away the remaining rendered fat and flattening the foie. Refrigerate the terrine again.
In a small pan, place the reserved fat and everything that was scraped off to level the foie over low heat; gently heat just to melt. Let cool slightly so that the fat mixture will not melt any more foie when placed over the top. Strain directly over the foie through a fine-mesh strainer, covering the whole terrine by slightly tipping it from one side to the other. This fat cap will help prevent the terrine from oxidizing. Place the lid back on top of the terrine and refrigerate until the fat has solidified, about 30 minutes. Wrap tightly with plastic wrap and place the lid over it. Store in the refrigerator for up to 2 weeks. (Be sure to tightly wrap any cut portions in plastic wrap, pressing the plastic wrap directly against the surface of the terrine to avoid oxidation.)

with charred leek puree and toasted pine nuts
We are always trying to find ways to use lesser-appreciated cuts of meat and introduce more people to foods that may sound scary but are delicious. A lamb heart is one of the most tender, delicate, mild-flavored pieces of offal you could ever eat, and we’re not just saying that: if someone weren’t sure they liked lamb, we would actually give them lamb heart as a gateway cut. Of course, it’s important to source the heart—like any offal—from a well-raised animal for the cleanest flavor.
Fire-cooked leeks are a magical pairing with this. We first cooked this dish in a fireplace in Provence after a trip to the local farmers’ market, and it was good enough to take home halfway across the world. Use the leftovers as a dip for crusty bread, or for smearing on grilled cheese sandwiches.
SERVES 4
3 tablespoons pine nuts
8 ounces trimmed, cleaned lamb heart
2 tablespoons extra-virgin olive oil
Kosher salt and freshly ground black pepper
¾ cup Charred Leek Puree, at room temperature
1 tablespoon saba (reduced grape must) (or substitute store-bought balsamic vinegar glaze)
12 small edible flowers (optional)
Prepare a grill to medium-high heat. Preheat the oven to 325°F.
Place the pine nuts in a small baking dish or rimmed baking sheet and roast, stirring once, until golden brown, 8 to 10 minutes. Transfer to a plate; let cool.
Cut the lamb heart into four 2-ounce portions, trimming away any fat or ventricles that were not previously removed. Drizzle with 1 tablespoon of the oil and season each side with salt and pepper. Place on the hottest section of the grill and cook for about 2 minutes, then flip and repeat. (This will cook the heart slightly to the rare side of medium-rare, which is ideal for this tender and mild meat.) Remove from the heat and let rest for 1 to 2 minutes. Slice lengthwise as thinly as possible (about ⅛ inch).
Place a generous dollop (2 to 3 tablespoons) of Charred Leek Puree in the center of each of four serving plates. Fan out the thinly sliced heart around the leek puree. Drizzle with saba and the remaining 1 tablespoon of oil, then garnish with the toasted pine nuts and edible flowers.
MAKES A GENEROUS 1 CUP
1 pound leeks (about 4 large leeks), trimmed
½ cup extra-virgin olive oil
Kosher salt and freshly ground black pepper
1 head garlic, cloves separated and peeled
1 cup firmly packed basil leaves, coarsely chopped
1 tablespoon sherry vinegar, plus more to taste
Prepare a grill to medium-high heat. Preheat the oven to 375°F.
Meanwhile, halve the leeks lengthwise and clean thoroughly (see How to Clean Leeks).
Set the leeks on a flat surface with the cut side down so any excess water can drip out of them before grilling; drizzle with ¼ cup of the oil and season with salt and pepper. Transfer to the grill and cook until charred with dark grill marks, 3 to 5 minutes. Flip and repeat, then transfer the leeks to a long, deep baking pan. Cover tightly with aluminum foil and transfer to the oven; cook until just tender, 45 to 60 minutes. Uncover and let rest until cool enough to handle.
Meanwhile, put the garlic cloves in a small pot or baking dish and drizzle with enough of the remaining oil to barely cover them, about ¼ cup. Cover with aluminum foil and roast in the same oven as the leeks until the cloves soften and turn a golden color (do not brown fully), about 40 minutes. Remove from the oven and let cool to room temperature.
Place the leeks on a cutting board and slice into 1-inch pieces; discard the roots. Transfer to a food processor and add the garlic and the oil from the garlic; pulse until the leeks and garlic are coarsely chopped, then add the basil and continue to process until a paste forms. Taste and season with salt and pepper, if necessary. Mix in 1 tablespoon of the vinegar. Taste again and add more vinegar to taste. The puree can be made up to 3 days in advance. Refrigerate until ready to use, then bring to room temperature before serving (about 1 hour).
Leeks can harbor a lot of hidden dirt, so clean them carefully. First, cut the leeks in half down the middle. Hold them under cold running water and rinse thoroughly, spreading open the various layers and blasting out any dirt clods with water. Then, just to be safe, submerge the leeks completely under water for 10 minutes before rinsing one more time.

with fried squid and herb-caper emulsion
We love contrast in every dish we make, like raw items with fried, crispy things, and cooler items with something hot or spicy, which is why we think it’s worth the extra effort to fry some squid and whip up our herb-caper emulsion reminiscent of tartar sauce. Store extra emulsion in a jar to use as a potato salad dressing; a sandwich, hot dog, or burger condiment; or as an accompaniment to fried fish. Use only the freshest, most beautiful, lean, and tender beef (preferably grass-fed) you can find. And when you’re cutting the meat, keep it chilled by placing a larger bowl with ice underneath the bowl you’re putting the diced meat into.
SERVES 4 TO 6
1 egg yolk
3 tablespoons Dijon mustard
1 tablespoon ketchup, homemade or store-bought
1 tablespoon soy sauce (gluten-free if desired)
1½ teaspoons sambal olek
2 teaspoons fresh lemon juice
¼ cup extra-virgin olive oil
¼ cup minced cornichons
2 tablespoons minced capers
2 tablespoons minced shallot
2 tablespoons minced onion
¼ cup chopped fresh flat-leaf parsley leaves
Tartare
¾ pound beef tenderloin, diced into ¼-inch pieces, trimmed of silver skin and fat
¼ cup extra-virgin olive oil
2 tablespoons chopped fresh flat-leaf parsley leaves
Flaked sea salt and freshly ground black pepper
Squid and Garnishes
Neutral-flavored vegetable oil, for deep-frying
24 whole flat-leaf parsley leaves
Kosher salt and freshly ground black pepper
1 lemon, sliced crosswise as thinly as possible
8 ounces cleaned squid, rings cut about ½ inch thick, and tentacles
1 cup all-purpose flour, for dredging
To make the herb-caper emulsion, in a bowl, whisk together the egg yolk, mustard, ketchup, soy sauce, sambal olek, and lemon juice. Slowly add the olive oil, whisking until completely emulsified. Stir in the cornichons, capers, shallot, onion, and parsley until combined. Chill until ready to serve.
No more than 10 minutes before serving, make the tartare by combining the beef, olive oil, and chopped parsley; season with sea salt and pepper and mix well. Taste and adjust the seasoning, if necessary.
To make the squid and garnishes, preheat the oven to 200°F. Set a paper towel–lined platter next to the stove. In a large pot over medium heat, heat the vegetable oil to 375°F on a deep-fry thermometer.
Add the whole parsley leaves to the hot oil and stir gently with a slotted spoon or spider skimmer. As soon as the leaves turn translucent and crisp, about 25 seconds, remove and transfer to the paper towels; season lightly with kosher salt.
Separate the lemon slices and gently lower into the hot oil. Fry for 30 seconds, then transfer to the paper towels to drain; season lightly with kosher salt and keep warm in the oven.
Working in batches to avoid overcrowding the pot, dredge about one-third of the squid with flour, then place it in a strainer and shake off the excess flour. Gently lower into the oil; fry until crispy, about 1 minute. Transfer to the paper towels, season with kosher salt, and keep warm. Repeat with the remaining squid.
As soon as all the squid is fried, mound a portion of the beef on each serving plate, and shape using a ring or square mold (if you don’t have one, just mound it onto the plate, then flatten the top). Drizzle a couple of tablespoons herb-caper emulsion around each portion of the beef but not on it. Divide the fried squid, parsley leaves, and lemon slices among the plates, piling them on top of the chilled beef. Serve immediately.

with ensalada rusa and sweetbread croutons
This dish is really just a version of smoked cold cuts and potato salad, but the details and complexity turn it into something special. We were inspired by a traditional Argentinian dish called lengua a la vinagreta, which is basically a pickled beef tongue. As delicious as the classic is, we wanted to transform it into something that would be more familiar and appealing to the American palate. We poach, then smoke, the tongue to give it a hammy flavor, then thinly slice and serve it with ensalada rusa, a richly embellished potato salad made and eaten all over Latin America. This salad can also be served as a side to any grilled meal. Our briny caper vinaigrette lends that classic pickle-y quality to the dish.
To find good sweetbreads, start by going to a butcher you trust. The sweetbreads should be relatively odorless, with a light pink–tan color and very little visible blood. The crispy sweetbread “croutons” can be eaten on their own—like nuggets with dipping sauce—or substituted for croutons on a hearty salad. Rice flour gives the crispiest results. Bonus: it’s gluten-free.
There will be some leftover tongue, and luckily there is also plenty to do with it. You can thinly slice it and serve as a ham or cold-cut replacement on sandwiches, or dice it and toss it into a cobb or chef’s salad, an omelet, soup, or fried rice. As for any leftover caper dressing, it’s great drizzled over grilled fish or chicken, or as a dressing for potato, pasta, or beet salad.
SERVES 8 TO 10
1 pound raw veal sweetbreads
½ cup unseasoned rice vinegar
Kosher salt and freshly ground black pepper
½ cup rice flour
Neutral-flavored vegetable oil, for deep-frying
Tongue and Potato Salad
1¼ pounds Cured and Smoked Beef Tongue, very thinly sliced against the grain
2½ cups Ensalada Rusa
40 leaves arugula
1 cup Caper Vinaigrette
Garnish
1 knob peeled horseradish root, for shaving
2 tablespoons chopped fresh flat-leaf parsley leaves
To prepare the croutons, soak the sweetbreads in cold water in the refrigerator for at least 8 hours and up to 24 hours; drain.
Set a bowl of ice water next to the stove. In a large nonreactive pot over medium heat, combine 10 cups water, the vinegar, and 1 tablespoon salt and bring to a simmer. Add the sweetbreads and return to a low simmer. Cook until they are just pink in the middle, 10 to 14 minutes. Transfer to the ice bath with a slotted spoon; let cool completely.
On a cutting board, peel away the white membranes and any fat from the sweetbreads, and cut away any gray spots. Keep chilled until ready to use.
In a large pot over medium-high heat, heat about 2 inches of the oil until it registers 375°F on a deep-fry thermometer. Line a plate with paper towels.
Cut the sweetbreads into ¾-inch chunks (“croutons”). Dredge them in the flour; then, shaking off any excess, transfer them to the hot oil. Cook, turning as needed, until crispy, 3 to 4 minutes. Transfer to the lined plate and season with salt and pepper. Keep warm until ready to serve.
To serve, divide the slices of beef tongue among eight to ten large plates, spreading them out so they just barely overlap. Top with dollops of the ensalada rusa, then garnish with the arugula leaves. Drizzle the caper vinaigrette over the tongue and around the plates. Using a grater, finely shave horseradish over each dish to taste, then sprinkle with the parsley. Divide the warm sweetbread croutons among the plates and serve immediately.
MAKES 1¾ TO 2½ POUNDS
In a large bowl, toss the beef tongue with the dry cure to coat generously. Transfer the tongue a large sealable plastic bag and refrigerate for 3 days.
On the fourth day, rinse the seasonings from the tongue. Transfer the tongue to a medium pot and add water to cover; season lightly with salt. Bring to a simmer, then let cook until the tongue is tender, about 3 hours. Remove from the liquid and let rest until cool enough to handle; peel off the outer membrane while the tongue is still warm. Refrigerate the remainder overnight, uncovered, to dry out any excess moisture.
The next day, prepare a smoker with mesquite chips and heat to 110°F. Smoke the tongue for about 3 hours. Let cool completely. Store unsliced and wrapped tightly for up to 5 days in the refrigerator or 1 month in the freezer.
MAKES ABOUT 2½ CUPS
Kosher salt
1 cup peeled and diced russet potato (⅓-inch cubes), soaked in water to avoid oxidation
¼ cup finely diced celery (⅓-inch cubes)
¼ cup peeled and finely diced carrot (⅓-inch cubes)
¼ cup finely diced yellow onion (⅓-inch cubes)
½ cup diced roasted golden beets or Chioggia (pink) beets, cut into ⅓-inch cubes
2 tablespoons thinly sliced cornichons
¼ cup mayonnaise, homemade or store-bought
2 tablespoons Dijon mustard
Freshly ground black pepper
To prepare the vegetables, bring a large pot of water to a boil. Season the water with enough salt so that it tastes like the sea. Set a large bowl of ice water next to the stove and set a large strainer inside. Drain the potatoes of their holding water, then toss in the boiling water. Boil until just cooked through, 7 to 9 minutes; remove immediately with a slotted spoon and transfer to the iced water.
Return the water to a boil and add the celery, carrot, and onion; boil until the carrot is just crisp-tender, about 3 minutes. Remove the vegetables using a slotted spoon and transfer to the ice water. Drain well and add to the bowl with the potatoes.
Add the beets, cornichons, mayonnaise, and mustard and mix well to combine; taste and adjust salt and pepper as needed. Keep chilled until ready to serve. Store, refrigerated, for up to 4 days.
MAKES 1⅔ CUPS
½ teaspoon finely grated or minced garlic
3 tablespoons Dijon mustard
¼ cup champagne vinegar
¼ teaspoon kosher salt
1 teaspoon freshly ground black pepper
1 cup extra-virgin olive oil
⅓ cup capers, drained
In a bowl, whisk together the garlic, mustard, vinegar, salt, and pepper. Slowly drizzle in the oil, whisking constantly. Stir in the capers. Store, refrigerated, for up to 2 weeks.
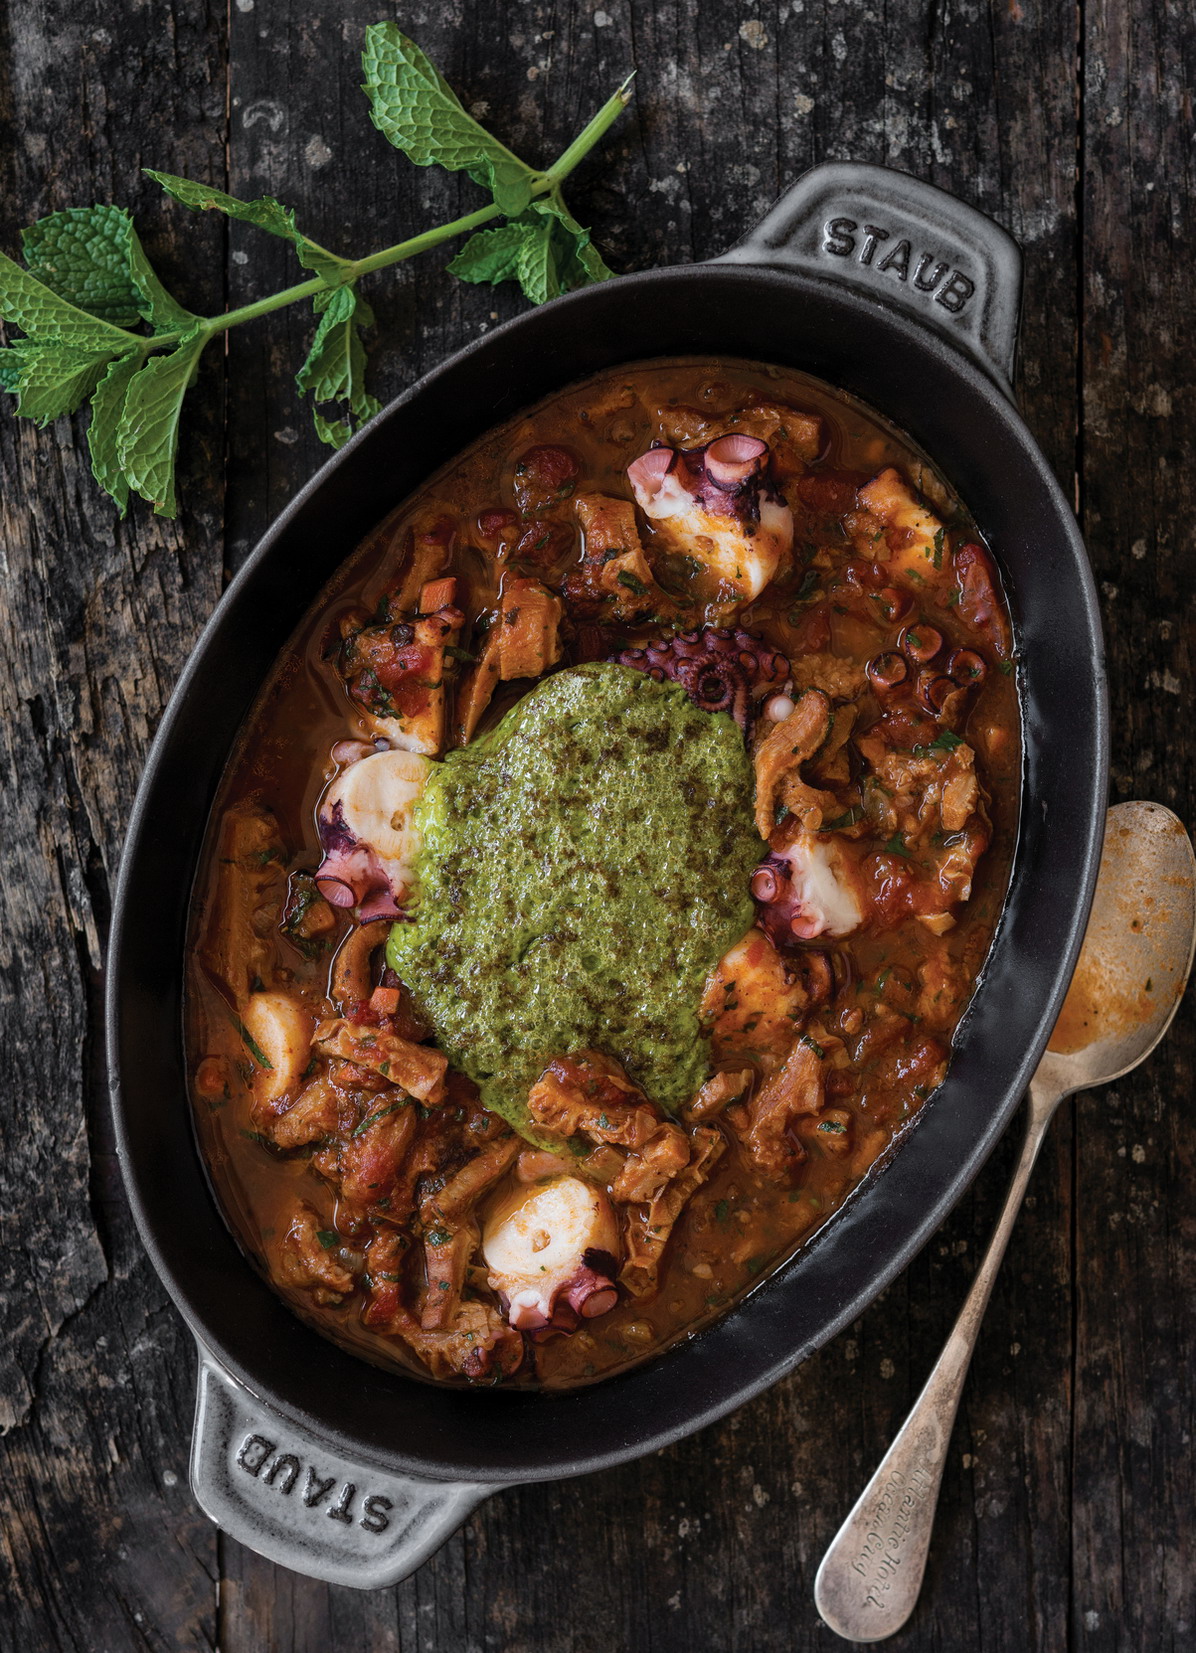
with poached octopus and mint aïoli
We love surf and turf, and we wanted to do a more unexpected take on the pairing. We start off with stewed tripe—or beef stomach lining—as the meaty element, inspired by our friend chef Hiro Sone’s Florentine-style version. We add briny poached octopus and a dollop of brightly flavored mint aïoli. If you like octopus, this dish provides a friendly introduction to the world of offal: the tender octopus and bright, spicy flavors of the tomato stew help balance some of the inherent gaminess of the tripe. It’s one of the most popular items on our menu and, no doubt, a dish your guests will talk about.
You want to think big when you’re cooking this recipe—what’s the point of slow-cooking anything in tiny batches? You can freeze the tripe once it’s cooked and pull it out as you need it. Feel free to play around with garnishes other than the mint aïoli and octopus, swapping in fresh cilantro, chiles, and lime juice. Or follow Chef Sone’s Italian-inspired lead and stir in white beans, grated cheese, and basil.
At Ox, we like to garnish this stew with crispy Sunchoke Chips for textural contrast and crunch, but the dish is also great with grilled or toasted bread.
Tripe can be found at your trusted butcher or a Latin market. Octopus can be found at many grocery stores and fishmongers, or at Asian markets.
SERVES 4 TO 6
Tripe
2 pounds honeycomb beef tripe
½ cup unseasoned rice vinegar
Stew
2 tablespoons extra-virgin olive oil
¼ cup unsalted butter
¼ cup chopped garlic
1 teaspoon red pepper flakes
8 anchovies in oil, chopped
1 cup diced yellow onion
½ cup diced celery rib
½ cup peeled and diced carrot
1 teaspoon dried marjoram
½ teaspoon kosher salt
½ teaspoon freshly ground black pepper
2 cups white wine
4 cups canned chopped San Marzano tomatoes or other high-quality tomatoes
2 cups ¼-inch diagonally cut slices Poached Octopus
8 leaves spearmint, thinly sliced into ribbons
4 leaves basil, thinly sliced into ribbons
1 tablespoon chopped fresh flat-leaf parsley leaves
¼ cup Mint Aïoli, for serving
To precook the tripe, combine the tripe and vinegar in a large pot and cover with water. Bring to a boil, then reduce to a simmer. Let cook, not stirring but skimming off foam and impurities occasionally, until the tripe is tender, about 90 minutes. (Test its tenderness by poking with the tip of a paring knife; the knife should feel no resistance.)
Transfer the tripe to a baking sheet and refrigerate until cool. Scrape or cut away any solidified fat. Slice into strips about ½ inch by 2 inches.
Preheat the oven to 325°F.
To prepare the stew, in a large ovenproof pot over medium heat, heat the oil and 2 tablespoons of the butter until the butter is melted. Add 2 tablespoons of the garlic, ½ teaspoon red pepper flakes, and the anchovies and stir, breaking up the anchovies with a wooden spoon. As soon as the garlic begins to brown, add the onion, celery, carrot, and marjoram; cook, stirring, until the onion begins to soften, 3 to 4 minutes. Add the tripe, season with the salt and pepper, and cook, stirring, a few minutes more. Stir in 1 cup of the wine, scraping up any browned bits from the bottom of the pan, then bring to a boil. Add the chopped tomatoes and bring to a simmer. Cover and bake for 90 minutes.
Remove the pot from the oven and skim off any oil or impurities. At this point, you can cool the braised tripe or even freeze it for later use. (If frozen, allow the tripe stew to thaw completely, then resume the recipe as follows.)
Preheat the broiler.
In a small, heavy nonreactive pot over medium heat, heat the remaining 2 tablespoons butter until melted. Add the remaining 2 tablespoons garlic and remaining ½ teaspoon red pepper flakes. Cook, stirring constantly with a wooden spoon, until the garlic is toasted to a deep golden brown, 1 to 2 minutes, then stir in the remaining 1 cup wine. Cook until the wine reduces by about half, 1 to 2 minutes. Add this garlicky wine reduction to the tripe stew and bring the stew back up to a simmer. Add the sliced octopus and cook, stirring, to heat through, about 2 minutes more. Stir in the fresh herbs, then taste and adjust the seasoning, if necessary.
Divide the stew among four to six ovenproof dishes and finish each with a dollop of the mint aïoli. Broil until the aïoli is lightly browned on top, about 2 minutes, and serve.

