CHAPTER 4 GRILLED SEAFOOD
Apart from the ubiquitous grilled shrimp, seafood seems always to play second fiddle to meat when it comes to home grilling—a fact that remains a mystery to us. Our only theory is that many home cooks have had a bad experience with fish sticking to the grill or falling apart. And maybe others aren’t sure how to get creative with it beyond the classic squeeze of lemon, or worry that delicate seafood can’t stand up to the intensity of the grill. Either way, it’s a shame. If we’re going to push you anywhere in this book, let it be in this section: you simply must discover the wonderful, heartier side of fish cooked over fire.
What made us believers? Our inspiration, it turns out, first came not from the grill fires of Argentina but during our honeymoon in Europe. We were staying on the Atlantic coast in Getaria, Spain, and everywhere we went, there was fish. Grilled fish. It was usually whole or bone-in, and almost always still covered in skin while it cooked. Even though the flesh itself was rarely in direct contact with the grill, the transformation of its mild white meat into the most unctuous, rich, gelatinous flesh as it sizzled away under that skin was astonishing. We paid attention to that—that bones and skin can help naturally protect the fish so the flesh stays moist—and took the theory all the way home. As you’ll see, the same holds true for shellfish and crustaceans: grilling lobsters, whole crab, shrimp, or crayfish right in their own shells works wonders for concentrating and enhancing their natural flavors.
It turns out that skin and shells actually simplify things: thanks to these protective and flavor-filled layers, grilling restaurant-worthy fish barely requires any preseasoning, skinning, or shelling at all. All you really have to do is make sure the grill is hot. Maybe as hot as it gets. Clean the grates and season them with vegetable oil just before adding the fish. And don’t mess with the fish too much. It’s naturally delicious, delicate, and often preseasoned by the very water it swims in, so you don’t need a bunch of intense blackening, salting, or special techniques to turn it into something attention-worthy. The fire does most of the work.
Once it’s off the grill and onto your plate, that’s another story. Although many fish taste delicate when raw, poached, or sautéed, the unparalleled smoky flavor that seafood picks up on the grill means it can stand up to some remarkably intense accompaniments: spicy things, salty things, and rich and fatty things, like our highly addictive Bacon-Sherry Cream. Within this chapter, you’ll find ideas for applying bold, interesting seasonings and techniques to a range of seafood styles, from strong-flavored fillets to delicate bivalves.
Between the beauty of fresh seafood itself and the flavors we’ve concocted for it, these recipes will make a fish lover out of anyone.

with garlic, green onion, and sumac
The meat of spot prawns or jumbo shrimp is tasty on its own, but the best flavor comes from the shells. Compared to their peeled counterparts, there’s a toastiness to shell-on, head-on grilled versions that’s totally unparalleled. And what’s hidden under the heads—especially the sweet spot where the head meets the body—has so much umami. We call it the foie gras of the sea.
We play up that savory flavor here with smoked sea salt, toasted garlic, and ground sumac, a Middle Eastern spice that imparts a bright citrusy flavor. Sumac is worth seeking out for its intensity and flexibility; it’s very inexpensive and also delicious on rice or steak. But if you want to keep your dish simple, the garlic-lemon dressing will do the trick on its own.
To eat the spot prawns or jumbo shrimp, tear away the head first and—trust us—slurp the juices out of the head before putting it aside. Then go at the rest with either your fingers or a steak knife. We suggest you eat the shell; it’s usually tender enough and is really where the true flavor resides.
SERVES 4 TO 5
20 large (U-10 count) head-on spot prawns (1½ to 2 ounces each) (or substitute jumbo shrimp)
2 teaspoons kosher salt
1 teaspoon freshly ground black pepper
¼ cup extra-virgin olive oil
1 cup Toasted Garlic–Lemon Oil
½ cup thinly sliced green onions
2 tablespoons ground sumac
Smoked sea salt, homemade or store-bought
With a sharp paring knife or pair of kitchen shears, make a shallow cut on the back of each spot prawn starting under the head and ending near the tail (do not remove the shells). Using your fingers, pry the cut open slightly and rinse under cold water, then pull out the dark digestive tract with your fingers or a toothpick.
Prepare a grill to high heat, leaving one area of the grill at low heat.
Season the prawns with salt and pepper and coat in oil. Place on a grill rack or in a grill basket if you have one, and transfer directly onto the hot coals or over the hottest part of the grill. Cook until the prawns turn from gray or light pink to a deeper, reddish pink, 30 to 60 seconds. Flip the prawns on the rack or in the grill basket and repeat the cooking on the other side. Transfer to the low-heat area of the grill and let rest for 2 minutes.
Serve the prawns whole and shell-on, drizzled with the garlic-lemon oil and garnished with the green onions, sumac, and smoked sea salt to taste.

with english peas and orange-pastis butter
Scallops taste heavenly with smoky flavors, and when it comes to grilling them, the bigger the size, the better. Because they don’t take long to cook, larger scallops can stand up to the grill heat without drying out.
Aside from being one of the first things to show you you’re heading out of winter, fresh peas have a nice bright flavor and a balance of starchiness and sweetness that goes well with a mildly flavored protein like scallops. Peas are often paired with ham or bacon, so we substitute salami for a salty, chewy dimension.
SERVES 4
English Pea Ragoût
¼ cup unsalted butter
1 small leek (½-inch dice)
1 small bulb fennel, (½-inch dice) (about 2 cups)
3 cups fresh English peas (from 2½ to 3 pounds unshucked peas)
6 ounces unsliced fennel salami, diced into ½-inch pieces
Kosher salt and freshly ground white or black pepper
2 to 3 tablespoons Orange-Pastis Butter, softened to room temperature, plus more for serving
Grilled Sea Scallops
1¼ pounds large sea scallops (12 to 16), cleaned
2 tablespoons extra-virgin olive oil
Kosher salt and freshly ground white pepper
Prepare one side of a grill to high heat and the other side to medium heat. (Set the scallops, oil, salt, and white pepper nearby so they are ready to go on the grill before the ragoût is done cooking.)
To make the ragoût, warm a medium cast-iron pan over medium heat on the grill (alternately, warm a skillet on the stove over medium-high heat to cook the ragoût there). Melt the butter, then add the leek and fennel. Cook, stirring occasionally, until the leek has softened, about 2 minutes. Add the peas and salami; season with salt and white pepper. Cook until everything is just warmed through, about 2 minutes. Add a few dollops (one per person) of the orange-pastis butter and remove from the heat; serve hot.
Meanwhile, to cook the scallops, coat them with oil, then season with salt and white pepper. Be sure to carefully oil the grate over the hottest area of the grill, then place the scallops on that area and cook, without disturbing, for 2 minutes. Flip carefully to prevent sticking. (If the scallops don’t release easily, use a thin metal spatula to gently scrape between the scallop and the grill to separate.) Cook until the center is just barely cooked through, 1 to 2 minutes more.
To serve, place the scallops atop the warm pea ragoût. Brush the scallops with some of the orange-pastis butter.
MAKES ABOUT ½ CUP
½ cup unsalted butter, softened to room temperature
4 teaspoons pastis liqueur (or another anise-flavored liqueur, such as Pernod or Sambuca)
¾ teaspoon grated orange zest (from about ½ orange)
¾ teaspoon kosher salt
⅛ teaspoon freshly ground white pepper
In a medium bowl, using a rubber spatula, mix together the butter, pastis, orange zest, salt, and white pepper until well combined. Keep at room temperature until ready to use, or freeze for up to 3 weeks.

with smoked tomato–ancho chile butter
There’s something beautifully family-oriented and ritualistic about eating whole shellfish. You end up around the table for what seems like hours, and everyone gets messy. Not to mention, there are silly-looking bibs to bond over.
Native to the Pacific Northwest waters, the Dungeness crab is available from November to late spring, and you can find it until the season closes in mid-August. It’s kind of awesome to fire up the grill and serve seafood in the wintertime. You taste the flavor of the ocean when you come in contact with any fish served in the shell—it’s like a flash of summer.
Feel free to use this same crab grilling technique and skip the Smoked Tomato–Ancho Chile Sauce in favor of melted butter. If you do decide to make the ancho sauce, the recipe will make more than you need, but you’ll want to have extra for future use. It makes a great base for a barbecue sauce or a smoky vinaigrette, or—with the addition of cream—a delicious pasta sauce. And if you can’t get ahold of any crabs, this sauce goes just as well with grilled crayfish or shrimp. If you don’t have a smoker, you can skip the smoking step and just add a tablespoon of smoked sweet Spanish paprika at the tomato-roasting stage.
SERVES 6
3 lemons, halved
3 cups Smoked Tomato–Ancho Chile Sauce
1 cup unsalted butter
6 live Dungeness crabs (1½ to 2 pounds each)
Prepare a grill to high heat.
Place the lemons, cut side down, on the grill and cook until grill marks appear, about 2 minutes. Remove and set aside.
In a medium pan, bring the tomato-chile sauce to a gentle simmer. Add the butter 1 tablespoon at a time, whisking until incorporated after each addition. (Do not boil, or the emulsion will break.) Remove from heat and set aside.
Place the crabs on the hot grill (or directly over the hot coals, if using). They will move for a second or two but will die very quickly. Alternately, you can kill the crabs first by plunging a knife deeply into their ventral nerve cord, which lies at the tip of the triangle-like shape on the belly. Cook for 6 minutes, then flip and cook for 6 to 7 minutes more, until the juices are boiling inside of the shell and sputtering around the edges. Cook for 1 minute more, then remove. Drizzle or toss with copious amounts of the warm sauce and serve with the extra sauce on the side and the grilled lemon halves for squeezing.
SMOKED TOMATO–ANCHO CHILE SAUCE
MAKES ABOUT 4 CUPS
1 pound tomatoes (about 3 medium tomatoes)
3 ounces dried ancho chiles (about 3 large chiles), stemmed and seeded
¼ cup extra-virgin olive oil
3 tablespoons chopped garlic, plus 1 medium clove
1 teaspoon red pepper flakes
2 cups white wine
1 tablespoon kosher salt
1 teaspoon freshly ground black pepper
1 tablespoon smoked sweet Spanish paprika (also called pimentón dulce) (use only if you are not smoking the tomatoes)
Prepare a smoker with mesquite wood chips and preheat to 120°F.
Cut each tomato into quarters and remove the core. Transfer to the smoker and smoke for 1 hour. (If you don’t have a smoker, simply roast the cored and quartered tomatoes as directed in the next step, adding 1 tablespoon Spanish paprika.) Transfer the smoked tomatoes to a shallow oven-safe dish.
Meanwhile, preheat the oven to 400°F. Roast the tomatoes (and the paprika, if using) until slightly shriveled and dehydrated, about 30 minutes. Remove from the oven and set aside.
Warm a medium stainless steel pot over medium heat. Add the chiles and toast, stirring occasionally, until lightly smoking, 3 minutes. Remove from the heat and add warm water to the pot to cover. Bring to a simmer and cook for 10 minutes, or until softened; drain and set the chiles aside.
Rinse out the pot and place it back over medium heat. Add the oil, garlic, and red pepper flakes; cook, stirring, until the garlic is lightly browned, 1 to 2 minutes. Remove from the heat and carefully pour in the wine. Return to the stove and bring to a simmer over low heat. Reduce the wine by about half, then add the smoked tomatoes (or, if you just roasted the tomatoes, the tomatoes with the smoked paprika) and the rehydrated ancho chiles. Bring to a simmer and stir in the salt and black pepper. Cook for 5 minutes.
Transfer the tomato mixture to a blender and add the garlic clove. Start the blender on low, then slowly increase the speed and blend until the sauce is pureed. Taste and adjust the seasoning, if necessary. (If the sauce isn’t velvety smooth, pass through a strainer and push through with the back of a small ladle.) Keep warm, or store refrigerated for up to 1 week, or frozen for up to 3 months.

with nettle and green garlic salsa verde
To us, serving morels with tuna is a not-so-common—and we think lovely—contrast that tastes a bit like surf and turf. The zesty salsa verde is a nice bridge between the mild fish and sturdy mushrooms. It’s also delicious with boiled or roasted potatoes, grilled chicken, or as a dressing for pasta salad.
For the best results, you want a superhot, searing grill. Since the fish does not have much natural fat, high heat will cause caramelization on the outside without drying out its center.
This dish may look fancy, but it’s totally bluffing: the sauce can be done in advance, the mushrooms can be cooked in advance, and none of it (not even the tuna) needs to be served hot. You can prep all of the components the day before and not even break a sweat come time to serve.
SERVES 4
Kosher salt
8 ounces fresh morel mushrooms
¼ cup extra-virgin olive oil
Freshly ground black pepper
4 (5-ounce) cubes albacore tuna loin (each about 2 inches square)
¾ cup Nettle and Green Garlic Salsa Verde, plus more for serving
Flaked sea salt, for garnishing
Prepare a grill to high heat.
Bring a small pot of lightly salted water to a boil and add the morels; cook until moistened and softened, about 30 seconds. Drain, dry the mushrooms gently on a towel, then drizzle with 2 tablespoons of the oil and season with kosher salt and pepper.
Season the albacore on all sides with a generous amount of kosher salt and pepper. Wait a few minutes, then rub it with the remaining 2 tablespoons of oil to coat.
Be sure to carefully oil the grate, then place the albacore on the hottest area of the grill. Cook, turning the tuna pieces every 30 to 45 seconds, until the insides are warm but still rare, 3 to 5 minutes total depending on the thickness of the tuna pieces. Once the albacore is on the grill, add the morels to the grill. Cook on one side until they begin to char, about 2 minutes, then flip and repeat. Remove from the grill and keep warm.
To serve, cut the tuna in half on the diagonal. Place 3 tablespoons of sauce on each plate and top with the tuna and morels. Garnish the cut side of the tuna pieces with sea salt. Serve extra sauce on the side.
NETTLE AND GREEN GARLIC SALSA VERDE
MAKES ABOUT 3 CUPS
3½ tablespoons kosher salt
4 cups firmly packed stinging nettle leaves (2 ounces)
1½ cups thinly sliced green garlic (from 1 medium stem)
10 medium-large basil leaves
½ cup extra-virgin olive oil
2 tablespoons capers
3 oil-packed anchovy fillets
1 tablespoon finely grated lemon zest
1 tablespoon fresh lemon juice
2 hard-boiled eggs (see Note), peeled and coarsely chopped
½ teaspoon freshly ground black pepper
½ cup water, plus more as needed
Bring a medium-large pot of water to a boil over high heat; season with 3 tablespoons salt. Prepare an ice bath by filling a large bowl with ice then filling it two-thirds of the way to the top with water. Nestle a strainer into the ice water bath, then set it next to the stove.
Drop the nettle leaves into the boiling water and blanch for 30 seconds, then remove using a slotted spoon and transfer to the ice bath. Once the nettles have completely cooled, squeeze the excess water out of them and set aside. (You should have about ⅓ cup nettles.)
Next, add the green garlic to the boiling water and let cook 90 seconds; transfer to the ice bath. Once the garlic has completely cooled, squeeze the excess water out of it and transfer to a blender. (You should have about 1¼ cups garlic.) Coarsely chop the blanched nettles, then add them to the blender. Add the basil, oil, capers, anchovies, lemon zest and juice, eggs, the remaining 1½ teaspoons salt, pepper, and water and blend, starting slowly and increasing the speed of the blender to high until the mixture is completely smooth. If the sauce is too thick to blend properly, add more water 1 tablespoon at a time (do not exceed 4 tablespoons total). Taste and adjust the seasoning, if necessary. Keep chilled until ready to use. The sauce will keep, refrigerated, for up to 4 days.

with toasted garlic–lemon oil
People love eating meat off the bone. So why not fish? (We’re not talking about those tiny pin bones.) From the crispy outer skin to the tender innermost flesh, cutting bulkier, bone-in portions allows you to cascade through layers of flavor as you eat. You’ll see what we mean: in comparison, a fillet just seems so one-note.
The bonus is that bone and skin make your job easy: they naturally protect the fish flesh from both ends so it stays moist atop the hot grill. We garnish our halibut with a garlicky lemon oil, and we don’t skimp on the big pieces of caramelized garlic. Afterwards, we shower the fish with chives for brightness and a little texture. This halibut is one of our best sellers and may be a different way of experiencing a fish you have had many times before.
You could possibly ask your fishmonger to reserve some halibut tails for you, but the best way to secure both the tail and steaks is to butcher the fish yourself (see How to Break Down Halibut). We recommend using a grill basket to prevent the skin from sticking to the grate and tearing away the delicate, flaky flesh.
SERVES 4
4 halibut tails, or 4 halibut steaks, sliced 1 to 1¼ inches thick (10 to 12 ounces each)
2 tablespoons extra-virgin olive oil
Kosher salt and freshly ground black pepper
1½ cups Toasted Garlic–Lemon Oil
2 tablespoons thinly sliced chives
3 small radishes, trimmed and thinly sliced, or 12 sprigs ice lettuce (fiocoide glaciale) (optional), for garnish
Flaked sea salt, for garnishing
Prepare a grill to high heat, with one area heated to warm. If using charcoal, once the coals are glowing, spread them evenly to flatten. Then place a grill grate or metal cooling rack directly atop the coals.
Season the halibut with the olive oil, salt, and pepper; transfer to an oiled grill basket and place it on top of the grate. If using tails, cook one side for about 4 minutes, then flip and repeat. If using steaks, cook for 7 to 8 minutes on the first side, then flip and cook 5 minutes more. Transfer the tails or steaks to a warm spot on the grill to rest for about 3 minutes.
To serve, transfer the fish to plates. Drizzle with the garlic-lemon oil and garnish with the chives, sliced radishes or ice lettuce, and sea salt.
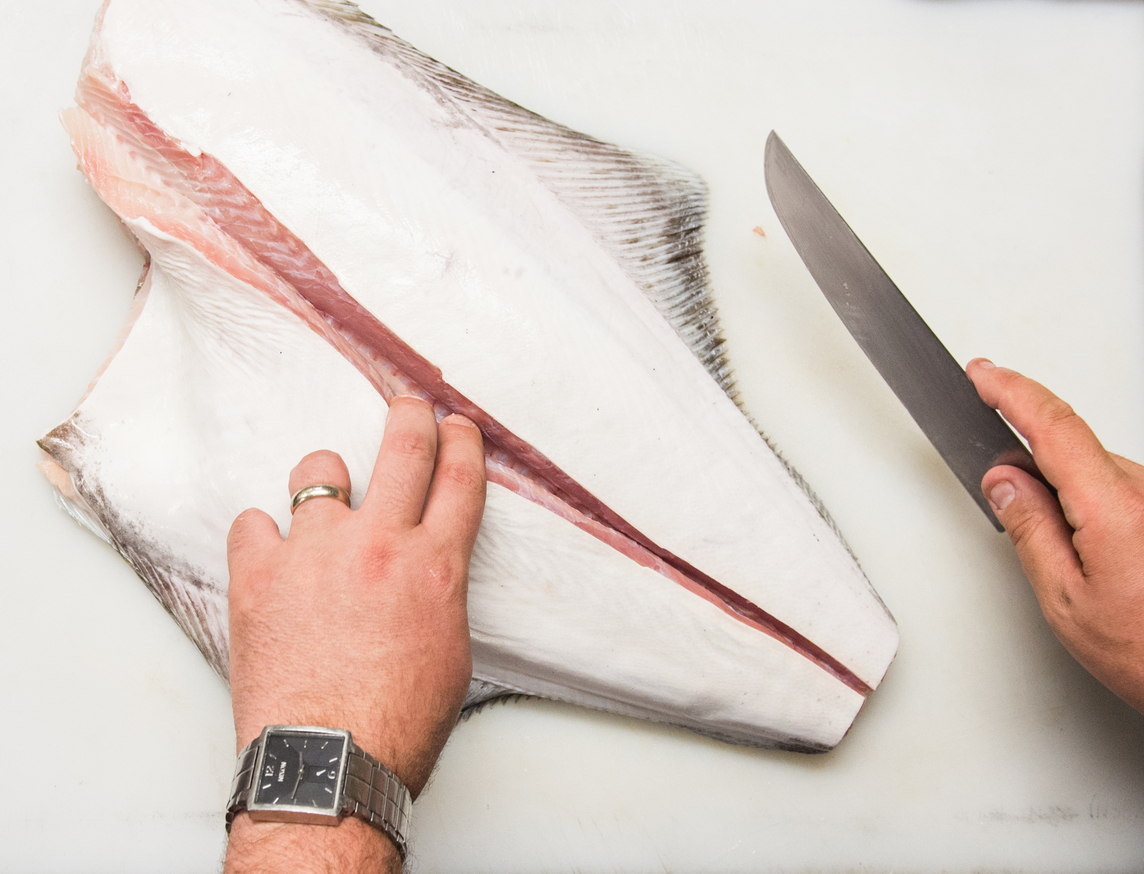
Pacific halibut is a flatfish with big, meaty fillets. Usually you find it at a fishmonger or grocery counter already cut into four “sides,” or boneless skinless fillets. We like the bone and skin intact—it creates juicier meat and crispy skin on the grill—so we portion the halibut instead into two (bone-in) sides, then slice the sides into thick steaks for the grill. This method yields 12 to 15 steak portions and one tail portion (they freeze pretty well). But if you don’t need that much, ask the fishmonger to sell you half. Here’s how it is done.
You’ll need 1 whole halibut (around 15 pounds), bone in and skin on, head and guts removed.

Step 1 Place the whole halibut, dark side up, on a clean cutting board that measures at least three-quarters the size of your fish. Pat the halibut dry as much as possible with a clean kitchen towel.

Step 2 Remove the collar on the side facing you. Keeping your knife close to the collar fins, make a U-shape cut from the belly side of the fish towards the neck side. You will end up near the backbone where the head was. Disconnect the collar completely and reserve for grilling.

Step 3 Keeping the fish on the same side, find the neck bone at the top. Press firmly on the skin near the neck to help feel exactly where you will need to cut. Make the cut from the open side (where the head was originally removed) to the back side. You will hit the backbone. With some effort and force, cut through the backbone, stopping as soon as it is broken.

Step 4 Flip the fish over. Repeat the same collar cut as you did before (in Step 2) and remove the collar.

Step 5 Repeat the neck cut as in Step 3. This side will be much easier. Make the same cut in order to connect to the cut on the other side. Set aside.

Step 6 Find where the tail of the halibut goes from thick to thin (where it starts to hourglass). Using force, cut the tail off where it starts to thin out; reserve.

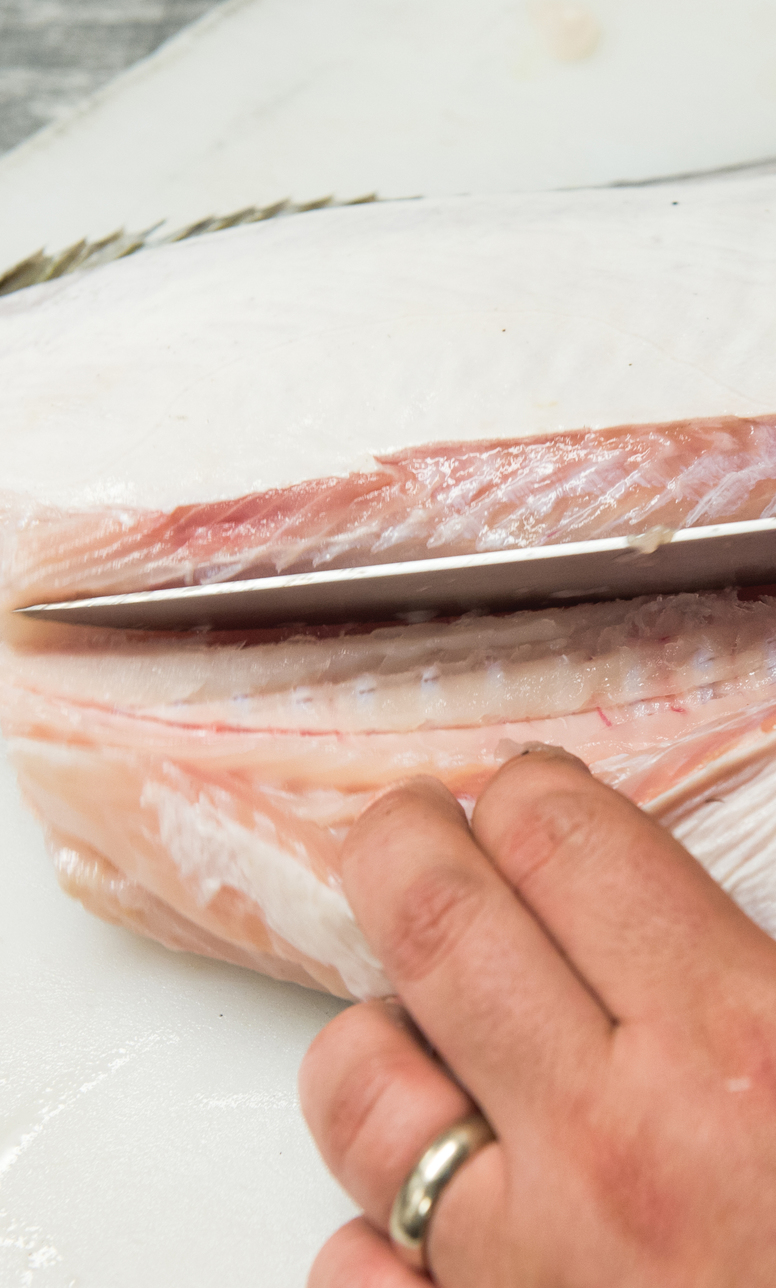
Step 7 Wipe down the fish again. You will notice a natural line that runs from the tail to the head on the fish, about midway between the fins. Plan to make a cut the entire length of the fish, down to the vertebrae, to one side of that “line” in the skin. Starting 2 to 3 inches from where the tail ends, make an incision with your knife along one side of the line. Cut all the way down to the vertebrae and towards the end of the tail. Turn the fish 180 degrees, and make a similar cut on the opposite side, connecting it to your original cut.
Step 8 When you have exposed the vertebrae completely, you will notice a thick side of the fish and a thin side. We will call the thinner side the belly, because that is where the guts were removed. You will need to cut the fish in half eventually, but cutting through a vertebrae is very difficult without using a saw. Instead, cut through the smaller bones that are connected to the vertebrae. Since we have to choose a side to leave more bone on than the other, we prefer to leave the majority of the bone and vertebrae on the thinner, belly side. Why? Because the bones will help protect the thinner flesh while cooking. To expose these smaller bones, use the vertebrae as a guide and slowly cut and push some flesh away from the vertebrae on the nonbelly side (about a half inch).

Step 9 Turn the fish over and repeat on the remaining side. Starting on the tail side of the fish and, cutting towards the head, make a cut that breaks the bones off the vertebrae but does not cut through the other side of the fish. Stop once you have broken the bone. Continue this style of cutting and breaking until one side is complete.
Step 10 Flip the fish so that the tail end is still on the same side of the cutting board, and gently cut the flesh away from the vertebrae and bone on the other side. (It should be easier because the bones are already broken.) You now will have cut your fish in half.

Step 11 Place the thicker nonvertebrae half of the fish in front of you with the cut side facing away. We cut our portions into about 12-ounce pieces, about 1 to 1¼ inches thick (but as you cut closer to the thinner tail end, those pieces will get shorter and wider). Make a 1-inch cut starting on the top side and cut all the way through the bottom side.

Step 12 To cut the other side of the fish, identify the white, thicker part of the vertebrae. When making the cut, start at that white section (where the vertebrae joins) so your knife will not get stuck. Cut all the way through. If you have trouble getting through the fin with a single cut, pick up your portion with your other hand and let the fin bones guide your knife through them.
Step 13 Store the fish portions on paper towels in a bin or large baking sheet to help soak up extra moisture. Use fresh within 3 days or until fish no longer smells fresh. Freeze any extra portions vacuum-sealed or wrapped tightly for up to 2 months.

with charred poblano romesco and pickled red onion
Mackerel, much like sardine, is a strong-flavored and oily fish, so it’s great with the smokiness from the grill and fun to pair with strong-flavored accompaniments. We love it, too, because it’s healthy, sustainable, and holds up well to freezing, so you can usually find it year-round.
In Spain, romesco is a traditional sauce containing red chiles, sherry vinegar, garlic, bread crumbs, and usually ground hazelnuts or almonds. Our own version echoes a lot of those same flavors and ingredients but has a green color from poblano peppers. Try it on roasted green beans or asparagus in the spring, and Brussels sprouts or butternut squash in the fall or winter. It’s great with grilled poultry, too, or spread on toast with a fried egg on top.
SERVES 4 AS A MAIN DISH OR 8 AS A STARTER
8 skin-on mackerel fillets (about 3 ounces each), pin bones removed
4 teaspoons kosher salt
2 teaspoons freshly ground black pepper
3 tablespoons extra-virgin olive oil
16 to 20 rings Pickled Red Onion
⅓ cup Toasted Garlic Bread Crumbs (optional)
Prepare a grill to medium-high heat.
Season the mackerel fillets with salt and pepper, then rub with oil. Be sure to carefully oil the grate, then place the mackerel, skin side down, on the grill. Let cook, without disturbing, until the flesh is mostly opaque and the fish is more than halfway cooked through, 3 to 4 minutes. Flip the fillets and sear quickly on the flesh side to finish, about 15 seconds.
Spoon some of the Charred Poblano Romesco onto a platter. Place the fish on the platter, skin side up (this will help keep the skin crispy). Garnish with some pickled red onion rings and a sprinkling of the toasted bread crumbs. Serve the extra romesco on the side.
MAKES ABOUT 1¼ CUPS
¼ cup raw pecans
2 poblano chile peppers
6 fresh oregano leaves
2 teaspoons kosher salt
1 teaspoon sherry vinegar
¼ cup water
¼ cup extra-virgin olive oil
Preheat the oven to 350°F.
Place the pecans on a rimmed baking sheet and roast until toasted and sweet, 6 to 9 minutes. Remove from the oven and let cool completely.
Prepare a grill to high heat.
Place the poblanos on the grill and cook, turning every few minutes, until charred and softened, 8 to 10 minutes. Seed and stem them but leave the skins on.
In a blender, combine the pecans, chiles, oregano, salt, vinegar, and water; puree until smooth. With the motor running, slowly drizzle in the oil to emulsify. The sauce can be refrigerated for up to 1 week. Bring to room temperature 2 hours before serving.

Serving a whole side of salmon rather than individually portioned fillets has its benefits. Besides being impressive looking, this presentation allows guests to serve themselves as much or as little of the fish as they want.
We typically like to grill salmon (and most other fish) with the skin still on. Not only does the skin help seal in the fish’s juices to protect it from drying it out; it is also the source of much of the fish’s flavor and imparts it into the flesh as it cooks. This is especially important when grilling wild salmon, which can be milder in flavor than its farm-raised counterparts.
Oyster leaves, which you can use as a garnish here, are blue-green-colored, lightly crunchy, succulent greens that taste uncannily like oysters. If you can’t find them, either substitute edible flowers or proudly serve the fish ungarnished. It is pictured here with Blistered Snap Peas.
SERVES 6
3 pounds wild salmon fillet, skin on, scales and bones removed by your fishmonger
Kosher salt
1 to 2 teaspoons freshly ground black pepper
¼ cup extra-virgin olive oil
Oyster leaves and/or edible flowers (optional)
Prepare a grill to medium-high heat.
Place the salmon fillet, skin side up, on a cutting board, and score the fish by cutting three to four shallow slits through the skin about ⅛ inch deep and 3 inches long (do not pierce through the flesh). Season the fish on both sides with salt and pepper, and rub it with the oil.
Be sure to carefully oil the grate, then place the fish, skin side down, on the hot grill. (This is the only side that will come in contact with the grill.) Close the lid on the grill or cover the fish with a large metal bowl; cook, without disturbing, until the skin starts to shrink and natural juices start to bubble near the skin, 5 to 7 minutes.
Carefully remove the fillet (the very top of it will still look rare) with two metal spatulas and turn it over onto a platter, flesh-side-down. Let it rest for 3 to 5 minutes so that carryover heat can help cook the fish to the proper temperature (it should be cooked through on the thinner sections and medium-rare at its thickest parts). Garnish with oyster leaves.

with “black gold” fingerling potatoes and capers
Smoke is famously good with trout, and this preparation takes advantage of that. This particular whole fish can also be a good gateway if the idea of whole fish freaks you out: most seafood shops and grocery counters sell trout already gutted and deboned, so you can enjoy all of the drama of presenting a whole fish but without the messiness of the guts or paranoia about swallowing bones.
Primarily the pleasure of a whole trout or any grilled whole fish is the bronzed, crispy skin. Done properly, the skin takes on the texture of a thin, well-done slice of bacon and a little of its saltiness, too—a nice contrast to the tender, mild-flavored flesh. We balance out the richness of the skin with plenty of lemon, some briny capers, and fresh herbs.
It is very important that you have all the ingredients for the recipe prepped in advance and at the ready beside the grill, since the fish takes just a few minutes to cook.
SERVES 2 AS A MAIN DISH OR 4 AS A STARTER
5 medium fingerling potatoes
Kosher salt
2 (12-ounce) whole boneless trout (preferably head-on, tail-on), fins removed
2 tablespoons extra-virgin olive oil
Freshly ground black pepper
2 tablespoons “Black Gold”
2 tablespoons drained capers
1 lemon, halved
1 cup fresh flat-leaf parsley leaves
¼ cup fresh marjoram leaves
Put the potatoes in a small pot and cover with water; season with salt. Bring to a boil, then simmer the potatoes until tender, about 10 minutes. Drain well and let cool enough to handle. Slice into ¼-inch rounds, then chill.
Prepare a grill to high heat. Preheat a cast-iron pan or any pan that can withstand high heat from the grill by placing it directly on the coals or over the hottest area of the grill.
Meanwhile, using paper towels, pat away any excess moisture from the trout. Brush the outside and inside of the cavity with the oil and season with salt and pepper. Close the fish cavity.
Add the “Black Gold” to the preheated pan, then add the fish. Cook until browned on one side, 3 to 4 minutes. Gently flip the fish using a metal spatula. Add the potatoes and capers (removing the pan from the heat and then returning it to the heat, if needed). Cook until the potatoes have started to brown, 3 to 4 minutes more. Squeeze the lemon into the pan, then add most of the parsley and all of the marjoram.
Remove the fish from the pan and transfer to a platter or two plates; divide the potatoes and capers between the plates. Taste the pan juices and adjust the seasoning, if necessary. Spoon it generously over the fish. Garnish with the remaining parsley leaves.
