CHAPTER 8 DESSERTS
Just like hearty, juicy meats and bright, vibrant vegetables, desserts are essential to any proper grilled feast. After you’ve enjoyed all the smoky, savory notes, it’s fun and satisfying to end on something at least relatively sweet. Though the two of us debate chocolate versus fruit desserts and which are better, we agree on the necessity of at least a little something to wrap up a good meal.
By making your own desserts at home, you can approach them with the same eye to balance and flavor as you do your savory courses. To us, having contrasts of sweet and salty as well as a mix of textures and temperatures are as important in the last course as they are in the first. Desserts made from scratch also give us the freedom to tweak recipes and cater to all types of eaters—including gluten-free and dairy-free (and both chocolate lovers and fruit lovers alike).
Our obsession with seasonality carries over into desserts, whether there is a glut of some wonderful berry or stone fruit in summer or it’s the height of orchard season, say. But dessert can also be a time to take advantage of the convenience staples in your pantry and fridge. Recipes like our Hazelnut Brown Butter Torte and Parmesan Pound Cake do just that. We’ve even found use in our recipes for a few savory-turned-sweet ingredients, like fresh summer corn and herbs.
It’s interesting that a part of the meal that can bring such childlike pleasure to everyone can sometimes be complicated to prepare. Of course, desserts can be complex, and if you have a love of showing off with them, you will find your share of dazzling displays in this chapter. But we urge you to keep things as simple as you like, remembering the wow factor that a stand-alone scoop of homemade fruit sorbet or a few bites of one perfect cookie can deliver. Feel free to break down these recipes into individual elements as you desire.
Speaking of keeping things simple, do your best to make these recipes ahead of time, as much for your own sanity as for your own enjoyment when it’s time to sit down and dig into dessert.
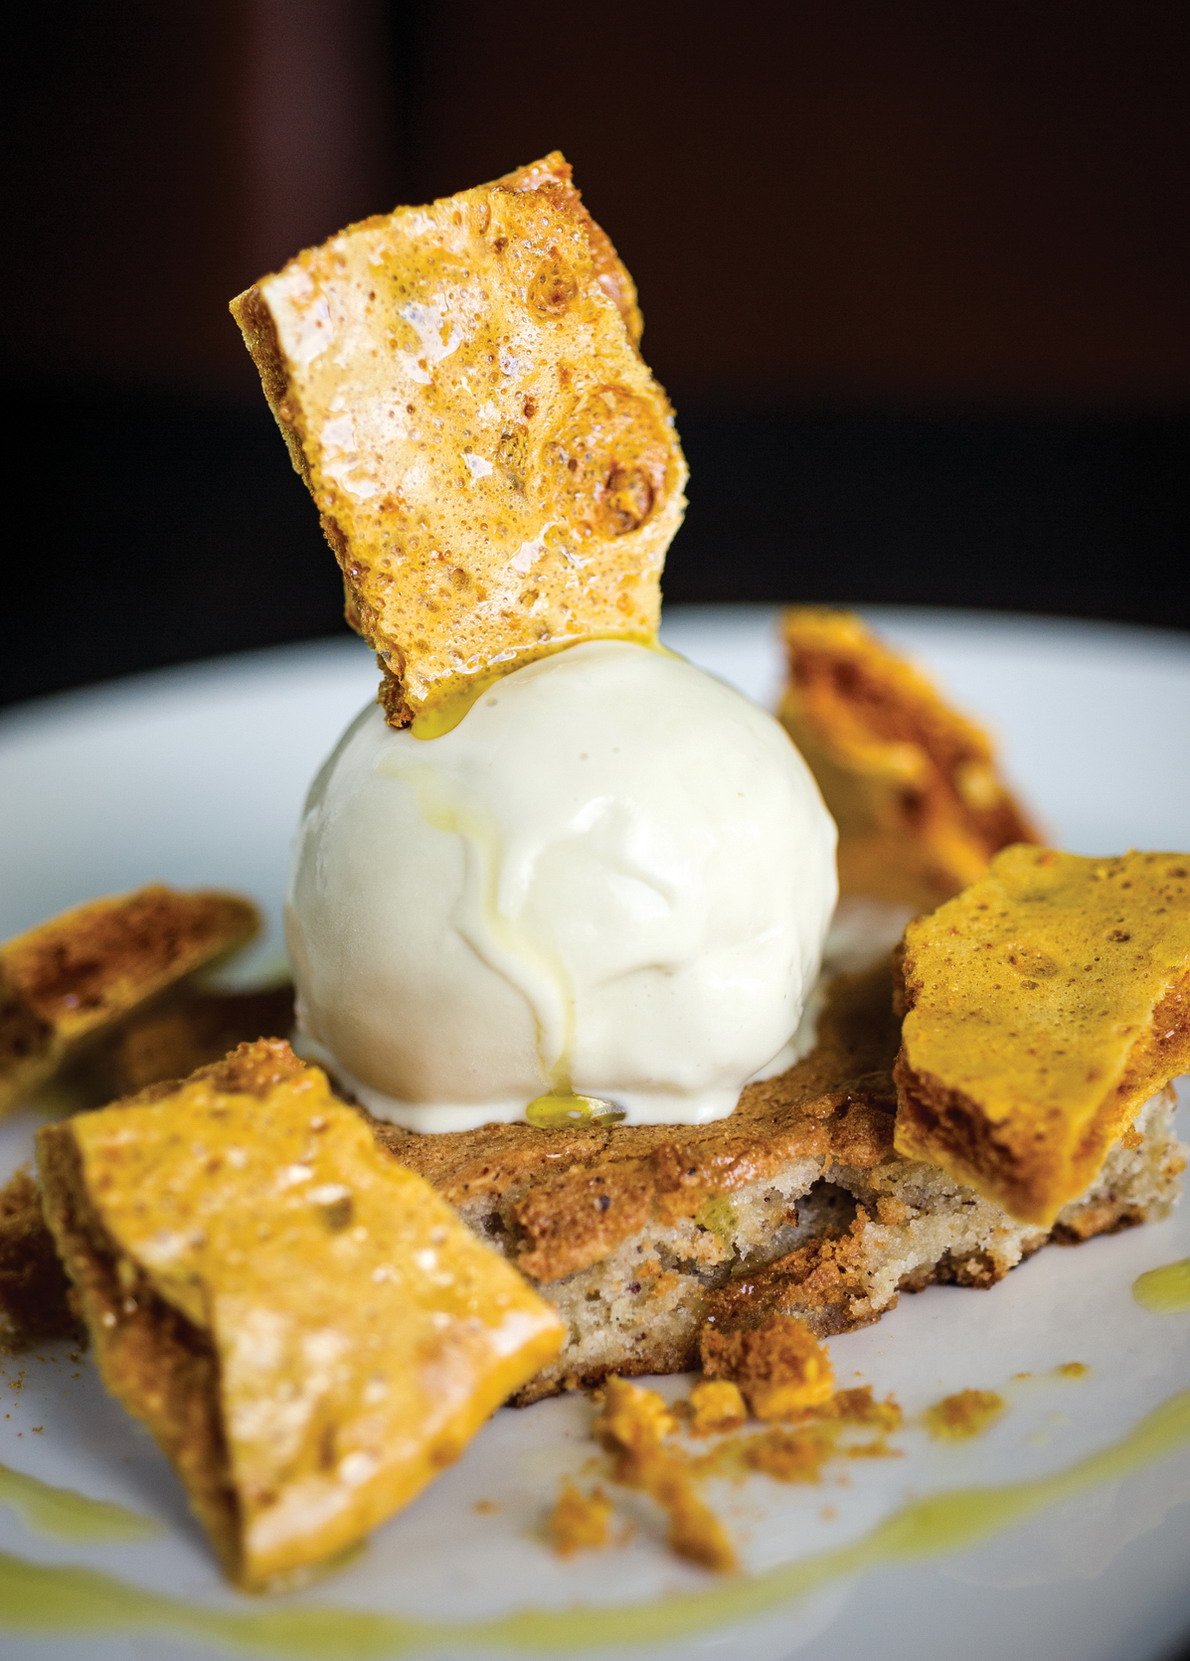
with “honeycomb” candy and honey-chamomile ice cream
Almost like a nutty blondie, this torte is a gluten-free dessert that never leaves anyone wanting. You can smell the brown butter and vanilla with each chewy bite. We add loads of hazelnuts (and the “honeycomb” candy) for contrast and crunch and top it with ice cream for creaminess.
This is a dish where the whole is so much greater than the sum of its parts, and while most of our dessert recipes can be broken down and appreciated as their individual components, we urge you to go the distance and serve everything together here, down to the ice cream and the drizzle of olive oil. The combination of chewy textures and sweet and savory flavors has made this dessert a house favorite that will always be on the menu at Ox.
SERVES 8 OR 9
Hazelnut Brown Butter Torte
1¼ cups toasted hazelnuts
1 ⅓ cups confectioners’ sugar
⅓ cup almond flour
1 teaspoon kosher salt
1 cup plus 1 tablespoon unsalted butter
½ vanilla bean, seeds scraped
5 egg whites
3 tablespoons granulated sugar
To Serve
Extra-virgin olive oil
Seasonal berries, for garnish (optional)
Preheat the oven to 350°F.
In a food processor, combine the hazelnuts and confectioners’ sugar; process until finely ground. Transfer to a large bowl; add the almond flour and salt. Stir to combine and set aside.
In a small saucepan over medium heat, warm the butter with the vanilla bean pod and seeds; cook, swirling the pan, until the butter has melted. Reduce the heat to low and continue to cook, being careful to avoid splatters as the moisture evaporates. Cook the butter until the milk solids have turned toasty and golden brown, the butter is foamy, and the aroma is nutty, about 10 minutes. Let cool for about 10 minutes. Remove the vanilla bean pod and discard.
Brush the bottom of a 10-inch round springform pan (or a 10-inch square cake pan) with 1 tablespoon of the vanilla brown butter.
In a large bowl or the bowl of a stand mixer fitted with the whisk attachment, whisk the egg whites for about 30 seconds (or until frothy). With the motor running, slowly add the granulated sugar. Whisk at medium speed until stiff peaks form. Gently fold the whipped egg whites into the dry ingredients with a rubber spatula. Mix in the remaining vanilla brown butter until fully incorporated.
Pour the torte batter into the prepared pan.
Bake until a toothpick inserted in the center of the cake comes out clean, 45 to 60 minutes. Let cool on a wire rack for 30 minutes, then release from the pan (alternatively, slice the cake straight from the pan).
Serve the cake slightly warm with a scoop of the honey-chamomile ice cream, and crumble the honeycomb candy on top. Garnish with a drizzle of oil and some seasonal berries, if available.
MAKES JUST OVER 1 QUART
1½ cups heavy cream
1 cup milk
¼ cup honey
⅓ cup dried chamomile flowers
6 egg yolks
3 tablespoons sugar
¼ teaspoon kosher salt
In a medium, heavy pot, combine the cream, milk, and honey; bring to a simmer over medium heat, then remove from the heat. Add the chamomile flowers and let steep for 10 minutes; strain.
In a medium bowl, whisk together the egg yolks, sugar, and salt. Slowly pour the cream mixture into the yolk mixture, whisking constantly. Transfer the mixture back to the pot and cook over low heat, stirring constantly with a heat-resistant rubber spatula. As soon as the custard thickens (and before the egg scrambles), strain through a fine-mesh strainer. Chill to cool completely before transferring to an ice cream maker; spin and freeze according to the manufacturer’s directions. Store for up to 1 month in a covered freezer-safe container.
SERVES 8 TO 10
Neutral-flavored vegetable oil, for greasing the pan
1½ cups sugar
¼ cup honey
¼ cup water
1 tablespoon baking soda
Rub or spray a baking sheet or silicone baking mat with vegetable oil.
In a large, heavy nonreactive pot, heat the sugar, honey, and water over medium-high until the mixture registers 300°F on a candy thermometer. Immediately remove from the heat and whisk in the baking soda. Quickly pour the mixture onto the prepared baking sheet, but do not smash it down or you will lose the air pockets that make this candy so light and crispy. Let cool to room temperature for about 15 minutes, then break off shards of the candy, crumbling some and leaving others in larger pieces.
with malted chocolate semifreddo and sunchoke chips
The semifreddo is a chocolate mousse recipe that we stuck in the freezer one day—we went crazy for the chewy texture it developed. A bonus of this recipe is that it won’t melt at room temperature like ice cream will. You can refrigerate the dessert instead of freezing it if you’re not in the mood for a frozen confection. Serving it with fried sunchoke chips adds a crunch reminiscent of crispy shards of salted caramel.
SERVES 4 TO 6
1 cup heavy cream
½ cup malted milk powder (3 ounces)
8 ounces milk chocolate, chopped into small pieces
2 ounces dark chocolate, chopped into small pieces
¼ cup egg whites
¼ teaspoon cream of tartar
½ teaspoon kosher salt
¼ cup sugar
4 firm bananas (without brown spots)
3 tablespoons extra-virgin olive oil
2 to 3 cups Sunchoke Chips
To make the semifreddo, in a large bowl using a whisk or in the bowl of a stand mixer fitted with the whisk attachment, begin whisking the cream and one-third of the malted milk powder until incorporated. Add half of the remaining powder to the cream mixture, and whisk again until incorporated. Finally, whisk in the remaining powder. Continue to whip the cream until stiff peaks form. Refrigerate until ready to use.
Fill a medium pot with 1 inch of water and bring to a simmer. Place a heatproof bowl on top (the water should not touch the bottom of the bowl). Add the chocolates and let melt, stirring frequently.
In a mixing bowl using a whisk or in the bowl of a stand mixer fitted with the whisk attachment, beat the egg whites until frothy. Add the cream of tartar and salt; slowly begin adding the sugar 1 tablespoon at a time, whisking constantly. Continue to beat until stiff peaks form. Whisk in the melted chocolate. This will deflate the egg and make it look like cake batter. Refrigerate until chilled, about 1 hour.
Add the whipped cream to the chilled chocolate mixture in three additions. For the first third, use a whisk and mix aggressively. For the second third, whisk less aggressively. For the final third, use a spatula and gently fold the whipped cream in until fully incorporated. Transfer the mixture to an appropriately sized storage container and freeze for at least 6 hours. (Alternatively, refrigerate for at least 6 hours to serve the mixture as a chocolate mousse instead.)
Prepare a grill to high heat.
Just before you are ready to serve, peel the bananas and slice in half crosswise, then lengthwise; rub gently with the oil. Be sure to carefully oil the grate, then transfer the bananas to the grill and cook just long enough for one side to pick up grill marks and become lightly caramelized, about 3 minutes. Gently flip the bananas and grill for 2 minutes more. With a metal spatula, carefully remove and place two (or more) pieces of banana in each bowl (banana split–style) and add a scoop or two of the semifreddo. Garnish with the sunchoke chips.
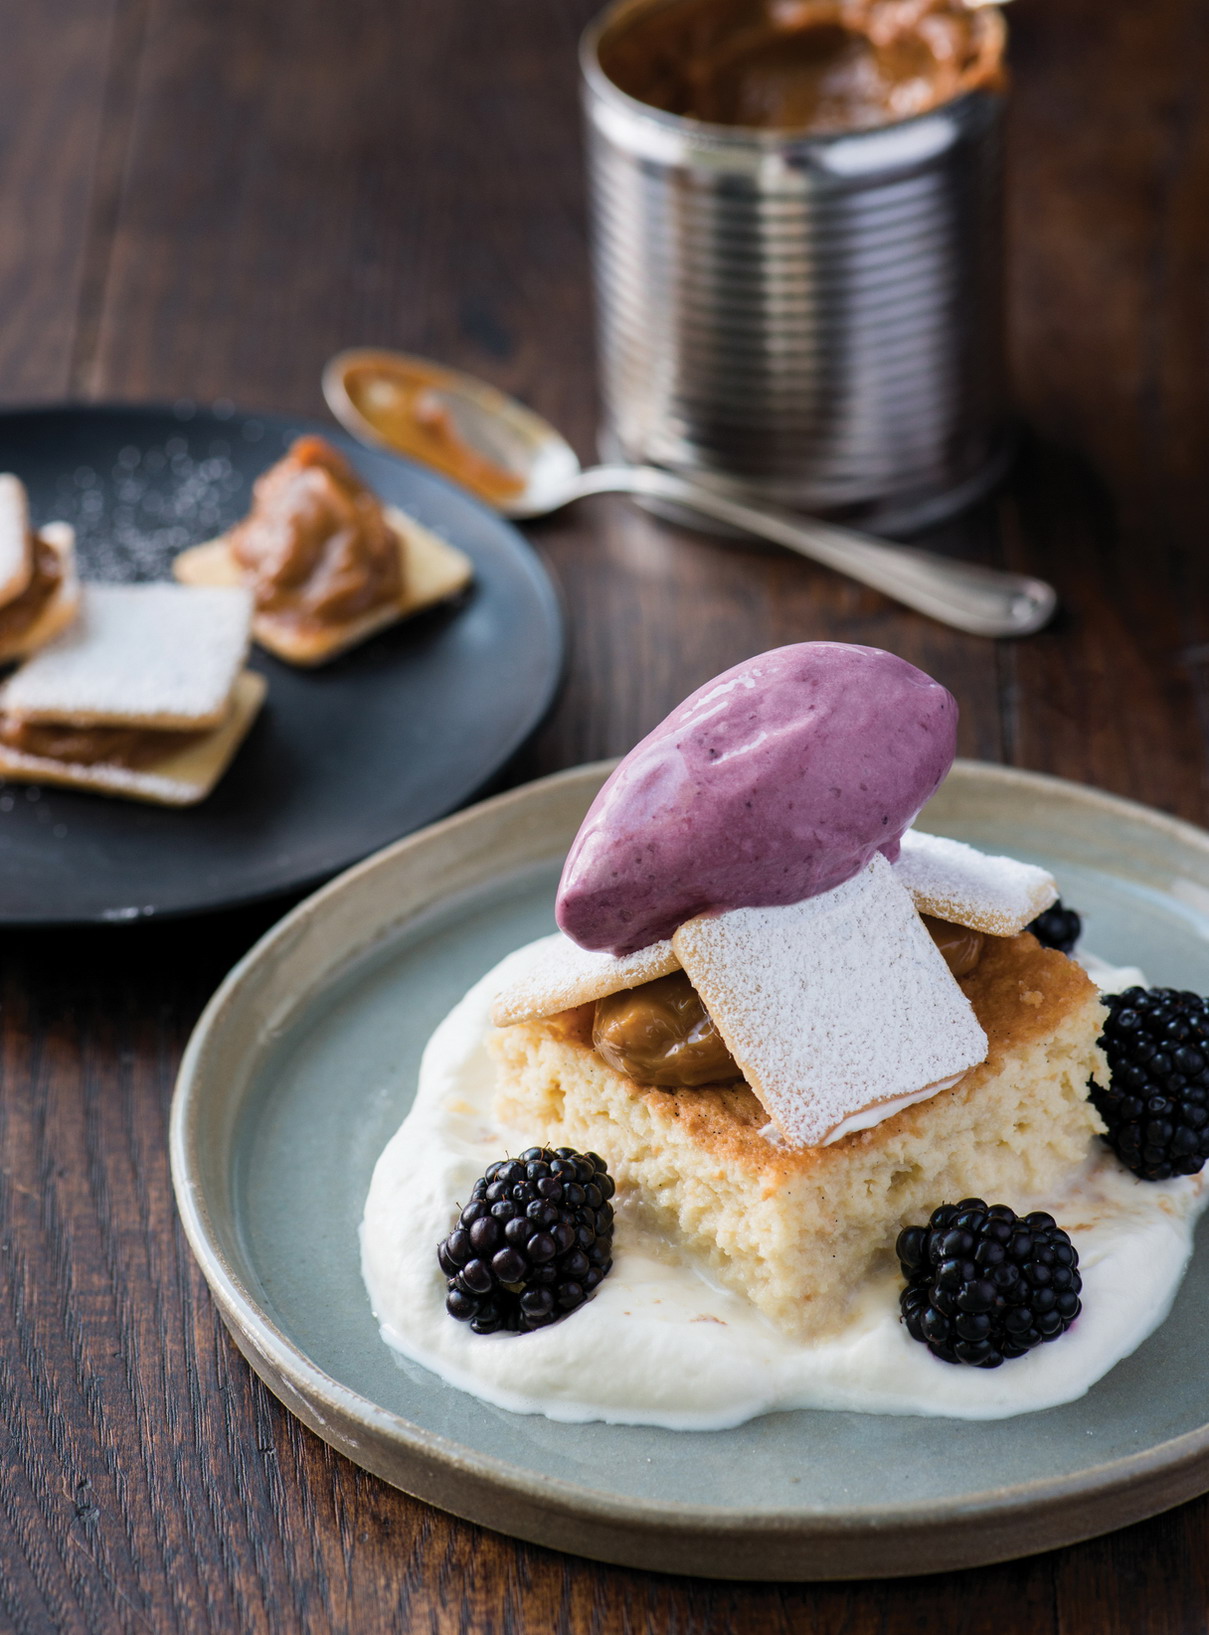
with marionberry ice cream
Tres leches cake is a traditional Latin American dessert served in many parts of the continent. Essentially a cream-soaked cake, it’s unparalleled in richness and puddinglike texture. You can definitely serve it alone, but it also goes really well with seasonal fruit like strawberries, tart lemon curd, citrus sorbet, or coffee ice cream.
In the summertime, we love to serve this cake with fresh berries and marionberry ice cream. Marionberries are a breed of blackberries that were originally developed in Oregon and come into season in July in the Pacific Northwest. They are a deep purple-black color, glossy, plump, and wonderfully juicy and tart. They also have a more concentrated, robust, caramelized-sugar sweetness than other blackberries. If you can’t find them, you can substitute ripe blackberries.
SERVES 12
Vanilla Bean Tres Leches Cake
1 cup all-purpose flour
1½ teaspoons baking powder
½ teaspoon kosher salt
5 eggs, separated
1 cup granulated sugar
⅓ cup whole milk
1 teaspoon vanilla extract
Soaking Liquid
1 (14-ounce) can sweetened condensed milk
1 (12-ounce) can evaporated milk
1 cup heavy cream
2 tablespoons dark rum
1 vanilla bean, seeds scraped
Kosher salt
Sweetened Whipped Cream
2 cups heavy cream
¼ cup confectioners’ sugar
To Serve
Alfajor Cookies with Dulce de Leche (optional)
Marionberry Ice Cream with additional Marionberry Puree
Preheat the oven to 350°F. Butter a 9 by 13-inch cake pan.
To make the cake, in a large bowl, whisk together the flour, baking powder, and salt; set aside.
In the bowl of a stand mixer fitted with the paddle attachment (or using a handheld electric mixer), beat the egg yolks on high speed with ¾ cup of the granulated sugar until thickened and pale in color, 5 to 8 minutes. Add the milk and vanilla and mix until combined. Using a spatula, fold in the dry ingredients until just incorporated (do not overmix).
In a clean bowl of a stand mixer fitted with the whisk attachment, beat the egg whites on high speed until frothy. With the motor running, slowly add the remaining ¼ cup granulated sugar. Continue beating on high until stiff peaks form, about 2 minutes. Fold the egg white mixture into the cake batter with the spatula until just combined (do not overmix). Pour the batter into the prepared pan.
Bake for 12 minutes. Rotate the pan 180 degrees and continue baking until a toothpick inserted into the center of the cake comes out clean, 12 to 15 minutes more. The cake will be golden brown and the edges will start to pull away from the sides. Remove from the oven and let cool slightly on a wire rack.
To make the soaking liquid, in a large bowl, whisk together the condensed milk, evaporated milk, cream, rum, vanilla bean pod and seeds, and a pinch of salt; remove the vanilla bean pod.
With the cake still in the pan, prick the cake all over with a fork (about 2 dozen times), then drizzle half of the soaking liquid over the cake.
Refrigerate for 30 minutes, then drizzle the rest of the soaking liquid over the cake and refrigerate until absorbed, about 2 hours.
To make the whipped cream, in a large bowl or the bowl of a stand mixer, whisk the cream and confectioners’ sugar until soft peaks form.
To serve, garnish the tres leches cake with the whipped cream, and the cookies with dulce de leche, if desired. Serve with the marionberry ice cream and a drizzle of marionberry puree.
MAKES 1½ QUARTS ICE CREAM, PLUS ½ CUP PUREE
Vanilla Ice Cream Base
1½ cups heavy cream
1½ cups whole milk
½ vanilla bean, seeds scraped
6 egg yolks
¾ cup sugar
¼ teaspoon kosher salt
Marionberry Puree
1 pound marionberries
1 cup sugar
2 tablespoons fresh lemon juice
Kosher salt
To make the ice cream, combine the cream, milk, and vanilla bean pod and seeds in a heavy nonreactive pot and bring to a simmer over medium heat. Remove from the heat and let steep for 10 minutes.
Whisk together the egg yolks, sugar, and salt in a bowl. Slowly whisk the cream mixture into the yolk mixture until combined. Transfer the mixture back to the pot and cook over low heat, mixing constantly with a heat-resistant rubber spatula, until the mixture thickens (and before the egg scrambles), 8 to 10 minutes. Strain through a fine-mesh strainer and transfer to the refrigerator or an ice bath to cool completely.
To make the marionberry puree, heat the berries, sugar, lemon juice, and a pinch of salt in a medium stainless steel pot over medium-high heat until the sugar dissolves and the mixture becomes juicy and begins to boil. Reduce heat to simmer for 10 minutes more. Remove from the heat and strain through a fine-mesh strainer, firmly pressing the mixture through with the back of a small ladle. Stir the puree, then chill.
Combine 1 cup of the chilled marionberry puree with the chilled ice cream base and mix well. Taste and add more puree or lemon juice, if needed. If not, save the extra puree (ideally ½ cup) to garnish the plate or drizzle over the marionberry ice cream. Transfer to an ice cream maker; spin and freeze according to the manufacturer’s directions. Store for up to 1 month in a covered freezer-safe container.
with dulce de leche
While alfajores may appear plain or simple on their own, the combination of these crumbly, buttery, cornstarch-based cookies and the rich, caramelized dulce de leche they sandwich is to die for. Originally from Spain, alfajores are found all over Latin America, where there are entire cafés dedicated just to them. Enjoy them filled, or savor the cookies on their own with coffee at the end of a meal. You could also substitute the dulce de leche filling with fruit preserves or peanut butter.
MAKES ABOUT 28 1½-INCH-SQUARE COOKIE SANDWICHES OR 56 REGULAR COOKIES
1¼ cups all-purpose flour
1 cup cornstarch
1 teaspoon baking powder
½ teaspoon kosher salt
½ cup unsalted butter, at room temperature
¾ cup granulated sugar
½ vanilla bean, seeds only
2 egg yolks
1 tablespoon brandy
¾ cup Dulce de Leche
Confectioners’ sugar, for dusting
Preheat the oven to 350°F. Line a large baking sheet with parchment paper or a silicone baking mat.
In a medium bowl, sift the flour, cornstarch, baking powder, and salt.
In a large bowl or the bowl of a stand mixer fitted with the paddle attachment, cream the butter, granulated sugar, and vanilla seeds until light and fluffy, about 5 minutes. Add the egg yolks one at a time and mix until incorporated. Add the brandy and mix well. Add the dry ingredients in three batches, mixing each time until just incorporated and the dough just comes together (do not overmix). Wrap the dough in plastic wrap and refrigerate for 10 to 20 minutes.
Using a rolling pin, roll out the dough between two pieces of parchment paper to a thickness of ¼ inch. Cut out cookies to 1½-inch squares or your preferred size and shape, and transfer to the prepared baking sheet, leaving at least ½ inch of space between each cookie. Refrigerate the dough as needed to keep it cool while working with it. Do not reroll scraps of dough more than once. Chill for 10 minutes.
Bake on the middle rack of the oven for 7 minutes, then rotate 180 degrees and bake until the cookies are barely starting to brown at the bottom (tops should still be pale), 6 to 8 minutes more (or longer if the cookies are cut larger). Set on a wire rack to cool completely.
If making sandwich cookies, carefully place a heaping teaspoon of dulce de leche (or more as desired) on the flat bottom side of half of the cookies; sandwich with the other half of the cookies. Dust the cookies with confectioners’ sugar before serving. Serve soon after adding the dulce de leche to prevent the cookies from softening.
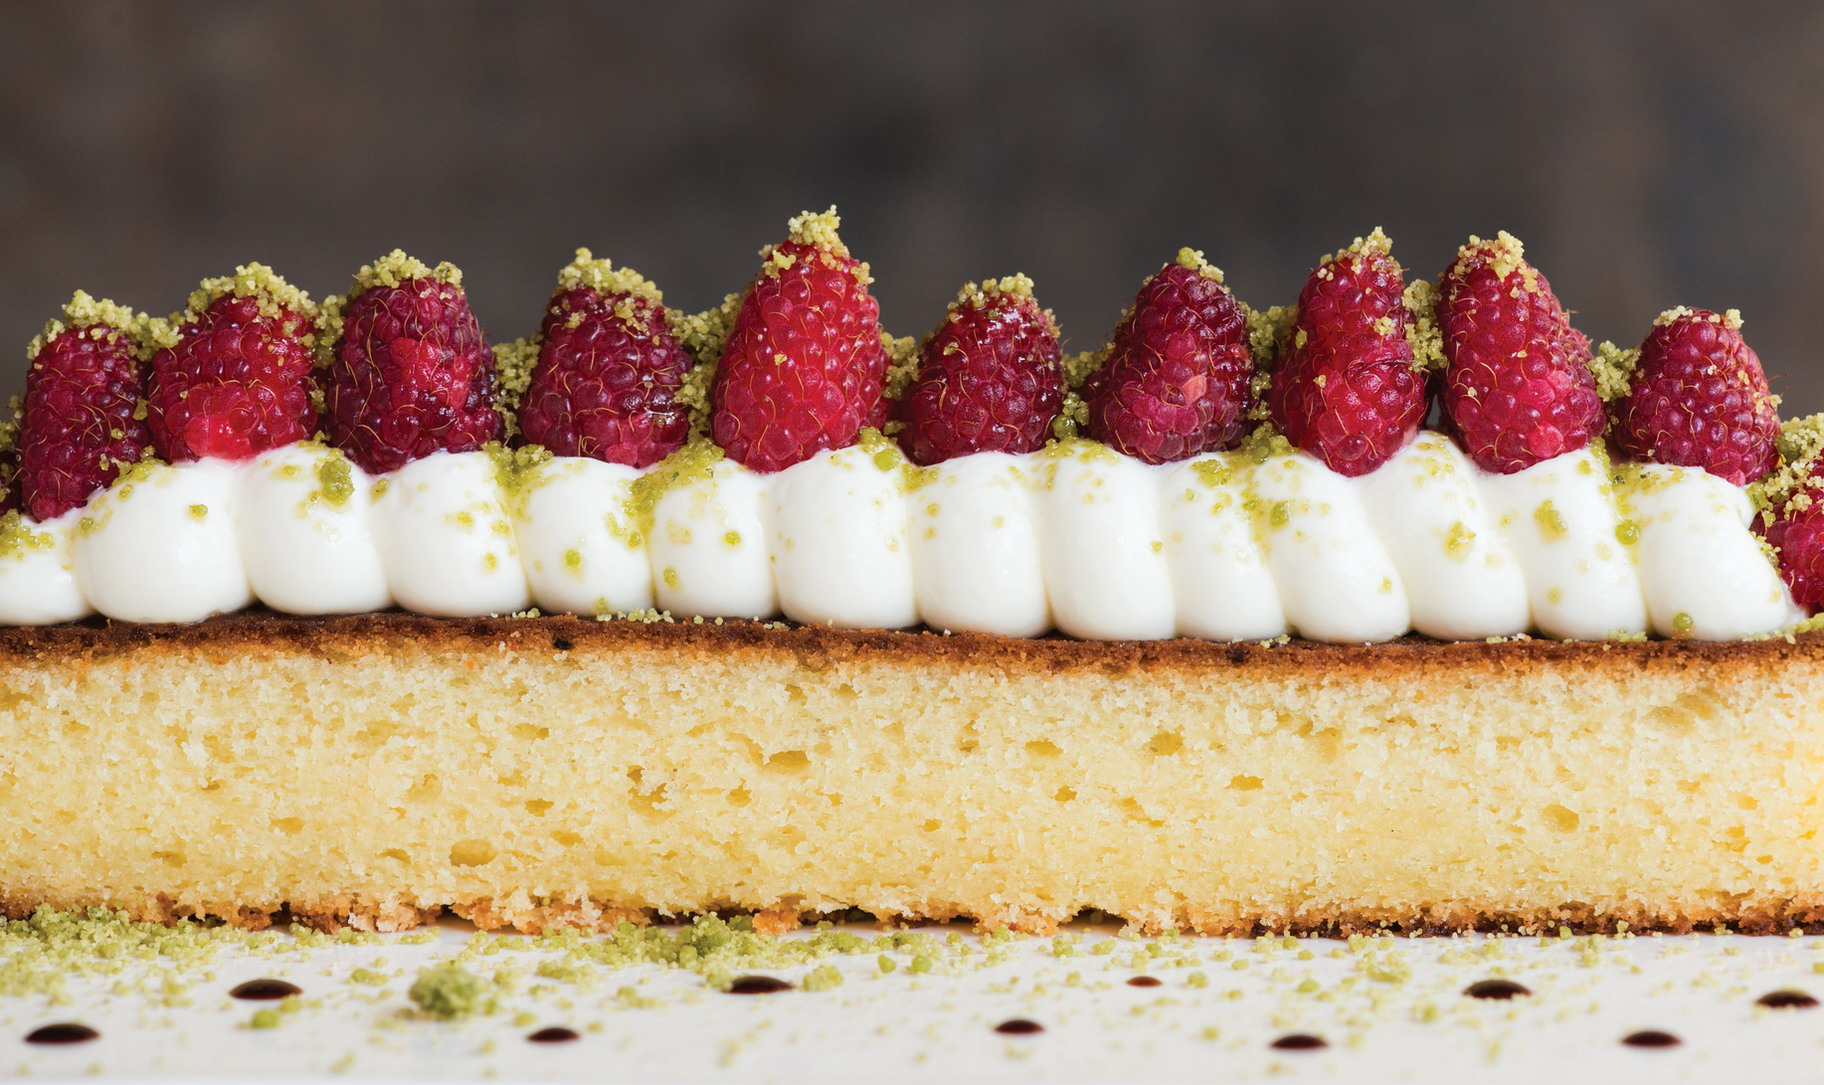
with whipped mascarpone, raspberries, and basil sugar
This cake is our version of a Salvadorian cake called a quesadilla—which is not to be mistaken for the Mexican tortilla-based dish, although it does get its name because it contains cheese. It’s a decidedly less sweet, more dense and buttery cake (similar to a pound cake) that is classically served as a snack in the afternoon with coffee. While the cheese used in the traditional recipe is comparable to a fresh farmers’ cheese, we substitute a generous amount of Parmigiano-Reggiano, which adds umami and an interesting crystalline texture. Mascarpone whipped with sour cream brings a little tanginess and lift. Saba, which you can find online and at some gourmet markets and which is used as a garnish here, is basically a reduction of grape juice that hasn’t yet been fermented into wine, so that adds a great acidic kick and marries well with the fruit. If you can’t find it, substitute a good-quality, aged balsamic vinegar or a balsamic glaze.
SERVES 12 TO 15
Whipped Mascarpone
2¼ cups mascarpone, homemade or store-bought
¾ cup sour cream
3 tablespoons confectioners’ sugar
Parmesan Pound Cake
2 cups all-purpose flour
2 teaspoons baking powder
½ teaspoon finely ground sea salt
5 ounces Parmigiano-Reggiano cheese, finely grated (1¼ cups firmly packed)
1 cup unsalted butter, softened to room temperature
2 cups granulated sugar
6 eggs, lightly beaten
1 cup mascarpone
1 cup sour cream
To Garnish
3 pints fresh raspberries
¼ cup saba (reduced grape must) (or substitute a thick, aged balsamic vinegar)
To make the whipped mascarpone, whisk together the mascarpone, sour cream, and confectioners’ sugar until well combined. Cover and keep chilled until ready to serve.
Preheat the oven to 350°F. Butter and lightly flour a 9 by 12-inch cake pan, tapping out any excess flour.
To make the cake, sift the flour, baking powder, and salt into a large bowl. Whisk in the grated cheese.
In the bowl of a stand mixer fitted with the paddle attachment, cream the butter and granulated sugar over high speed for about 5 minutes, stopping to scrape down the sides of the bowl with a rubber spatula as needed. Reduce the speed to medium and slowly drizzle in the beaten eggs; mix thoroughly. Add the mascarpone and mix again until smooth. Reduce the speed to low and alternate adding one-third of the flour mixture and one-third of the sour cream until both are nearly incorporated. Stop the machine and finish mixing the ingredients using a spatula to avoid overmixing. Transfer the batter to the prepared cake pan and spread evenly into the pan.
Bake in the middle rack of the oven until a toothpick inserted into the center of the cake comes out clean, 45 to 55 minutes. Transfer to a wire rack to cool. Serve warm, topped with whipped mascarpone and fresh berries. Sprinkle some of the basil sugar over everything, then drizzle the berries and the plate with the saba.
MAKES ½ CUP
½ cup sugar
¼ cup firmly packed fresh basil leaves
In a coffee grinder, spice grinder, or micro food processor, combine half of the sugar and half of the basil; pulse until the basil leaves have been chopped up finely and the sugar has taken on the color and scent of the basil. Repeat with the remaining sugar and basil. Store in an airtight container for up to 3 days.

with molasses cream and fudge sauce
This chocolate cake is our go-to birthday cake recipe every year. Along with the molasses cream and fudge sauce, the frosting or accompaniments change based on the honoree’s preference. One favorite is mint ice cream, but this cake also pairs extremely well with lightly sweetened mascarpone whipped with a little dark rum (the resulting flavor is reminiscent of tiramisù). The molasses cream adds a savory note to this dessert, and the fudge sauce—somewhat like a glaze—is a nice alternative to an intensely sweet, buttery frosting.
In place of a neutral-flavored vegetable oil, we use olive oil in this cake to impart a mild fruitiness and a good degree of moisture.
SERVES 12
1 ¾ cups all-purpose flour
1 cup granulated sugar
1 cup firmly packed light or dark brown sugar
1 cup unsweetened cocoa powder
2 teaspoons baking soda
1 teaspoon baking powder
1½ teaspoons kosher salt
2 eggs
1 cup sour cream
1 cup hot brewed coffee
½ cup extra-virgin olive oil
1 teaspoon vanilla extract
Molasses Cream, for serving
Lissa’s Fudge Sauce, for serving
Chocolate croquant sprinkles, for serving (optional)
Peppermint ice cream, for serving (optional)
Preheat the oven to 350°F. Butter or oil and flour a 9 by 13-inch cake pan, tapping out any excess flour.
In a large bowl, whisk together the flour, granulated sugar, brown sugar, cocoa, baking soda, baking powder, and salt. In a separate bowl, whisk together the eggs, sour cream, coffee, oil, and vanilla. Add the wet ingredients to the dry and whisk just to incorporate (some small remaining lumps are okay). Transfer the batter to the prepared cake pan.
Bake for 10 minutes, then rotate the pan 180 degrees and bake for another 10 minutes, or until a toothpick inserted into the center of the cake comes out clean. Remove from the oven and cool in the pan on a wire rack.
To serve, cut the cake (while still in the pan) into 3-inch squares or disks using a square cookie cutter or ring mold. Place a couple of spoonfuls of the molasses cream onto each serving dish. Place a portion of cake into the center of the cream, then drizzle the cake with the fudge sauce and sprinkles. Serve with peppermint ice cream, if desired.
MAKES JUST OVER 2 CUPS
2 cups heavy cream
¼ cup blackstrap molasses
3 tablespoons sugar
Kosher salt
In a small saucepan over low heat, combine the cream, molasses, sugar, and a pinch of salt; bring to a boil, keeping the heat low and stirring often. Immediately remove from heat and pass through a fine-mesh strainer. Let cool completely, then briefly whisk before serving. This sauce can be refrigerated for up to 5 days.
MAKES JUST UNDER 2 CUPS
4 ounces bittersweet chocolate
¼ cup light corn syrup or cane syrup
7 tablespoons water
¼ cup sugar (2½ ounces)
⅓ cup unsweetened cocoa powder (2½ ounces)
½ teaspoon kosher salt
Fill a medium pot with 1 to 2 inches of water and bring to a simmer. Place a heatproof bowl on top of the pot (water should not touch the bottom of the bowl). Add the chocolate and let melt, stirring frequently.
In a small saucepan, combine the corn syrup and water; bring to a boil over medium-high heat, then turn off the heat.
In a large bowl, whisk together the sugar, cocoa powder, and salt in a large bowl. Slowly whisk in the corn syrup mixture, then whisk the cocoa–corn syrup mixture into the melted chocolate. Strain through a fine-mesh strainer and let cool completely before using. This sauce can be stored in the refrigerator indefinitely.
A generous scoop of this sorbet is a light, refreshing way to end a big meal any time of year. Even as bright and bracing as the cucumber and fruit flavors are, the texture remains surprisingly creamy. In part, that’s due to the addition of glucose syrup (available online), which helps prevent an icy mouthfeel. But if you don’t have any on hand, substitute either Lyle’s Golden Syrup or light corn syrup.
MAKES ABOUT 2 QUARTS
2 pounds peeled pineapple, cut into cubes
1 pound peeled cucumber, sliced
¾ cup glucose syrup (or substitute Lyle’s Golden Syrup or corn syrup, preferably organic)
½ teaspoon kosher salt
1 cup granulated sugar, plus more if needed
In a high-powered blender, combine the pineapple, cucumber, glucose syrup, and salt; process until smooth. Add the sugar and blend on medium-high until fully dissolved, about 3 minutes. Taste and add more sugar if needed for sweetness, keeping in mind that the sweetness mellows once the sorbet is frozen. If more sugar is added, blend all ingredients together again. Strain through a fine-mesh strainer, pushing through with the back of a small ladle.
Refrigerate the mixture until fully chilled, then transfer to an ice cream maker. Spin and freeze according to the manufacturer’s directions. Store for up to 1 month in a covered freezer-safe container.

with maple–sweet corn panna cotta
The rustic presentation of this dessert brings up a bit of a chicken-and-egg scenario: since you can serve yourself as much as you want of either the juicy, fire-kissed peaches or the luscious, light panna cotta, you can choose which one is the star of this dessert plate. While either can certainly hold its own as dessert, why not have a bit of both?
Anytime you are going to serve a grilled food at dessert, remember to keep your grill fire going after dinner, or to get the grilling done during dinner prep. In that case, enjoy your grilled dessert at room temperature later.
SERVES 4 TO 6
1 cup heavy cream
½ cup whole milk
½ cup mascarpone, homemade or store-bought
1 cup corn kernels (from about 1 large cob), plus scrapings from the cob
½ cup plus 1 teaspoon maple syrup, preferably Grade B
½ vanilla bean, seeds scraped
½ teaspoon kosher salt
3 sheets gelatin
Grilled Peaches
3 large firm-ripe peaches, halved and pitted
2 tablespoons extra-virgin olive oil
2 tablespoons maple syrup, preferably Grade B
Flaked sea salt
To make the panna cotta, in a nonreactive pot, whisk together the cream, milk, mascarpone, corn, maple syrup, vanilla bean pod and seeds, and salt. Bring to a boil over medium heat, then let steep for 10 minutes. Discard the vanilla pod and transfer the mixture to a blender; puree until smooth, then strain through a fine-mesh strainer into a bowl.
Put the gelatin in a small bowl and add enough cold water to cover it completely; let sit until “bloomed,” about 3 minutes. Remove the softened gelatin from the water, gently squeeze out any excess water, then whisk the gelatin into the hot cream mixture, making sure it melts and incorporates completely. Transfer to a storage container and cover with plastic wrap, pressing it against the surface of the mixture to prevent a skin from forming. Chill for at least 8 hours before serving.
When ready to serve, whisk the panna cotta briefly to loosen it up into a puddinglike consistency, then transfer to a large serving bowl or individual bowls.
Prepare a grill to medium-high heat and be sure to carefully oil the grate. Rub the peach halves with oil and transfer, cut side down, to the hot grill. Let cook, undisturbed, until grill marks form, 2 to 3 minutes. Flip and cook for 2 minutes more, then remove from the grill and place on a serving plate, cut side up. Drizzle the peach halves with the syrup and sprinkle with sea salt. Serve family-style, alongside the panna cotta, so your diners can help themselves.
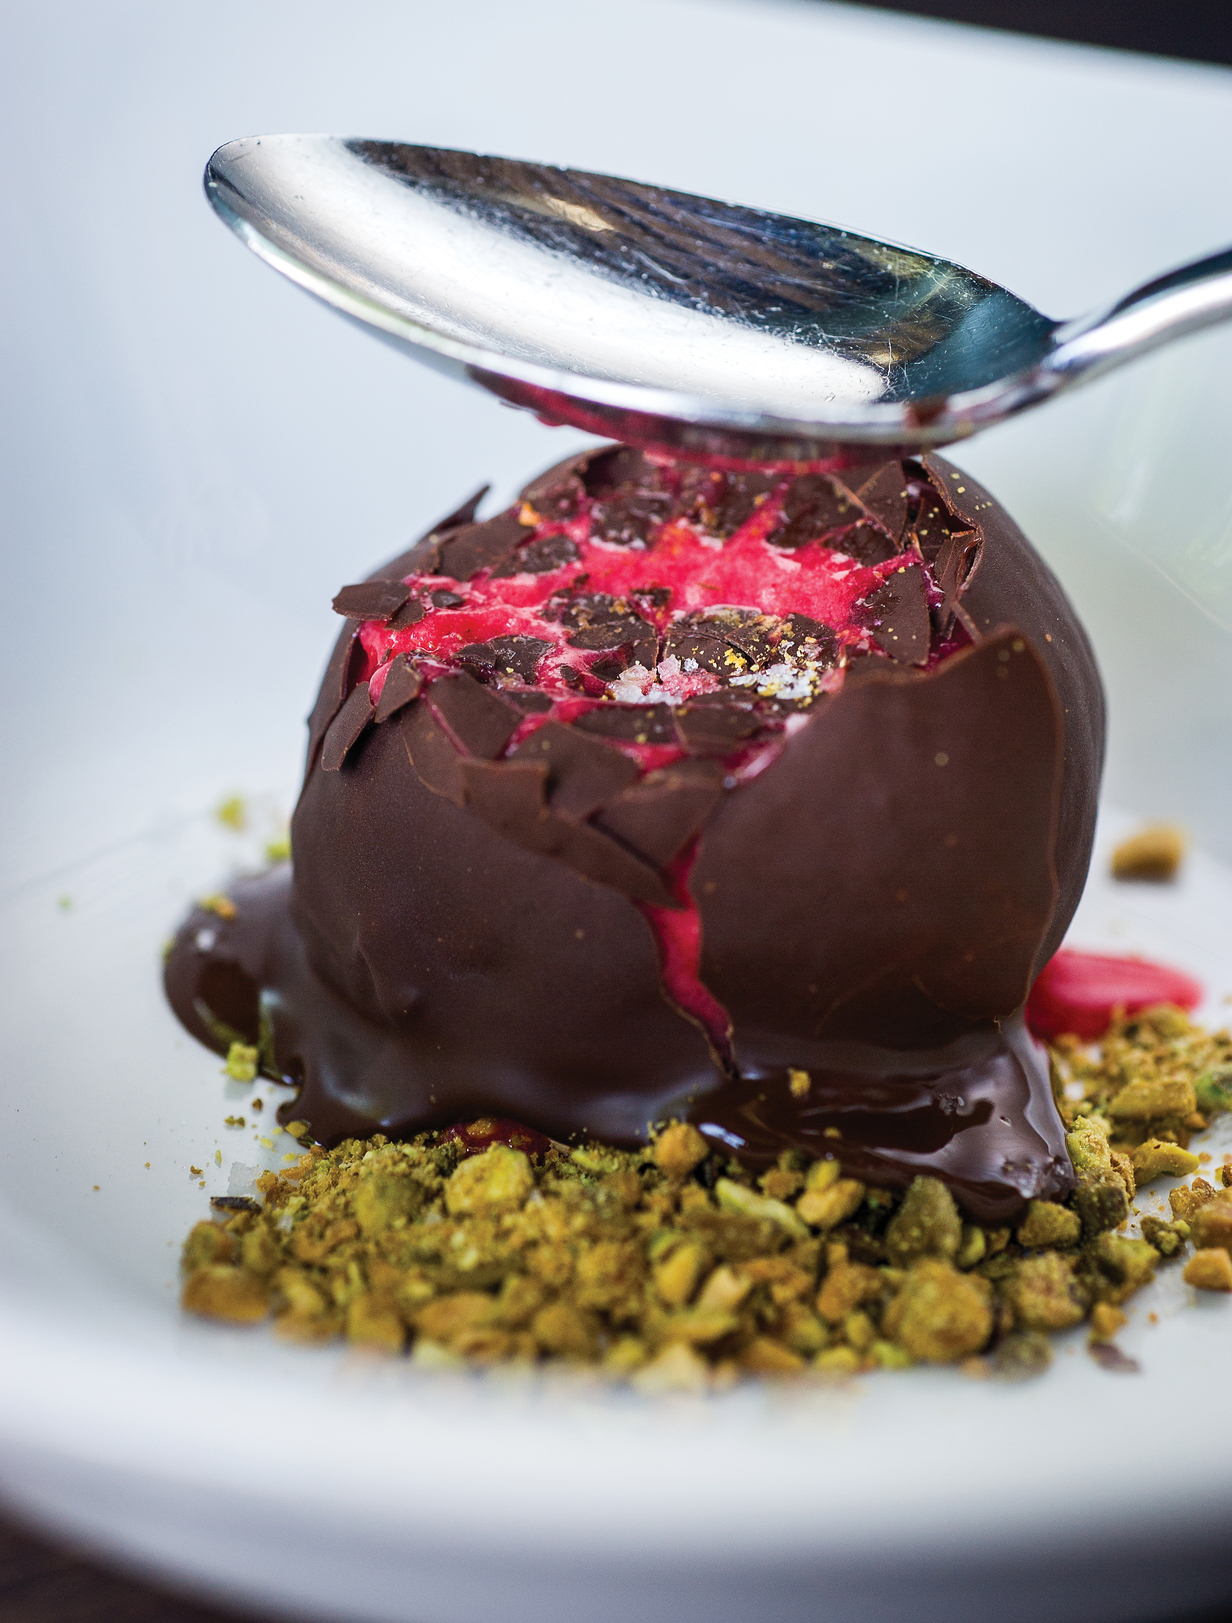
with chocolate “magic shell” and crushed pistachios
Since icy sorbets can often be overlooked as the diet-friendly cousins of more exciting sweets like ice cream, we wanted to make one that could give more decadent desserts a run for their money. In late spring or early summer, when strawberries are at their prime here in Oregon and cherries are starting to hit the market, we let the flavors of the fruits shine and simply do what we can to help them along. Cooking the cherries before we blend them into the sorbet does just this, adding intensity and dimension.
Since strawberries and cherries go undeniably well with chocolate, we top this sorbet with a hard chocolate shell—like the ones at the ice cream shops of our childhood. It’s a bit nostalgic and lends more texture than a typical fudge sauce.
MAKES JUST OVER 1½ QUARTS, SERVES 4 TO 6
Strawberry-Cherry Sorbet
1 quart pitted and halved sweet cherries (from about 1½ pounds cherries)
1½ cups sugar, plus more as needed
1 pound ripe strawberries, hulled
1 teaspoon kosher salt
To Garnish
½ cup roasted pistachios, chopped
Bittersweet Chocolate “Magic Shell”
Flaked sea salt
In a nonreactive stainless steel pot, bring the cherries and sugar to a simmer over medium-high heat. Simmer until the cherries are just cooked through, 10 to 12 minutes. Remove from the heat, transfer to a blender, and puree until completely smooth. If your blender does not produce a perfectly smooth puree, strain the mixture through a fine-mesh strainer, using the back of a ladle to help push it through. Add the fresh strawberries to the blender and puree until smooth (do not bother to strain). Add to the cooked cherries.
Taste and adjust the sugar content, if necessary. If the sorbet base needs more, place some of the mixture back into the blender with another ¼ cup sugar and blend until the sugar dissolves. Mix it all together and taste. Repeat the process, if necessary.
Chill the mixture completely, then transfer to an ice cream maker. Spin and freeze according to the manufacturer’s directions.
To serve, sprinkle some pistachios into small serving bowls. Place a scoop or two of the sorbet in each bowl, then drizzle with warm chocolate sauce. Sprinkle the remaining pistachios and a few grains of sea salt over the chocolate. Let the shell harden for about 1 minute.
BITTERSWEET CHOCOLATE “MAGIC SHELL”
MAKES ABOUT 1 CUP
8 ounces bittersweet chocolate
2 tablespoons plus ½ teaspoon virgin coconut oil
Kosher salt
Fill a medium pot with 1 to 2 inches of water and bring to a simmer. Place a heatproof bowl on top of the pot (water should not touch the bottom of the bowl). Add the chocolate and let melt, stirring frequently. Stir in the coconut oil and a pinch of salt. Keep warm until ready to use, or refrigerate for up to 3 weeks. Reheat gently in a double boiler.
