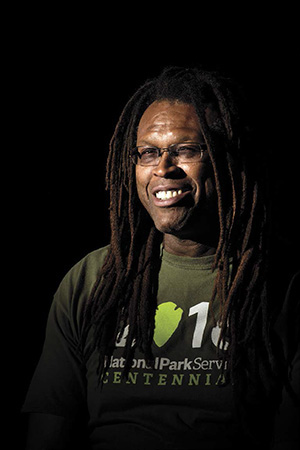
NIKON D750 ISO 200 1/125 SEC. F/8
A portrait can be a painting, photograph, or drawing of a person, usually showing the face or the head and shoulders. This chapter deals with lighting for photographing portraits of people. Some of the lighting approaches predate photography and are taken from portraits painted by the Old Masters. Rembrandt lighting is still popular today, for example, because it creates a portrait where the subject looks naturally lit. No matter what your needs, you’ll find something in this chapter to help: classic lighting strategies, hard versus soft light comparisons, advice for using one and multiple lights, and, finally, approaches for taking environmental portraits where the location needs to be lit as well as the person.
I’ll bet you don’t like your driver’s license photo; no one I’ve met ever does. There is good reason for this universal dislike: The light blasts out from the flash right at the camera level and hits the subject straight on, creating a flat-looking photo with no shadows—totally unflattering. Shadows create the depth in your images, and you need depth to give your subject a natural look.
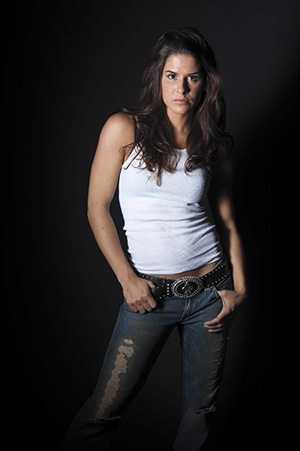
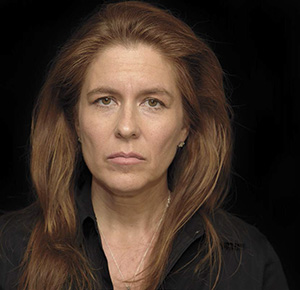
You can control the shadows by controlling the light. The position of the light determines where the shadows will fall, what will be brightly lit, and what will be obscured. As you can see in Figure 12.1 , the shadows give the person shape and depth.
NIKON D2X ISO 200 1/250 SEC. F/5.6
Figure 12.1 Using one off-camera flash placed to the camera’s left created the shadows across the subject.
We are used to seeing shadows fall at a downward angle because the main light in our lives, the sun, is above us. When you set up light for a portrait, positioning the light above the subject and angling it slightly down makes the portrait look more natural. In Figure 12.2 , the light creates a downward-pointing shadow on the face, giving our brains enough information to determine that the light illuminating the subject was up high above and streaming downward. Even without us consciously being aware of the light’s direction, the image looks natural.
NIKON D2X ISO 100 1/250 SEC. F/5.6
Figure 12.2 The hat created lines of shadows across the face showing us where the light was coming from. The flash was placed up high and pointed down to mimic the angle of the sun.
As portrait photographers we get to decide where the light is placed and where the shadows fall. The idea is that we can use this to render the subjects in a flattering way and control where the eye travels in the image.
When lighting people for portraits, some basic lighting patterns will give you a good starting point. All of these patterns need to be adjusted for your individual subjects, however, as no two faces are exactly the same. In Chapter 1 , I talked about the basic directions that light travels. Now we’ll use that information to fine-tune the placement of the lights to create pleasing light patterns.
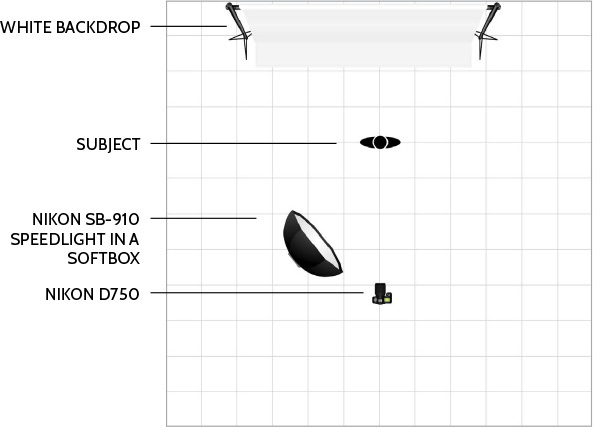
The classic lighting pattern for portraits is Rembrandt lighting , named for the seventeen-century Dutch painter. To mimic Rembrandt’s signature use of light and shadows, place your main light high and to one side of the subject at about a 45-degree angle and position the subject facing forward toward the camera. It doesn’t really matter which side the light is on. You can use a reflector on the other side to open up the shadows a little. The important feature in Rembrandt lighting is the triangle-shaped area of light underneath the eye. One side of the face (the one facing the main light) is well lit, while the other side is in deeper shadows with the triangle under the eye on the darker side created by the shadow of the nose on the cheek. The classic look is for the triangle under the eye to be no longer than the nose and no wider than the eye. For example, notice, the triangle shape under the eye on the shadow side of the face in Figure 12.3 . I took this portrait with one Speedlight off to the side in a softbox, which created a softer light and shadows with a more gradual transition ( Figure 12.4 ).
NIKON D750 ISO 320 1/250 SEC. F/5.6
Figure 12.3 Rembrandt lighting produces a characteristic triangle shape under the eye on the shadow side of the face.
Figure 12.4 You can see the setup of the softbox over to the side and placed at approximately 45 degrees from the subject.
Loop lighting produces a small shadow of the subject’s nose on the shadow side of the face. The light needs to be placed at about 30 degrees off to the side of the camera and higher than the subject’s eye height so that the shadow falls to the side and down. Adjusting the angle of the light changes the way the shadow falls, and for this pattern the light needs more of a downward angle rather than falling across the face as in Rembrandt lighting. Although you can use a second light or a reflector to open up the shadows, be sure that the light is just a little fill light and does not create a second set of shadows on the face. As you can see in Figure 12.5 , the small shadow created by the light striking the nose doesn’t travel under the eye but instead is close to the nose. With a loop-lighting scheme, the placement of the light also creates a more open photo with less of the shadow side of her face in darkness. This portrait was taken with a single Speedlight placed in a small softbox off to the side ( Figure 12.6 ).
NIKON D750 ISO 200 1/250 SEC. F/5.6
Figure 12.5 Adjusting the light depending on the facial features is important. Here the small nose creates a small shadow because of the angle of the light.
Figure 12.6 The SB-910 is placed in a softbox off to the side, but the angle is less than for the Rembrandt lighting in the previous example. Moving the light closer to the camera changes the angle of the shadow on the subject’s cheek.
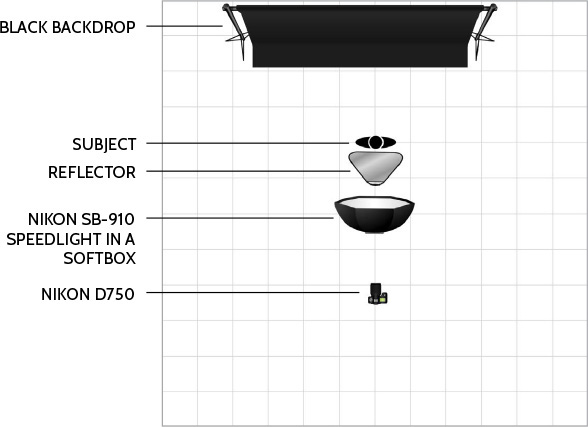
Named for the butterfly-shaped shadow under the nose, the butterfly lighting pattern is created when the light is above and in line with the camera. This type of lighting creates a brighter area on the forehead, upper cheeks, and bridge of the nose. You also can place a reflector in front of and under the subject’s face to bounce some of the light into the eyes and to open up the shadows a little bit. For Figure 12.7 , I used a single SB-910 in a softbox, placing it in front of and above the subject with the light at a downward angle. The subject held a silver reflector facing up to help open the shadows ( Figure 12.8 ).
NIKON D750 ISO 200 1/250 SEC. F/4.5
Figure 12.7 For the butterfly lighting in this portrait, I used one Speedlight in front and above the subject. A silver reflector bounced the light up into the face, which helped open up the shadows under the chin.
Figure 12.8 Positioned in line with the subject and camera, the SB-910 in the softbox is up high but aimed downward. The silver reflector is placed to bounce the light up and into the underside of the face, opening up the shadows but not overpowering the main light.
Sometimes referred to as Paramount lighting , butterfly lighting is common in fashion and glamour because it tends to work well for woman with high cheekbones and thinner faces. This lighting is more feminine than masculine and more suited to woman than men, however. It tends to make the eye sockets on men look too deep.
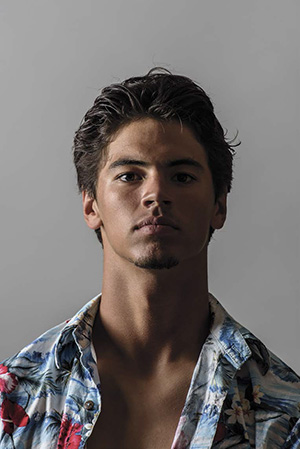
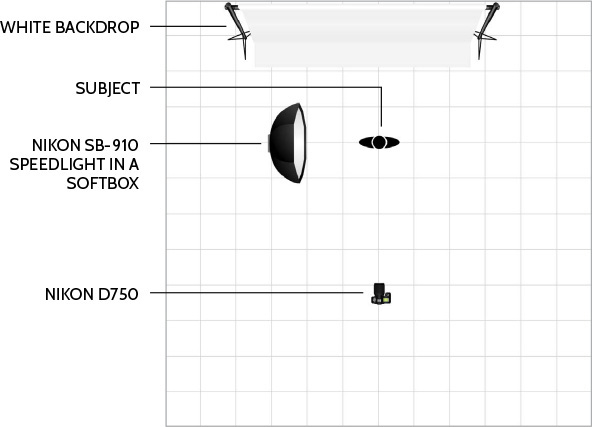
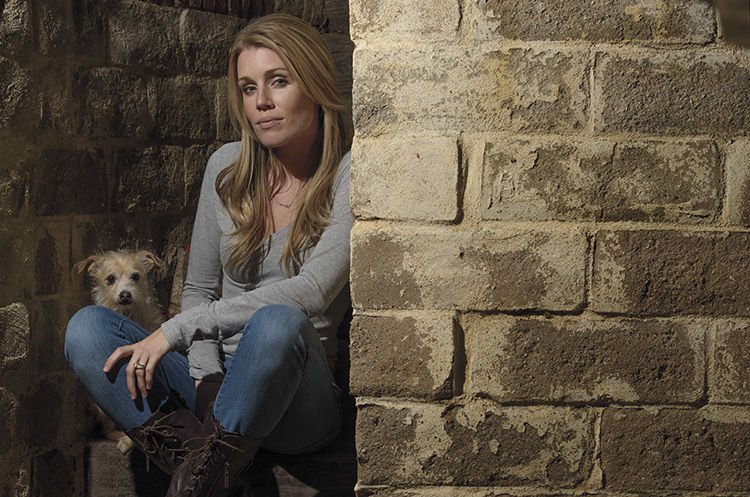
In a split lighting pattern, the main light is placed off to the side of the subject at about 90 degrees and positioned at face height or slightly above. The subject looks straight on at the camera. This arrangement lights up half the face and leaves the other half in shadows. Split lighting can help to narrow a face. You can adjust this lighting to create a dramatic portrait with half the face in deep shadows or, by using a fill light to brighten up the shadow side, to be more subtle. Even if you use a fill light, however, you still want a distinct split in the lighting with the transition being right down the middle of the face. In Figure 12.9 you can see the use of a single Speedlight at a right angle to the subject lights up one side of the face and leaves the other side in deep shadow. Figure 12.10 illustrates the setup I used.
NIKON D750 ISO 200 1/250 SEC. F/5.6
Figure 12.9 I photographed Sam with a single Speedlight off to his right, lighting up the right side of his face while leaving the left side in deep shadows.
Figure 12.10 One SB-910 placed in a softbox at a 90-degree angle to the subject creates the split lighting pattern.
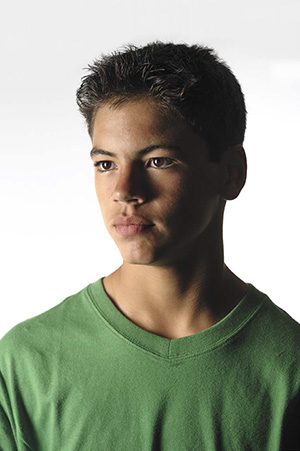
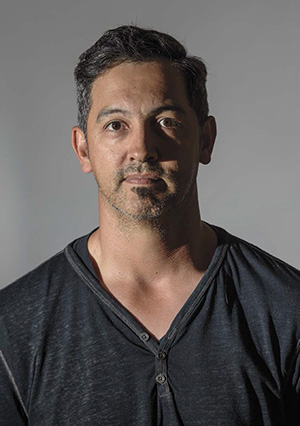
In all the previous lighting patterns, the subject is looking directly at the camera, but this is not always optimal because it can make the subject look bigger and can feel like a passport photo or driver’s license. The solution is to have the subject turn his or her head about three-quarters toward the camera, which positions one side of the person’s face closer the camera. If the larger side of the face is in the bright light and the shorter side of the face in shadows, that’s called broad lighting . When the shorter side of the face is brightly lit, then the pattern is called short lighting .
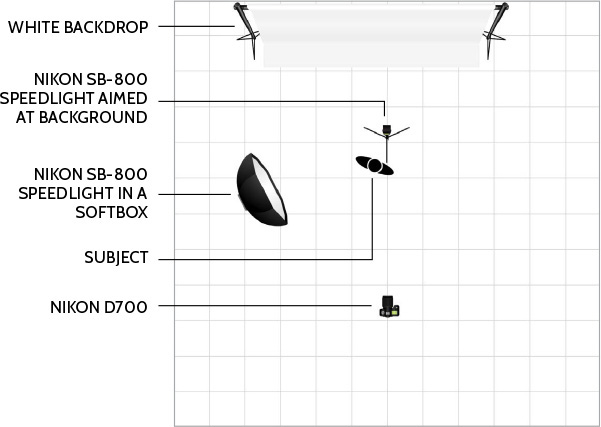
In Figure 12.11 you can see that the short side of the face is well lit and the broad side of the face is in heavy shadows created by the combination of the light placement and the turn of the head. Figure 12.12 shows the lighting diagram for the setup used for the short side lighting.
NIKON D700 ISO 200 1/250 SEC. F/5.6
Figure 12.11 For this portrait, the short side of the face, that is, the side turned away from the camera, is brightly lit.
Figure 12.12 This lighting diagram shows the setup for the short side lighting used in Figure 12.11 .
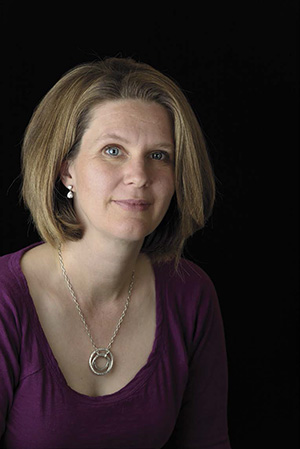
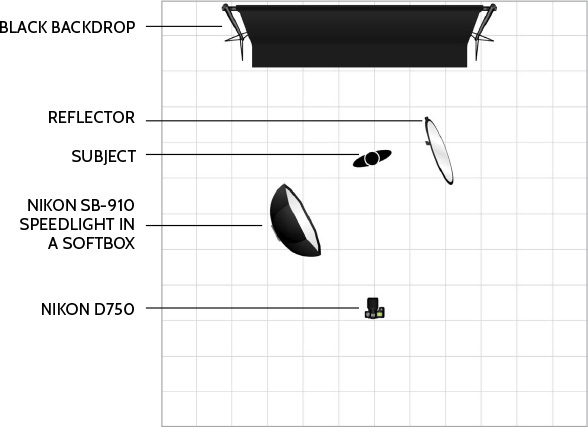
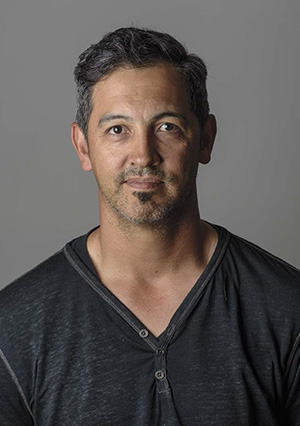
In Figure 12.13 the broad side of the face is lit while the short side is in shadows. To open up those shadows, I placed a silver reflector on the short side to bounce some of the light back, as shown in the lighting diagram for this photo ( Figure 12.14 ).
NIKON D4 ISO 100 1/250 SEC. F/4.5
Figure 12.13 The light was placed so that the long side of the face was lit and the short side had more shadows. The shadows are not very deep in this photo because a reflector was used to add some light to the short side of the face.
Figure 12.14 This is the lighting diagram for the setup used in Figure 12.13 .
The placement of the light depends on which way the subject is facing and which side of the face you want lit versus which side you want in shadows. Short lighting can help to slim a fuller face, while broad lighting can help if the subject has a thin face. This type of lighting can also be used to hide any facial issues that the subject might have. A scar or case of acne can be minimized by placing hiding it on the shadow side.
Hard light and soft light are terms you hear photographers throw around all the time. Now it is time to actually start putting each to use when photographing people. As you remember from Chapter 1 , hard light has a hard edge between the light and the shadow, while a soft light has a smoother transition. For hard light, you use a small light source relative to the subject; for soft light, you use a large light source relative to the subject.
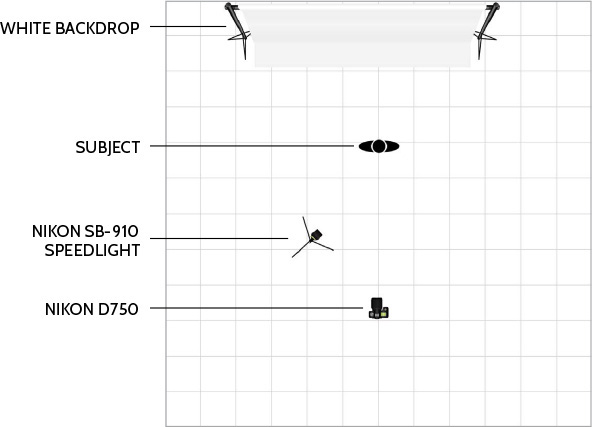
The same light source can be hard or soft depending on its distance from the subject and the type of diffusion you use. If you place an SB-910 Speedlight 5 feet away from your subject, for example, and zoom the head to 200mm, the light will be small and hard. Add the diffusion dome over the head of the flash, change the zoom to 24mm, and the light is a little softer. Plus, because the light bounces around the room, the overall effect is a much softer light. As you can see in Figures 12.15 and 12.16 , the same light at the same distance can be quite different even with just a small change in the diffusion. The room where the photographs were taken had white ceilings, and as the light left the flash, the diffusion dome used in Figure 12.16 bounced the light around to greatly soften it. Figure 12.17 illustrates the lighting setup.
NIKON D750 ISO 200 1/80 SEC. F/5.6
Figure 12.15 For this image, I placed the SB-910 to the camera’s left and zoomed the flash head to 200mm, creating a small, hard light. You can see that the light didn’t wrap around the facial features but instead created a lot of hard shadows. You can also tell by the angle of the shadows that the light was placed at head height because the shadows move across the face from side to side.
NIKON D750 ISO 200 1/80 SEC. F/5.6
Figure 12.16 Without moving the position of the flash or the model, I created a softer light by adding the diffusion dome and changing the zoom position of the flash head from 200mm to 24mm. The light bounced around the room and created a much softer portrait light as you can see by more open shadows.
Figure 12.17 This is the lighting diagram showing the placement of the light used in Figures 12.15 and 12.16 .
In practical terms, if you want a hard light, just move the light further away from the subject and don’t put any diffusion material in its path. Want a softer light? Move the light in close and add diffusion. The diffusion can be a softbox, an umbrella, or a diffusion panel.
When it comes to using hard or soft light, you need to decide how you want the subject to be shown. Neither is inherently better or worse than the other, but people tend to like soft more because it is more flattering, especially to faces.
For Figure 12.18 , I placed a large softbox very close to the subject to create a soft and pleasing light across her face. The only place you can even see a shadow is where her hair falls across her cheek.
NIKON D2X ISO 100 1/250 SEC. F/4.5
Figure 12.18 For this photo of Mia, I used a large softbox as close as I could to her to get the softest possible light.
For the portrait of Ted in Figure 12.19 , I used a single SB-910 Speedlight with a snoot to control the spill of light and placed it quite far away from him to create a much harder light. The light created the mood and tone of the image.
NIKON D4 ISO 100 1/250 SEC. F/4.5
Figure 12.19 Ted has a look that worked well with a hard light. Here he is lit with a single, off-camera SB-910 and snooted to control the spill of the light.
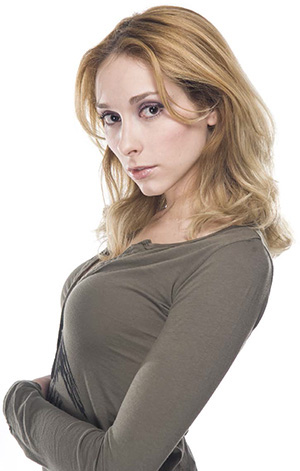
Figure 12.20 illustrates a combination of both hard light and soft light. The harder light high up and off to the right of the camera creates a hard shadow on the model, which is especially noticeable under and to the side of her nose. The large reflector placed as close as possible and just out of the frame creates the much softer fill light. There is also a light on the background that is creating the pure white backdrop, but because the subject is actually quite close to the background, a lot of that light is bouncing back and causing the bright areas between her arms and body.
NIKON D4 ISO 100 1/250 SEC. F/4.5
Figure 12.20 Using a single light and a reflector for the front of this image created an overall soft light, but you can see some harder shadows under and to the side of her nose.
A hard light was used to create the hard shadows on both the face and the clothing of the subject. The original pose was for the subject to be looking straight at the camera, but something distracting happened over to the side and the resulting image ended up being one of the favorites from the shoot ( Figure 12.21 ).
NIKON D4 ISO 400 1/250 SEC. F/5.6
Figure 12.21 For this photo of Sam, I used a single SB-800 off-camera and you can see the hard shadow under his jaw and on the shirt.
Every lighting plan has to start somewhere, and for me, it is with the main light. What will be the main source of light in the photo, I ask myself, and what will it show? Using one light to take portraits can render great results and is perfect for those working alone and on a budget because you don’t need a lot of gear and can focus on the subject.
Later chapters cover photographing portraits with one light either attached to the camera (Chapter 15 ) or triggered by the AWL functions of the CLS (Chapter 16 ). In this chapter, you’ll learn the basic ideas that you’ll put into use in both those later chapters.
My general approach when using a single Speedlight is to want that light to be the largest, softest light possible because that makes just about everyone look good. With just one light, you can use an umbrella or softbox as close to the subject as possible, or you can bounce the light off a wall, ceiling, or reflector. For Figure 12.22 , I used a single Speedlight on the camera aimed right at the white ceiling, which created a soft light on the subject. A solid black background was used against a far wall, far enough away that the light didn’t reach it.
NIKON D750 ISO 320 1/200 SEC. F/16
Figure 12.22 A single SB-910 with a diffusion dome over the flash head mounted on the Nikon D750 and aimed straight up at the ceiling creates a soft bounce light down on the subject.
Moving the flash off the camera opens up more possibilities, allowing for more precise placement of the light. Using an off-camera flash also makes adding a second light source much easier, either another flash or a reflector bouncing additional light into the scene. You can use this second light source as an accent light to help define the subject. In Figure 12.23 , I added a reflector below the subject’s face to act as a second light source and bounce the light up to open the shadows especially under the chin. In Figure 12.24 , a second Speedlight adds an accent light on the hair, giving the top of the hair some more depth and separation from the background.
NIKON D750 ISO 320 1/80 SEC. F/5.6
Figure 12.23 A reflector placed under the face allows some light to bounce up and add some light under the chin to open up the shadows.
NIKON D750 ISO 320 1/80 SEC. F/5.6
Figure 12.24 Here a second Speedlight adds just a touch of light on the subject’s hair.
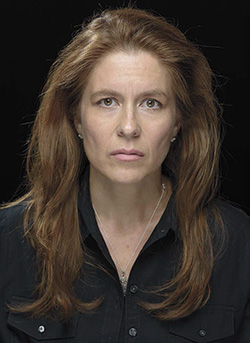
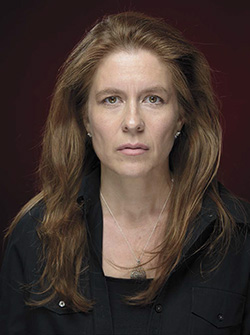
Adding a third light to your portrait setup allows you to add more separation between the subject and background. This light could be some natural light coming in through a window or door, or it could a Speedlight or two. Adding a Speedlight behind the subject aimed at the background allows you to control the light on the background and the color of the background. On a solid black background, a Speedlight with a red gel adds a touch of color. In Figure 12.25 , the red gel changes the background’s color and adds some illumination to the whole scene.
NIKON D4 ISO 100 1/250 SEC. F/4.5
Figure 12.25 The main light is in a softbox, a reflector opens up the shadows, and a second flash acts as an accent light on the hair. A red gel over a third Speedlight now colors the background taking it from black to a dark red.
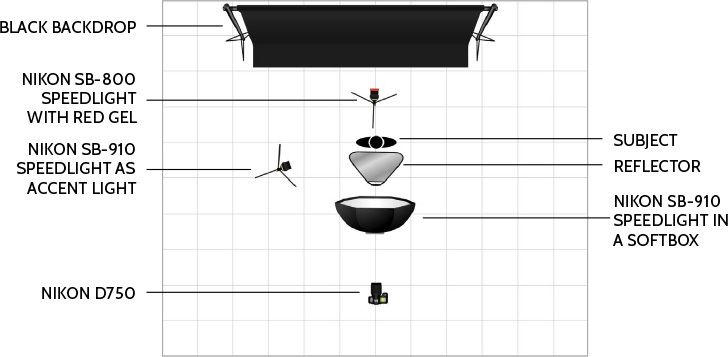
Figure 12.26 shows the lighting diagram used for Figure 12.25 and the placement of the three Speedlights and the reflector. As you can see, it started out as a butterfly lighting pattern, and then I added the two additional Speedlights.
Figure 12.26 The lighting diagram for the portrait in Figure 12.25 shows the three Speedlights and reflector.
An environmental portrait or location portrait usually shows the subject in his or her natural environment or somewhere other than in front of a standard, plain studio backdrop. Using Speedlights for this type of portrait really makes a lot of sense: The lights are small and easy to set up, you can carry a lot of them in a single bag, the AWL capabilities allow you to adjust the light quickly (so you don’t waste the subject’s time), and the wide range of light modifiers available gives you a lot of options.
The challenge of an environmental portrait is that you have to not only make the subject look good but have to make the background and surroundings look good. More importantly, you need to light the environment so that you can add a sense of place and time to the portrait. You get to use the lighting to decide which elements you will draw attention to and which you will allow to fade into the background. It is up to you as the photographer to decide which parts of the image the viewer looks at based on which elements help to tell the story and which elements don’t. You want to be able to light the parts that matter and avoid the parts that don’t.
You get to tell a real story with these types of images as compared to a straight studio portrait, but it takes a lot more planning and forethought than just putting a person against a plain backdrop. You need to think ahead and plan out the shoot before picking up the camera or even setting up a light.
Environmental portraits take planning to make the best use of your time. There are some things you can do before the shoot that will save you time, keep you organized, and allow you to make the best of the limited time with the subject. Occasionally, you get an unlimited amount of time, but in my experience those shoots are rare. Often you get less time than you want.
The more you know about your subject, the easier it will be to tell the person’s story. A little research can really help, especially if the subject of the portrait does a job or has a pastime that you don’t know intimately. One of the best ways to get to know your subject is to talk to the person before the shoot. All the information you gather will help you come up with the best spot to take the portrait.
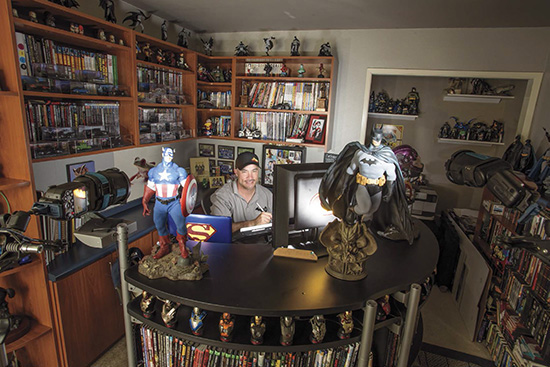
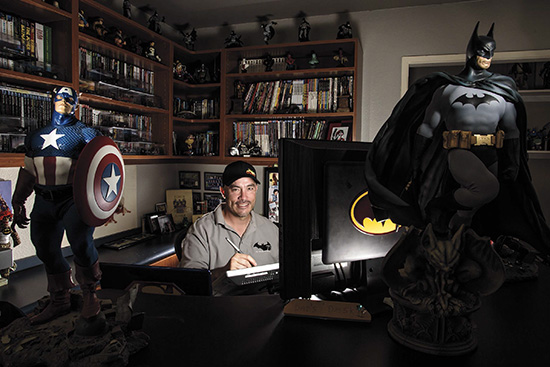
I wanted to photograph my friend Alex in his office since the first time I saw it. Alex is a color artist in the comic book industry and has worked on some of the most famous characters, including Batman, the Flash, and the Green Lantern. Before I set up for the shoot, I already knew that I needed to include some of his office’s Batman items in the photo. While talking to Alex, I also found out that the Captain America statue in his office has some personal significance, so it needed to be part of the shot, as well. I gathered all this information before I started setting up the lights. You can see from Figure 12.27 that Alex had quite a lot of Batman items to pick from. This shot also shows the two Speedlights with Rogue Grids on them that I used to control the lights striking the Captain America and Batman statues.
NIKON D750 ISO 320 1/10 SEC. F/11
Figure 12.27 Both the Captain America and Batman statues needed their own light sources to separate them from the rest of the office.
To help tell the story in your environmental portrait, you need to decide which parts of the scene get illuminated and which parts need to fade into the background. The viewer’s eye will be drawn to the brightest, sharpest area of the image, so you can control where the viewer looks just by either lighting something up or keeping it in shadows.
A couple of extra Speedlights can come in handy for storytelling because you can strategically place them to selectively add some light or highlights just where you want them. If you have only one light, you need to make sure that it is on the main subject—but, don’t assume “the subject” means “the person.” For the purposes of your story, the subject might be the location itself or something that the person is working on.
Many times shooting an environmental portrait takes place during work hours in a working environment, making it important to get in and set up as quickly as possible so as to not waste precious time. Here are a few things that I do before the shoot to cut down on the setup time:
 Set up flashes early
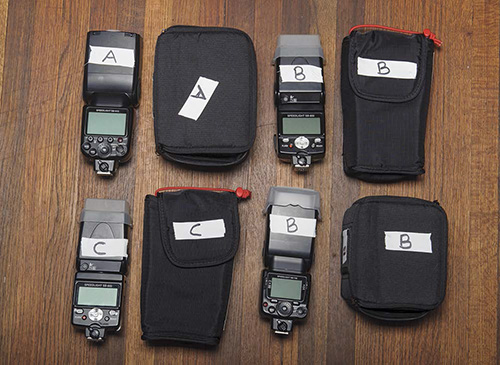
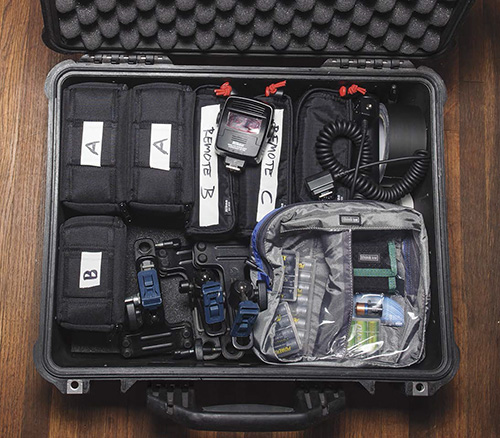
: Before I even get to the location, I decide which of my flashes are going to be remotes and what I am going to use as the Commander. Next, I set them all to the same channel and assign each of the remote flashes to the different groups I think I am going to use. I then use small pieces of white gaffer tape to note each flash’s group, not only marking the flash units but also the flash cases so that I know which flash I want to use where when I open the cases on location (
Figure 12.28
).
Set up flashes early
: Before I even get to the location, I decide which of my flashes are going to be remotes and what I am going to use as the Commander. Next, I set them all to the same channel and assign each of the remote flashes to the different groups I think I am going to use. I then use small pieces of white gaffer tape to note each flash’s group, not only marking the flash units but also the flash cases so that I know which flash I want to use where when I open the cases on location (
Figure 12.28
).
Figure 12.28 Each Speedlight and each Speedlight bag is labeled with the letter of the group in which I plan on using that light. Of course, this can all change on location, but it helps to keep me organized while on a shoot.
Charge and install batteries
: I use rechargeable batteries that need to be charged up prior to use, so I make sure that the batteries are fully charged and in each unit I plan to use. This saves time when I get to the location because I know each flash is ready to go. Each step that I can save on location gives me a little more time to take photographs.
Pack smart
: It really helps to have a system when you pack for a shoot. I use two Pelican cases for the actual Speedlights and the small modifiers. When I get to the location, I open the Speedlight case, and everything is exactly where it is supposed to be. This makes setting up easy, and if I need anything, I know where it is immediately.
Before any shoot, especially one that will take place on location, I create a plan that describes the following:
What I want to photograph
Where I will place the lights
Gear I will need
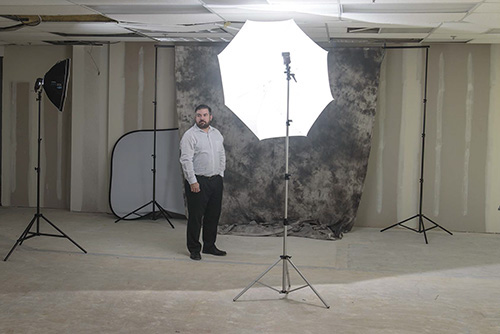
This plan may be very detailed with the exact locations of the light stands, which flashes will be used where, which group each flash will be in, and what light modifiers will be used. Or, the plan may be more of an outline or an idea with a general concept of what I am trying to capture. The difference depends on how much information I gather before the shoot and, specifically, if I know the location. For example, the offices in Figure 12.29 were under construction, so I had a big open area that allowed me plenty of space to set up a background and lights.
NIKON D750 ISO 100 1/60 SEC. F/6.3
Figure 12.29 A construction site made a great place to take a few on-location headshots. There was plenty of space to work and no reflective surfaces.
Despite all the preparatory work that I do, I still know that my plan can all go out the window the minute the shoot starts. There are so many different things that can go wrong or need to be changed at the last minute. The best thing you can do is be prepared to change your plans on the fly.
Sometimes I have no idea what a shoot’s location is going to be like at all. One of the every first shoots I ever did using SB-800s in the field was for musician John Ginty. The shoot was to take place between the sound check and actual show at the San Diego House of Blues in one of the dressing rooms. I had no idea what the room looked like or how long we would have to shoot. Luckily, the dressing room had great couch, so I had John sit and turn slightly to me; then I placed a single SB-800 across from him on the counter using the built-in flash stand and triggered it with a second SB-800 on the camera acting as the Commander. Looking back at the photo now ( Figure 12.30 ) more than 10 years later, I wish I had placed a flag between the light and the wall. This would have stopped the reflection from the flash from bouncing off the mural, but it was the first time I was using Speedlights on location for this type of lighting.
NIKON D2X ISO 250 1/60 SEC. F/4.5
Figure 12.30 Musician John Ginty photographed in the dressing room of the House of Blues while I used a single off-camera SB-800 Speedlight for this portrait.
Environmental portraits can be a lot of fun to take but far more frustrating than the basic studio portrait at the same time. The location could have numerous surfaces bouncing the light all over the place or a brightly colored wall that affects the color of the light as it bounces back at the subject. You may find you don’t have as much space as you need to set up the big umbrella or softbox as planned, and time always seems in short supply.
As an environmental photographer, it is your job to resolve the location’s challenges and come away with the portrait you envisioned. No one plan will work every time, but a consistent approach to each shoot will help you work it until you get the results you (or the client) are happy with. Here are the steps I consistently follow:
1. Consider the ambient light : The most important light at the location is the light that is already there. The ambient light will drive everything else you do. If you are shooting in an office building with a wall of west-facing windows, then the afternoon sun is going to be a factor. If there is a ton of light streaming in, consider just adding a reflector to the opposite side and maybe a couple of Speedlights to add some spots of illumination to key items in the office. If you are shooting inside an empty sports arena with all the lights off, then that lack of illumination is going to be the main factor. In this case, you have to provide all the lighting and build the scene from scratch. In both scenarios, however, the ambient lighting is what dictates your next moves.
2. Control the ambient light : Sometimes controlling the ambient light in the scene is as simple as just turning off the overhead lights or drawing the shades. You can use your camera to control the ambient light by adjusting the shutter speed. Remember, you can control the amount of ambient light that the sensor records, but no setting on the camera can change the direction or the quality of the light. For that to happen, you need to either add your own light or use a diffuser, reflector, or other light-shaping tool. You cannot make hard light into soft light just by changing the shutter speed. What you can do is reduce the effect the ambient has on the exposure and then add the lights where you want them to go. How much of the ambient light is used is up to you.
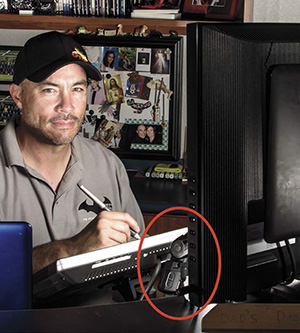
3. Use the main light for the main subject : You can go about building the light in your scene in lots of different ways, but my preference is to start with the light that is going to illuminate the main subject. This main, or key, light is what the other lights build around. For the photograph of Alex at his desk, the main light is the light that is illuminating his face. This was an SB-800 that I placed so the light bounced off the computer screen, which made it look more natural because we all know that computer screens emit light. In Figure 12.31 you can see the placement of the Speedlight just below and behind the monitor. I used a Justin clamp to fine-tune the position of the light and made sure that the sensor on the flash is facing where it could see the Commander. This light was set to group A.
Figure 12.31 The main light used to illuminate Alex is an SB-800 mounted so that the light is bounced off the computer monitor. I added a small reflector to the screen to help the light bounce back. The reflector is just a piece of white paper taped to the screen with gaffer tape.
4. Build the scene : After setting the main light, I build up the lighting working backward from the most important lights to the least important lights. This usually means the accent lights and then the background lights. To stay consistent and help control the different zones of lighting, make the accent lights group B and the background lights group C. As you add each light, take a photo to make sure that the newly added light does not change the overall light in the scene. Keep in mind that if all the groups are using TTL, adding lights can affect the way the scene looks to the camera, and the output of the other groups can be affected, as well. This is why adding a single light at a time as you build up the scene is a good idea.
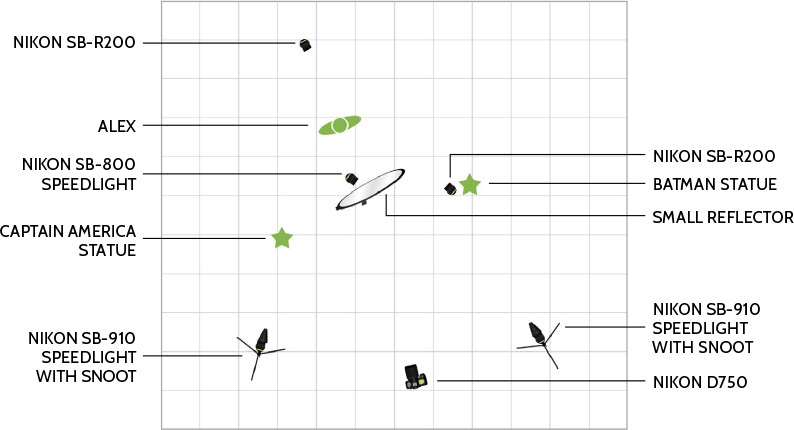
For the final photo of Alex sitting and working at his desk, I used five Speedlights to keep the focus on Alex but at the same time highlight the cool parts of his office ( Figure 12.32 ). The lighting in Figure 12.33 consists of the following:
One SB-800 mounted on a Justin clamp and aimed at the computer monitor to light up his face
Two SB-910s with snoots mounted on light stands and aimed at the Captain America and Batman figures on the desk
One SB-R200 hidden behind the Batman figure to illuminate the logo on the back of the monitor
One SB-R200 on a shelf behind Alex’s head fired at the camera to give some separation between Alex and the background
Figure 12.32 The five Speedlights in this lighting diagram for the Alex Sinclair environmental portrait are all controlled by the SU-800 on the camera.
NIKON D750 ISO 400 1/250 SEC. F/11
Figure 12.33 The final image of comic book color artist Alex Sinclair in his home office, or, as I like to call it, his Bat Cave.
All these Speedlights were controlled by the SU-800 on my Nikon D750.
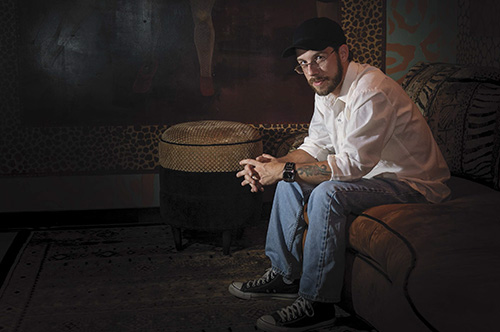
NIKON D4 ISO 200 1/250 SEC. F/5.6
Figure 12.34 For this headshot taken at the home office, one light, placed up and to the left of the camera, created a soft light that wrapped around the face.
NIKON D4 ISO 200 1/200 SEC. F/5.6
Figure 12.35 For Ashley’s headshot, I used two Speedlights, one on either side, and because I could control the power of each separately, I could control where the shadows would fall by increasing or decreasing the power of the two groups.
NIKON D4 ISO 200 1/60 SEC. F/5.6
Figure 12.36 A simple two-light setup and a white backdrop created this headshot that looks as if it was shot against a gray backdrop. The TTL mode on the flash will try to have the exposure as a middle gray, which means unless you add a lot more light, the white backdrop is underexposed while the subject is properly exposed.
Being organized when on a location shoot is vital. Nothing can make you look less professional than having to scramble around looking for something while the subject sits and waits. With this in mind, I put together a checklist that helps keep me organized when I pack for a shoot. It doesn’t matter what combination of bags you use; just look at what you pack in each bag and make a list so that the same gear goes in the same place each time. I currently use two Pelican cases (www.pelican.com ) for the Speedlights and small light modifiers, a Think Tank Photo Shape Shifter backpack (www.thinktankphoto.com ) for the camera and lenses, and a large light-stand bag for the stands and backdrops. I pack these bags the same way each time.
In the camera bag, currently the ThinkTankPhoto Shapeshifter backpack shown in Figures 12.37 and 12.38 , I pack the following:
Camera bodies
: I currently use the Nikon D4 and Nikon D750 as my camera bodies. I always take both with me just in case. If one has an issue, then I have a second body ready to use.
Lenses
: I take the lenses I think I will need for the shoot, usually the Nikkor 24–70mm f/2.8 and the Nikkor 70–200mm f/2.8. I like to use
the longer focal lengths when photographing portraits because they are more flattering to the subject.
Camera batteries
: I always carry an extra set of fully charged batteries for each camera with me. It would be a nightmare to run out of power during a shoot.
Memory cards
: I always have extra memory cards with me, just in case. True, the high capacity of current memory cards means that the chance of actually running out of space is low, but why risk it?
Figure 12.37 Two camera bodies and two lenses along with spare batteries and plenty of memory cards all go into the Shapeshifter backpack.
Figure 12.38 The Shapeshifter backpack is actually designed to hold a lot more than two cameras and two lenses. It has space for a laptop and enough pockets to keep any photographer happy. If I am doing a group shot, I might add a wide-angle lens or some other gear; the bag has plenty of space.
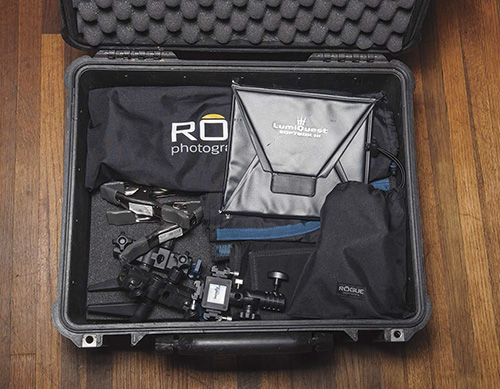
The Speedlight bag I carry is shown in Figures 12.39 and 12.40 and contains the following gear:
Speedlights
: Over the years I have purchased a few Speedlights including some SB-800s and SB-910s. I tend to bring all the flashes with me just in case I need to add a little more light somewhere, but the reality is that I usually just need a light or two. I also have an SU-800 as a Commander, and I will often add the SB-R200s because they take up very little space and can be really useful in adding a touch of light in the image.
TTL cords
: Nothing can be more frustrating than the line of sight not working properly when on location. Having a TTL cord allows me to reposition the Commander unit off the top of the flash.
Batteries
: I use Think Tank Photo Cable Management bags to hold the fully charged batteries. I have a second bag that I reserve for batteries that are used, so I know which batteries need to be recharged and which are already used.
Gels
: Another Think Tank Photo Cable Management bag holds all my gels. This includes the round gels for the Rogue Grid and the regular gels.
Justin clamps
: These clamps are slightly bulky, but they are so useful that I make sure I have one or two of them in the bag just in case I have to use them. Having them in the same bag as the Speedlights allows me to get the lights all set up in one spot.
Gaffer tape
: You never know what you will need a piece of gaffer tape for and knowing exactly where it is means that you can get to it quickly. Many times I will use a piece or two to make a mark where the subject needs to stand, allowing me to get consistent results.
Battery charger
: This one is optional. If I know I will be out for a longer job or on the road for an extended period, I will take the battery charger along so that I can recharge the batteries on the road.
Figure 12.39 Here are the pieces that go into the Speedlight case; I know it looks like a lot of stuff, but it all fits.
Figure 12.40 All the equipment from Figure 12.39 fits into the single case with a little room to spare.
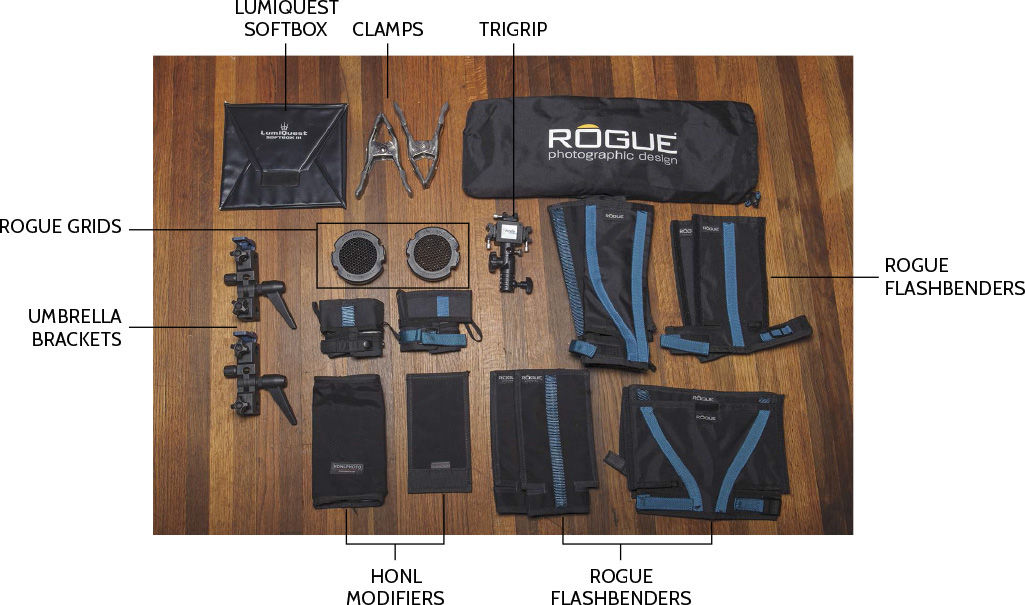
I pack an array of equipment in the modifier bag, but I try to leave a little space in this one in case I need to add something specific for the shoot. The gear listed here is shown in Figure 12.41 and all packed in Figure 12.42 :
Assorted rogue FlashBenders
: I love these light modifiers for their ability to shape the light and for the fact that they take up a very little space when packed. I pack a variety in different sizes from the small flags to the large softbox kit.
Rogue Grids
: These grids are perfect for small flash use, and I have a couple in the bag at all times. They can be used to add a controllable splash of light just where you need it and nowhere else.
Additional light modifiers
: I have an assortment of modifiers from Honl and LumiQuest (www.honlphoto.com
and lumiquest.com
) that live in this bag.
Clamps
: You never know when you will need to clamp something. I try to always have a few handy.
Umbrella brackets
: I keep all the umbrella brackets in the this bag as well. I tend to use the Justin clamps more than the basic umbrella brackets, but at times these are needed. I also keep a Joe McNally Lastolite TriFlash bracket (www.lastolite.com
) and other assorted mounting hardware in this bag.
Figure 12.42 With all the modifiers packed in the case, there is still plenty of space in case I need to add anything.
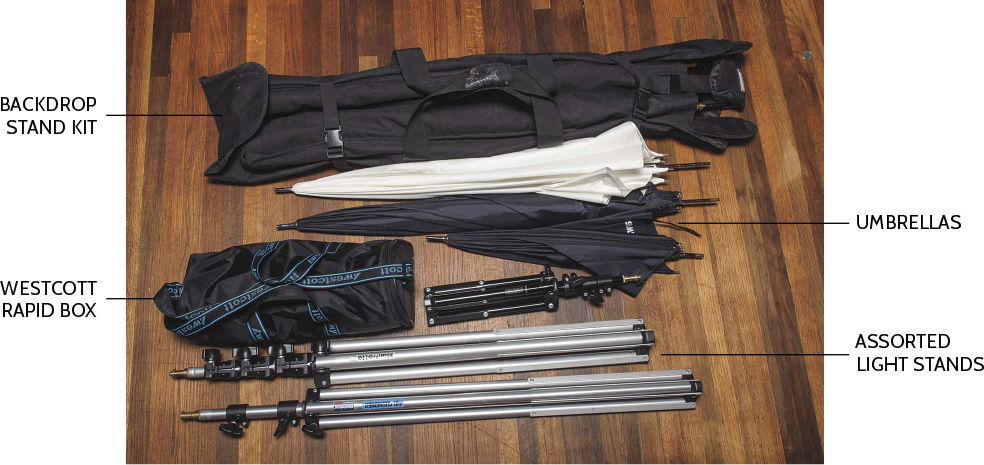
Finally, the light-stand bag carries all the stands and the Westcott Rapid Boxes as shown in Figures 12.43 and 12.44 :
Umbrellas
: I have a couple of different size umbrellas in this bag because they are light, take up very little space, and can make a huge difference when on location.
Background stand kit
: A background stand kit consists of two light stands and a bar that goes between them to create a way to hang a cloth backdrop. You can also use it to secure a pop-up background with a couple of clamps.
Assorted light stands
: I carry a minimum of three light stands with me, two full size and one shorter for use in the background.
Softboxes
: The Westcott Rapid Box softboxes are pretty compact and come in their own travel cases. Because they are small, they fit in this big bag.
Figure 12.43 Here is the gear that is packed into the light-stand bag. If I know I’ll need an extra light stand or other gear, it gets crammed in with this stuff.
Figure 12.44 This older TransPac case from Photoflex (http://photoflex.com ) holds all the light stands and other gear shown in Figure 12.43 . It has seen better days, but it still holds the gear needed for a location shoot.
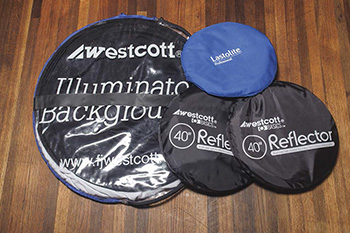
The last pieces of gear that I take with me don’t fit easily into any of the bags I use. The reflectors, diffusers, and pop-up backgrounds all fold pretty small and flat, but they are just too big to fit in any of my bags ( Figure 12.45 ).
Figure 12.45 The pop-up background, a couple of reflectors, and a Lastotile diffuser make up the rest of my gear used for location shoots.
This all might seem like a lot of gear, but compared to hauling a set of studio lights around, this kit is really quite portable and easily managed by one photographer.
Create a system that works for you and stick with it. It makes working on location a lot easier.
One last factor that influences how your portraits look has nothing to do with the light. It has to do with making your subject feel comfortable in front of the camera. One way to do that is to be confident and sure of yourself and of your lighting setups. I suggest that you practice setting up the basic lighting with just one light. The more you practice, the easier it will be to see where you need to make small adjustments to take your portraits to the next step. When you are confident in your lighting, you can spend more time interacting with your subject, which results in better images.