Having two, three, or more flashes allows you to ratchet up the creativity even more with your lighting. In this chapter, I use a couple of Speedlights to start adding little touches of light to enhance the image. The images in this chapter were all lit with two off-camera Speedlights, building on the setups in Chapter 16 . The more lights you have, the more options open up.
Matching the light to the subject for this portrait meant trying to create the largest, softest light possible. For the previous chapter’s photos of Jennifer, I used a large umbrella alone. For this round, I added another large modifier: a softbox. Having more lights gives me more options. Either I can use the light as a large light source to add lots of illumination to the scene or I can use that additional light to bring out extra details in the image that previously were obscured or hidden. In this section, I will show you how I did both.
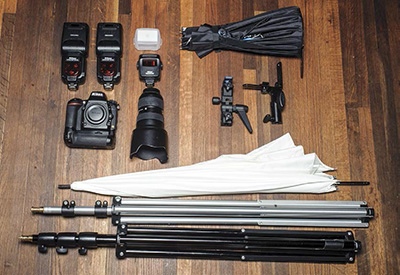
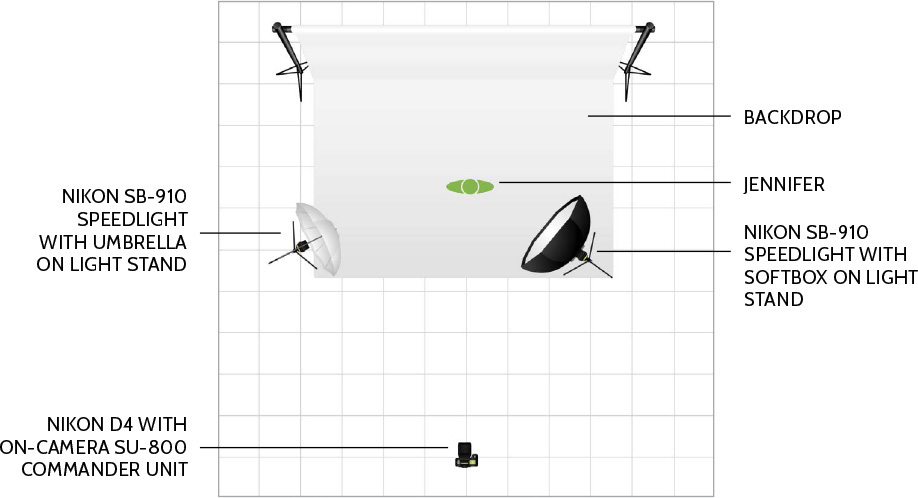
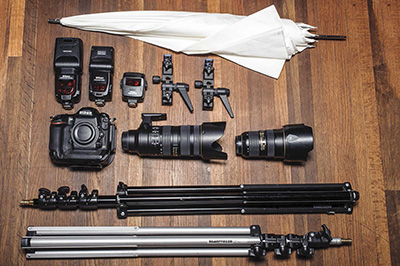
The equipment for this shoot ( Figure 17.1 ) includes two Speedlights and both a softbox and an umbrella to turn a small light into a bigger, softer light. Most photographers have this combination on hand because many times photographers start with an umbrella and then get a softbox. Here’s the complete list of gear:
 Nikon D4 DSLR
: You can use any camera for this type of shot. The Nikon D4 does not have a built-in flash, so a separate method is needed to trigger the remote Speedlights.
Nikon D4 DSLR
: You can use any camera for this type of shot. The Nikon D4 does not have a built-in flash, so a separate method is needed to trigger the remote Speedlights.
24–70mm f/2.8 Nikkor lens
: I was still shooting quite wide and needed to be close. The 24–70mm focal lengths worked perfectly.
Two Nikon SB-910 Speedlights
: I needed two off-camera flashes for this shoot. You can use any two of the Speedlights that can act as remotes.
Nikon SB-910 Diffusion Dome SW-13H
: Diffusing the light as much as possible means using the diffusion dome on the Speedlights to bounce the light around before it reaches the diffusion material of the softbox or umbrella.
SU-800 Commander unit
: I needed a way to trigger both off-camera flashes, and the SU-800 did a great job. Because I was using only two off-camera flashes in two groups, I could use any of the flashes that have a Commander mode or even a camera’s built-in flash.
Westcott Rapid Box Octa
: For this shoot, I created soft light with both this softbox and an umbrella. The softbox is a little more controllable.
Convertible umbrella
: This umbrella is both a shoot-through and bounce umbrella depending on whether the black cover is on or off. In Figure 17.1
, the umbrella is shown with the cover off.
Flash bracket/umbrella holder
: This is the device that goes between the light stand and flash. It allows for the light to be angled up or down as needed and can be used with or without the umbrella.
Light stands
: I needed a light stand for each of the Speedlights.
Background stand kit
: I used the background stand kit to hang the cloth backdrop creating a studio look on location.
Cloth background
: For this set of photos I used a gray, mottled cloth backdrop. You can get just about any color or pattern imaginable.
Figure 17.1 Here is the gear used for the shoot, minus the cloth backdrop and background stand kit. The umbrella is shown with the cover off.
Before I shot the final portrait of the dancer, I wanted to revisit the photo taken with one off-camera flash and see what would happen if I added a second light to add some illumination to her hair or, more specifically, the flowers in her hair. As you can see in Figure 17.2 , I added the second SB-910 to a light stand behind the subject and aimed the flash at the back of her head. I added a Rogue Grid to the light to keep the spread of light from spilling over on her face. This remote Speedlight was set to channel 1 and group B, while the main light was set to channel 1 and group A. On the SU-800, I set group A to TTL and its power to +1, while I set group B to Manual and 1/8 power. Finally, I set the camera to Manual mode using a 1/80-second shutter speed, an f/2.8 aperture, and an ISO of 320.
Figure 17.2 I first set up the Speedlights to add a hair light striking the flowers at the back of Jennifer’s head.
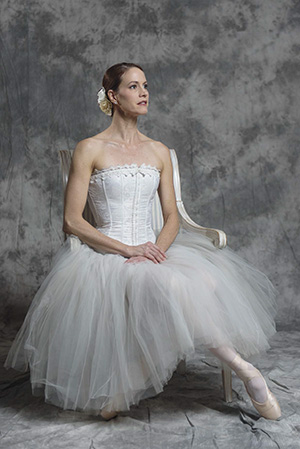
Figure 17.3 shows the resulting image. As you can see, it does brighten up the hair quite a bit and shows that although it isn’t needed to make a good portrait, having access to an extra light can help. The lighting diagram for Figure 17.3 is shown in Figure 17.4 .
NIKON D4 ISO 320 1/80 SEC. F/2.8
Figure 17.3 With Jennifer in the chair, the bounce umbrella provides the main light, and the SB-910 with a Rogue Grid creates the hair light.
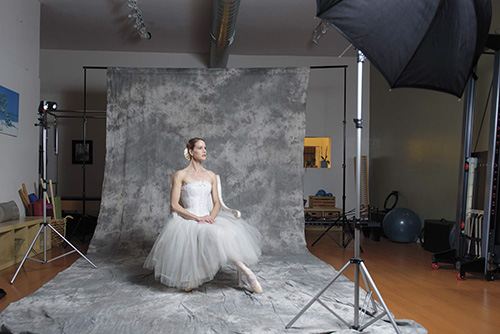
For the final lighting setup, I used two Speedlights with different modifiers, one on either side of Jennifer, to create a soft light throughout the image. The main light that was aimed at her face, the SB-910, was in a Westcott Rapid Box and set to Remote mode, channel 1, and group A. The second light was behind her, fired through a shoot-through umbrella and set to channel 1 and group B. This allowed me to control the power of both lights from the camera position using the SU-800. You can see the lights set up in Figure 17.5 and the lighting diagram in Figure 17.6 . It was important to make sure that the Speedlights were positioned so that the sensor on the flash could see the SU-800 because the system works on line of sight.
Figure 17.5 The two-light setup placed the softbox in front and aimed at the front of the subject, and the umbrella placed in the back added fill.
Figure 17.6 The lighting diagram for the hair light shows the position of the two lights in relation to the camera and subject.
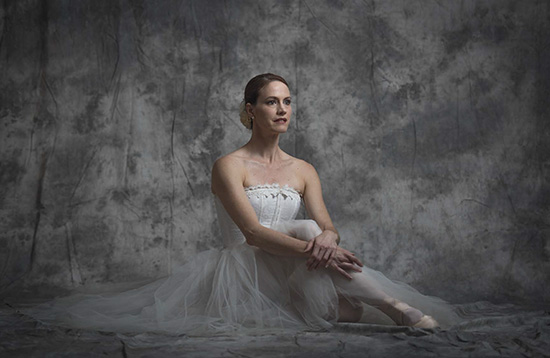
Using the same lighting setup, I took two different photos of Jennifer. The first, a slight variation of the previous chapters’ photos, had the ballerina sitting on the ground instead of in the chair. The lighting for Figure 17.7 comes from the two Speedlights. Both Speedlights were set to channel 1 with the light in the softbox set to group A, while the light in the umbrella was set to group B. The SU-800 had both groups set to TTL with the power of group A set to 0 and the power of group B set to –1.
NIKON D4 ISO 320 1/80 SEC. F/2.8
Figure 17.7 For this portrait of Jennifer, two lights illuminated the scene with more light coming from the front light.
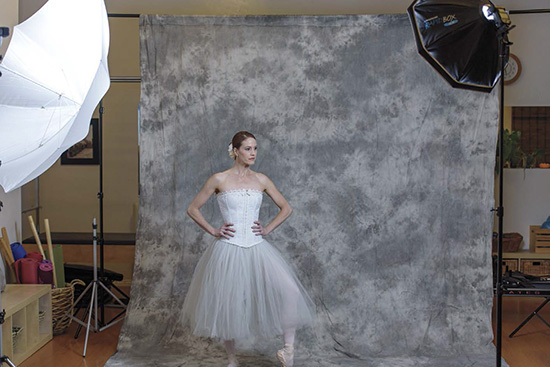
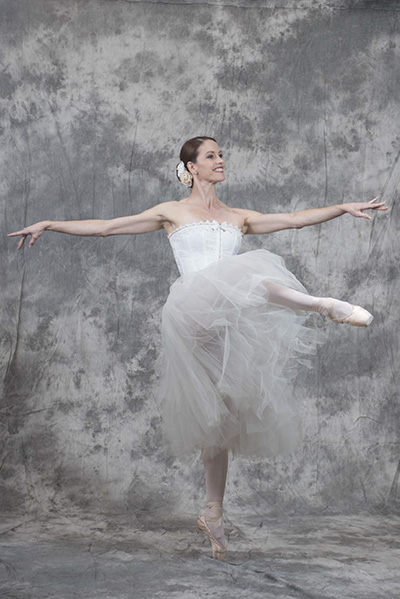
For the final image, I had Jennifer strike a dance pose. Because the lighting was already set up, the most difficult part of this image was the timing of the photograph. Simple is always the preferable route, so I counted to three and then pressed the shutter release button. Jennifer went into the pose so that she would be in position when I reached three ( Figure 17.8 ). For the final image I increased the shutter speed, and because the Speedlights were in TTL mode, they kept up creating the same even lighting. Group A was set to TTL with the power set to +1 and group B was set to TTL and power of 0.
NIKON D4 ISO 320 1/400 SEC. F/2.8
Figure 17.8 As Jennifer hit her pose, she was lit with the two Speedlights.
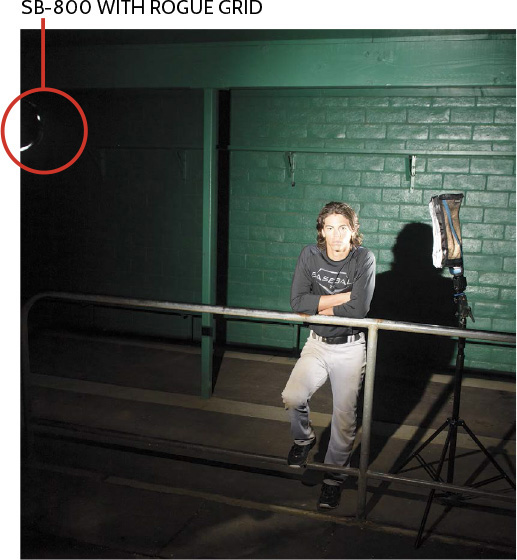
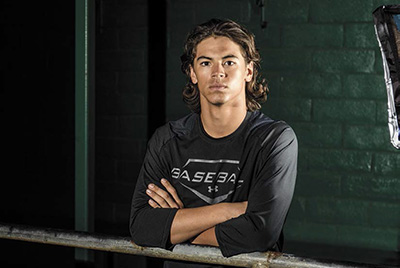
When photographing Sam in the dugout, I have been using the light to create a more dramatic photo with harder light. In the previous examples, I had Sam sitting in the dugout, but this time I asked him to come forward and lean on the railing. This allowed me to light him both from the front and from the side, which provided some separation between Sam and the background.
The gear for this shoot is a combination of the gear used in Chapters 15 and 16 for the photos of Sam. For this image, I used the Rogue Grid and the FlashBender 2 XL Pro Lighting System. Here’s the complete list ( Figure 17.9 ):
Nikon D750 DSLR
: You can use any camera for this type of shot. The D750 has a built-in flash that allows you to trigger the off-camera flashes right from the camera.
24–70mm f/2.8 Nikkor lens
: I chose to use a focal length that would allow me to capture some of the dugout surrounding Sam.
Nikon SB-910 Speedlight
: Any of the Nikon Speedlights that can be used as a remote can be used here. Because of the size of the light modifier, I would stick with the SB-600, SB-700, SB-800, SB-900, or SB-910, but I don’t recommend the smaller SB-500 because it would have issues connecting to the FlashBender 2 XL Pro because of its smaller flash head.
Nikon SB-800
: For the second light, I used the older SB-800 Speedlight. Even though this flash is discontinued, that doesn’t mean it is obsolete. You could use any of the Speedlights as long as the one you choose supports Remote mode.
Nikon SU-800 Commander unit
: I needed a way to trigger the off-camera flashes. You could use any Speedlight or built-in flash that can act as a Commander.
Rogue FlashBender 2 XL Pro Lighting System
: This is the largest FlashBender that Rogue makes, and when used with the strip grid, it produces a larger light that is still well controlled with little spill.
Rogue Grid
: This is a great small flash modifier to choose when you want to create a tight beam of light. With the three different grid patterns, it is more versatile than a snoot.
Light stands
: A light stand is needed to hold the flash and light modifier in place. For this photo I needed two, one for each flash.
Flash bracket/umbrella holders
: This is the device that goes between the light stand and flash. It allows for the light to be angled up or down as needed and used with or without an umbrella. I needed two of them, one for each flash.
Frio universal locking cold shoe
: This little wonder goes on the flash bracket and holds the flash in place. It works great, and I know that the flash isn’t going to fall out or come loose.
Figure 17.9 The gear for this photo included the Rogue FlashBender 2 XL and the strip grid in their handy supplied bag.
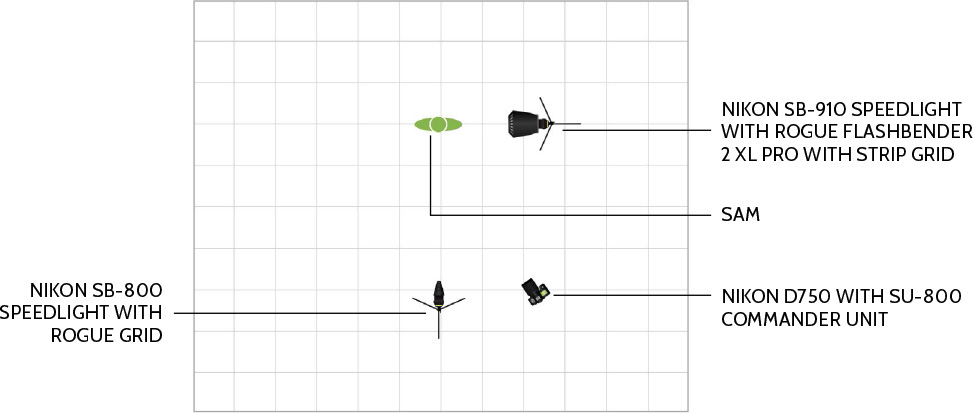
The setup for this photo of Sam in the dugout consisted of a single SB-800 with a Rogue Grid aimed directly at his face with the SB-910 and the FlashBender 2 XL Pro with the strip grid off to the side of his face. I chose these light modifiers because both control the spread of the light, allowing me control over what gets lit and what doesn’t. In Figure 17.10 you can see both lights set up in relationship to Sam.
Figure 17.10 The two lights were arranged to illuminate Sam but keep the light off the surroundings.
The SB-910 with the FlashBender 2 XL Pro with the strip grid was placed really close to Sam, just out of the frame when taking the portrait. The distance of the light from the subject softens the light but also controls the spread of the light ( Figure 17.11 ).
Figure 17.11 Here you can see the distance of the light to the subject. It is as close to the subject as possible without being in the frame.
This is not a complicated setup, but because both the lights are pretty tight and have little spill to the sides, you need to keep the subject in place while aiming each light. If the subject moves, even a little bit, then the lights will need to be adjusted. Figure 17.12 provides the lighting diagram.
Figure 17.12 The lighting diagram is basic, but you can change the amount of light spill by changing the grid in the Rogue Grid.
The final two portraits of Sam were taken with the same settings, with the only difference being the slight change in the pose, the focal length, and the distance from the camera to the subject. The advantage of the Nikon Advanced Wireless Lighting is that you can control the remote lights from the camera, so once they are set up, you can concentrate on talking to the subject from the camera position.
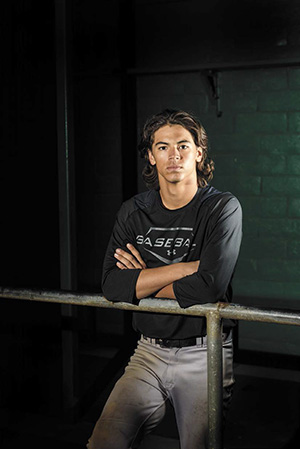
For Figures 17.13 and 17.14 , I set both remote Speedlights to channel 1, assigning the SB-800 set to group A and the SB-910 set to group B. I set the camera to Manual mode with 1/125 second, f/5.0, and ISO 400 with the flash mode of group A set to Manual at 1/2 power and flash mode of group B set to Manual with 1/8 power.
NIKON D750 ISO 400 1/125 SEC. F/5.0
Figure 17.13 For this shot of Sam, I stayed a little further back and used a 60mm focal length. You can see how the light drops off at the edges of the photos. This is because of the grid on the main light.
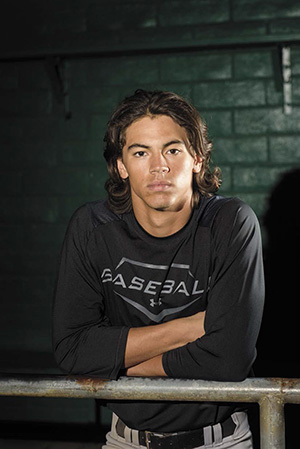
NIKON D750 ISO 400 1/125 SEC. F/5.0
Figure 17.14 With the light unchanged, I moved in tighter and changed the focal length to 70mm. You can still see some of the light falloff on the edges of the frame, but now you can also see the hard shadow on the back wall created but the hard front light.
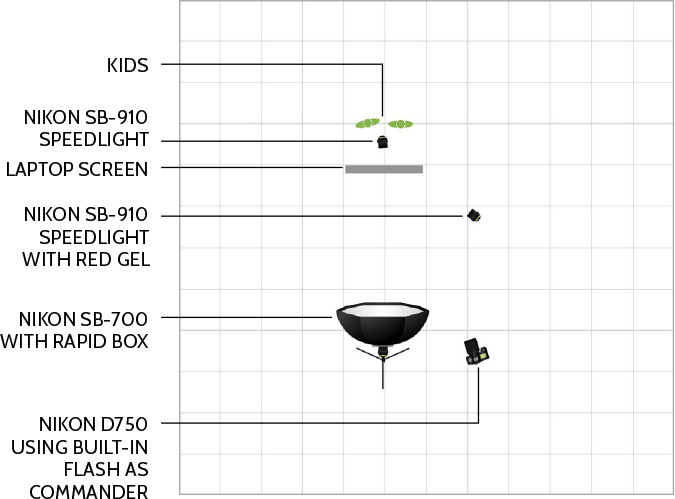
In the previous two chapters, I photographed the kids playing a board game in the living room, but kids also spend time playing on the computer—the perfect opportunity to have some fun with an off-camera flash. This time, I used it to mimic the light coming off a computer screen. Specifically, I used a single Speedlight to bounce the light off the computer screen and a second light to illuminate the whole scene; then just for fun I added a third light to change the color of the laptop.
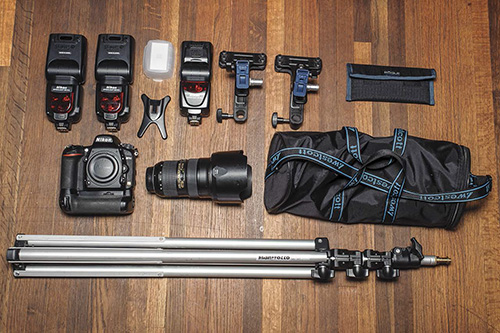
The gear for this shoot included three flashes, a softbox, and a piece of white paper. Although the most low-tech of the equipment, the white paper played the vital role of creating the bounce surface on the computer screen. Here’s the complete gear list:
Nikon D750
: The Nikon D750 lets me trigger the off-camera flashes in two groups: A and B. For this shoot, I started by using one of the SB-910 Speedlights as a Commander for the other two off-camera flashes; then when I wanted a third off-camera flash, I used the built-in flash as a Commander.
Nikkor 24–70mm f/2.8
: Because of space limitations, I needed to use a wider-angle lens, and this was my preference. You can use any lens for this type of shot.
Nikon SB-700 Speedlight
: I used the SB-700 as the light in the softbox. Any Speedlight in Remote mode will work.
Two Nikon SB-910 Speedlights
: I used two SB-910s when taking these photos. I placed the first in the supplied flash stand and set it on the keyboard of the computer to act as the main light. I used the second SB-910 first as my on-camera trigger and then removed it from the camera to become another light source in the final image.
Nikon SB-910 Diffusion Dome SW-13H
: The diffusion dome that comes with the SB-910 worked to diffuse the light from the flash placed on the computer. I wanted the light to spread around, because it needed to cover two kids.
Westcott Rapid Box
: The softbox added ambient light to the scene.
Light stand
: I needed a light stand to hold the softbox in place.
Justin clamp
: When I added the third light to the scene, I needed a way to position it, and the Justin clamp allowed me to attach and position the light off to the side of the computer.
Colored gels
: The Rogue gels allowed me to change the color of the light of the third flash for the final image.
Figure 17.15 illustrates the gear (minus the plain white piece of paper). Bouncing a light off the computer screen is a really great lighting technique.
Figure 17.15 Here’s the gear I used for this shoot. You can use the Speedlights either as remotes or as a controller.
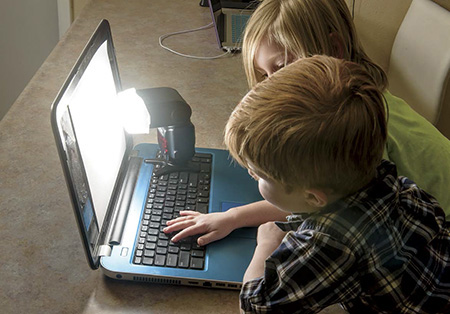
The setup for this glowing-screen photo is simple and effective. Place the main flash behind the computer screen and aim it at a piece of white paper on the screen. The light bounces off the screen and illuminates the faces of the people looking at the computer. In Figure 17.16 , you can see I placed the SB-910 on the keyboard and aimed it at the screen. The white piece of paper is just leaned against the screen, turning it into a bounce card.
Figure 17.16 The SB-910 rests on the flash stand that comes with it, and the diffusion dome is over the head of the flash.
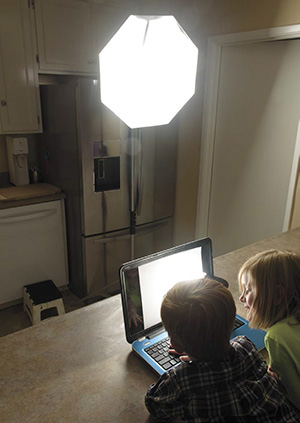
The second light in the scene was the Westcott Rapid Box placed on the light stand in front of the computer and aimed down at the computer and counter. This light was used to light up the overall scene. You can see the placement of the light in Figure 17.17 .
Figure 17.17 The SB-700 is mounted in the Westcott Rapid Box and placed in front of the laptop adding overall illumination to the scene.
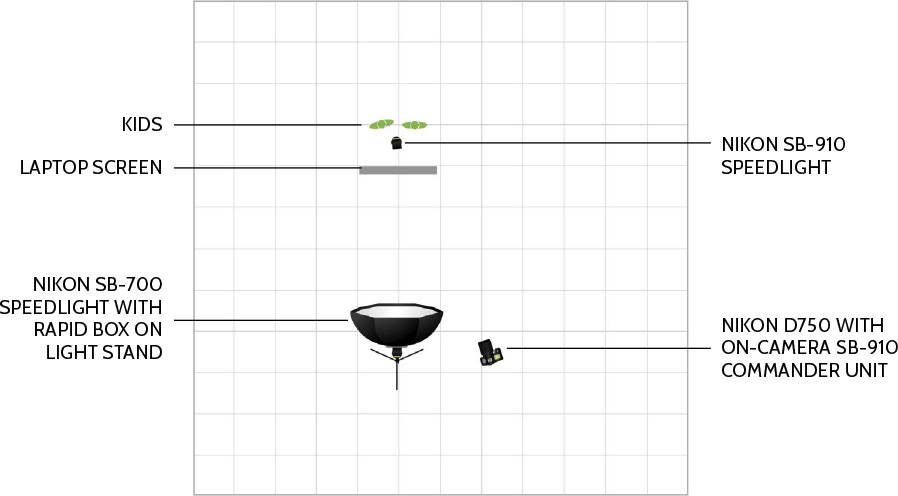
The lighting diagram shows the placement of the lights and the camera ( Figure 17.18 ). I did stand on a small stepstool to get the right angle over the laptop screen so that the remote flashes could see the signal from the Commander.
For the final image, I set both remote flashes to channel 1 with the SB-910 in group A and the SB-700 in group B. I wanted the rest of the room to be dark, so I used camera settings that reduced the effect of the ambient light. A shutter speed of 1/250 second with an aperture of f/13 and an ISO of 200 meant that the only light affecting the scene would be from the two remote Speedlights.
On the SB-910 that was being used as a Commander unit, I set group A to Manual flash mode with a power of 1/32 and group B to Manual flash mode with a power of 1/8. Because the SB-910 (group A) was close to the subjects, it needed a lot less power than the SB-700 that was in the softbox used to light up the counter.
The advantage of having these two lights in different groups was that I could adjust them separately from the camera without disturbing the subject. For Figure 17.19 , I just waited until I saw the expression I wanted to capture and pressed the shutter release button.
NIKON D750 ISO 200 1/250 SEC. F/13
Figure 17.19 The final image shows the kids playing with the computer, with the main light coming from the SB-910 that is bouncing the light off the white paper on the screen of the computer.
Just for fun, I took the SB-910 off the camera and changed it from Commander to Remote mode and then set it to channel 1 and group A. It now fired in the same mode and power as the SB-910 that was bouncing the light off the screen. I mounted the flash in a Justin clamp and placed it on the edge of the counter aimed at the back of the laptop screen. Then I added a red gel over the flash head and angled the flash to hit the back of the laptop and not the kids on the other side. I triggered the remote flashes with the built-in flash on the D750. Figure 17.20 shows the lighting diagram for this, and Figure 17.21 shows the final image.
Figure 17.20 The lighting diagram shows the addition of the third Speedlight used to illuminate the back of the laptop and change its color to red.
NIKON D750 ISO 200 WITH RAPID BOX ON LIGHT STAND NIKON D750 WITH BUILT-IN FLASH 1/250 SEC. F/13
Figure 17.21 Using a light to change the color of the laptop is just a little extra fun thing to try. Gelling the Speedlight and aiming it low kept the color on the laptop.
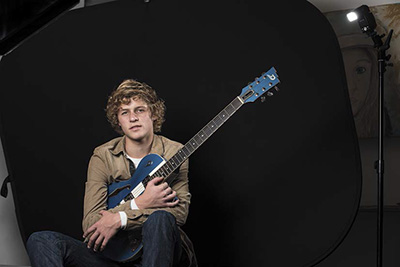
I photograph a lot of musicians, guitar players especially, and they are some of my favorite subjects. When using a single light source, you have to decide whether you are going to light up the musician or the instrument. With more than one light, however, you can illuminate both the musician and the instrument (or instruments).
The gear for this shoot includes two different lenses because I used two different setups for two different types of shots. The first is Cody against a plain black background holding a single guitar, and the second is Cody surrounded by his instruments.
Nikon D4
: The Nikon D4 is a fantastic camera, but it does not have a built-in flash, so to trigger the off-camera units, I needed to use a Commander unit, such as the SU-800 or another of the Speedlights.
Nikkor 24–70mm f/2.8
: For the wide shot of Cody surrounded by his instruments, I used the 24–70mm lens because I needed a wider view.
Nikkor 70–200mm f/2.8
: The longer focal lengths work better when you need to minimize the background as I did in the photo of Cody with the single guitar.
Nikon SU-800 Commander unit
: The SU-800 is needed to trigger the remote Speedlights because the D4 does not have a built-in flash.
Nikon SB-800 Speedlight
: Even though the SB-800 is now discontinued, it is still a perfectly good flash.
Nikon SB-910 Speedlight
: Any Speedlight will work. I used a combination of the SB-800 and the SB-910 as the two off-camera flashes. The two flashes can be used in any combination. The only real difference is that the SB-910 is quite a bit bigger than the SB-800, as you can see in
Figure 17.22
.
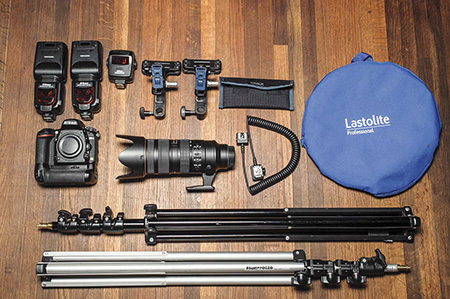
Figure 17.22 The gear for this shoot includes just the basics: an umbrella, a couple of flashes, and some light stands.
Umbrella
: I needed a light modifier to create a big, soft light to illuminate all the instruments, and the shoot-through umbrella fit the bill.
Light stands
: The light stands allowed me to position the two Speedlights off camera, but the light stands need a way for the flashes to be attached to them. That’s what the umbrella holders are used for.
Two flash brackets/umbrella holders
: I used two umbrella holders, one for each flash. Only one of the flashes had an umbrella mounted, the other was a bare flash, but mounting it in the umbrella holder allowed me to adjust the downward angle of the Speedlight.
Black backdrop
: I really love bringing the collapsible background with me on a shoot. Having a quick solid white or black background anywhere at any time is really useful.
This chapter actually has two different setups for the photos of Cody. This first one builds on the Chapter 16 portrait. In this case, I shot the SB-910 through an umbrella in the light stand to supply the main light. After I mounted the SB-800 on a second light stand using the second umbrella holder, I placed it close to and above the guitar headstock. I then aimed the light down to highlight the Taylor name on the guitar. I simply leaned the black backdrop up against a wall behind Cody. You can see the setup shot and the lighting diagram in Figures 17.23 and 17.24 .
Figure 17.23 This setup shot shows the bare SB-800 in a light stand aimed at the headstock of the guitar.
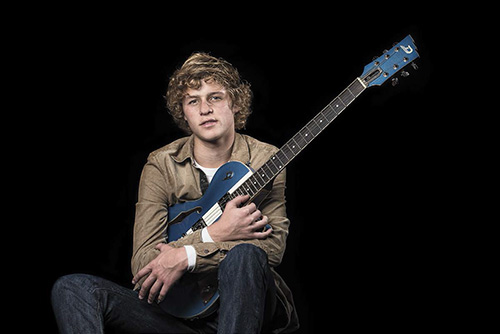
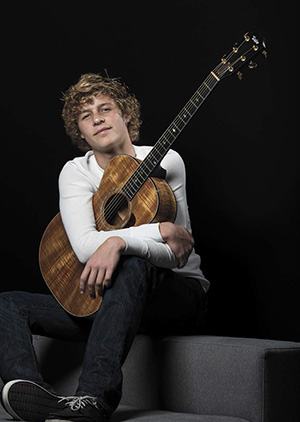
I used the same setup to take Figures 17.25 and 17.26 . You can see that the headstocks of the guitars are both well-lit even though they are quite a distance from Cody’s face. This extra bit of light makes the difference between something that is merely good and something that the guitar company will want to use. Both of the Speedlights were set to channel 1 with the SB-910 in the umbrella set to group A with the SB-800 set to group B. The camera is set to Manual exposure mode with 1/250, f/6.3, and ISO 100.
NIKON D4 ISO 100 1/250 SEC. F/6
Figure 17.25 You can see that the light on the headstock is at a slightly different angle than the main light. There are no shadows under the bottom three strings on the headstock.
NIKON D4 ISO 100 1/250 SEC. F/6
Figure 17.26 The Taylor logo on the guitar is lit by the SB-800. You can see a splash of light on the wood headstock, reflecting the SB-800 light.
The flash modes for both A and B were set to Manual flash mode on the SU-800 with the power for group A set to 1/4 and the power for group B set to 1/16.
Switching to a portrait orientation made for a tighter composition but also meant that I needed to move the SB-800 in a little closer and make sure it was aimed right at the headstock of the guitar.
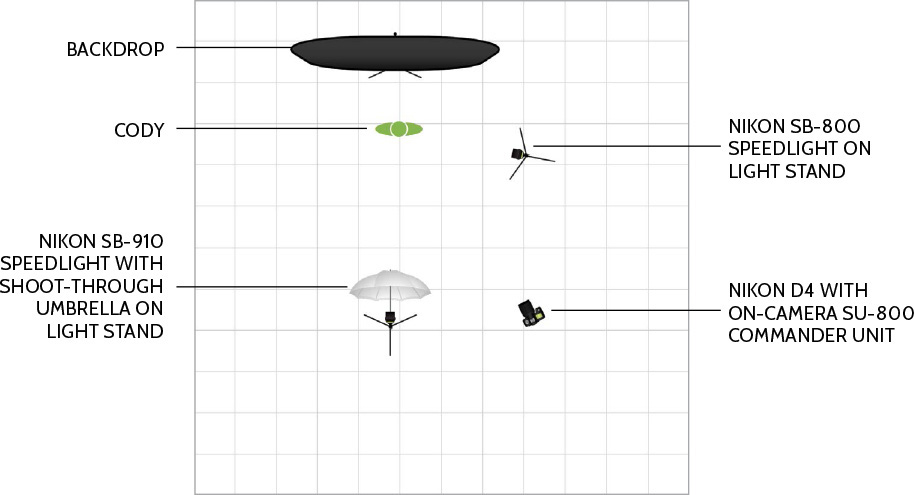
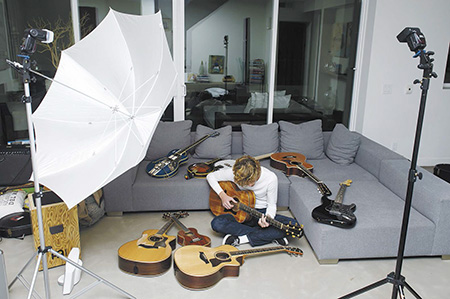
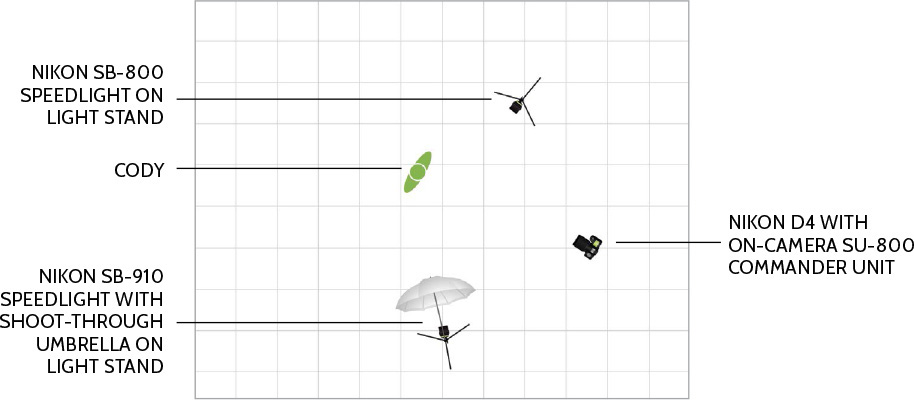
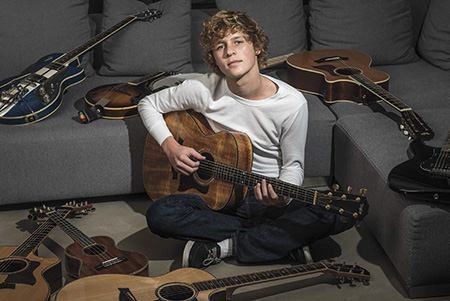
For the second shot of Cody, I wanted to surround him with his favorite instruments and then light the whole room. I did this by positioning Cody on the floor and placing the instruments all around him. I set the lights in the same manner as the previous shot, but angled the flashes down on Cody. You can see the light setup in Figure 17.27 and the lighting diagram in Figure 17.28 .
Figure 17.27 You can see the two lights set up, the first with the shoot-through umbrella and the second with just a bare flash.
Figure 17.28 The lighting diagram shows the position of the lights and camera. I wanted a big, soft light on the room and instruments with a harder light right on Cody.
Figures 17.29 and 17.30 differ only slightly in their lighting. Both of the Speedlights were set to channel 1 with the SB-910 in the umbrella set to group A and the SB-800 set to group B. The camera was set to Manual exposure mode with 1/250, f/6.3, and ISO 100.
NIKON D4 ISO 200 1/200 SEC. F/7.1
Figure 17.29 Cody Lovaas surrounded by his favorite instruments. The light from the umbrella is lighting up the whole scene with the SB-800 adding the harder light right on Cody.
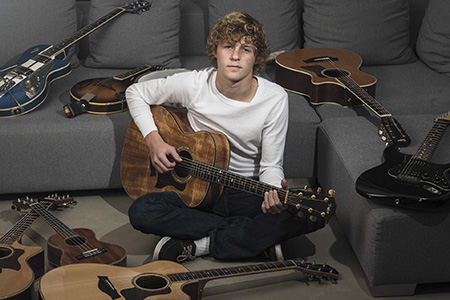
NIKON D4 ISO 200 1/200 SEC. F/7.1
Figure 17.30 Adjusting the power of the flashes from the camera allowed me to change the light without changing the scene.
I set the flash modes for both A and B Manual on the SU-800 and adjusted the power for group A to 1/16 and for group B to 1/4 power for the first shot. You can see the harder light from the bare flash head in the sharpness of the shadow created by Cody’s nose in Figure 17.29 . In Figure 17.30 , I reduced the power of group B to 1/8 and increased the power to group A to 1/8. With the adjustment Cody made to his pose, the light on his face was evened out.
The final shot of the librarian took a second Speedlight to add some light so that the break in the bookshelf would be illuminated and act as a frame around the librarian. This is a more subtle effect, so just for fun I added a blue gel to the light so it would be overly obvious which light was coming from which flash.
This shoot added a second light stand and Justin clamp for the second Speedlight to the portrait’s gear list ( Figure 17.31 ). Using a Justin clamp on a light stand allows you to adjust the angle and position of the light easily. I also added a diffuser to go between the light coming through the bookshelf and the librarian. Because the distance between the flash head and the diffuser is small, the diffuser doesn’t do a whole lot, but a little softening of the light is better than none.
Nikon D750
: Any camera will work for this image.
Nikkor 70–200mm f/2.8
: I needed the reach of the longer focal lengths to shoot right down the library stacks.
Two SB-910 Speedlights
: I used two SB-910 Speedlights to light up this photo. Any of the Speedlights that can act as a remote would work.
Nikon SU-800 Commander unit
: The remote flashes need to be triggered, and because of their placement, the built-in flash couldn’t do it, so I used the SU-800. I could have used another Speedlight that has the ability to act as a Commander.
TTL cord
: The SU-800 needs to be able to send the trigger flash to the remote flashes, and it couldn’t do that from the camera position, so I used the TTL cord to move the SU-800 off the camera and over to the second aisle.
Light stands
: I needed a way to position the SU-800 and the second Speedlight—lights stands to the rescue.
Justin clamps
: These clamps were used to position both the lights. The first one was clamped to a large book, while the second was placed on a light stand.
Gels
: I added a blue gel to the second light to show the spread of the light. I always have a pack of gels with me. They are small and take up little space but can add something great to a photo.
Lastolite Diffuser
: I added the diffuser to soften the light coming through the shelves. It didn’t make a huge difference, but any amount of softening helped.
Rogue FlashBender
: I used the large FlashBender to bounce the light through the bookshelf.
Figure 17.31 The gear used for this shoot (minus the Rogue FlashBender). The Lastolite diffuser collapses into a compact shape and easily stored in its bag.
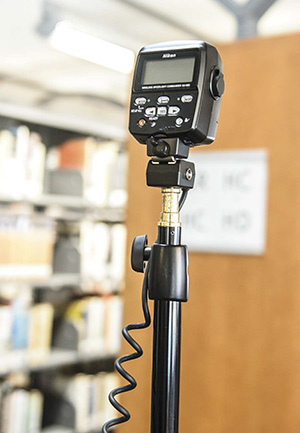
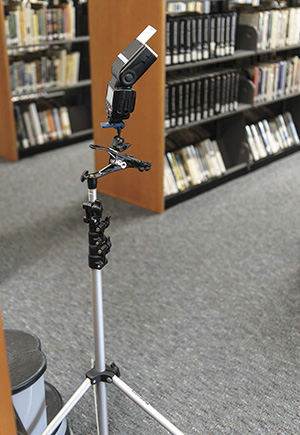
The two flash units were not far from the SU-800, but the angle made it impossible for the SU-800 to trigger the Speedlights from the camera position. The solution was to place the SU-800 in a TTL cord and attach the TTL cord to a light stand. You can see the TTL mounted on the light stand in Figure 17.32 . The mounting hole in the bottom of the TTL cord allows the light stand to screw directly in it. The SU-800 can then be positioned away from the camera and moved so that the SB-910 Speedlights can be triggered. The one thing to watch for is pulling the light stand over by moving too far away from it. I usually place my camera bag on the feet of the light stand to give it more stability.
Figure 17.32 Here the SU-800 is mounted in the TTL cord, and the cord end is mounted on the light stand.
I set an SB-910 into the Justin clamp, which I in turn mounted on the light stand. I could then position the flash as I needed just by loosening the small ball head that connected the flash cold shoe to the body of the clamp. Once the flash was in the proper position, I just tightened the ball head to lock the position of the flash. In Figure 17.33 you can see the built-in bounce card was pulled out and so was the wide-angle adapter. For the actual images, I left the wide-angle adapter in place because I need a wide spread of light, but I put the built-in bounce card away because it didn’t do anything to the light.
The final part of the setup was to add the Lastolite diffuser in front of the light that was blasting through the bookshelf. The SB-910 was positioned using a Justin clamp and a Rogue FlashBender to bounce the light. The diffuser was placed between the flash and the shelf to help soften the light. You can see the diffuser in position in Figure 17.34 and the lighting diagram for the shoot in Figure 17.35 .
Figure 17.34 This time the SB-910 is mounted in a Justin clamp and positioned on the bookshelf. The Rogue FlashBender bounces the light through the shelf, while the Lastolite diffuser is positioned to soften the light as much as possible before going through the shelf.
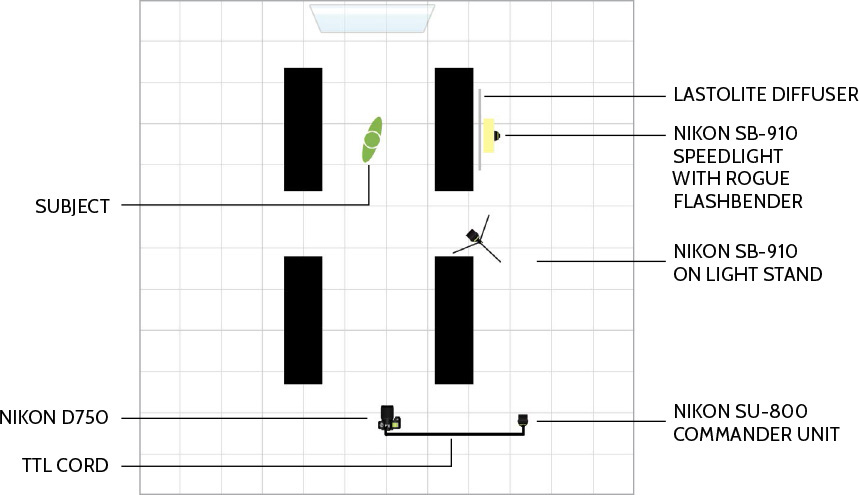
Figure 17.35 The lighting diagram shows the placement of the two flash units and the SU-800. The SU-800 is connected to the camera via a TTL cord.
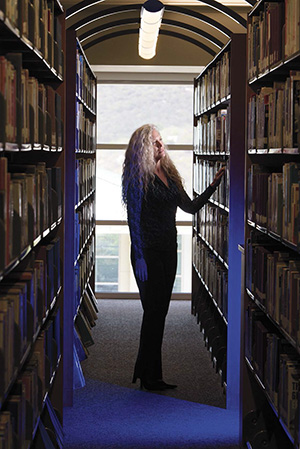
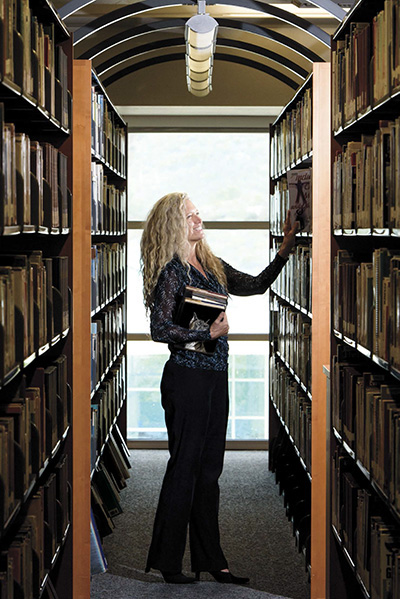
The final images were first taken with a blue gel on the second flash. This allowed me to see exactly where the light from the second flash was impacting the scene. You can see what that looks like in Figure 17.36 where the blue light is illuminating the bookshelf ends. For Figure 17.37 , I removed the blue gel and moved the angle of the light upward so that the light would strike the bookshelf ends creating a frame around the librarian.
NIKON D4 ISO 800 1/60 SEC. F/5.6
Figure 17.36 You can see the blue light on the walls and floor of the library stack. This was a great way to see what the position of the light was actually doing.
NIKON D4 ISO 800 1/60 SEC. F/5.6
Figure 17.37 The final image of my wife, the librarian, working in the library stacks. The main light is illuminating her face and arms, while the second light is illuminating the ends of the bookshelves acting as a frame within the image.
Both of the Speedlights were set to channel 1 with the SB-910 that shines through the bookshelf as group A and the second light as group B. The camera was set to Manual mode, 1/250 second, f/9.0, and ISO 400. The Speedlights were set to TTL mode with A at +1 power and B at 0.
Using multiple lights is a lot of fun. Being able to do it on location is even more fun. I know that most photographers, especially those starting out, don’t have a whole bag full of Speedlights, which is why I have limited the number of off-camera flashes in this chapter. It is easy to get carried away and create complicated light setups using 4, 5, 60, or more Speedlights, but it is important to build up that light methodically and to keep thinking in terms of the three groups of lights: A, B, and C.