NIKON D4 ISO 100 1/250 SEC. F/4.5
NIKON D4 ISO 100 1/250 SEC. F/4.5
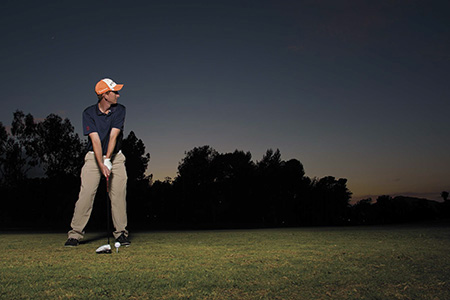
Capturing action photos is usually accomplished using the available light with fast shutter speeds, high ISOs, and wide apertures—but it doesn’t have to be. For this chapter, I caught the action using Speedlights to create a more dramatic portrait. One of the basic techniques I used for all the photos was to underexpose the whole image and then add back in the light on the subject, keeping the background more dramatic. The other thing that I tried to do on all the images was to shoot from a low angle up at the athletes because this makes them look larger than life.
A golfer practicing his swing is a great subject because he will repeat the same motion over and over again. In addition, golf courses are beautiful places with trees and green lawns—perfect for taking an action portrait.
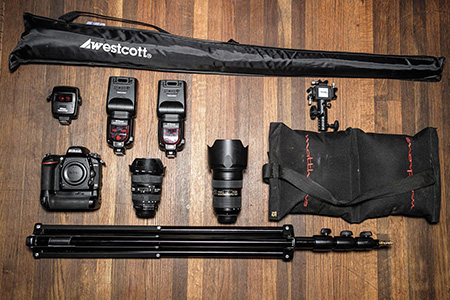
The equipment for this shoot was minimal: a camera and lens along with a large umbrella and a couple of Speedlights ( Figure 18.1 ). I used the Westcott 7-foot parabolic umbrella, which is really big and quite deep, to create a big, soft light source. Here’s the complete list:
 Nikon D750
: Any of the Nikon DSLR cameras could work here, and I could have used the built-in flash to trigger the remote Speedlights.
Nikon D750
: Any of the Nikon DSLR cameras could work here, and I could have used the built-in flash to trigger the remote Speedlights.
Nikkor 24–70mm f/2
.4
: I started the shoot with the 24–70mm lens to capture a medium shot of the golfer, but after a few frames, I switched to a wider angle to capture more of the scene.
Nikkor 20–35mm f/2
.4
: When I went to a wider angle, I used the widest angle lens I had: the 20–35mm at the 20mm focal length. I loved the way the light from the umbrella lit up the golfer and the ground around him, creating a natural vignette.
Two Nikon SB-910 Speedlights
: The large umbrella that I used for this shoot needs some serious light bounced into it, so I used two SB-910 Speedlights mounted in the umbrella.
Nikon SU-800 Commander unit
: I used the SU-800 Commander unit to trigger the two remote SB-910 Speedlights.
Lasolite McNally TriGrip
: This piece of gear allows you to mount up to three Speedlights together and to rotate the Speedlights so that the sensors used to trigger the off-camera flashes can be positioned properly.
Westcott 7-foot parabolic umbrella
: This is a great light-shaping tool, creating a very soft light. The version I have has the silver interior designed for the light to be bounced into and then out of the umbrella. You need quite a bit of light going into the umbrella, which is why I used it with the McNally TriGrip and two SB-910 Speedlights.
Light stands
: I used a heavy-duty light stand to hold the umbrella and TriGrip in place.
Sandbag
: The umbrella is big—really big—so I wanted to make sure that any breeze that popped up at the scene wouldn’t knock it over. A 15-pound sandbag on the legs of the light stand kept it nice and secure.
Figure 18.1 The gear used for this shoot was really quite minimal with just two Speedlights mounted in the big umbrella.
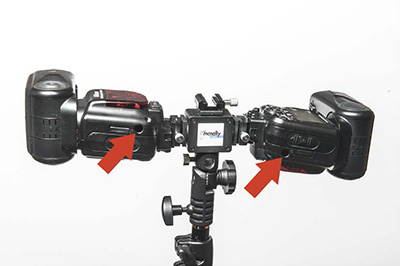
The McNally TriGrip allowed me to mount two SB-910 Speedlights and then rotate them in the holder so that the sensors faced the right direction. You can see the way the two Speedlights were positioned in Figure 18.2 .
Figure 18.2 The advantage of the McNally TrIGrip is that the two Speedlights can be rotated so that the sensors used to trigger them in Remote mode can see the signal from the SU-800.
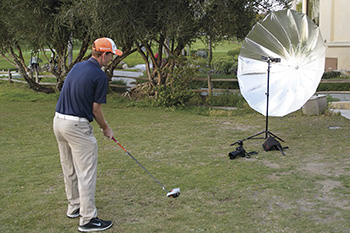
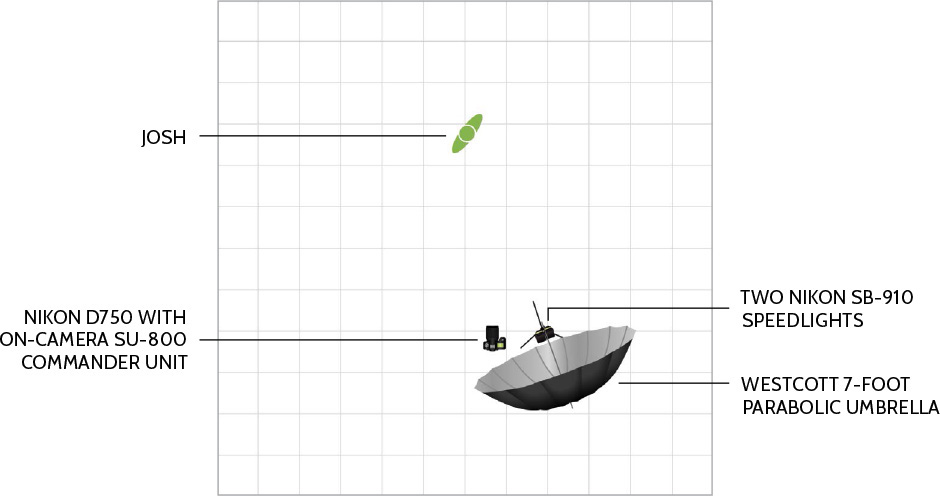
The setup for the golf shot was probably the easiest setup of all the photos because it is just a big umbrella pointed at the golfer. The two Speedlights were mounted in the umbrella and were both set to channel 1 and group A. Then I sat and watched the golfer, Josh, practice his swing so I could work out the best place from which to photograph. I wanted to make sure that we kept the setting sun behind him and that I was not going to bet smacked in the head by a golf ball or a club. In Figure 18.3 , you can see the position of the umbrella and camera in relationship to Josh. I ended up lying on the ground and shooting at a slight upward angle; Josh got to look larger than life, and I got a great angle on the swing.
Figure 18.3 The Westcott 7-foot parabolic umbrella is in position with two SB-910 Speedlights mounted inside.
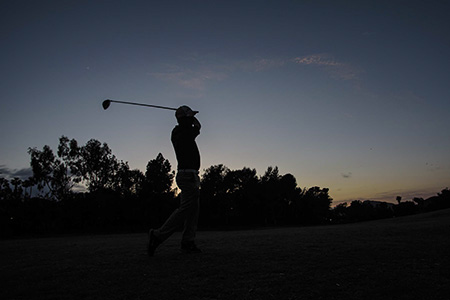
The next step was to set the camera to capture the ambient light without the flash going off. I wanted the scene to be dark so that the main light illuminating the swing would be from the two Speedlights in the umbrella. I set the camera to Manual exposure mode, 1/250 second, f/7.1, and ISO 200 and to create the silhouette of Josh shown in Figure 18.4 .
NIKON D750 ISO 200 1/250 SEC. F/7.1
Figure 18.4 Without the Speedlights firing, Josh is just a silhouette against the sky.
Then, it was just a matter of turning on the SU-800 and the two SB-910 Speedlights and setting the power of the remote flashes on the Commander unit. After some experimentation, a 1/2-power setting worked to capture the scene, as you can see in Figure 18.5 . The lighting diagram for the photo appears in Figure 18.6 .
NIKON D750 ISO 200 1/250 SEC. F/7.1
Figure 18.5 Josh posed before taking a swing. This helped me set up the lighting so I didn’t have to worry about both the timing and the lighting all at once.
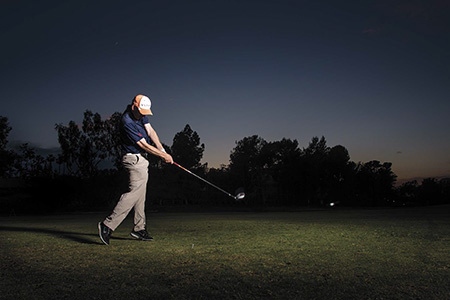
With the light and camera all set up, the final piece of the puzzle was to get the timing down to capture the actual swing. Because the Speedlights need time to recycle, I could fire only one flash per golf swing. The easiest way to get the timing right was to talk to Josh as he practiced his swing. He counted out loud as he started his swing, which helped me know when to press the shutter release button. On the first try with an actual golf ball on the tee, I managed to capture both the swing and the golf ball in flight ( Figure 18.7 ).
NIKON D750 ISO 200 1/250 SEC. F/7.1
Figure 18.7 Getting the timing right allowed me to capture the ball in midair as it left the club head.
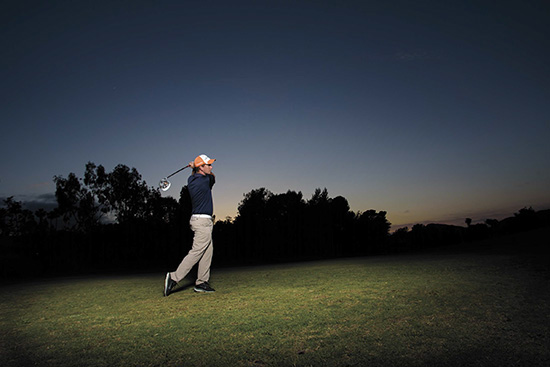
Figure 18.8 , the final shot of Josh, shows the follow-through of the golf swing. The wide-angle lens allowed the light from the umbrella to create a natural vignette. Getting set up early was important in achieving this shot. The sun was rapidly setting, and a few minutes after this last shot was taken, all traces of the sunlight were gone.
NIKON D750 ISO 200 1/250 SEC. F/7.1
Figure 18.8 The final shot vignettes Josh’s golf swing amid the gathering dusk.
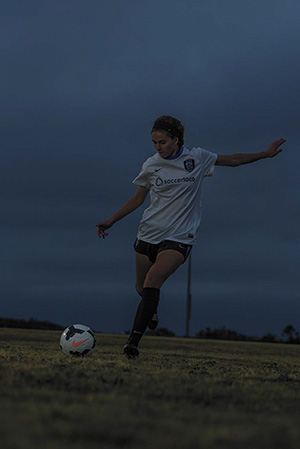
Soccer is the most popular sport in the world. For this photo, I had the fortune of being able to photograph Emma, who will play college soccer this year. The concept was to capture her kicking the ball and light the scene with a couple of Speedlights.
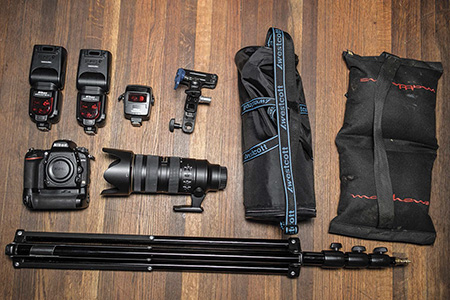
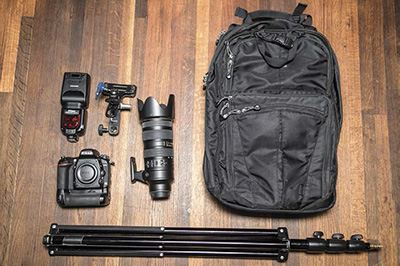
The equipment used for this photo included two Speedlights that I wanted mounted so that all the light looked like it was coming from the same source. To do this, I mounted the second Speedlight in a Justin clamp and attached it to the light stand below the first light. Figure 18.9 and the following list detail all the gear for this shot:
Nikon D750
: I used the Nikon D750 DSLR for this photo but could have used any of the Nikon DSLRs.
Nikkor 70–200mm f/2
.8
: I needed to compress the scene and minimize the background, because I wanted just the soccer player and the floodlights in the background. The longer focal length allowed me to do that and stay back a safe distance.
Two Nikon SB-910 Speedlights
: I used two Speedlights in Remote mode. It could have been any of the Nikon Speedlights.
Nikon SU-800 Commander unit
: I used the SU-800 Commander to trigger the off-camera flashes because I find it the easiest to work with when time is a factor, and for this photo I had only a few minutes when the floodlights would be on and the sky was still light enough to have some detail.
Westcott Rapid Box Strip
: I wanted a slightly softer light on the face and upper torso of the soccer player, and the Rapid Box Strip was perfect for this.
Light stand
: I used a single light stand with the softbox mounted to the top and the second flash attached using the Justin clamp halfway up the stand.
Justin clamp
: The clamp was used to position the second flash on the light stand.
Sandbag
: I used a 15-pound sandbag on the leg of the light stand to make sure it didn’t fall over with the softbox and Justin clamp attached.
Figure 18.9 Here’s the gear used for the soccer kick photo, including the sandbag that held the light stand in place.
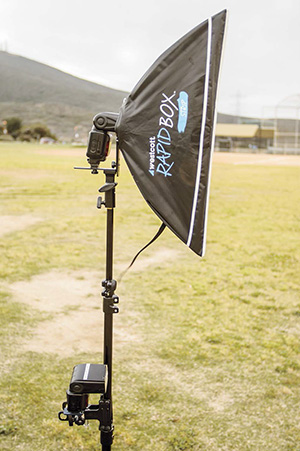
The first SB-910 was mounted in the Westcott Rapid Box Strip and attached to the top of the light stand using the mounting bracket that comes with the softbox. This Speedlight was set to Remote mode, channel 1, and group A. I mounted the second Speedlight in the Justin clamp and then clamped it to the light stand below the softbox. This second flash was set to Remote mode using channel 1 and group B. You can see the placement of the two Speedlights in Figure 18.10 .
Figure 18.10 I mounted the two Speedlights on the same light stand, setting the top light as group A and the bottom light as group B.
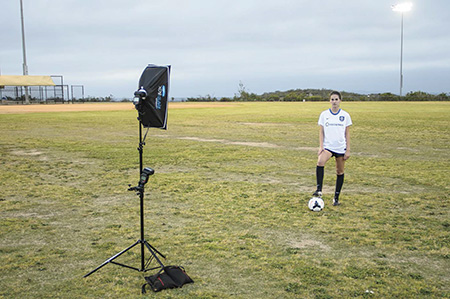
The next step was to set up the lights in relation to where Emma would be kicking the ball. To do this, I need to place the ball in the right spot and then adjust the aim of the Speedlights. As you can see in Figure 18.11 , I aimed the softbox at the soccer player’s head and then positioned the lower light to light up the ball in flight. The one great thing about working with athletes is that they can repeat an action over and over again and it looks the same each time. This allowed me to fine-tune the position of the lights and not have to worry that the ball was going to hit me. (Her dad played goalie behind me, and although the kick looks strong, she was just tapping it over my head.)
Figure 18.11 You can see the setup of the two lights in relation to Emma. Note the slight downward angle of the lower Speedlight so that the harder light would hit the ball and the ground but not her.
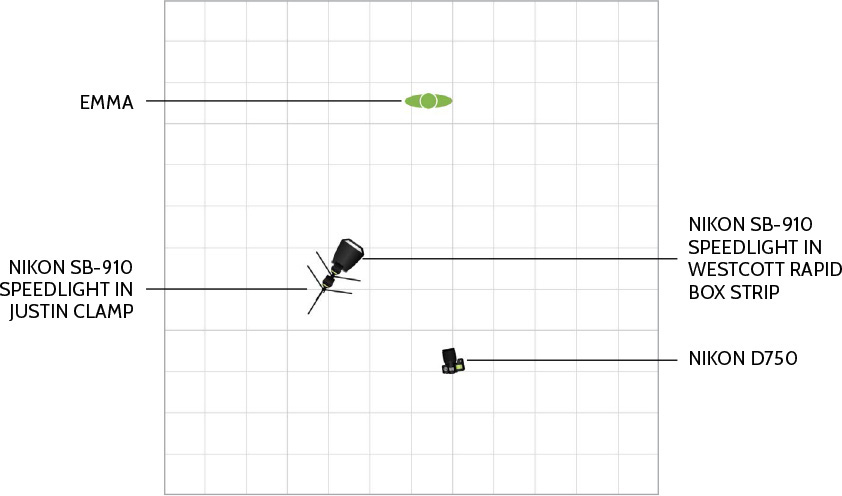
Figure 18.12 is the lighting diagram for this photo shoot, but keep in mind that the two flashes are set up with one in the softbox above the other one. I wanted it look like one light source, and using the Justin clamp allowed me to do that.
Figure 18.12 The lighting diagram shows the position of the two Speedlights. I adjusted the shooting position to include the floodlights in the background.
You can see the ambient light present before the Speedlights were added to the mix in Figure 18.13 . This was shot at a 1/1000-second shutter speed at f/3.5 using ISO 400. The scene was underexposed so that when I added the lights, the sky would stay the same and the light would illuminate the player and ideally the ball in the air.
NIKON D750 ISO 400 1/1000 SEC. F/3.5
Figure 18.13 Emma’s practice kick without the Speedlights turned on allowed me to make sure the background light was how I wanted it.
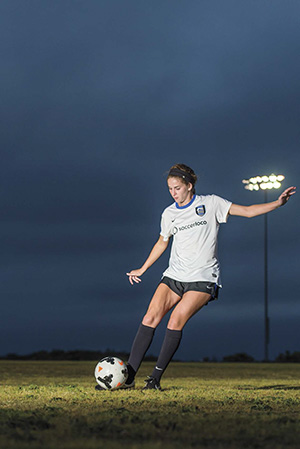
The final image of Emma kicking the soccer ball took some practice, a lot of timing, and a little luck. The field we were shooting on had some floodlights in the background; they came on just before sunset but wouldn’t be on for long as the area closed after dark. I had Emma take a few practice kicks ( Figure 18.14 ) so that I could work on the timing. Because I needed to freeze the kick and the ball, I used a very fast, 1/1000-second shutter speed; therefore, the flashes needed a lot of power to fire in the High-Speed Sync mode. This meant I got one exposure per kick and needed to press the shutter button right after the ball left her foot.
NIKON D750 ISO 400 1/1000 SEC. F/3.5
Figure 18.14 Having Emma perform a few practice kicks allowed me to focus on my position and make sure that the floodlights in the background would be where I wanted them.
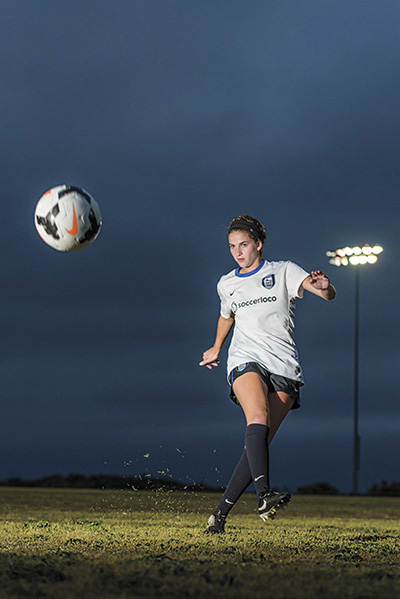
It took about three tries to get the final image, which has the soccer ball in the air, a great look of determination on Emma’s face, and the floodlights over her shoulder ( Figure 18.15 ). The lighting plan for the shot was to have the group A Speedlight (in the softbox) set to Manual power at 1/1 (full power) and the group B Speedlight set to Manual power at 1/2. For the final images, I raised the light stand as high as possible with both Speedlights angled down at the scene.
NIKON D750 ISO 400 1/1000 SEC. F/3.5
Figure 18.15 Emma kicks the soccer ball between the lights and the camera position. It’s a good thing she can kick the ball consistently in the same spot, because it allowed me to adjust the lights to illuminate the action
I have lots of friends who are into mountain biking and ride just about every weekend. It is not only a fun pastime but a really great subject for sports action shots. The challenge for this shoot was to do it with as little gear as possible and still get a more dramatic light on the rider riding the trail. My friend Andy joined me on some local trails where we came up with two spots to shoot that would both give us some interesting photos and, more importantly, keep everyone on the trail safe.
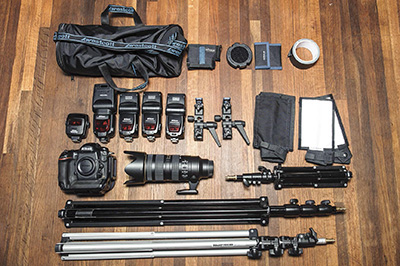
The gear for this shoot was the absolute minimum, consisting of a single off-camera flash, a clamp, and a light stand. The reasons for this were twofold: I wanted a hard light, so the bare SB-910 was perfect, and I needed to carry the gear up and down a narrow track, so the less gear, the better. Here’s the load I carried ( Figure 18.16 ):
Nikon D750
: I used the D750 because it has a built-in flash that can be used as a Commander to trigger an off-camera Speedlight.
Nikkor 70–200mm f/2
.8
: I wanted to compress the background as much as possible, so a longer zoom lens was my pick.
Nikon SB-910 Speedlight
: I needed one off-camera flash and picked the SB-910. I could have used any of the Speedlights for this as long as they could be set to Remote mode.
Justin clamp
: I needed to position the SB-910 to illuminate the rider, and the best way to do that was with the highly adjustable Justin clamp.
Light stand
: I could have clamped the Speedlight to a tree or a branch but took a single light stand with me in case I found a spot with uncooperative foliage and ended up using it for both shots. It isn’t that big, and because I had such a small amount of gear, I could just pack it right on the backpack.
Think Tank Photo Shape Shifter backpack
: I used my camera bag to pack the camera, lens, flash, clamp, and light stand because I did not know how far I was going to have to walk to get to a good spot to shoot. This setup allowed me to not have to worry about extra pieces of gear on the trail.
Figure 18.16 The small amount of gear meant that everything could be packed into a Think Tank Photo Shape Shifter backpack (www.thinktankphoto.com ) with the light stand attached in the same way a tripod would be.
The advantage to using a small kit of gear is that setting up is easy. I was able to carry the gear into the trails and set up the light stand in a spot that was going to give me the lighting I wanted and, more importantly, keep the bike rider safe. Because I used only a single light, I could make sure that it in a spot that wasn’t going to interfere with the trail.
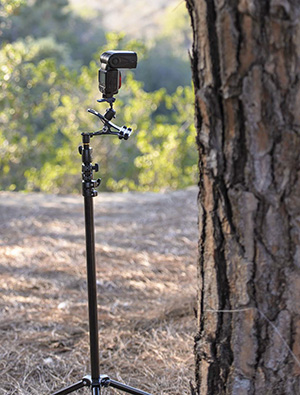
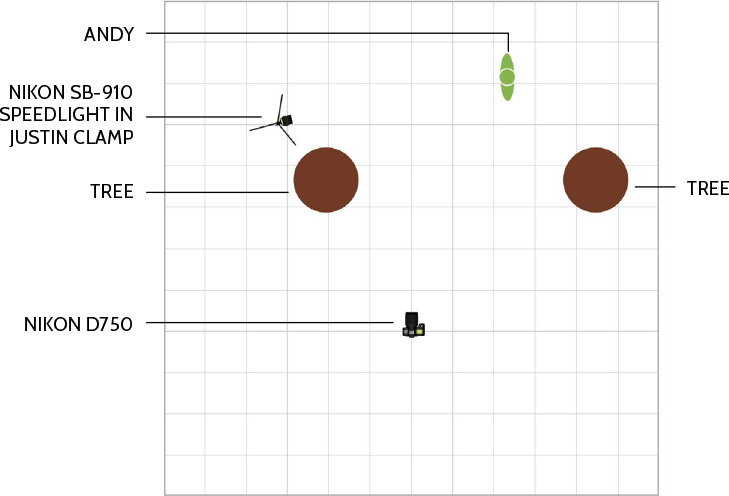
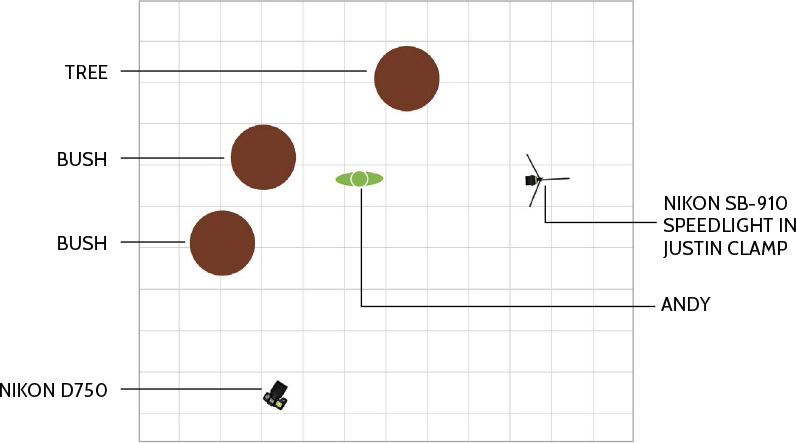
The small amount of gear allowed me to move fast and take two different shots along the same trail. The setup for both shots was similar: a single SB-910 in a Justin clamp on a light stand allowing me to aim the light where I needed it. The SB-910 was set to Remote mode, channel 1, and group A with the remote sensor on the side of the flash pointed back at the camera ( Figure 18.17 ). For the first shot, the Speedlight was hidden behind the tree and aimed back up the trail that Andy would be riding down. I positioned myself so that the two trees would act as a natural frame, tracked Andy through the viewfinder, and took the photo as he passed the first tree. Figure 18.18 shows the lighting diagram.
Figure 18.17 I attached the SB-910 on the light stand with a Justin clamp and placed it behind the tree with the sensor aimed back at camera position.
Figure 18.18 The lighting diagram shows the placement of the SB-910 in relationship to the trees and the camera. It’s important that the SB-910 is placed where the built-in flash on the Nikon D750 can trigger it.
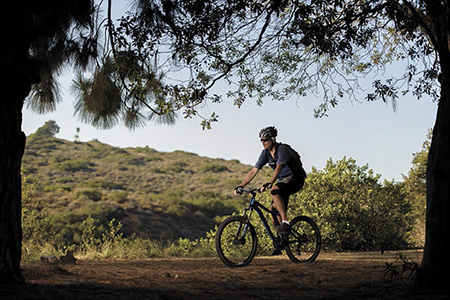
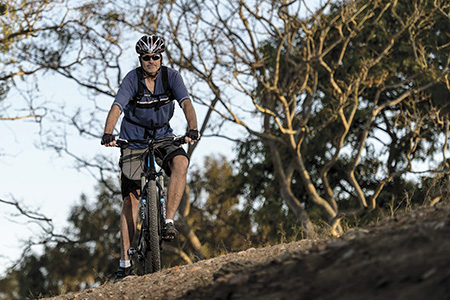
With the camera in Manual mode, I used a shutter speed of 1/1600 to freeze Andy on the bike and to underexpose the scene. The light from the flash then acted as a fill light, blasting right into the rider, as shown in Figure 18.19 .
NIKON D750 ISO 500 1/1600 SEC. F/2.8
Figure 18.19 It took a few tries to get the timing just right and focus on Andy as he came past the tree. Because the flash was firing on full power, I had only one chance each time Andy came by get the shot.
With the same gear, we moved a little way down the trail and came to a spot where I could safely set up a light and trigger it from farther down the trail, allowing me to capture Andy as he crested the small hill. In Figure 18.20 , you can see the light setup, and in Figure 18.21 , you see the lighting diagram.
Figure 18.20 This time I positioned the single SB-910 (attached to a light stand with a Justin clamp) close to the peak of the small hill.
Figure 18.21 The lighting diagram shows the position of the rider and the light. The hardest part of this arrangement was making sure that the SB-910 could see the D750 from the shooting position.
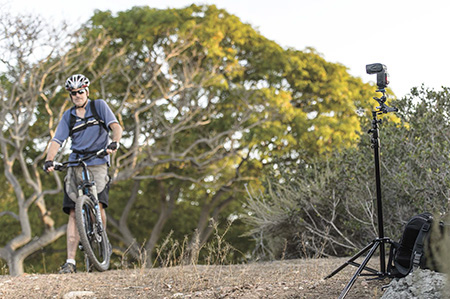
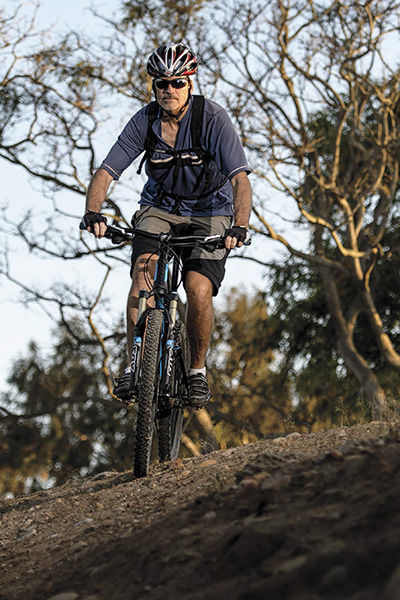
For the final image, I had Andy first stop on the top of the small hill to check the light and focus ( Figure 18.22 ). The real test was if the built-in flash would be able to trigger the remote flash from the position where I was shooting. I set the SB-910 to Remote mode on channel 1 and group A, and I used the built-in flash on the D750 in Commander mode with the flash power set to Manual and the power set to 1/1. For Figure 18.23 , I turned the camera to a portrait orientation with the built-in flash on the right so that it would still trigger the remote Speedlight; then I had Andy come riding over the crest and down the trail. The tricky part was making sure I got out of the way after taking the photo. The SB-910 was zoomed to 200mm, making for a tight beam of hard light that mimicked the setting sun.
NIKON D750 ISO 400 1/200 SEC. F/2.8
Figure 18.22 Andy in position at the top of the trail allowed me to set up and test fire the light.
NIKON D750 ISO 400 1/200 SEC. F/2.8
Figure 18.23 Here’s the final shot of Andy in action as he came down the trail. The SB-910 was positioned off to the camera’s right and zoomed to 200mm.
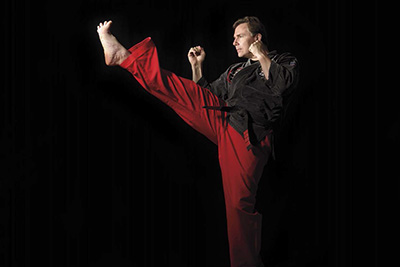
The idea for this image grew over time and went through a couple versions before I settled on the one in this chapter. The shot uses the short duration of the flash to freeze the snap kick, and at the same time creates something powerful and dynamic. This is a combination of a straight portrait setup combined with the action of the kick.
I built the shot up layer by layer with three separate zones of light all adding to the overall effect. The main light would illuminate the leg and foot, I needed sidelighting to separate Tim from the background, and I wanted to throw a colored gel on the background to give the image a little pop (plus I thought it would look cool).
The gear for this shot was quite expensive; I used four Speedlights and the SU-800, along with the camera and lens. Plus, I needed light stands, modifiers, a boom, a background, and assorted grid and gels ( Figure 18.24 ). Here’s the complete shopping list:
Nikon D4
: I used my Nikon D4 for this image, but any camera would work.
Nikkor 70–200mm f/2
.8
: I picked the longer focal lengths and shot from further away to minimize the amount of the background seen in the photo.
Four Nikon Speedlights
: I used a total of four Speedlights: a single SB-910 and three SB-800s. I divided the Speedlights into three groups. Group A was for the front light, group B for the sidelights, and group C for the background light.
Nikon SU-800 Commander unit
: I needed a way to trigger the three groups. I could have used another SB-900, SB-910, or SB-800, but I could not use the built-in flash (if the D4 had one), because I needed to trigger three different groups of lights. The SU-800 was the best tool for this job.
Westcott Rapid Box Octa, 26-inch
: The light that was illuminating the foot and leg needed to be softened and controlled, so I used the Westcott Rapid Box Octa and attached it to the boom to position it up high and angled down.
Rogue Grid
: Controlling the the spill of background light needed a grid or a snoot, and in this case, the Rough Grid just worked better.
Rogue Flags
: I used these to control the spill of the sidelights in conjunction with the small FlashBenders.
Rogue FlashBenders
: I used two of these in conjunction with the Rogue FlashBender flags to create a barn-door effect to control the spill of light on the sidelights. Doing so allowed me to blast Tim with light from the sides and not worry about the light lighting up other items in the frame.
Light stands
: I needed a way to hold all these lights in place, so I set up four light stands, one for each light.
Flash brackets/umbrella holders
: I didn’t use any umbrellas for this image, but I did use the umbrella holders to mount the flashes on the light stands, which enabled me to adjust their angles.
Boom
: To position the light up high, I used a boom that allowed me to get the light in close without the light stand being in the photo.
Black seamless paper
: I created the solid black background using a roll of seamless black paper and the backdrop support kit.
Backdrop support kit
: This kit consists of two heavy-duty light stands and a set of metal rods that combine to hold a roll of seamless paper behind the subject.
Gaffer tape
: A roll of black gaffer tape is always important to have on hand. This time, I used small pieces to modify the light on the sidelights to control the spill of the light around the FlashBenders.
Gels
: The gels were used to change the color of the background light. In this case, I used a red gel.
Figure 18.24 I used a lot of gear for this shot. This figure illustrates most of it, but the background stand kit, seamless paper, and boom were just too big to fit. This is the most gear used for any one shot in this book.
This image was shot in my living room, which gave me the greatest amount of space to move and work. It did require some time and moving of furniture, but it was worth it. The basic idea was to get a photo of Tim in mid-kick with a light on his foot, some dramatic sidelighting, and then a red glow on the background. This idea came about during a test shoot where we had a just a couple of lights, and although the test looked good ( Figure 18.25 ), it didn’t have the pop that I wanted from the photo.
NIKON D4 ISO 200 1/250 SEC. F/8.0
Figure 18.25 Tim in mid-kick in my living room illuminated by two lights. It’s a good shot, but I wasn’t happy with the final results because I cut off his foot and he didn’t pop off the background.
I started from scratch with more Speedlights and a plan to build the light from the background to the foreground. The first step was to divide the Speedlights into groups. All the flashes were set to Remote mode and channel 1 with one of the SB-800s set to group C for the background and the other two SB-800s set to group B for the two sidelights. The SB-910 was set to group A and would be the front light in the softbox on the boom.
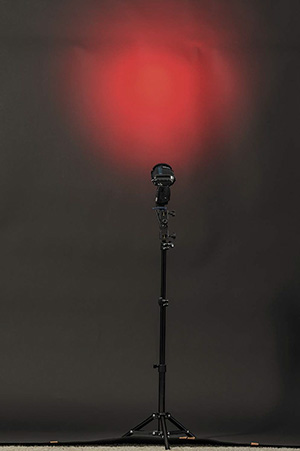
I positioned the group C SB-800 close to the backdrop with a Rogue Grid and red gel on it. You can see the result in Figure 18.26 ; when the SB-800 fires, the red gel creates a red area on the backdrop.
Figure 18.26 The SB-800 with the Rogue Grid and red gel created the background red area on the black seamless paper.
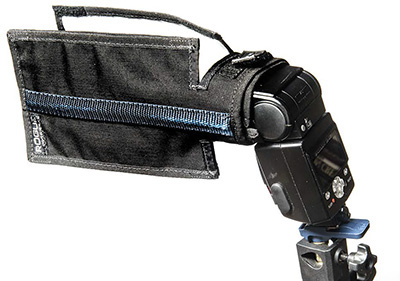
I then positioned the two sidelights on either side of where Tim would be standing and used some of the Rogue FlashBenders and the Rogue Flags to control the spill of the light. You can see in Figure 18.27 how I positioned the light modifiers on each of the sidelights. Using the two modifiers per flash allowed me to create a barn-door type of modifier stopping the spill of light from reaching the background or the camera.
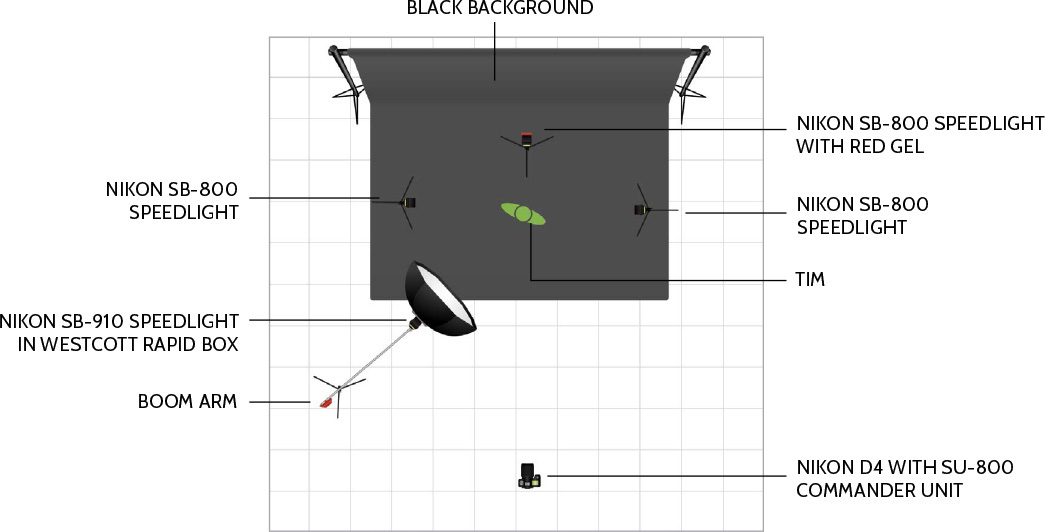
The last light to be set up was the group A SB-910, which I placed in the Westcott Rapid Box and mounted on the boom. The boom allowed me to place the light up high and angled at the spot where Tim’s foot would be when in mid-kick. You can see the lighting diagram showing the placement of the lights in Figure 18.28 . The final step was to adjust the power of the three lighting groups to get the final image.
Figure 18.28 This is the most complicated setup in the chapter with multiple Speedlights in three groups. My strategy was to get the background lights in position and then build the side and front lights.
With the lights in place, the final steps were to adjust the camera and flash settings. The camera settings I used killed the ambient light in the room, so the only illumination was from the Speedlights. The camera was set to Manual mode with a shutter speed of 1/250 second, ISO 100, and f/7.1. The settings for this photo were covered in Chapter 11 , but I’ll recap here to show how I built the scene.
With the SU-800 on the camera, I turned off groups A and B and set group C to Manual mode and a power of 1/16. This created the red background behind Tim in Figure 18.29 .
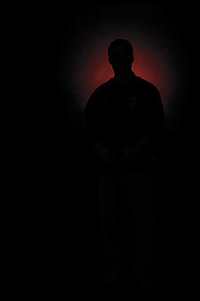
Figure 18.29 With just the group C lights firing, you can see the red glow on the background and the silhouette of Tim.
The next step was to turn on group B on the SU-800. These two lights were also set to TTL mode with –1 Flash compensation. I had Tim turn toward the main light and tested the sidelights. Once I was happy with the way the light was striking Tim ( Figure 18.30 ), I turned on group A on the SU-800 and set it to Manual flash mode and 1/4 power ( Figure 18.31 ).
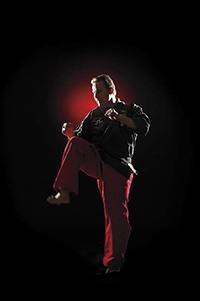
Figure 18.30 With group B turned on, the sidelights illuminate the side of Tim’s face and the back of his Gi (karate uniform).
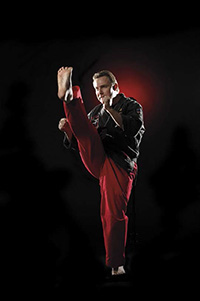
Figure 18.31 All three groups of lights were now firing, and the light was how I wanted it. Now it was just a matter of adjusting the kick and Tim’s arms so I could see more of his face.
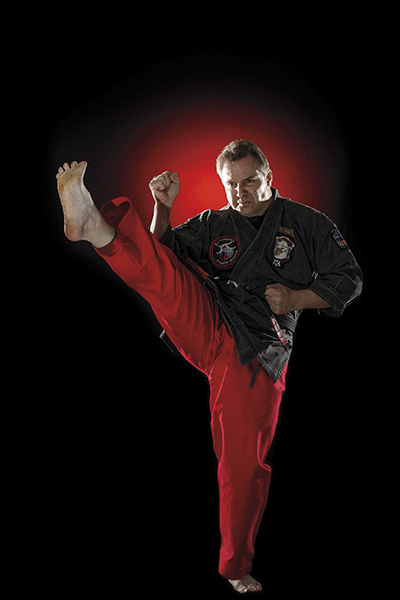
For the final image ( Figure 18.32 ), I moved the background light farther away from the backdrop to increase the spread of the red light and had Tim keep his left arm lower down so that I could see more of his face. It took about 15 kicks to get one that both Tim and I liked.
NIKON D4 ISO 100 1/250 SEC. F/7.1
Figure 18.32 With all the lights firing and Tim kicking, the final image took more than a few tries to get just right, but it was worth the work.
Photographing athletes is great for a variety of reasons. As I mentioned earlier, athletes can perform the same act over and over again allowing you to set up an action portrait more easily. All the athletes I worked with in this book were willing to push the photoshoot to get the best images possible. For all the photos in this chapter and the photos for which I worked with Jennifer (the dancer), I went in with an idea but was open to what the subject wanted to do or could do. This collaboration made it much easier to get great photos because the subject was invested in the outcome.