 LEEWAY
17 THE ESTIMATED POSITION
Whether we like it or not, the estimated position (EP) marches hand-in-hand with the GPS fix as the core of today’s navigation. There is a tendency to think of the fix, whether electronically derived or worked up from other means, as being the centrepiece, but a fix alone is, as my grandfather might have observed, like tripe without vinegar. Contrary to what one might assume, the fix does not arise from a vacuum to reassure the navigator, it follows the EP as surely as the cart rattles along behind the horse.
Most of the time when we are sailing, part of our mind is working up an EP. Whether we are sheeting in the genoa to accommodate a windshift, wondering if we’ll lay our objective, or turning in to an unmarked river mouth having decided we’ve run far enough to clear the shoals in the entrance, we are estimating our position. We may opt for putting nothing on the chart, but the EP is in our minds just the same.
Even when you are sailing waters you know well and never bring out a chart at all, you are still estimating your position. You are aware of the rocks, and you make an educated guess as to whether or not you will clear them. You may possibly know of a defined clearing line, in which case you are halfway to a fix, but mostly you estimate.
On an offshore passage where you have decided to run a plot, you may have chosen to estimate your position on the chart. Having plotted the EP, the next step is to firm it up by means of a fix. However this is derived, the EP still comes first. An experienced navigator using GPS may elect not to plot the EPs, but he is still aware of where he should be. If his electronic plot runs adrift from his mental EP, he jumps on it like a terrier and finds out why. Any fix serves either to confirm or throw doubt on the EP, whether the latter was plotted or not.
If, for any reason, a full fix is not available, the EP is all you will have. You should therefore take it seriously and know how to plot it with all the art and science at your disposal. The first stage is the dead reckoning position (DR).
A DR is worked up from two sources only: your course steered, and your distance run from the last known position. It is plotted by drawing a suitable heading line on the chart and it is marked with a small cross. A DR should not be used on its own, because it leaves out two vital factors affecting where you have actually been.
LEEWAY
Any boat sailing with the wind on or forward of the beam makes leeway (Fig 17.1). In fact, she makes it all the time except when the wind is dead aft, but it becomes much less significant once the wind is abaft the beam.
How much leeway you make depends on the boat, the wind and the sea. A powerful 40 ft (12 m) cruiser hard on the wind in force 4 (15 knots) and a calm sea makes only 2° or 3°, while a 22 ft (6.7 m) bilge-keel yacht trying to hack to windward in force 6 (28 knots) could be sliding off at 20° or more.
The only way of determining your leeway is to look at your wake in relation to the fore-and-aft line of your boat. If it’s dark and you can’t see it, guess 7° when you are going to windward in moderate conditions for your boat and you probably won’t be too disappointed. When you have a good view of the proceedings you might try to measure leeway by com paring a compass bearing of your wake with the reciprocal of your heading, or by holding a chart protractor up to your eye to turn your guesstimate into an empirical assessment.
When the going is rough and danger lies to leeward, never risk underestimating leeway. To do so is far too easy and the results of a mistake can be very nasty indeed.
When plotting an EP, you should always apply leeway to your heading. This makes it into a water track and shows where you have actually been through the water. The line that appears on the chart with the modified DR at the end of it should be the water track rather than the heading. If you try to draw both, or even part of both, the result could be confusing. Stick to the water track, then you’ll always know what you’ve plotted and there will be no ambiguity. Mark it on the chart with a single arrowhead halfway along its length.
The practicalities of this are straightforward. Lay your protractor on the chart against the last known position, indicating your heading. Now imagine the wind blowing across the chart. Swivel the protractor around the point of departure so that it turns downwind through however many degrees you have decided. Now draw in your water track along its edge.
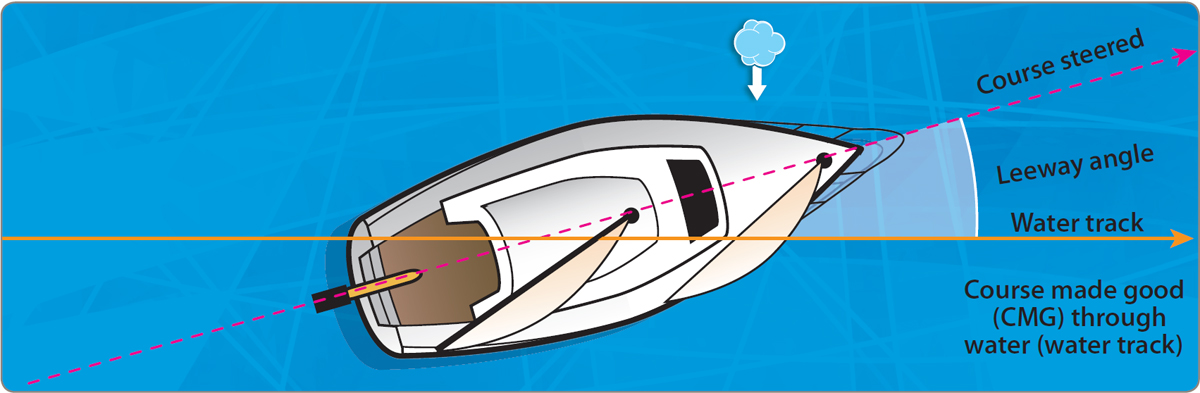
 Fig 17.1 Leeway.
PLOTTED VECTORS
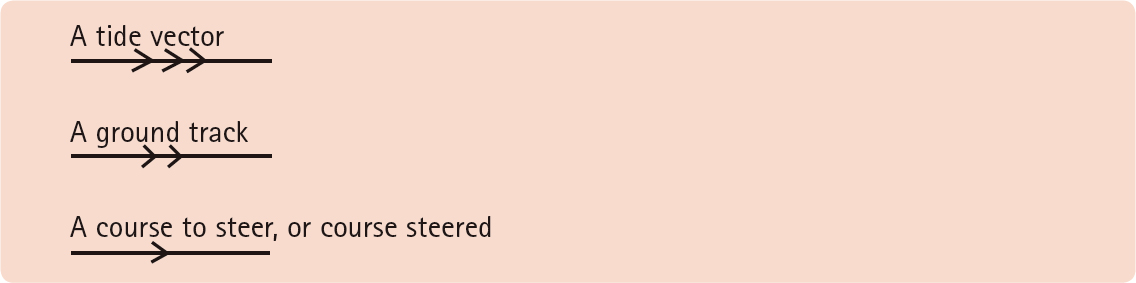
THE TIDE VECTOR
The second factor affecting your estimate of where you are is the set and drift due to tidal stream, or any other current. The information is extracted from the sources described in Chapter 15. It is plotted on to the end of the measured water track. Its direction is that of the tide, and its length is the distance a free-floating object would travel in the time for which the vector is being plotted. The tide vector is identified by three arrowheads. At its measured end, a triangle with a time against it marks the EP.
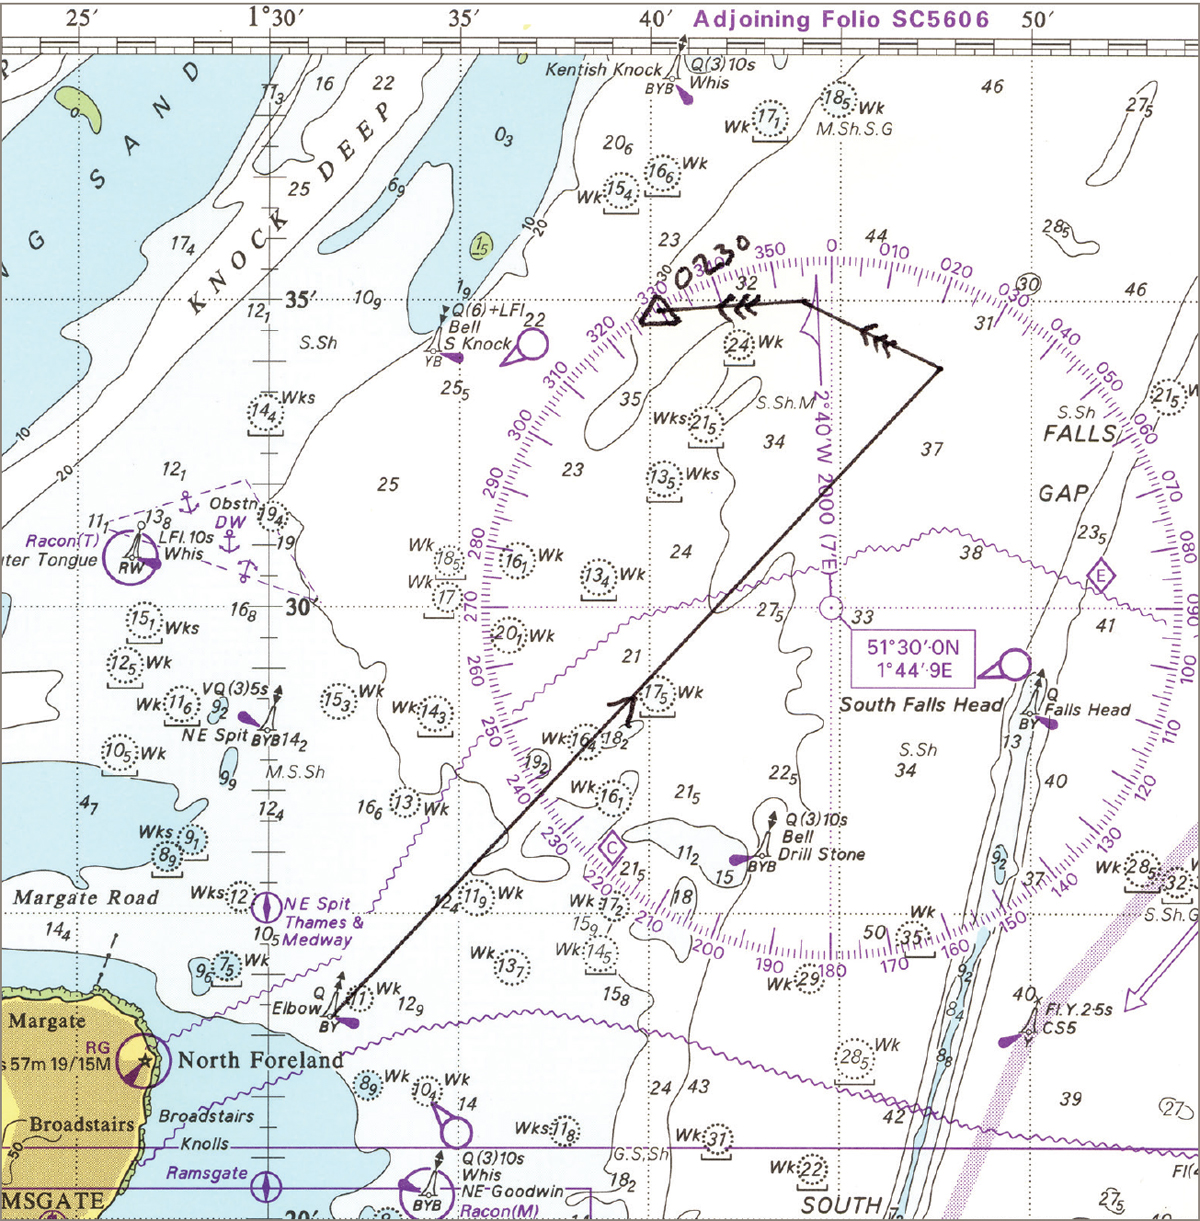
Ideally, an EP is plotted at the end of a ‘tidal hour’. This makes all calculations and constructions as simple as possible. If the boat has covered 5 miles, that is the length of the water track. The tide may be setting at 1.8 knots on a bearing of 250° (any tide directions, like all charted compass bearings, are given in degrees true). The tide vector will thus be 1.8 miles long on that heading. The EP at the end of the hour is on the end of the tide line.
If you need an EP for less than an hour you must make a pro rata adjustment to the length of the tide vector. If the EP is for two hours, or for a period of less than two hours but straddling a part of two tidal hours, it is plotted like this: first draw the water track for the desired distance run. Now plot the first hour’s tide on the end of it, or the first pro rata period of tide if less than one hour. Last, plot the second hour, or part of an hour, on the end of the first tidal vector. The EP is at its end.
If you are beating to windward you will be tacking at all sorts of odd times in order to work your wind shifts (Chapter 21). The last thing you want is to be plotting an EP every time you go about, because you’ll find yourself trying to work out some impossible fractions just when you feel least like doing so. Instead, note the times and log readings of all your tacks in the log book, keep a commonsense eye on where you are, then when you are ready, plot a ‘compound EP’ (Fig 17.2). All you need do is plot all your DRs (allowing for leeway), one after the other. When you reach the last one, plot all the tide vectors for the various one-hour periods your run has involved on to this final DR position. Plot the tide vectors one after another also, then lay your EP on the end of the last one. The job can be done very smartly indeed.
A two-hour EP.

Fig 17.2 Estimated position when beating.
THE ECHO SOUNDER
We’ll be seeing in the next chapter how an EP should be checked with a fix, if possible, but whether it is or not, you should always hit the echo sounder immediately after reading the log preparatory to plotting an EP. If necessary, make an approximate correction in your head for any tidal height, then check the sounding with the charted depth in the vicinity of the EP. If the two coincide, credibility of the EP is improved. If there is a marked discrepancy, the EP must immediately be treated with some suspicion.
PLOTTING
It is well worth the effort to take real pride in the neatness of your chartwork. Conventional plotting as described above is not only a joy to behold, it is unambiguous, not only for you, but for any other proper navigator who may wish to take over the plot, no matter what his nationality.
It has been suggested that when we come face to face with our first extraterrestrial aliens, we will communicate in the universal language of pure mathematics, but I believe that it is the navigators who will be the first to break through the silence. I’ll bet a forenoon watch to a middle watch that Martian pilots draw three arrowheads on their set and drift vectors as they cruise through the asteroid belt.
THE LOG BOOK
The paper log book is the core of all yacht management on passage. Modern commercial vessels equipped with electronics that would boggle the simple mind still demand their use. Quite simply, the log book, or ‘ship’s log’, is the navigator’s bedrock.
In an ideal world, the textbook navigator plots his position every hour during an offshore passage. In reality, you sometimes do it more often, sometimes less, depending on the need of the moment. It is most important that all course changes are logged, together with times and distance log readings. EPs should be recorded; so should fixes, objects abeam, electronic plots, and any other significant navigational event. Any fix (electronic or otherwise) plotted on a paper chart must have a time against it to refer it to the relevant log book entry. Even if you’ve plotted nothing on the chart, there should be enough information stored in the log book to work up an EP at any time.
You might choose to buy a published yacht log book, with entries for all sorts of information, or you may prefer to make up your own from a stiff-backed exercise book ruled off into columns. Professional yachts should have no difficulty in keeping a comprehensive log book. After all, they have plenty of crew and in the event of an inquiry into some incident on board, all manner of information may be required. Aboard a large yacht operating under the MCA Code of Practice, columns should be drawn up for: Zone Time, Log, Distance Run and, perhaps, Distance to Destination. In addition, Course Steered and Course over Ground (COG), Log Speed and Speed over Ground (SOG), Lat/Long, True Wind Speed and Direction, Sea State, Weather and Barometer. These are a suggested minimum. If no dedicated engine log is being run, Engine Hours and Fuel Remaining columns may also be needed. Following all this hard data come the Remarks. One double page spread per day makes a clear working layout, with the date and voyage details at the top. A crew list is also advisable.
Short-handed yachts running on a more casual basis should at least have columns headed: Time, Log, Course Steered and COG, Weather, Position and a large one for Remarks. Many people sensibly insist on a sixth column to record Engine Hours, which helps to maintain a service schedule.
In an informal group of two people – both competent navigators with absolute faith in one another – the discipline of log entries can be relaxed into ‘an entry when it is needed’ so long as it is understood that the longer it has been since an entry was made, the worse any EP may be. Depending on circumstances, therefore, when well offshore and clear of danger, one entry every two hours seems a sensible minimum. Where less experienced watch keepers are involved, a full hourly log entry is a must. It takes little time and ensures that when the skipper needs an EP, or requires to refer back to something else – such as a marked change in the barometer – the information is immediately and accurately to hand, in a familiar, recognisable form.
| SKIPPER’S TIPS | Logging on the chart |
| Some yacht sailors prefer to log their progress on the paper chart rather than maintain a full log book. To be at all safe, a plotted fix must then have more than just the time noted against it. As an absolute minimum it will also have a log reading and the course steered onward from it. This practice may deliver the bones of an EP should one be required, but that is all it does. There is no record of barometer readings, wind shifts that may affect leeway, what the COG was at last count and, for future amusement, what the skipper thought of his breakfast. You can just about get away with ‘chart logging’, but it has many shortfalls and is not encouraged here. | |