2.4Getting Started in the Development System
Now that you’ve set up a development environment for ABAP development on SAP HANA, you can get started in the system. We’ll therefore provide you with sample developments that you can install on SAP NetWeaver AS ABAP 7.4 (as of SP 10, by using the description provided in Appendix E).
[»]Note
If this is your first time working with Eclipse, we recommend that you look at other sources of information in addition to this book. We’ll refer you to these additional sources at the relevant stages in this section.
2.4.1Basic Principles of Eclipse
Start the newly set up development environment as described in Section 2.3. Run the eclipse.exe program file for this purpose.
If the Welcome tab page is displayed when you start the program, use the button at the top-right of the screen to navigate to the Workbench. Choose Window • Open Perspective to open the ABAP perspective. You should now see a screen similar to that shown in Figure 2.4. We’ll use this figure to explain the key elements of the Eclipse development environment.
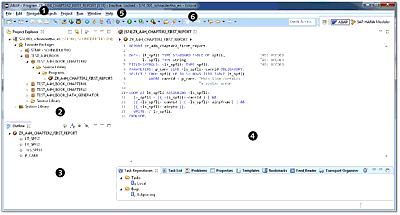
Figure 2.4Eclipse Workbench (with the ABAP Perspective Opened)
In Eclipse, you can work with one or more windows in parallel. If you want to open an additional window, choose the menu option, Window • New Window.
Within a window, Eclipse only ever shows exactly one perspective at any given point in time. The name of the perspective currently displayed by the system is shown in the window’s title bar 1. A perspective describes the layout of screen elements for a particular purpose. For example, the ABAP perspective is available for ABAP development, while the Java perspective is available for Java development.
In the following text, we’ll discuss in detail the most important screen elements within a perspective:
-
Views 2 and 3
-
Editors 4
-
Menu bars 5
-
Toolbars 6
Eclipse automatically saves any changes that you make to the screen elements of a perspective (e.g., layout and size). If you exit a perspective and then open it again (via the menu path, Window • Open Perspective), the perspective will look exactly as it did when you exited it.
If you want to reset a perspective to its original state, choose the menu option, Window • Reset Perspective. You can also create your own perspectives, if necessary, by choosing Window • Save Perspective As.
A view (2 and 3) makes certain information available to you. For example, the Problems view displays warnings and errors that occurred when you activated a program. You can view the properties of a program (e.g., title, package, and original system) in the Properties view and change them to some extent. To open a view, choose Window • Show View.
An editor 4 is used to edit a development object. Editors are frequently source code-based. However, form-based editors also exist.
[»]Differences between Views and Editors
When developers work with Eclipse for the first time, they often ask what the difference is between a view and an editor. The main differences between views and editors are as follows:
-
Within a window, a view can only be opened once, while an editor can be opened several times (e.g., to edit different programs in parallel).
-
Unlike a view, an editor can’t be positioned anywhere.
-
When an editor is open, it can be viewed in every perspective.
-
Changes within a view are saved immediately. Changes within an editor must be saved explicitly.
Further information is available at http://wiki.eclipse.org.
Menu bars and toolbars contain commands that you can execute in the current context (e.g., saving a program or activating a program). The main menu bar 5 is located at the very top of the Eclipse development environment. Views and editors can have additional menus, especially context menus (which you open by right-clicking). However, you can also add additional commands to the main menu bar.
The main toolbar is located below the main menu bar 6. Frequently used commands are located there. Views and editors can have additional toolbars. You can also add additional commands to the main toolbar.
Finally, we want to explain the purpose of workspaces. You likely noticed that the system prompted you to specify a workspace upon initial startup of the development environment.
Put simply, a workspace is a directory on your computer’s hard drive in which Eclipse stores your personal settings (e.g., layout and size of the screen elements in a perspective) and your project data (e.g., system connections to the ABAP AS). Eclipse only works with exactly one workspace at any given point in time. In the case of workspaces, you can configure the following settings:
-
You can use the file eclipse.ini to control which workspace Eclipse will automatically open at startup.
-
You can configure Eclipse in such a way that, at startup, you’re asked which workspace you want to use. This is Eclipse’s default behavior.
-
You can change the workspace within Eclipse at any time. To do this, choose File • Switch Workspace.
Further information about Eclipse is available at www.eclipse.org/documentation/.
2.4.2ABAP Development Tools for SAP NetWeaver
We’ll now discuss the ABAP Development Tools for SAP NetWeaver in more detail. When working with the ABAP Development Tools, use the following views/perspectives:
-
ABAP
Use this perspective to edit development objects (e.g., programs, classes, and interfaces). You can also perform code checks and module tests here. -
ABAP Connectivity & Integration
Use this perspective to develop integration between systems. An enhanced programming model enables you to create your own ABAP application irrespective of the communication protocol that is used later on. -
ABAP Profiling
Use this perspective to conduct performance analyses. -
Debug
Use this perspective to analyze program errors. (The Debug perspective isn’t delivered with the ABAP Development Tools. Rather, it’s a standard component of Eclipse and is also used, for example, to debug Java programs or SQLScript.)
In the ABAP backend, you require the relevant authorizations for working with the ABAP Development Tools. The following authorization roles are available by default:
-
SAP_BC_DWB_ABAPDEVELOPER
This role enables you to create, change, activate, and delete development objects. -
SAP_BC_DWB_WBDISPLAY
This role enables you to display development objects.
Both roles contain the authorization object S_ADT_RES, which is needed for working with the Eclipse-based development environment. If you want to use your own roles to assign authorizations to ABAP developers, make sure that these roles consider the authorization object S_ADT_RES.
We’ll now explain the steps involved in creating a program with the ABAP Development Tools. We’ll provide some background information for each step as well.
Creating a Project
To work with the ABAP Development Tools, you need an ABAP project that connects the Eclipse-based development environment with the ABAP backend. To create an ABAP project, choose File • New • ABAP Project, and then provide:
-
A connection from the SAP Logon Pad. Alternatively, you can also maintain the connection data manually without a corresponding entry in the SAP Logon Pad.
-
A logon client and language.
-
A user name and password. You only enter the password if single sign-on (SSO) isn’t set up for the connection from the SAP Logon Pad. Because the password isn’t saved, you must enter it again any time you restart Eclipse.
-
Optionally, include a list of your favorite packages. You should always include the TEST_A4H_BOOK package here, which you’ll use in conjunction with this book. (To install the package, refer to the information contained in Appendix E.)
The project data is saved to your current workspace (see also Section 2.4.1). You can create any number of projects within a workspace and therefore work with multiple ABAP backends simultaneously.
After you’ve saved the project data, the ABAP project is displayed in the Project Explorer view (2 in Figure 2.4). A tree structure is displayed below your project, and the uppermost level of this tree structure contains the following two nodes:
-
The System Library, which you use to access all packages and their development objects on the connected application server
If you double-click a development object in Project Explorer, the relevant editor opens. In addition, the Outline view 3 displays the structure (e.g., the global variables and methods for a program), while the Properties view displays the properties of the development object. Not all development objects have an editor that is implemented natively in Eclipse. If a development object doesn’t have an editor, the SAP GUI opens. For a data element, Transaction SE11 (ABAP Data Dictionary) opens, for example. The Outline and Properties views aren’t available in this case.
You can use SAP GUI integration to execute any development objects in the SAP GUI, even if they aren’t displayed in the Project Explorer view at present. To do this, choose Run • Run ABAP Development Object, and select the relevant development object. This is particularly useful if you want to execute a standard program or transaction (e.g., Transaction SM50).
ABAP resource URLs are interesting for all development objects, irrespective of whether the ABAP Development Tools provide native editor development objects. They enable you to generate hyperlinks for development objects and integrate them into websites or emails, for example. You can click the hyperlink to open the relevant development object directly in the ABAP Development Tools.
To generate an ABAP resource URL, choose Share Link from the context menu of a development object (or choose Share Link for Selection in the source of a development object). Note that you can’t open a development object via a hyperlink unless you’ve registered your Eclipse installation. Keep reading for more information.
Unlike other Eclipse-based development tools, the ABAP Development Tools don’t use a check-in/check-out mechanism. As a result, you can’t work with the ABAP Development Tools offline (i.e., without a connection to the ABAP backend). As soon as you edit a development object, this is automatically locked against editing by another user. Therefore, unlike in the SAP GUI, you don’t explicitly toggle between Display and Change. The following tasks always occur in the ABAP backend: save, perform syntax check, and activate.
User-Specific Settings
You should be familiar with choosing Utilities • Settings to configure user-specific settings in the ABAP Workbench, and therefore adjust the (SAP GUI-based) development environment to your personal requirements.
In Eclipse, user-specific settings are available under Window • Preferences. Many of the options provided here are general settings for Eclipse. They aren’t specifically used for ABAP development but influence it nonetheless. The specific settings for the ABAP Development Tools are available under the ABAP Development node (see Figure 2.5).

Figure 2.5User-Specific Settings for ABAP Development Tools
You should be familiar with the following setting options:
-
Directly on the ABAP Development node, you can set the Open ADT Links from external documents in this installation of Eclipse checkbox. You can’t use ABAP resource URLs (see the previous section) unless this checkbox is set.
-
You can make settings for activation using the Activation node.
-
You control debugging via the Debug node.
-
With the Editors node, you can manage code templates and control Pretty Printer, among other things.
-
The Profiling node allows you to parameterize performance analyses, and the SQL Monitor node allows you to influence the behavior of the SQL Monitor.
Creating a Program
The next step is to create a new development object by choosing File • New. If you want to create a program that outputs the flight schedule for a given airline, for example, choose File • New • ABAP Program. Then enter the program name, title, and package. Select a transport request, if necessary.
The editor for the program now opens. As an example, insert the source code from Listing 2.1.
DATA: lt_spfli TYPE STANDARD TABLE OF spfli, "#EC NEEDED
lv_spfli TYPE string. "#EC NEEDED
FIELD-SYMBOLS: <ls_spfli> TYPE spfli. "#EC NEEDED
PARAMETERS: p_carr LIKE <ls_spfli>-carrid OBLIGATORY.
SELECT * FROM spfli UP TO 50 ROWS INTO TABLE lt_spfli
WHERE carrid = p_car. "this line contains
"a syntax error
LOOP AT lt_spfli ASSIGNING <ls_spfli>.
lv_spfli = |{ <ls_spfli>-carrid } | &&
|{ <ls_spfli>-connid } { <ls_spfli>-airpfrom } | &&
|{ <ls_spfli>-airpto }|.
WRITE: / lv_spfli.
ENDLOOP.
Listing 2.1Simple ABAP Program
[»]Note on Listing 2.1
To restrict the program runtime, use the UP TO n ROWS addition. Consequently, the program doesn’t output the entire flight schedule. Instead, it outputs a maximum of 50 connections.
When editing the source code, you’re supported by numerous functions in ABAP Development Tools (just like in the SAP GUI), including the following three functions:
-
Code completion
You can use the key combination (Ctrl)+(Space) to ensure that the system proposes valid keywords and identifiers at a particular location within the source text. -
Code templates
You can also use the key combination (Ctrl)+(Space) to insert code templates) in the source code. Alternatively, this also works by dragging templates from the Templates view and dropping them in the editor. Also in the Templates view, you can also define your own code templates that are then saved to your current workspace. -
Pretty Printer
The Pretty Printer helps you to standardize source text formatting (especially with regard to uppercase/lowercase and indentations). As is the case in the SAP GUI, you use the key combination (Shift)+(F1) to call the Pretty Printer in the ABAP Development Tools.
When editing the source text, you can perform a syntax check at any time by pressing (Ctrl)+(F2).
As shown in Figure 2.6, warnings and errors are displayed in both the Problems view and in the editor (specifically in the left and right column spaces). For Listing 2.1, the syntax check should issue a reminder about an error in program line 8. Correct this error.
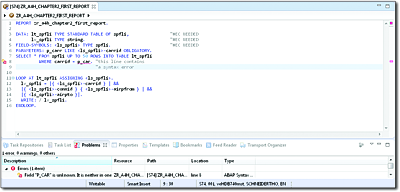
Figure 2.6Result of the Syntax Check
If you want the source text to undergo more extensive checks, you can use the ABAP Test Cockpit for this purpose. To do this, call the context menu in your program: Run As • ABAP Test Cockpit.
Following a successful syntax check, choose File • Save to save your program (in principle, you can also save erroneous development objects). When you save your program, an inactive version of the program is generated in the ABAP backend.
If you then choose Edit • Activate to activate the program, an active version of the program is generated in the ABAP backend (assuming that the program doesn’t contain any syntax errors).
As a result of your work with the ABAP Workbench, you have no doubt become familiar with—and have come to appreciate—the extensive navigation options available there. Forward navigation and the where-used list are also available to you in the Eclipse-based development environment.
For forward navigation, select an identifier in the source text, and choose Navigate • Navigate To (or press the (F3) key). For our sample program, you can execute the following actions:
-
Forward navigation to the variable LV_SPFLI in program line 14: The system navigates to the definition of the variable in program line 4.
-
Use the mouse pointer to select database table SPFLI, and then press the (F3) key: The system opens the definition of the database table in the SAP GUI.
The where-used list works in the same way. First, select an identifier in the source text. Then, choose Get where-used list in the context menu. The result of the where-used list is displayed in the Search view (see Figure 2.7).

Figure 2.7Result of the Where-Used List
You can double-click a line in the result to navigate to where the object is used.
Executing the Program
Now that you’ve learned how to create a program and are familiar with the editing options available in the ABAP Development Tools for SAP NetWeaver, you’ll most likely want to execute the program for testing purposes. To do this, choose Run As • ABAP Application from the program’s context menu, and execute the sample program shown earlier in Listing 2.1. The selection screen for the program is then displayed in the SAP GUI. Here, enter the code of an airline. Press (F8) to display the corresponding flight schedule.
If you want to debug a program to analyze program errors, you can set one or more breakpoints in the ABAP Development Tools. Here, you can choose between static and dynamic breakpoints:
-
Static breakpoints refer to a specific program line. You set a static breakpoint by double-clicking the left column space in the editor.
-
Dynamic breakpoints refer to a specific ABAP statement or exception class. To set a dynamic breakpoint, choose Run • ABAP Breakpoints.
Figure 2.8 shows how static breakpoints are displayed in the left column space in the editor and in the Breakpoints view. Dynamic breakpoints are displayed in the Breakpoints view only.

Figure 2.8Displaying Breakpoints That Have Been Set
From a technical perspective, the ABAP Development Tools work with external breakpoints. These apply to all programs in your current user session, which are executed under your user on one of the application servers on the ABAP backend (defined by the system and client in the ABAP project).
If the system encounters a breakpoint when executing a development object, it automatically opens the Debug perspective. Similar to the SAP GUI-based debugger, you can analyze the call hierarchy and the contents of the variables, as well as debug the source code step by step. Figure 2.9 shows the Debug perspective for our sample program.
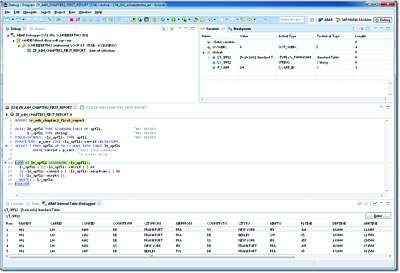
Figure 2.9Debug Perspective
The following are some additional sources of information related to the ABAP Development Tools:
-
If this is your first time working with the ABAP Development Tools, we recommend that you complete the tutorials in the SAP Community Network athttp://scn.sap.com/docs/DOC-31815.
-
You can call the online documentation at any time by choosing Help • Help Contents.
-
SAP has provided some cheat sheets to help you get started with the ABAP Development Tools. They are located under Help • Cheat Sheets.
You’re now ready to use the ABAP Development Tools for SAP NetWeaver. In the next section, we’ll introduce you to SAP HANA Studio.
2.4.3SAP HANA Studio
Just like the ABAP Development Tools for SAP NetWeaver, SAP HANA Studio also includes different perspectives:
-
SAP HANA Administration Console
In this perspective, you or an administrator can monitor the system, configure system settings, and manage users and authorizations, among other things. -
SAP HANA Modeler (Modeler)
In the modeler, you can access the database catalog and create views and database procedures in the SAP HANA Repository. -
SAP HANA PlanViz
This perspective is used to visualize execution plans (see Chapter 7). -
SAP HANA Development
This perspective is used for development in SAP HANA. In particular, it’s intended for SAP HANA XS. It communicates with the SAP HANA Repository.
Similar to working with AS ABAP, you require the relevant authorizations for working with SAP HANA Studio, specifically in the SAP HANA database.
[»]Authorizations in SAP HANA
The authorizations in SAP HANA are divided into the following areas:
-
Analytical authorizations control access to attribute views, analytic views, and calculation views.
-
Object authorizations define specific authorizations that users have for particular database objects.
-
System authorizations define the system operations that users are permitted to perform.
-
Package authorizations control access to the packages in the SAP HANA Repository.
-
Application authorizations control access to applications that are developed with SAP HANA XS Engine.
-
User authorizations are required within the scope of debugging of SQLScript from other users.
Authorizations can be grouped into roles or assigned directly to users.
We won’t discuss the authorization concept for the SAP HANA database in detail here. Instead, we’ll focus on the authorizations that you require, as an ABAP developer, to work with SAP HANA Studio.
If you’re already working with ABAP release 7.4 and using the SAP HANA database as the primary persistent storage, you can use the following standard roles to assign authorizations to ABAP developers who will work with SAP HANA Studio:
-
ABAP_DEV
This role enables you to edit development objects in the SAP HANA Repository. -
ABAP_READ
This role enables you to display development objects. -
ABAP_ADMIN
This role allows system administrators to assign the ABAP_DEV and ABAP_READ roles to other users.
In this section, we’ll focus on the SAP HANA Modeler perspective, which is relevant for you as an ABAP developer. Based on this, Chapter 4 will provide more detailed information.
Creating a System Connection
To work with SAP HANA Studio, you require a system connection between SAP HANA Studio and the SAP HANA database. You can create a system connection in the SAP HANA Modeler perspective, for example. In the Systems view, use the Add System option in the context menu for this purpose. Then, provide the following information for the system connection:
-
Server name and instance number
-
Description
-
User name and password
The system data is saved to your current workspace (see also Section 2.4.1). You can create any number of system connections within a workspace. This enables you to work with multiple databases simultaneously.
After you’ve saved the system data, the system connection is displayed in the Systems view (see Figure 2.10).
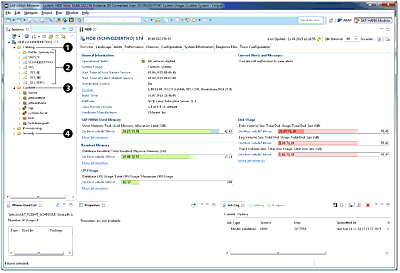
Figure 2.10Modeler Perspective in SAP HANA Studio
A tree structure is displayed below your system connection, and the uppermost level of this tree structure contains the following four nodes:
-
The Catalog node 1 contains database objects 2, such as database tables, views, and database procedures.
-
The Content node 3 represents the packages in the SAP HANA Repository, which is used for development organization.
-
The Provisioning node is used for integrating other data sources.
-
The Security node 4 is used for managing roles and users.
User-Specific Settings
Similar to the ABAP Workbench or ABAP Development Tools, you can also configure some user-specific settings in SAP HANA Studio. The relevant settings for the SAP HANA Modeler perspective are located under Window • Preferences • SAP HANA • Modeler. Of particular interest here are the data preview settings (under the Data Preview node) and the rules for validating development objects (under the Validation Rules node).
Working with the Database Catalog
The database catalog in the SAP HANA database has a similar structure to the catalogs in other databases. It manages the database objects in database schemas (2 in Figure 2.10). A schema groups logically related database objects together (comparable with a namespace). In principle, each database user has his own database schema.
The ABAP application server generally uses exactly one technical database user to communicate with the database. This user also has a corresponding database schema, known as the system schema or ABAP schema (for more information, see Chapter 3, Section 3.1). In Figure 2.10, this is schema SAPS74.
Some database schemas are used internally by the SAP HANA database. In particular, these include the database schema SYS and all database schemas that start with _SYS.
[»]Technical Database Schemas in SAP HANA
Immediately after the installation, SAP HANA contains a set of database schemas that play a major role in different scenarios, so we’ve included some background information about some of the schemas used internally by the SAP HANA database:
-
_SYS
This schema contains technical tables and views for managing and monitoring the system. It doesn’t play any role in application development. -
_SYS_AFL
Database objects for function libraries are stored here. The schema is first created when function libraries are installed (see Chapter 12). -
_SYS_BI
This schema contains special tables and views for analysis scenarios (e.g., fiscal year data). -
_SYS_BIC
When you activate development objects, the associated runtime objects are generated in this schema (we’ll discuss this in more detail next). -
_SYS_REPO
The development objects for the SAP HANA Repository are stored here (we’ll also discuss this in more detail later in this section). -
_SYS_XS:
This schema is used by the SAP HANA XS Engine.
Database schemas contain database objects. The SAP HANA database recognizes the database objects listed in Table 2.1.
|
Object |
Description |
|---|---|
|
Column View |
Column views are special views in SAP HANA based on tables in the column store and are usually created in the SAP HANA Repository. |
|
Function |
A user-defined function performs calculations and can be integrated into SELECT statements. |
|
Index |
An index facilitates searches and sorting. Note the information about indexes in Chapter 10 and Chapter 14. |
|
Procedure |
You can use database procedures to encapsulate and reuse algorithms that are to be executed in the SAP HANA database. Further information is available in Chapter 6. |
|
Sequence |
You can use a sequence to generate unique, consecutive numbers in accordance with certain rules. This concept is very similar to number ranges in ABAP. |
|
Synonym |
Synonyms can be defined as aliases for database tables, data views, procedures, and sequences. We’ll discuss these later in this chapter. |
|
Table |
Data is saved to database tables. As part of your ABAP development work in SAP HANA, you frequently use the ABAP Data Dictionary (DDIC) to create database tables. |
|
Trigger |
Database triggers are functions called for certain changes made in the database. |
|
View |
Views are saved queries (across one or more tables) that can be called via SQL in the same way as a database table. |
Table 2.1Objects in the Database Catalog
As part of your ABAP development work in SAP HANA, you generally won’t create any database objects directly in the catalog. You’ll typically create objects only indirectly, for example, via the DDIC, SAP HANA Repository, or SAP Landscape Transformation Replication Server (SAP LT Replication Server). In certain circumstances, however, you may want to view database objects directly in the catalog. We’ll now use the example of table SPFLI, which you already used in Listing 2.1, to explain how this works.
Open the ABAP schema under the Catalog node. Here, you see nodes for the different database objects. If you want to search for a specific database table, choose the Find Table option in the context menu for the Tables node. Then, enter “SPFLI” in the search dialog box. Make sure that the Show definition checkbox is set, and choose OK.
The system now opens the table definition (see Figure 2.11). Here, you see that table SPFLI uses column-oriented data storage (known as the column store). You can also check columns, indexes, and runtime information for the database table, among other things.
Similar to the table definition, you can also use the Find Table option in the context menu to display the table contents. Alternatively, you can use the context menu for the Tables node to set a filter for the table name. The Navigator view then displays only those tables that satisfy the filter condition. You can now right-click to select the Open Content option in the context menu. Note that the system displays only the first 1,000 data records (and not the entire contents of the database table).
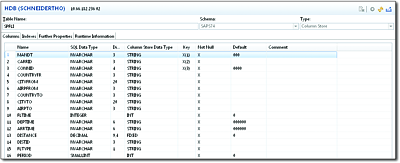
Figure 2.11Table Definition Using the Example of Table SPFLI
You can use the data preview to analyze more than 1,000 data records. To access the data preview, choose the Open Data Preview option in the context menu. Figure 2.12 displays the data preview using the example of table SPFLI.
The data preview comprises the following tab pages:
-
The Raw Data tab page displays the table’s raw data. Here, you can filter, sort, and export the data, among other things.
-
On the Distinct values tab page, you can analyze which different values exist for a field in the database table and the frequency with which these values occur, thus enabling you to draw conclusions in relation to data distribution.
-
The Analysis tab page has a similar structure to a pivot table. You can create simple analyses here. Both a tabular and graphical display are available here.
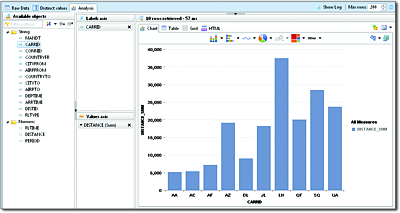
Figure 2.12Data Preview Using the Example of Table SPFLI
We’ll now introduce you to one more tool—the SQL console—that can be very useful when working with the database catalog. This enables you to quickly and easily execute read and write SQL statements on the SAP HANA database. If, for example, you want to add the name of an airline to the flight schedule from Section 2.4.2, you can use a join (see Chapter 3). You can test the JOIN statement (see Listing 2.2) in the SQL console. To open the SQL console in the Navigator view, choose the Open SQL Console option in the context menu for the ABAP schema. You can then enter the relevant SQL statement. Similar to the ABAP Development Tools, you can also use (Ctrl)+(Space) to revert to code completion and templates.
spfli.airpfrom, spfli.airpto
from spfli
join scarr on scarr.carrid = spfli.carrid;
Listing 2.2Simple Join
Then, choose Execute to execute the SQL statement. The result is shown in Figure 2.13. In addition to the result list, the system provides some information about the runtime and number of data records read.
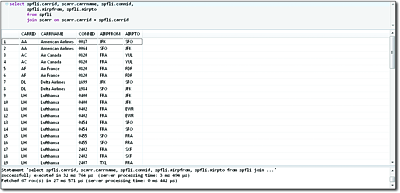
Figure 2.13SQL Console
If you enter several SQL statements in the SQL console, each separated by a semicolon, you can execute them by choosing Execute once. If you want to execute only one or some of the SQL statements, select them before you choose Execute.
Working with the SAP HANA Repository
This brings us to the SAP HANA Repository, which helps to organize development objects (known as content) in a flexible and expansible manner. The development objects contained in the SAP HANA Repository are organized along a package hierarchy. In terms of their notation and significance, these packages are very similar to Java packages. Because a package defines a namespace, the identifier for development objects must only be unique within the package (unlike the global uniqueness of the identifiers for ABAP objects).
SAP delivers content below the sap root package. Parallel to this package, you can establish your own package hierarchy for your development objects. You can group multiple packages together to form a delivery unit, which you can then transport. We’ll examine the package concept and application transport in detail in Chapter 5.
In the Modeler perspective, you can create the development objects described in Table 2.2. These are also known as content types.
|
Object |
Description |
|---|---|
|
Package |
A package groups development objects together. We’ll discuss this in Chapter 5, Section 5.3.1. |
|
Attribute View |
You can use attribute views to connect multiple database tables or to select a subset of the columns in a database table. For more information, see Chapter 4, Section 4.4.1. |
|
Analytic View |
In particular, you use analytic views to quickly aggregate data. Details are available in Chapter 4, Section 4.4.2. |
|
Calculation |
Calculation views are available for requirements that can’t be mapped using attribute views and analytic views. They can be modeled or implemented using SQLScript. Details are available in Chapter 4, Section 4.4.3. |
|
Analytic |
You can use analytic privileges to restrict—line by line—access to views. They aren’t directly relevant for access from ABAP because this is done using a technical database user. |
|
Procedure |
You can use database procedures to encapsulate and reuse algorithms that are to be executed in the SAP HANA database. More information can be found in Chapter 4, Section 4.3. |
|
Decision Table |
You can use decision tables to store business rules in SAP HANA. We’ll discuss this in Chapter 11. |
Table 2.2Development Objects in the SAP HANA Repository
You can create additional development objects in the SAP HANA Development perspective. This is particularly relevant for any development work based on SAP HANA XS. For the moment, we won’t discuss these development objects further.
We’ll now use a specific example to explain some key concepts associated with the SAP HANA Repository: Figure 2.14 shows the editor for the attribute view AT_FLIGHT_SCHEDULE in the package test.ah4. book.chapter02.
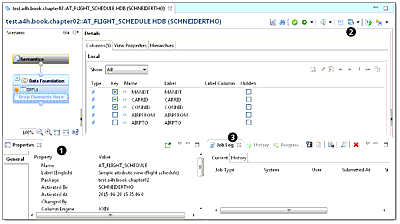
Figure 2.14Attribute View AT_FLIGHT_SCHEDULE
Without discussing the specific features of attribute views, we’ll explain the following concepts:
-
Creating development objects
-
Validating development objects
-
Activating development objects
-
Testing development objects
-
History and version management
Each development object in the SAP HANA Repository is described by different properties (1 in Figure 2.14), some of which you can specify when creating the object, and some you can also change later. Examples include the unique identifier within the package (Name), description (Label), and Default Client. Other properties are automatically set by the system, for example, the last user who changed the object (Changed by).
The system creates an XML file for each development object and ultimately stores it as a Character Large Object (CLOB) data type in the database schema _SYS_REPO. You can choose Display XML to display the XML file for an object 2.
Figure 2.15 shows the XML representation of the attribute view AT_FLIGHT_SCHEDULE. In this figure, we’ve highlighted some parts of the XML document, namely the identifier for the view, the description of the view, the columns in the view, and the database table underlying the view.
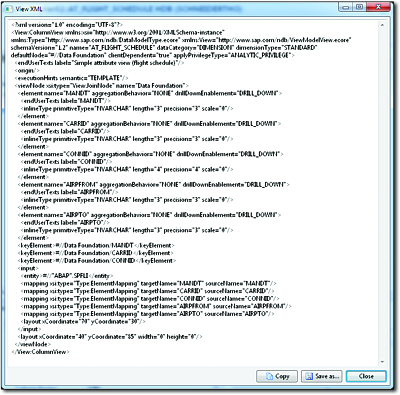
Figure 2.15XML Representation of an Attribute View
Similar to ABAP development objects, the development objects in the SAP HANA Repository also have a status (either Inactive or Active). If you create a new object or change an existing object, the system generates an inactive version first.
You can validate an object before you activate it. In addition to syntax checks (e.g., correct syntax of SQLScript within a database procedure), the validation can also consider some aspects of quality (e.g., performance). This is similar to the (enhanced) syntax check in ABAP. We’ll discuss some of these aspects in greater detail in Chapter 14.
To start validation, choose Save and Validate changes to this object. The validation result is displayed in the Job Log (3 in Figure 2.14). If warnings or errors occur when validating an object, you can display them by double-clicking the corresponding row in the job log.
Figure 2.16 shows an example of what would happen if you were to validate the attribute view AT_FLIGHT_SCHEDULE without defining at least one key attribute first. This is a mandatory requirement for attribute views.
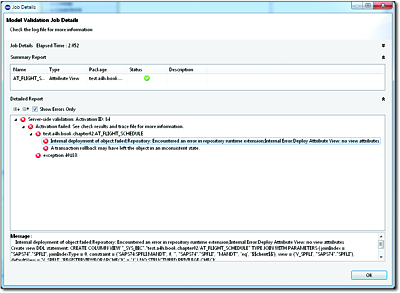
Figure 2.16Job Details with Validation Errors
When you activate an object, you generate an active (i.e., executable) version of a development object. An object is automatically validated when it’s activated. To start activation, choose Save and Activate. The result is displayed in the job log.
Following successful activation, the system usually generates one or more database objects in the schema _SYS_BIC. The development objects in the SAP HANA Repository represent the design time objects, while the database objects in the database catalog represent the runtime objects (see Figure 2.17).
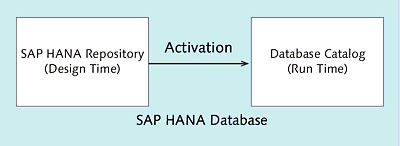
Figure 2.17Design Time and Runtime
[»]Authorizations for the User _SYS_REPO
The internal user _SYS_REPO (the owner of the SAP HANA Repository) generates the runtime objects in the database schema _SYS_BIC. This user must have read access to the schemas used in the development objects. In other words, the user requires the SQL SELECT with GRANT authorization on the schema.
For the attribute view AT_FLIGHT_SCHEDULE, the system generates (among other things) a column view and a public synonym for this column view in the database catalog. A column view is a special data view in SAP HANA. In our example, the name of the column view comprises the package and identifier for the attribute view (see Figure 2.18).
A synonym is an alias. A public synonym is an alias that is unique across all database schemas and can be used by all users. If, for example, you use the relevant public synonym to access the column view, you avoid having to name the schema _SYS_BIC explicitly. In our example, the name of the public synonym comprises the package and name of the attribute view (see Figure 2.19).
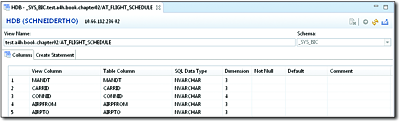
Figure 2.18Runtime Object for an Attribute View
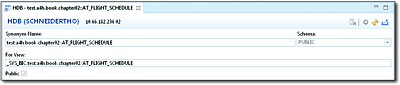
Figure 2.19Public Synonym for a Column View
When you want to test objects in the SAP HANA Repository, it’s best to use the data preview and the SQL console. You’re already familiar with both of these tools, which we explained when we discussed the database catalog previously. To start the data preview for a development object, choose Data Preview. This preview is available for attribute views, analytic views, calculation views, and decision tables.
Because we’ve already used the example of database table SPFLI to explain the data preview, we won’t discuss it in further detail here. However, take a look at the Show Log button in the data preview. You can use this button to call a selection log, which helps you quickly find the corresponding runtime object for a design time object (see Figure 2.20). This enables you to determine the runtime object for a development object.
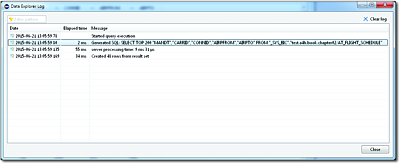
Figure 2.20Selection Log with a Database Object
Alternatively, you can conduct tests directly in the SQL console. In our example, you can use the following objects here: the name of the column view generated (i.e., test. a4h.book.chapter02/AT_FLIGHT_SCHEDULE in the schema _SYS_BIC) and the public synonym (test.a4h. book.chapter02:: AT_FLIGHT_SCHEDULE).
Similar to ABAP, development objects are put under version control. Each time an object is activated, the system creates a new version of the object. You can display existing versions in the version history. To access the version history, choose History. However, you see only the time when a version was created (i.e., the time when an object was activated). You can’t see the actual changes made to each version.
If there is an inactive version, you can choose Switch Version to execute the following actions:
-
Switch between displaying active and inactive versions.
-
Drop the version that is currently inactive, and revert to the last active version.
You now know the relevant tools for ABAP development on SAP HANA, and you’ve taken your first steps toward getting started in the system. In the next chapter, we’ll discuss ABAP database programming. For more information on working with SAP HANA Studio, see Chapter 4.