11.2Creating Decision Tables in SAP HANA Studio
Like other development objects, decision tables are created via the Modeler perspective in SAP HANA Studio. To do so, you select New • Decision Table in the context menu of a package as shown in Figure 11.1.
In the next step, you specify the name for the decision table and a description (see Figure 11.2).
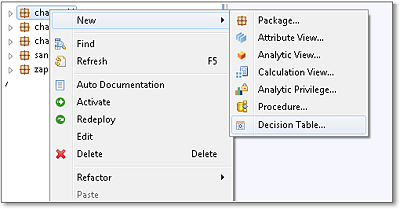
Figure 11.1Creating a Decision Table (Part 1)
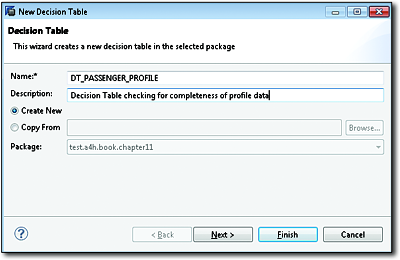
Figure 11.2Creating a Decision Table (Part 2)
As with view modeling (see Chapter 4), you now have to select the data basis for the decision table. You can choose between tables or previously defined views (e.g., an attribute view).
The editor for decision tables (Figure 11.3) consists of two sections that are opened via the Data Foundation and Decision Table tabs. The Data Foundation tab is used to define the conditions and actions used in the decision table, whereas the Decision Table pane is used to maintain the actual rule values.
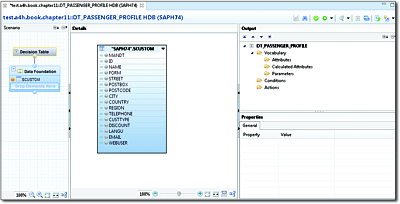
Figure 11.3Layout of the Editor for Decision Tables
To get started, we want to classify air passengers directly based on columns of table SCUSTOM and add them to the Data Foundation tab. Because we want to access the attributes CUSTTYPE, EMAIL, and TELEPHONE in addition to the name of the passenger, we add these as attributes of the decision table. To use the named attributes as conditions, they must be flagged as such (Add As Condition). As for all other modeled objects in SAP HANA, you can also add calculated fields to decision tables.
In our example, we want to determine a classification with the help of a calculated attribute. To do so, we first define a new parameter via the Parameters context menu, for which we specify a data type CHAR(1) and static fixed values—T for True (Complete) and F for False (Incomplete)—as shown in Figure 11.4.
Because this parameter should be used as the result, we flag it as Action (Add As Action). The final structure of the decision table is shown in Figure 11.5.
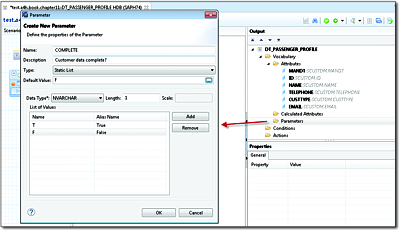
Figure 11.4Defining a Parameter for the Output Value
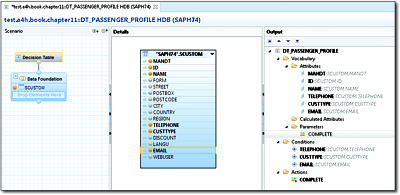
Figure 11.5Structure of the Decision Table
Using the Decision Table node, you can now specify the classification rules for the decision table, as shown earlier in Table 11.1. To define the conditions (e.g., CUSTTYPE), you select a cell and then choose Add Condition Values from the context menu. This opens a dialog where you can either enter a condition or select a fixed value from a list. To specify actions (in our example, COMPLETE), you can select either Set Initial Value for fixed values or Set Dynamic Value for calculated values from the context menu. Figure 11.6 shows the resulting set of rules, where it depends on the customer type and the availability of an email address or telephone number whether the profile is complete. With this rule set, the Like _* expression is used to verify if a nonempty string is present. The static True and False action values were set using Set Initial Value.
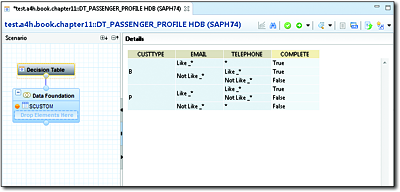
Figure 11.6Rules of the Decision Table
After saving and activating the decision table, you can display the result using the Data Preview. Decision tables are activated the same way as views. Figure 11.7 shows that, according to the defined rules, 6% of the system’s roughly 4,800 customer profiles are incomplete.
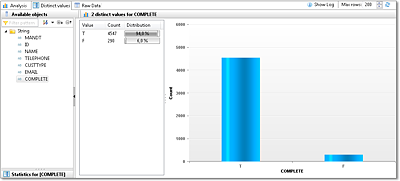
Figure 11.7Output of the Decision Table for Profile Analysis
You can also export or import the values for decision tables to or from Microsoft Excel. This especially facilitates collaboration between IT experts and business departments. To export or import values, use the context menu in the Decision Table editor pane.
SAP HANA currently supports the expressions listed in Table 11.2 to define decision rules. You can then logically link such expressions via And and Or.
|
Expression |
Supported SQL Data Types |
Example |
|---|---|---|
|
Not equal (!=) |
Any |
!= Lufthansa |
|
Greater Than (>), |
Strings and numeric types |
Greater Than 20 |
|
In, Not In |
Strings and numeric types |
In AA;LH |
|
Like, Not Like |
Strings |
Like Lufthansa* |
|
Between |
Numeric types |
Between 100 and 200 |
|
After, Before, Between |
Date (DATE) |
Before 2016-01-01 |
Table 11.2Available Expressions for Decision Rules
Once again, correct handling of data types can be somewhat tricky, and ignoring these aspects may cause problems. In particular, you must first convert data types in some cases. For example, to compare dates After, Before, Between with an ABAP date (DATS, i.e., NVARCHAR(8) in the database), you first have to convert this date into a field of type DATE. For this purpose, you usually create a calculated attribute and use a conversion function such as to_date().
Another example is numeric data stored in a character-type field. If you used the NUMC data type for a numeric value in your ABAP data model, for instance, this is a NVARCHAR type in the database (see Chapter 3, Section 3.1.3). An example for this is the DISCOUNT column in table SCUSTOM. As a result, a rule such as >20 is interpreted as a comparison of strings by the decision table, that is, as >'20' instead of a numeric comparison. Once again, the value must be converted first.
[ ! ]Consider Data Types When Designing Decision Tables
To avoid unexpected consequences when evaluating rules, you must carefully define the structure and semantics of a decision table. For a successful design, you must have the required development skills and understand the technological aspects and semantics of the data structures and types. In combination with a thorough documentation, this makes it possible for the specialist department to define the set of rules correctly.