The Hips
In 1997, there were 117,000 hip replacements associated with hospitalizations for arthritis.1
Aging runners, soccer players, dancers, athletes of all kinds, and many who do not have a particularly active past find themselves unable to tie their own shoes, or find that walking, possibly just standing, or even riding in the comfortable seat of a luxury car for any length of time is painful. If they had an injury in the upper extremities they would have more leeway: they could turn the key with the other hand, move closer or farther from the easel, carry a package differently. But walking requires the uniform use of all parts of the legs, and every joint in one leg bears all the weight with each step.
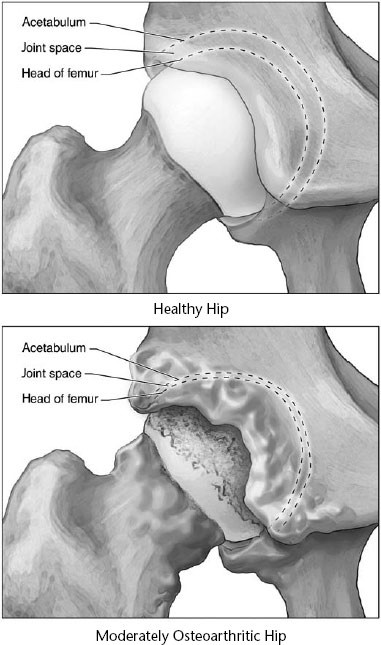
Figure 6. Healthy and arthritic hip joints.
The architecture of the legs and pelvis is like that of a Roman arch, (see page 196), with the sacrum serving as the keystone between the wings of the pelvis and the femurs (the thigh bones). In a sense, the off-set neck of each femur also resembles the flying buttress of a Gothic cathedral, a structure that parallels the joint’s function: the femur inserts into the acetabulum, a socket in a thickened boney mass, maximizing the supporting role that the hips serve in us bipeds.
The femur moves in three ways: forward and back, away from and toward the body, and outwardly and inwardly. The symptoms of osteoarthritis usually show up first during adduction, motions of the leg inward, toward, and across the other leg. The first one is usually pain along the crease of the groin. Taking X-rays is still the best way to accurately diagnose and estimate the severity of osteoarthritis of the hip.
During the initial stages of treatment, nonsteroidal anti-inflammatory medicines, which come in a large spectrum of potency and safety, are often helpful in easing the pain and improving range of motion of the hip. After moderate progress and increased control of the center of gravity and hip muscles, the dosage can frequently be sharply reduced or the medicine discontinued altogether.
One particular thing to watch for in all patients with osteoarthritis of the hip is the combination of flexion, adduction, and internal rotation—the kind of movement required when you are tying your shoe. This is known to leverage the femur of a severely arthritic hip joint right out of the acetabulum, causing dislocation. This movement is generally severely restricted after total hip replacement as well.
Luckily, with yoga treatment for osteoarthritis of the hip, there are none of the problems that we had with the shoulder: there is no way for the hip joint’s housing in the pelvis to move and adjust to the loss of range of motion. Here the difficulty is the opposite: in treatment the joint has to be made to increase its range, for there is no margin, no give-and-take, no flexibility in its set spot in the body or in its function. Anusara Yoga describes two beneficial movement patterns for the hip. They are spelled out fully in Appendix III. The goal of these actions is to center the femoral head in the acetabulum.
• Inner Spiral—The thighs turn in toward the midline, move back, and spread apart. This action broadens the pelvic floor and seats the head of the femur back in the acetabulum. It also takes pressure away from the inner edges of the hip joints, where arthritis usually begins, and it arches the lower back, an effect which is balanced by the Outer Spiral.
• Outer Spiral—The base of the sacrum moves down and forward, and the thighs rotate outward. This action takes the outer thighs back, completing the effect of seating the head of the femur back. The lower back lengthens and the pelvis is stabilized over the legs.
Poses
Purpose: To loosen the hip joints and become aware of the range of motion for inner and outer rotation.
Contraindication: Late pregnancy.
Props: A yoga mat, possibly a blanket for head support.
Avoiding pitfalls: Work hard enough at getting the legs to roll, but stop short of causing strain.
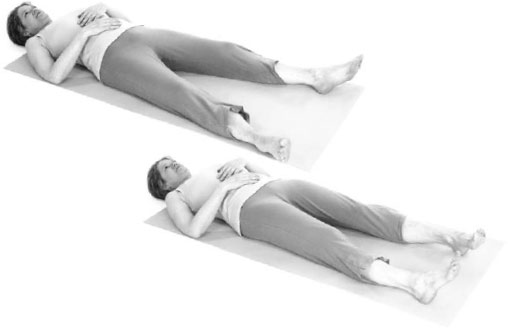
1. Lie on your back, with your head supported if needed and your arms relaxed.
2. Separate your legs six to twelve inches apart, then relax them.
3. Slowly and easily roll your legs in toward each other, then away from each other. You do not need to pick them up off the floor, just roll them.
4. Picture the easy frictionless motion inside the hip joint.
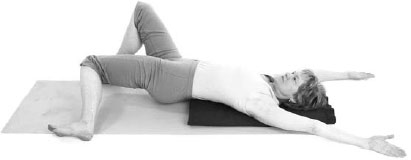
This pose is helpful in maintaining range of motion across the midline.
The legs are strengthened and the hip flexors are stretched.
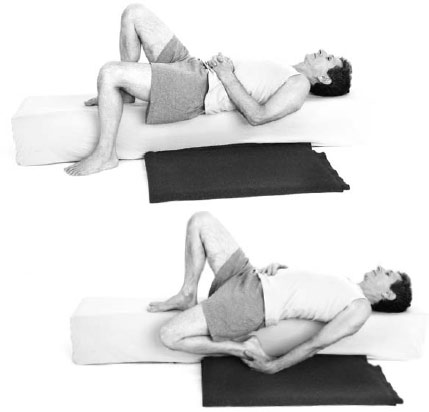
This is a variation of the All-Star pose of the same name.
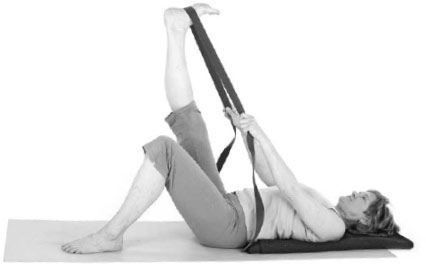
Purpose: To sequentially flex the hip and stretch the hamstrings, improving hip range of motion.
Contraindications: Hamstring sprain, gastroesophageal reflux.
Props: A yoga mat, a belt, and a blanket.
Avoiding pitfalls: If the possibility of knee injury exists, hold hands behind thigh.
1. Lie on your back with both knees bent, feet flat.
2. Bring your right knee toward your chest with your hands. If grasping the knee is painful, interlace your fingers behind the knee to disengage the knee joint.
3. Carefully lower the left leg to the floor, extending through the left heel.
4. See if you can touch the floor with your left thigh; if you can’t, gradually release the pull on the right knee until you can. Pay attention to the opposite actions of each leg: gently work to increase both as equally as you can.
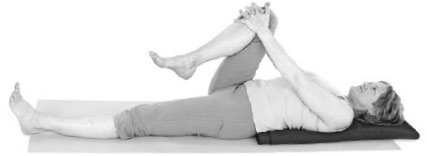
5. Maintain this stretch for a few breaths, then change legs and repeat.
6. Proceed to the instructions in All-Star pose 14, on page 83.

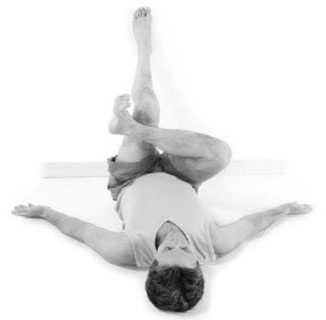
This stretch focuses on the back and sides of the hip joint. The support of the wall and the floor makes it a good preparation for seated poses.
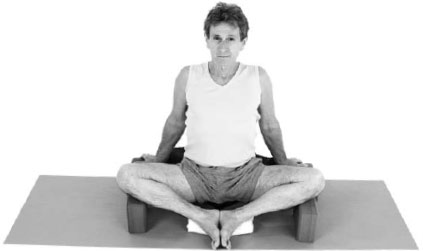
Purpose: To stretch the adductor muscles, improve hip mobility, and coordinate these with foot eversion. To practice aligned leg actions that minimize foot strain.
Contraindications: Sacroiliac derangement, knee instability.
Props: A mat, a blanket, two blocks, and a towel.
Avoiding pitfalls: Begin using the props as described below. The props reduce the risk of mild injury to the lower back or knees. Progress at your own rate.
1. Do a test run to see what props you will need, as follows.
2. Sit on the floor with your knees apart and soles of the feet together. If your knees are higher than your pelvic rim, place a firm support under your hips until the knees and hips are level. When you are using a folded blanket, it helps to sit on the corner of the blanket, with your sitting bones fully supported but each thigh free from the edge of the blanket. This support will allow your pelvis to tilt slightly forward and your knees to drop lower. If your knees are high off the floor, support them with blocks as shown.
3. Place a folded towel under both ankles and heels as shown. This is important for the alignment of the ankle and foot. The ankles will be higher off the floor than the toes.

4. Manually widen your upper thighs and buttocks.
5. Place your hands on the floor beside you.
6. Take a full breath. Elongate and lift up your spine.
7. Firm your leg muscles, and do the following in sequence.
8. Widen the sitting bones and tip them back, which will tip the top of your pelvis forward (Inner Spiral). Walk your hands forward on the floor.
9. Curl your tailbone down and lift up through the abdominal area. Roll your knees more open if possible (Outer Spiral).
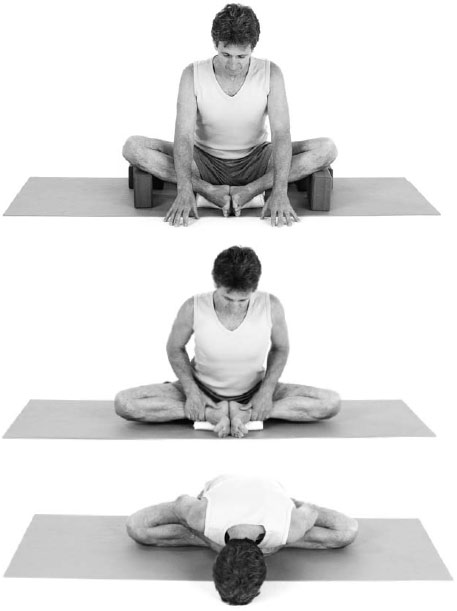
10. From the core of your pelvis, extend out through the thighs and up through the whole spine, still pressing your feet together.
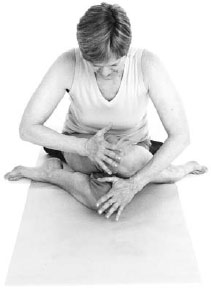
11. To intensify: Hold your ankles. Lean forward, with your spine long and all the actions of the legs continuing. Isometrically push your feet into your hands as if to straighten your knees. This will deepen the hip stretch.
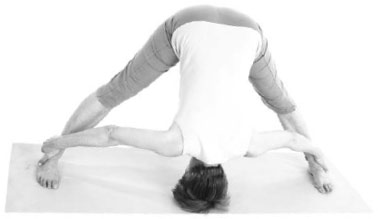
This forward bend stretches the back of the hips and legs.
In helping to widen the pelvis, this pose takes pressure off of the inner edges of the hip sockets.
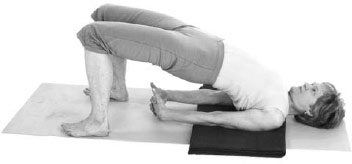
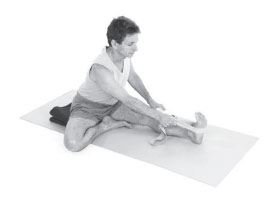
Purpose: To stretch the quadriceps and hip flexors one leg at a time, improving hip extension.
Contraindications: Meniscal tear, anterior cruciate tear, moderate or severe chondromalacia patellae, inguinal hernia.
Prop: A couch.
Avoiding pitfalls: Bringing the leg to the back in this pose will tend to cause the lower back to arch. To avoid that, flex your abdominal muscles and move your tailbone toward your feet. Also, stretch your spine up away from your pelvis.
1. Lie on the edge of a couch or low bed, with one leg off the edge.
2. Bend your knee and curl your foot back and down. Tilt your thigh downward as much as you can.
3. Reach backward with the thigh and foot. Align your foot straight back; tuck in the outer ankle.
4. Maintain firm abdominal muscles to prevent overarching of the lower back.
5. Use the center of your pelvis as the Focal Point: stretch out from there through your thigh and pelvis and up through your spine toward your head.
6. Breathe and maintain the stretch for as long as you can.
7. Repeat on the other side.
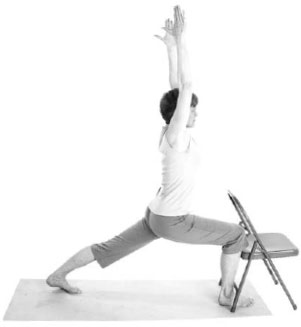
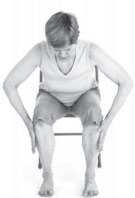
This pose opens the front of the hip, beginning with a chair for balance. Intensity can be varied by how the back leg is positioned.
Purpose: To safely stretch the rectus femoris, iliopsoas, and adductors, improving hip extension.
Contraindications: Ischial or prepatellar bursitis, medial or lateral meniscal or anterior or posterior cruciate tears, knee effusion.
Prop: A chair
Avoiding pitfalls: As in all hip extension movements, when the leg goes back, the lower back may arch too much. Work into it slowly, and contract and lift your abdominal muscles the whole time to support the lower back.
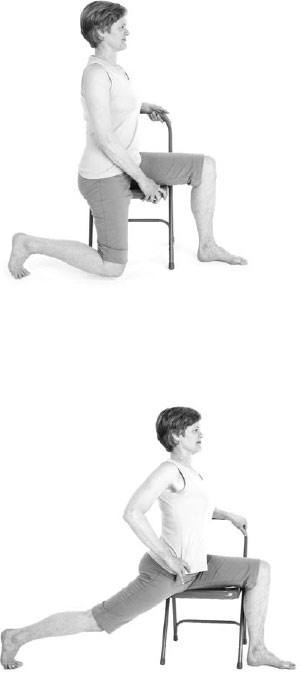
1. Sit sideways on the front edge of a chair, with your left thigh fully on the chair seat and your right leg hanging straight down off the front edge.
2. Lean forward and use your hands on the chair as needed for stability.
3. Firm all the leg muscles, and widen your buttocks and thighs, as in the Pressure Cooker (page 73).
4. Lengthen your tailbone down and lift your abdominal muscles up to stabilize your pelvis.
5. Once you are steady, carefully inch your right leg back behind you. The knee will remain bent as the thigh moves farther from vertical.
6. Breathe deeply as you reach back through the back leg; find the appropriate level of intensity of effort.
7. Stretch your leg back as far as possible. Attempt to straighten the knee.
8. Lift your torso up to vertical.
9. Enjoy this deep hip stretch, made safe by the support of the chair.
10. Bring the back leg forward to change sides.
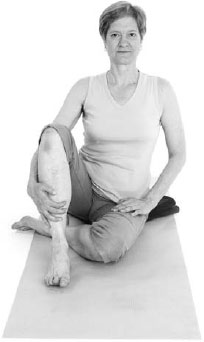
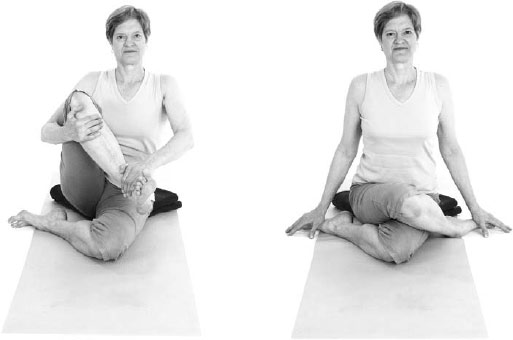
Purpose: To stretch the abductors and iliotibial band.
Contraindication: Ischial bursitis.
Props: A mat and one or two folded blankets.
Avoiding pitfalls: Use blankets under your hips to help you sit up straight with your pelvis vertical, not sloping back.
1. Place the folded blankets on the mat, with one corner pointing forward.
2. Sit on the front corner of the blankets as shown: left knee pointing forward, right knee up.
3. Grasp your right leg with both hands and cross it over the left.
4. Stack your right knee on top of your left, with the feet to the side.
5. If your knees stay very high up, use more support under your hips.
6. Manually move the buttocks apart as much as possible. This will free your pelvis to bend forward.
7. Inhale, lift through your spine, and tone the leg muscles.
8. Isometrically pull your thighs apart without changing their alignment. The resistance of your crossed legs will bring a stretch to the outer thighs.
9. For more intensity, lean forward and put your right hand just above your right knee and your left hand just above your left knee.
10. Push in with your hands and out with your thighs for a stronger isometric action.
11. Breathe through your entire chest.
12. Release and unfold your legs to change sides.
The three standing poses that follow all stretch the hip muscles with the spine off center, promoting greater range of motion and strength and refining the actions of the hips.
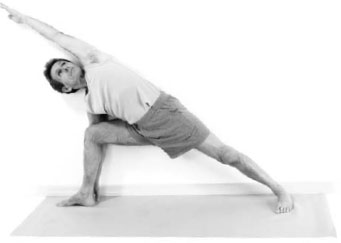
With the arm and leg extended away from each other, one side of the spine and pelvis gets a good stretch.
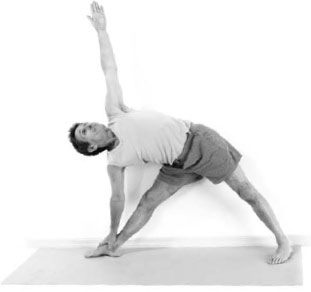
Side bending strengthens the lumbar muscles, while stretching the hips intensely.
This hip and hamstring stretch is also a safe inversion.
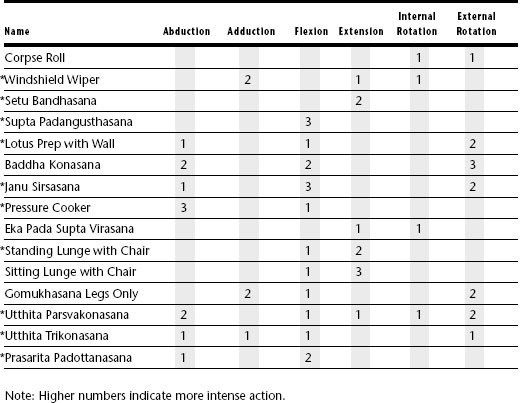
Hip Asana: Movement Type and Intensity of Action