The Knees
The knees are the largest joints in the body. This fact in itself prompts some to rank them among the most vulnerable to injury. They also bear a great deal of weight, loading and unloading with every step, every time one gets up, and on every stair. Further, unlike the hips they move only in a single plane, without very much adaptability to linear or rotating pressures from the side. We can protect the hips when we fall by bending our knees. But what do we have to cushion the knees? Only the ankles and feet, with their much more limited size, strength, and ranges of motion.
Unlike most joints, there are three bones participating in the knee joint (see Figure 1 on page 25). The kneecap or patella is a sesamoid bone, a bone enclosed in a tendon. This gives additional leverage to the quadriceps in extending the knees, very much like putting a block beneath a hammer’s head when pulling out a nail. But the patella is also exposed to the trauma that comes naturally to all bipeds.
If you could examine the underside of the patella closely, you would find a wonderfully precise structure, like a well-cut, many-faceted jewel. The thigh bone, or femur, ends at the knee in the form of two egg-sized half ellipses side by side. The two shapes are unequal in size. Therefore, the joint’s center of rotation moves with each infinitesimal change of angle as it goes from flexed to extended. The underside of the patella interfaces with the tibia and the femur in an ever-changing spatial and mechanical relationship. So we have a very delicate, vulnerable structure exposed to near-constant trauma. Even minimal swelling upsets the balance. Any imbalance leads to regions of exaggerated stress. As we have seen several times already, this is the formula for osteoarthritis.
But the picture is broader and deeper. The knee has its own internal shock absorbers, the medial and lateral menisci: a thick figure-of-eight-shaped cartilage that sits on top of the flat joint surface of the tibia, and cradles the elliptical hemispheres of the femur. This too can be worn down and injured. Generally the medial meniscus is affected before and more seriously than the lateral one.
How do we resist or at least minimize this wearing down? As you will recall from Chapter 3, joint health is primarily maintained by the circulation of the joint fluid, an excellent viscous lubricant that provides the oxygen and proteins needed for joint repair, and carries away the waste products of metabolism. Yoga, by moving the joint to the extremes of motion (but not farther), helps this process considerably.
Because the knee is so much affected by movements in its neighboring joints (especially the hip, sacroiliac, lumbar spine, and ankle) the yoga we offer for those areas can protect the knee a great deal. Flexibility in the hips means less demand on the knees. Strength in the lumbar spine and abdominal musculature reduces the load on the knees, and as stated, flexibility in the ankles cushions the impact that the knees might otherwise absorb. So if the knees are your area of concern, please practice the poses from the chapters on these other joints as well as those in this one.
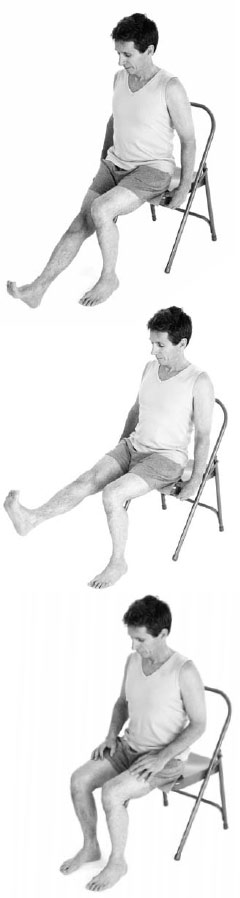
Two pairs of opposite actions serve to stabilize and align the knee for safety in all types of movements and positions. First, let us look at the alignment of the knee in the frontal plane. In many people, the lower legs bow outward, and the knees and thighs angle in toward the midline. Often the arches of the feet are collapsed as well. What is needed for better alignment is to balance the weight on the four corners of the feet (see page 235), to bring the shins in toward the midline, and to widen the thighs, until each leg lines up in one plumb line from ankle to hip joint. This Shins-In-Thighs-Out action is exemplified by the Pressure Cooker (see page 73). Shins-In-Thighs-Out aligns the kneecaps to point straight forward toward the second toes. This is also called tracking the knee, and you can check it for yourself in a mirror.
The second alignment to consider is the forward-back relationship of the lower and upper leg, as observed from the side. Knees that are hyperextended push back too far, reducing stability and distributing pressure unevenly inside the joint. The Shin Loop and the Thigh Loop (see Appendix III) comprise an excellent safeguard. Pressing the ball of the foot down while standing advances the top of the shin bone forward, and then flexing the quadriceps fixes the femur without overextending the knee. These actions may seem complex at first, but with practice they can be incorporated into many poses. You will recognize them in the instructions below.
Poses
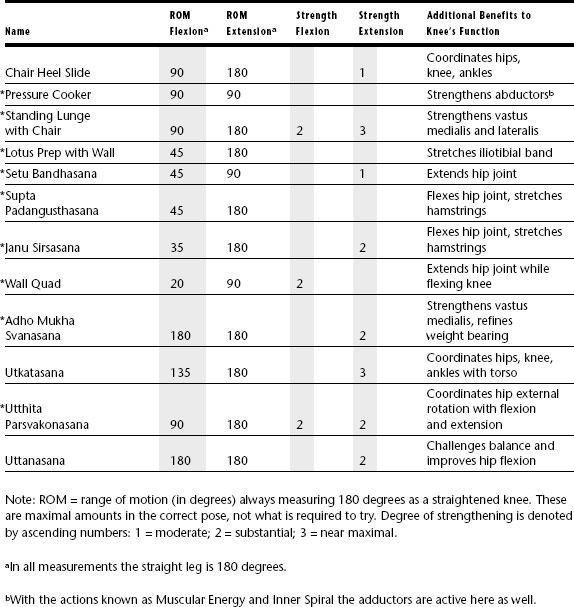
Purpose: To track the alignment of the knee, coordinate knee, ankle, foot, and thigh movements made during normal walking, and gently strengthen the quadriceps, all with minimal weight bearing.
Contraindication: Recent abdominal surgery.
Prop: A chair.
Avoiding pitfalls: Watch and move carefully, coordinating the movement between all the anatomical components. Do not lift the straight-legged knee above the bent knee at any time.

1. Sit on the edge of a chair with feet flat on the floor and knees bent ninety degrees. The thighs are parallel and at the same level.
2. Slide the right heel outward along the floor until the right knee is fully extended. At this point the right thigh slants downward away from the left thigh.
3. After sliding the right leg out until the knee is straight, lift the entire right leg until the right thigh is parallel with the left.
4. Maintain parallel thighs while bending the right knee and returning the right foot to its place beside the left.
5. Repeat five to ten times.
6. Repeat with the left leg.
7. To reduce the intensity, from the initial sitting position, slide the right heel out about halfway. The knee will not straighten fully. Raise the right thigh until it is parallel to the left, even though the knee is still somewhat bent. Lower the foot back directly under the knee, keeping the thighs parallel throughout the process. Repeat on the other side. This pose can gradually metamorphose into the more intense version by gradually increasing the distance you slide the heel until the knee is straight.
Both versions of this action pose are gentle but require precision and full attention. Coordination and proprioception at ankle, knee, and hip are improved significantly, all of which are critical to knee care.
This pose uses an isometric action in the legs to realign the sacroiliac joint, hips, and knees.

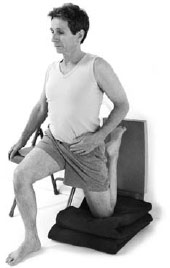
You can practice tracking the front knee carefully in this pose while also stretching the calf and hip of your back leg.

This deep hip stretch helps take pressure off the knee.

Thigh muscles are strengthened in this pose.

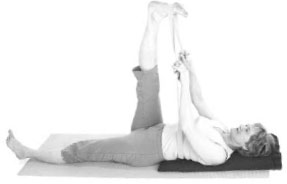
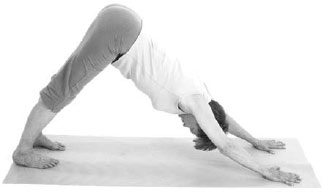
This excellent overall leg stretch helps straighten knees with the hips flexed.
Tight hamstring muscles strain the lower back.
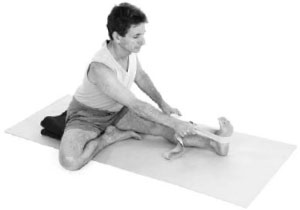
This seated leg stretch also benefits the hips and spine.
This is a deep stretch of the quadriceps.
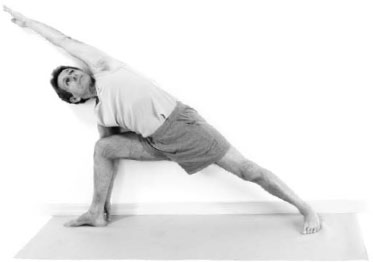
You can see your knees in this pose. Practice aligning them carefully.
Purpose: To align and strengthen the quadriceps, adductors, and abductors, and to coordinate knees, hips, ankles, and lumbar spine.
Contraindications: Imbalance, acromioclavicular subluxation, rotator cuff tear, severe osteoporosis, profound weakness, moderate or severe anterior cruciate tear, chondromalacia patellae.
Prop: A wall.
Avoiding pitfalls: Take care to align the knees to track the kneecaps straight forward over the second toes, and to align the lower back—neither too arched nor too curved.

1. Stand a few feet from a wall, facing it.
2. Reach your arms forward, shoulder-width apart, and touch your fingertips lightly on the wall, just above eye level.
3. Set your arms deeply into the shoulder sockets. Stretch your legs and strongly draw your abdomen in toward your core.
4. Lift your toes and root the four corners of your feet down (see page 235 for foot illustration).
5. Inhale, extend your upper body up from the inside, and arch your lower back slightly.
6. Exhale, bend your knees, and reach your hips back. Make one long line from fingers to hips.
7. Widen your thighs apart, as in Pressure Cooker (see page 73), without widening the lower legs. Your arms will lean more firmly on the wall.
8. Curl your tailbone down and lift your lower abdomen. This will support your lower back and lessen the arch there. Take special care to track the kneecaps straight forward.
9. Splay the toes apart. Press the balls of the feet and the heels down.
10. Breathe strongly to energize the pose.
11. Inhale as you return to standing.
This pose brings tremendous inner and outer strength.
1. Stand facing away from a wall, and adjust the distance so that when you bend your knees and hips, your hips will rest against the wall. Set your feet hip-distance apart and parallel.
2. Inhaling, bend your knees, reach your hips back to the wall, and raise your arms to the sides in one vigorous movement.
3. Stretch your toes, especially the fourth and fifth ones, and root the heels down.
4. Re-create the widening of the thighs as in Pressure Cooker (see page 73), tracking the kneecaps straight forward over the second and third toes.

5. As your hips draw back, allow the lower back to arch, producing a deep fold in your hips.
6. Lift the lower abdomen up to support the lower back and lessen the lumbar curve.
7. Breathe calmly and maintain the position for as long as you can.
8. Come back up and lower your arms.
This vigorous standing pose stretches and strengthens the knees.
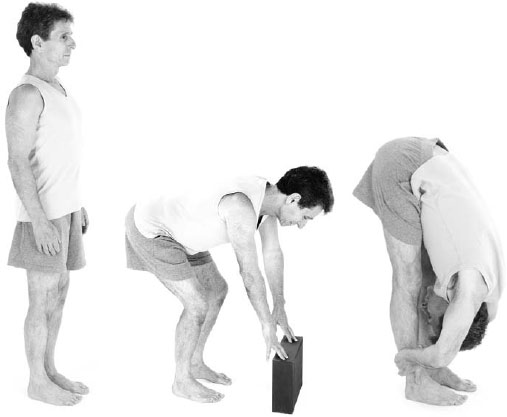
Purpose: To stretch the thoracic spine and the legs.
Contraindications: Herniated nucleus pulposus, imbalance.
Props: A yoga mat, two blocks if your legs are stiff.
Avoiding pitfalls: Keep your leg muscles working, whether your knees are bent or straight. Avoid letting the knees fall in toward the midline. Let your head release. Come out of the pose smoothly to avoid dizziness.
1. Stand with your feet hip-width apart.
2. Stretch your toes and lift them up, which activates the whole lower leg. Balance your weight on the four corners of your feet.
3. Retain the elevated toes, then squeeze your shins in toward the midline, and widen your thighs apart. You can lean forward a little to do this.
4. With thighs still wide, pull your tailbone down and your spine up vertically.
5. Inhale and stretch fully up from inside.
6. Exhale, bend forward, and touch the floor or two blocks. Bend your knees if necessary, taking care to track them straight forward.
7. Come down far enough to feel the pull on your hamstring muscles.
8. Retain your arms deep in their sockets, even as you reach down.
9. If you can straighten your knees and you want more intensity, hold your ankles and pull yourself farther down.
10. Avoid pushing your knees back; instead, press the balls of the feet down and lift up the quadriceps.
11. Balance your use of strength with an attitude of surrender and release. Breathe evenly.
12. To come up, bring your hands to your waist. Root down through your legs to the four corners of your feet, extend your head and chest forward, and lift up smoothly as you inhale.
13. Exhale and release your hands.
Knee Asana: Range of Motion and Degree of Strengthening