Scoliosis
Scoliosis is lateral curvature of the spine. The vertebrae often rotate as well as curve to the side. The rotation is almost invariably toward the convex side and backward, so that the ribs fill up the enlarged space there, producing a bulge or hump in the back. More specific scoliosis diagnoses are made from simple back-to-front X-rays of the neck, chest, and lumbar spine that are then mounted together, yielding a long thin X-ray of the entire spine. There are standard ways of accurately measuring the curves, often with a four- to six-degree margin of error. Curves are generally either simple C-shaped curves or more complex S-shaped ones. The S-shaped curves generally have convex cervical spines and convex thoracolumbar spines in opposite directions. Some scoliosis resolves spontaneously with forward bending and is called idiopathic, meaning “of no known cause.”Scoliosis diagnoses are named for the size of the curve, for its place in the spine, and for right (dextro-) or left (levo-) convexity. Thus, the diagnosis “thirty-five-degree nonidiopathic rotatory thoracolumbar dextroscoliosis”would translate into lay terms as an unchanging thirty-five-degree curve with its apex on the right, involving the vertebrae of the chest and abdomen, with a humplike bulge in the right lower back.
In contrast to the other conditions we have discussed so far, scoliosis is rarely painful. Very infrequently, a patient will experience achiness on one side. In young patients, the difficulties are usually cosmetic, but occasionally it can interfere with childbearing. After a person with scoliosis has passed age sixty or seventy, though, the scoliosis can become increasingly severe, to the point of limiting breathing.
The causes of scoliosis range from a leg-length discrepancy to partial paralysis, but frequently the cause is unknown. Some believe there is a hereditary component since it is more common in children of scoliotics. It is also more common in women. The standard treatment guidelines are “brace patients with curves from twenty to forty degrees, surgery for those above forty, and expectantly watch those less than twenty.”Deepening of the curve generally drops off dramatically after the growth spurt at age fifteen to eighteen, but, as already mentioned, the curvature may progress substantially after middle age.
Despite its ubiquity, there is no convincing evidence that bracing works. Modern surgical treatment began with insertion of the Harrington rod, a metal dowel to which the vertebral bodies are attached, holding the spine straight as if it were a growing sapling. The most advanced surgeries as of this writing, the Cotrel-Dubousset and Texas Scottish Rite Hospital procedures, use extensive wiring to produce a spine that is symmetrical and well formed in three dimensions and gives unending support. But they sacrifice flexibility, and always include the possibility of complications such as infections, breakdown of the hardware, and allergic reactions, among others. Since the postsurgical spine resembles the spondyloarthritic one in its immobility, postsurgical patients should see Chapter 15, on spondyloarthropathies, and pursue the exercises there that are meant for fused spines. The scoliosis asana are not for them.
That there are scoliosis asana at all, though, is a recent realization. We initially began using yoga postures to treat scoliosis out of desperation. One person had ever-increasing scoliosis and was unable to endure surgical corrections, partially because of limited breathing due to the scoliosis. We thought at least we could slow the process of further curvature and possibly—just possibly—stop it. After two years of faithful daily postures, another scoliosis film showed a decrease of the curvature from ninety-three to fifty-three degrees. Then her moderately scoliotic daughter, a yoga teacher as luck would have it, learned the postures and reduced her curve to nearly zero in three months. Since then we have had a number of successes, and one unfortunate but informative episode. A teenager reduced her S-shaped curves from twenty-four and eighteen degrees to twelve and eight degrees with three months of hard and faithful work. Then she got a boyfriend, started smoking, and quit doing yoga. Within three months her curves had returned to twenty-four and eighteen degrees. She is now diligently doing the postures again; perhaps others can learn from this apparent exception.
No one was more surprised than we were when X-rays of people we had been treating actually started to show a reduction in their curves three to six months after beginning the yoga exercises that follow. No one had reported it before. In fact, a number of previous studies had shown that exercise was useless or worse! The old-time exercises that worsened scoliotic curves focused on flexibility. In our clinical practice we made a fresh start. We compared the spine to a tent pole or a radio antenna: These vertical structures are paradoxically held up by forces that are pulling downward. Generally the muscles that perform this same function for our spines apply their forces symmetrically, and the spine is held straight. When the tensions in the muscles, analogous to the guy wires steadying a radio antenna, happen to become asymmetrical, though, the bend of the spine is toward the stronger side, and as it continues, gravity tends to amplify the imbalance. The more flexibility the spine develops, the more gravity and the muscular imbalance are able to bend it! This is why increased flexibility is actually harmful for scoliosis.
There was another key realization: in people with more advanced scoliosis, the ribs tend to migrate backward on the convex (weaker) side. If you examine the back of someone with this condition, the bulging convex side actually looks as though it has the larger muscles. But that is an illusion brought on by the backward migration of the ribs. In reality, the muscles on the concave side are pulling the top and bottom of the spine over toward it. The ribs jut out in the opposite direction, just as the handle of a bow moves away from a taut bowstring.
Our theory is that scoliosis is generally due to asymmetrical weakness of the muscles that support and hold up the spine, and the weakness is on the convex side. Our solution is surprisingly simple: we strengthen the muscles of the convex side, taking care not to increase the spine’s flexibility. The process of strengthening seems to increase the range of motion in exactly the right direction.
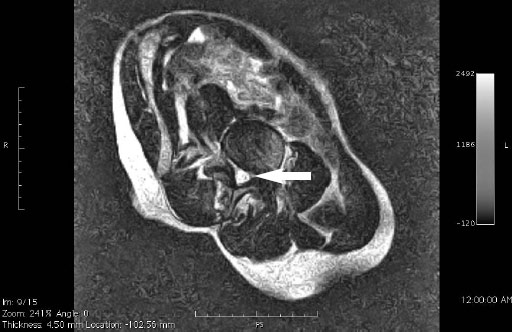
Figure 14. Spinal stenosis at L4-L5 (MRI). Anatomical position: The central spinal canal is narrowed, placing this person at risk of pain, paresthesias, weakness, and numbness at any point below the narrowing.
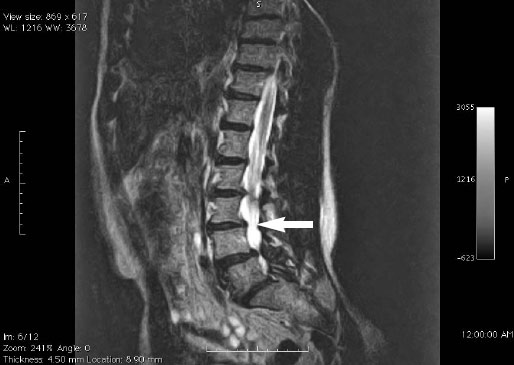
Figure 15. Spondylolisthesis at L4-L5 (MRI). Standing: Spondylolisthesis occurs when a vertebra slips from its normal alignment, generally forward, drawing the boney perimeter of the spinal canal dangerously close to the nervous tissue within the central canal.
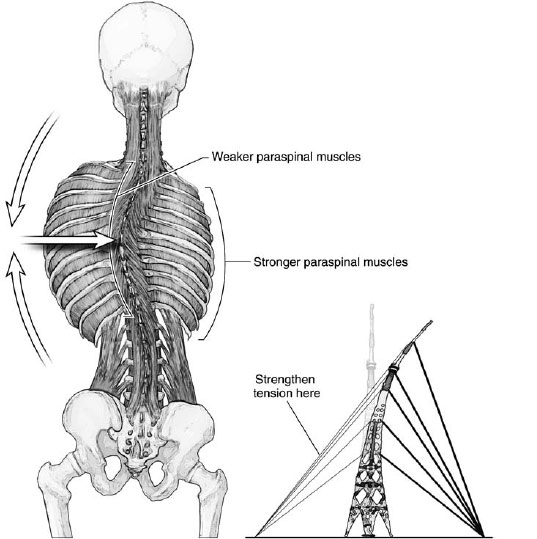
Figure 16. Correcting scoliosis. The convex side, though appearing larger, is actually the weaker side. Strengthening it brings the spine toward vertical.
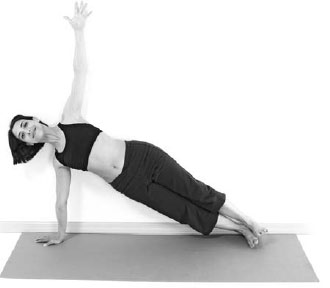
Vasisthasana has been one of the most successful poses we have used to reduce and cure scoliosis. It is done asymmetrically, convex-side down. Common sense suggests that it may strengthen muscles on the convex, bulging side, raising that side upward. The images of one of us performing Vasisthasana inside a special MRI machine confirm that the iliopsoas and other vertically oriented muscles actually are put to work asymmetrically during this pose (see pages 267–68).
We cannot stress too strongly that you need to pursue these exercises every single day, with a physician, a yoga therapist, or another person who is skilled enough to help and humble enough to ask questions and obtain scoliosis films every six months.
Part I: Getting to Know Your Curve
Important Note: The first four poses are for learning more about the nature, size, direction, rotation, and malleability of your curve. You will do better if you first understand what is going on in your back. These Part I exercises will not lessen your curve. Do these poses possibly every month to note any changes. Do not do them every day: increasing flexibility will worsen your curve, not cure it.
Purpose: To understand your particular spinal curves.
Contraindications: Plantar fasciitis, balance disorder.
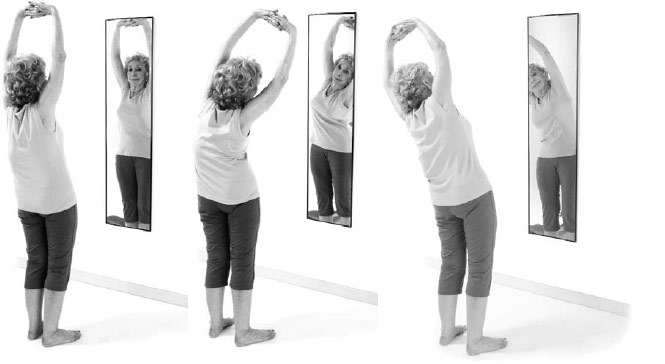
Prop: A mirror.
Avoiding pitfalls: Keep your legs firm for good balance. Be patient as you observe your own movements as objectively as possible.
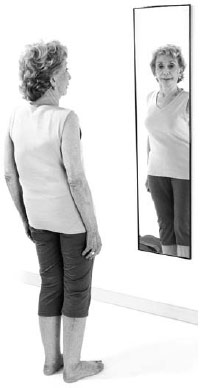
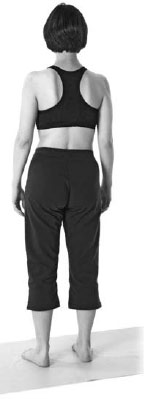
1. Stand facing a mirror with your feet hip-width apart. Wear clothes that are tight enough to reveal your body’s contours. See where your body is asymmetrical. Is one shoulder higher? (This side is probably your convex side in the thoracic spine.) Is one hip protruding? (This may be your concave side in the lumbar spine.) Is one side of the ribs protruding? (This is probably your convex side in the thoracic spine.) Is one hip higher? (This side is probably your concave side in the lumbar spine.)
2. Firm your legs, take a big breath in, and raise your arms up overhead. Interlace your fingers over your head, palms up.
3. Exhale as you lean to the right and observe how your spine moves. Does it feel restricted in the upper part or the lower part? It will be more difficult to lean toward the convex side, and easier to lean toward the concave side. Does your back want to turn as you do this? A rotatory element in the scoliosis will cause a turn as you bend to the side.
4. Return to center, and repeat on the other side.
5. Write down what you discover about your curve, and confirm it with another observer.
Purpose: To understand your particular spinal curves.
Contraindications: Meniscal tear, prepatellar bursitis, rotator cuff tear.
Props: A yoga mat and a blanket.
Avoiding pitfalls: Use padding under and just below your knees. Position the hips over the knees. Keep your arms plugged into your shoulder sockets.
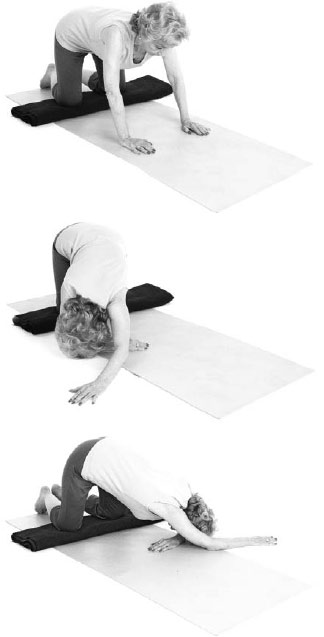
1. Come down onto your hands and knees on the blanket.
2. Walk your hands to the right, bend your right arm, and position your right forearm to support your forehead. Extend your left arm forward at an angle toward the right that begins to stretch your left side.
3. Firm your arm muscles. Lift up the side ribs and armpit. Pull the arm into the shoulder joint, connecting the whole left side.
4. Extend back with your left hip, and reach out through the left hand, making a long continuous arc of stretch along your left side.
5. Repeat on the other side.
6. Observe which area of your back bends easily this way, and which part does not. Note the distribution of air as you inhale.
Purpose: To understand your spinal curves when reversing gravitational influence.
Contraindications: Balance disorder, wet macular degeneration, cerebrovascular disease, Chiari malformation, vasovagal episodes.
Props: A yoga mat, possibly a block.
Avoiding pitfalls: Spread your feet wide enough apart so your pelvis moves easily. Place the feet parallel to protect your knees.
1. Place your feet four to five feet apart. When you stretch your arms out to the side, your wrists should be over your ankles. This is a good way to determine the width of your stance, based on your body’s proportions. Do the best you can.
2. Make sure that your feet are parallel, both facing forward.
3. Firm your leg muscles, hugging the bones from all sides.
4. Gather your strength up into the core of the pelvis, and maintain this throughout the pose.
5. Hold your feet and shins firmly toward the midline and, challenging that, push both thighs apart without rotating them. Imagine that you are riding a very large horse, and you have to widen your thighs to straddle it, but you also need to hold on.
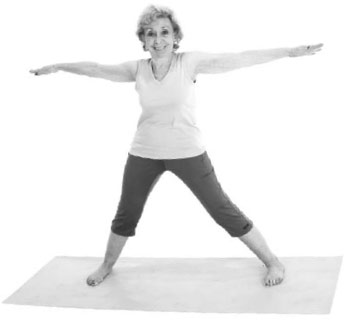
6. Curl your tailbone down and lift your abdomen up.
7. Keep your legs firm. Extend your energy down through your legs to the floor, rooting yourself for stability.
8. Inhale, extend your spine up, and while exhaling, bend straight forward to touch the floor or a block.
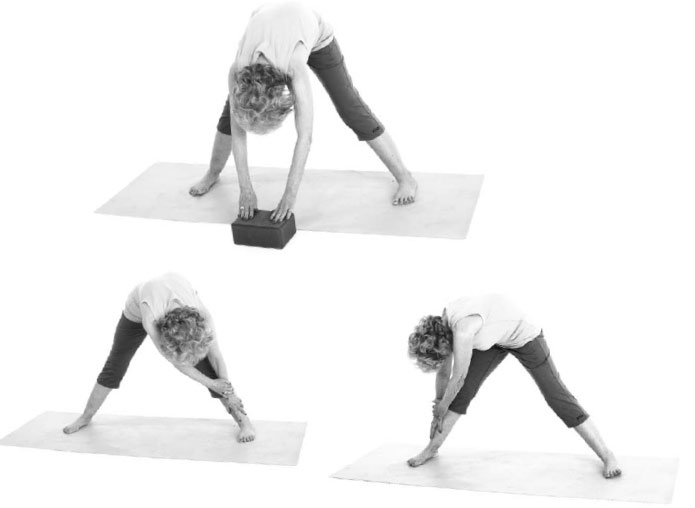
9. Playfully but cautiously move your torso in this hanging position. Experiment with lateral and rotating movements; try to understand your curve. See which kinds of movements are easy, and to which there is resistance. See if this matches what you discovered in the previous exercises.
10. You can walk your hands toward the right and left—again to gain information, not to stretch anything.
11. To come up: Place your hands on your hips, step your feet a bit closer together, and pull your shoulders back. Then inhale smoothly as you raise your torso to vertical.
Purpose: To understand your spinal curves.
Contraindications: Rotator cuff and shoulder impingement syndromes, spondylolisthesis.
Prop: A wall or a table.
Avoiding pitfalls: Choose a height for your arms that is comfortable, one that allows you to stay in the pose long enough to make observations. Use the wall if you are stiffer, the table if you are more limber.
1. Stand near a wall or tabletop with your feet hip-width apart and parallel.
2. Place your hands on the wall or tabletop, shoulder-width apart and parallel. Rotate the upper arms so that the biceps face up. Straighten your elbows.
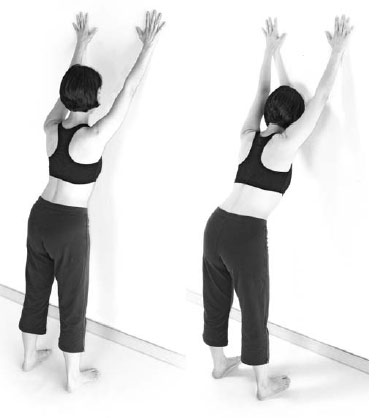
3. With your arms and legs firm, and your chest soft, bend forward with your upper body, reaching your hips back. Bend your knees.
4. Widen your sitting bones and thighs. This will create a slight arch in your lower back.
5. Firm your abdominal muscles and lengthen through the lower part of the spine without eliminating the arch.
6. Straighten your knees as much as possible.
7. Extend fully from your pelvis in two directions: out through your spine and arms, and down through your legs. This energetic lengthening will help you to know where your body is more mobile and less mobile.
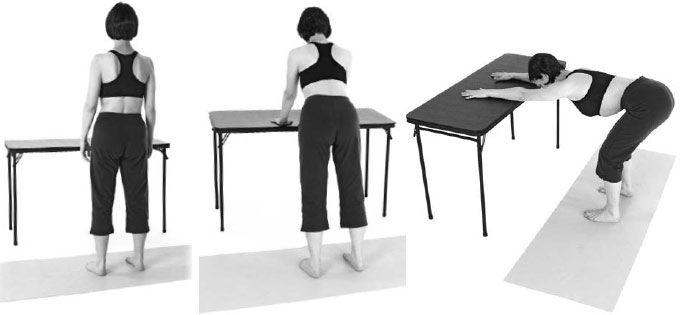
8. Look for the following (ideally with someone else watching to report what he or she sees). What you see will help you determine where your curves are, and therefore help you to do the exercises on the correct side:
• If one shoulder is higher, if one arm is difficult to straighten, or if the ribs are more prominent on one side, that is the convex side of your thoracic spine.
• If one side of the waistline looks more indented or if one hip is harder to stretch away from the wall, that is your concave side in the lumbar spine.
9. Compare these observations with those you made in previous poses.
10. To come up, breathe in and step toward the wall or table as you raise your torso.
Part II: Strengthening the Convex Side
Important Note: These are the exercises to do every day. The more you do them, the sooner you will begin to reduce your curve and approach true symmetry. Many poses are described in several stages, which allows you to choose the level of challenge that suits you. We recommend that you begin with Stage I, and if it is quite easy, progress through the stages until you find the one that is moderately challenging for you. Stay with that stage for a few weeks or so, and when it becomes too easy, move on to the next stage. It is nearly indispensable to have a yoga therapist, physician, or physical therapist to help with positioning and to check you at least monthly to be sure that the correct muscles are actually doing the right thing. You should obtain scoliosis X-rays every six months to measure your progress. A change of more than six degrees is meaningful.
Purpose: To use strength and leverage to bring the spine more into balance, and to strengthen the muscles that do so.
Contraindications: Anterior labral tear, herniated lumbar disc, recent vertebral fracture.
Prop: A chair.
Avoiding pitfalls: Follow instructions to level the pelvis, then integrate the force you apply with your arms throughout your torso to assist in leveling the rest of the spine.
1. Sit sideways on a straight chair, with your concave side away from the chair back, whether it is the lumbar or the cervicothoracic part of your spine. Place one hand on the back of the chair, the other on your thigh.
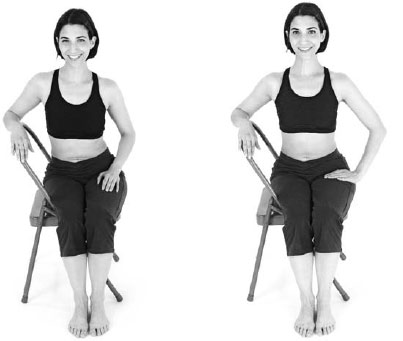
2. (a) If it is your lower back you want to level: Carefully push on the chair back and push down the hip that is higher. Your waist and lower abdomen will move away from the chair back and you will reduce the rotation slightly. (b) If it is your upper back or neck: Carefully push on the chair back to move your ribs and upper spine away from the chair. The same derotation will occur here also.
3. In both cases, attempt to equalize the length of both sides of your body, from your shoulders to your hips. Breathe and hold the pose for ten to twenty seconds for the first few weeks, then for as long as possible.
4. Feel internally for the midline!
5. If you have a complex curve, in which there are two convex parts—one lower down, one higher up—instruction 2(a) will need to be done on one side, and 2(b) on the other. Do not repeat either 2(a) or 2(b) for the concave sides.
Purpose: To strengthen the paraspinal and related muscles on the convex side.
Contraindication: Balance disorder.
Prop: A wall.
Avoiding pitfalls: Do not let the trunk move toward or away from the wall.
1. Stand with your concave side toward the wall, your arm by your side and the back of your hand against the wall.
2. Place your feet hip-width apart, with your leg muscles engaged, in your best Tadasana alignment.
3. Press your hand into the wall.
4. At first, let the rest of your body move in response.
5. Continue pressing without letting the rest of your body move in response. You should be using the muscles on the side away from the wall to stay steady and still.
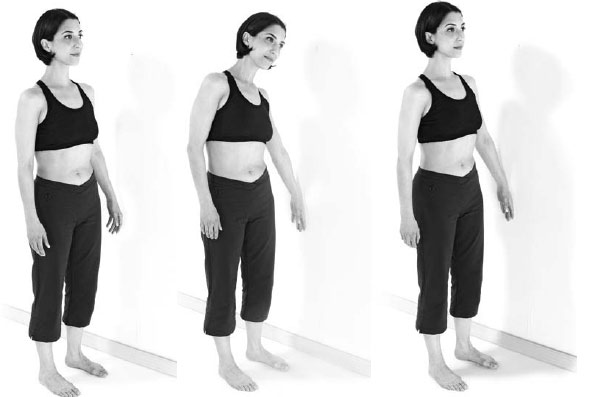
6. Do this until the muscles on the side away from the wall feel tired. This may take anywhere from thirty seconds to five minutes or longer.
7. It takes practice to avoid leaning into or away from the wall. At first push gently. After a few weeks, using greater pressure against the wall will reduce the amount of time it takes to get tired. You are building muscle strength here.
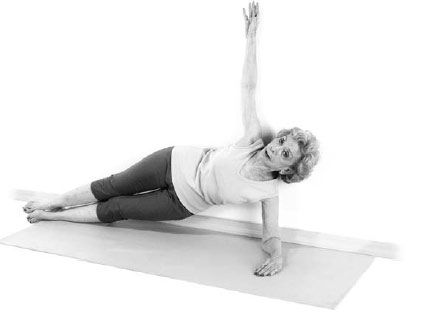
Purpose: To strengthen the paraspinal and other muscles of the convex side.
Contraindications: Profound weakness, Hill-Sachs deformity, balance disorder, carpal tunnel syndrome at wrist on convex side.
Props: A wall, a yoga mat, a block, and a chair.
Avoiding pitfalls: Pull your upper arm and shoulder back before putting weight on it. Line your head up with your spine. Don’t be tentative: be firm and expansive with your whole body. Note: This is an extremely versitile pose, as pages 267–68 indicate.
1. Lie on a yoga mat on the floor, with your convex side down.
2. Rest on your forearm, with your body lined up parallel to the wall and your knees bent. Pull your shoulders back.
3. Let the side of your ribs sag down toward the floor.

4. Inhaling, firm your muscles (especially arms and abdomen). Lift the side of your ribs up away from the floor. Let your hips and legs remain on the floor. Press on a block (if needed) with your upper hand.
5. Hold the side of your ribs up until your back feels tired on the convex side.
6. Slowly release.
1. Complete instructions 1 through 4 above. When you lift, as per instruction 4, lift your hips up as well, so that only your calves, ankles, and feet remain on the floor.
1. Complete instructions 1 through 3 under Preparation for Stages I and II.
2. Extend your legs straight out.
3. Place one foot on top of the other. Pull the little-toe edge of the top foot up toward the outer ankle bone.
4. Lift your whole body up, from ribs to ankles.
Go into the pose from the Adho Mukha Svanasana Pose (see page 66) as follows:
1. Place a chair next to your mat in case you need it for support.
2. Perform Adho Mukha Svanasana, the Full Downward Dog Pose.
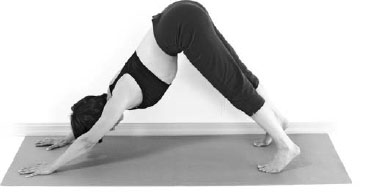
3. From the Full Downward Dog Pose, shift your weight onto the outside of your foot on the convex side of your scoliosis.
4. Reposition the hand on the convex side, lining it up with the foot, the fingers angled outward slightly.
5. Firm the upper arm and pull the shoulder back.
6. Revolve over onto the arm on the convex side and the outer edge of the foot on the convex side until your back is parallel to the wall.
7. Use your upper hand on the chair for balance if you need it. One option here (not pictured) is to place the upper foot at midmat for additional aid in balance. Otherwise, stretch your arm up along the wall.
8. Raise your ribs and hips high enough to make one long diagonal line from head to feet.
9. Breathe with a bright energy throughout your whole body.
10. Remain until the convex side tires.
11. Return to the Full Downward Dog Pose, followed by the Child’s Pose (see page 92).
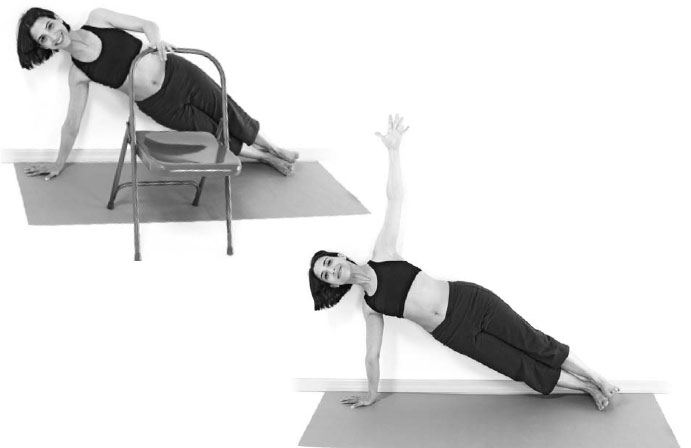
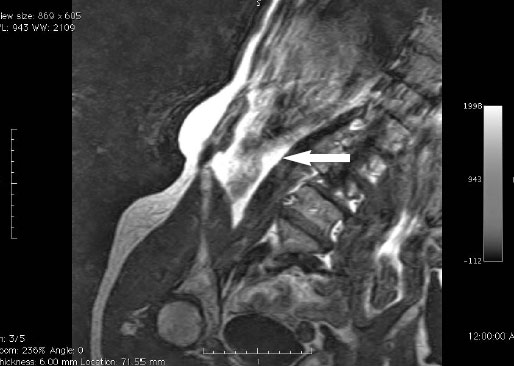
Figure 17. (MRI). Vasisthasana with scoliosis, convex side down. Asymmetrical tightening of the iliopsoas muscle on the convex side strengthens this muscle, effectively reestablishing symmetrical forces on the spine, reducing the scoliosis.

Figure 18. Vasisthasana (MRI). The central canal is broadened, reassuming its normal heart-shaped form. No study confirms that Vasisthasana gives lasting benefit to people with spinal stenosis. However, this image suggests that it is safe.

Figure 19. Vasisthasana (MRI). Spondylolisthesis is also effectively countered in Vasisthasana. Like spinal stenosis, no definitive study verifies a lasting benefit at this point, but the possibilities of treating these serious and often surgical conditions are intriguing.
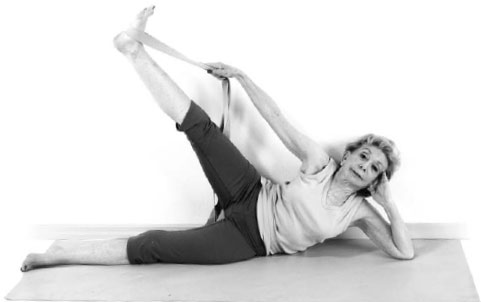
Purpose: To straighten simple and complex curves.
Contraindication: Profound weakness.
Props: A wall, a mat, and a belt.
Avoiding pitfalls: Stay lined up with the wall as much as possible.
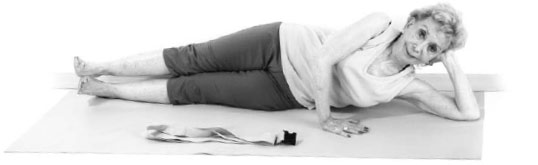
1. Lie on the side of the thoracic convexity, with padding placed under your side and with your back against a wall. Bend your legs slightly. Extend your lower arm out along the wall, and prop your head up with your hand.
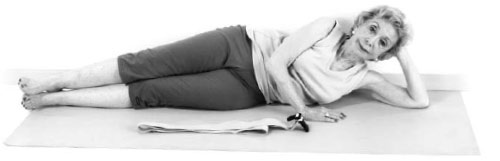
2. Place your upper hand in front of you on the floor to help with balance. Have a belt handy for Stage II.
3. Lift the underside of your ribs up off the floor.
4. Pull your lower arm in toward you. Slowly continue until the forearm is vertical, or as close as you can get to it. You may experience only the pull, without any movement of the arm taking place.
5. Stay in your best approximation of the pose for as long as you can, in order to strengthen the convex side.
6. Bend your upper leg, hold your toe or hook the belt onto the foot, and turn the heel forward to rotate the leg outward.
7. Stretch the leg upward.
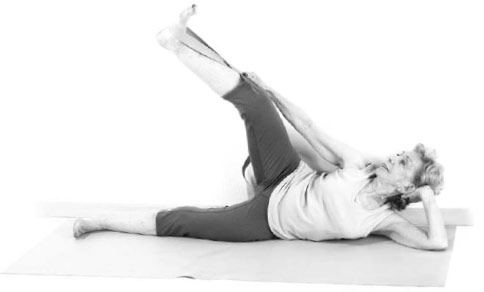
8. Straighten the knee as much as possible. Keep your back against the wall and use your abdominal and back muscles to stabilize your pelvis as you raise the extended leg. You can gaze up or forward. Raise your ribs away from the floor as well. Don’t forget to breathe!
9. Release down and rest on your back.
Purpose: To strengthen the relevant spinal muscles in simple and complex curves. This pose is effective when the arm on the side of the convex upper curve is raised. It also strengthens the lumbar musculature on the opposite side.
Contraindications: Extreme hypertension, lumbar spinal stenosis.
Props: A yoga mat and a blanket for comfort.
Avoiding pitfalls: If you have a complex curve involving the left lumbar and right thoracocervical spine, then lift the right arm and leg. Lift the left arm and leg if the curve involves the right lumbar and left thoracocervical spine.
Breathe continuously, elongate your neck and tailbone; retract your shoulders. Fully engage your legs. Carefully balance between pulling in and stretching out, which happen simultaneously when you are in the pose.
1. Lie facedown on a mat. Place your forehead on the floor and extend your arms out alongside your ears, palms facing in. If this starting position is uncomfortable for your lower back, neck, or shoulders, put a folded blanket or pillow under your chest and pelvis.
2. Firm your arm, leg, and spinal muscles, drawing into your core of strength. Widen your thighs, making space for the tailbone to curl downward. Stretch back through your legs all the way to the toes, being careful not to squeeze your buttock muscles toward each other, but press the whole pelvis down.
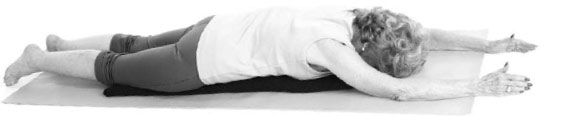
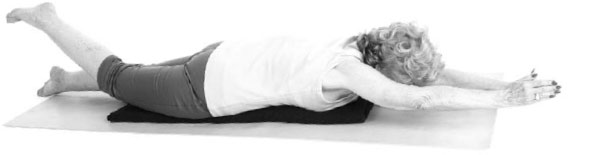
3. Inhale, lift, and extend through one arm and leg on the same side. (See “Avoiding pitfalls”above to determine which side you use.)
4. Wholeheartedly lengthen through your entire body.
5. Remain in the pose until you are tired, then rest down onto the floor.
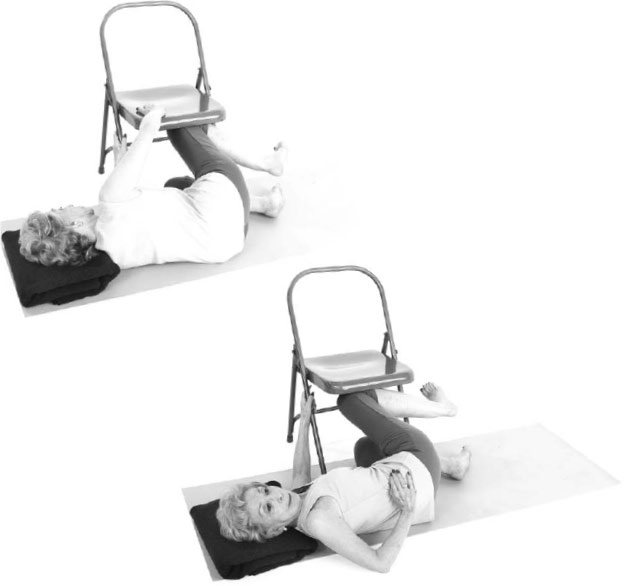
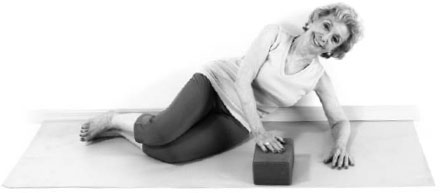
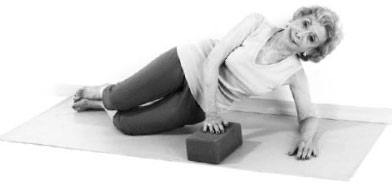
Purpose: To use the thighs to help balance the pelvis and lower back.
Contraindications: Inguinal or abdominal hernia, spondylolisthesis.
Props: A yoga mat and a chair, possibly a blanket or pillow.
Avoiding pitfalls: Pad yourself as needed, perhaps with a pillow placed under the side of your ribs, and a larger support under your head to rest it comfortably.
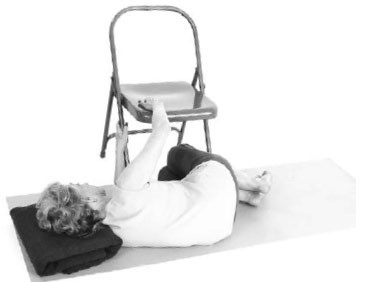
1. Lie on your convex side (in this description it is your left side) and bend your knees up toward your chest so they will fit under the seat of a straight chair. Support the chair with your hands.
2. Breathe and open your thighs away from each other. Widen your sitting bones as well. Your left leg will push against the floor and your right leg will push against the underside of the chair seat. Do this action strongly enough to lift your left ribs slightly off the floor.
3. As you maintain the position, breathe and make more space inside.
4. Take it into a twist: steady the chair with your left hand, and rest your right hand on your waistline. Curl your right shoulder back and down toward the floor, twisting your upper back to the right.
5. Stay with that stretch for several breaths, then free your legs, unwind, and roll onto your back to rest.