CHAPTER 4
Packaging and Dispensing Methods
Aging
So, you have brewed the beer, and the primary fermentation is done. What next? There are no hard and fast rules, of course, but your approach is dictated by whatever substyle you are brewing. If you are making a low-gravity bitter, then it is perfectly possible to rack it directly into a cask or keg immediately after the primary fermentation is done. It is possible, but I do not recommend it.
For all pale ales, it is best to rack after primary and to hold in either a closed vessel or one fitted with a fermentation lock for from one to seven days. You can dry hop at this point if you wish, although traditionally this takes place in the cask. Racking after primary fermentation is beneficial because the beer does not sit on the dead yeast for any length of time; yeast allowed to do this can cause the development of off-flavors through autolysis. Also, the period of secondary fermentation, or conditioning, allows a reduction in yeast content so that the beer is ready for packaging. If you have too high a yeast content after the secondary fermentation, then you will have a lot of sediment in bottle-conditioned beer, difficulties in fining a cask-conditioned beer, or problems in filtration.
In fact, not much does occur in the way of secondary fermentation. With a good, healthy yeast added in sufficient quantity, all but the strongest of these beers should be down to finishing gravity at the end of primary fermentation. Also, it is not wise to cool the beer too soon, as a short period at relatively warm temperatures (60–70 °F, 15.6–21.1 °C) will ensure that diacetyl concentrations are at acceptable levels. Although these styles can stand more in the way of diacetyl than would be permissible in a pale lager, you will regret it if the levels are too high!
For a beer with an original gravity of up to 1.050 (12.4 °P) or so, you do not really need more than one week in the secondary. Long maturation times in the secondary or in the final container do not add anything to the flavor of this type of beer and will result in a loss of freshness. These beers are high in both hop bitterness and hop character; long storage causes a loss of both and will spoil the beer’s impact. Possibly worse, if you have not excluded all air from your fermenter, bottle, or keg, then hop-derived compounds will oxidize, thereby giving a whole host of unpleasant-tasting products. Think fresh! In my opinion, lower-gravity bitters are best drunk within a week or so of kegging or casking. Special bitters, American pale ales, and amber ales will keep for a few more weeks, but do not overdo it.
IPAs, however, are a little different. Because of their higher gravities, they might not ferment fully in the primary and might need a few weeks in the secondary to reach full attenuation. Since they have very high levels of hop bitterness, they might taste quite harsh when just a week or two old; several months’ maturation will help to smooth out the beer. Again, if you do not rigidly exclude air, such maturation might cause more problems than it cures.
If you want an oak flavor in your beer, consider maturing over oak chips. Lengthy maturation in wooden casks will not normally give an oak flavor, unless the type of oak has been carefully chosen to do just that. I discuss this a little further in this chapter under cask conditioning. I do not believe that oak should be a part of this beer’s flavor spectrum, whatever might be said about Ballantine’s IPA. It is certainly not a characteristic of any English beer that I have tasted and, as I discussed in chapter 1, probably did not apply to any of the pale ales of the nineteenth century.
In fact, long storage of pale ales results in a loss of hop bitterness and hop character. This might not be serious at higher bittering levels. I have kept bottles of my version of Original IPA (see chapter 1) for up to two years and could not detect any loss in bitterness. However, that beer could have been as high as 200 IBUs so that even a 50% reduction over two years would still have left it a very bitter beer by normal standards.
An issue I did not discuss in chapter 3 is finishing gravity, although I referred to it earlier in this chapter. With proper yeast management, you should be able to come very close to finishing gravity by the end of primary fermentation, no more than 0.002 points (about 0.5 °P) above your target. This applies even to the higher-gravity IPAs (close to 1.070, 17.1 °P). This is generally considered not true for high-gravity beers because ale yeasts supposedly have a relatively low alcohol tolerance. However, it has been well-demonstrated that beer yeasts are just as tolerant of high-alcohol concentrations as are wine yeasts.1
Clarifying Beer with Finings
Finings is a fine piece of brewer’s jargon, if you will forgive the pun. Essentially, the term is applied to any additive that helps to clarify the beer. An example is copper finings, which are added to the kettle to flocculate the break.
Copper finings are actually called Irish moss, which in America largely comes from Massachusetts.2 Irish moss contains carrageenan. Carrageenan is a complex mixture of polysaccharides, some of which carry acidic sulfate groups (a relatively unusual group in naturally occurring organic compounds). These groups neutralize the positively charged protein fragments that form the break, agglomerating them into larger particles that settle better than the small break particles. The idea behind using these is to get clear wort that contains very little trub and to reduce the risk of chill haze formation in the finished beer. However, it seems that some trub present in the wort might actually help yeast growth. For a 5-gallon brew volume, you need only 1–2 grams (a pinch is the term often used in the homebrewing literature).
I used Irish moss for several years, regarding it as small insurance to pay for a sound fermentation and a good clear beer. However, I had a problem with one batch of wort: It formed a very voluminous, fluffy break that was difficult to remove. In subsequent batches, I stopped using Irish moss, and I since have encountered no problems with either fermentation or final beer clarity.
In English brewing, the term finings is specifically applied to isinglass. Isinglass is prepared from the swim bladders of certain fish and is mainly collagen, a proteinaceous material.3 Gelatin is similar but is much lower in molecular weight. Both substances carry negative and positive charges that are capable of binding with oppositely charged sites on the yeast wall. Yeast cell walls carry charges (usually positive), and these charges cause the yeast particles to repel each other so that they stay in suspension. The finings adsorb onto the cell wall, neutralizing the charges on the wall to enable the yeast particles to aggregate and form flocs. Large flocs settle out much more quickly than small flocs. The settling rate is roughly proportional to the square of the particle size. In other words, if one floc is 10 times bigger than another, it will settle at 100 times the speed of the smaller floc.
Isinglass is significantly higher in molecular weight than gelatin, so it carries more charge per molecule and is capable of forming much larger flocs than gelatin. This means that it will form a dense, compact sediment that is not easily disturbed in transit or when the beer is drawn off from the container. Isinglass will also pull out some proteins—this helps prevent haze formation and also contributes to the stability of beer foam.4
Gelatin is not used by many professional brewers because it is relatively slow acting. It offers no great advantage with well-flocculating yeast and has difficulty handling powdery yeasts. It is of some use to the homebrewer, however, simply because it is easier to handle than isinglass. For 5 gallons of beer, dissolve one standard sachet (0.5 ounce, 14 g) in warm, but not boiling, water, mix well with a pint of beer, and add it to the bulk of the beer. The gelatin might take several days or more to clear and cannot handle high levels of yeast at all. It is useful only for draught beers, since bottled beers will usually clear well if left alone. Even with draught beers, gelatin does not give much more of a compact sediment than can be obtained by natural settling of the yeast. And if you are going to keep the beer for a week or more before drinking anyway, the extra effort of adding gelatin hardly seems worthwhile.
Isinglass is much different. Properly used, it will make the beer fall bright within 24 hours. It will do so even if added at the brewery before shipping to an account. It has been used in England since the eighteenth century and is still preferred by many traditional brewers. It is not necessary if you centrifuge or plan to filter the green beer. But if you want to make a cask-conditioned beer, isinglass finings ensure bright beer that has a sediment that is not easily disturbed, even when the last few pints of beer in the cask are pumped off.
There are problems with isinglass, however, not the least of which is storage stability. Its big collagen molecule, so effective at clearing the beer, very quickly degrades at temperatures of 70 °F (21 °C); from that point, it is useless as a finings agent. Further, yeast count must be fairly well controlled, generally in the region of 1–2 million cells/milliliter. If it is much above or below this level, the beer might not clear well. In addition, not all yeasts respond well to isinglass (or other finings); its use should be restricted to English-style, top-fermenting strains. And if you get it wrong the first time, you cannot re-fine—the situation will just get worse.
Despite this, isinglass finings are not all that difficult to use, with a little care. The results are excellent, even for the homebrewer. This is especially true if soda kegs are used, since these are quite tall and the yeast has to fall a much greater distance than in, for example, a 12-ounce bottle. The result is that the beer can take a long time to clear on its own. I use soda kegs all of the time for my draught beers, and they are clear and ready to drink within a day or so after kegging or casking.
Do not buy liquid finings unless they have been kept refrigerated and you are taking them straight home. If finings must be shipped to you, then the liquid form will almost certainly have degraded by the time you receive it. In the past, isinglass required “cutting” in an acid solution for as much as several weeks in order to dissolve it for use. You can now purchase it in powder form, produced by a freeze-dried process, which supposedly dissolves in water in as few as 20 minutes. Just follow the instructions on the packet.
I find I get more consistent results from the following approach. Take a 1-pint jar, add a little water (3–4 ounces, about 100 milliliters), and carefully shred 5 grams isinglass on top of the water, shaking vigorously after each addition. A more sophisticated technique that will avoid the formation of undissolved clumps is to add the isinglass to a dry jar and then add enough straight grain alcohol to wet the powder. Top up the jar with boiled water, add 5 grams tartaric acid, and 1 gram sodium metabisulphite. Seal the jar tightly, shake well, and store in a refrigerator, shaking at frequent intervals over a week or so. Kept cold, these finings will keep for months.
The yeast count should be in the correct range after a week in the primary, followed by a week in the secondary vessel. Rack into the final container, and mix 5–6 ounces of the prepared 1% solution of isinglass with 1 pint of beer. Then add it all to the bulk. Seal the container, and shake vigorously. For best results, the beer should be at around 60 °F (15.6 °C) when fined, and its temperature preferably should rise a few degrees after that point. Primings, if used, should be added at the same time. This technique has consistently given me bright draught beer after around 24 hours, although this result might take a little longer to produce, depending on the yeast you use. Craftbrewers will find it advantageous to do a few tests on a small amount of beer in order to determine the required volume of finings.
You can get more complicated than this and use auxiliary finings. These are usually acidified silicates, or polysaccharide gums, such as carrageenan and gum arabic, or blends of both. These will also remove proteins as well as yeast, thereby leading to better beer colloidal stability.5 Auxiliary finings are not used on their own. Rather, they are added just prior to fining with isinglass; they will reduce the amount of isinglass required. I have not found them necessary, but craftbrewers might want to explore their use, since they will give the beer better resistance to chill haze formation.
Priming and Carbonation
The purpose of priming is simply to give the finished beer a suitable amount of dissolved carbon dioxide. However, before you ask how much priming you need, you must decide how much carbonation you want in the beer. And before that comes the determination of at what temperature you will serve the beer.
As I mentioned previously, the best temperature is 52–55 °F (11–13 °C). This is the traditional temperature for English draught beer and is the range in which the flavors are best perceived. Colder temperatures tend to dampen the fruity ale character and lessen the impact of hop bitterness. If you prefer the American approach of drinking your beer colder than that, I recommend that you go no lower than about 45 °F (7 °C). Anything less than that, and there is little point in going to great lengths to choose expensive yeasts and complicated hop and grain bills. You are just not going to taste any of the complexities that you have labored to put into the beer.
For reasons that I have never understood, carbon dioxide levels are always measured in volumes of CO2; a volume is measured at 0 °C and 760 millimeters of mercury pressure. English draught bitter should be served at 1.0–1.5 volumes, preferably toward the lower end of this range. American pale and amber ales and IPAs tend to be served at higher carbonation levels, 2.0–2.5 volumes. This is all really a question of taste, and in that area, there can be no absolutes. But I find that at 2.0 volumes, the gassiness of the beer tends to dominate the flavor, masking many of the subtleties of these styles (although the powerful flavor of Cascades can be difficult to quell!). I also find that a high gas content makes the drink much more filling, so it is difficult for me to drink anything more than one or two pints in a session.
Once you have decided on serving temperature and gas content, how do you get the CO2 into the beer? For the professional, and for the amateur with a keg set-up, this is fairly straightforward. You simply apply enough pressure to the vessel to achieve the desired level of carbonation. There are published tables that provide the required pressure amounts, in terms of both temperature and carbon dioxide volumes.6 Note that none of these tables shows as low as 1 volume of CO2, which requires less than 5 pounds per square inch of applied pressure.
Simply applying a pressure to the headspace above the beer will not readily achieve the carbonation levels you want. This is because carbon dioxide dissolves slowly in beer. Homebrewers often find it necessary to rock the keg violently to get the gas to dissolve quickly. Craftbrewers often use a carbonation stone, a device that disperses the gas as very fine bubbles so that it dissolves much faster. Otherwise, it might take days for the beer to come to equilibrium with the applied gas pressure. Clearly, the higher the final content you want, the longer it will take to reach equilibrium—this is yet another argument in favor of low levels of carbonation.
If you are bottling a beer, things are a little more difficult because you do not know just how much gas is already dissolved in the beer before bottling. Assuming that you have fermented your beer at temperatures in the range 60–70 °F (15.6–21.1 °C), you will have around 0.4–0.5 volumes of CO2 in the beer. You then have to add enough priming sugar to bring it up to the required level. But bear in mind that this assumes that the beer has reached terminal gravity. If it has not, then any residual fermentable sugar will ferment along with the primings, and the beer might be considerably gassier than you intended.
English brewers use the rule of thumb that finishing gravity should be about one-quarter original gravity. This can vary, depending on mashing temperatures used by you or by your malt extract manufacturer. If the beer has stayed at the same gravity after several days in the secondary, and your fermentation has proceeded in a normal manner, then you usually can safely assume that you have reached final gravity. It is prudent, however, to allow for this if your gravity is above this one-quarter original gravity value. Simply deduct from the recommended amount of priming 1.5 ounces cane sugar (2 ounces corn sugar) for every one point of gravity (1.001, 0.3 °P) above this value.
TABLE 10
Priming and Carbonation
(for 5 U.S. gallons)
|
Required CO2 Level |
Cane Sugar Addition (oz.)1 |
Corn Sugar Addition (oz.) |
Volumes CO2 added |
Final Volumes CO2 in Beer2 |
|
1.0 |
2.0 |
2.5 |
0.6 |
1.0–1.1 |
|
1.5 |
3.5 |
4.4 |
1.1 |
1.5–1.6 |
|
2.0 |
5.0 |
6.3 |
1.7 |
2.1–2.2 |
|
2.5 |
6.0 |
7.5 |
2.1 |
2.5–2.6 |
|
3.0 |
7.5 |
9.4 |
2.6 |
3.0–3.1 |
1Rounded up for convenience.
2Assumes 0.4–0.5 volumes of CO2 in beer before priming.
You might find table 10 helpful in determining the required amount of priming for a given carbonation level.
I have given cane sugar as the main priming agent and equivalent amounts of corn sugar, allowing for the presence of only about 80% dextrose in corn sugar. Cane sugar is much more convenient and readily available and works equally as well as corn sugar. I really see no need to prime with the latter. As usual, priming is best boiled with a little water, cooled, and then added to the bulk of the beer, before bottling. For kegged or cask-conditioned beer, add the priming along with any finings used.
Bottling and Kegging
This section is really aimed at the homebrewer, since the technology of bottling lines is beyond the scope of this book. Craftbrewers in general have tended to move away from bottle-conditioned beers, favoring either filtration and pasteurization or sterile filtration. That has been very much the trend followed by English brewers during most of the twentieth century, and by the 1970s, just one or two bottle-conditioned beers were available. Only one example, Worthington White Shield, had anything remotely approaching national availability. Even then it was not easy to find in a pub, and there was a good chance the barman did not know how to pour it!
However, one offshoot of the craftbrewing revolution in England has been the rediscovery of bottle-conditioned beers by some of the established brewers, as well as by new brewers. Indeed, there are more than 130 such beers listed in a recent CAMRA publication, although only some of those are pale ales.7 Oddly, this trend is inspired by some of the big supermarket chains that often offer a range of these beers on their shelves. Even the giant brewer Courage was inspired to bring out its Director’s Bitter in this form a few years ago. Unfortunately, they did not do a very good job of it, as the yeast did not compact well. Plus, they used clear bottles, and this often led to unpleasant-tasting, light-struck beer. It since has been withdrawn from the market.
Despite this, many improvements have been made in the technology of producing bottle-conditioned pale ales. These include adding auxiliary finings to the fermenter and then using isinglass in the racking back, and sometimes coarse filtration. This is followed by repitching with yeast, adding priming sugars, storing at ambient temperatures for about one week to develop CO2, and then cooling to 40–45 °F (4.4–7.2 °C) to allow the yeast to sediment. Recommended shelf life might be up to six months, although six weeks is regarded as ideal.8 Note that Worthington White Shield was for some years filtered and then repitched with a different, better-sedimenting yeast.
Although, as I mentioned earlier, the homebrewer can filter the beer before bottling, I do not recommend this. Conditioning in the bottle is a simple technique and if properly done produces bottled beer at its best. Indeed, it is as close as you can get to cask-conditioned beer for many homebrewers. However, it generally leads to much higher levels of carbonation (up to 2.0–2.5 volumes CO2) than can be obtained in a cask. One of the big advantages for the homebrewer is the presence of yeast in the bottle, since yeast is a reducing agent and helps to combat the risk of air oxidation on storage.
Of course, the presence of dissolved air in the beer is often a problem for the amateur.9 One way around this is to use counter-pressure bottling directly from a keg. This permits you to bottle clarified, force-carbonated beer directly, thereby eliminating the need for priming and enabling you to achieve the carbonation level you want. There are a number of such devices available on the market at reasonable prices (see appendix B).
The other problem with counter-pressure bottling is that it requires a kegging system. If you have a kegging system, why would you want to go to the trouble of bottling? For me, the biggest advance in homebrewing techniques is the wide availability of the stainless steel, soda-keg system. These kegs are much simpler to use than bottles, considerably easier to keep clean, and permit good control of carbonation. They even allow you to produce a sediment-free beer by reracking under pressure. Further, they can be stored in a refrigerator, if desired. I have used nothing else since I discovered them. And I should point out that I have tried every type of plastic keg under the sun. Although plastic kegs are cheaper than stainless steel kegs, they are harder to keep clean and they just do not have the life of the soda kegs.
Soda kegs also are more expensive than bottles. A complete, new, soda-keg system, including a CO2 cylinder and pressure regulator, will cost you $200 or more. You will probably want more than one keg—new 5-gallon kegs cost $80–$100, although you can pick up used ones more cheaply ($20–$25). But soda kegs will last virtually forever, so the amortized cost per brew is really very low. Running costs are quite cheap. I have had few maintenance problems, and spares are readily available from homebrew dealers. You do need to refill the cylinder. This costs me $11 for my 5-pound tank, but the refilled cylinder lasts me six months or more. (However, I operate at lower gas pressures than is normal for American homebrewers.)
Another advantage of soda kegs is that you can obtain them in the smaller 3-gallon size, which I have found an excellent way to store very strong beers that require long maturation. For more details on the mechanics of handling and selecting kegs, see the articles in appendix B.
Kegs also help in controlling air levels in the beer. Carbon dioxide is denser than air, so you can use it to flush out the keg before racking the beer into it. Once the keg is sealed, you can also flush the headspace two or three times with CO2. Even better, allow the beer to come to equilibrium with the applied pressure, vent the cask through the pressure relief device, and reapply the pressure, and then repeat the operation. If you have left yeast in the beer, the combination of this approach and the reducing powers of the yeast should minimize air oxidation of the beer. You can permit the beer to clarify under its own steam, but this might be slow, depending on the flocculent nature of the yeast. I usually find it advantageous to fine the beer with isinglass, as discussed in this chapter. You can also dry hop the beer in the keg quite easily simply by suspending a muslin bag full of hops in it. You will need to weight it down (you can actually buy suitable weights from suppliers) to prevent it from floating (do not forget to sanitize the weight). Avoid simply throwing in a handful of hop flowers or pellets. This will block the outlet tube, resulting in a possible safety hazard, as well as being very frustrating when you are thirsty!
An argument against the use of kegs is that you have to push the beer through the serving line and tap by carbon dioxide pressure. This might be all right if you are operating at CO2 levels of 2.0 volumes and above, but it is not so good if you want a less gassy beer. The problem is that you need about 10 pounds per square inch (psi) for serving. If you maintain that level of pressure on the beer constantly, then the beer will equilibrate with the applied pressure and will contain as much as 2.0 volumes CO2. There is a very simple way around this that I use. When I fill the keg, I set the regulator to around 5 pounds per square inch and let the beer equilibrate over a few days. I draw off a pint or two, set the regulator to 10 pounds per square inch, open the valve, allow the pressures to balance, and then turn off the valve. The valve is opened only when the flow of beer slows while serving, and it remains open just for a few minutes. In that way, the pressure in the keg always remains close to 5 pounds per square inch and the beer is perfect, no gassier than any real ale served from a cask by a beer engine.
This last technique amounts to top-pressure serving (in CAMRA terms), while a constant applied pressure is basically artificial carbonation. Note that when the pressure in the keg is the same, there is no difference in flavor due to artificial carbonation in the presence of yeast, as opposed to priming by secondary fermentation (although CAMRA diehards would prefer the latter). However, the top-pressure technique does permit you to operate at much lower gas levels, similar to those obtained with cask-conditioning, but without the ingress of air. You cannot let in air, as is the custom with real ale, unless the beer is to be consumed in a day or two. If you expect it to last a matter of weeks, you must keep the air out to prevent spoilage.
Finally, kegs permit you to experiment with the newest fad in dispensing beer: the use of mixed gas (nitrogen and carbon dioxide). This has become very trendy in England, especially among the big factory brewers. The technique was pioneered by Guinness and is the secret behind the big, creamy head, formed by very fine bubbles, of the company’s stout. It is also what is used in cans of Guinness and the cans of “pub beer” from England, now available in America. The logic behind its use is that nitrogen is much less soluble in beer. Thus, by using mixed gas you can apply a high pressure to the beer, while the level of carbon dioxide dissolved remains low enough for the beer in the glass not to be gassy.10
Mixed gases can be used at home, but I do not see that this is something the homebrewer would or should do.11 It does simplify life a little for the pub operator trying to dispense beer through long lines. But, then, if he operated with a less gassy beer to start with and pumped it mechanically, he would not have the problem in the first place. In fact, I think there is a big disadvantage in serving the pale ale style of beer in this manner. This is because a good deal of the hop bitterness and character is swept up by the big head that is formed and consequently lost to the body of the beer. For a beer that depends to a great extent on these flavor aspects, this can be a disaster. A big creamy head might look good, but it can make the beer beneath it flabby and uninteresting.
Cask Conditioning
I have already described what I mean by cask-conditioned, and what real ale is. To recap, cask conditioning is the process by which the green beer is racked into a cask, primed and fined, and shipped to the pub. In the pub’s cellar, it undergoes a secondary fermentation, during which the cask is vented in a controlled manner. Once the secondary fermentation has subsided, the beer is allowed to sit for a few days. It then is served directly from the cask by mechanical means (a beer engine or an electric pump). It must not be pushed from the cask by carbon dioxide. As the beer is drawn off, air is allowed into the cask, so the cask must be emptied within a couple of days or so; otherwise, the beer will spoil. The priming level is controlled to give a relatively low gas content of around 1 volume CO2.
In American usage, the terms keg and cask are interchangeable. All draught containers tend to be called kegs in America, but in England a keg is most definitely not a cask. A keg is designed for serving bright beer under carbon dioxide pressure and has only one central entry point, called a spear. The gas is forced down the spear, and beer is driven up it to the point of dispense. You cannot draw beer from a keg by means of a tap, and the beer will always be gassy because it is driven by gas.
A cask has the traditional rounded barrel shape, with an arched body flanked by flat ends, or heads. One of the heads has a hole at the bottom suited to take a tap; it is usually fitted with a brass bushing called a keystone. In the middle of the arched side, in a plane passing vertically through the keystone, is a much larger hole, about two inches in diameter, called the shive hole. This is usually fitted with a brass collar. At the brewery, both the shive hole and the keystone are fitted with wooden plugs, called shives. The keystone shive is half cut out so that a metal or wooden tap can be banged through it. The residue of the shive remains as a seal around the tap. The tap itself might be constructed to take a cone of fine metal gauze inside its body so as to prevent hop flowers (used for dry hopping) from clogging the dispense lines.
On arrival in the cellar, the cask is put on stillage—that is, resting on its curved side so that the heads are vertical and the shive hole is at the top. Stillage can be simply a couple of shaped blocks, a set of X-shaped legs connected by struts (with the cask sitting on the top half of the X), or any similar arrangement to hold the cask steady and slightly tilted towards the tap. The shive is partly drilled (0.25 inch or so in diameter). After the cask is stillaged, this hole is knocked through completely, and a wooden spile is fitted. A spile is a conical peg; it comes in two forms. The first is porous and made from bamboo; the second is nonporous hard wood. When the shive is drilled out, a porous spile is first inserted into the hole. It is placed firmly in position but not hammered home so that it can easily be removed by hand. In the early stages of the secondary fermentation, some foaming through the spile will occur and must be carefully and frequently wiped away. Once the beer is properly conditioned and foaming ceases, the porous spile is replaced by a hard spile so that no more gas can escape. The exact timing of this is crucial to the proper serving of real ale; it is something that can be learned only by experience. (However, it usually is from 36 to 48 hours at normal cellar temperatures.)
The hard spile is kept in place until the beer is ready to serve. The tap, if not already in place, is hammered home and connected to the lines. The hard spile then is removed, and the beer is dispensed. In rare cases, the dispense might be done by gravity. More often, it is pulled off by a beer engine or an electric pump. At the end of each serving session, the hard spile should be replaced so that the beer does not lose condition.
This is the traditional approach to preparing real, cask-conditioned ale. Its devotees (of whom I am one) will tell you that the resulting beer is bitter at its best, with a soft, fruity flavor unmatched by beer dispensed by any other method. There is some disagreement in England as to whether the beer should be served with a head. In the South, it is pulled from the hand pump so as to have a minimal head. In the North, drinkers like the little device on the spout, a restricted orifice called a sparkler, that is screwed home tightly so that an inch or so of close-bubbled head is formed. Some drinkers even argue that the beer is formulated and brewed according to whether it will have a head and that one brewed to have no head will be spoiled by pulling it out of a tight sparkler.12 Appendix B lists some excellent resources on producing real ale, whether at home or as a professional brewer.
It takes a great deal of care, skill, and knowledge to maintain cask beer at its best. Several English brewers have in the past operated various schemes to train and reward publicans who keep their beer well. In 1998, a number of national and regional brewers were recruited to a new scheme, called Cask Marque. In the first stages, regular visits will be made to participating pubs and plaques awarded to those whose beers consistently pass taste tests. Periodic inspections will be done and plaques withdrawn from those whose beer falls in quality.13 It remains to be seen how well this scheme works. However, the fact that it is seen as needed indicates how difficult it is to keep real ale in good condition. Poorly trained staff, failure to control cellar temperature properly, and misjudgment of turnover rates—all result in poor-quality ale that is cloudy, flat, or even downright vinegary! This makes real ale a rarity in America, where brewpub staffs have no idea how to handle it and only a few brewers are willing to take the risk with it. Indeed, I have run across quite a few brewpubs that offer “cask-conditioned beer” that actually is nothing of the sort. It is simply kegged, clarified beer (sometimes even lightly filtered) that has undergone no sort of secondary fermentation in cask and is sometimes kept under a blanket of nitrogen.
Offering the genuine article can be done, and a few intrepid brewers do so. (See appendix B for some useful articles on the subject.) They might, however, have to make some changes in the brewing process to suit American conditions. Pike Place, for example, conditions the beer in cask at the brewery (without fining, since fining does not suit their yeast). It then draws off the sediment immediately before delivery, so the beer can be served right away in the bar or pub.14 Other breweries, such as Hales Ales of Seattle, also offer a bright, racked “real ale,” although it certainly does not deserve that designation if dispensed with carbon dioxide.
Attempts have been made to modify the traditional process in England, especially for pubs where the beer might have a low turnover rate and will therefore go flat and spoil. The most important modification is the so-called “cask breather.” Basically, the cask breather permits the ingress of carbon dioxide or nitrogen, at atmospheric pressure, instead of air, as the beer is drawn off. It carries a relief valve to prevent any buildup of pressure so that the beer does not become gassier during its serving life and does not oxidize due to the presence of air.15 It is used by a number of well-respected traditional and regional brewers, who swear that it is the only way to handle slow-moving casks. CAMRA has officially proscribed its use for real ale, but the argument between its members about this has been long and heated. The cask breather does not let in air, and some people think that the effects of air might actually be beneficial over the short life of a cask (long-term effects of air are agreed to be bad). Evidence for this is anecdotal, but it seems unlikely that air really affects flavor in this way.
Casks
Today, most English (and American) brewers use stainless steel casks. Of course, to be really traditional you would use a wooden cask. A limited number of English brewers still do that, and a few—Young’s and Sam Smith among them—still have their own coopers to make and repair the wooden casks. Aficionados consider this to be the only way to serve real ale. Wooden casks give better control over temperature than do steel casks. They also are capable of adding something extra to the beer’s flavor. This flavor comes not so much from the wood itself, but from various microflora that dwell in it.
The use of coopered casks goes back centuries and is based on sound engineering principles. The staves of the casks are tapered from end to end on all four sides so that the resultant arch shape of the cask is reinforced in both the vertical and horizontal planes. The staves are forced into tight contact with one another by means of metal hoops. Today, wooden casks are often partially assembled by machine methods, although there are still a number of traditional coopers left who assemble them entirely by hand (most of these are in the Scotch whisky industry, unfortunately for brewers). Their occupation still requires a four-year apprenticeship and membership in a guild that goes back to the early fourteenth century in England. In the hand coopering of a cask, only the length of the staves and the diameter of the head are actually measured. All other cutting and shaving is estimated by sight and done by hand. In today’s machine era, it is a delight to watch a cooper at work. I recommend it, if you ever get the chance.
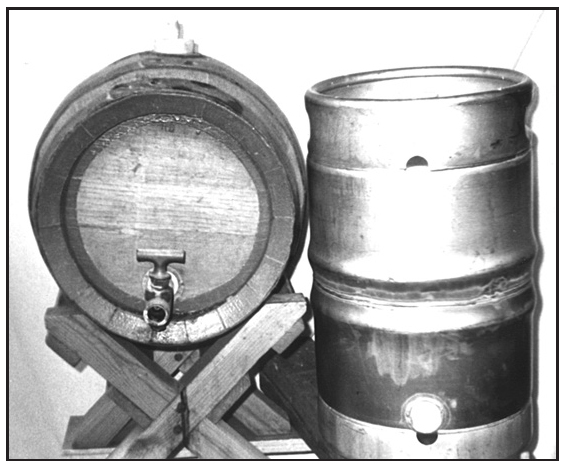
The old and the new—a traditional English coopered wooden cask and a modern version in stainless steel.
Originally, the cask was made of English oak, but this wood is now virtually a vanished commodity. Polish oak now seems to be the favored raw material, although both German and Russian oak are also suitable. According to the cooper who made my casks, these oaks are relatively nonporous when properly cut—this is what helps to make them so watertight. They also have virtually no “oaking” effect on the beer’s flavor, and that has certainly been my experience with my own casks. Apparently, English coopers were forced to use American oak during World War II and found it quite unsuitable. American oak resins leached out into the beer, giving it an undesirable flavor, and the only solution was to line the casks with pitch. If you are going to do that, you might just as well use a steel cask, which is easier to handle.
Effect of Wood on Flavor
The role of oak flavor in beer is mysterious. It is unknown whether the casks used in the Burton Unions added an oak flavor to the original pale ales. Marston’s is the only English brewer to still use unions. It reports a somewhat different initial flavor when the unions are freshly scraped out, as happens every three years or so.16 But my own experience brewing in and drinking beers from oak casks suggests that the typical oaky character so often seen in the ubiquitous Chardonnays is not a part of pale ale flavor. But then there is Ballantine’s IPA and its renowned American oak flavor. However, as I discussed in chapter 1, this probably came from maturing in wooden tanks, rather than from the casks used to transport the beer.
Fermenting and maturing in wood is rare these days and is usually reserved for fairly strong beers that need lengthy maturation. However, Gale’s of Hampshire reportedly uses fermenters made of a type of pine imported from New Zealand and prefers the flavor of beer made in these to that produced in stainless steel vessels.17 I am quite familiar with Gale’s fine beers, which do have a malty, complex character. But I cannot remember ever detecting any taste notes that I could assign to pine. The Firestone Walker Brewing Company in California is also said to use American oak casks in a Union-type system that gives the beer a distinctive oaky character.18
In his article “Beer from the Wood,” Jason Dunson-Todd recommends the use of oak, and the American variety in particular. He suggests that all pale ales, and even medium-gravity bitters, would nicely pick up oak flavors.19 The beer will pick up some tannins, which could cause harsh flavors in a low-gravity beer. This might not be a problem, however, since by definition such beers are not matured for long periods of time. And of course, there are all of the other oaky flavors, such as vanillins, which are so prominent in many modern Chardonnays. While this approach would certainly add some complexity to the beer, it also would take the beer out of the classic pale ale style. Still, that is no reason not to do it. I have said elsewhere that classic definitions should not be regarded as restrictive. If you are interested in trying it, go ahead, push back the frontiers.
Another approach, tried in America, is to add oak chips to the maturing beer. This might have been inspired by Budweiser’s much publicized use of beechwood chips for aging. In fact, these confer no flavor at all. Using them is simply a way of providing a large surface area to help pick up yeast and clarify the beer. Pike Place reportedly used this technique at one time, aging an IPA on French oak chips, but they have now discontinued this beer because of a lack of interest from their customers.20 If you want to try aging on wood chips, go ahead, although you might find sanitation a problem. Boiling the chips is likely to remove a lot of the flavoring substances from the oak, and less stringent sanitation methods might leave infecting bacteria in the wood pores. But, as I said previously, it might add some extra complexity, so try it by all means!
Wood versus Stainless Steel
I do have some problems with wooden casks, especially for the homebrewer who is likely to have them out of use for significant periods of time. First, a cask should not be allowed to dry out, as its staves will shrink and it will no longer be watertight. You have to keep it filled with water. But you can accomplish this only very gradually because it takes some time for the staves to soak up the water and expand, thereby becoming watertight. I had a bad experience doing this when I moved to America from England, bringing with me a couple of casks. It took nearly two months of soaking before they finally ceased to leak!
A second problem with wooden casks is the difficulty of cleaning one that might have all sorts of unpleasant contamination lodged in the wood. Even when in use, casks can become contaminated, particularly if they are left sitting around still containing some beer dregs. Cleaning them out thoroughly is very difficult unless you have access to live steam. You can give them a short soak in dilute bleach solution, but they will need several soakings and rinses after such treatment. And I can tell you that heaving about even a 5-gallon cask when full of water is quite an exercise.
For these reasons, you are probably better off getting new casks, or least remade casks. I really recommend that if you want to brew real ale at home, you stick with stainless steel casks. These will last a very long time, do not leak, and are much easier to clean than wooden casks. Note, however, that their shape and narrow entry orifices make cleaning them more difficult than is the case with the soda kegs. In fact, you can use a soda keg to dispense true real ale.21 Lay the keg horizontally, with the gas inlet on the bottom and the long outlet tube at the top. Then dispense the beer through the “in” valve, while admitting air through the “out” valve, which has been fitted with a quick disconnect hose-barb attachment. There is no reason why this should not work well, but I must admit I have not tried it, largely because the beer must all be consumed in a day or two or oxidation will result.
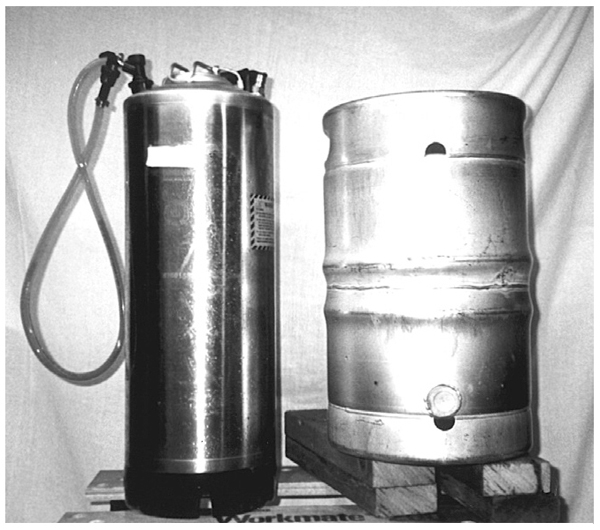
A stainless steel soda keg, ready for dispensing one of my IPAs, alongside a vertical cask designed for real ale storage. Who wants to wash bottles?
Casks can be fairly expensive—$100 and up for American oak or American stainless steel casks.22 Imported casks, whether wooden or metal, are obviously more expensive. And note that English casks come in some odd sizes. Smallest (and rarest in America) is the pin, which contains 4.5 imperial gallons (about 5.5 U.S. gallons). Next is the firkin, at 9 imperial gallons (10.5 U.S. gallons), followed by the 18-imperial-gallon kilderkin and the 36-imperial-gallon barrel. Incidentally, apart from the barrel, the names of the other three are Dutch in origin, reflecting the fact that the first beer brewers (as opposed to ale brewers) in England were from the Netherlands. Having said all that, I have just bought a stainless steel pin for $85. Unlike more traditional casks, this one is straight-sided, with the keystone at the bottom and the shive hole in the top. I have not tried it yet, but there is no reason why it should not work as well as the traditional barrel shape. And it will, of course, need no stillage.
In addition to the casks, you will need a variety of other equipment. These include
• shives,
• spiles,
• taps (stainless steel is best, but brass is the most common),
• a wooden mallet (for banging home shives and taps), and
• a shive extractor.
If you are going to take the “authentic” English approach and connect your cask to a beer engine, you also will need suitable tubing and, of course, a beer engine. The engine will probably set you back another $250 to $300 or so. An alternative is to build one yourself, as described by Sal Emma in his article, “Build a Beer Engine.”23
Dispensing through a Beer Engine
Beer engines have existed in England since early in the nineteenth century. They are not essential to the serving of real ale, but do add a nice touch and give you much better control over head formation than does gravity dispense. Although called a beer engine, it is more properly a hand pump, in that it operates entirely manually. It consists of a cylinder, which is usually 0.5 imperial pint in volume and fitted with a plunger. As you pull on the handle, the plunger pulls the beer up to the spout and into the glass. As the handle is returned to the vertical, a flap valve in the plunger opens and the cylinder refills with beer. In England, the presence of a hand pump on the bar can imply that the pub is selling real ale. While this is often true, it is also possible to use one to dispense from a cask that carries a top-pressure of carbon dioxide and does not permit the entry of air into the cask.
In modern times, electric pumps were introduced. These offer an advantage over hand pumps in that they can meter in exact quantities. They are quite widely used, but many brewers and publicans still prefer the hand pump, perhaps as much for its aesthetic qualities as for its practicality.

A pair of antique handpumps, or beer engines, along with a rear view of the bar in my home brewery.
Today, there are two types of hand pumps, distinguished by the shape of the delivery spout, as I mentioned earlier in this chapter. The standard one is quite short, often just a straight horizontal tube with a short, wide tap at one end. This is the type that has been used for dispensing beers in the south of England for as long as I have been drinking beer. The second type has a long arching tube, or swan neck, ending in a fairly narrow orifice. This is a somewhat newer design and has become accepted as the standard for Northern beers.
Both types can be fitted with a sparkler, which is adjustable and can be screwed up or down to increase or decrease its effect. The turbulence caused by forcing the beer through the restricted orifices of the sparkler generates foaming by the evolution of carbon dioxide and by air pickup. A tight sparkler gives the beer a very thick, dense head, while a loose one gives it a much fluffier, smaller head. Without the sparkler, as used to be common, the beer is often served with virtually no head at all (depending on its condition).
Both types of hand pumps have their devotees in England, but in recent years the swan neck types have spread all over the country, and beer with a big head has become common, even in the South. Many English drinkers feel that this is wrong and that the choice of nozzle should depend on the beer, rather than the other way round. As always, it is an issue that is clouded by ancient North-South enmity that often gets in the way of rational judgment. The argument is that because many hop bittering and aroma components have significant surface activity, they will be concentrated in the big head of a beer pulled from a swan neck. This will leave the body of the beer emasculated and uninteresting. This is certainly true if the head is overdone. However, it is still possible with a swan neck to produce a beer with a modest head that does not suffer from this effect. Of course, others say that a tight head actually leads to an emphasis on the hop aromatic character. It probably would not hurt an American pale ale or IPA to be pulled off in this way because of their characteristic high hop character.
I feel that this is really a personal choice; you have to decide for yourself on the type of hand pump to use. If you are not sure, then go for the swan neck, as I have done—a new clamp-on type costs me $325. Experiment with the sparkler position or even leave it off, using the same beer. Once you have found what works for you, leave it that way for future brews. Craftbrewers might have the choice made for them by their customers. It might well be worth educating them as to which you think is best for your type of beer. If time permits, you would be well advised to demonstrate your desired approach to them.
I have included in appendix B a list of sources that include names of suppliers of casks, kegs, hand pumps, and accessories. I have not checked out all of these suppliers; some might deal only on a wholesale basis. Homebrewers might have to work through the lists to find someone prepared to supply retail (although I found one straightaway when I recently bought a pin and hand pump from an East Coast supplier).
Serving Pale Ale
Finally, what are you going to dispense the beer into? A glass, naturally, but what sort of glass? In my opinion, neither American nor English brewers pay enough attention to their glasses for bitters and pale ales. The so-called “shaker pint” used by many American craftbreweries and brewpubs is heavy and unattractive and does little to enhance the enjoyment of drinking. When I first started going to pubs in England, this style of glass was used only in public bars, where cheapness was a major consideration. The up-market saloon and private bars would use something a little better, usually the dimpled mug. This is not so bad, but it is a little heavy and clumsy and not exactly stylish. Some of the newer thin straight glasses, or sleeves, used in England are an improvement. But surely modern design techniques could come up with something much better and more interesting. Belgian brewers in particular are fastidious about ensuring that their beer is served from a suitable and attractive, usually badged, glass, so why do we not also?
I am something of a glass fanatic. I have a collection of around 200 different styles from all over the world, but particularly from England and America. Surprisingly few of them are all that interesting in terms of design—many are more important to me as nostalgic reminders of beers I have drunk. So this is a plea to brewers everywhere: Pale ale is one of the most important beer styles in the world, so why can we not have glasses that match that importance?