Controlling Heat Loss: Insulation
Minimizing heat loss is one of the key differences between a smart, solar greenhouse and the standard energy-guzzling one. Though both have similar amounts of solar gain during the day, a solar greenhouse is designed to trap this heat overnight by reducing heat loss through the walls, roof and ground as much as possible. Insulation allows the greenhouse to maintain warmer temperatures at night and through cold winter days.
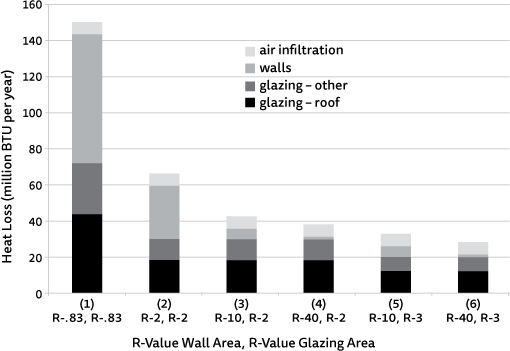
The purpose of insulation is to reduce conductive heat losses through the surfaces of the greenhouse. Conduction — the movement of heat through a material — is the primary reason the greenhouse cools down at night and on cold days. As shown in Fig. 6.2, the vast majority of conductive losses occur through the glazing materials, which are much less insulating than the walls.
The second largest source of heat loss in the greenhouse is typically air infiltration: when warm air leaks out the greenhouse through cracks or gaps, or cold air seeps in. Here, too, the glazing area is the biggest culprit because most glazing materials create air gaps as they expand and contract under temperature swings. To compare, most homes have one half to one full air exchange per hour. (Very efficient homes have one third air exchange per hour; that is, they only lose a third of their air volume every hour). Traditional greenhouses are notoriously “leaky” structures and have upwards of two air exchanges per hour.
It’s impossible to create a perfectly sealed environment, but it is possible to greatly reduce air infiltration with some simple, cheap methods. It’s critical to caulk all cracks and seams in the greenhouse after it’s built. Given proper caulking, and “tight construction,” we find it possible to keep air exchanges to less than one per hour. Secondly, avoid windy locations when siting the greenhouse. Wind increases air infiltration because it blows through cracks. It also creates pressure differentials around the greenhouse, spurring more air movement.
Convection — the movement of heat as air warms up and rises — plays a corollary role in heat loss. As air expands and rises, it passes across the glazing, where conductive heat losses occur.
More importantly, convection is responsible for a salient characteristic of greenhouses: extreme temperature differentials between plant levels and the peak. As hot air expands and rises, it collects at the highest point in the greenhouse, causing the top zone to commonly be 40 degrees F warmer than plant level. This phenomena allows for passively cooling the greenhouse during the day. Hot air at the peak can be vented out, creating a convection current that draws cool fresh air in.
We point out these terms because, while much of the conversation revolves around insulation — reducing conductive heat loss — it is imperative to know this is only part of the picture. You can install super-insulated walls, but if the entire volume of air in the greenhouse is exchanged 2–3 times per hour due to air infiltration, the insulation becomes much less relevant. Insulation must be combined with a well-sealed environment for the greatest effectiveness.
The universal metric for rating insulation materials is the R-value. It measures a material’s resistance to thermal conduction, or its insulating quality. The higher the R-value, the more insulating. R-values dominate any discussion of insulation because they are a simple value that can be applied to any material. However, what is less discussed is that R-values are only part of the equation that measures the total heat loss through a wall or surface, which can be defined as:
R-value = resistance to heat transfer of a material
ΔT = the difference between the inside and outside temperatures in degrees F.
Importantly, the relationship between R-values and heat loss is not linear, as shown in Fig. 6.1. That fact has major implications when choosing an insulation strategy. We say “strategy” because you naturally have choices about where and how much to insulate. Fig. 6.1 shows that heat loss plummets as you move from an R-1 to an R-2 but changes relatively little when increasing from an R-20 to an R-21. Though in both cases the R-value increases by 1, the first upgrade will have a huge impact on total heat loss, the second comparatively little.
The implication is that money is much better spent adding some insulation to low-R-value surfaces like glazing, rather investing greatly in “super insulated” walls with very high R-values. Due to this non-linear relationship, we recommend ensuring that all glazing materials have a decent R-value (at least R-2).
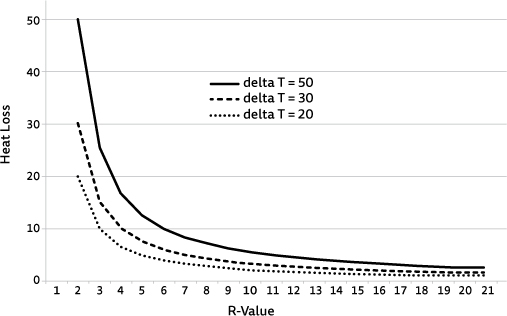
FIGURE 6.1. Relationship between R-Values and Heat Loss.
FIGURE 6.2: Effect of R-values on Heat Loss. Variables: 12' × 20' greenhouse, located in Boulder, Colorado, with a 50% glazing area-to-wall ratio (415 sq. ft. of glazing in the roof and walls, and 413 sq. ft. of insulated wall [for scenarios 3–6]). Slab insulation assumed at R-10. Air infiltration assumed 1 per hour. Calculations made using the Heat Loss Calculator on builditsolar.com.
To further illustrate this point, Fig. 6.2 compares different combinations of R-values for the glazing area (in both the roof and on the walls) and for the insulated wall area. We use a hypothetical greenhouse, and keep other variables the same, changing just the R-value of each surface.
The first scenario represents a traditional uninsulated greenhouse with polyethylene or single-pane glass glazing (R-0.83) on all sides and the roof. There is no insulated wall area. The second assumes the same structure has a double layer of glazing (R-2) on all surfaces. The third adds R-10 insulation on the north wall, and some on the east and west. Now the greenhouse has what we would call a 50% glazing-to-insulation ratio; about half the area is insulated with an R-10 wall and the other half with R-2 glazing. From there, we alter the two variables slightly, changing the insulated wall area to R-40 (run #4), or changing just the glazing area to R-3 (run #5). The last represents the most efficient structure, combining an R-40 wall with R-3 glazing.
The change in total heat loss demonstrates the payback of upgrading glazing materials to a decent R-value. Adding the second layer of glazing (going from R-1 to R-2) cuts heat loss by over 50%. Adding the insulated wall reduces total heat loss by another 35%. From there, the payback becomes less straightforward. Going from an R-10 to an R-40 wall only creates heat savings of 10%. Whether this investment is worth it depends on your goals for the greenhouse, the current cost of heating, the cost of the insulation material, and your climate. To evaluate the effect for your area, we recommend performing your own quick analysis using an online heat loss calculator, such as “The Home Heat Loss Calculator” on builditsolar.com. Hand calculations are also possible, but are becoming less relevant given the ease and functionality of online calculators. (See Further Reading for more resources.)
We flesh this out because a common mistake we see is the devotion of lots of money and effort to creating super-insulated walls (R-40 or greater) while at the same time using very poor glazing materials. The justification is usually, “I need a thin glazing for light transmission.” However, adding a second layer of glazing is usually only a 10% reduction in light. Given the enormous energy savings from that extra layer, in our opinion, the increased temperatures and performance are worth it.

What is the difference between R-values and U-values?
The U-value is the reciprocal of the R-value (U=1/R). It indicates the ability of a material to conduct heat; therefore, a lower number is better. It’s most commonly used for glazing materials, like window units, and in heat loss calculations.
As demonstrated by an exercise like Fig. 6.2, the lion’s share of heat loss in a greenhouse occurs through the glazing. The good news is it is easy to improve the insulating quality of glazing by using multiple layers of material. Layers create air gaps, which insulate and transmit light.
We recommend a minimum of two layers of glazing. This can be done by layering multiple sheets of material (such as two layers of polyethylene), or using a multi-layer material (such as a tri-wall polycarbonate or double-pane windows). The added cost of a thicker multi-layer material is not very big, and the energy savings are huge, making this a no-brainer when it comes to solar greenhouse design.
A second strategy is simply to minimize the area of glazing as much as possible. (This has less to do with actually insulating, and more to do with adjusting the geometry of the greenhouse, the topic of Chapter 8). The geometry of some greenhouses minimizes the glazing area while creating an angle that allows for year-round light collection. In other words, they minimize the glazing-to-insulation ratio and maximize the annual light gain on the glazing surface. This is an excellent tactic for areas that have harsh winters and sufficient light. In cloudier climates, you will have to rely on a larger glazing area.
Highly insulated glazing materials are out there, such as a 5-layer polycarbonate or triple-pane, low-e windows. Typically, though, they are either too low in light transmission, or too expensive for large areas. R-values under 5 are the norm for glazing — and hard to get around. To accommodate for that fact, a common strategy among solar greenhouses builders is the use of moveable insulation to cover the glazing at night. This creates the best of both worlds: the glazing is a light collector during the day, and becomes like an insulated wall at night.
The challenge with these systems is simply the moveable part. Automation requires tracks, motors and a system customized for your greenhouse. There are not many easy kit products out there, so automated moveable insulation systems are either quite expensive or very time intensive. They are justifiable for large commercial greenhouses, but rarely so for residential greenhouses. Thus, moveable insulation usually requires an active operator to move it in the morning/night.
The strategies vary from very simple to complex. At the most basic level, you can install an extra layer of a glazing material or bubble wrap — commonly sold for greenhouses — during the winter months. This is left up, but comes with the challenge that water can easily get between the two materials and fog up the glazing, reducing light transmission.
The next step up is moveable curtains or shutters. Curtains are a popular method for large commercial greenhouses. They’re made out of aluminized fabrics, which reflect thermal radiation back into the greenhouse. Large-scale systems are automated with motors and tracks to pull the curtain across the glazing. This is one case when a cost-effective automated solution is possible, though it is only justified at a certain scale. A number of studies show that thermal curtains can cut nighttime heating loads by 50%. They can also be used as a shading element during the summer months.
While a great solution for commercial growers, unfortunately there are not many easily installed curtain systems for small greenhouses on the market. Creating one typically involves purchasing a curtain material (found through a greenhouse supplier) and building a custom track system out of wire cables. Do not use fabrics or insulating shades made for residential windows — they will quickly mildew and mold in the high humidity of the greenhouse. The best fabrics are sold from greenhouse retailers and contain an aluminized fabric, which reflect thermal radiation back into the greenhouse at night.
An additional strategy for fitting curtains to your greenhouse is to use track systems intended for something else. Try looking for “shade curtains” or “black-out systems” for parts and supplies when building a curtain system. See the resources in Further Reading as well.
A major challenge with curtains of all types is getting a good seal against the wall or glazing. Without a seal, warm air will be drawn between the curtain and the glazing, negating much of the effect of the curtain. Magnetic strips or Velcro can help create seals, but they are pretty inelegant solutions.
Instead of curtains, rigid insulation in the form of shutters can be manually moved and placed over the glazing at night. These provide more insulation and better seals — if done right. The basic versions are made from rigid foam board insulation, sized to fit the opening of the window or glazing. Called pop-in shutters, these are placed snugly in the opening and secured with a latch, bungee cord, or wood board. The disadvantage is that the boards are awkward to move and store when not in use. We recommend using them as a “once in a while” backup in cases of extreme weather and storing them in the garage for most of the season.
FIGURE 6.3. Pop-in Shutters. Credit: Ceres Greenhouse Solutions
The next level involves creating permanent shutters that are hinged to the outside of the greenhouse and close over the glazing at night, as shown in Fig. 6.4. The most common design is to hinge shutters below the window and flip them up to cover the glazing, though there are many variations. Permanent shutters have a unique benefit: they can also be used as light reflectors during the day. The topside of the shutter can be covered with a reflective metal or plastic. It can be positioned at the correct angle, relative to the angle of the sun, to direct more light into the greenhouse during the day. This gives you the capability to both increase the total amount of light during the day and turn your greenhouse into a tightly sealed, insulated box capable of withstanding extremely harsh conditions.
This shutter/light shelf combination is a brilliant concept in theory, but it’s beset by some practical challenges. First, from a materials perspective, it is hard to create a large shutter that is both lightweight and able to achieve torsional stability (making the shutter rigid and exactly plane to close evenly against the window). Shutter frames can be made of welded metal or very thick wood. The first requires some custom welding (expensive, if you don’t do it yourself); the latter creates very heavy shutters (difficult to lift and secure by hand). But you can add a pulley system to assist in opening/closing them. To go a step further, the shutter can be automated using a timer and a motor. Keep in mind these are custom solutions that require time and money, appropriate for some growers who are doing the building themselves, but impractical for many others.
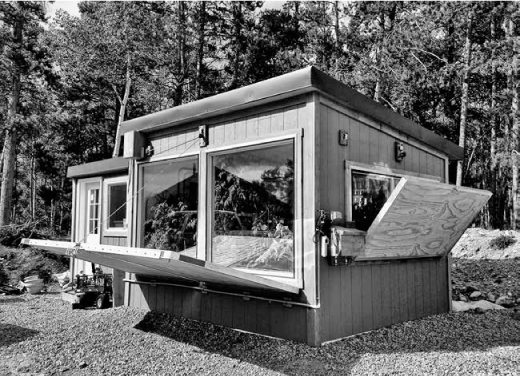
FIGURE 6.4. Moveable Insulating Shutters. A motor and pulley system closes these shutters/light reflectors over the windows at night, creating a highly insulated window at night. Credit: Ceres Greenhouse Solutions
The final scenario — creating an automated shutter and light reflector — is the holy grail of moveable insulation. This was one of our early endeavors at Ceres, but it turned out to be much more difficult than expected. In addition to the challenges mentioned above, snow and wind loads create further complications for building stable, automated shutters. All the challenges were solvable, but added significant cost and engineering time. We constructed shutters out of extruded aluminum frames and rigid polyiso insulation at the center, backed by plywood. Taking into account installation, an attachment system, and automated control, this custom system added a few thousand dollars to the residential greenhouse. The cost would be lowered if designing and installing the system yourself. Again, moveable insulating shutters are excellent options for those who enjoy building and engineering custom solutions — and all the time/tinkering that entails — but difficult for “hands-off” growers.
When considering insulation, most people think about the walls, glazing and roof. Less considered, but equally important, is the ground. Heat loss occurs through the floor of the greenhouse just as it does through the walls, because the natural temperature of the topsoil is about the same as the outdoor air temperature (i.e., freezing in areas with freezing winters).
When we say greenhouse floor, we mean the ground plane. Many greenhouses don’t use flooring materials; they have bare ground so that plants can be grown in the soil. (Even if growing in raised beds, we recommend connecting the beds to the soil underground.) We don’t recommend creating an insulated floor, per se. Rather, underground insulation should extend around the perimeter of the greenhouse, as shown in Fig. 6.5, leaving the greenhouse connected to the soil underground.
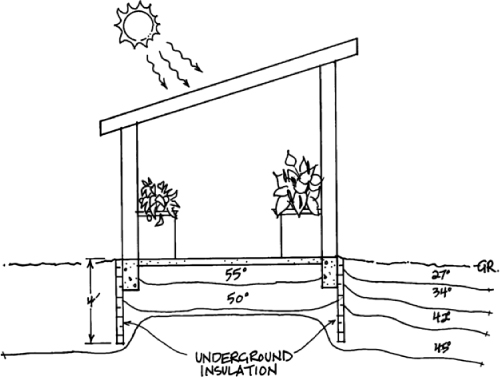
FIGURE 6.5. Effect of Underground Insulation. Insulating around the perimeter creates a “thermal bubble” of warmer soil temperatures directly beneath the greenhouse.
The purpose of underground insulation is two-fold. First, it insulates the indoor soil from the surrounding topsoil, reducing heat loss and keeping the soil warmer year-round. Secondly, it connects the greenhouse to the stable temperatures of the soil deep underground. Once insulated, the soil underground becomes useful thermal mass. It passively absorbs and stores heat, creating stable temperatures year-round — what we call the “thermal bubble” underneath the greenhouse. This prevents the soil inside from freezing. Moreover, it helps stablize indoor air temperatures by integrating a large source of thermal mass.
The reason for underground insulation stems from the fact that anywhere in the world, the soil deep underground stays warmer and fluctuates less than air temperatures (as shown in Fig. 6.6). Across the US, average soil temperatures below the frost line are around 40°F–50°F (4°C–10°C). The exact range varies by climate. You can find data for many areas by using the National Resources Conservation Service (NRCS) database, called the Soil Climate Analysis Network (wcc.nrcs.usda.gov/scan/).
There are two strategies for installing perimeter insulation: vertically (straight down); or horizontally (sloping it away from the edges of the greenhouse). Which is easier depends on your site preparation, and whether or not you need to excavate. Excavation usually depends on your foundation type and if you are installing an underground heat exchanger like a ground-to-air transfer (GAHT) system, the subject of Chapter 13. Foundation types are discussed more in Chapter 9. Thus, the best method for your greenhouse — vertical or horizontal insulation — will become clearer as you progress with your greenhouse design.
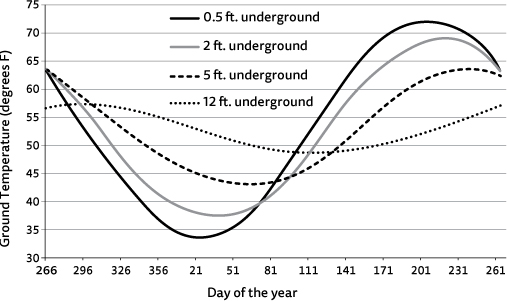
FIGURE 6.6. Effect of Depth on Soil Temperature. (Example: Temperatures vary by climate)
How deep should insulation be installed?
Like many decisions, this comes down to striking a balance between cost and performance. The greater the distance of insulation, the more stable soil temperatures will be underground. We usually insulate to a depth of 4’. In most climates, soil temperatures 4’ underground start to even out and stay warmer year-round, as shown in Fig. 6.6. Four feet is also the standard width of insulation boards, so it keeps material costs down. In climates that have harsher conditions (say, colder climates like northern Canada or Alaska, or very hot climates like the southwestern US), it is worthwhile going to greater depths (e.g., 6’). In climates that have mild conditions (for example, parts of California), insulation may not be needed at all, or it can be used to very shallow depths (e.g., 2’). It all depends on your soil temperatures. You can look yours up using the NRCS database for US locations (www.wcc.nrcs.usda.gov/scan/).
Vertical insulation is more logical if you are already planning to excavate underneath the greenhouse (either for foundation reasons, or if installing an underground heat exchanger). In the vertical method, boards of rigid foam insulation surround the foundation of the greenhouse, as shown on the last page of the color section. We recommend overlapping two layers of 4' × 8' insulation boards around the foundation. The excavated soil is then back-filled and allowed to settle before the greenhouse is built.
If you don’t plan on excavating underground, horizontal insulation is probably easier. Also known as wing insulation, the boards of insulation slope away from the edge of the greenhouse, 2'–4' away on all sides, as shown in Fig. 6.7. Unlike vertical insulation, this is best installed after the greenhouse is fully constructed on-site. To install, a backhoe or excavator excavates an area sloping away from the greenhouse, starting about 9” deep and extending to about 2' deep at the edge. Ideally, a layer of gravel is first laid on this soil (to help with drainage underneath the insulation). The boards of insulation are placed on this sloping surface. The slope is critical to allow for drainage away from the greenhouse. On top of the insulation goes another layer of gravel (well-draining soil can also be used).
Recommended Insulation: Underground
We normally use two layers of rigid foam board insulation (extruded polystyrene) to achieve an R-12 to R-14 layer of insulation around the perimeter of the greenhouse.
In either method, extruded polystyrene foam board (commonly called blue board or pink board) is the standard insulation for below-grade applications; it can withstand higher levels of moisture. We normally install two layers of boards, providing a total of R-10 to R-14 around the perimeter of the greenhouse. Boards should overlap so there aren’t gaps between boards.
A recent concern has emerged: currently, all types of polystyrene are treated with a fire retardant called HBDC, a known toxin. Research is going on now, including investigations into whether or how HBDC can leach into soils and have effects there. As a result of these concerns, at Ceres we are looking for safer and more sustainable alternatives for underground insulation. Possibilities include mineral wool or perlite, but these are still limited in availability. Extruded polystyrene is still the norm.
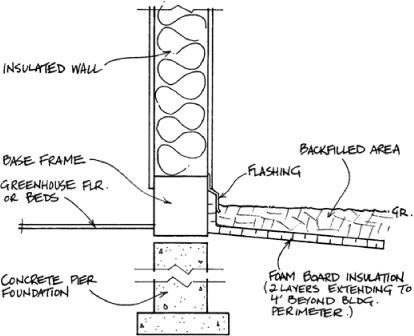
FIGURE 6.7. Horizontal/Wing Insulation. Rigid foam board is laid at a slight slope to allow for drainage, extending out from the base of the greenhouse.
Regardless of the method, underground insulation is relatively cheap to install and can have a major impact on all greenhouses. Thus, it’s one of our first suggestions for greenhouses of all types, whether small residential greenhouses with no foundation, or commercial-scale greenhouses that a full foundation.
Insulating the walls of a framed solar greenhouse is much like insulating a house: the same materials options are available to you, though some are better than others for a greenhouse.
Fiberglass is ubiquitous in every type of construction for a very simple reason — it is cheap and easy to install. However, you get what you pay for. The “field performance” of fiberglass is much lower than its rated R-values because it can easily wick moisture. For that reason, we don’t recommend it for greenhouse applications (because moisture is a constant factor).
A similar, but more effective material is mineral wool batts. Mineral wool includes rock wool and slag wool (different materials formed into the same mineral wool batts). In contrast to fiberglass, these batts are semi-rigid: they come in boards that are firmer and thus easier to cut and get a secure fit. The R-values are also significantly higher, at 3–4 per inch. Finally, mineral wool is more water resistant than fiberglass, making it a viable candidate for insulating greenhouse walls. The drawback is that at the time of this writing it is not as readily available as fiberglass (it must be sourced through distributors or certain retailers), though this is changing quickly as its popularity — particularly among green builders — is increasing.
Rigid foam board is another very common type of insulation that can be used in walls and underground. Foam board has a higher moisture resistance than fiberglass, giving it better performance over time. There are three types: extruded polystyrene (XPS), expanded polystyrene (EPS), and polyiso. Because that is a lot of “polys” we normally use their nontechnical names as references.
Extruded polystyrene is normally called “pink” or “blue” board due to brands’ characteristic colors. It is very common both for walls and below-grade applications. The advantage of pink/blue board is that it has high insulation values for its cost, and it is very moisture resistant. The latter makes it a very good material for using in humid environments like greenhouses and also underground. It’s commonly used to insulate around the foundation of a greenhouse. Unfortunately, it is not the “greenest” material — making it creates ozone-depleting compounds and, as mentioned above, it currently includes a fire-retardant chemical called HBDC in the US.
Using a different manufacturing process, companies also make expanded polystyrene (EPS). Commonly called “beadboard,” these rigid boards are made of a conglomerate of white beads (the same material as Styrofoam cups). Though more sustainable than its extruded counterpart, EPS has a lower R-value per inch and worse moisture resistance. For those reasons, it is less common than pink/blue board for greenhouse applications.
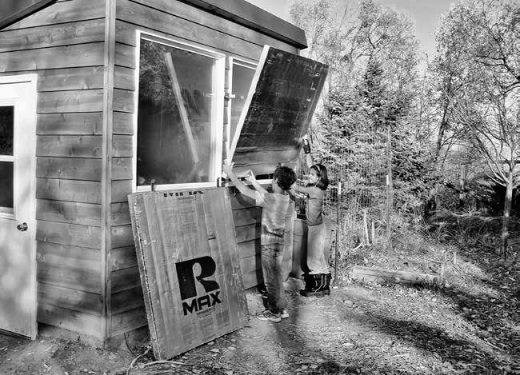
Polyiso (full name polyisocyanurate) is another type of rigid plastic insulation. It has a higher insulation value, usually R-6 per inch. Though the total cost per board is higher for polyiso boards, the cost per R-value is the lowest among rigid insulation products. For that reason, this tends to be our top choice when insulating the walls of the greenhouse, as it has the greatest insulation value per dollar spent. It absorbs moisture slightly more readily than polystyrene, but still has adequate-to-good moisture resistance. Polyiso boards come with a reflective foil backing. The predominant brand name is R-Max.
Recommended Insulation: Walls
We recommend polyiso rigid foam board to insulate the framed (nonglazed) walls of the greenhouse. Polyiso provides high R-values for its cost, while also being water resistant. In addition to insulating in the wall cavity (between the studs) we highly recommend using a layer of polyiso behind the studs. The board of polyiso is installed so that it covers each stud, underneath the exterior siding. This reduces heat loss through the wood framing (also called thermal bridging). The conductive losses of uninsulated studs significantly reduce the R-value of the wall overall. We also recommend insulating around the edges of the board with insulating foam sealant (brand name: Great Stuff) to seal any gaps.
Rigid foam boards (of any material) come in 2' or 4' widths, typically 8' long. You can get them 1, 2 or 4 inches thick. So the overall R-value can be anywhere from R-2 to R-16, depending on the thickness and rating. Recommended R-values vary by climate, as we’ll discuss below.
Blown-in insulation can consist of cellulose, fiberglass or mineral wool. All are made out of some recycled content (either newspaper, glass shards, or industrial waste products), processed into slurry that is blown into the wall cavity. These are less commonly used in greenhouses. Though they provide high R-values, the installation is usually cost-prohibitive. Blown-in methods require significant preparation and setup by professional installers. The small insulated wall area of most greenhouses makes this impractical cost-wise. Blown-in insulation may have a place in very large commercial greenhouses; it depends on cost estimates provided by local installers.
So far, we’ve discussed using better glazing materials on the roof. To go one step further, you can insulate the top section of the roof that is not needed for light collection. The top portion of a glazed roof does little to directly illuminate plants. Rather, light coming through the top section hits the top of the back wall, due to the angle of sun (shown in Fig. 12.4). Although some light is reflected off the wall, the contribution to the plants below is minimal (unless plants are reaching all the way up the wall). While not a necessity, roof insulation adds to the overall energy efficiency of the structure, by both reducing unnecessary heat gain during the day and heat loss at night. If left uninsulated, the glazing here experiences the highest rates of heat loss.
In a stick-framed greenhouse, the insulation is best installed between the rafters under the roof, using the same materials and methods as the walls. More information on finding the right length of roof insulation is given in Chapter 12.
Like many quantitative recommendations in this book, the “perfect” insulation level is unique to you; it depends on your outdoor climate and your goals for what you want to grow. Other factors include the heating/cooling systems in the greenhouse; the greenhouse design; whether or not you will be relying on backup heating; the cost of installation; and the cost of backup heating. To take all those variables into account and produce the optimal metric requires some advanced energy modeling in a program like Energy Plus. Energy modeling is usually above and beyond the needs of the average grower (though consultants/greenhouse designers can help). However, calculating the heat loss of the structure is a practical step. A heat loss calculation can’t tell you the “best” level of insulation, nor can it give you the predicted indoor temperatures. It can compare the effect of different insulation strategies on total heat loss and thus heating costs, creating an analysis like the one shown in Fig. 6.2. This can tell you the relative effect of different upgrades, such as going from an R-2 to an R-3 glazing material or an R-20 to R-21 wall. Several online heat loss calculators are available; a few are listed in Further Reading at the end of this chapter.
Some people are inclined toward this kind of quantitative analysis; others prefer a simple, albeit more generalized, recommendation. Figure 6.8 gives basic recommended R-values of walls and glazing areas according to growing zone. (You’ll need to reference your growing zone; see Chapter 3). We say “basic” because these are broad recommendations; they aim to provide good insulation levels to keep the greenhouse above freezing for most of the year. They assume that the greenhouse has a form of efficient heating, thermal storage, or climate control. They are infused with a bit of common sense, since we recognize the level of insulation also depends on cost, and there are diminishing returns to adding more and more insulation.
FIGURE 6.8. Recommended Insulation Levels.
Growing Zone |
Walls |
Glazing |
|---|---|---|
1–5 |
R-20 to R-40 |
R-3 or greater |
6–9 |
R-14 to R-20 |
R 2–3 |
10–13* |
R-10 to R-14 |
R 2–3 |
* These climates do not experience freezing conditions and year-round growing outdoors is common. In very hot climates, insulation is useful for keeping the greenhouse from overheating rather than overcooling.
• Heat loss occurs through conduction through the walls and roof of the greenhouse, predominantly the glazing areas. To minimize heat loss, the north and some of the east and west walls should be well insulated; the glazing should include at least two layers of material with an air gap in between. The exact level of insulation depends on your climate and growing goals.
• Air infiltration is a big contributor to heat loss; it should be minimized by caulking all cracks and seams in the building after it is complete.
• In most climates, the greenhouse can greatly benefit from insulation installed around the perimeter of the greenhouse underground. This keeps the soil beneath the greenhouse warmer, and allows it to tap into the stable temperatures of the earth deep underground.
Heat Loss Calculations
“Home Heat Loss calculator” provided at builditsolar.com/References/Calculators/HeatLoss/HeatLoss.htm
Many resources give step-by-step instructions on how to perform a heat loss calculation by hand instead of using an online calculator or website. We recommend the steps laid out by Rob Avis in his free ebook, Passive Solar Greenhouses: A Do-It-Yourself Guide, available at vergepermaculture.ca
National Resource Conservation Services database, the Soil Climate Analysis Network, (www.wcc.nrcs.usda.gov/scan/). You can find soil temperature data here.
McCullagh, James. The Solar Greenhouse Book. Rodale Press, 1978. Recommended insulation levels are given.
Langdon, William K. Moveable Insulation: A Guide to Reducing Heating and Cooling Losses in Your Home. Rodale Press, 1980. A good guide to designing/building insulating curtains and shutters for glazing.
ENERGY Star, Recommended Levels of Insulation, energystar.gov. Recommended R-values for standard construction.
US Department of Energy, Energy Saver, energy.gov