Greenhouse Geometries
Thus far, we’ve covered the basic principles in greenhouse design — orientation, glazing, insulation and ventilation. The next step is examining how to integrate all these elements into a structure’s design. Solar greenhouses can use many shapes and building styles (what we call “a geometry”). There is no single correct design. Rather, a range of geometries can yield the same level of performance and energy efficiency. They vary by their cost, complexity and aesthetics.
Once you determine the basic geometry of the greenhouse, you can move on to creating a framing and construction plan. Thus, this chapter is the bridge between the conceptual principles of solar greenhouse design and the details of construction.
The shapes of solar greenhouses mostly vary in their roof design, which in turn affects other factors, such as:
• Material choices: Designs with vertical or shallow-sloped walls make it easier to use glass as view windows. Some designs allow for one area of glazing, which can be a pro or a con — material and installation costs are reduced somewhat, but two glazing materials allow you to strategically control light by season.
• Cost and complexity: The more complicated the geometry of the greenhouse, the more expensive it is to build. Adding angles to the roof design requires more structural supports, which increase the time and cost.
• Glazing-to-insulation ratio: We’ve mentioned before that energy-efficient greenhouses usually use 30%–80% glazing area relative to the insulated wall area. Some geometries create a lower glazing-to-insulation ratio — while still allowing for year-round light — by using a single span of glazing. Other designs use glazing more liberally — on two areas, like vertical walls and the roof.
• Glazing and wall angles: Chapter 5 provides a full discussion of the effect of glazing angles on light transmission. Some designs create steeper glazing angles, which will maximize light and heat gain in the winter, though a range of glazing angles are acceptable, as discussed in Chapter 5.
An additional design factor is the angle of the north wall and its role in reflecting light. Some greenhouse designers recommend the north wall also be angled so it reflects light down to the plants. While this sounds valid in theory, the effects of this direct light reflection are minimal unless you are using a wall covering that reflects light in a single direction (called specular reflection). Most walls act as diffuse reflectors; they reflect light in many directions. Thus, the angle becomes less important. In our opinion, angling the north wall solely for light reflection is not worth the added time or cost. It can, however, be useful to create geometry such that the south-facing glazing can be a steeper angle, as you’ll see in the examples below.
The styles below are the most common geometries for solar greenhouses, and you can see examples of each throughout the case studies in this book. To make a consistent comparison, we use a 12' × 20' greenhouse to depict each design, though they can be scaled to any size. The dimensions we give here are simply examples to put the structure in perspective; they should be modified to suit the particulars of your greenhouse.
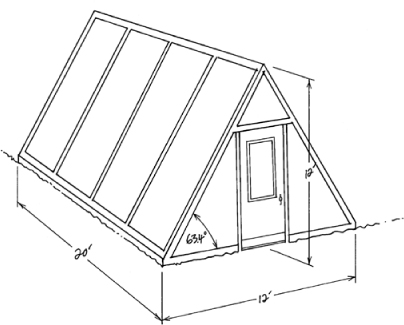
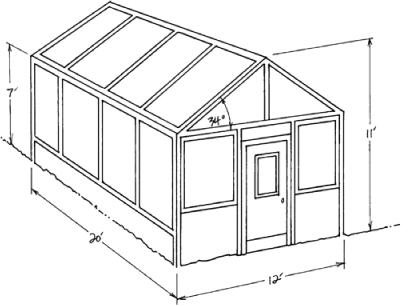
Consisting of two steeply sloped sides joining at a center peak, this is perhaps the simplest greenhouse geometry, resulting in a cost-effective build.
• Simple design; many building plans available.
• A lower-cost design. Using a single glazing material along the entire south wall avoids having to purchase multiple materials and shortens the build time. In the 12' × 20' example, the south glazing area can be covered by 14'-long sheets of polycarbonate.
• A-frames can create low headroom at the front and back of the structure. Or, they can create an abnormally tall building if using a smaller width.
• If the entire south wall is glazed (typical), this creates a very large glazing area, reducing efficiency. Glazing near the peak is not effective at transmitting light down to the plants, but it still loses heat.
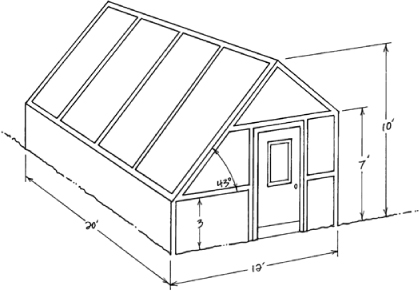
One of the most popular greenhouse styles, the shed roof is easy to build due to its vertical walls on all sides. The south wall is usually glazed with glass or rigid plastic. The roof can be partially or completely glazed, and have a range of slopes.
• A very common building design most contractors are familiar with. An abundance of plans for sheds or greenhouses is available online. Shed plans can easily be modified using the materials and recommendations in this book.
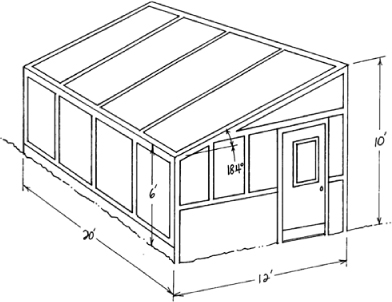
• One of the simpler and cheaper designs to build.
• It creates two areas of glazing — the roof and the south wall. This has pros and cons in itself: they can be different materials, allowing you to strategically choose materials to tailor light transmission by season (see discussion in Chapter 5), but it could also be costlier to purchase two different materials instead of a larger area of one.
• It enables the use of glass windows because it has vertical walls, creating a nice aesthetic for residential growers.
• Both the roof and the south wall have to be glazed in order to achieve adequate year-round light (for both winter and summer months). This creates a larger area of glazing, relative to insulation, which can be a pro or con depending on climate.
Variations: The standard shed design uses a relatively shallow slope to maintain enough headroom on the south side, however a variety of roof pitches can be used to create a steeper roof slope. Though not essential to performance, a steeper pitch is favorable in order to increase winter light slightly (see discussion in Chapter 5) and shed snow in high snow load areas. To create a steeper roof angle, options include:
• Reducing the height of the south wall, turning it into a knee-wall, (shown in Fig. 8.3). This eliminates the need for multiple glazing materials: the knee-wall is insulated and the roof becomes a much longer, steeply sloped plane. A strategic move is to incorporate passive intake vents on the south knee-wall. However, it results in low headroom on the south side.
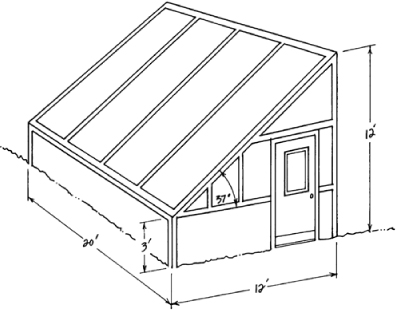
FIGURE 8.3. Shed Roof Variation.
• Instead of building a vertical wall on the south, this wall is angled slightly, similar to the vertical wall in Fig. 8.6. This adds some building time and cost, since the wall needs a vertical post in order to support the roof, in addition to framing for the angled wall. It also creates a larger footprint of the greenhouse, and creates a larger solar collector for winter light (since the dimensions of the building are greater). Angling the south wall slightly is possible in any of the styles discussed below that have a vertical south wall.
The gable roof has an on-center peak with vertical walls. The south-facing portion of the roof should be glazed in order to receive sufficient year-round light; the north half of the roof is usually best insulated to reduce heat loss. (Very low-light climates like the Pacific Northwest are an exception in which having both sides of the roof glazed can be justified.)
The gable roof design is a good option if incorporating another structure or use with the greenhouse. The north half of the structure can be a shed area, chicken coop, sitting area, etc. The two areas can be easily divided by a center wall, or kept as one with the north half more shaded for a certain purpose.
• Can be aesthetically integrated with the home, as this is a very common residential style.
• Moderate cost and moderately simple design. Many plans available online for either a greenhouse or shed.
• Many kit greenhouses available online have a gable roof design. You can modify the kit with insulation and proper glazing to make it a more energy-efficient, year-round greenhouse. Keep in mind, though, that the framing of the kit — usually aluminum — probably won’t be rated for wind loads/snow loads.
• Even with half of the roof glazed, part of the floor area will be shaded during the warmer months when the sun is at a high angle (shading depends on the depth of the structure). Shading is not always a bad thing; it can make the back of the greenhouse a good spot for a sitting area, aquaponic fish tanks, shade-tolerant plants, or thermal mass. Be aware of solar angles during the months you want to grow, and evaluate how much of the floor area will be fully lit using a simple sketch of your greenhouse and the angle of the sun at different times of year.
This unusual name harks back to colonial America; it was a popular home design named after wooden salt boxes. The salt box roof is similar to the gable roof except that it has an off-center peak. That gives it a larger south-facing roof, which allows for more year-round light, while keeping the overall height of the structure reasonable.
• This has a very well-balanced glazing-to-insulation ratio of about 50%–60%.
• The peak gives the south-facing roof a steeper slope, which increases light transmission in the winter and reflects more light in the summer.
• This design uses several more angles, which creates a more complex structure to build. The roof and each wall require supports, which can get quite extensive in large greenhouses or those with high snow loads. Large roof spans often require trusses, which further increases building costs in large greenhouses.
Variations: The south-facing roof can be angled to increase light penetration in the winter, shown in Fig. 8.6.
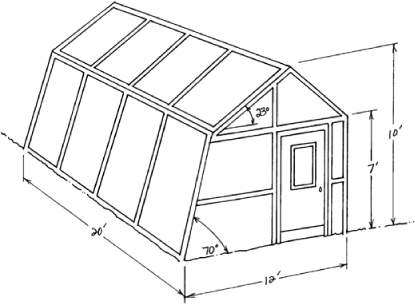
FIGURE 8.6. Salt Box Roof Variation.
In the 1980s, Chinese farmers started the trend of building greenhouses with an arched south wall, low insulated north wall, and low-cost materials. As these designs became more popular, eventually gaining some attention in North America, the name came with it, and Chinese greenhouse is still how this particular design is best known. Not all arched greenhouses follow Chinese methods, though the two have almost become synonymous in recent years.
The Chinese style of using arched greenhouses (shown in Fig. 8.7) is to use a low north wall (usually built with low-cost natural materials) and polyethylene glazing spread over arched wood beams. These greenhouses commonly include a thermal curtain or insulation blanket (often straw) that rolls down over the south wall at night. This provides a very low-cost method of reducing heat loss through the polyethylene at night. The Chinese design is often used for low-cost commercial structures that are still very energy-efficient.

FIGURE 8.7. Chinese-style Greenhouse. Credit: indoorgardenhq.com
The basic design of an arched greenhouse can also be applied to more high-tech structures with advanced materials, such as the solar-powered aquaponics greenhouse shown in Fig. 8.8. The pros and cons below apply to the materials and methods used by traditional Chinese greenhouses.
• Low-cost and high-performance structure that can be easily scaled.
• Moderate glazing-to-insulation ratio.
• If using plastic film as a glazing, this has a short lifespan, particularly in harsh environments. It is hard to find durable insulating glazing materials that can also be easily curved; thus these designs often use thin, low R-value glazing.
• Insulating curtains require a large boom and motor to be automated. Without the nighttime insulation, the exposed plastic film is very inefficient, negating the overall efficiency of the design.
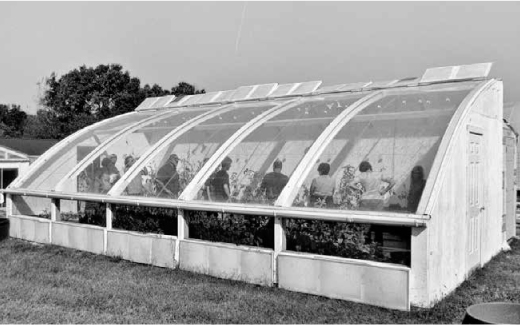
FIGURE 8.8. Aquaponics Greenhouse. Designed by Friendly Aquaponics, Inc., an arched greenhouse uses ETFE for curved glazing. The year-round greenhouse uses plenty of passive ventilation to grow through hot summers in Tennessee. Credit: Friendly Aquaponics, Inc.
• The support structure typically involves longer build times (given natural building materials and/or arching beams).
Domes are the most unique of the styles described here. In a dome, small sections of glazing — either pentagons or octagons — are cut out and fitted over the frame (wood or aluminum). They require many more framing pieces; however, the framing members are usually thinner.
There are many true statements online about the dome’s unique characteristics — along with a lot of misinformation. Many people cite the dome’s increased structural strength as a reason to use it. In truth, any structure can achieve the same strength; it is simply a matter of engineering. What is true is that the domes use thinner framing pieces to achieve the same strength. This is because the framing is spread out over the shape of the dome and many pieces. In a rectangular structure with a flat roof, the structural loads are carried by a few larger beams. That has pros and cons, described below.
In our view, dome greenhouses can perform as well as rectangular structures, but they often require more time and labor to build and insulate due to the many individual sections of glazing or walls. For most growers, deciding whether or not to build a dome usually comes down to the unique shape, which has a certain aesthetic both inside and out. To some it is cool and distinctive; to others it’s reminiscent of the 1960s/70s (when this style originated), and doesn’t blend with their home/other structures. Often, deciding whether or not to build a dome is simply a matter of personal preference.
• Kits are available online which offer prefabricated framing that is easily put together.
• Due to thinner framing members, there is less distinct shading than structures with larger roof beams, but there is not a huge difference in light levels overall.
• Domes are more aerodynamic in high winds because wind blows uniformly over the curved shape. However, high winds can still be problematic for vents protruding from the greenhouse frame.
• As a geometry, the dome has the smallest surface area relative to the footprint. Assuming some of the structure is properly insulated, this can create a very “effective” glazing area: one that lets in a lot of light while reducing the surface area as much as possible.
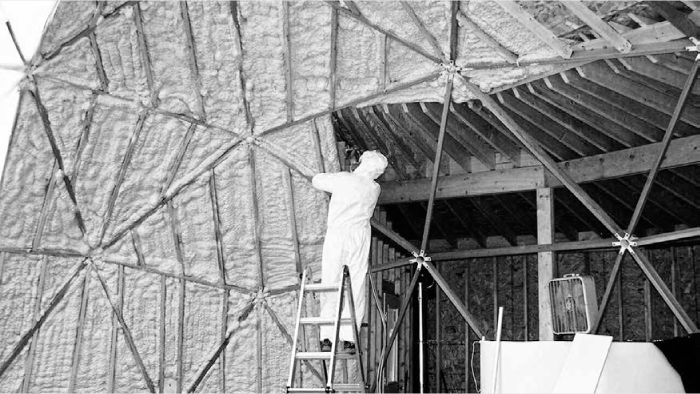
• Most domes, particularly kits, don’t include an insulated north wall, which greatly reduces performance in cold climates. To create an energy-efficient structure, the north half should be insulated, but the options with a dome are more limited. Insulating a dome is best done with spray foam insulation, shown in Fig. 8.10. The other option is to cut out individual sections of rigid foam board insulation, which is a much more time-intensive process than it would be for a rectangular greenhouse.
• The increase in framing members creates more areas where air can leak through seams, increasing air infiltration and possibly water leaks if not sealed well.
• Generally, domes take longer to build if doing the framing yourself since there are many more framing sections and individual cuts. Framing-in rectangular openings for fans or doors is more time-consuming.
• The shape of the greenhouse is not a “make-or-break” factor for how it will perform. Rather, performance depends on what you do with that shape — how you insulate it, glaze it, orient it, and control the environment.
• The design does influence material choices, the glazing-to-insulation ratio, and greenhouse dimensions.
• Aesthetics, cost and the complexity of the designs are factors you need to consider early on.
Rob Torcellini is a DIYer extraordinaire. An engineer by training, he built his 32’ dome greenhouse along with all of its climate and operating systems, documenting his work in a series of high-quality online videos. Systems include a 3 kW solar PV system with battery backup, aquaponics growing system, advanced rocket mass heater, wood stove, and thermostatically controlled vents.
The combination of the solar PV system, rocket mass heater and wood stove allows the greenhouse to run off-grid for about eight months a year. During the low-light winter months, Rob switches the greenhouse to grid power by connecting it to the main breaker panel. Even when connected, the roof-mounted off-grid PV system supplies power for the intricate plumbing of the aquaponics system and other small electric loads. The rocket mass heater and wood stove together provide all heating for the fish tanks and keeping the greenhouse above freezing through the cold and cloudy Connecticut winters. (More details on Rob’s modified rocket mass heater appear in Chapter 15.) The aquaponic growing beds are filled with strawberries, vining tomatoes, pineapples, and an assortment of other crops that form concentric circles within the dome. They are fertilized by the fish living in a 1,000-gallon tank in a large shed area attached to the north side of the dome.
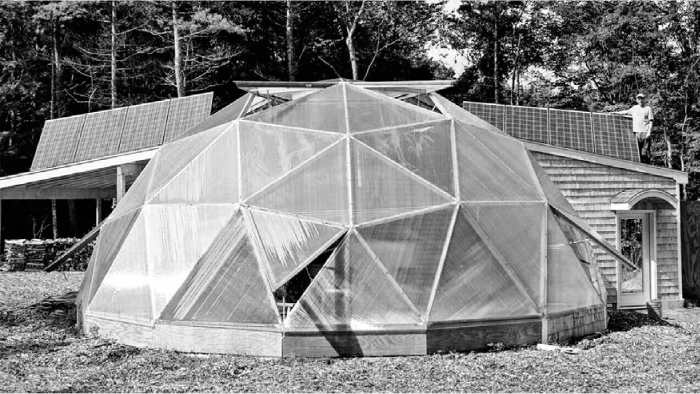
FIGURE 8.9. Bigelow Brook Farm Dome Greenhouse. Credit: Bigelow Brook Farm
Rob elected for a dome so that he could cut all the parts during the winter and have it ready to assemble in the spring, putting it together like a kit. He also liked that the individual framing members were small enough that he could do the framing himself. The large triangles (spanning 6’ across) are framed out of a rot-resistant cedar and sided with polycarbonate. To insulate the north half of the structure, he used spray foam applied in the framing of each triangle. The dome is outfitted with custom vents formed out of single triangle sections. Rob used motorized vent openers to give him more precise temperature control of the ventilation. “Each vent can be programmed to open at different temperatures so they don’t have to open all at once, which could create fast temperature swings,” says Rob.
To learn more about Rob’s design and many systems you can see his many videos on Bigelow Brook Farm’s YouTube page: youtube.com/user/web4deb.