
Rocket Mass Stoves and Compost Heaters
The final heating systems we’ll discuss use biomass (either wood or compostable material) to heat the greenhouse. Like solar hot water, these are purely heating systems; there is no cooling effect during the day.
Biomass systems have some unique advantages. They produce very high temperatures and deliver heat quickly to the greenhouse. Moreover, they don’t rely on solar energy or heat from the greenhouse. That makes them a good option for greenhouses in climates with harsh and low-light winters. Many of the examples in this chapter are in the northeastern or midwestern US — places with harsh, cloudy winters.
The downside of both of these systems is that they are more time intensive to maintain or operate. Rocket mass stoves need to be lit manually. Compost piles need to be rebuilt every couple of years and occasionally aerated, strenuous and time-consuming work. Though more hands-on, either can work well in the right applications. This chapter explores how to integrate them with a greenhouse. Like many topics, they warrant much more in-depth research if you want to build a system yourself. See Further Reading at the end of this chapter.
A rocket mass heater combines a highly efficient wood stove (called a rocket stove) with thermal mass, usually made of cob (a mixture of clay, sand and straw or other fiber). The stove burns wood at extremely high temperatures, heating up the surrounding mass, which then slowly radiates that heat over the course of the night or cloudy day. In short, rocket mass stoves rely on wood’s ability to give off tremendous amounts of heat and thermal mass’ ability to store that heat and release it slowly. They are becoming increasingly popular as an efficient way to heat both homes and greenhouses.
Fig. 15.1 shows the basic design of a rocket mass heater. The stove part of a rocket mass heater is made out of an insulated combustion chamber and a heat riser: a tall, vertical column that draws smoke out, creating an intense chimney effect. The combustion chamber is horizontal, with wood fed in vertically. The fire, in other words, burns sideways. This feature allows the smoke and flames to run horizontally before hitting a 90-degree turn at the start of the heat riser. The turn creates turbulence, causing the smoke and air to mix before it goes up the riser.
The riser gets extremely hot, causing secondary combustion — the burning of gases and particulates in the smoke. This makes rocket mass heaters immensely more efficient compared to traditional wood stoves. In effect, they use much less wood to heat a space.
FIGURE 15.1. Rocket Mass Heater.
The riser also creates a strong “chimney effect” — a natural convection current that draws air up and out of the stove. This strong draft draws and moves air into the stove. It also allows the stove to burn without smoke/embers drafting back into the greenhouse, making it safe to operate without constant attention. The riser’s draft-effect is what gives the rocket heater its name: stand by one, and you can hear the “whooshing” of air being drawn up quickly through the heater.
The final leg of a rocket mass heater is an exhaust flue, which carries the smoke out of the greenhouse. (Though we call it smoke, the exhaust from a rocket mass heater is actually mostly water and CO2. It has little smell because the particulates that give regular smoke its odor and dark color are burned off in the heat riser.)
Thermal mass, usually in the form of cob (a mixture of sand, straw and clay that’s cheap and easily molded) surrounds most of the stove, riser and exhaust flue. The cob absorbs the thousands of Btus produced by the stove and by the smoke as it’s carried out of the structure. Often, cob surrounds the exhaust flue and forms a bench, running along or around the edges of the greenhouse, as shown in Fig. 15.2. This allows it to absorb any remaining heat before it’s exhausted outside. The exhaust flue exits the greenhouse out of the top of the structure. It should extend well above the roofline to avoid downdrafts.
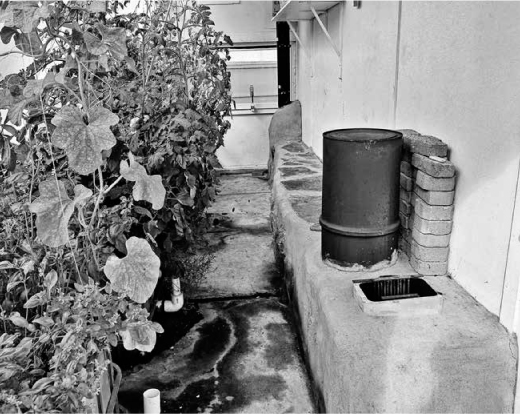
FIGURE 15.2. Rocket Mass Heater. Credit: Verge Permaculture
Rocket mass heaters are normally DIY systems, made of low-cost components. It is crucial to use the right materials — those that can withstand the extremely high temperatures. Instead of standard brick, for instance, you must use fire brick. Additionally, consider the greenhouse’s humidity when building your system. If using cob, it should be protected with a plaster. If considering a rocket mass heater, we recommend that you do thorough research on how to build a system (see Further Reading) and/or take a workshop.
• Efficient: The stove uses far less wood than a conventional wood stove, meaning less wood to stock and keep near the greenhouse. It also utilizes the heat much more efficiently, by slowly heating up the mass of the stove.
• Long-lasting heat: After the stove has burned for 3–5 hours, the thermal mass should be warmed enough to provide heat for the rest of the night, or longer (depending on the size of the stove and mass). That long-lasting high-grade heat is useful in climates with very harsh winters where GAHT systems may not provide enough heat.
• Cheap: The stove is usually made out of recycled materials (brick, steel pipe or barrels, and cob). Most mass stoves typically cost less than $300 in materials.
• Added thermal mass: Even when the stove is not lit, the thermal mass of the heater helps regulate the greenhouse temperature to a small extent.
• Multi-purpose: A warm bench can be useful for seed trays or a cold backside. Mass heaters can also be combined with hot tubs, aquaponics tanks and other integrated systems.
• Time and maintenance: The biggest drawback is that rocket mass stoves require an active operator to keep the stove burning for a few hours while it heats up the mass. According to Rob Avis of Verge Permaculture (see case study Chapter 3), a wood-fed stove needs to be lit for a few hours in order to heat up the mass. During that time it needs to be refueled every 15 to 30 minutes. In Rob’s view, that makes them “great in a house where you can sit by the fire with a book, but it’s an inconvenience when you have to run out to the greenhouse.” If you have a detached greenhouse and don’t enjoy the idea of trudging through snow on winter night to stoke a fire, this is not a good system for you.
“Rocket Mass Heater on Steroids”
That is the title of a video clip explaining Rob Torcellini’s prototype rocket mass heater in his dome greenhouse in Connecticut (see case study at the end of Chapter 8). Rob built a pellet feeder to supply the rocket mass heater with pellets at a rate of 12 lbs. of pellets per hour. The feeder uses gravity to feed the fire at a constant rate, allowing for longer burn times without having to refuel or kindle the fire. The heater is partially buried underground, and heat is drawn through exhaust pipes buried in a layer of sand. In this way, the heater takes advantage of the existing thermal mass underground, rather than occupying space in the greenhouse. Rob continues to make adjustments to his heater, still in its testing phase, though it has been effectively heating the greenhouse and aquaponic fish tanks. “I was able to maintain the building temperature at 60°F [16°C] degrees (30°F outside) [−1°C], and heated the water from 55°F–63°F [13°C–17°C],” says Rob. For a full explanation of the system, you can see videos on the YouTube page of Bigelow Brook Farm: youtube.com/user/web4deb.
Variations exist to make rocket mass heaters run longer and be easier to operate. In cold climates, people are building larger “batch box”-style heaters that burn larger batches of wood for longer.
• Self-built: Not necessarily a “con,” rocket mass stoves are almost always self-designed and built. Building a stove is not difficult, once you know what to do, but they do require time, research and initiative. According to Leslie Jackson, co-author of Rocket Mass Heaters: “From designing, building, processing firewood for maximizing burning efficiency, troubleshooting, maintaining, and living with, this is not a hands-off heater.... It’s one of the reasons people love it.”
• Feed stocks required: As wood-burning stoves, rocket mass heaters require a stockpile of wood in or around the greenhouse. Another common modification is to add a grate so the stove can burn wood pellets. If these are cheaply sourced in your area, using pellets means you avoid having to chop, dry and store wood; it also allows for easier feeding in some cases.
• Space: Normally, the thermal mass of a rocket mass heater takes up significant space in a greenhouse that could otherwise be used for growing.
• Increased drafts: Not necessarily a detriment, but something to be aware of, is that rocket mass heaters increase air infiltration when they are burning. The stove is intaking air from the greenhouse and exhausting it outside. This, in turn, draws cold outdoor air into the greenhouse through leaks and cracks. Since the heater is simultaneously warming the air, the effect is not that detrimental. Some growers may prefer it as it helps reduce the humidity, replacing the existing air with fresh, albeit very cold, air.
Due to all these pros and cons, we find rocket mass heaters to be very useful as backup heaters if you have the room for the thermal mass, and don’t mind operating a stove when it’s needed. They can supplement another heating method during very cold periods. However, relying on them constantly as a heating source throughout the colder months can get cumbersome, both in time and materials (firewood).
The final method of this section is less common, but equally viable if done correctly in large-scale applications. Compost heating takes advantage of the fact that a large compost pile produces millions of Btus of heat per day, reaching 110°F–160°F (43°C–71°C) at its center. That is a lot of free, sustainably generated heat. Additionally, at the end of a compost pile’s life, it leaves a high-quality organic soil amendment/fertilizer.
The challenge with composting is simply the volume of material that has to be moved and stored. To heat a residential greenhouse, compost piles are typically 10'–20' in diameter and 8'–10' tall — this is not your backyard compost bin. Smaller compost piles don’t get hot enough to be effective heating elements. Namely, a compost pile must get hot enough (occasionally over 150°F [65°C]) to kill the eggs of parasites, cysts and flies. While a large compost pile is a heating machine, a small compost pile is simply a pile of rotting organic material...not something you want around your greenhouse.
Thus, compost heat recovery is best done at scale, using large mounds of compost that can generate very high temperatures. They are best suited for growers who can easily source and move big volumes of compostable material (i.e., those who have machinery and composting material on-site).
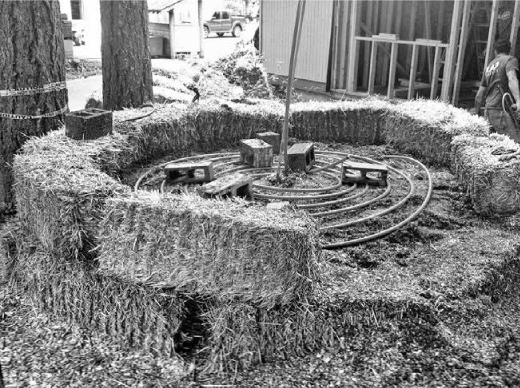
FIGURE 15.3. Compost Piles with Hydronic Heating Coils. Credit: Gaelan Brown
If you find compost heating bizarre, recall from Chapter 2 that for most of greenhouse history this was a primary method of heating greenhouses. Today, compost systems can be as advanced as solar hot water or GAHT systems. That said, they are still less common, mostly because they require moving large amounts of organic material and are labor intensive to create and maintain.
The magic ingredient in a compost pile is the aerobic bacteria that produce heat as they consume and break down organic material. Given the right inputs — organic material, air and water — this process occurs naturally, generating an incredible amount of heat completely on its own.
The key to success of a high-heat compost pile is the right balance of inputs: carbon, nitrogen, air and water. All of these parts are needed, in the right proportion. That balancing act makes compost heating more time intensive than other heating systems. It requires research, tinkering and possibly a few tries to get right.
Compost piles should have a carbon-to-nitrogen ratio (C:N) between 20:1 and 30:1. In other words, for every part nitrogen there should be 20–30 parts carbon. Each material has its own C:N makeup. Most compost materials, like leaves and wood chips, are predominantly carbon. Materials like manure and coffee grounds are predominantly used to add nitrogen. (Fun fact: hair clippings have extremely high levels of nitrogen. If you have a longhaired friend who is ready for a change, you can give your compost a boost of nitrogen that way.) Online “compost calculators” can help you create a pile with the right C:N ratio based on your inputs. Or you can research others good substrates, usually a combination of organic matter, like wood chips, and manure.
Because aerobic bacteria require oxygen, compost piles need to be aerated. Using a substrate material that is not too dense, like wood chips or mulch allows both air and bacteria to contact the material. Air, not organic material, is often the limiting factor when it comes to heat production.
A compost pile will produce heat for a few months to a couple years, depending on pile size, composition and aeration. After the bacteria have consumed all the organic material, the temperature will slowly decline, and the pile will need to be reconstructed with new organic matter.
Outdoor piles should be insulated with a layer of wood chips or straw to reduce heat loss from the center of the pile during colder months. If the pile is built correctly, the center of the pile should stay at 110°F–160°F (43°C–71°C). There are a few different methods to draw this heat into the greenhouse, ranging from very simple (direct use) to very advanced (steam heat exchangers).
On the simple end, some growers use compost directly inside or outside the greenhouse. Will Allen’s urban farm in Milwaukee, Wisconsin, for example, heats several hoop houses with rows of compost piled alongside the structures (see case study, Chapter 4). The compost directly heats the greenhouse through the thin polyethylene plastic. This is only a logical means of heating for uninsulated greenhouses (like polyethylene hoop houses) which have terrible energy efficiency. While effective, this is a labor-intensive method. Growing Power processes millions of pounds of compost every year; work crews and many volunteers are needed to move it around.
A more common method for residential growers is using the compost inside the greenhouse by creating hot beds. In this case, the bottom of a raised bed is filled with manure and organic material. As the compost degrades, it delivers heat to the plant roots. The top 1'–2' of the bed is filled with well-aerated garden soil. This acts as a bio-filter, absorbing toxic byproducts — ammonia and excess nitrogen — produced by raw compost. It also reduces the risk of attracting insects, though pathogens are still a risk. Because compost piles produce odors, as well as ammonia, they should not be directly exposed to the greenhouse air.

FIGURE 15.4. Compost Pile at Growing Power. Mounds of compost are stored on site before being piled around the hoop houses. Credit: Growing Power
A hot bed will heat the soil for several months, after which it loses its heating capacity, and the bed must be rebuilt. This is back-breaking work. For that reason, presumably, we haven’t seen many examples of hot beds, but they do work for some people. Roger Marshall, author of How to Build Your Own Greenhouse, describes creating a hot bed to overwinter plants in his New England greenhouse. He filled the bottom 3' of his raised bed with a mixture of horse manure, grass clippings, wood chips and leaves. Marshall notes that it took 4–6 weeks for the bed to heat up to maximum temperature (160°F [71°C]). “It will remain at this temperature for about 2 months before gradually cooling down to about 80°F [27°C], warm enough to keep plants growing for a long time after they’ve stopped growing outdoors.”1
Using compost directly is simple but labor intensive. If hand shoveling manure and composting materials is not your cup of tea, this is not a good fit for you. Direct use of compost also introduces the risk of pathogens and insects. A properly functioning compost pile should kill anything harmful, but “properly functioning” is the operative phrase. If the pile does not get hot enough (over 150°F [67°C]), it will be a hotbed mainly for insects. For those reasons alone, we don’t recommend direct use of compost unless you are completely committed to it.
A more advanced method of using compost is combining it with a heat exchanger. Hydronic heat exchangers circulate water through the compost pile, and then transfer this heat to the greenhouse. This method was popularized by Jean Pain, a French inventor who spent many years developing systems on his farm in Vermont. Pain used compost water heaters to heat his home and several outbuildings.
Compost water heaters are relatively simple systems. PEX tubing is built into the center of a large compost pile, as shown in Fig. 15.3. A water pump circulates water through the tubing, where it’s exposed to the 100°F–160°F (38°C–71°C) temperatures at the center of the pile. The hot water is then pumped to a hot water tank inside the greenhouse, where it’s stored until needed for heating. Additional PEX tubing pumps the hot water from the tank through the greenhouse, either through the floor (as radiant floor heating) or under seed trays, delivering heat to plant starts.
Compost water heaters allow you to extract much more heat from the pile by circulating water through the hot core of the pile. They also avoid having to store compost next to the greenhouse. The pile can be kept in an adjacent area, and insulated PEX tubing connects the two. Finally, hydronic systems are controllable: a thermostat inside the greenhouse draws hot water from the water tank when it’s needed. Unlike direct use systems, the pile does not heat the greenhouse when heat isn’t needed (on warm days). Since the output is hot water, this system can also have other uses when not needed for greenhouse heating, such as an outdoor shower or hot tub.
Compost water heaters require physical labor, usually from a few people. According to the Compost Power Network, a compost pile can be constructed in a day by three to five people. It is best done with some machinery and a tractor, though hand shoveling is always required since compost must be carefully layered around the coils.
Perhaps the biggest drawback, in our opinion, is that the pile must be rebuilt every few months to a couple of years. Whereas a GAHT system or a solar hot water system works for many years with little to no maintenance, a compost pile must be reconstructed or moved frequently. However, for farms that have existing compostable wastes, a composting system can make use of a waste stream that would otherwise go to a landfill, saving money and leaving nutrient-rich compost as a byproduct.
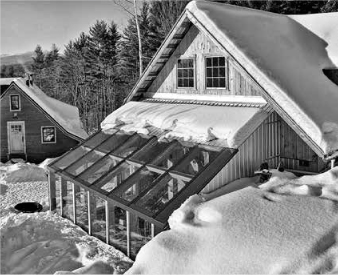
To add to his homestead in northern Vermont, Ben Falk, author of The Resilient Farm and Homestead, built an attached greenhouse onto the south side of his barn. The greenhouse was originally heated with a compost water heater. In the first season, the compost pile proved the heating potential of composting: the hot water was temporarily used for a hot tub and hot showers. However, after a few months, the heat ran out due to a lack of aeration. Ben moved the pile so that it could get more air, and it produced heat for another couple months before the heat slowly trickled to a stop.
“People aren’t able to get them to work like Jean Pain did,” is Ben’s honest review. “The likelihood of failure is high. It’s appropriate at the right scale, where you have a lot of manure and the equipment to move it, but not for most greenhouses.” Currently, Ben Falk uses his greenhouse for three-season production. He no longer uses compost heat, but does have a wood stove in the greenhouse as an “insurance policy” for cold snaps.
Other growers, like Alice and Karel Starek of The Golden Hoof Farm in Boulder, Colorado, (see case study, Chapter 16) are able to get longer run times and are enthusiastic about compost’s heating potential. “Our piles have been lasting about 8 months. So far, it’s the chickens that have been the demise of the piles. We use mainly wood chips and have a coil of 4” perforated drain tile at the bottom and up through the center to get plenty of aeration” says Alice. The Stareks use their 12’ diameter mound to heat a 300 sq. ft. insulated barn, and they find that it is an appropriate size for the application.
• Both rocket mass heaters and most compost piles produce high-temperature heat that can be used regardless of outdoor weather conditions. Thus, they are good options for cold climates that have little solar gain in the winter.
• Building a compost pile is labor intensive and requires large amounts of compostable material and the space to store it, making these systems more appropriate for greenhouses in rural areas and impractical for urban backyards.
• Rocket mass heaters must be manually operated to provide heating.
Rocket Mass Heaters
Evans, Ianto and Leslie Jackson. Rocket Mass Heaters.
Permies.com web forum.
Brown, Gaelan. The Compost Powered Water Heater. Countryman, 2014.
The Compost Power Network, compostpower.org
Compost mixture spreadsheets from Cornell University: compost.css.cornell.edu/download.html
“Compost Fundamentals,” Washington State University, whatcom.wsu.edu/ag/compost/fundamentals
1. Marshall, Roger. How to Build Your Own Greenhouse. Storey Publishing, p. 70.
Located in Greensboro, Vermont, Jasper Hill Farm is a picturesque dairy and cheese farm that heats its 2,300 sq. ft. greenhouse entirely with compost. Forty-seven grass-fed Ayrshire cows are the hub of the farm. Not only do they produce the milk for Jasper’s award-winning cheese, but ultimately, they produce most of the energy for the farm.
The secret to this ultra-sustainable farm is “The Green Machine,” a multi-functional manure processing system that integrates three technologies to process and extract heat from manure. A bio-filtration system separates solids to produce useable irrigation water. An anaerobic digester converts solid waste to methane to fuel the farm’s boiler. Third, a compost heat recovery system converts the manure into heat for the large greenhouse.
The compost heat recovery system is an advanced design that takes advantage of the steam produced by large compost piles. Designed by Agrilab Technologies, the system uses fans to draw steam downward and pumps it through pipes buried underground. A heat exchanger then extracts heat as steam undergoes a phase change to water. The energy is transferred to hot water and hot air is delivered to the greenhouse through radiant floor heating.
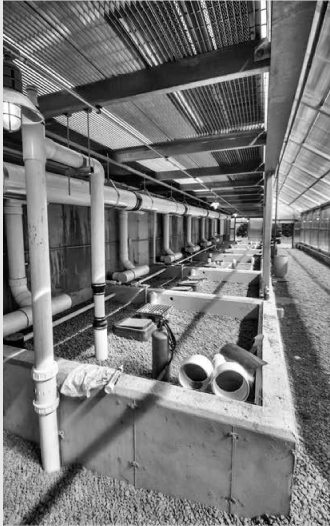
FIGURE 15.6. Inside the Jasper Hill Farm greenhouse, large pipes form part of an advanced heat exchanger. (An exterior view appears in the color section.) Credit: Jasper Hill Farm/Bob Montgomery Images
Jasper Hill Farm’s compost heat exchanger system is much more complex, intended for farms with more than 100 cows or equivalent feedstocks. Though a much higher capital investment, it also has a much larger energy production, capable of keeping the greenhouse “balmy” year-round, according to a farm manager. Currently, the greenhouse grows lemons, bananas, tomatoes and fig trees year-round in their boreal climate zone. Though the Jasper Hill system was funded by a state grant, it has the potential to pay for itself in five years, according to Gaelan Brown, author of “The Compost Power Water Heater,” which describes the system more in-depth.
More than energy production, The Green Machine solves the large problem of pollution caused by waste runoff. Conventional manure management practices often equate to “manure lagoons,” which threaten water and air quality in addition to producing immense carbon emissions.
With The Green Machine, Jasper Hill is able to upcycle a former waste product into clean water and energy for the farm. Though still in its infancy, Jasper Hill sees huge potential for large-scale compost heat recovery, particularly on a community scale. “Say you have a livestock operation on one side of the road and a commercial greenhouse production on the other. The output of one could be the heating resource for the other.” In that way, large-scale compost heat recovery tackles a multitude of issues, enabling sustainable food production, safe manure management, and carbon reduction. More information about The Green Machine and Jasper Hill Farm can be found at agrilabtech.com and jasperhillfarm.com.
FIGURE 15.7 Bringing It All Together: Sustainable Heating and Cooling Systems
The systems mentioned thus far are designed to heat the greenhouse for the majority of the year. However, they are not all perfect heating solutions. Trying to cover the last 5% of the heating requirements during the coldest days of the year often requires a backup heater to meet certain temperature thresholds.
If the greenhouse is small and only needs heating during cold snaps, a simple electric space heater, like you find at hardware stores, can suffice. They are energy-intensive devices and can quickly get expensive if used for too large a space.
Larger greenhouses can turn to propane or natural gas heaters, whichever fuel is more economical in your area. Propane has a slightly higher heat output. They can be sized for a range of greenhouse sizes, both small and large.
Finally, wood-burning stoves are a more sustainable option. Unlike the methods above, these must be manually operated, which is difficult to do through a long cold night and introduces the risk of fire. For these reasons, we recommend using a rocket mass heater as a safer and more effective alternative.
To size a backup heater, you can perform a simple heat loss calculation using an online heat loss calculator like the one provided at builditsolar.com. First you must estimate the greatest possible temperature difference the greenhouse could experience, based on the coldest expected temperature and the target indoor temperature. You can then estimate the heat loss from the greenhouse under these conditions. A heater should be sized to accommodate for the heat loss at that period. You can also use product spec sheets to help size a heater.
In any situation, you can reduce the heat requirement by delivering heat directly to where it is needed. For instance, plants can withstand greater fluctuations in air temperatures if their roots are kept warm. Thus, a wise tactic is to use electric or hydronic heat directly beneath seed trays or growing racks, keeping the soil warm without trying to heat the entire air space. If only your aquaponics fish tanks require heat, heat the water directly, not the entire greenhouse.