Controlling Light and Heat Gain: Glazing
Solar greenhouse design depends on the balance of glazing materials (light-transmitting materials) and insulation. Historically, greenhouses have given primacy to getting the maximum amount of light possible while sacrificing energy efficiency. Smart greenhouse design relies on using glazing more carefully. By maximizing the light coming through the glazing area, you limit the amount of glazing necessary, allowing for more insulated wall area, and a more thermally stable structure overall. The purpose of glazing is to transmit solar radiation (both for heat and growth), so the first part of this chapter provides some context on the electromagnetic radiation we call light.
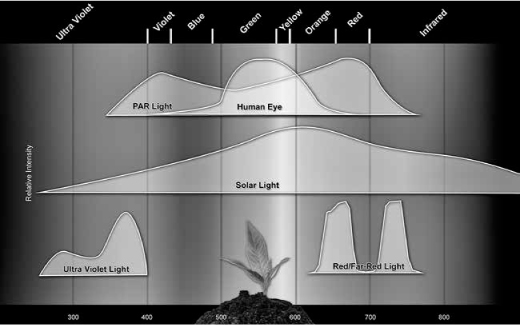
A thing to remember about sunlight: we can’t see all of it. We see a small slice of the light spectrum, called the visible spectrum. Similarly, plants also use only a small portion of the spectrum for growth. This is called photosynthetically active radiation (PAR) light. Conveniently, it covers about the same range that humans can see, roughly 350 to 700 nanometers in wavelength. While the range is the about the same, plants and people are sensitive to different parts of the spectrum, as shown in Fig.5.1. Our eyes are most sensitive to colors in the green range (with a peak at 550 nm). Plants are most productive when exposed to the red and the blue portions of the spectrum (so, the part we are least sensitive to).
FIGURE 5.1: Photo-synthetically Active Radiation vs. Visible Light. Credit: Spectrum Technologies
How does this relate to building a greenhouse? First, it means you can’t accurately evaluate a glazing material just by looking at it. Our eyes are not great sensors for the light that plants use, PAR light. Some new residential windows, for instance, contain tints or coatings that transmit visible light but block most of the ultraviolet (UV) and infrared (IR) portions of the spectrum; in doing so they can block portions of the PAR spectrum. Secondly, it means that the units of measurement that apply to visible light (foot-candles and lumens) are not accurate tools for measuring and evaluating light levels in a greenhouse.

Do plants use infrared (IR) or ultraviolet (UV) light?
For the most part, no, plants don’t use IR or UV light directly for growth. However, these wavelengths have other effects on the plants and the greenhouse. IR light is useful for heating the greenhouse and thermal mass in the winter. Far UV light (UV-B and UV-C) is actually harmful for plants, causing DNA damage and mutations, just like it does to our skin. For this reason, and because it degrades plastics, many glazing materials intentionally block UV light. UV-A light (close to the blue range) can bring out some unique characteristics in plants, like deep purple hues, but it is not essential for growth. In general, glazing materials that have UV-blocking coatings are helpful, as long as they transmit the full spectrum of PAR light.
There are myriad ways to measure and describe light. Here we’ll just graze the surface of this intensive subject in order to make informed decisions in the greenhouse planning process. It’s helpful to have a basic understanding of lighting units so that when you see one (say, on a glazing spec sheet or light bulb package) you can put it into context.
First, it is important to note that light is like rainfall; it changes in both intensity and duration. Measurements of both are needed to get a full picture of the total light available at a site, or to describe how much light plants need. The intensity is often called light quantity; duration is called the photo-period. Light quality is a term used to describe the spectrum of wavelengths, or color, which can be affected by a glazing material.
All three of these factors determine the productivity of plants in the greenhouse, but most lighting terms describe quantity, the intensity at a single point in time. Furthermore, measurement units vary by the spectrum they measure. One way to frame the many terms is by what they are used for, either people, plants or systems.
Lumens, lux and foot-candles all measure the intensity of the visible spectrum. They are calibrated to measure the wavelengths we are most sensitive to. Thus, they are limited tools for measuring light for plants; they don’t measure the PAR spectrum, and they only measure light at a single point in time. Ft-candles are useful for comparing light conditions, as shown in Fig. 5.2, and are commonly used to rate grow lights.
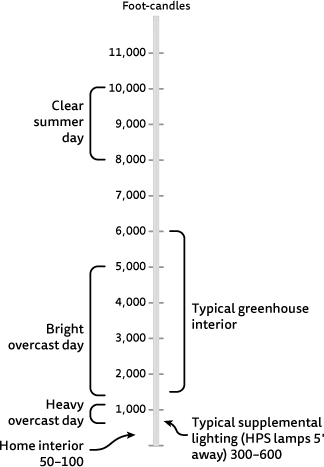
FIGURE 5.2. Comparison of Light Intensities in Ft-Candles. Though not a good measure of the total light available at a site, ft-candles are useful for comparing different conditions, such as a clear versus overcast day. Some say that plants need at least 2,000 ft-candles for growth, but this is an overly simplistic metric because it doesn’t take into account the length of light exposure.
Sunlight can also be measured in watts, a measure of power. Watts can measure the full spectrum, including the IR and UV wavelengths, going far beyond the visible or PAR spectrum. Watts per square meter is commonly used to rate power systems, like solar photovoltaic panels. For instance, on a bright day the total amount of solar radiation hitting the ground is about 1,000 watts per square meter. If you have 10 square meters of solar panels on your roof, and the panels are 15% efficient, you could estimate that the panels would produce 1,500 watts, or 1.5 kilowatts at that time (10 square meters × 1,000 watts × 0.15 = 1,500 watts). Watts can be converted to Btus/hour, another common metric for rating the heat gain of buildings (1 watt = 3.4 Btu/hour).
The most important term for greenhouse growers is the daily light integral (DLI). DLI measures the PAR spectrum (using a unit called a micromole). More importantly, the DLI measures the total amount of light over the course of a day. Conceptually, it’s is like a rain gauge; it combines both intensity and duration (a 24-hour period) to get a single cumulative metric for light. That makes it very useful for comparing light levels and describing how much light plants need, making it the most common metric in the horticultural industry, and the most helpful one for any grower to use.
The first map in the color section shows the average DLI values by month across the US. They vary from 0–60 depending on location and time of year. By looking at the DLI numbers for your location, you can see the huge seasonal fluctuations in light levels. On average in the US, the winter months have only 10%–20% of the light as the summer. Higher latitudes will experience greater variations.
This presents the basis for one of the main principles of solar greenhouse design: maximize light and heat in the winter. If a plant that evolved to grow during the long days of summer is in an environment with only one tenth the light levels, there will obviously be repercussions. Transmitting enough light and heat in the low-light months is a main goal of glazing in a year-round greenhouse.
This is a common question, but a hard one to answer, because it all depends on your expectations. If you were to ask “how much money do I need to live?” you would first need to know whether you want to live in a camper van or a castle. Similarly, what you want to grow, and how robust you expect this growth to be, determines how much light you need.
Though it’s a subjective question, there are a few studies that give some context to the “how much light” question (see Further Reading).1 The drawback is that these studies are targeted to the commercial greenhouse industry, which has a different set of expectations. Many commercial growers consider a DLI of 12 to be the minimum threshold for good growth of most crops. For high-light crops like tomatoes and peppers, commercial growers often shoot for a DLI of 20. (Many fruiting crops like tomatoes survive given warm temperatures, but do not set fruit in low-light.) However, home growers, and even many commercial growers, can grow year-round with much less light than this, going down to the low single digits of DLI levels. Because light requirements are subjective, based on your expectations for growth, we recommend experimenting the first year by planting many different crops, then observing and recording what you find works best in your particular conditions.
Many growers in high northern latitudes discover that heat is not the limiting factor when it comes to year-round growing; it’s the light. Dealing with low light levels is a fact of life for most year-round gardeners. Beyond designing the greenhouse to maximize light, there are two strategies to compensate: adjusting how and what you grow; and/or using artificial lighting.
The first is the more natural — and energy-efficient — method. By timing your growing pattern you can create robust year-round growth. Starting plants in the late summer/early fall alows them to easily “ride out” the low-light months. (We’ll return to growing calendars in Chapter 17, “Creating the Greenhouse Environment.”) In addition, cool weather crops tolerate low light better than warm weather crops (also called full-sun plants). Fruiting plants can survive in the right temperatures, but they often don’t set fruit in low light.
Other strategies for growing in low light:
• Don’t let the greenhouse overheat in the winter. It may seem only natural that a greenhouse will be cooler in the winter, but in sunny areas, greenhouses can overheat just as easily in the winter if they are completely closed. Prolonged high temperatures (over 80°F [27°C]) induce the plant to grow quickly, even though there isn’t sufficient energy for photosynthesis, producing the “spindly” effect. According to the Ball Redbook: Crop Production, “cool temperatures [during low-light periods] allow the leaves and flowers to develop slowly, which allows the plant more time to accumulate energy from sunlight to produce healthy leaves and flowers.” Keeping greenhouses cool under low-light conditions is one of the reasons why Northern European countries are able to compete successfully in the greenhouse industry.
• Don’t crowd plants. Tightly spaced plants have to compete for light, expending energy to grow taller rather than producing healthy leaves and robust growth. Again, spindly growth results.
• Reflect light. All surfaces in the greenhouse — except those of thermal mass materials — should be painted white, which reflects the maximum amount of light. This is particularly key on the north wall of the greenhouse, which intercepts the majority of winter light. A more intensive strategy is to use light reflectors on the outside of the greenhouse. We comment on this in Chapter 6, as they are typically also combined with insulating shutters.
While these strategies can maximize light in the winter, some growers understandably have higher expectations. You may need to meet a certain crop quality or simply want more variety from the winter garden. If the goal is a cluster of red tomatoes in January, many North American growers will need artificial lighting. Methods for adding supplemental lighting, and doing so energy efficiently, are covered in Appendix 3.
Another way to evaluate light conditions is by “percentage of possible sunshine,” or simply, cloudiness. This plays a role in where and how much glazing to use in the greenhouse and where to place it. Reason being, clouds affect the directionality of light, as shown in Fig. 5.3.
• Clear days create intense direct light. In these conditions, about 90% of the light comes from a specific area of the sky dome (the south, if in the Northern Hemisphere). This very directional light creates sharply defined shadows and justifies using glazing predominantly on the south side of the greenhouse. (The north side plays a very minor role in light collection.)
• Overcast days have uniform cloud cover, which creates diffuse light. Cloud cover acts like a lampshade over a bright bulb. Instead of single point in the sky, light emanates from a larger area of the sky dome. Cloud cover ranges from light to heavy, affecting the intensity of light on the ground. Cloudy climates, like those in the northwestern or northeastern US, justify the use of larger glazing areas that are exposed to more of the sky dome.
• Partly cloudy days have a combination of conditions. Light alternates from very intense and directional, to less intense and diffuse.
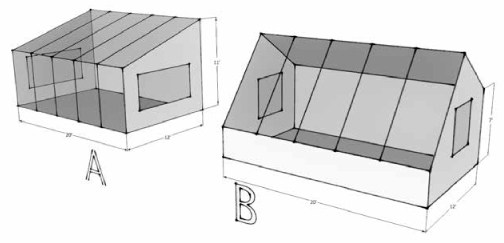
The area of glazing is normally expressed relative to the area of insulated surfaces, or the “glazing-to-insulation” ratio; the goal is to have a balance between the area of glazing and the insulated wall area. Traditional greenhouses are 100% glazed — they don’t include any insulation in the walls. Typically, energy-efficient/solar greenhouses have 30%–80% glazed area relative to insulated wall area. In other words, if the total surface area (including all walls and the roof) amounts to 1,000 sq. ft., the area of glazing would be 300– 800 sq. ft. This is a broad range, as it greatly depends on light conditions and when you want to grow. Different climates lend themselves toward different strategies:

FIGURE 5.3. Light Conditions Based on Cloud Cover. Credit: Adapted from James McCullagh, The Solar Greenhouse Book, Rodale Press, 1978
• Mild and cloudy (e.g., Seattle): Greenhouses in cloudy climates require a larger area of glazing exposed to the sky dome for light levels to be sufficient inside. Optimizing glazing for a specific sun angle or time of year (as discussed below) is less relevant because light is more uniformly distributed throughout the sky dome. Thus, a shallow roof slope and glazing on the south, east and west opens the “aperture” of the greenhouse up to the whole sky. Due to milder temperatures, less insulation is required. Greenhouses may only have the north wall insulated. Or, this is one of the few instances that might justify a fully glazed structure.
• Cold and sunny (e.g., Colorado): Given greater light levels and the need to retain heat, greenhouses in cold and sunny environments should be on the lower end of the glazing-to-insulation range. Given the direct light, the majority of the glazing should face south, with an angle optimized for the time of year you want to grow (discussed below). Adding some roof insulation also makes sense. Growers in hot and sunny climates can follow similar advice, with the possibility of adding lower light-transmittance glazing materials and shade cloth.
• Cold and cloudy (e.g., Connecticut): This is where it gets challenging. Both glazing for light transmittance and insulation are needed. Generally, we recommend using a moderate ratio and ensuring that the glazing has a good R-value, a material property we’ll discuss more below and again in Chapter 6.
When placing glazing, also consider obstructions that might shade the greenhouse. For example, if the east side of the greenhouse is shaded for most of the day, it’s a poor area for glazing. That wall is better left insulated.
FIGURE 5.4. Glazing-to-Insulation Ratio. Example A has an 80% glazing-to-insulation ratio and is better suited for cloudier climates (hopefully mild ones as well). Example B has a 30% glazing-to-insulation ratio, better suited for climates with direct sun and colder temperatures.
Options abound when it comes to greenhouse glazing materials, and sometimes the choices can get overwhelming. To simplify things, we’ve grouped them into three major categories: rigid plastics, glass and films. Figure 5.5 outlines the most common choices, and their pros and cons. More than the materials themselves, it’s important to know how to evaluate a glazing material as the materials are continually changing with advances in manufacturing technology.
• Light transmittance: This should be one of the top factors you evaluate. Light transmittance is how much of the available light a material transmits, described as a percentage of indoor light compared to light hitting the outside of the greenhouse.
• Insulation: Glazing materials are rated by their R-value, which measures their resistance to heat transfer, or simply insulating quality. They can also be rated by their U-value, the inverse of an R-value. Compared to standard insulation or wall materials, glazing materials are very poor insulators: most greenhouse glazings are below R-3. Importantly, the R-value is inversely correlated with light transmission — the higher the R-value, the lower the light transmission. Insulation is added by using more layers of the material with air gaps in between, but each layer reflects and absorbs some light. Thus, choosing a glazing material is often a balancing act between light and insulating quality.
FIGURE 5.5. Comparison of Glazing Materials.

• Cost: Consider the upfront cost, but also the lifetime costs, based on how often the material will need to be replaced if damaged.
• Durability and UV stability: Susceptibility to snow, wind and hail is an important factor, particularly for harsher climates. Additionally, plastic glazing materials will degrade with exposure to UV rays, some much faster than others.
• Transparent vs. diffuse: These two terms are often misused. When glazing is transparent, it allows a unidirectional ray of light through. You can clearly see detailed objects through transparent materials, like glass. However, most glazing materials are translucent: they refract light into many rays (also called scattering, or diffusing the light). A plastic milk carton is translucent — it allows some light through but you can’t clearly see through it. Studies have shown that crops grow better under diffuse light conditions because when light is refracted into many rays light, it penetrates deeper into the leaf canopy. Thus, growers prefer diffuse materials, though transparent ones offer nicer views of outside, making the greenhouse feel open.
• Thermal expansion: Another factor is how the material reacts to dramatic temperature fluctuations (which occur daily in a greenhouse). Materials will expand and contract with temperature swings and shift over time. This, in turn, causes air infiltration and water leaks. The measurement of this quality is called the “coefficient of expansion,” and it is usually specified on a materials spec sheet. If a material has a high coefficient of expansion, this needs to be considered when installing the material; special screws or attachments that allow for shifting should be used.
• Sealability: How well can the material act like a sleek marine mammal? No, we don’t mean that kind of seal. “Sealability” is how we describe the ability of a material to seal tightly to the frame of a greenhouse. The connection between the glazing and the frame is a major area for potential air infiltration, and, thus heat loss in a greenhouse. Sealability depends on the coefficient of expansion and how the material is attached to the greenhouse frame. A poor seal results in poor energy performance.
Rigid plastics include polycarbonate, fiberglass and acrylic. These are major players in the hobby greenhouse market today. They’re popular for good reasons: they’re moderately priced, durable, lightweight and easy to install.
Within rigid plastics, polycarbonate is probably the most common in current greenhouses. It has a relatively long lifespan (15+ years), and can be rated for any wind or snow load.
There is a huge range of polycarbonate options, if you find the right distributor (see Further Reading at the end of this chapter). Single-layer polycarbonate is transparent and thin enough that it can be bent over a curved frame. (Thus, this category includes semi-rigid plastics.) It is still durable and resistant to hail, but it has an R-value of less than 1. For that reason, we don’t recommend it unless you have a hoop house application.
The most common products are 2-layer or 3-layer polycarbonates, also called double or triple wall. These provide decent levels of insulation and high light transmission. You can achieve much more insulation by using more layers, such as a 5-layer material that is rated R-4. However, higher insulation comes at a cost in terms of light transmission: the 5-layer material only transmits 50%–60% of light.
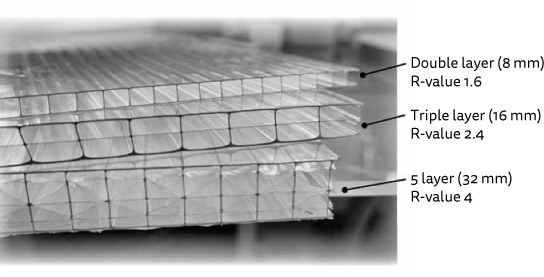
FIGURE 5.6. Polygal Polycarbonate.
Polycarbonate is also available with different tints or colors that diffuse and/or reduce light. A milky-colored version, called opal, reduces light significantly. This would be a good choice for plants that like dimmer, diffuse light, such as orchids. It could be useful for greenhouse roofs in very hot climates like the Southwest.
All these products are lightweight and easy to install, provided the right support and components. They come in panels, typically 4' or 6' wide, and a variety of lengths. Either a plastic or an aluminum track is used to attach it to the frame. We use an aluminum track called Mega-Lock, a durable product that gives the roof an attractive finished look. In addition, there are a number of other parts required: special screws to allow for shifting from thermal expansion; a vapor barrier for the edges; end caps; and gaskets. (These can be sourced with the material from a greenhouse or plastics distributor.) Given these accoutrements and the high-quality material itself, most polycarbonate roofing systems are in the mid-range of cost, at $3–$7 per sq. ft.
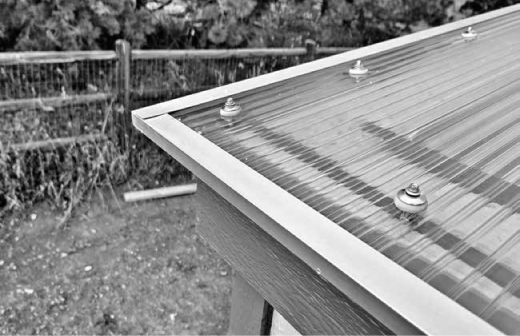
FIGURE 5.7. Polycarbonate Installed. “Bubble washer” screws, gaskets and an end cap are some of the components needed to install polycarbonate. Credit: Ceres Greenhouse Solutions
Historically, the disadvantage of polycarbonate was that it was susceptible to UV damage which caused it to turn yellow and become brittle over time. However, its UV resistance has greatly improved in recent years. Most products now come with a 10–20-year warranty.
Acrylic and fiberglass were the main rigid plastic glazings used before polycarbonate dropped in cost and improved in performance. Commonly known by its trade name “Plexiglas,” acrylic is similar to polycarbonate in many ways. It can come in a multi-walled form, making it a good choice for roof and wall applications. It can also be bent over a shallowly curved frame. Acrylic is slightly less impact resistant than polycarbonate — it will shatter more easily — but is still very strong as a material. (Acrylic has 17 times the impact resistance of glass. Polycarbonate has 250 times the impact resistance of glass.) We recommend making a decision based on manufacturers and costs in your area. It is likely that polycarbonate will be more widely available and cheaper to procure.
Fiberglass is made by embedding shards of glass fibers into a plastic resin. Most varieties are opaque; it’s used in storage tanks, sports helmets, boat hulls, etc. Translucent varieties (typically a milky color) can be used for greenhouse glazing; however, they have lower light-transmission. Be aware that it is also flammable, and it often has a rough texture that can trap dirt and further reduce your light transmission. Though fiberglass used to be common in greenhouses, today it has mostly been replaced with polycarbonate.
Glass has one clear advantage, literally speaking: it is transparent and provides a view window. For residential greenhouses, this makes the greenhouse feel open and spacious, much like a sunroom. If you plan on using your greenhouse as a sitting/relaxing space, we highly recommend incorporating some glass to avoid feeling like you are sitting in a small box, though a nice box it may be.
There are two types of glass products: single-pane glass (often called plate glass) and Insulated Glazing Units (or IGUs). Both have an extremely long lifetime if used in the right applications, as they are impervious to UV damage. Single-pane glass is a single sheet of glass that can come in many sizes (in standard-sized sheets as replacement glass for storm doors, custom cut from a manufacturer, or small panes from older greenhouses). Plate glass has very low insulating qualities and is much heavier than plastics (requiring a sturdier frame), so we don’t recommend it. If you want something thin and transparent, one of the single-layer clear, rigid plastics would be a better choice.
A better alternative to plate glass is Insulated Glazing Units, or IGUs, the windows used in homes. Double-pane types consist of two layers of glass with an air gap in between. Layers greatly increase the R-value, usually R-2.5 for a clear double-pane window — making it an energy-efficient option. They are encased in a variety of materials — like vinyl or fiberglass — and come in a range of sizes. You may be surprised at the sizes of IGUs you can order from the hardware store at a reasonable cost per square foot. There is quite a variety of operable and fixed windows in a range of frames types. Vinyl is the lowest cost, but it also experiences the greatest thermal expansion.
The primary disadvantage with glass is that it can shatter. For that reason, it is best used in vertical applications, not in angled walls or roofs where it is exposed to falling objects. If used in a roof, you will probably need to use tempered or laminated glass, which is typically required by building codes. These added elements prevent the glass from breaking into dangerous shards; however, they also increase costs tremendously. For these reasons, we typically avoid glass in roofing applications. Glass is generally more expensive and much heavier than its plastic counterparts, and it requires more framing if used in the roof. While many IGUs have warranties, they may not apply to use in a greenhouse application. The glass itself has an extremely long lifetime, but the seal of the window can break, causing it to fog up.
Given its pros and cons, we think glass has a place in residential and educational greenhouses; however, it should be used sparingly and cautiously. We recommend clear double-pane windows for vertical walls. This provides a high light-transmittance and moderately well insulating material, while keeping the upfront cost down.
Should I use low-emissivity (low-e) or argon-gas filled windows?
Window options go far beyond clear glass. There are thousands of variations of residential windows that increase energy efficiency. These add films or tints to the glass, or gases between the panes. Low-e windows, for instance, reflect much of the IR and UV wavelengths, while allowing the visual spectrum through. (In turn, they reflect IR wavelengths back into the room, increasing efficiency.) While that in itself is not harmful to plants (since they don’t use the IR or UV wavelengths for growth), some coatings can cut out part of the PAR spectrum, diminishing growth. As an anecdote, once we went to visit a high-tech conservatory that used a highly energy-efficient tinted glass. Although it looked relatively clear, it transmitted less than 40% of PAR light due to the coatings.
Light transmittance varies by individual product. If considering a more advanced window, talk to a supplier that specializes in greenhouse glass. Also check the visual transmittance (VT) of the window, which can serve as an indicator for PAR light transmittance (since they span the same range). In general, we’ve found low-e and argon-gas-filled windows are acceptable if you want to upgrade to more energy-efficient glazing. We don’t recommend tinted windows — they cut out PAR light.
In most of our residential projects at Ceres Greenhouse Solutions, we combine a triwall polycarbonate for the roof with vertical glass windows on the south, east and west sides. We typically use operable windows on the east and west for added airflow to supplement ventilation. We most commonly use vinyl-framed, double-pane glass windows without advanced energy-efficient tints or coatings.
You’ve probably seen polyethylene film on hoop houses. This thin, malleable plastic is very cheap upfront but has a very short lifespan. It has applications for greenhouses in mild climates and for season extension in colder areas. For year-round greenhouses in most places with freezing winters, we don’t recommend it.
First, poly can easily collapse or get torn off in wind, snow or hail. We’ve seen many polyethylene structures go down in the first year of use, some after only a few months. The film is highly susceptible to degradation from UV rays and becomes brittle, needing to be replaced every few years. If you are considering poly, we recommend using a UV-resistant product, which increases its lifetime some. Even so, having to replace a whole greenhouse every 2–4 years is costly, both environmentally and financially.
A second disadvantage is that the thin film is a horrible insulator. It has an R-value less than 1 and does not seal tightly to a greenhouse frame. For that reason, poly films are often used in double layers with air blown into the cavity in between them. If you do opt for polyethylene, we recommend going this route, even though it requires some additional equipment, like an inflation blower. The air pocket provides some insulation; however, the poly can still tear easily, producing holes that cause the greenhouse to become a sieve.
The pro of poly films is simply the low cost — the reason it is the most popular material in the greenhouse industry today. Polyethylene provides a level of crop protection and season extension without much investment. It can also be sufficient if you only want to grow cold-hardy crops over the winter. (Eliot Coleman is famous for growing mache and other greens in unheated polyethylene greenhouses through the winter in Maine.)
Poly is undoubtedly the most flexible material; it can be used on any structure, no matter the size or shape. A great application is as a season extender covering raised beds or a hoop house in the fall and spring. It can then be taken down during the winter and summer to reduce weathering. Due to the flimsy nature of films, we don’t recommend them for year-round applications in a solar greenhouse design.
A new material is ETFE (lovely full name: ethylene tetrafluoroethylene). It is also a malleable plastic film, but much more durable and insulating than poly film. It is becoming more common as an architectural glazing to cover curved buildings with a translucent material. Notably, the biome greenhouses of The Eden Project in Cornwall, England, are glazed with ETFE. Currently, most distributors are in Europe, so sourcing is difficult. Because it is so new, we have not seen enough data or applications to comment definitely on its performance; however, it is one to keep watching.
It is one of the most common questions: What is the best angle for the glazing in a solar greenhouse? The optimum angle of glazing depends on the seasons you want to grow in. More specifically, it depends on the seasons in which you want to maximize light and heat in the greenhouse (typically winter for most year-round growers). There are many articles with simple answers to this question floating around on the internet, but seldom do they explain the reasoning behind their rules — and that can lead to some misguided decisions.
A common rule of thumb for calculating the “best” angle of glazing — either in the roof or south-facing glazing — is to take your latitude and add 20 degrees. While valid in its logic, this rule is overly simplified. Moreover, it can be problematic because it creates extremely steep roof pitches. For example, in Denver, latitude 40 degrees, this would create a roof pitch of 60 degrees. Such a steep roof necessitates either a very tall building or altering the geometry of the greenhouse, which can increase costs. We’ll evaluate these geometries in Chapter 8; for now, it’s helpful to understand how light interacts with glazing based on the angle.
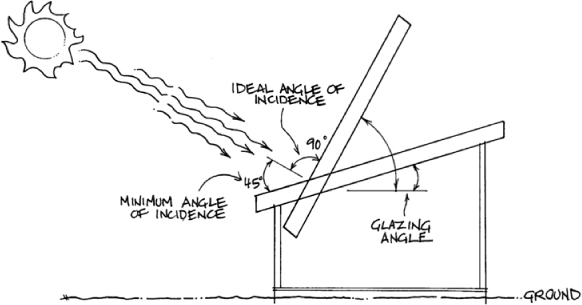
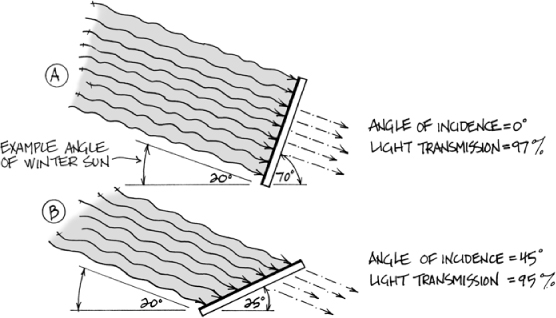
The first thing to understand is that when light hits a material “straight on” or perpendicular to the glazing material, the maximum amount of light is transmitted. The angle of a ray of light relative to perpendicular is called the angle of incidence, shown in Fig. 5.8. When that angle is 0 (perpendicular) the maximum amount of light is transmitted. (This is about 87% for a single pane of clear glass. The other 13% is reflected or absorbed.) When the angle of incidence increases, more light is reflected instead of being transmitted.
FIGURE 5.8. Angle of Incidence.
Importantly, this relationship — between the angle of incidence and light transmission — is not linear. For polycarbonate and some other materials, there is almost no decrease in PAR light transmission when the angle of incidence is less than 45 degrees. In other words, as long as the glazing is within 45 degrees of perpendicular, the decrease in light transmission is insignificant. This is true for all glazing materials: going from a perpendicular angle to an angle of incidence of 45 degrees typically reduces light by only 1%–5%. With triple wall polycarbonate, for example, there is virtually no change (about 1%) in light transmission when the material is perpendicular to the sun and when it is tilted 45 degrees away from perpendicular. Thus, as long as you stay away from very shallow roof angles, there is little effect on light transmission due to reflectance. For roof angles at 40 degrees latitude, then, the minimum threshold is greater than 15 degrees.
To find the range for your location, simply modify the common rule of thumb to account for the great deal of tolerance in glazing angles:
1. First follow the common rule of thumb to find the perfect angle of glazing in the walls and roof: take your latitude and add 20 degrees. This will create a perpendicular, or nearly perpendicular, angle to the sun in the winter months, yielding the maximum light transmission.
FIGURE 5.9. Relationship between Light Transmission and Angle of Incidence. This data represents tests conducted by Ceres Greenhouse Solutions for several materials at once. The same conclusions have been made by other greenhouse designers (e.g., James McCullagh, The Solar Greenhouse Book, Rodale Press, 1978, p 18).
We use 20 degrees because this is a good average for the winter months. Some designers use a higher number, like 25 degrees, which creates a perpendicular angle to the sun at winter solstice. We recommend using an average, not choosing the angle when the sun is at its absolute lowest point; this allows for better light transmission over the whole winter season. If you want to optimize for an entirely different time of year, see this basic process laid out in more detail in Appendix 2.
2. Second, subtract 45 degrees from the number in step #1. This is the practical angle of incidence that yields sufficient light levels during the winter. Any shallower than this and light dramatically starts to decline.
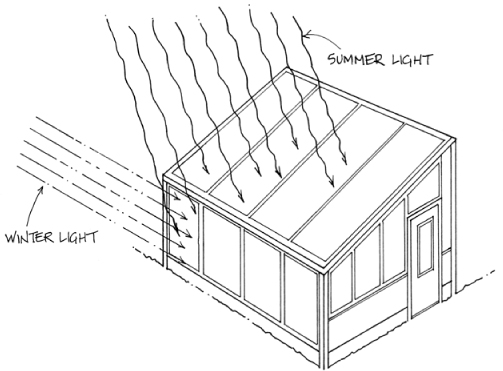
That’s the first half of the story. The second half has to do with the area of glazing that is exposed to the sun, often called the area of incidence. You can see how the area exposed to the sun changes by comparing the shaded areas in Scenarios A and B in Fig. 5.11. Scenario B (representing a 45 degree angle of incidence) will receive about 30% less light than Scenario A because it has a smaller area directly exposed to the sun. In this way, the angle of glazing (either roof or walls) can significantly impact how much light the greenhouse collects.
It is important to realize, though, that this also changes the building’s dimensions. Think of a greenhouse as a collector of solar energy (both light and heat). A building that is 20' tall (such as in Scenario A) will collect much more light than one that is 10' tall because it is a larger collector. Though a tall greenhouse with a larger glazing area will receive more light, it may go against building codes or neighbors’ preferences. Likewise, if the south wall is slanted at an angle (instead of vertical), it creates a larger area of incidence for winter light, but also requires a larger footprint and foundation. In short, while it is possible to increase light with a larger building, this in turn can increase complexity and cost.
So how do you factor in the building dimensions when choosing the angles of glazing areas, particularly the roof? We recommend first choosing dimensions based on your budget and other practical factors. Building an extremely tall building just for the sake of light collection is not practical. For the height, we recommend a maximum wall height of 9'–12' for residential greenhouses. Once you have determined the dimensions, and thus the size of the solar collector, you can then find the range of glazing angles that allow for maximum light transmission using the simple steps given above.
Finally, note that this discussion revolves around glazing angles but light transmission also depends on the glazing material you choose as well as shading factors in the greenhouse, like roof beams. Material choices/shading factors tend to have an even greater effect on light transmission, decreasing light by 30% or more. Most commercial growers strive for total light transmission levels of 70% or more.
Other than light, several other factors should be considered when it comes to choosing glazing angles:
• Greenhouse shape: Different greenhouse shapes — what we call geometries — allow for different glazing areas and angles. Some greenhouses allow for one steeply pitched glazing surface. A single steeply angled roof uses less glazing than both a vertical wall and roof. Using less glazing creates a more efficient structure because it reduces the most inefficient material; however it tends to increase the complexity of the build. Other greenhouses use two glazing areas: a vertical wall combined with a glazed roof. We’ll compare these options more in Chapter 8, Greenhouse Geometries.
• Climate: In cloudy climates, precisely calculating glazing angles is less relevant. Solar radiation is diffused across the sky and comes from many angles.
• Summer heating: While steeper glazing angles maximize light in the winter, they also deflect more light in the summer — generally advantageous for preventing overheating of the greenhouse. Given the high angle of the sun in the summer, much more light will be reflected off the glazing. In other words, the summer sun creates a very severe angle of incidence, which reduces transmission.
Pitch vs. Angles
The building industry describes roof slopes as fraction of rise over run, using increments of 12 as the run. Once you determine the angle of glazing, you can easily equate this to a pitch. Some examples appear in the table here.
Pitch |
Angle |
|---|---|
4:12 |
18.4 |
6:12 |
26.5 |
8:12 |
33.7 |
10:12 |
39.8 |
12:12 |
45.0 |
FIGURE 5.11. Summer vs. Winter Light Exposure.
• Snow loads Finally, steeper pitches of the roof allow it to shed snow more easily. This allows for the use of thinner framing members — less structure is needed to support snow loads — which reduces costs and enhances light.
As mentioned above, solar greenhouses can have one or multiple glazing areas. Using two different glazing materials allows you to be particularly strategic about controlling light and heat transmission.
As the angle of the sun changes through the year, from low in the winter to high in the summer, different glazing areas play a lesser or greater role in light transmission. In the winter, the vertical or near-vertical surfaces will be the predominant collectors of light and heat because they have a greater surface area exposed directly to light. In the summer, glazing areas with shallower slopes are the predominant collectors, as shown in Fig. 5.11.
To maximize light in the winter, use a high-light-transmittance glazing on south-facing vertical walls, (the areas that will absorb the most light during the winter). Even though these have lower insulation values, they can be very valuable for heat gain. In residential greenhouses, double-pane glass windows serve nicely here. They have a high light transmission (>95%), and are nice as view windows.
A lower light transmittance material on the roof will help control overheating during the summer. This also has the advantage that the material will also have a higher insulation value in the area of greatest heat loss. Consider thicker, more insulating (and more light diffusing) polycarbonates, which have the advantage of being resistant to hail.
Regardless of your greenhouse design, understanding how the angles and materials affect light transmission affords you some control over the growing environment.
In addition to full ventilation, adding shade cloth to the glazing during warmer months is extremely helpful to keep the greenhouse from over-heating in the summer (if you intend to use your greenhouse in the summer). To estimate whether or not shade cloth is needed, consider the average summer temperatures in your climate. If it is 80°F (27°C) outside, at best the greenhouse will be 80°F, and likely much warmer (unless you use mechanical equipment like swamp coolers). That climate will likely overheat plants. Shade cloth helps reduce heat gain, to make daytime temperatures more manageable.
A natural (and attractive) shading method is to use plants trellised on the greenhouse walls and roof. Morning glories, passion fruit, hops, beans...any fast-growing vine that can tolerate heat and sun can be grown on the south side of the greenhouse or across the roof. While a greenhouse covered in flowering morning glories is an enticing image, it obviously requires some time and patience for the plants to grow.
Shade cloth is a simple, low-cost, and highly effective alternative. The most common products are made out of woven polyethylene. They come in a variety of shading factors, rated by how much light they block, such as a 25% light-blocking material. Which you choose depends on the intensity of the summer sun and what you are trying to grow.
Shade cloth is most effective when placed on the outside of the greenhouse. Installed on the interior, it still lets heat build up between the cloth and the glazing. When applied outside, it must be secured using tie-downs to avoid having it being torn off in wind. Mechanical systems can also be used as backup cooling, if necessary, in hot climates. Evaporative coolers and misting systems are other aids to summer growing in hot and dry climates.
• Typically solar greenhouses use 30%–80% glazing area relative to insulated wall area.
• When considering glazing materials, evaluate their durability, insulating quality and light transmittance.
• Glass is best used in vertical applications; rigid plastics like polycarbonate are good for most applications due to their light weight, durability and balance of light transmission/insulating quality.
• Steeper pitches for glazing on the south wall and the roof are generally better from a performance standpoint: they maximize light transmission in the winter, allow less light in the summer, and shed snow more easily. The downfall with steeper pitches is that they create impractical heights and are costlier to build.
• A range of roof angles will provide close to maximum light transmission. Stay away from very shallow roofs as this dramatically reduces light transmission in the winter. Consider snow loads, ease of building and other factors when choosing a roof slope, not just light.
• If using multiple glazing materials, use a high light-transmittance glazing on south-facing vertical walls and a lower light-transmittance material on the roof, which will help control overheating during the summer.
Measuring Light and Light Levels for Crops
Torres, Ariana P. and Roberto G. Lopez. “Measuring Daily Light Integral in a Greenhouse,” Department of Horticulture and Landscape Architecture, Purdue University, May, 2012, extension.purdue.edu
Runkle, Erik. “Light It Up,” Michigan State University Extension, hrt.msu.edu/energy
Biernbaum, John. “Hoophouse Environment Management: Light, Temperature, Ventilation,” MSU Horticulture, hrt.msu.edu
Most plastic products are sold through greenhouse retailers or regional distributors. You can search for distributors in your area by going to the manufacturers’ websites, or searching online for plastic distributors in your area.
For more information on energy-efficient window options see The National Fenestration Rating Council: nfrc.org
How do you grow year-round when light levels are only one tenth of the levels recommended by commercial growers? That is the situation for many growers in the Pacific Northwest climate. From the late 1970s through early 80s, a group of researchers addressed this issue with an inventive greenhouse located on a Washington farm. Davis Straub, one of the designers, summed it up: “The idea was to aim the sunlight into the fish pond at the back of the greenhouse to be a storage heat source that would steady the inside greenhouse climate.” The north wall was framed as a parabolic curve so that it would catch the winter sun and direct it downward toward plants and a large in-ground fish tank housed on the north wall. The 4,800-gallon fish tank served as the thermal mass for the structure, passively regulating temperatures.
The greenhouse also included a “passive cooling stack” consisting of a glazed column with a black interior. The stack was meant to heat up during the day. As the hot air inside rose, it exhausted out the top, drawing cooler air into the greenhouse; this created a strong convection current that greatly accelerated passive ventilation. At its peak, the cooling stack exhausted air at a rate of 1,600 cubic feet per minute (the rate of an exhaust fan). It worked extremely well to keep temperatures below 85°F (29°C) through the summers. In the winter, the large fish tank was a suitable source of thermal mass. On average, indoor temperatures stayed 14 degrees above outdoor nighttime temperatures over the first two years.
While some elements were successful, the north wall reflector was not very effective at concentrating and directing solar energy. Reflectors work best when there is a unidirectional ray of light to reflect. Given the low-light levels and cloudy climate (diffuse light conditions), a greenhouse with a larger glazing area would have been a more logical choice. Davis Straub agreed, commenting: “The parabolic greenhouse was a clever design, but not a very successful one given the cold and cloudy climate and the cost. I’m quite certain that there are cheaper ways to build such a greenhouse and better locations for it.” However, innovation tends to happen in increments. As one of the early trials of a solar greenhouse, the Ecotope greenhouse advanced both greenhouse design and aquaculture/aqua-ponic growing strategies.
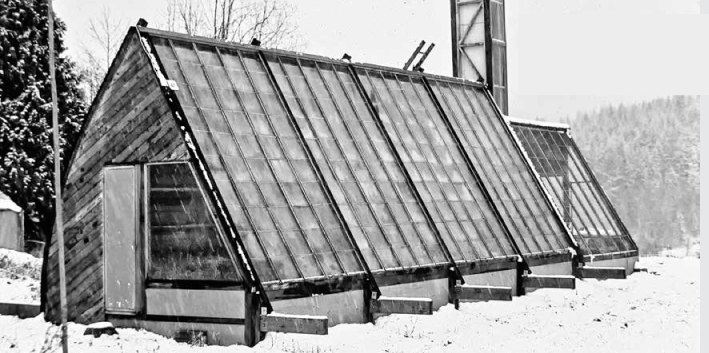
FIGURE 5.12. Ecotope Greenhouse in the 1980s. Credit: Ecotope, Inc.
Polycarbonate: Brand names are Polygal, Lexan and Palram (Sunlite and ThermaGlas).
Acrylic: Acrylite.
1. “Measuring Daily Light Integral in a Greenhouse,” Ariana P. Torres and Roberto G. Lopez, Department of Horticulture and Landscape Architecture, Purdue University; extension.purdue.edu