Creating the Greenhouse Environment
The soil is the great connector of our lives, the source and destination of all.
— Wendell Berry, The Unsettling of America, 1977
There is a certain excitement that accompanies planning a garden. A border of alyssum will go here; fava beans will trellis up there.... Like a painter envisioning a painting, you can see it in your mind’s eye, and there’s fulfillment and creativity as you start on this last leg of the journey.
This chapter focuses on the most popular greenhouse gardening method: growing in soil. In recent years, hydroponic, aquaponic and vertical growing methods have become major trends. Due to an impressive wave of recent interest, we’ve dedicated the next chapter to these methods.
The floor plan is tied to your planting plan (the layout for what you intend to grow), and your growing method. For residential greenhouses, we strongly recommend raised beds. They offer a much easier gardening experience — they don’t require kneeling or bending over. They maximize use of the floor space by creating space-efficient pathways. Most importantly, they allow you to add incredibly rich, nutrient-dense soils to the beds, building up from the native soils in the ground.
In small greenhouses, beds usually line the edges, forming a U with a walkway in the middle. Larger greenhouses can add a center bed, or get more creative, using a “keyhole” bed design, as shown in Fig. 17.1. In any case, a bed layout should make the most efficient use of the floor space, while keeping beds a reasonable width for reaching across. Beds are typically 2'–4' wide and 2'–4' tall. Taller beds allow you to add more high-quality soil for plants’ roots (and require less bending over).
Bed height is an important detail to plan early on — when defining your greenhouse geometry and dimensions. We recommend using a south-facing knee-wall below raised beds. Using glazing below the raised beds does nothing for light collection; this area is best insulated as a durable wall. The height of the wall should roughly equal your bed height. Similarly, intake vents — commonly located on the lower south, east and west walls — should be above raised beds, so they are not blocked.
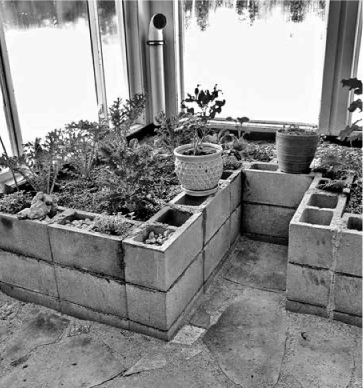
FIGURE 17.1. Raised beds can be made out of a variety of materials (the same options as for an outdoor garden). Concrete blocks are a good alternative to wood. They have the advantage of adding thermal mass to the greenhouse; plus, the openings can form additional planters. Be cautious of pH levels; they can make the soil more alkaline.
When it comes to greenhouse floors, flagstone, gravel and pavers are good choices for creating walkways between the raised beds. We always recommend leaving the bottom of beds connected to the natural soil. There should be no insulation or flooring underneath beds. Connecting the beds to the earth below ground allows plants’ roots to grow as fully as possible (particularly important with perennials), and creates better drainage. Since the perimeter of the greenhouse will be insulated, the floor itself does not need to be insulated.
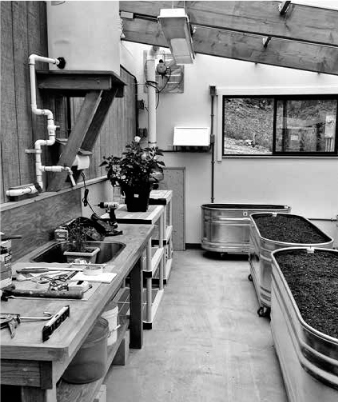
FIGURE 17.2. This greenhouse includes a workstation and sink on the north side.
When laying out a floor plan, consider the other ways you might want to use the space. We strongly recommend putting in a workbench/seeding area, like the one shown in Fig. 17.2. Though many growers don’t anticipate it, a bench is very helpful for starting plants, transplanting and propagating. There is also a certain amount of “stuff” that accumulates with a greenhouse. Seed trays, hoses, watering cans and pots can all be stored below a seeding area/workstation.
A warm, protected environment in a greenhouse can be a potential enclave for animals, like chickens, ducks or rabbits. (Integrating fish with aquaculture or aquaponics is discussed in Chapter 18.) But, animals, particularly chickens, can introduce pathogens and unpleasant odors into the greenhouse. For that reason, we don’t recommend keeping fowl in the greenhouse.
Some growers see it differently, and advocate keeping chickens or rabbits in an enclosed area in the greenhouse, as they boost CO2 inside and provide a safe, warm space for the animals. According to Ben Falk of Whole Systems Design, “It’s a super safe warm environment with access to fresh greens for baby ducks and geese. They graze right out of the gate even in March, which is huge for their health.” You definitely do not want to allow chickens to roam throughout the greenhouse; to them, a greenhouse is a giant buffet (which would leave you without much food).
Rather than integrating animals in a combined space, we recommend using an add-on structure, as in the “greenhouse/chicken coop combination” shown in Fig. 17.3. When joined, both structures are more energy efficient, and it makes excellent use of a single site. The chickens still benefit from the greenhouse, but aren’t able to contaminate it.
Worms are nature’s great fertilizers. Their benefits are numerous and hard to overstate: they accelerate decomposition, aerate the soil, and fertilize it with their castings. Worm castings (a nice name for worm poop) are an excellent source of organic fertilizer for your soil.
To add worms to the greenhouse, we recommend the simple and easy method: adding them directly to raised beds. Some growers go further and build vermicomposting bins in a section of the greenhouse or underneath the walkways. The area directly beneath the pathways of the greenhouse can be turned into a vermicomposting bin, as shown by Jerome Osentowski and other growers. An online search of “vermicomposting pathways” will yield examples and details about how to do it.
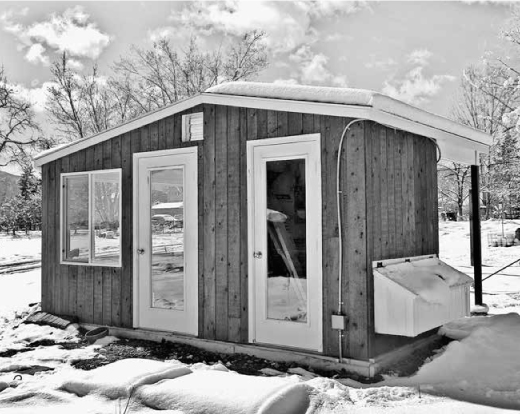
FIGURE 17.3. Chicken Coop and Greenhouse Combination. Credit: Ceres Greenhouse Solutions
There is also a lot of interest in adding bees to the greenhouse, which serve as natural pollinators. Some growers build beehives into the wall so that bees can freely move outside in the summer and then access the greenhouse in the winter. Like many integrated designs — aquaponics, vermicomposting, chickens — this can be a great benefit to the greenhouse, but is a practice in itself and beyond our scope here.
Without bees, pollinating crops in a greenhouse is typically accomplished by providing gentle air movement. (Wind, just like bees, can carry pollen from the stamen to the pistil of a flower.) Growers can also hand-pollinate by gently shaking flowers.
In a narrow view, a greenhouse is a place to grow food. In a larger view, it is a place to enhance your health, and that can extend far beyond the food you eat. We encourage residential clients to view the greenhouse holistically — as a space for mental health, relaxation and rejuvenation — in addition to food production. Some clients go as far as incorporating saunas, hot tubs and sleeping areas in the greenhouse. At the very least, we recommend planning some sitting/hanging out space into your floor plan if possible. Once it is up and running, a warm, green and sun-filled space is hard to resist in the winter. Having a place to enjoy the fruits of your labor is a design integration we always recommend.
As the gardener’s adage goes, it all starts with the soil. Soil is the foundation of all growth in the greenhouse. Soil determines plants’ productivity, and their immunity to pests and disease. It influences the nutrient density and taste of the food you grow. You can build a perfectly controlled environment, but if the soil is not able to grow anything, it will all be for naught. With that in mind, building soils should be a priority when you start growing and something you continue to do year after year.
We say building soils, because it usually requires a bit of effort and some amendments to achieve soil that allows plants to thrive. Good soil is biologically active, rich in nutrients, and well textured. We’ll break these facets down individually.
Biologically active means the soil has life. Living elements like worms, microbes and mycelium break down organic matter and provide many of the essential nutrients for plants. The “Big 3” nutrients — nitrogen, phosphorus and potassium, or NPK — get a lot of attention. Indeed, these are essential to growth, but so are many other nutrients often called micronutrients. Plants need smaller concentrations of micronutrients, but they are still crucial to plant heath. Focusing solely on NPK is a limited view that can hinder the success of your greenhouse.
The best way to give plants the full spectrum of nutrients they need is by creating biologically active soils rich in organic matter (sources of carbon and nitrogen, among other things, contained in plant matter). Organisms in the soil make nutrients available to plants by breaking down organic matter. They also help aerate soil. In their wake they leave behind pockets for air and water and for plant roots to penetrate further into the soil. Plants have evolved to depend on soil organisms, and there is no easy replacement for their complex biological role. Nutrients can be supplemented with liquid fertilizers or soil amendments, though these are not a direct replacement for biologically active soil.
How do you encourage biologic activity? The easiest way is to add lots of organic matter to soils, following the mantra “if you build it, they will come.” You can purchase compost (decomposed organic matter and sometimes manures) from a reputable source, or simply make your own. Our society discards immense quantities of organic material. Bags of leaves on the curb, nitrogen-rich coffee grounds from your local coffee shop...there are numerous sources for organic materials. Disrupting these waste cycles and turning them into rich, organic soil is a positive and satisfying pursuit.
Creating your own compost simply requires organic material, water, air and time. You can fine-tune your organic recipe by researching particular organic materials and finding out whether they are good sources of carbon or nitrogen. See the books listed in Further Reading for more on composting.
The main drawbacks, in our view, are simply the time and labor involved in creating large amounts of compost. Raw organic materials usually take many months to decompose before they are good soil amendments. We recommend starting a backyard composting pile well before you build your greenhouse; that way, you’ll have a source of compost by the time the raised beds are installed. Some growers, like Jerome Osentowski of the Central Rocky Mountain Permaculture Institute, add raw organic matter directly to the growing beds, building soils right in the greenhouse. It still takes time for the material to decompose in the beds, but there is less work involved in moving materials. Jerome’s book, The Forest Garden Greenhouse, provides more information on building soils.
Though more labor intensive, DIY composting saves money and usually creates a better product at the end. Compost sitting out at your site will naturally be inoculated with microorganisms and mycelium, and these beneficial soil organisms will then be transplanted to your raised beds.
While composting and organisms add nutrients to the soil, it’s impossible to know the exact nutrient makeup of a soil just by looking at it. To do that, we recommend getting a soil test (provided by many states’ agricultural extension offices). These will tell you the soil’s pH, nutrient density and structure (percentages of sand, silt and clay). Most plants like a neutral pH, around 7.5.
After you have your soil test results, you can respond with soil amendments to supplement for a deficiency. There are a huge range of options: kelp, fish emulsions, blood meal, bone meal and many others can bring out specific qualities in the soil and thus, plants. This takes some additional research; we recommend looking into options once you know the profile of your soil.
While we recommend doing as much composting as is logistically feasible, it is a tall order to fill the entire volume of growing beds with your own compost (limitations are usually space and back power). Thus, many growers wisely purchase a base soil substrate (often a mix from a landscaping company) and use homemade or purchased compost to amend.
Landscape companies typically offer something like a “top soil mix” or a “compost mix.” While you can use these to fill some of the volume of the beds, be cautious about overusing them. Many are very high in salts from manures. Ask for a copy of the provider’s soil test to know what you are starting out with. You may be able to source local compost (from a farm, for example). Generally, asking other gardeners in the area is the best way to find the best local sources.
A second common source of material is the bagged soils you find at garden and hardware stores. These mixes can be useful for amending soil — particularly to enhance drainage — but we don’t recommend relying on them extensively. First, they are extremely expensive per volume. They are also pretty wasteful, given the long-distance shipping, and not always sustainably sourced. Finally, though they say “soil,” these mixes are usually predominantly peat moss or coco coir, fibrous materials that make soil light and fluffy. (Manufacturers do this because they’re cheaper to ship, and most of these mixes are marketed as well-draining potting soils.) That makes them low in organic matter, the basic building block of nutrient-rich soils.
What about using the existing soil underground? Perhaps you have some extra soil left over from when you installed a GAHT system. Using your native soils is a viable option; it all depends on what kind of soil you are starting with. Here in Colorado, soils are very heavy in clay, which prevents them from draining well. So, if we want to use native soil in a raised bed, we have to add substantial amounts of organic material.
This brings us to soil texture. The percentage of sand, silt and clay in a soil affects how it holds water and air. It changes the feel of soil and how easily roots can penetrate it. Unlike nutrient compositions, you can get a feel for soil texture just by touching it. If you rub a clump of soil between your fingers and it feels slimy and smooth, it probably has a high concentration of clay. High clay content restricts drainage, which can lead to soils becoming waterlogged. This in turn cuts off air to plant roots. In a humid greenhouse environment, well-draining soils are critical. These can be created by adding organic matter or an amendment like perlite or coco coir. A soil test can tell you the structure of your soils to know whether this is needed.
If this all seems overwhelming, focus on these few takeaways when building good soils: First, you can’t really overdo it with organic matter, as long as it’s properly composted and not too high in salts (from uncomposted manures). Secondly, keep soils well-drained. Finally, use a soil test to evaluate the nutrient concentration and decide if you need further amendments to target a specific deficiency.
Qualities of Good Soil:
• Rich in organic matter
• Healthy biologic activity
• Drains well
• Rich in nutrients
• Low in salts
• Neutral pH
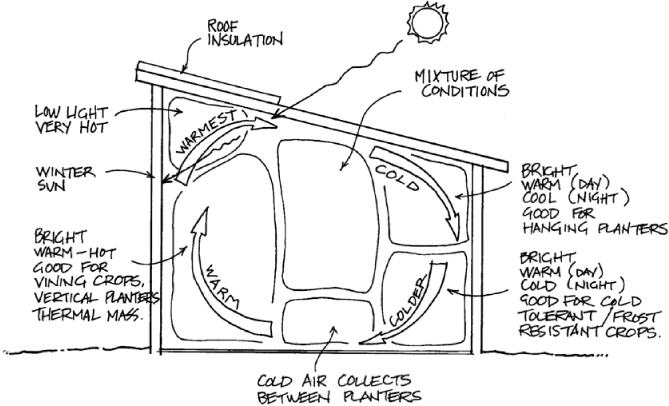
Each planting plan is unique, though there are some considerations that apply to all growers. Solar greenhouses have microclimates, zones in which light and temperatures vary. These change throughout the year as the angle of the sun changes. Figure 17.4 show typical microclimates during the winter. Anything located near the glazing will experience the greatest temperature swings, and coldest temperatures. At night, plants here are inundated with cold air. As air cools around the glazing and descends, it eventually collects at plant level. For that reason, we recommend planting cold-tolerant crops along the front beds in the winter.
The back of the greenhouse, particularly if there is thermal mass, will be the warmest and most stable in temperature. It is a good area for more sensitive plants, and those that can take advantage of the vertical space. Tomatoes, cucumbers, and peas are often placed here, and allowed to trellis up the wall.
FIGURE 17.4. Microclimates during the Winter.
The temperature differences between these zones can be quite noticeable in the winter. In the summer, conditions are more uniform, especially when there is some shading on the north wall (from roof insulation or shade cloth).
• Insectary plants: Insectary plants attract beneficial insects, which in turn, naturally fend off harmful insects. Attracting and keeping these insects is the basis for integrated pest management, or IPM, a holistic approach to pest control. Insectary plants are often flowers and/or herbs, which have the additional benefit of adding color and aroma to your garden. Adding them to your greenhouse helps create a resilient ecosystem that mimics nature. They sustain beneficial insects throughout the winter (when there is no access to outdoor food sources). In the summer, they invite pollinators and beneficial insects into the greenhouse to help with pest management.
• Alyssum
• Composite flowers (daisy and chamomile)
• Chives
• Dill
• Fennel
• Marigold
• Mint
• Nitrogen-fixers: Just like in the outdoor garden, certain plants can help add nitrogen to the soil. Beans, peas and clovers are among the plants that absorb nitrogen from the atmosphere and deposit it into the soil through their roots. They can be interspersed throughout the greenhouse to enhance nutrient rich soils.
• Plant height: A bit obvious, but sometimes forgotten factor: plants grow to different heights and can shade each other. During the winter, we generally recommend placing tall, vining plants on the north wall, and shorter plants in the front. In the summer, tall plants can be used to help control heat gain; you may want to use their shading effect as they trellis up the south wall. Or, you can intersperse tall and short, using shorter shade-tolerant plants as ground cover, which is more characteristic of natural outdoor environments.
• Mimic nature: Natural environments are diverse polycultures. Biodiversity helps thwart the spread of pests and disease by creating resilient ecosystems. For example, if you have a single large area of lettuce starts, and aphids establish there, they are very susceptible to the pest outbreak. If the lettuce is interspersed with other plants — perhaps some mature plants more resistant to pests, or flower that attract beneficial insects — the system as a whole is more resilient. Diversity is nature’s defense system and should be designed into the greenhouse as well. (Commercial greenhouses are sometimes the exception, though even those can take advantage of diversity and permaculture principles.)
• Think three-dimensionally: In his book, The Forest Garden Greenhouse, Jerome Osentowski said it best: “You’re sculpting a three-dimensional landscape.” Consider not just how plants will occupy the area of the greenhouse, but the entire volume. Do you want to create multiple stories of plants, or stack tall plants on the north side? Jerome has become a master of creating three-dimensional landscapes in his greenhouses, interspersing fruit trees, vining crops, trellising crops (like passion fruit) and annual vegetables.
• Experiment: The year-round environment of an efficient greenhouse opens up the possibilities of what you can grow. It’s an opportunity to branch out and try new crops. Ever eaten a tree tomato or grown purple lablab beans? Now you can. Seed catalogs, traveling to other areas, and talking to other growers are great sources of inspiration.
Year-round greenhouses are constantly evolving environments. Growing is a continual process of life and death, seeding and harvesting. As a backdrop to the daily tasks, life in the greenhouse also takes on seasonal rhythms. Each season has certain characteristics and corresponding tasks depending on the light and temperature afforded by the sun. A simplified summary is shown in Fig. 17.5.
The winter is predominantly characterized by low light and very slow growth. We call this “hibernation mode.” Plants survive, but their growth slows to a snail’s pace when the daily light integral drops to the low single digits. (See Chapter 5 for more on light requirements.) Low light is especially detrimental to seedlings. To accommodate, start plants early enough (the late summer/early fall) that they can persist and still provide a good harvest through the winter. Plants should have full leaves and developed root systems before day length declines drastically, around October/November in North America. That way, they can be harvested through the winter, providing fresh produce that is impossible to find at the grocery store.
Of course, the exact timing varies by crop and your latitude. A good indicator of when to start planting for winter is when there are still 11 or 12 hours of sunlight (not an exact number, but a rough approximation for solid growth). For us, in Denver, at 40-degree latitude, that corresponds to September to mid-October in the fall (and mid-February to March in the spring).
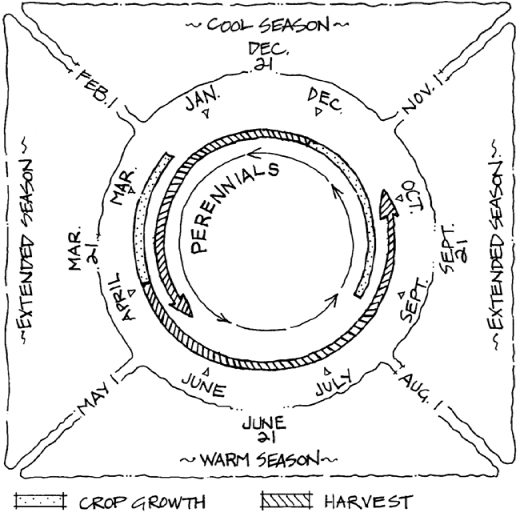
FIGURE 17.5. Simplified Year-round Growing Cycle. This is a generalized depiction intended to show the “second” season afforded by year-round greenhouses; that which occurs while outdoor gardens are fallow. The specifics of your planting calendar are entirely dependent on your goals, greenhouse and climate. Credit: Adapted from “A Solar Greenhouse for the Northwest,” by Ecotope, Inc.
A mistake we’ve made a few times in our own greenhouse gardens is to wait too long before starting plants for the off-season. When you are up to your elbows in tomatoes in August and September, the last thing you think about is starting more plants. But if you miss this window, it is hard to recover without adding supplemental lighting or purchasing starts. Thus, keep in mind the planting calendar in Fig. 17.5 and plan ahead.
We recommend starting cold-tolerant crops for winter growing, mainly because these are usually also shade-tolerant or low-light crops. If your greenhouse runs warmer, you can keep warm-season crops like tomatoes, cucumbers and peppers going, though they don’t produce much fruit in low light. However, the occasional vine-ripened juicy red tomato in the dead of winter may be well worth it. Because it is hard to tell what will thrive in your winter conditions, we recommend starting a range of plants and seeing what does well the first year.
In spring, any remaining annuals that were started in the fall experience robust growth as light returns. The greenhouse becomes a verdant oasis at a time when most other growers are still hankering to get outside to start their gardens. (We sometimes call spring the “jealousy season.”) It’s an excellent time to start plants for growing on in the greenhouse or transplanting outside.
That brings us to summer. Some growers grow heat-tolerant crops in the greenhouse in the summer. Others let it go fallow, concentrating on their outdoor gardens instead. Either way, things typically get shifted around during the summer as some plants get moved outside.
As a backdrop to these cycles, perennials (fruit trees, flowers and herbs) can remain in greenhouse year-round, adding to the abundance. You may find that a greenhouse allows many annuals to turn into perennials. In our demonstration greenhouse at Ceres, a kale plant seemed to like the environment, so we just left it. After a couple of years we had a “kale tree” about four feet tall with a stalk several inches in diameter. Though the leaves got tough in its old age, it kept producing, providing a nutritious supplement to green smoothies.
In his book, The Winter Harvest Handbook, Eliot Coleman astutely makes the point that the “cross-quarter” days are very useful for crop planning. Most of us are familiar with the “quarter days” — the solstices and equinoxes. However, the cross-quarter days — the mid-point between the equinox and the next solstice — align more closely with the beginning of each season and can serve as a rough guide for your planting schedule:
• Feb. 1: Start warm-season annuals as days start to lengthen.
• May 1: Begin to transplant starts outdoors, depending on your last frost date and the crop.
• Aug. 1: Start planning for cool-season annuals for the winter growing season, though they may be started a little later depending on your climate.
• Nov. 1: Plants for winter harvesting should be nearing maturity by this time.
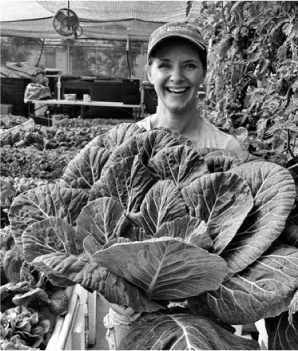
FIGURE 17.6. Super-size Collard Greens. Credit: Flourish Farms
Obviously these dates are not concrete, and vary by climate. They’re meant to serve as reminders for the next phase of growing... a gentle ping that the season is changing and it’s time to prepare.
Year-round growing isn’t a requisite for a solar greenhouse. Three-season greenhouses allow growth most of the year, but go dormant in the winter or the summer. Other growers choose a middle road, keeping some frost-tolerant crops in the greenhouse in the winter without actively trying to maintain certain temperatures. Fig trees, for example, can withstand temperatures down to about 10°F (−12°C) and can be left in a greenhouse, mostly dormant, for the winter with little tending.
Your growing calendar and planting plan will be completely unique to you. We recommend using the experience of others and experimenting on your own to see what works best for your greenhouse. Documentation is extremely helpful in this regard. It hastens the learning process, allowing you to get a full picture of how the greenhouse operates throughout the year. Simple journal entries can be extremely helpful to record observations. For example:
November 15, 9 AM: Greenhouse 50°F. Cold damage on basil. Re-seeded spinach.
May 5, 12 PM: Greenhouse 90°F. Tomato starts taking over. Start these later next year.
Simple notes can go a long way to clarify patterns. Other growers prefer a more organized chart for record keeping. Recording climate data like temperature, light and humidity, with thermostats and data loggers can also be extremely helpful. Whatever your style, documentation is a good habit to get into. It can inspire you to observe more and see patterns that emerge. That, in turn, allows you to anticipate changes and refine your planting schedule year after year.
Pest management sections of books tend to focus on introducing beneficial insects or using pesticides after a pest problem emerges. These are emergency measures, very useful, but only part of the full picture. To us, pest management starts long before harmful insects get into the greenhouse. It starts with creating a resilient ecosystem that naturally resists pest outbreaks on its own. This involves using polycultures to create diversity and adding beneficial plants to your planting plan. It equates to focusing on the full picture of plants’ health. When plants are stressed, their natural defense systems are compromised. By building good soils, maintaining proper watering, and preventing overheating and cold shock, you enable plants to thrive. In turn, they are able to naturally deter pests on their own (to an extent). Hence, pest management begins with the greenhouse itself, including design and climate control.

Should I use screens over windows/fans?
We don’t advocate using screens in the greenhouse. Most harmful pest populations, like aphids, can find their way in with or without a screen. Moreover, screens tend to block out many beneficial insects, like ladybugs, which are larger and can’t get through.
Commercial greenhouses that use monocultures are a different story and may need to side toward the “sterile-environment” approach, using screens and other measures to prevent all insects from entering the greenhouse.
This approach is more akin to a philosophy than a management strategy. Some growers try to create a sterile, extremely controlled environment in the greenhouse. Indeed, it is wise to take some measures to prevent pests from entering the greenhouse (like washing off starts purchased from garden centers). We find that insects — both good and bad — are natural and inevitable parts of the garden. For most residential greenhouses, management doesn’t mean complete annihilation of pests. Rather, it is about controlling their populations using natural defenses and healthy plants.
Unlike an outdoor garden, pests in a greenhouse find a haven free from many natural predators. Their populations can easily explode if not caught early. Observation is critical. If a population is caught early, it can be quickly remedied with simple, natural methods. Removing dead plant matter/debris and checking plants (particularly under leaves) will go a long way to preventing problems. Observation also includes correctly identifying what the problem is. The top three pests that afflict greenhouses are aphids, whiteflies and thrips, and each requires a tailored control strategy.
This brings us to a third level of management in the case of a pest outbreak. There are a range of natural techniques, such as using beneficial predatory insects or organic sprays. Ladybugs or lacewings will prey on aphids, naturally controlling their populations. Ladybugs can consume 5,000 aphids in their lifetime, and quickly reproduce, creating alligator-looking larvae, which in turn consume more aphids. Some growers use insectary flowers to try to maintain a year-round population of ladybugs in the greenhouse. Others purchase ladybugs (online or at garden centers) if an aphid outbreak occurs. Lacewings are also a popular choice, considered by some to be more effective than ladybugs.
Organic sprays are also useful, if needed. Pyrethrum is a naturally occurring oil that can be used as a pesticide. An interim (and much cheaper) step is simply knocking pests off plants with water. Gently spraying affected leaves can disrupt resident aphid populations enough to curtail their growth.
The water requirements of greenhouses vary greatly throughout the year. For most of the year, greenhouses require much less water than outdoor gardens, where winds dry out the soil. The protected environment of a greenhouse traps moisture — often, too much moisture — making the watering requirement much lower for most of the year. The exception is the summer. If the greenhouse is operating in the summer, it will need to be constantly ventilated to avoid overheating. As a result, regular watering is a necessity.
Getting water to the greenhouse can happen in three ways: collecting rainwater, bringing in a hose from the outside, or installing a conventional water line. Collecting rainwater from the greenhouse roof is an excellent method that enhances the self-sufficiency of the structure.
Rainwater collection can be done with gutters and drains, similar to how it works with a home. There are two main options. With exterior gutters, water flows from the gutters through a drain through the wall and is collected in a reservoir inside, as shown in Fig. 17.7. Alternatively, the gutters can be inset into the roof and drain down to barrels inside the greenhouse (these are usually located on the south side, since water runs off the angled south-facing roof).
If a small residential greenhouse is located near the home, a hose can be brought out to provide watering as needed. While very simple and free to set up, this can get cumbersome as time goes on, particularly in the winter, when hoses should be disconnected from the residential plumbing in freezing climates. To address this issue, one of our clients devised an elegant solution for storing domestic water in the greenhouse. Shown in Fig. 17.2, a large water storage tank is located on the wall inside. This connects to a valve that can be connected to a hose outside. When the hose is on, the water pressure is sufficient to fill the water tank. Once the tank is full, water can be gravity-fed from the tank to watering cans... easy access without taking the hose out every day.
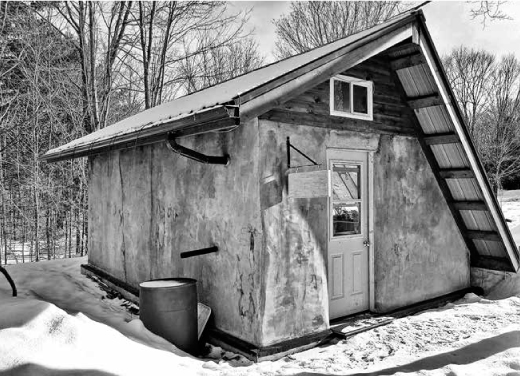
FIGURE 17.7. Designed by Dirt Craft Natural Building, this cob greenhouse uses rainwater catchment. Credit: Dirt Craft Natural Building
The final method of getting water to the greenhouse is a conventional water line. In this case, a copper or PVC pipe is buried underground, bringing water from a nearby structure to a spigot inside or outside the greenhouse. The water line should be buried below the frost line in locations with freezing winters. The line must be plumbed to the house. Because most municipal water sources contain chlorine — harmful to plants in high concentrations — we recommend adding a water filter to the end of the line. Often, a plumber completes this process, but there are DIY resources available to help you install a line yourself (see How to Build Your Own Greenhouse by Roger Marshall).
Hand-watering and drip irrigation systems are the conventional options. Drip irrigation has the advantage of providing regularly scheduled watering, helpful if you plan to leave the greenhouse for a few days on its own. The setup is the same for outdoor systems: a main hose, fed by a water pump, brings water to a series of emitters that are spread within the beds. It takes a bit of monitoring to ensure that water is evenly distributed and getting to the plants in need.
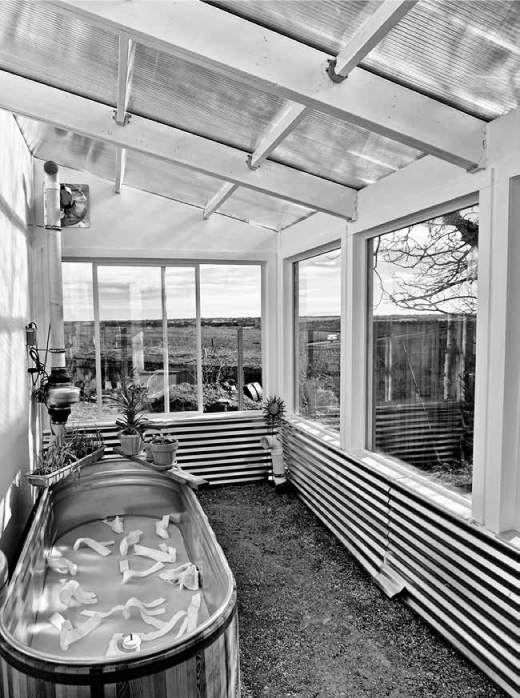
FIGURE 17.8. Greenhouse with wicking raised beds from Farm Tub™. You can see the cloth wicking material in the unfilled grow bed.
Wicking beds are another watering option that have a number of advantages. These are raised bed containers with a water reservoir on the bottom. Cloth wicks extend from the reservoir and disperse water into the soil. This reduces water usage by watering plants’ roots directly (not the surface of the soil). Thus, it reduces evaporation from the soil. That, in turn, reduces humidity in the greenhouse and the watering requirement. Self-wicking beds can be made from basic containers and materials or purchased pre-made, like the Farm Tub™ wicking beds shown in Fig. 17.2 and 17.8.
Lowenfels, Jeff and Wayne Lewis. Teaming with Microbes: The Organic Gardener’s Guide to the Soil Food Web. Timber Press, 2010.
Lowenfels, Jeff. Teaming with Nutrients: The Organic Gardener’s Guide to Optimizing Plant Nutrition. Timber Press, 2013.
Osentowski, Jerome. The Forest Garden Greenhouse. Chelsea Green Publishing, 2015.
Smith, Shane. The Greenhouse Gardener’s Companion: Growing Food and Flowers in Your Greenhouse or Sunspace. Fulcrum Publishing, 2000.