Ventilation
When we started designing greenhouses, we thought the primary challenge was keeping them warm enough. Greenhouses operate primarily through the colder months right? We didn’t anticipate that keeping the greenhouse cool enough was an equally great challenge. Fortunately, though, it’s one that can be easily remedied with proper ventilation and thermal storage methods. This chapter explains how to equip a greenhouse with sufficient ventilation via passive vents or electrically operated exhaust fans.
Here in sunny Colorado, the temperature of a closed greenhouse can easily soar over 100°F (38°C) on a clear day — and that’s not even during the summer months. The greenhouse effect is surprisingly powerful. An anecdote can best explain: One of our clients had purchased a kit plastic greenhouse and left it closed and unused except for storing some foam boards of insulation inside. After a couple of months, she pulled the boards out to find them completely disfigured. The greenhouse got so hot, they melted like a stick of butter in the microwave.
So, you can expect a greenhouse to get very warm during the day. Most plants get stressed at temperatures over 90°F (32°C). Even with thermal storage methods to absorb excess heat during the day, most greenhouses need ventilation to provide cooling for much of the year.
First, we should clarify some terms. “Cooling” describes anything aimed at lowering temperatures in the greenhouse, including shade cloths, evaporative coolers, and misting systems. The easiest, most energy-efficient method (by far) of cooling a greenhouse is exchanging the greenhouse air with cooler outdoor air (“ventilation”). In addition to cooling, ventilation serves other vital functions that keep the greenhouse healthy, such as circulating air, adding CO2, and reducing humidity.
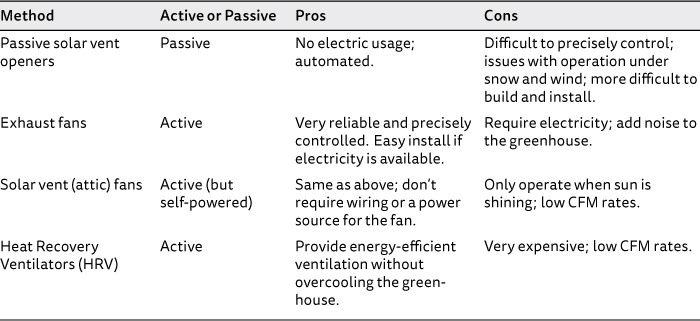
Ventilation methods can be categorized into those that require electricity (active systems) and those that don’t (passive systems), summarized in Fig. 7.1. All provide some level of automation, via a thermostat or a vent opener. An additional possibility is to manually open windows and doors in the greenhouse. This can be a nice backup method during the summer, but we don’t recommend relying on it. The greenhouse can heat up and cool down quickly, and it’s hard to be present at just the right the time to open and close windows. Often, the greenhouse will just need a short period of ventilation, requiring multiple trips to adjust windows. Plus, the manual method makes it hard to take a vacation.
FIGURE 7.1. Ventilation Methods.
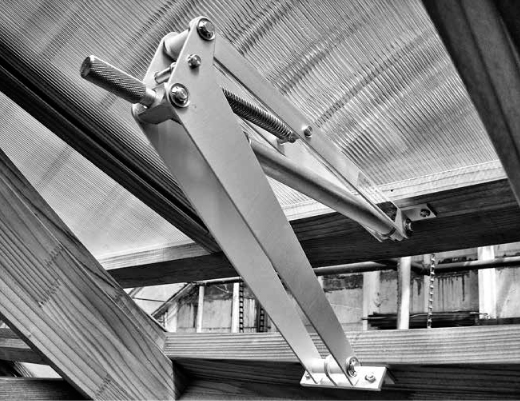
FIGURE 7.2. Bayliss Solar Vent Opener. Credit: Superior Autovents (Sturdi-Built Greenhouses)
Passive vents rely on devices called solar vent openers to open and close vents. These contain a wax cylinder that expands when heated, opening the vent. When the temperature drops, the wax contracts and closes the vent. The cylinder can be set to operate at a certain temperature (within a set range).
The second element that facilitates passive venting is natural convection. As air heats up, it rises and is exhausted out of vents located at the top of the greenhouse. Intake vents located as low as possible on the greenhouse wall draw cooler, fresh air into the greenhouse. The greater the distance between the lower and upper vents, the greater the airflow. There are a variety of possible configurations, shown in Fig. 7.3.
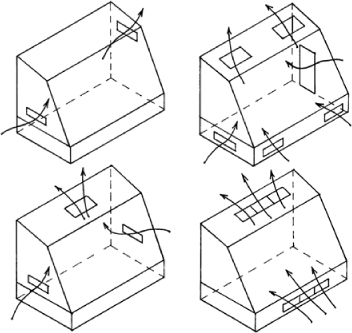
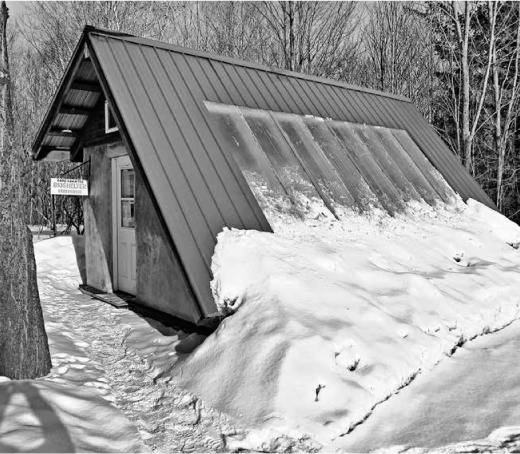
FIGURE 7.4. Consider snow buildup when placing intake vents. Credit: Dirt Craft Natural Building
There are a number of things to keep in mind when locating vents:
• Wind directions at your site: Ideally, the exhaust vent should be on the leeward (downwind) side of the greenhouse. Wind blowing against an exhaust vent will impede airflow.
• Snow and ice buildup: Many people consider building exhaust vents in the roof. It’s possible, but much more complicated given that snow and ice can build up on top of a vent and prevent it from opening, possibly breaking the vent opener. Additionally, roof vents create exposed edges where water runoff can leak down into the greenhouse. Roof vents require more careful construction, normally raised above the roofline so that water runs around the lip of the vent, not down into cracks (the same way skylights are installed).
• Snow shedding: For intake vents, snow buildup at the front of the greenhouse can be a problem as shown in Fig. 7.4. A vent trying to open into a mound of snow will break. You can disable some vents when they are not needed in the winter; build overhangs into the roof; or go above and beyond, creating special awnings above intake vents to protect them from snow
• Interior layout: When locating intake vents, sketch out the location of growing beds or any equipment inside that could block a vent. Typically, intake vents are located in the south wall above the growing beds. In winter, though, plants can be “shocked” with bursts of freezing cold air when the vent opens. To avoid this, consider disabling some vents during the winter. The east and west corners are also good places for vents.
• High winds: Vents protruding from the greenhouse have the tendency to act like sails; they can get torn off in wind gusts. Most vents have a safety cord, but these are not fail proof. If you are in a very windy location, consider building a windbreak around the greenhouse. Locating intake vents as low as possible and putting exhaust vents on the leeward side of the greenhouse keeps them out of the strongest winds.
As you can see, the effects of wind, snow, ice and water penetration make designing and building vents more complicated than it first appears. Think carefully about how the elements will affect vents to ensure their longevity. We find the easiest locations for exhaust vents are high on the vertical north wall of the greenhouse; intake vents are best low in the east or west corners of the greenhouse.
A vent is a simple concept in theory — it’s an opening with an operable covering — but the devil’s in the details. It’s hard to get something to both move easily and close tightly. The edges of vents are prone to air infiltration (heat loss) and water penetration. The best way to seal vents is with gaskets — either foam or urethane — where the vent frame connects to the frame of the greenhouse. Both intake and exhaust vents should be sealed as well as possible, as these can be a major area of air infiltration (heat loss).
Having quality, well-sealed vents normally requires building your own. There are a few turn-key systems available from greenhouse retailers like FarmTek, but the options are limited. Additionally, kit vents are relatively cheap systems that will not seal well to the greenhouse. They are only available in a limited number of small sizes and may be hard to accommodate in your greenhouse build.
Thus, most growers build their own custom vents if using a passive venting strategy. Vents can be framed out of metal or wood. Wood is more practical unless you have welding experience. Large, wood-framed vents can get very heavy, so vents are typically moderate sizes, less than 10 sq. ft. in area and sized to fit between the studs or framing members. Sometimes, they span two stud bays with a header on top.
The specifics of vent construction depend on where it is located. If intake vents are part of a glazed wall, the same glazing material, like polycarbonate, can be used as the center of the vent. Longtime passive solar greenhouse designer Cord Parmenter (see the case study at end of this chapter) frames intake vents with aluminum extrusions sold from greenhouse retailers. He cuts the extrusion to length, inserts the polycarbonate in the center, and pop rivets these together (using screws is also possible).
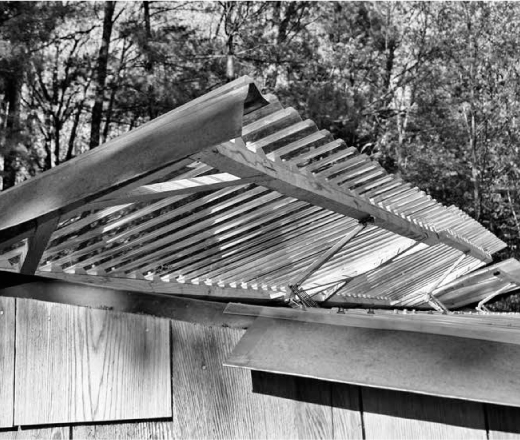
FIGURE 7.5. Roof Vent. Credit: Raven Crest Botanicals
Most builders place intake vents in an insulated knee-wall or on the side walls. If a vent (either intake or exhaust) is built into an insulated wall, it can be framed out of wood and insulated with rigid foam board insulation like polystyrene or polyiso. The vent is then sided with the same greenhouse siding material. The vent is hinged to the greenhouse frame, and the solar vent opener is attached per the device’s instructions.
Vents are always best when built into vertical or shallow-sloped walls. This reduces issues with snow, ice and water. In these cases, the construction is conceptually straightforward: build frame, insert glazing or insulation, hinge to frame, and install opener. Exhaust vents located on the roof require some added steps to prevent water leaking down through the cracks around the vent. They are raised slightly above the roof plane so that water runs around the vent, not over the cracks. Flashing covers the lip. Add-On Solar Greenhouses and Sunspaces by Andrew Shapiro has good diagrams showing multiple ways of building quality roof vents.
Even when built yourself, vents are prone to air infiltration and heat loss. To accommodate, we recommend sealing and insulating any vents that are not needed in the winter. Often, just one pair of vents (intake and exhaust) can suffice to provide the small amount of ventilation needed in winter. The rest can be insulated for the season by disconnecting the vent opener and inserting a block of foam board insulation, like polyiso or polystyrene, in the vent cavity.
There are a variety of solar vent openers available from online retailers. The main brand names are Gigavent, Univent and Bayliss. When evaluating options, consider the lifting capacity of the opener. It’s crucial to get an opener that can lift your vent, which will be heavy if wood framed. (The exact weight will vary by where it’s installed as well. Roof vents pushing up will need more force than vertical vents swinging out.) Gigavent makes a robust opener that can lift up to 60 lbs.
Secondly, check the “maximum opening size” of the opener — how wide it will open the vent. The effective area of a vent is not equal to the size of the vent itself, but only its length times the distance that it opens. An opener that protrudes farther allows more airflow; however, be cautious of wind and the sail effect.
Finally, check product warranties and general durability. Solar vent openers are often damaged in high wind and snow events. A more expensive but robust opener is a probably better investment in the end. The wax cylinder, or “tube,” of an opener will need to be replaced after a few years — these inevitably degrade with use — but most companies offer replacement tubes.
The typical rule of thumb when sizing vents is that the total area should equal 10%–20% of the square footage of the greenhouse.1 Half of that area should be intake vents, and the other half exhaust vents. Doors and operable windows can be included in the vent area — they will contribute if they are open. We don’t recommend relying on manually operated doors and windows for too much of your vent area, since they are not automated. They are useful to add extra ventilation during the summer. As described below, for warmer months doors and windows can be left open full-time.
Planning the size of your vents usually requires some give-and-take calculations. To illustrate, say you have a 12' × 20' (240 sq. ft.) greenhouse. The above rule of thumb would dictate 24–48 sq. ft. of total vent area. If your greenhouse is built with framing 16” on center, it would make sense to have each vent about 16” or 32” long.2 Say you chose 32” and plan to build each vent 24” high. Thus, each vent is a little over 5 sq. ft. (We will round to 5 sq. ft. for simplicity.)
To achieve the recommended area you could have:
• Three intake vents and three exhaust vents (a total of 30 sq. ft. of vents)
• Four intake vents and four exhaust vents (a total of 40 sq. ft. of vents)
From there, you can evaluate your climate to estimate the final area. If you live in a climate with intense sun and warm temperatures, the larger vent area would be wise. A cool and cloudy climate would call for the smaller area. Or, if you only plan on using the greenhouse in the winter, you can make the vent even smaller — a total of 20 sq. ft. Other considerations are the spacing and layout. If the greenhouse were a larger footprint, it may call for spacing out smaller vents in more areas to achieve uniform airflow.
As you can tell, several considerations go into this process, but generally it’s easy to predict and use your best judgment to determine size and vent spacing. If unsure on vent area, we recommend going with a larger size. It’s always possible to close and seal vents if they are not needed, but it’s quite difficult to add more venting later if the greenhouse is overheating.
Passive vent openers have a couple other quirks you should be aware of before relying on them. First, while you can adjust the cylinder to open at different set temperatures, they are not as precisely controlled as a thermostat. This is because the mechanism of control is located at the vent, not at the center of the greenhouse. Rather than registering the temperature where the plants are, the vent responds to the temperature directly around it. Exhaust vents can stay open too long in the evening because they experience warmer temperatures at the peak of the greenhouse. Thus, precious heat can be lost just when greenhouse needs it most. Intake vents, on the other hand, are inundated with cold air from the outside when they are open. They are prone to closing too early, leaving the greenhouse vulnerable to overheating. These are not insurmountable issues, though; solar vents simply require some time and fiddling to get them to open at the right time.
Though not as precise as fans, passive solar vents are the easiest automated and passive venting method. If you do not plan on adding electricity to the greenhouse, they are an essential tactic. Growers that are looking to use the space as a relaxing/sitting area or a classroom, may favor the quiet, passive venting solution.
Instead of solar vent openers, you can open vents (or windows) with a motorized opener. This is similar to passive solar vent openers in that the actual ventilation is passive — facilitated by convection currents — but the vent opener requires a small amount of electricity as the vent opens. (Exhaust fans, in contrast, may need power for a few hours each day.) Thus, it’s quite easy to power a motorized vent opener off a small PV panel connected to a thermostat.
The downside is that motorized vent openers are usually more expensive, in the range of $200 each — a significant cost if you are using them for multiple vents. Most temperature-controlled motorized openers are designed for skylights and awnings; they are not greenhouse-specific products. Finding a product that is right for your windows setup requires a little more research and customization.
The plus is that they can be more precisely controlled. If using multiple controls on different windows they can be set to open at slightly different temperatures so that the greenhouse cools down gradually, reducing the shock of cold air on plants in the winter. Motorized openers can also create a tighter seal, and be used with a more insulating window instead of a custom-built vent.
Motorized options are a good fit if you have operable windows and want to take advantage of these as your vent area. We recommend integrating them with awning windows (which swing out) versus slider windows (which slide sideways). With a slider window arrangement, the motorized vent opener often has an arm that sits on the window and restricts how far it can open. Combined, an awning window and an automated opener is a great plus for efficiency and aesthetics but much more costly than vents or fans.
Exhaust fans offer precise control and reliability. A thermostat located at plant level activates the fans, which run until the greenhouse is cooled. The drawbacks are the electric usage and noise. For residential greenhouses, we find the latter is typically more of the determining factor. As we’ll show below, the energy costs of running fans are minimal. The larger cost is simply bringing electricity out to the site. If fans are the only electric appliances, it is more cost-effective to use a passive system or the solar-powered exhaust fans described next. For other growers, especially commercial ones, exhaust fans are essential to achieve easily controlled, reliable ventilation.
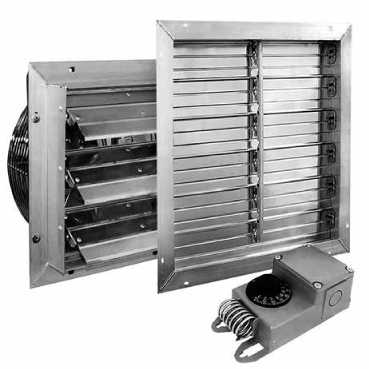
FIGURE 7.6. Exhaust Fan Kit. Credit: Greenhouse Megastore.com
Using exhaust fans requires three components: a fan, an intake shutter and a thermostat, all shown in Fig. 7.6. The fan exhausts hot air from inside the greenhouse to the outside. An intake shutter is a simple vent covered with louvers; it’s needed to provide a source of incoming air when the fan is running. These can be motorized, or they can be allowed to freely flap open when the fan turns on. The motorized versions allow for more controlled airflow (the flaps don’t blow open in a strong wind) but are more expensive.
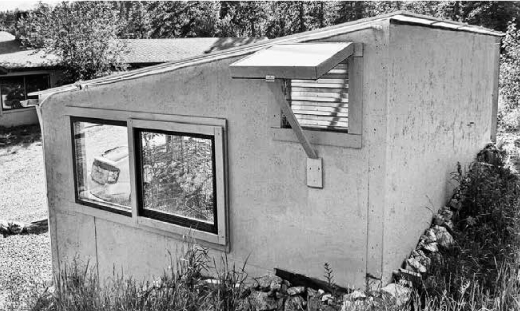
Like passive vents, intake vents and fans can be the Achilles’ heel of an energy-efficient greenhouse during the winter. Both parts are aluminum, a highly conductive metal that can easily sap heat to the outside. To reduce heat loss, we recommend covering and insulating fans and intake vents during the winter when ventilation isn’t needed daily. We find this is best done by building a simple moveable insulating shutter, as shown in Fig. 7.7. A simple wood frame with insulation at the center can be hinged to the outside of the fan and vent. (Make sure to unplug the fan when you close the shutter so it does not run while the shutter is closed). The frame can be easily propped open again when temperatures are warm enough to allow ventilation. Thus, it’s an easy and low-cost way to curb heat losses from leaky, aluminum fans and intake vents in the winter.
FIGURE 7.7. Exterior Insulating Shutter Over an Exhaust Fan. Credit: Ceres Greenhouse Solutions.
Exhaust fans should be placed high on a wall so they exhaust the hottest air out of the greenhouse. Intake shutters should be located lower down on the opposite wall to take advantage of natural convection, drawing air up and across the greenhouse. Ideally, the intake vent should be on the windward side of the greenhouse and the exhaust fan on the leeward side of the greenhouse (if you have consistent wind patterns). For example, in Boulder, Colorado winds predominantly come from the west, so we typically put exhaust fans in the northeast corner of the greenhouse and intake vents low on the west side.
Fans are rated by how much air they can move in units of cubic feet per minute (CFM). The standard rule of thumb for sizing fans is to create at least 1 exchange of the entire air volume every 1–2 minutes. That means if your greenhouse has a volume of 2,400 cubic feet (say it is a 12' × 20' with average height of 10'), a good fan size would be 1,200–2,400 CFM.
Some growers size the fans smaller than this recommended airflow rate if they have other, more efficient means of storing heat during the day, like thermal mass. While that’s a logical and appropriate step, we typically stick to the standard recommendations when choosing fan sizing. If the fan is sized too small, you risk seriously overheating the greenhouse, and possibly needing to replace the fan at some point. Plus, there are few disadvantages with a larger size. Currently, a 12” fan with maximum flow rate of 1,100 CFM costs about $145. A 16” with maximum rate of 2,950 CFM costs $175. The power usage is not hugely different between the two. If unsure which to pick, we recommend spending the extra $30 to size the fan larger in case there is a greater need for cooling than you expect. The fan will simply run less often if there is less of a cooling load.
Many fans have variable speeds, which allow you cover range of flow rates. Of course, consider your climate (sunny or cloudy) when choosing a fan within the recommended range. For a specific calculation, an energy analysis is needed. This can be done in professional software program like Energy Plus, or via consultation from a greenhouse designer.
Considerations when buying a fan are the energy usage (rated in amps), noise level (decibels), and size. You can estimate electrical costs of running fans by multiplying the energy usage with how often you expect it to run. For example, say you select the 2,400 CFM fan for your residential greenhouse. It uses 2.5 amps. You first need to convert this to Watts (a measure of power) using the “WAV” equation, Watts = Amps × Volts. (Note most fans run on 115 or 120 Volts.)
In our experience, fans typically run a couple to a few hours per day when the sun is out. (This can be more accurately estimated with an energy analysis.) You can then estimate the annual energy usage and the cost of running an exhaust fan by following some simple calculations:
2.5 amps × 120 volts = 300 watts
Assuming the fan will run an average of 3 hours per day over the year:
300 watts × 3 hours = 900 watt-hours, or
.9 kWh used per day .9 kWh per day × 365 days = 328.5 kWh per year
328.5 kWh per year × $0.15 per kWh (estimate) = $49 per year
From that sample calculation, you can see that using a fan in a residential greenhouse is not very expensive, but that all depends on how often it runs (and your interpretation of expensive). Other measures — thermal storage and strategic shading of the greenhouse — keep dependence on the fan down.
The fan you purchase will stipulate the required rough opening to fit in the wall. Fans are either hard-wired or plugged to a dial thermostat that in turn is wired or plugged into an outlet. We prefer the plug-in options, as the outlet can be used for something else if the fan is not in use. The thermostat should be set a few degrees below the maximum temperature you want the greenhouse (i.e., 85°F [29°C] if your threshold temperature is 90°F [32°C]). Plug the fan into thermostat, and you have reliable ventilation and cooling.
Solar-powered exhaust fans are a recent addition to the array of ventilation options, for greenhouses at least. These small exhaust fans include a solar photovoltaic module that powers the fan. The PV panel is direct wired to the fan, so it can only run when the sun is shining. They are popular options for cooling attics, and thus you can find most products by searching the more popular name, “solar attic fan.”
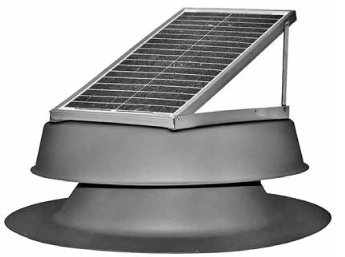
FIGURE 7.8. Solar-Powered Vent Fan. Credit: solaratticfan.com
Most solar-powered fans are a reasonable cost ($200–$500) but typically have low flow rates (most are under 1,000 CFM). They are intended for attic applications, not sunny greenhouses. A possible variation is to purchase a larger DC (direct current) exhaust fan and create your own custom system, adding a small direct-wired solar panel to run the fan. We’ll return to this tactic in Chapter 16, Powering the Greenhouse.
A major caveat to these fans is that they only work when the sun is shining. For many climates, this doesn’t impede their use because the vast majority of ventilation is needed on sunny days. This can be problematic, though, for very warm climates (if the greenhouse needs cooling on overcast days). Another drawback is that most aren’t manufactured for greenhouse (i.e. humid) environments. Because they are relatively new to the market, we can’t comment on their lifespan in a greenhouse, and we recommend checking the warranty of the product.
Solar powered fans are an excellent option if you want to otherwise forgo electricity. They are also a good means of providing supplemental venting in the winter. The demand for ventilation in the winter is only a fraction of that for the rest of the year, so a small solar fan can take the place of larger passive vents (which can then be sealed up and insulated in the winter).
If purchasing a solar-powered fan, make sure that it includes, or can be wired with, a thermostat. Without a thermostat, the fan will run whenever the sun is out, including on cold winter days, so you could end up with an overly cool greenhouse. Just like a standard exhaust fan, you want a solar-powered fan to kick on only when the greenhouse needs ventilation.
When it’s 30°F (−1°C) outside and the greenhouse is struggling to stay above 40°F (4°C), the last thing you want to do is blast it with freezing cold air. Cooling is occasionally needed in the winter, depending on the intensity of sunshine, but often it is not. At times when cooling is not needed, the greenhouse still needs some humidity control, air movement, and enough CO2 to fuel growth. At these times, the benefits of ventilation are at odds: you don’t want to overcool the greenhouse, but do want fresh, dry air. There are several backup strategies we recommend to help maintain a healthy greenhouse environment when ventilation isn’t advisable. These include:
• Air circulation is essential for a healthy growing environment, particularly in the winter. We’ll return to this vital part of greenhouse growing below.
• Heat Recovery Ventilators (HRVs) are air-to-air heat exchangers, devices that can provide dehumidification and CO2 supply without overcooling the greenhouse. They preheat incoming air using the outgoing air of the greenhouse. The two air channels pass by each other, without mixing, in a box installed in the wall. HRVs work much like an exhaust fan except that, instead of drawing in 30°F (−1°C) air in the winter, the HRV prewarms the air to say, 45°F (7°C). In this process, it also lowers the relative humidity of the greenhouse. As the incoming air is warmed, it’s able to hold more moisture, reducing humidity levels.
The major drawback is the cost. Most units are over $600 before installation (many much more). Additionally, they tend to have lower flow rates than exhaust fans, so an additional exhaust fan is typically required. HRVs are good extra step for growers who want to provide winter ventilation and humidity control as energy-efficiently as possible. They also have applications in attached greenhouses in which humidity control is more of a concern.
• A Ground-to-Air Heat Transfer (GAHT) system is the topic of Chapter 13. A GAHT system stores heat from the greenhouse in the soil underground. As it does so, it circulates and dehumidifies the air. This is possible because the warm, humid air from the greenhouse is circulated through the cooler soil during the day. The air is cooled underground, and, when it reaches the dew point, the water vapor condenses underground. Perforated pipes allow the water to drip into the soil, near plants roots. In this way, a GAHT system helps take humidity out of the air and moves condensed water into the soil. Though its primary purpose is temperature control, these are great corollary benefits.
• Dehumidifiers forgo ventilation and just provide dehumidification within a closed environment. They are rare in residential applications, but reasonable for commercial greenhouses that require a tightly controlled growing environment. More expensive machines simultaneously dehumidify and heat the greenhouse through a process of phase changes.
Another strategy is to ventilate manually on warmer days in the winter to replenish CO2. Say there is a sunny mild January day; it would be a good time to open up the windows fully for a bit and flush the greenhouse with fresh air.
During the spring and the fall, automated venting systems are particularly helpful because venting requirements change day by day and hour by hour. In the summer, we recommend keeping the greenhouse fully open. If nighttime temperatures are warm enough to allow it, all windows, doors and vents can be open full-time. Allowing the greenhouse to cool at night helps any thermal mass reset and be able to absorb more heat the next day.
High humidity is often the biggest surprise for first-time greenhouse growers/builders. They don’t plan for it, and often use materials and components not made for humid environments, which in turn quickly degrade or break. Furthermore, high relative humidity can be a major detriment to a healthy growing environment. The reason involves basic processes of plant growth.
A key part of photosynthesis is transpiration, in which plants suck up water and nutrients from the soil to new growth at the top, where photosynthesis occurs. The mechanism for this works a lot like a straw: plants use negative pressure to draw up water from the soil. What creates the negative pressure? Evaporation. As water evaporates from leaves, the plant naturally sucks more water and nutrients up from the soil. Evaporation is also the plants’ cooling mechanism. If you ever wonder why greenhouses are so humid, just look at every green surface — during the day plants are constantly emitting water vapor as they grow.
Without air movement, the air directly around the leaf becomes saturated, and evaporation slows, since it is more difficult for plants to release water vapor into very humid air. As a result, photosynthesis slows, nutrient uptake suffers, and a whole host of things go wrong with the plant. (Blossom drop in tomatoes, for example, can be caused by high humidity.) Furthermore, in stagnant conditions, plants use up the CO2 in their vicinity, leaving a thin layer of CO2-depleted air around the leaf. Equally important is the fact that most molds, mildews, bacterial pathogens, and insects thrive in stagnant, humid air.
The ideal relative humidity levels are in the range of 40%–70% for most growers. This is easily achieved for much of the year when the greenhouse is ventilated some. However, the winter it becomes more challenging, hence the winter-specific strategies above. The good news is that these issues are easily remedied by controlling humidity and providing regular, gentle air circulation, as discussed below.
It’s easy to test humidity levels with low-cost digital thermometers that include a humidity reading. Keep in mind that humidity is relative to the air temperature, which changes over the course of the day. Warm air holds more water, so relative humidity is always lower during the day. At night, the temperature drops and reaches the dew point, and water condenses into droplets. A simple analogy is useful to illustrate this relationship: Imagine a bucket which can grow or shrink in response to air temperature, reflective of how warm air has a greater capacity to hold water vapor than cooler air. For this analogy, imagine water vapor as liquid water in the bucket. The total amount of water stays the same, but the bucket size changes. During the day, at 80°F (27°C), the bucket is very large. Depending on how humid the greenhouse is, it may be a little over half full. At night, cold air causes the bucket to shrink down to half its original size. Now the bucket is full and overflowing. Overflowing represents condensation — the point when the air can’t hold any more water and it condenses into droplets. Relative humidity is simply the amount of water in the bucket relative to the size of the bucket. In this example, it’s roughly 50% during the day, and 100% at night.
Condensation has major implications on material choices, which we touch on in the construction advice in Chapter 9. It means that on most nights over the winter, greenhouses experience droplets of water on all interior surfaces of the greenhouse.
Outside, wind and convection currents constantly move and circulate air, reducing saturation around the leaf zone. In a greenhouse environment, air circulation must be created with fans, if vents are closed. While not always critical, we find gentle air circulation greatly benefits the growing environment, particularly in the winter.
Air circulation is very easy to create with fans (either wall-mounted or ceiling fans). They do not need to be very powerful: the goal is to move leaves gently, not wildly blow them around. You also want air movement to be uniform throughout the greenhouse (benefiting all the plants). Oscillating wall-mounted fans are helpful to create even air movement in small greenhouses. Larger greenhouses need larger fans, often called Horizontal Airflow fans (HAF). These can be positioned in opposite corners of the greenhouse to make a circular pattern of airflow, or on opposite ends of the greenhouse targeting different areas. In any case, make sure to purchase fans intended for humid greenhouse environments.
• Greenhouse owners typically use electric exhaust fans, or custom-built vents with passive vent openers to ventilate the greenhouse. Exhaust fans provide precise control and quick installation. Passive vents don’t use electricity, reducing ongoing energy costs and creating a quiet environment.
• Rule of thumb for sizing passive vents: the total area should equal 15%–20% of the square footage of the greenhouse.
• Rule of thumb for sizing exhaust fans: create at least one exchange of the entire air volume every 1 — 2 minutes.
• During the winter, close and insulate vents that are not needed for cooling, and add air circulation to reduce the negative effects of high humidity.
Plans and diagrams of vent construction: The Homeowner’s Complete Handbook for Add-on Solar Greenhouses and Sunspaces. Andrew Shapiro. Rodale Press, 1985.
1. This recommendation has been used by many designers and manuals, including the Department of Energy’s evaluation of 200 small-scale solar greenhouses in the 1980s: Solar Greenhouses and Sunspaces, Lessons Learned. It is widely used to provide passive venting for solar greenhouses in a range of climates.
2. The vent would need to fit in between the studs of the wall, so the actual outer dimensions of the vent would be 14½” or 30½” long if using 2 × 4 construction.
In 1991, Penn and Cord Parmenter arrived on their newly purchased 43 acres in the Wet Mountains of south-central Colorado with a camper van and a wood stove. They were immediately told they would not be able to grow year-round at their 8,000 ft. elevation.
In the ensuing 25 years, they’ve created an iron forging business, seed business, three kids, and a self-sufficient life revolving around year-round food production.
Through 15 years of practice, they have also become expert solar greenhouse designers/builders. That journey started with a couple of raised beds. Soon after, they built their own small passive solar greenhouse to extend their growing season in the Rocky Mountain climate. Their designs were based on those found in Bill Yanda and Rick Fisher’s 1980 book, The Food and Heat Producing Solar Greenhouse. In 2006, they started teaching courses on their design and high-altitude gardening at the Denver Botanic Gardens. From there, they began getting inquiries to build the structures for neighbors. In response to the new demand, Cord put down his blacksmith hammer and picked up a claw hammer.
Today, Penn and Cord design and build custom greenhouses in the Colorado region through their business Smart Greenhouses LLC. Their approach is both low-tech and high-impact; their greenhouses are elegantly simple and incredibly robust. As passive structures, they don’t include electrical systems or backup heating. Instead, careful planning, thoughtful design and passive thermal mass help to achieve abundant year-round food production, even in very harsh climates. “We’ve had tomatoes live through −30°F [−34°C] nights,” says Penn. Achieving a 60-degree temperature difference without any fossil fuels or electricity is an impressive accomplishment they attribute to “finding the right balance.” Heat gain (influenced by orientation, glazing materials and angle) must be balanced with heat loss (determined by insulated wall area, thermal mass and other factors) says Cord.
Penn and Cord are known for using water walls (rows of 55-gallon barrels filled with water and painted black) to give their greenhouses thermal mass and resistance to temperature swings. They are also masters of passive ventilation, which requires careful consideration of wind and snow patterns in the Rocky Mountains. To protect upper exhaust vents, Cord developed a uniquely shaped roof design, shown in Fig. 7.9. It allows vents to be installed vertically on the top of the north wall (protected from snow buildup) while still optimizing the angle of the glazing for maximum light and heat gain in the winter. The south wall typically includes several intake vents. Cord builds awnings over the vents that will stay operable through the winter to prevent them from having to push into snow mounds.
Finally, Cord has developed his own unique method of solving the temperature discrepancy issue associated with solar vent openers. Using a series of connections, he raises the piston to plant level and “transfers the mechanical energy” back down to the opener at the vent. This way, the vent responds to the temperature at the center of greenhouse, not the location of the vent. Penn and Cord Parmenter regularly give classes on their design, building and organic gardening methods. More information is available at pennandcordsgarden.com.
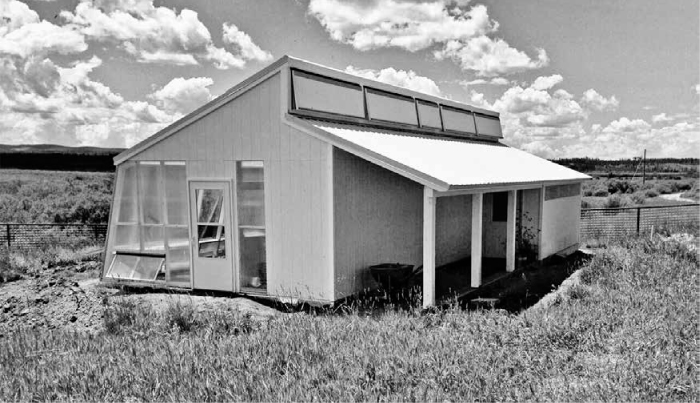
FIGURE 7.9. The north side of one of Penn and Cord’s greenhouse builds, also shown on cover, and in the color section. Credit: Smart Greenhouses LLC.
* Note: Some of the information in this case study was adapted from Bill Giebler’s article in Grit Magazine: “DIY Principles for a Passive Solar Greenhouse,” published January/February 2015.