Attached Greenhouses
Attached greenhouses are dual-purpose structures. Not only are they a lush year-round garden, but the greenhouse also serves as a vital heat source for the home. Greenhouses are such large solar collectors, they have the ability to dramatically reduce a home’s winter heating bill — 30%–50% in many cases. Even if supplemental heating is not the primary purpose of the greenhouse, attached greenhouses have several benefits over freestanding ones. But, they create some unique challenges as well.
If done properly, the typical attached greenhouse presents many benefits for both the home and greenhouse:
• Free heat: A greenhouse is a large solar collector, a source of free home heat during cold winter days. The home, in turn, absorbs excess heat during the day. Combined, the two environments work synergistically, requiring less heating and cooling as one.
• Supplemental CO2: The home provides a source of CO2 and air circulation for the greenhouse. Plants naturally filter the air and add oxygen to the home.
• Controlled humidity: In the winter, the greenhouse adds humidity to the home’s drier air. Air from the home lowers the relative humidity in the greenhouse.
• Added home value: A site next to the home takes up minimal yard space. The greenhouse can blend aesthetically with the home, adding significantly to a property’s value.
On the other hand, attached greenhouses come with some particular challenges:
• Permit costs: Most people will tell you an attached greenhouse is cheaper to build than a freestanding one. That is true only if a building permit isn’t required. In many places, local building codes consider an attached greenhouse an addition, like an extra bedroom, and mandate the same foundation type as the house (usually a concrete wall and footer) to prevent the greenhouse from shifting and damaging the home. Normally, the project requires stamped engineered construction documents, and a more robust foundation. These can easily add a few thousand dollars to the cost of the project. Even if a permit is not required, attached structures require more careful building, which often means more expense, not less.
• Excess heat and humidity: A hot, humid environment adjacent to the home is beneficial for much of the year. At other times, heat and humidity are unwanted and create a climate burden for the home. Excess humidity is probably the number one problem with attached greenhouses: it can damage books, furniture and electronics, or allow mold to grow in the shared wall. For that reason, much of this chapter focuses on controlling air exchange between the two environments so the greenhouse does not over-humidify the home.
• Pest risk: If pests, like aphids, get established in the greenhouse, there is the risk that they will spread into the home. Most pests stay where their food source is (the greenhouse), but it is possible for them to expand into the home. Here too, controlled air exchange helps keep pests out of the home. Partitions also help.
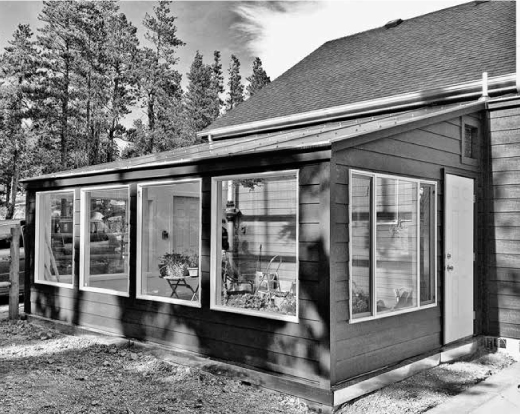
There are a few different approaches to attaching a greenhouse; which you choose depends on how integrated you want the greenhouse and home to be. At the most basic level, a greenhouse can be structurally attached to the home, but not exchange air with it. An open south-facing back of a garage, for example, is an excellent spot for a greenhouse, as shown in Fig. 10.1. Since the site is not adjacent to living areas, homeowners usually don’t go through the expense of venting the greenhouse’s heat into the home (though it’s possible with ductwork). The greenhouse uses the existing wall as its north wall, but otherwise operates exactly like a freestanding structure.
On a side note, there’s also the possibility of what we call the “almost attached greenhouse.” To get around prohibitive and expensive permitting requirements, some homeowners site the greenhouse about 2' off the house, and make it look attached. Technically considered a detached structure according to building codes, a permit is not required, but the greenhouse still blends with the home and makes use of a good site that doesn’t take up extra space in the yard. A false wall can be built in between the two to block heat-sapping winds blowing behind the greenhouse. (See color section for an example of an almost-attached greenhouse.) If considering this route, check your local building regulations, which may stipulate how far an accessory structure must be from the house. An example is of an “almost attached” greenhouse appears in the color photo section.
FIGURE 10.1. Attached Greenhouse. CREDIT: Ceres Greenhouse Solutions
Most attached greenhouses are sited adjacent to a living area, connecting the two environments to take advantage of the free heat of the greenhouse. Because this the most common arrangement, we’ll call it the “typical attached solar greenhouse.”
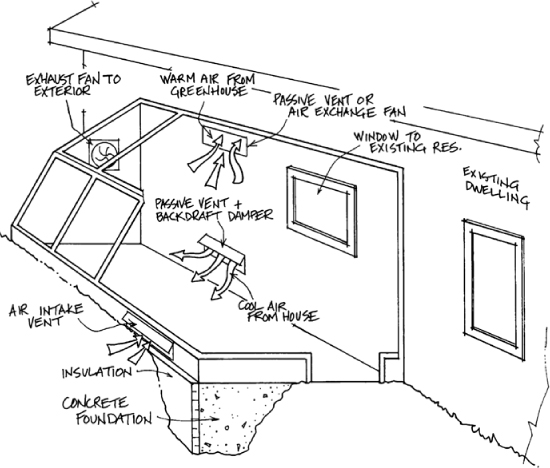
The typical attached solar greenhouse is designed mostly like a freestanding one. The major difference is that the greenhouse also exchanges air with the home. The greenhouse should still be equipped with standard ventilation to exhaust excess heat outside when you don’t want it in the home. So there are two venting routes: one connects to the home (air exchange) and one to the outside (ventilation). All the other aspects of solar greenhouse design — thermal storage, insulation, careful glazing, etc. — still apply, so the greenhouse can grow year-round without depending on backup heat from the home. The typical attached solar greenhouse is usually retrofitted onto the home and separated, except for some openings in the shared wall.
Another approach is becoming popular with new homes: fully integrating the greenhouse and the home. In cases of new construction, the design options abound. Instead of simply an add-on structure, the greenhouse can be a lush, sun-filled space seamlessly blended with the living areas. It can be integrated with a kitchen, or it can occupy the center of the home as its focal point and main heat source, as shown in the case study at the end of this chapter.
While this strategy has great potential benefits, it calls for caution. The greenhouse can easily “over-glaze” the home, making it susceptible to huge temperature swings. While large south-facing windows are a premise of passive solar homes, a greenhouse often requires more glazing than is normally recommended (i.e., passive solar home designers recommend the glazing area equal 6%–10% of the home’s footprint; greenhouses create much more). It’s essential that there be sufficient thermal mass and enough insulation to accommodate for the glazing. This type of arrangement also is best with more advanced glazing materials to control heat loss. Excess humidity is a potential problem. Installing a heat recovery ventilator (HRV), described in Chapter 7, is a good option. If you are considering building a fully integrated greenhouse, discuss it with your architect or home designer early on in the process, and consult the resources on passive solar home design at the end of this chapter.
Siting an attached greenhouse follows the principles discussed in Chapter 3. In addition, we recommend siting the greenhouse around existing openings in the wall (windows or doors) to take advantage of passive air exchange between the two. Moreover, doors and windows give easy access to a lush year-round garden just steps away. You get the food and heat of the greenhouse, and the verdant view as well.
In an ideal world, an attached greenhouse would be built slightly below ground. This allows the peak of the greenhouse to cover an existing opening in the shared wall, so that the hottest air in the greenhouse will vent directly into the room. If the two structures are on the same level, hot air rises to the top of the greenhouse and is vented into the home near the ceiling. The hot air stagnates there, doing little for comfort. Thus, a strategic integration is combining an attached greenhouse with an earth-sheltered design (discussed in Chapter 11), with the floor of the greenhouse sitting a couple feet below grade, as shown in Fig. 10.2. The top of the greenhouse can then be located around existing windows in the home, venting warm air directly into the room. This also allows the greenhouse to sit more easily underneath the home’s existing soffits or overhangs. It does require more caution in building, since the greenhouse will sit next to the foundation of the home. Consult a structural engineer if considering this route.
FIGURE 10.2. Underground Attached Greenhouse.
Exchanging air between the greenhouse and the home behooves both structures, but must be controlled. Otherwise, the greenhouse can easily overheat and over-humidify the home. It can also overcool the home at night — a large uninsulated glazing area will lose a huge amount of heat during winter nights, potentially increasing heating bills.
Separating the two environments is logical because plants and people have different ideal temperature ranges. Plants have a greater tolerance for cooler temperatures (most down to 40°F [4°C]), whereas people like to keep their homes above 65°F (18°C). Since the two have different requirements, trying to heat and cool them as one results in wasteful overheating of the greenhouse. It is better to equip the greenhouse with sufficient thermal storage and insulation, separate the two environments and keep the heat in the home at night. The home can provide a source of backup heat on very cold nights, but we don’t recommend relying on it extensively.
The methods for controlling air flow between the home and greenhouse mirror the options for ventilation discussed in Chapter 7: windows and doors, passive vents, and fans. Refer to Fig. 7.1 for a summary of these. Below, we’ll discuss how each applies to an attached greenhouse.
If the greenhouse is sited around windows/doors in the shared wall, manually opening these is an excellent option for venting excess heat into the home. The drawback is that you must be there to facilitate it — usually twice a day — and that makes control less precise and reliable.
If there aren’t any existing openings in the shared wall, it is common to retrofit a sliding glass door into the wall. While a considerable added expense, it is often worth it to get the views and easy access to your year-round garden.
If there are no existing openings, and you don’t want to go through a full retrofit of your wall, an alternative is to install passive vents between the greenhouse and home. These are smaller openings that rely on natural convection cycles to facilitate air movement, similar to the passive exhaust vents discussed in Chapter 7. Typically, vents are sized to fit between the wall studs so the framing doesn’t need to be altered. Intake vents should be located low on the shared wall, and exhaust vents high. When doing a retrofit like this, consider the home’s electrical wiring, plumbing and baseboards before knocking a hole in your wall.
Typically, vents include a simple control mechanism to stop the convection cycle at night. Ideally, you only want air to flow from the home to the greenhouse during the day, when the greenhouse is able to supplement heat. At night, vents should be closed to prevent over cooling the home. Backdraft dampers, either purchased or handcrafted, can be used for this purpose. In older solar greenhouse books, you’ll see instructions for making your own using plastic flaps over the vent opening. The plastic flap is installed on the home side of the upper vent and greenhouse side of the lower vent. This arrangement allows the flaps to open the greenhouse is in “heating mode” and stay shut when there is no convection cycle.
Backdraft dampers are cheap (Bill Yanda describes them as the 3-cent solution) and not sophisticated devices. They don’t provide an airtight seal or insulation between the two environments. They also don’t provide any control against overheating or over-humidifying the home, which are important considerations. For these reasons, we don’t recommend them as a means to control airflow. In our opinion, your home and its contents are too valuable to risk damaging from excess humidty. Other reputable greenhouse designers recommend them as a cheap and passive venting method. See Further Reading for more on their techniques.
The third option for controlling airflow is thermostatically controlled fans. The same exhaust fans and intake shutters discussed in Chapter 7 can be used in a shared wall. These allow for precise control of air and heat exchange, but come with the drawback that they are noisy, and can be annoying if located in common living areas. To reduce noise, purchase a fan with a speed controller and set the fan at a slower speed.
Fans should be coupled with intake vents to allow return airflow into the greenhouse, and controlled with a thermostat inside the greenhouse. We recommend going one step further and adding a second thermostat and/or a humidistat inside the home. This requires more advanced wiring, but it’s the only way to add regulation based on the home’s temperature and humidity level. In this scenario, a thermo stat in the home turns the fan off when the home reaches a critical temperature. Thus, the fan can only run when two conditions are met: an over-heated greenhouse and under-heated home. You can also purchase a thermostat combined with a humidistat to control for home humidity levels as well.
In our view this strategy is the safest way of preventing overheating and over-humidifying the home, and it’s what we recommend to control air flow (wisely combined with manually opening doors, when you are at home). It requires a more advanced wiring layout that should be installed by an electrician if you do not have electrical experience.
As we’ve mentioned, the typical attached greenhouse needs two ventilation routes — one connected with the outside air and one with the home. It’s important that these work congruously. The goal is to have air exchange vents open first — venting excess heat into the home — and then have vents to the outside open if the greenhouse needs additional venting. This is where thermostatically controlled openers and precise control comes in handy. If orchestrating this scenario with passive vents or solar vent openers, there’s a good chance vents will open at the wrong time.
The balance between air exchange and standard ventilation varies by season. For most climates, in the summer all air exchange vents or fans can be closed, because the home will probably not need heating. During the winter, many of the exterior exhaust fans or vents can be closed and sealed as described in Chapter 7, since the majority of greenhouse’s heat will be used for the home.
In addition to limiting air exchange in the summer months, we recommend adding a shade cloth to the greenhouse if you live in a warm climate. Basically, you want to take every measure to reduce heat gain that will overheat the home. Even when the two areas are separated by a door or window, direct light shining into the home can add uncomfortable heat.
Roof insulation can be strategically placed to shade windows and doors, but still allow light into the growing area. An insulated roof is used like an overhang, a common feature in passive solar homes. See the section in Chapter 12, titled “Water as Thermal Mass” for more on calculating the length of roof insulation.
A minor issue with attached greenhouses and sunspaces is that air can stagnate in one room, creating a single hot room without much benefit for the rest of the home. This can be compensated for with a series of fans to move air into adjacent rooms; luckily, even after the greenhouse is constructed, this is a relatively easy remedy to apply.
We also recommend additional measures to monitor and control humidity in the home. According to Andrew Shapiro, author of Add-On Solar Greenhouses & Sunspaces, “a residential greenhouse full of plants can move as much as 2 to 3 gallons of water into the house over the course of the day.” This moisture is mostly an issue for the surfaces directly exposed to the greenhouse: window and doorframes and the shared wall between the greenhouse and home. It can also create condensation on windows at night.
Whether humidity is an issue depends on the size of the greenhouse relative to the home, and your home’s construction. Newer, energy-efficient homes have more issues with humidity because they have fewer air exchanges compared to older, “leakier” homes. Humid air gets trapped inside rather than regularly flushed out. The ideal relative humidity level for homes is in the range of 30%–50%. Here are some tips to keep it in this range, and mitigate damage to the home:
• Add a vapor barrier in the shared wall if there is not already one. This should be placed on the greenhouse side of the wall since that is where the moisture comes from. Additionally, make sure your home siding is in good shape. Normally, this exterior siding of the home is the interior siding of the greenhouse. Older wood sidings in poor condition should not be used in a greenhouse environment; they should be replaced or, at the very least, well protected.
• Protect all surfaces regularly in contact with the greenhouse air (e.g., window and door frames). These should be regularly stained or painted. Or, you can trim them with a more durable non-wood siding material like engineered wood products. See Chapter 9 for siding recommendations.
• Add a humidistat to any fans bringing in air to the home. This will turn a fan off when the home reaches a maximum threshold for relative humidity.
• Consider adding a heat recovery ventilator (HRV) to the home to create additional air exchanges without overcooling the home. We strongly recommend this if you have a very efficient home with less than ½ air exchanges per hour. See the section in Chapter 7 titled “Season-specific Strategies” for more on HRVs.
• Attached greenhouses present many benefits, such as home heat gain and climate control for the greenhouse.
• Airflow between the home and greenhouse should be controlled to prevent the greenhouse from overheating or over-humidifying the home. Sidings and adjacent surfaces should be well-protected to avoid damage from moisture.
• Controlling air flow depends on where the greenhouse is sited. Thermostatically operated fans offer the greatest level of climate control for the greenhouse and home.
Chiras, Daniel D. The Solar Home: Passive Heating and Cooling. Chelsea Green, 2002.
Shapiro, Andrew. The Homeowner’s Complete Handbook for Add-On Solar Greenhouses & Sunspaces. Rodale Press, 1985.
Yanda, Bill and Rick Fisher. The Food and Heat Producing Solar Greenhouse. John Muir Publications, 1980.
Amory Lovins’s “banana farm” is not your typical home. The structure is beyond-net-zero energy (i.e., produces more energy than it consumes), heated mostly by a greenhouse; and grows banana trees high in the Rocky Mountains. The chief scientist and co-founder of the Rocky Mountain Institute renovated the 3,000 sq. ft. home to accomplish this. The original walls were made out of 12”-thick stone. Along with many other materials, they contribute to the large thermal mass of the building. There is so much mass (and insulation) that Lovins predicts if there were a solar apocalypse, cutting off all heat and energy to the home, it would only cool down 1 degree per day.
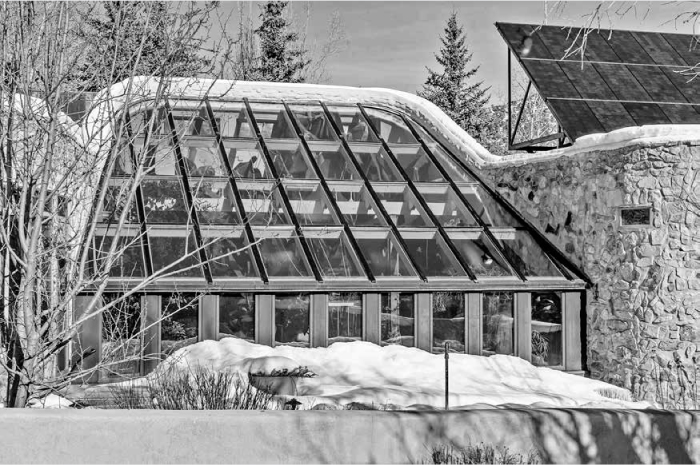
FIGURE 10.3. Amory Lovins Home and Greenhouse. Credit: Tila Zimmerman
The greenhouse is a central atrium that serves as the “furnace” for the home. “This 900-square-foot space, plus the heat gain from the other windows, lights, appliances, and people, provides all the heat that’s needed for the entire building most of the year. The heat is stored in the masonry, the floor, the water, and the earth under the house. Because of the building’s huge thermal capacity, heat is stored for months, not just hours” according to the group’s website.
With such a large greenhouse space in a tightly built home, excess humidity would normally be a major issue. To handle humidity, Lovins installed a large HRV in the roof. The air-to-air heat exchanger provides efficient ventilation and a source of water. As the humid air cools in the HRV, condensate forms, which is collected for garden watering. In addition, the rainwater from most of the roof surfaces is collected and diverted into large barrels in the greenhouse space.
Another feature that prevents the greenhouse from overheating/overcooling the home is the super-insulated windows; Lovins refers to these as “super-windows.” Technically called “krypton-filled Heat Mirror® windows”, they work by reflecting radiation back into the space, similar to how low-e films work. According to Lovins, the windows lose only one tenth as much heat as a single pane of glass, and still provide enough light for the established banana trees that give the home its name. “In the first year and a half [the original banana tree] grew to seven meters and gave five bunches of fruit.”
Lovins’s large integrated structure demonstrates a greenhouse’s potential for home heating, but doing it right requires a thorough understanding of the thermodynamics of a building, as well as a willingness to invest in solutions like insulation, higher thermal mass and advanced glazing.
The Lovins greenhouse integrates seamlessly with the home, designed in tandem with the whole structure. If retrofitting a greenhouse onto the home, Mr. Lovins recommends homeowners use a partitioning wall with a sliding glass door to protect the home from excess heat and humidity.
You can find out more about Lovins’s home, including all its sustainable gadgets and systems (such as a concrete cantilevered bridge arch for thermal mass) at rmi.org/rmi/Greenhouse.