Chapter 9. Hair and Particle Systems
Blender’s particle systems are a powerful tool that you can use to create both static and dynamic hair and animated particle effects. They can also be used to populate your scene with instanced objects in order to create grass and other foliage. In this chapter, we’ll use Blender’s hair particles to create fur for the Bat Creature and to create grass for the Jungle Temple scene.
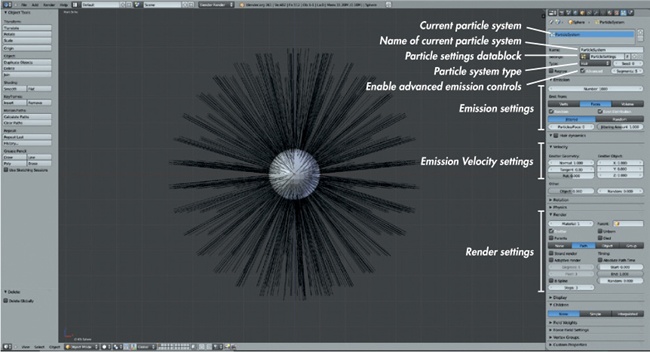
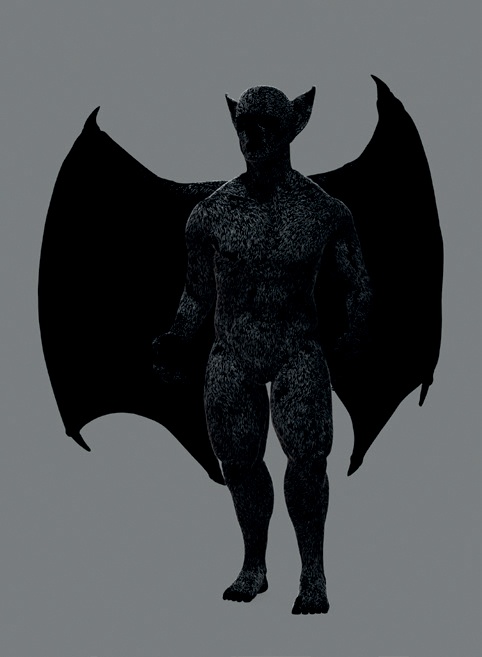
When you add a particle system to an object, the system is initially set up as a dynamic one that spawns point particles that are then simulated using Blender’s physics engine. In this chapter, though, we’ll mostly use the “hair” type for particles to create strands that are emitted from the surface of your mesh by default (see Figure 9-1). These strands will respond to physics and can be combed over the surface of your model and be procedurally modified to look like hair, fur, grass, or a variety of other materials. You’ll learn how to move from the default system shown in Figure 9-1 to creating realistic hair and fur that we’ll add materials to in Chapter 12 and then render in Chapter 14.
Particles for Hair
In order to make Blender’s basic particle system resemble fur or hair, we need to give it some guidance. First, we determine where and how we want the fur to grow, after which we can comb the resulting hair for more control over how it looks. But rather than do this for hundreds of thousands of hairs on a body, we’ll define a few hairs by hand as parent particles and then have Blender fill in the rest with child particles automatically. These stages are represented in Figure 9-2: First, the particle system is added 1; then, the hair is restricted to some areas with a vertex group 2; next, it’s combed 3; and finally, child particles are added 4. You then have a basic render 5.
Choosing an Object to Add Hair To
One question to think about when creating the hair or fur for a model is what mesh you want to assign the particle system to, as this can be approached in several ways. The simplest option is to just add a particle system to the mesh you have modeled and intend to texture and render later. However, this means that you can no longer edit your mesh (at least beyond moving vertices), as changes to the vertex order of your model will corrupt the hair.
In the case of the Bat Creature, the final render will be done using a mesh created by applying some of the multires subdivision to the model and leaving the rest to be re-created using a displacement map. Because this will require creating a new mesh, I could either wait until that stage before creating the hair or create the hair system using a different mesh, which I would keep in the .blend file for the final render later. The latter option allows me to work on a “safe” mesh, which I can then use to work on the fur—the mesh won’t change if I make further changes (within reason) to the “skin” model later. I will use this mesh only to hold the hair for the character, and its surface will not be rendered.
Creating a Scalp
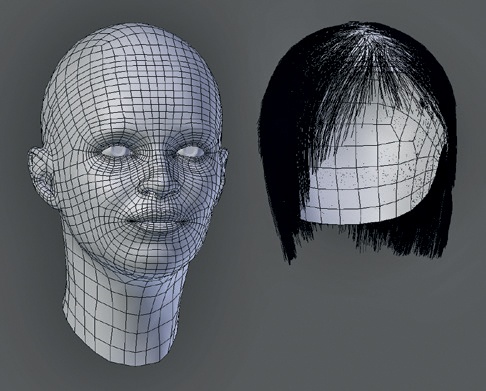
A similar strategy can be useful when creating a haircut for a character. While we might wish to make all kinds of changes to the model for a head, the shape of the skull is likely to remain reasonably static. In order to keep the hair separate, then, it is often useful to create a “scalp” object to which the hair can be added by duplicating the head mesh and deleting any parts that aren’t needed (see Figure 9-3). The particle system for the hair can then be added to this object.
For the Bat Creature, I created a new mesh to hold the particle system by duplicating my sculpted high-resolution mesh and applying the Multires modifier at level 1. To do this on a mesh that has shape keys, use the Convert to Mesh operator (ALT-C▸Mesh from Curve/Meta/Text). This applies all modifiers and shape keys to the mesh.
Vertex Groups for Hair
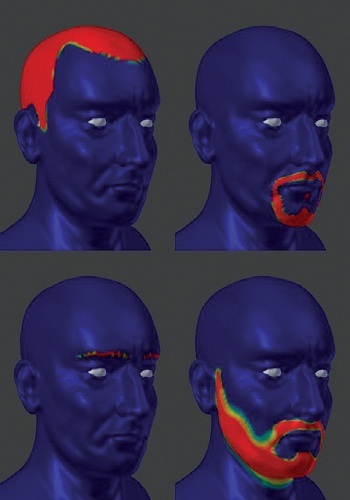
By default, particle systems emit particles from all over the surface of an object. In order to restrict hair to specific areas of a model and control the length and behavior of the hair, we use vertex groups. A vertex group is a subset of the vertices in a mesh, like the legs of a character or a specific part of a wall. You can assign vertices to these groups either in Edit mode or Weight Paint mode.
Vertices can also be partially assigned to a group, with their weighting for the group (that is, how strongly they belong to it) given any value between 0 and 1. This allows for smooth gradients and blending between vertices that are and are not assigned to groups.
Once created, vertex groups can be used to control the effects of modifiers, to make it easy to quickly select vertices in Edit mode, and to influence particle systems. By using vertex groups, we can “paint” hair placement in Weight Paint mode and then assign the vertex group to the particle settings to tell Blender to create particles only where we want them.
Weight Painting
Blender offers two methods of editing vertex groups. The first is to manually assign weights to a group in Edit mode, using the buttons in the Object Data tab of the Properties editor and the tools in the Properties region of the 3D Viewport (press N to bring this up). This method is useful for defining more precise groups, like the ones we used in Chapter 4 and Chapter 6 to restrict the effect of the Displace modifier.
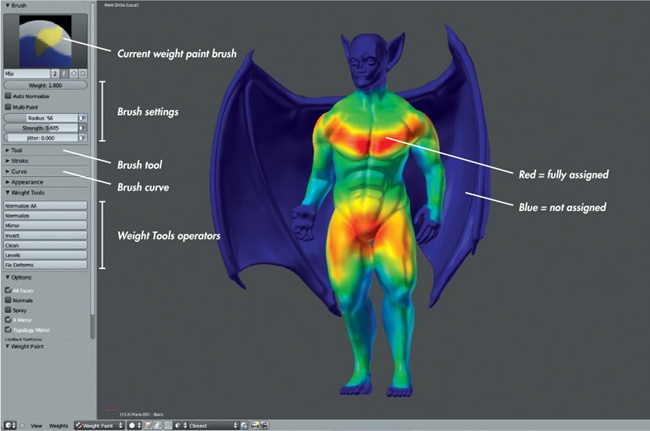
But if your goal is to produce smoother, less precise groups with more variation and randomness, Blender’s Weight Paint mode tools (shown in Figure 9-4) are a better option. Entering Weight Paint mode (CTRL-TAB, or use the mode drop-down menu in the 3D Viewport header) allows you to paint vertex weights using brushes.
The standard brush tools in Weight Paint mode are as follows:
Mix. Replaces the current weighting with the weight specified by the brush. This is the standard brush for painting vertex groups.
Blur. Blurs vertex weights between neighboring vertices and is useful for smoothing transitions.
Add. Adds to the vertices’ weight.
Subtract. Subtracts from the vertices’ weight. This brush is useful as an eraser.
Multiply. Multiplies the vertices’ current weight by a particular value. Set the weight to 0 to use this as an eraser; use higher values to reduce vertex weights without completely removing vertices from the current group.
Lighten. Replaces the vertices’ current weight with the weight you specify for the brush if the new weight is greater.
Darken. Replaces the vertices’ current weight with the weight you specify for the brush if the new weight is less.
Blender’s default brushes work pretty well, so you probably won’t need to make your own, though you can do so in much the same way as described in Chapter 6.
Hair Density
To control where the Bat Creature’s hair will grow, I needed to paint a vertex group that defined where I wanted hair and where I didn’t. I began by adding a new vertex group that I’ll call hair density. Then in Weight Paint mode (CTRL-TAB), I began assigning areas I wanted to be furry to the group using a Mix type brush. I could remove areas using the Subtract brush and smooth the transition between hairy and hairless areas with the Blur brush. (Because I am editing only the hair density for now, the boundaries of the vertex group will still have long hairs. To make the hairy regions fade out into shorter hairs, I will create a second vertex group in a minute to control the hair length.)
Figure 9-4 shows my hair-density group: Areas on the upper body and upper legs are fully assigned to the group, areas like the arms and lower legs are only partially assigned, and areas like the wings and face that are to remain hairless are not assigned at all.
To completely remove part of a mesh from a vertex group, you can use the Subtract brush in Weight Paint mode, but it’s easier to do this precisely in Edit mode. To do so, use the Object Data tab of the Properties editor to edit vertex groups and manually add or remove vertices by selecting them in Edit mode and pressing the Assign or Remove buttons. For example, for the Bat Creature, I manually selected the wings and removed them from the density (and length) vertex group to be sure the wings wouldn’t grow hair.
Hair Length
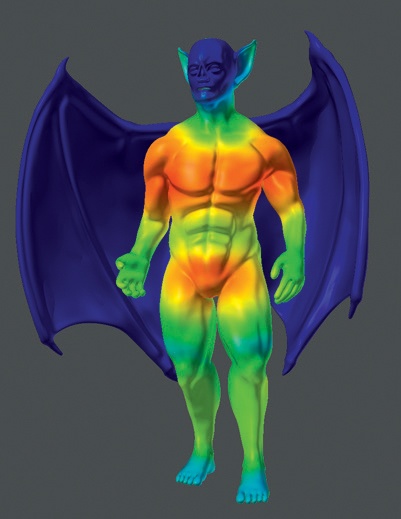
The hair-length vertex group (see Figure 9-5) controls the length of the hair by defining how long the hair created by our particle system will grow, relative to the maximum length we choose in the Particle System settings. This group is similar to the hairdensity group, except that I assigned the chest and pelvis much more than other areas, giving them the longest hair, and I blurred the weights more significantly between areas to produce a smooth transition in hair length.
When painting the length group, you can paint outside the bounds of the hair-density group without fear because hair will not grow outside the density group. This allows you, for example, to grow long hair right up to the edge of the density group, if you wish.
Adding a Particle System
Having added the basic hair vertex groups, I next created a particle system to “grow” the hair. To do so, I went to the Particles tab of the Properties editor and added a new particle system using the + icon on the right. (You can add additional particle systems to the same object and switch between them using the selector at the top of the Particles tab.)
Adding a new particle system brings up a whole slew of panels, like the ones shown earlier in Figure 9-1. I began modifying some of these. First, I changed the particle system type from an emitter of dynamic particles to a hair system by changing the type setting to Hair. This change initially caused the mesh to look like a crazy hairball. To turn the hair particle system into something useful, I used the vertex groups I created for hair length and density to restrict the hair growth. Then, I assigned the settings for the particles and combed and cut the hair to make it look the way I wanted. To make going through these stages easier, I’ll first discuss the main panels for particle systems when creating hair-type particle systems. These are discussed below in the order they appear in the Particles tab of the Properties editor.
Particle System Properties
At the top of the Particles tab in the Properties editor, you’ll find a panel showing the existing particle systems assigned to the active object. Below this are a few basic options that define what sort of particle system you are creating:
Type (Hair/Emitter). Set this to Hair for creating hair and fur. The Emitter type is for creating dynamic, point-particle stems.
Advanced. Turn this on for greater control over particle emission.
Segments. This determines how many control points are used per strand of hair in order to control the shape of the hair. More control points mean you can incorporate more twists and bends into your project. For short hair and fur, the default value of 5 is fine, but for longer haircuts, consider turning the value up.
Emission Panel
This panel controls how many particles are emitted from your mesh and their distribution.
Number. Determines the number of particles the particle system will generate. If you use child particles in the settings, the total number of particles will be this setting multiplied by the number of child particles. Keep this in mind when setting up a hair particle system because for the same final number of particles, you could create lots of parents and fewer children, or fewer parents and more children. In general, you want to have to edit as few strands as possible, while maintaining control over the look of the hair over the surface of the mesh. So when adding hair to a simple head, Blender’s default of 1,000 might be a little high, but for larger areas (for example, when covering a whole creature in fur), you might want to increase this value. For the Bat Creature, I chose a value of 2,000.
Emit From (Verts/Faces/Volume). Determines where hair particles are emitted from, such as from the vertices of the mesh, scattered over its faces, or from inside the volume of a closed mesh.
Random. Emits particles randomly, ignoring the order in which you created the faces of your mesh. Leave this set to Random for hair.
Even Distribution. Scales the number of particles emitted from each face according to the face’s area. Leave this checked, or large faces will appear sparsely populated with hair when compared to smaller faces.
Jittered/Random, Particles Per Face, and Jittering Amount. These settings control how the emission locations for particles are generated. The default values almost always work well.
Velocity Panel
The settings in the Velocity panel basically determine how long your hairs will be and in what direction they’ll point. The random and normal values are most important here. Normal values cause hair to point straight out from the surface, while random values make the hair point in random directions. Combining the two will allow you to point the hair generally away from the head with the normal value, while keeping a little roughness with the random value. The other settings in this panel can be useful if you want the hair to point in a specific direction (such as straight up, using the Z value).
Rotation
The Rotation panel isn’t particularly important when working with strand-particle hair, but if you set the render type for the particle system to Object or Group, you can use the settings here to add random rotation to the objects as they are generated. This feature is a great way to prevent particle systems that use the Object render type from looking too repetitive by making it more difficult to recognize repeated objects.
Render
This panel contains settings for how your particles will be rendered in the final image. These settings, listed below, will interact with the material we apply to the particles later on in Chapter 12.
Material. This determines what material slot (in the Materials tab of the Properties editor) the hair particles will use. For example, if your first material slot for the object is the skin material for your model, you could set this to 2 and use the second slot to define the hair material.
Emitter. When this setting is checked, both the hair and its emitter mesh will render; when unchecked, only the hair itself will render. This setting is useful to disable if you are using an object other than your “skin” object to generate hair or if you’re generating objects with a particle system and you want to render only those instanced objects.
Parents. If you are using child particles, this setting will cause the parent particles to be rendered along with the children.
None/Path/Object/Group. This setting determines which renderable geometry the particle system will use for particle generation. The default setting of Path is used to create particle hair, but a particle system can also be used to create other kinds of geometry. Setting this to Object will turn each hair particle into a duplicate of the object chosen in the box that appears, and setting it to Group will choose objects from a group and duplicate them in the same way. These options are useful for making grass or for populating a surface with extra details, like rocks or debris. The None option will cause particles not to be rendered.
For hair, choose the Path option, which brings up the following additional settings that determine how particle hair will be rendered:
Strand Render. This uses Blender’s custom strand primitive to render hair and fur in a way that produces much faster results. The downside to this rendering method is that it’s not compatible with ray-traced shadows, so you will need to use spot lamps with buffer shadows instead.
Adaptive Renderer. This option for rendering hair is compatible with ray tracing and optimizes the hair geometry, simplifying bends in the hair so that long, straight sections use less geometry than more complex, curved parts of strands. This keeps the total amount of geometry used for hair to a minimum and thus can speed up renders.
Degrees. The strand renderer renders hairs in a sequence of straight sections, and this value determines how many degrees the underlying curve must bend through in order to create a new section. Smaller values will result in smoother-looking hair but will take longer to render as they will generate more sections.
B-Spline. This method uses a Bézier-like curve to render hair strands, resulting in much smoother curves but with some loss of detail in the shape of your edited hair as the curve is smoothed out.
Steps. This method determines how many sections in total are generated for the hair curve, expressed as the number of times the hair is subdivided. For example, a value of 3 will make the hair twice as smooth (twice as many sections) as 2, and a value of 4 will make the hair curve twice as smooth again.
Display
This panel works like the Render panel but defines how your particles appear in the 3D Viewport. Turning these settings down can often speed up the 3D Viewport when working with complex particle systems, while turning them up can give you a better feel for what your rendered particles will actually look like.
None/Rendered/Path. These options allow you to determine how particles appear in the 3D Viewport. Setting this to Rendered will use the display type used for the render. None prevents the particle system being drawn at all in the 3D Viewport, and Path draws particles as paths regardless of the render type.
Display (Percentage). This option sets the proportion of the total number of hairs visible in the 3D Viewport. Lower settings will reduce the strain on your machine when working with complex hair systems.
Size, Velocity, Number. These options will draw the corresponding datum for each particle on screen next to that particle datum (that is, the particle’s size, velocity, or ID number).
Color (Material/Velocity/Acceleration/None). This option is more relevant for emitter particle systems. Leave it set to Material for hair particles.
Steps. This option determines how many subdivisions are used to draw the hair in the 3D Viewport (as in the render options). Set this higher if you need to work on complex hairstyles or lower if you need a more responsive 3D Viewport.
Children
Here, we get to the most powerful aspect of particle systems. Child particles work by treating each original parent particle created by the particle system as a guide for creating further particles. Not only does this let you define relatively few particles and then create a great many more, but it also allows you to add novel features, like clumping, twisting, and even braiding, to the hair around the parent particle guides, making your hair look more varied and interesting.
None/Simple/Interpolated. Simple particles are a basic option that creates a basic bundle of child particles around each original parent, all of which follow the same path as their parent. Simple children aren’t attached to the mesh surface, and they don’t use vertex-group inputs to influence how they are generated. Other than in basic hair systems, simple children don’t usually look as good as interpolated children. This is because interpolated children are generated from the surface of the mesh just like parent hairs, and then they interpolate their paths from the various parent particles around them. Interpolated children generally give nicer results, so assume for this chapter that we are using interpolated child particles.
Display. Determines how many child particles to create and display in the 3D Viewport.
Render. Determines how many child particles to create at render time.
Seed. Lets you choose the random seed for use in generating child particles. If you have a few child particles that you really don’t like, try changing this value.
Virtual Parents. Creates extra virtual parent particles before generating children, which gives the children more targets to clump to or kink around, making the hair look more varied.
Clump. Causes child hairs to clump together around their parents, making the hair look matted or spiky. Negative values cause hairs to puff out toward the ends instead. The shape value determines how far up the hairs start to clump.
Length. Determines how long the child particles grow as a proportion of the parent particle length. The threshold value below this setting allows some particles to reach the full length, while others are cut down to the shorter value specified by the Length setting.
Parting Controls. These options only appear if Virtual Parents is set to 0. Turning up the parting (cap) amount forces child particles to pick a side when interpolating between parents that point in different directions. As you might imagine, this is useful for parting hair (though as we will see later, there are other ways). The min and max values determine the range of angles or distances between parent hairs that child particles will part over.
Roughness. You can apply three kinds of roughness to the child hairs. The Uniform Rough setting roughens up the hair depending on location, affecting all hairs in a local area in the same way. The size value determines the scale of these perturbations. The Endpoint Rough setting randomizes the endpoints of the hairs, pushing them farther apart (much like the opposite of the Clump setting). The Random Rough setting roughens the hairs independently, with the size value determining the scale of perturbations and the threshold value determining what proportion of hairs are left unaffected by this roughening. (Random roughness is good for adding stray hairs or for making hair look frizzy.)
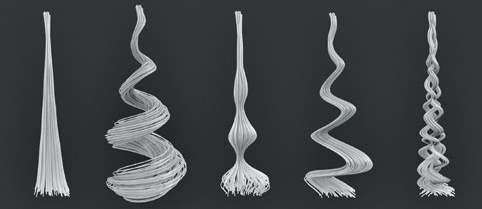
Kink (Nothing/Curl/Radial/Wave/Braid). These options (shown in Figure 9-6) add secondary patterns to the way the child hairs follow the parents. Curl causes the hair to form curls, Radial makes the hairs move periodically closer and farther apart, Wave adds waves to the hair, and Braid makes them form a threestranded braid. The settings below these choices determine the amplitude and frequency of this secondary pattern, as well as how it is affected by clumping and distributed along the hairs using the shape value. The flatness value causes the hairs to flatten together when taking on these secondary shapes.
Vertex Groups
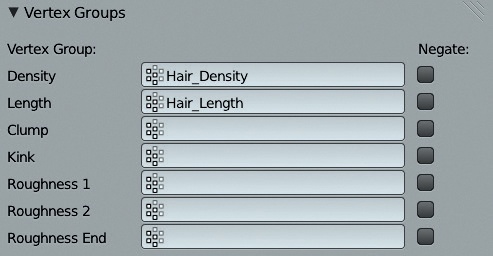
In this panel, you can assign various vertex groups to control the settings over the surface of a mesh. This panel is where we apply the vertex groups we created earlier in order to control the density and length of our initial parent hairs before combing and cutting them (see Figure 9-7).
Using vertex groups to control particle systems affects both the initial generation of parent particles and the later distribution of child particles. However, once you start editing the parent particles in Particle mode, you can add or remove particles and edit them independently of the properties defined by vertex groups using the Particle mode brushes, as discussed in the next section.
Particle Mode
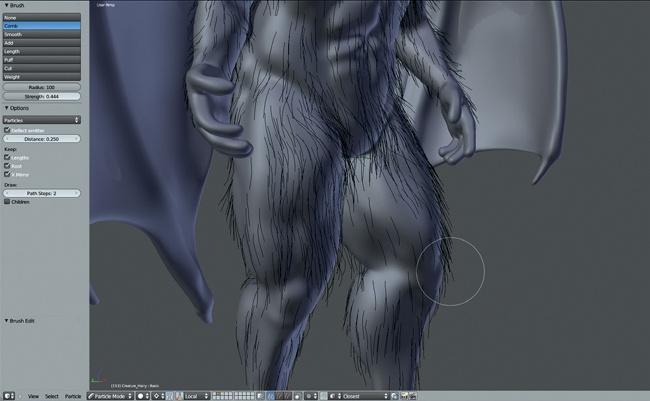
Having set up a basic hair system, you can edit it in Particle mode (see Figure 9-8), using a variety of tools that let you grow, comb, cut, and smooth your hair or fur, as well as add or delete hairs.
You can switch to Particle mode from the mode drop-down menu in the header of the 3D Viewport. Once in Particle mode, the hair particles in the currently selected particle system become editable. (At the same time, you will no longer be able to edit the Particle Emission settings in the Properties editor, unless you click Free Edit at the top of the Particle Settings tab to scrap your edited particles and start again.) Similar to Sculpt mode, Particle mode brings up a list of brushes in the Tool Shelf on the left of the 3D Viewport, along with some options for how these brushes affect your particles.
Shaping Your Hair
In Particle mode, I began shaping and styling the hair for the Bat Creature using Blender’s particle brushes. I first used the Comb tool to flatten the hair and get it to flow along with the contours of the body (see Figure 9-8), adding some peaks and scruffy areas as well. By default, when you comb hair in Particle mode, it’s deflected by the emitter mesh, making it easy to comb it along the mesh’s surface. (You can turn this off using the Deflect Emitter option from the Tool Shelf, if you wish.) If the hair in an area gets a bit too flat, use the Puff tool to fluff it back up. (The Puff tool causes the hairs to repel one another and generally spread out.)
To control the length of the hair strands, the Length and Cut tools are the most useful. The Length tool allows you to grow or shrink hairs to adjust their length, while the Cut tool cuts them back away from the brush as you make strokes with it. The Cut tool will also completely remove a hair if you cut it right down to the base, so this is a useful technique for getting rid of awkward hairs that are causing your child particles to behave strangely. (If it’s difficult to see the base of a strand, try switching to wireframe view and zooming in.)
You can also add extra hairs using the Add brush, which creates new hairs wherever you stroke. Turning on the Interpolate option (usually advisable) causes new hairs to follow the direction of surrounding ones that already exist, which comes in handy when adding extra hairs to an area you have already combed. For example, with the Bat Creature, I added some extra hairs to the ears and around the feet and hands to better define the flow of the hair around these areas.
Styling Tips
Be sure when styling to rotate the model frequently to see it from different angles. As you rotate it, think about the silhouette you are carving out as well as the direction the hair is pointing and use the Cut tool to trim stray hairs that disrupt the silhouette. If you cut any hairs too short, you can use the Length brush to grow hair back out.
You can select and manipulate individual or multiple hairs as you would in Edit mode, using the right mouse button to select and the G, S, and R keys to grab, rotate, and scale strands. You can also switch between different selection methods in Particle mode, selecting either the whole hair or individual points along it or just choosing to comb and cut the overall path. This is analogous to being able to choose between selecting vertices, edges, or faces in Edit mode. Selecting hair strands can be useful for dealing with tricky areas, as the brush tools will work only on selected strands, allowing you to select specific particle hairs that are causing issues and comb or cut them in isolation.
Another useful trick is to press L to select hairs under the cursor. Hold down L and wave the mouse over an area to select a few hairs at random. Then, comb them independently. This works well for roughening up hair and adding volume.
Child Particles
Once you have the basic hairstyle roughly in place, turn on Child Particles in the Particles tab to see what effect it has on the look of your hair. Set the child type to Interpolated and set the Display number of particles to about 50. (The Render number can be a lot higher, but keep in mind how this will affect the total number of hairs and thus your render times.)
For the Bat Creature, I set Virtual Parents to 0.3 and Clump to 0.5, and I added a very small amount of Random, Endpoint, and Uniform Roughness (around 0.001 to 0.01 for each, as these are sensitive settings). Turning up the virtual parents gives the child particles more parent strands to clump around and prevents the hair from looking too patchy. Adding some roughness makes it look less neat and smooth.
I also added some variation to the particle length using a Length setting of 0.5, and I set the threshold value to 0.15 to produce hair of different lengths and to give a more natural look to the fur (see Figure 9-9).
Note
Returning to Particle mode will hide your child particles by default, but you can turn them on in the draw options in the 3D Viewport Tool Shelf by checking the Children option.
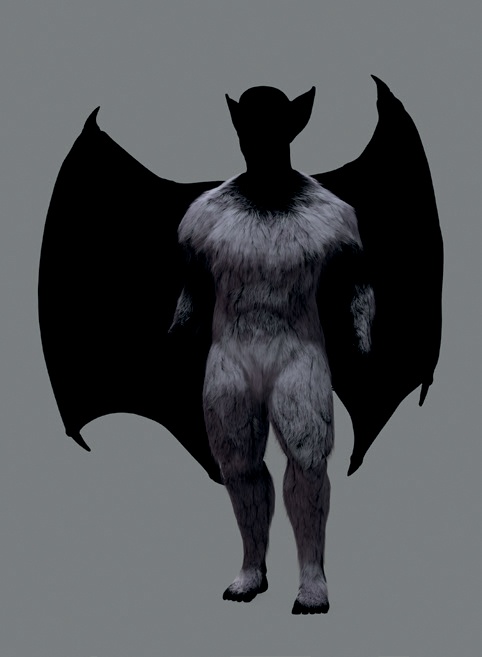
When working on hair systems, it can be useful to render occasionally, as the shading of hairs in the 3D Viewport can look flat and ambiguous. You may want to skip to Chapter 12 for a discussion of materials for hair and then create a quick render setup for use while you are working on hair (see Figure 9-10). See Chapter 13 for how to light the scene and Chapter 14 for more on rendering.
Peach Fuzz
I also decided to add a second particle system to my Bat Creature to incorporate some short hair that covered more of the body, like the head, ears, and some of the wings. I made this in exactly the same way as the first system. I started by adding another new particle system to the same object as the first, this time with a much shorter length. Then, I created a vertex group to limit this hair to the body, head, and the beginnings of the wings. I didn’t need a length vertex group this time, as the hair was all very short. Next, I combed the hair to follow the contours of the body and added child particles to increase the hair density. The resulting particle system can be seen in Figure 9-11.
Complex Haircuts
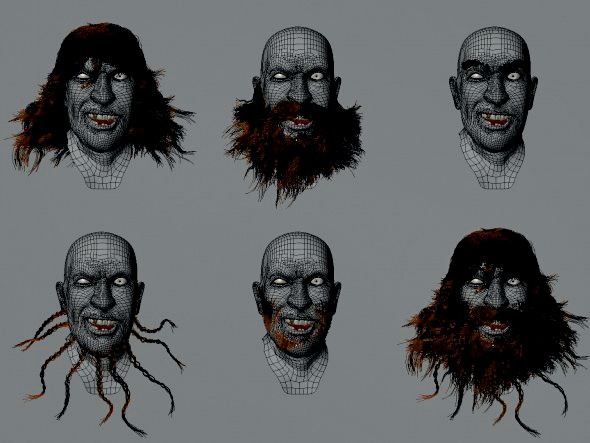
The hair for the Bat Creature was pretty simple, so let’s look at a character with a more complex hairdo. The character in Figure 9-12 uses several different particle systems, each of which covers different areas of the overall hairstyle. Each system is restricted to its own area by a separate vertex group, allowing it to be edited separately.
Creating hair this way makes it easier to iterate through different styles and create more complex hair because you can edit individual aspects without worrying about their effect on others.
Figure 9-13 shows a character that makes full use of this strategy with different hair particle systems that all use different settings. For example, the braids in the beard are single parent strands that use the Braid Kink setting for children, while other systems use different kink settings. This technique is often useful when creating a hairstyle with a parting of some kind because splitting the hair into two particle systems makes it much easier to comb outward from the parting on either side.
Controlling Particles with Textures
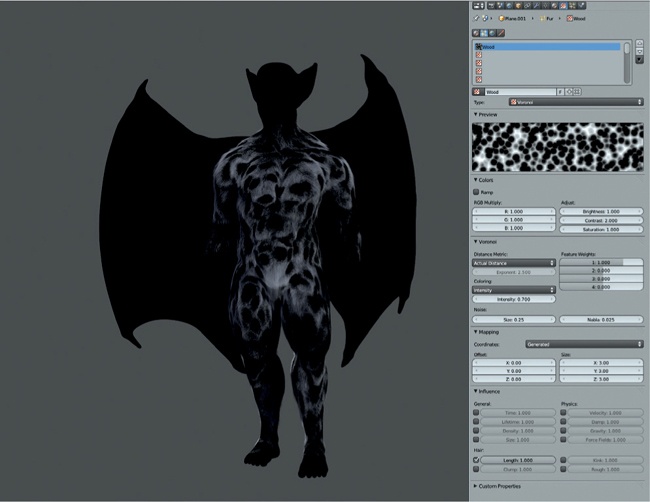
While so far we have focused on using vertex groups to control particle hair properties, Blender can also use texture input to control aspects of particle systems in the same way that we use vertexes. To use a texture this way, first assign a particle system to your mesh, switch to the Textures tab of the Properties editor, and click the Particle Textures icon (see Figure 9-14). Now you can add textures and use them for the same inputs as you would vertex groups, including the density and length of hair for hair particles, as well as clump, kink, and rough values. (Values such as time and velocity are used for dynamic point particle systems.) By default, white will be mapped to 1.0, and black to 0.0 for these values.
Controlling particle systems with textures allows you to use Blender’s procedural textures to add variation to how a hair or fur system looks. For example, by using a cloud texture to affect the rough value of the fur for the Bat Creature, I could quickly add some randomized roughness to the creature’s hair, without having to edit vertex groups manually.
Note
Textures can also be used to affect the look of particles through Blender’s materials, as you’ll learn in Chapter 12.
Other Uses for Particle Systems
In addition to modeling hair and fur, Blender’s particle systems are useful for numerous other tasks. For example, for the Jungle Temple, I used a particle system to create patches of grass on the ground, using the Group render type to duplicate a few different grass objects many times.
Grass for the Jungle Temple
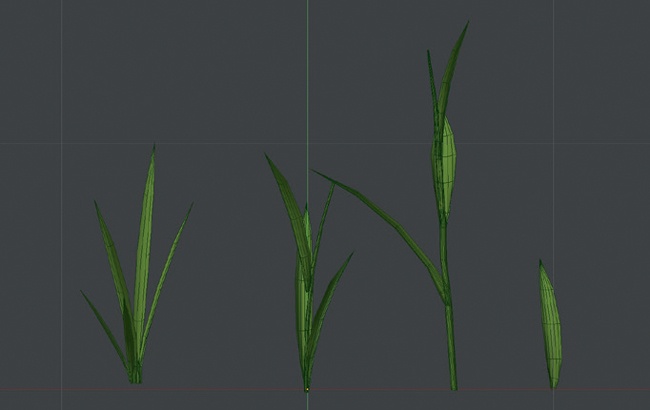
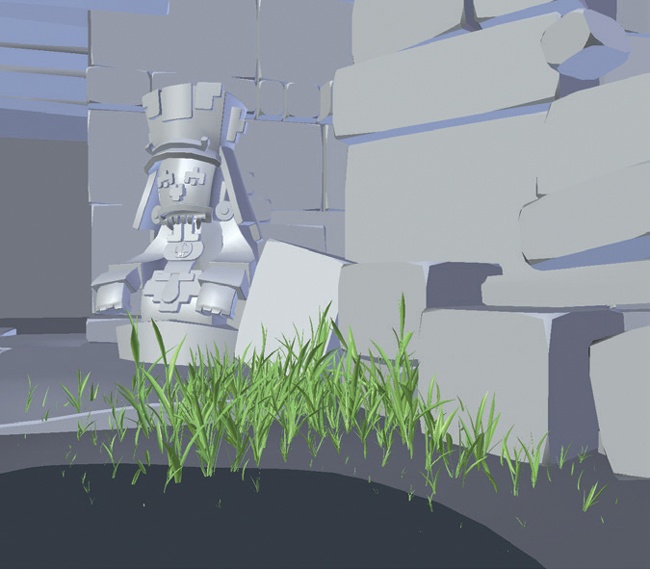
While I placed most of the plants in the Jungle Temple scene by hand, I used a particle system to generate some grass around my scene. While hair strands on their own can look a lot like grass with the right materials, I chose to create models for the individual blades of grass. Then, I used a particle system to scatter them around the scene, as shown in Figure 9-15.
Creating a Grass Particle System
To create grass this way, I needed some models for different blades or clumps of grass and then a particle system (added to my ground mesh) that would duplicate and scatter these models around the scene. First, I created a few different grass models (see Figure 9-15) and added them all into a single group (CTRL-G). Next, I added a new particle system to the ground mesh in my Jungle Temple and created a vertex group for the grass density and length (as I did for the hair) to place the grass in just a few key areas (see Figure 9-16). Then, I set the render type for the particle system to Group and chose my grass group as the group to use (the Dupli Group setting). Finally, I enabled the Use Count option to determine how each member of the group was duplicated so that the small grass models repeated more often than the larger ones (see Figure 9-17).
To give the grass duplicates some random rotation, I used the rotation properties (see Figure 9-17). By setting the rotation axis to Normal and the random values to 0.15 for the rotation axis and 1.0 for the rotation phase, each grass element gets a bit of random rotation, making it look more unique (see Figure 9-18). Similar variation can be achieved for the scale of the objects with the Random Size setting in the particle systems physics properties (see Figure 9-17).
Object Rotation and Particle Systems
It should be noted that in order for the grass particle system to work correctly, the grass meshes need to be rotated so that the stems of the grass point along Blender’s y-axis. This is because, although the z-axis is treated as the “up” direction in Blender’s global coordinates, for particle systems, the y-axis of an object points along the length of the strand.
The easiest way to rotate the grass objects correctly is to select them in Object mode and (assuming you initially modeled them pointing upward with respect to everything else in the scene) press R▸X to rotate the objects around the global x-axis and enter –90 degrees to specify the amount of rotation. This should leave your grass pointing along the y-axis of the scene. Press CTRL-A and select Rotation to apply this rotation to the objects’ geometry.
Hair and Fur Tips
Here are some final tips for working with hair particle systems.
Split up complex tasks. For complex haircuts, split the hair into different systems that you can comb and cut separately. Use different settings to get the effect you need.
Keep an eye on particle counts. As an example, human hair has an approximate density of a few hundred hairs per square centimeter, but you don’t always need to reach this value. When rendering your hair, try various numbers of children to see what looks best.
Experiment. Hair is tough to get right. Sometimes the only way is to try a number of different settings to see what works best. Getting a quick render of your hair will often provide useful insight.
Materials make a difference. Chapter 12 features some materials geared specifically for particle hair. If you’re tearing your hair out wondering why your fur doesn’t look right, it might not be the particle system’s fault. Make sure you have a good material on your hair system to help it look its best.
In Review
In this chapter, we’ve looked at ways to create particle hair and fur systems and discovered other uses for Blender’s hair particles, such as for procedurally scattering objects, as we did for grass. In later chapters, we’ll return to hair and fur, as we discuss what materials to apply to create nice looking hair (see Chapter 12), how to light strand particles (see Chapter 13), and how to get the best results when rendering hair (see Chapter 14) by rendering it as a separate render layer.
