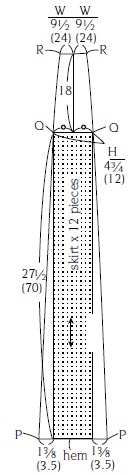
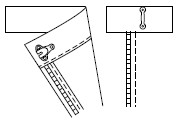
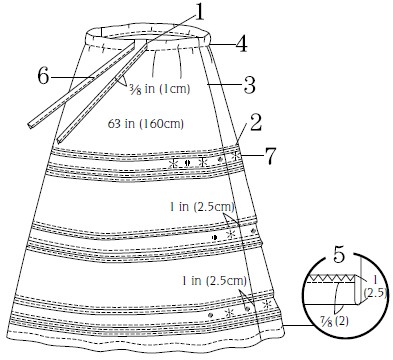
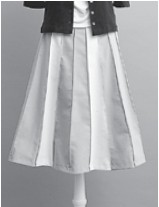
Ⓐ Embroidered Skirt with Gathered Waist and Lace Hem (photo→p.4)
MATERIALS
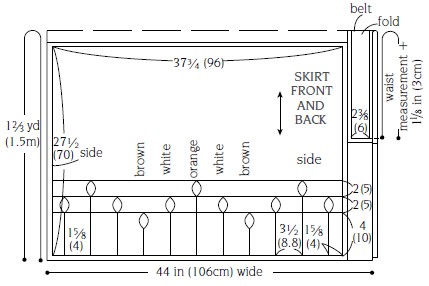
Fabric—slub cotton 44 in (106cm) wide x 1⅔ yd (1.5m)
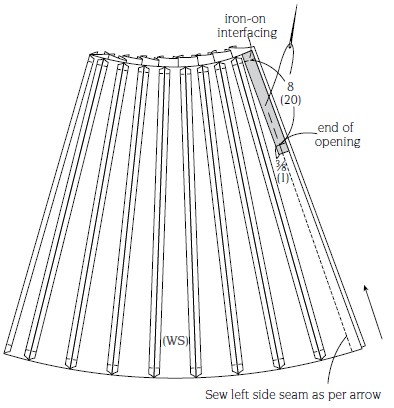
Iron-on interfacing—⅞ in (2cm) x 9 in (23cm)
8 in (20cm) zipper x 1
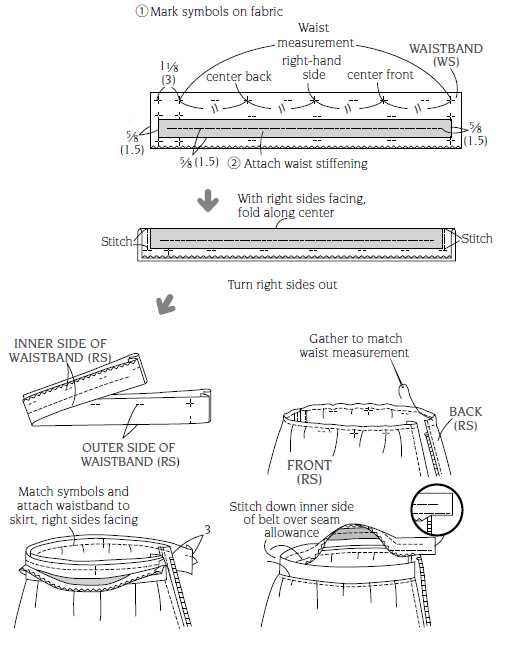
Waistband stiffening—1⅛ in (3cm) wide x [your waist measurement + 1⅛ in (3cm)
Lace—⅞ in (2cm) wide x 2¼ yd (2m)
Skirt hook and bar
One snap fastener
Embroidery thread – white, orange, brown
SEWING STEPS
1. Sew left side and attach zipper
2. Sew right side and open out seam
3. Attach waistband
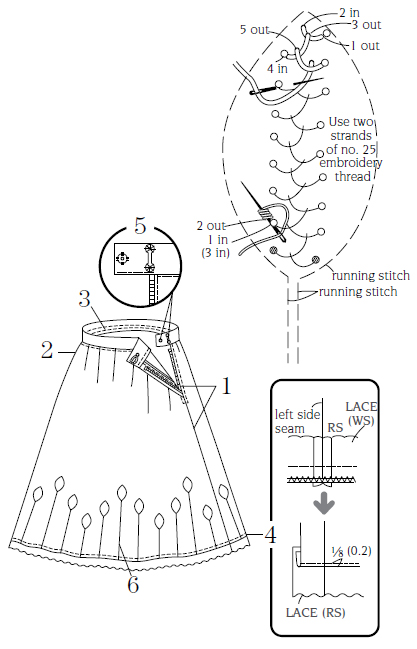
4. Attach lace to hem
5. Attach skirt hook and bar
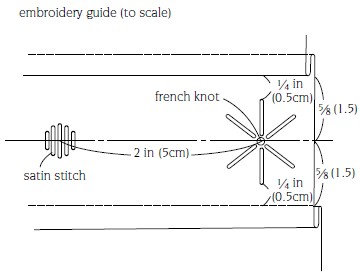
6. Embroider pattern
• Drafting and cutting out
3. Attach belt
1. Sew left side seam, attach zipper

6. Embroidery instructions (full-scale)
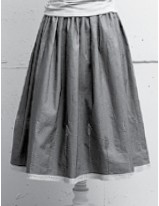
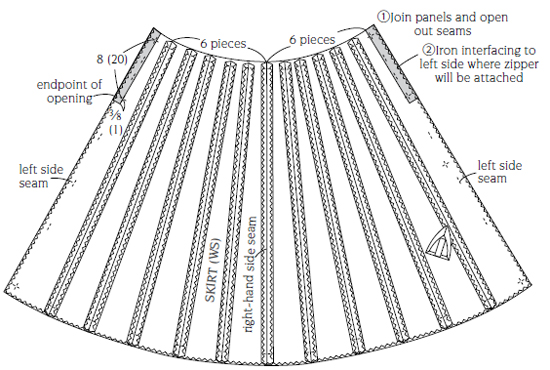
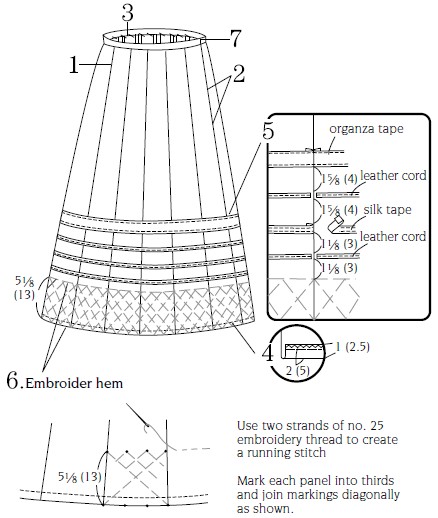
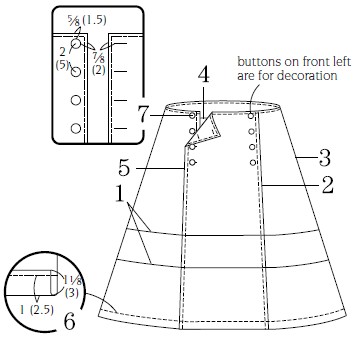
Ⓑ 12-panel Skirt with Embroidery and Tape Decoration (photo→p.5)
MATERIALS
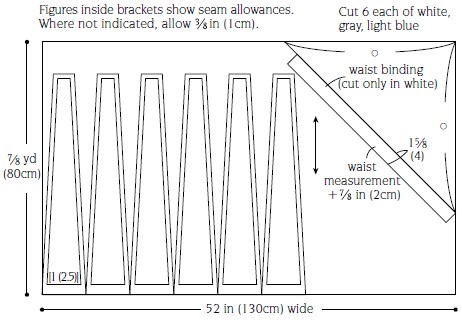
Fabric—plain gray fabric 44 in (110cm) wide x 2½ yd (2.3m)
Iron-on interfacing—⅞ in (2cm) x 9 in (22cm)
1 x invisible zipper, 9 in (22cm) long
Hook and eye
Organza tape 1 in (2.5cm) x 1½ yd (1.4m)
Leather cord 3/16 (0.4cm) wide x 1¾ yd (1m)
Embroidery thread—black
SEWING STEPS
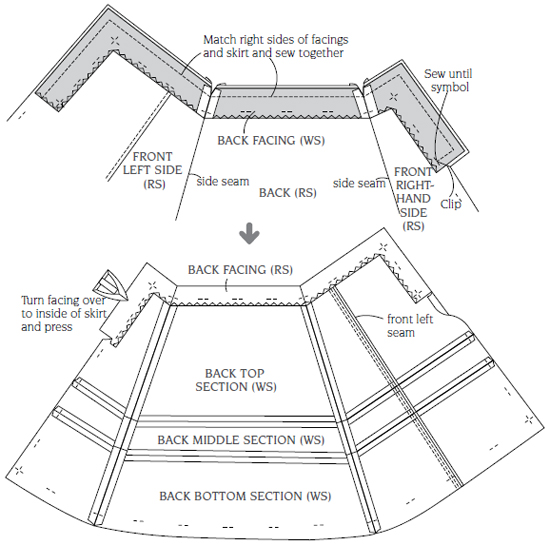
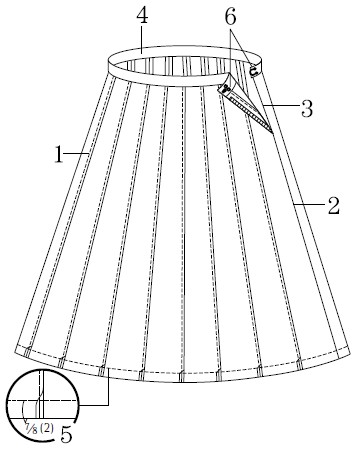
1. Join 12 panels together
2. Sew left side to opening and insert invisible zipper (see p76)
3. Attach waistband
4. Create hem (see p67)
5. Attach tape
6. Embroider hem
7. Attach hook and eye (see p63)
• Drafting
Drafting order
①Draft rectangle (shaded section of diagram)
②Draft hem
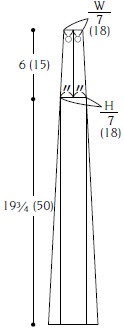
③At midpoint of hip, draft up 7 in (18cm) to create waist
④Join P and Q with a straight line
⑤Draft in a naturally curved line from Q to R
1. Join 12 panels
• Cutting layout

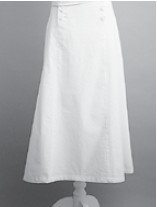
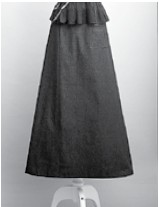
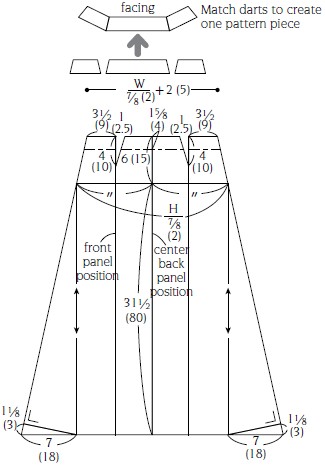
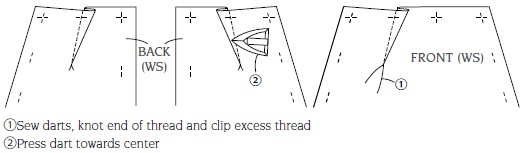
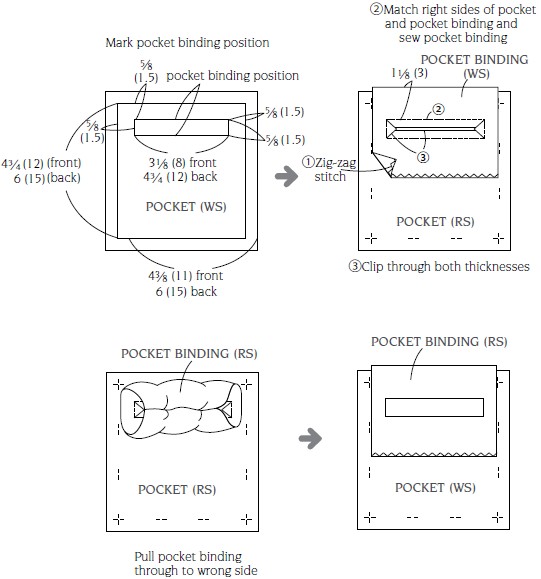
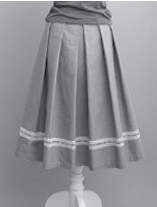
Ⓒ White Twill A-line Skirt (photo→p.6-7)
MATERIALS
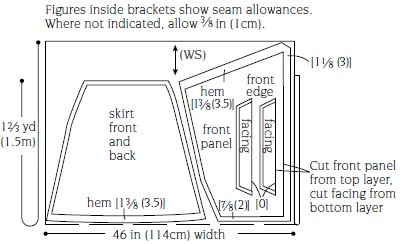
Fabric—twill 56 in (142cm) wide x 2¼ yd (2m)
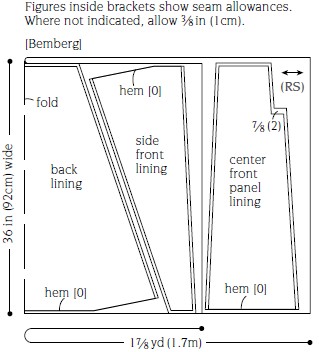
Lining—Bemberg 36 in (92cm) x 1⅞ yd (1.7m)
Iron-on interfacing—24 in (60cm) x 16 in (40cm)
Buttons—8 at 1 in (2.3cm) diameter; 2 at ¾ in (1.8cm) diameter
SEWING STEPS
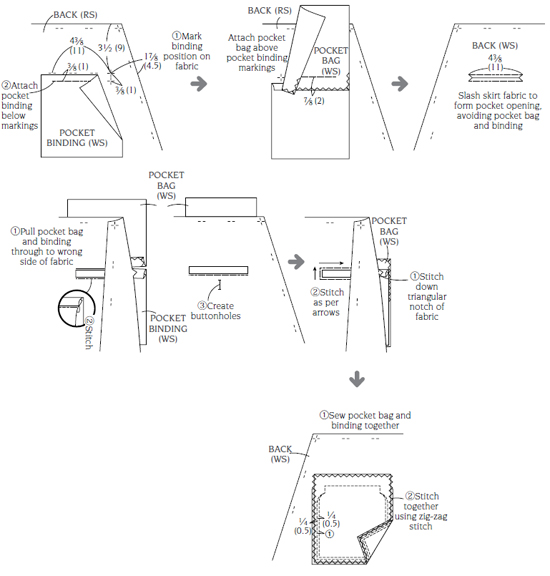
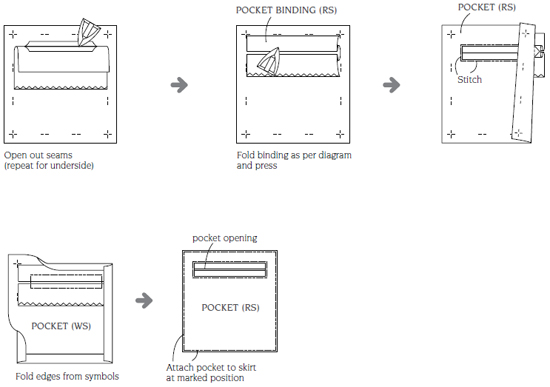
1. Attach pockets
2. Sew front left seam and stitch on outer side of fabric
3. Sew side seams to mark at waist
4. Attach facing (see p87)
5. Sew front right seam and stitch on outer side of fabric
6. Create hem (see p67)
7. Attach lining
8. Make buttonholes and attach buttons (see p63)
• Drafting

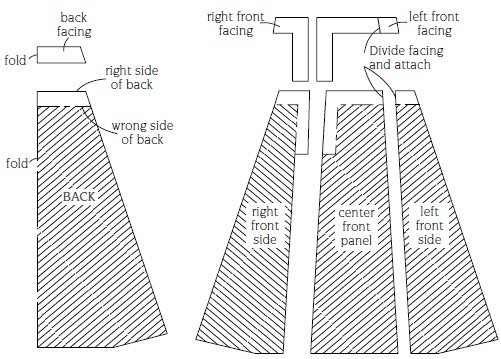
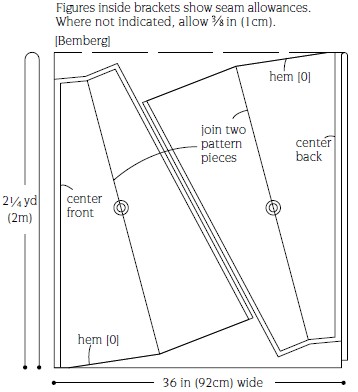
Lining pattern is created by removing facing sections from outer skirt pattern
1. Attach pockets
• Cutting layout (skirt)
5. Sew right front seam and topstitch


7. Attach lining


• Cutting layout (lining)
Ⓓ Slub Denim Wrap-style Denim Skirt (photo→p.6-7)

MATERIALS
Fabric—yarn-dyed slub denim 45 in (114cm) wide x 1⅔ yd (1.5m)
Iron-on interfacing—7⅞ in (20cm) x 20 in (50cm)
1 x invisible zipper 9 in (22cm) long
Hook and eye
Leather cord—⅜ in (1cm) wide x 1¾ yd (1.6m)
SEWING STEPS
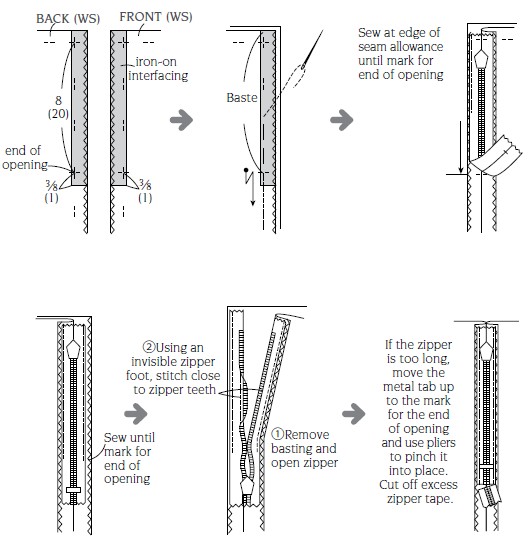
1. Sew left side until opening and insert zipper (see p76)
2. Neaten hem, front edge and waist of front panel by folding three times and stitching in place. Attach to right of skirt.
3. Attach interfacing to waist
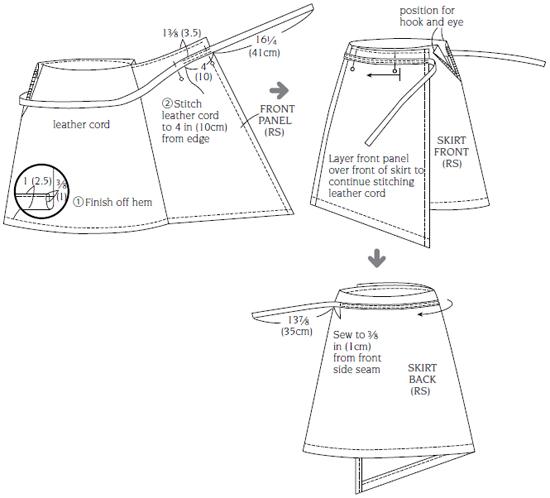
4. Create hem. Position and attach leather cord as shown.
5. Attach hook and eye (see p63)
• Drafting

• Cutting layout
3. Attach facing to waist
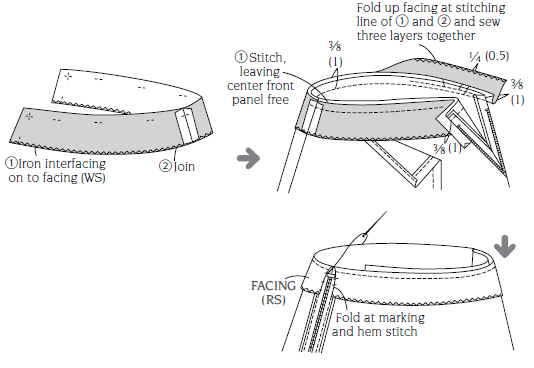
4. Finish off hem, attach leather cord
Ⓔ Russel Lace Gored Skirt (photo→p.8)

MATERIALS
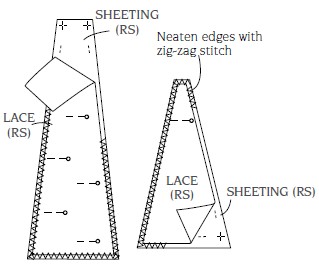
Fabric—Russel lace 44 in (110cm) wide x 2½ yd (2.3m)
Sheeting (for underskirt) 44 in (110cm) x 2½ yd (2.3m)
Plain pink fabric (for waistband) 36 in (90cm) x ⅔ yd (0.6m)
1 x invisible zipper, 9 in (22cm) long
Hook and eye
SEWING STEPS
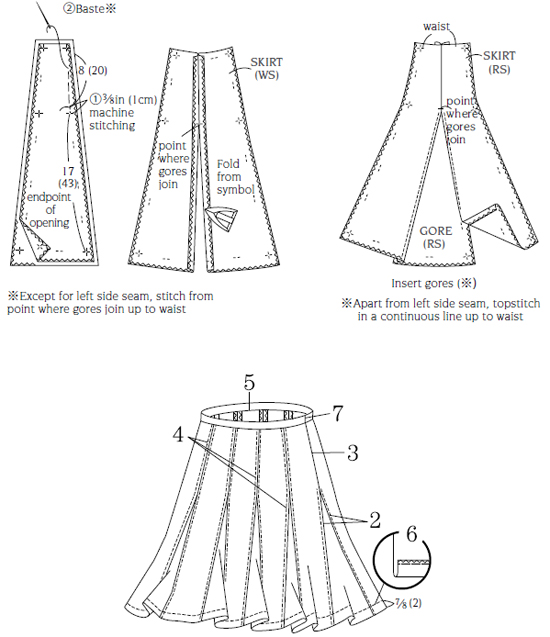
1. Sew underskirt and skirt pieces together
2. Sew left side and create gores
3. Insert zipper (see p76)
4. Join remaining panels and complete main part of skirt
5. Attach waistband (see 50)
6. Create hem (see p67)
• Drafting

1. Join lining to skirt
• Cutting layout

2. Sew left seam, insert gores
Ⓕ Skirt with Lace-trimmed Irregular Hem (photo→p.9)

MATERIALS
Fabric—Liberty Tana Lawn 44 in (110cm) wide x 1¼ yd (1.1 m)
Iron-on interfacing—⅞ in (2cm) x 7 in (18cm)
1 x invisible zipper, 9 in (22cm) long
Hook and eye
Lace—1 in (2.5cm) wide x 5 yd (4.5m)
SEWING STEPS
1. Stitch darts, sew side seams
2. Insert zipper (see p76)
3. Attach waistband (see p55)
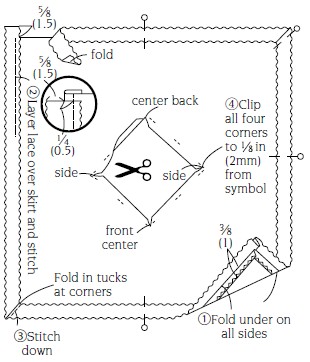
4. Attach lace to hem
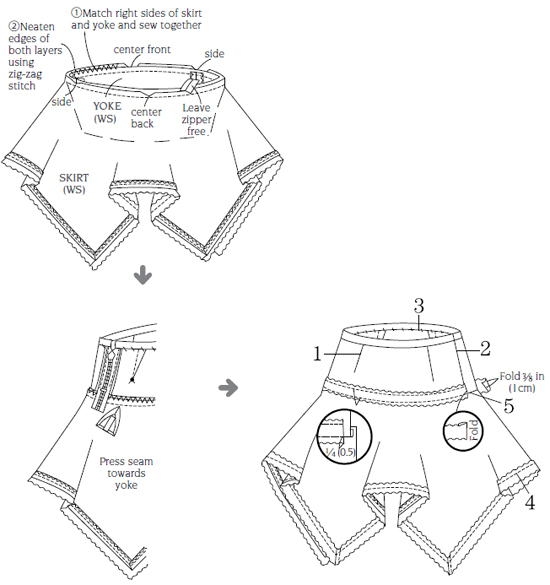
5. Attach skirt to yoke
6. Attach lace at hips over yoke and skirt seam
7. Attach hook and eye (see p63)
• Cutting layout Seam allowances are all in (1cm)
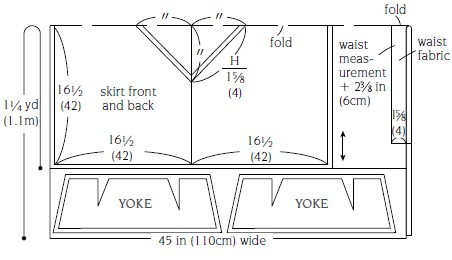
4. Attach lace to skirt hem
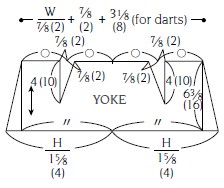
• Drafting (yoke)
1. Sew darts, sew sides
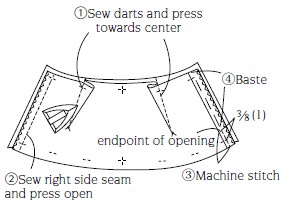
2. Attach zipper
3. Attach waist fabric

5. Attach skirt to yoke
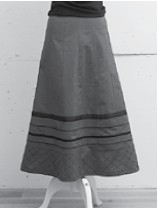
Ⓖ Striped Skirt with Box Pleats (photo→p.10-11 )
MATERIALS
Fabric—half linen stripe 44 in (110cm) wide x 2⅛ yd (1.9m)
Lining—Bemberg 36 in (92cm) x 1½ yd (1.4m)
Iron-on interfacing—⅞ in (2cm) x 9 in (23cm)
1 x invisible zipper, 9 in (22cm) long
Hook and eye
SEWING STEPS
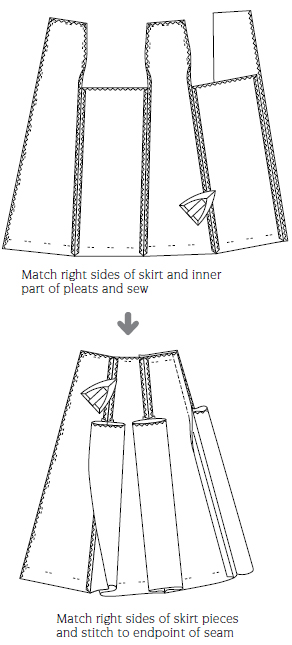
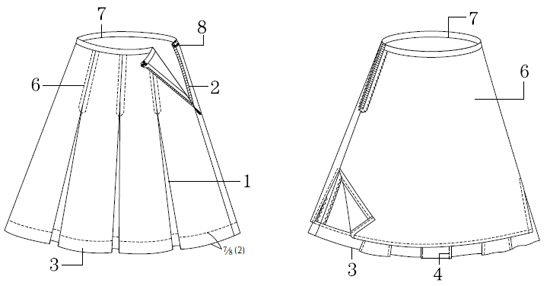
1. Sew skirt and inner pleat sections together to create front and back sections
2. Sew left side seam to opening and insert zipper (see p76)
3. Create hem
4. Stitch along edges of pleats
5. Topstitch pleats to endpoint of seam
6. Attach lining
7. Attach waistband
8. Attach hook and eye (see p63)
• Cutting layout (skirt)
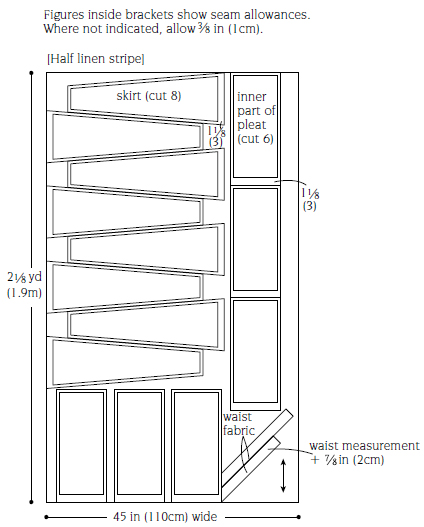
1.Join skirt and inner part of pleats, make front and back of skirt
• Drafting
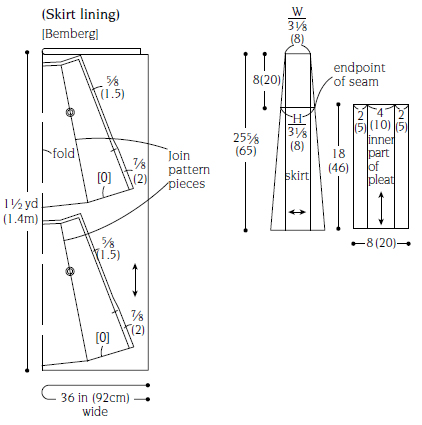
4. Sew top and sides of inner pleat sections
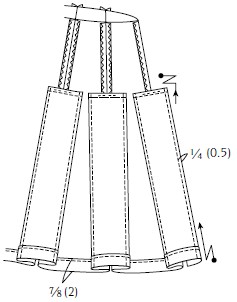
5. Topstitch to endpoint of seam
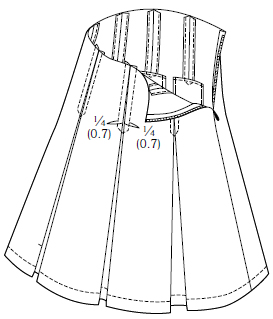
6. Attach lining
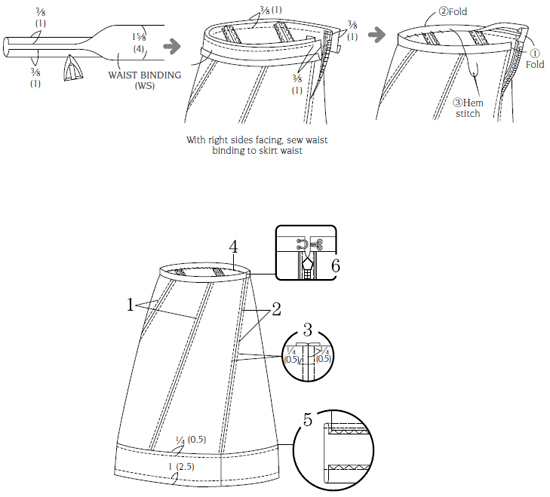
8. Attach waist binding

• Preparing fabric
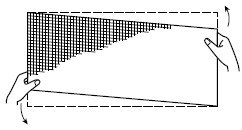
Before you start cutting, check the fabric for pulls, holes or warping that may have occurred in the weaving process. Garments created without proper fabric preparation do not hold their shape well, so this step is important. Washing fabric prior to cutting also prevents shrinkage once the garment is made up. The kind of preparation required depends on the type of fabric selected, so work out what is necessary and then test a scrap of fabric before proceeding.
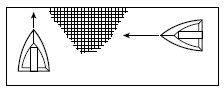
• Straightening the grain of fabric
Pull fabric in direction of arrows to straighten weft threads (cotton, linen)
Put fabric into a lingerie washing bag and rinse in the washing machine or leave to soak in a basin of water for about an hour. Wring lightly and dry in shade before pressing from the reverse side, with your iron on the steam setting.
• How to iron
Press fabric to follow grain of warp and weft threads (silk, synthetics)
In order not to dull fabric or lose its drape, press using a dry iron on the reverse side of fabric. Press with a cloth over fabric if necessary.
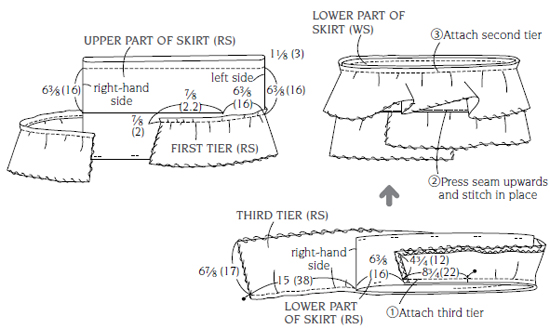
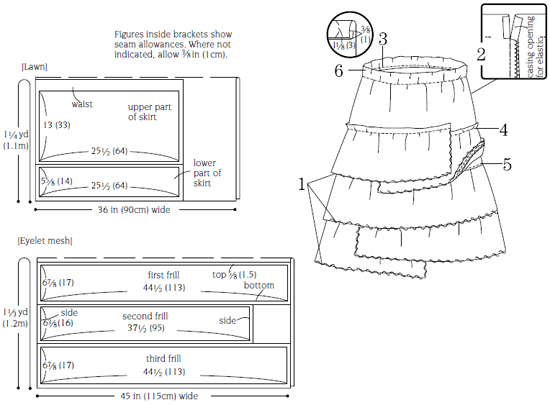
Ⓗ Tiered-look Frill Skirt (photo→p.12)
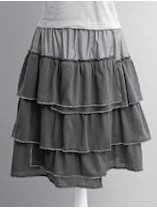
MATERIALS
Fabric—durable, washable lawn chintz (for skirt) 44 in (110cm) x 1¼ yd (1.1 m)
Sweatshirt mesh (for frill) 45 in (115cm) x 1⅓ yd (1.2m)
Belt elastic—1 in (2.5cm) wide x [your waist measurement x 0.9 +⅞ in (2cm)]
Embroidery thread—blue
SEWING STEPS
1. Sew the frill
2. Make side seams of upper skirt and lower skirt
3. Sew waist casing
4. Attach frills to skirt
5. Join upper and lower skirt sections
6. Insert elastic into waist casing
1. Sew frills
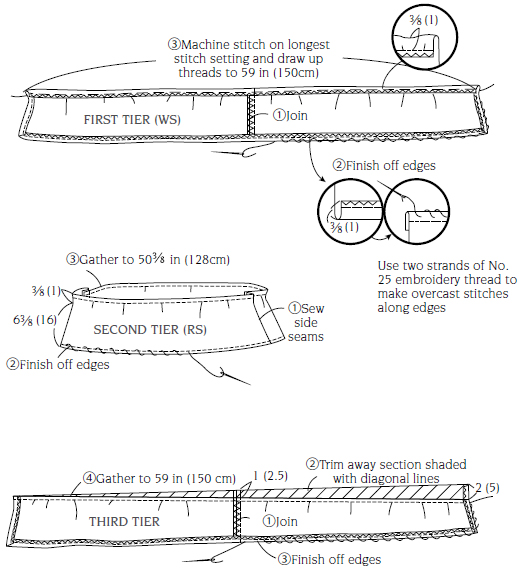
4. Attach frills to skirt
• Drafting and cutting layout
Ⓘ Long Jacquard “Escargot” Skirt with Straight Hem Panel (photo→p.13)
MATERIALS
Fabric—jacquard 56 in (142cm) wide x 1⅞ yd (1.7m)※
Iron-on interfacing—⅞ in (2cm) x 8¼ in (21cm)
1 x invisible zipper, 9 in (22cm) long
Hook and eye
※ For hips measuring up to 37¾ in (96cm), 1⅞ yd (1.7m) is required. For hips over 37¾ in (96cm), multiply the hem width by five and add ⅞ in (2cm) to calculate the required fabric length.
SEWING STEPS
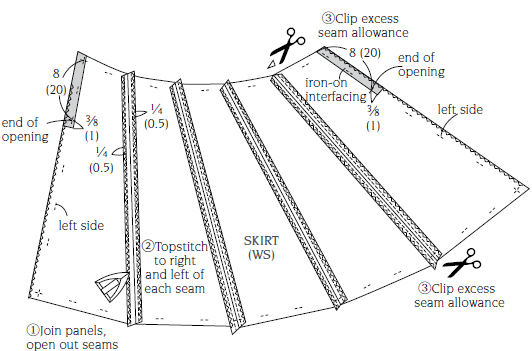
1. Join all five panels together
2. Sew left side to opening and attach zipper (see p76)
3. Open out seams of left side and stitch on both sides of seam
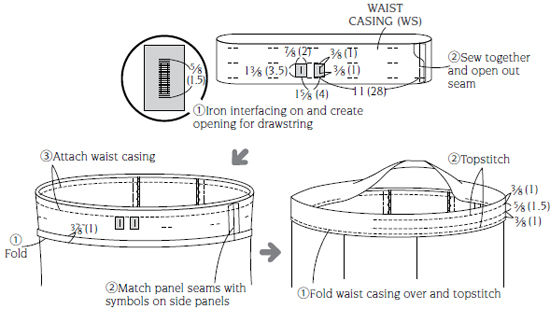
4. Attach waistband
5. Create hem and attach hem panel
6. Attach hook and eye (see p63)
• Drafting
1. Join 5 panels
• Cutting layout
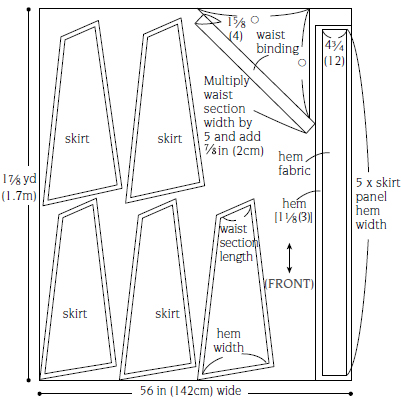
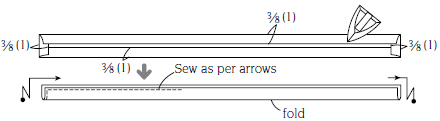
4. Attach waist binding
Ⓙ Skirt with Irregular Gathering (photo→p.14-15)

MATERIALS
Fabric—cotton lace 41 in (102cm) x 2⅓ yd (2.1 m)
Iron-on interfacing—⅞ in (2cm) x 2¾ in (7cm)
Elastic—⅜ in (0.8cm) wide x [your waist measurement x 0.9 + ⅞ in (2cm)]—two pieces
SEWING STEPS
1. Join skirt sections
2. Attach waist casing
3. Create drawstring
4. Insert elastic and drawstring into waist casing
5. Create hem
• Cutting layout

1. Join panels

2. Attach waist casing
3. Create drawstring
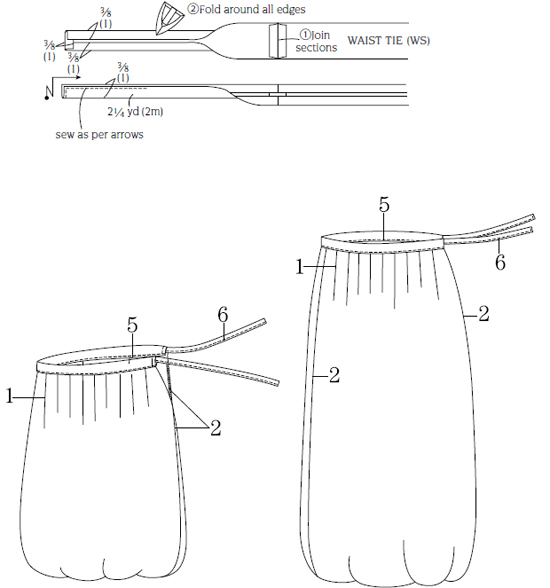
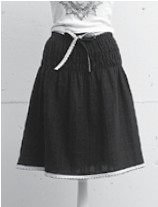
Ⓚ Wrap Skirt with Frilled Edge (photo→p.16)

MATERIALS
Fabric—44 in (112cm) wide x 1⅔ yd (1.5m)
SEWING STEPS
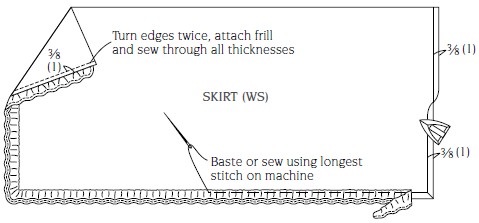
1. Create frill
2. Attach frill to skirt
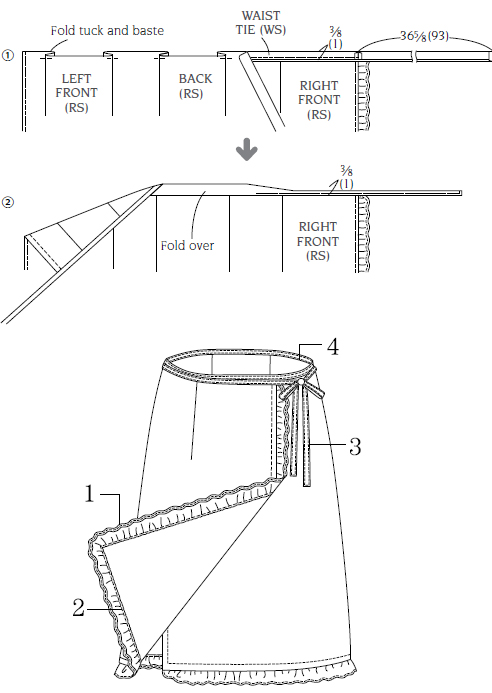
3. Create waist tie
4. Complete waist section
• Cutting layout
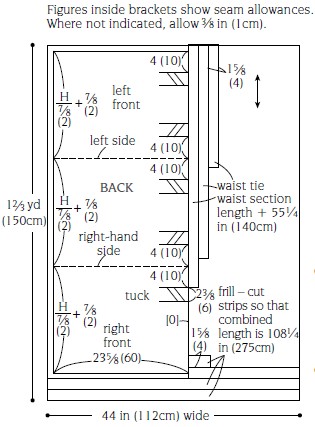
1. Create frill
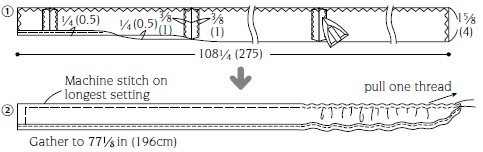
2. Attach frill
3. Create waist tie

4. Finish off waist
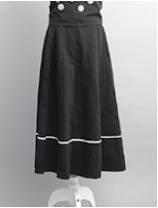
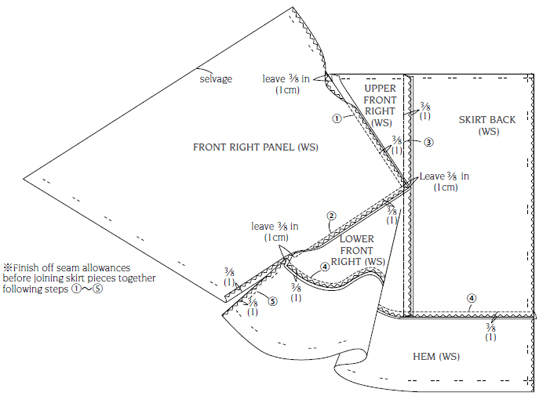
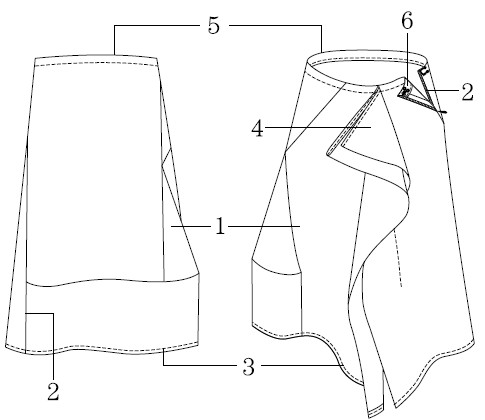
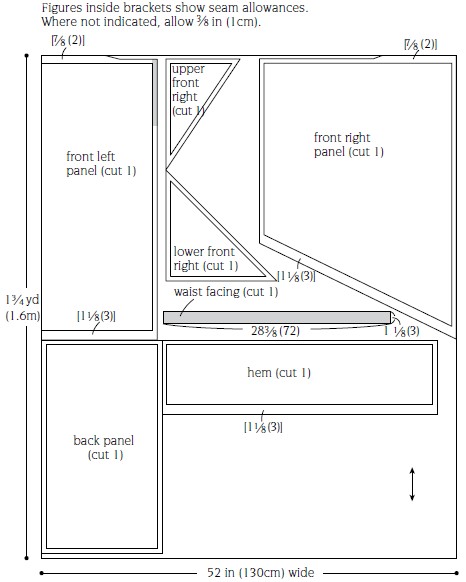
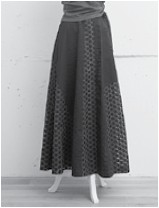
Ⓛ Trapezoid Skirt with Line Detail (photo→p.17)
MATERIALS
Fabric—52 in (130cm) wide x 3⅓ yd (3m)
Iron-on interfacing—2⅜ in (6cm) x 31½ in (80cm)
1 x invisible zipper, 9 in (22cm) long
Hook and eye
Grosgrain tape—¼ in (0.6cm) wide x 3⅓ yd (3m)
SEWING STEPS
1. Join five panels together for skirt front and grosgrain tape. Repeat for skirt back
2. Sew left side to opening and attach zipper (see p76)
3. Sew right side and create hem
4. Stitch along pleats on inside and outside of skirt
5. Attach waistband (see p50)
6. Attach hook and eye (see p63)
• Drafting

• Cutting layout
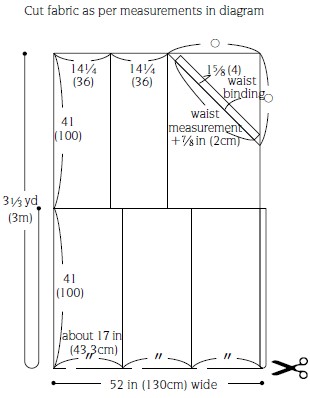
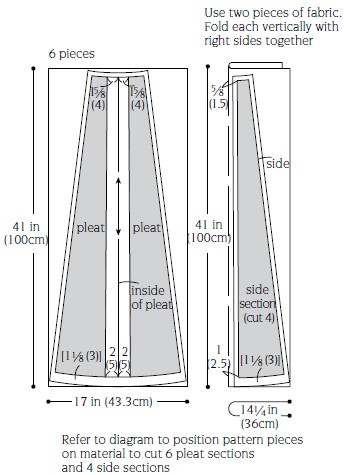
1. Join 5 panels each for front and back and attach grosgrain tape
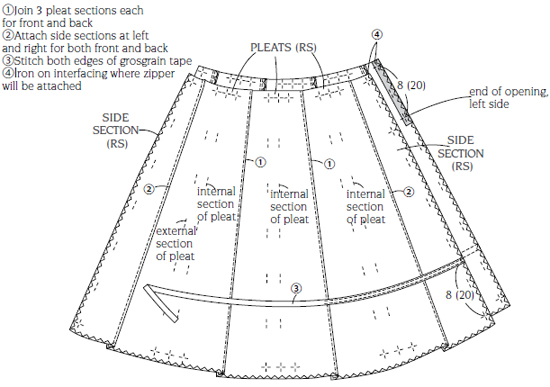
4. Stitch edges of pleats, inner and outer

• Attaching skirt hook and bar

①Knot thread and backstitch fabric at hook position

②Insert needle through hook hole from flat side and back through hole under flat side

③Bring needle through thread loop
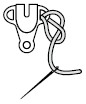
④Pull thread firmly

⑤Repeat steps②~④ several times, working counter-clockwise

⑥At the top of the hook, bring needle around flat side and through next hole

⑦Pass needle through last few stitches and knot to finish

⑧Bring needle under hook and clip thread

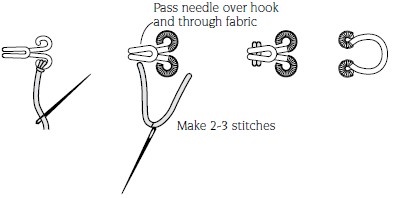
• Attaching hook and eye


Stitch as shown
• How to attach buttons

①Use thread to create shank as long as the width of the fabric through which button will pass

②Repeat 2-3 times

③Wind thread around shank firmly and pull tight

④Knot on underside of fabric. Bring needle back to right side and clip thread
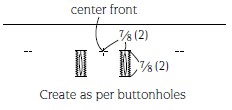
• Creating buttonholes

①Mark position of buttonhole (length for buttonhole = diameter of button +button thickness) and stitch a narrow zig-zag line of in (0.2cm)

②Stitch at position “0” 5 times using 3/16 in (0.4cm) wide stitch

③Make another line of stitching in the same way as ①

④Finish off the buttonhole by repeating ②
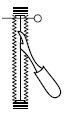
⑤Use seam ripper to slash between the rows of stitching. Insert a pin at the top of the buttonhole first to prevent it being slashed
Ⓜ Denim Skirt with Patch Pocket (photo→p.18)
MATERIALS
Fabric—8-ounce denim 58 in (145cm) wide x 1⅓ yd (1.2m)
Iron-on interfacing—20 in (50cm) x 12 in (30cm)
1 x invisible zipper, 9 in (22cm) long
Hook and eye
SEWING STEPS
1. Sew darts
2. Sew panels for right front section
3. Sew center back
4. Attach pockets
5. Sew left side to opening and insert zipper (see p76)
6. Sew right side
7. Attach facing
8. Create hem
9. Attach hook and eye (see p63)
• Drafting
• Cutting layout

1. Sew darts
4. Attach pockets
5. Sew left side seam

7. Attach facing
Ⓝ Tucked and Gathered Cotton Skirt (photo→p.19)
MATERIALS
Fabric—slub cotton 44 (106cm) wide x 1⅔ yd (1.5m)
Iron-on interfacing—⅞ in (2cm) x 9 in (23cm)
1 x invisible zipper, 9 in (22cm) long
Hook and eye
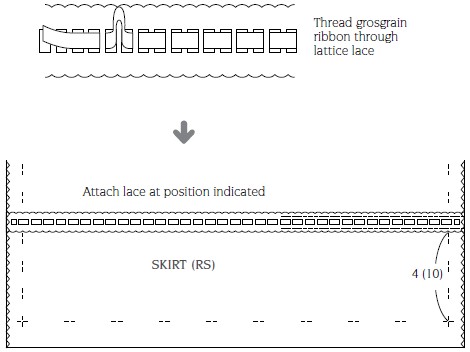
Lattice lace ribbon—1⅛ in (3cm) wide x [your waist measurement + 53½ in (136cm)]
Grosgrain tape—⅜ in (1cm) wide x [your waist measurement + 53½ in (136cm)]
SEWING STEPS
1. Attach lace to skirt
2. Sew left side to opening and insert zipper (see p76)
3. Create hem
4. Baste tucks
5. Attach waistband (see p50)
6. Attach hook and eye (see p63)
• Cutting layout

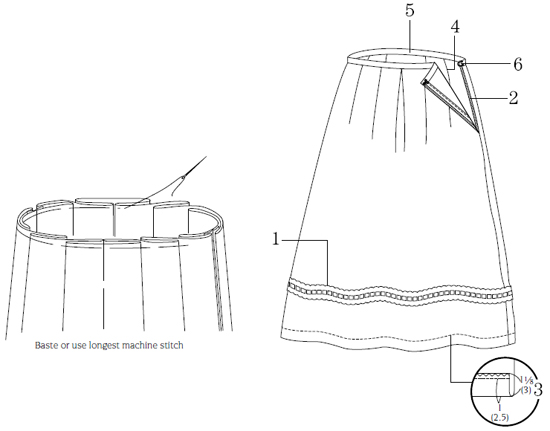
• How to fold tucks

1. Attach lattice lace
4. Create tucks
Ⓞ Tweed Skirt with Panel Detail (photo→p.20-21)

MATERIALS
Fabric—washable Tweed 52 in (130cm) wide x 1¾ yd (1.6m)
Iron-on interfacing—⅞ in (2cm) x 9 in (23cm)
1 x invisible zipper, 9 in (22cm) long
Hook and eye
SEWING STEPS
1. Join all parts from the right front panel to the back of the skirt
2. Sew left side until opening and insert zipper (see p76)
3. Create hem
4. Match front right and front left panels and stitch together
5. Create waist
6. Attach hook and eye (see p63)
1. Starting with front right panel and working towards the back of the skirt, sew all parts of skirt together
3. Finish off hem

4. Match front right and front left panels and sew

5. Finish off waist

• Drafting

• Cutting layout
Ⓟ Long Balloon Skirt (photo→p.22)
Ⓠ Black Balloon Skirt (photo→p.23)

MATERIALS
Fabric—Crushed satin 50 in (122cm) wide x 2½ yd (2.2m) [P]/1⅔ yd (1.5m) [Q]
Lining—Bemberg 36 in (92cm) wide x 1⅞ yd (1.7m) [P]/1⅓ yd (1.2m) [Q]
Iron-on interfacing—each 2⅜ in (6cm) x 32 in (78cm)
1 x invisible zipper, 9 in (22cm) long, for each skirt
SEWING STEPS
1. Make marks for tucks and baste tucks
2. Sew side seams of outer skirt section and attach zipper
3. Sew side seams of lining
4. Sew outer and inner skirt sections together
5. Attach waistband casing
6. Create cord and insert into waist casing
1. Fold tucks
• Drafting and cutting layout (skirt)

2. Sew side seams of skirt, attach zipper
4. Attach lining to skirt
5. Attach waist casing

6. Create waist tie and insert through casing
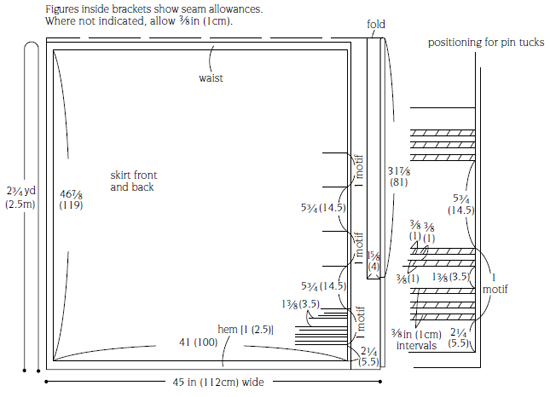
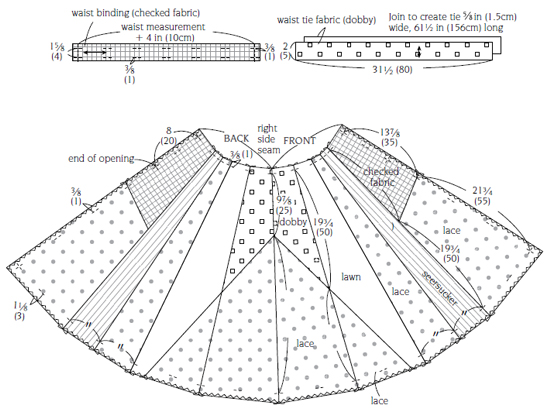
Ⓡ Skirt with Shirred Yoke and Lace Belt (photo→p.24-25)
MATERIALS
Fabric—double gauze dobby check washer 44 in (110cm) wide x 1⅔ yd (1.5m)
Iron-on interfacing—⅞ in (2cm) x 9 in (22cm)
1 x invisible zipper, 9 in (22cm) long
Hook and eye
Torchon lace ⅝ in (1.5cm) wide x3⅛ yd (2.8m)
Shirring elastic
SEWING STEPS
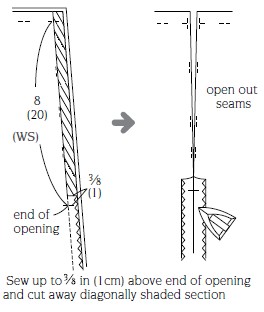
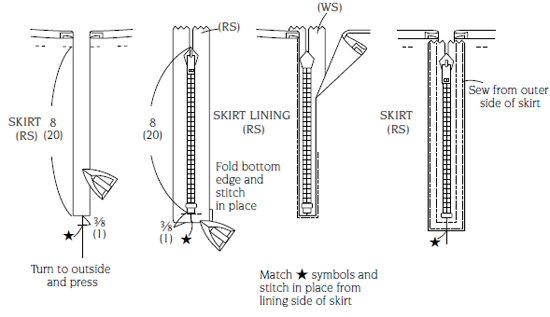
1. Sew right side, create shirring
2. Sew left side to opening and insert zipper (see p76)
3. Attach loops to waist
4. Create hem
5. Create belt
6. Attach hook and eye (see p63)
• Drafting and cutting layout (skirt)

1. Sew right side seam, create shirring
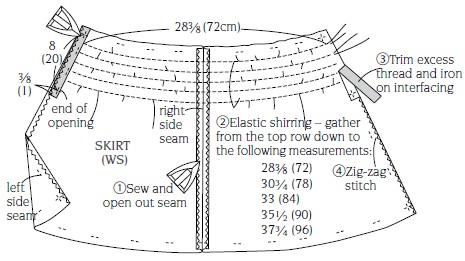
• Elastic shirring

3. Attach loops and waist binding
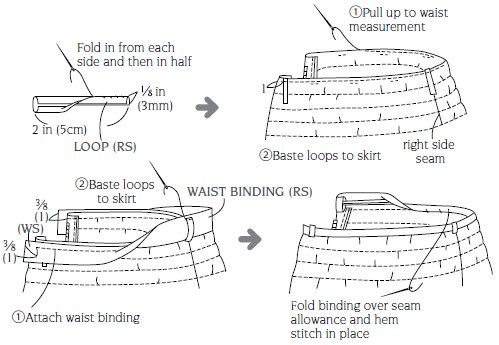
5. Create belt

Ⓢ Linen Skirt with Cargo Pockets (photo→p.26)

MATERIALS
Fabric—linen 44 in (110cm) wide x 2⅛ yd (1.9m)
Iron-on interfacing 24 in (60cm) x 16 in (40cm)
1 x invisible zipper, 9 in (22cm) long
Hook and eye
SEWING STEPS
1. Sew sides
2. Attach pockets
3. Sew center back seam to opening and insert zipper (see p76)
4. Attach waist facing (see p67)
5. Create hem (see p67)
6. Attach belt loops
7. Attach hook and eye
• Drafting and cutting layout (skirt)

6. Attach belt carriers

2. Attach pockets

Ⓣ Embroidered Skirt with Horizontal Tuck Pattern (photo→p.27)

MATERIALS
Fabric—44 in (112cm) wide x 2¾ yd (2.5m)
Embroidery thread—light green
SEWING STEPS
1. Create buttonholes for drawstring
2. Create pintucks
3. Sew side seams
4. Sew waist
5. Sew hem
6. Create drawstring and insert into casing
7. Embroider between tucks
• Drafting and cutting layout
1. Create casing openings
2. Make pin tucks

Ⓤ Eight-button Skirt with Horizontal Stripe Sections (photo→p.28)

MATERIALS
Fabric—52 in (130cm) wide x 1 yd (90cm) [Bordeaux], ⅓ yd (30cm) [white], ⅔ yd (60cm) [purple]
Iron-on interfacing 24 in (60cm) x 16 (40cm)
Buttons—8 at ⅞ in (2cm) diameter
SEWING STEPS
1. Join upper, middle and lower sections and open out seams
2. Sew front left seam and stitch on outside (see p40)
3. Sew side seam to waist mark
4. Attach facing
5. Sew front right seam and stitch on outside (see p40)
6. Create hem (see p67)
7. Create buttonholes and attach buttons (see p63)
• Cutting layout

• Drafting

4. Attach facings
Ⓥ 8-panel Skirt In Three Colors (photo→p.29)
MATERIALS
52 in (130cm) wide x ⅞ yd (80cm) each of white, gray and light blue
Iron-on interfacing—2⅜ in (6cm) x 31½ in (80cm)
1 x invisible zipper, 9 in (22cm) long
Hook and eye
SEWING STEPS
1. Join the 18 panels and create pin tucks
2. Sew left side seam
3. Insert zipper (see p76)
4. Attach waistband (see p50)
5. Create hem (see p67)
6. Attach hook and eye (see p63)
• Drafting
1. Join 18 panels together and create pin tucks

2. Sew left side seam
• Cutting layout
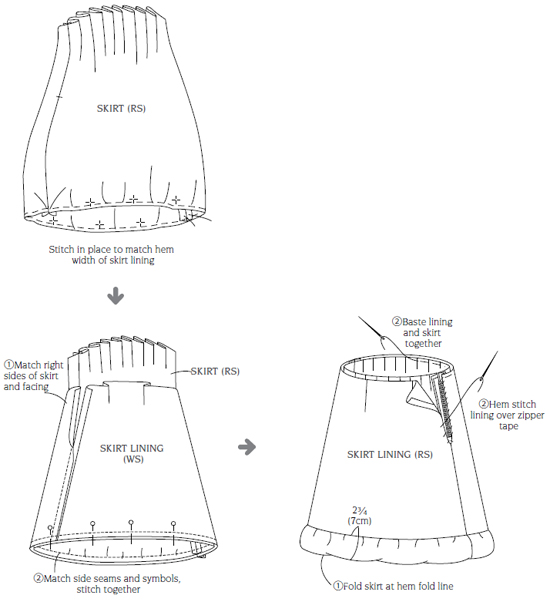
Ⓦ Eight-panel Irregular Flare Skirt in Lace (photo→p.30-31)
MATERIALS
Fabric—lace 41 in (100cm) wide x 1¾ yd (1.6m)
Washable dobby—20 in (50cm) x 31½ in (80cm), lawn—25⅞ in (65cm) x 1⅛ yd (1m), seersucker—16 in (40cm) x 1⅛ yd (1m), check—24 in (60cm) x 31½ in (80cm)
Lining—Bemberg 36 in (92cm) wide x 2¼ yd (2m)
1 x zipper 8 in (20cm) long
SEWING STEPS
1. Join panels for skirt
2. Make lining
3. Sew left side seam of skirt and create hem (see p67)
4. Match skirt and lining and stitch together at left side opening
5. Insert zipper
6. Attach waistband (see p55)
7. Create waist cord and insert into casing
• Drafting

• Cutting layout (skirt lining)
2. Create skirt lining

• Cutting layout Draft skirt, waist and waist tie using diagrams below as a guide
1. Create casing openings
4. Match right sides of skirt and lining and sew left side opening

3. Sew skirt left side seam
5. Attach zipper
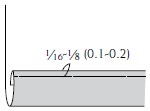
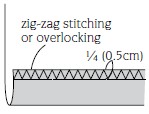
• Finishing off seam allowances
• Zig-zag stitch

Zig-zag stitch can be used on fabric that doesn’t fray easily. If you don’t have an overlocker, zig-zag stitch is a fine alternative.
• Overlocking
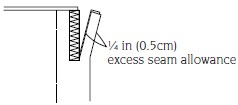
Overlocking binds fabric together firmly. An overlocker trims excess as it locks fabric together so a wider seam allowance than normal is given in some cases.
• Double fold
Fabric is folded twice and stitched in place. The width of the fold can be anything from ⅛-¼ (0.3-0.5cm) to over 1 in (4cm). This kind of finishing is used for hems among other things.
• Single fold
Sew raw edge using zig-zag stitch or overlocking, then fold and stitch in place.