 3
3
Preparations and Planning
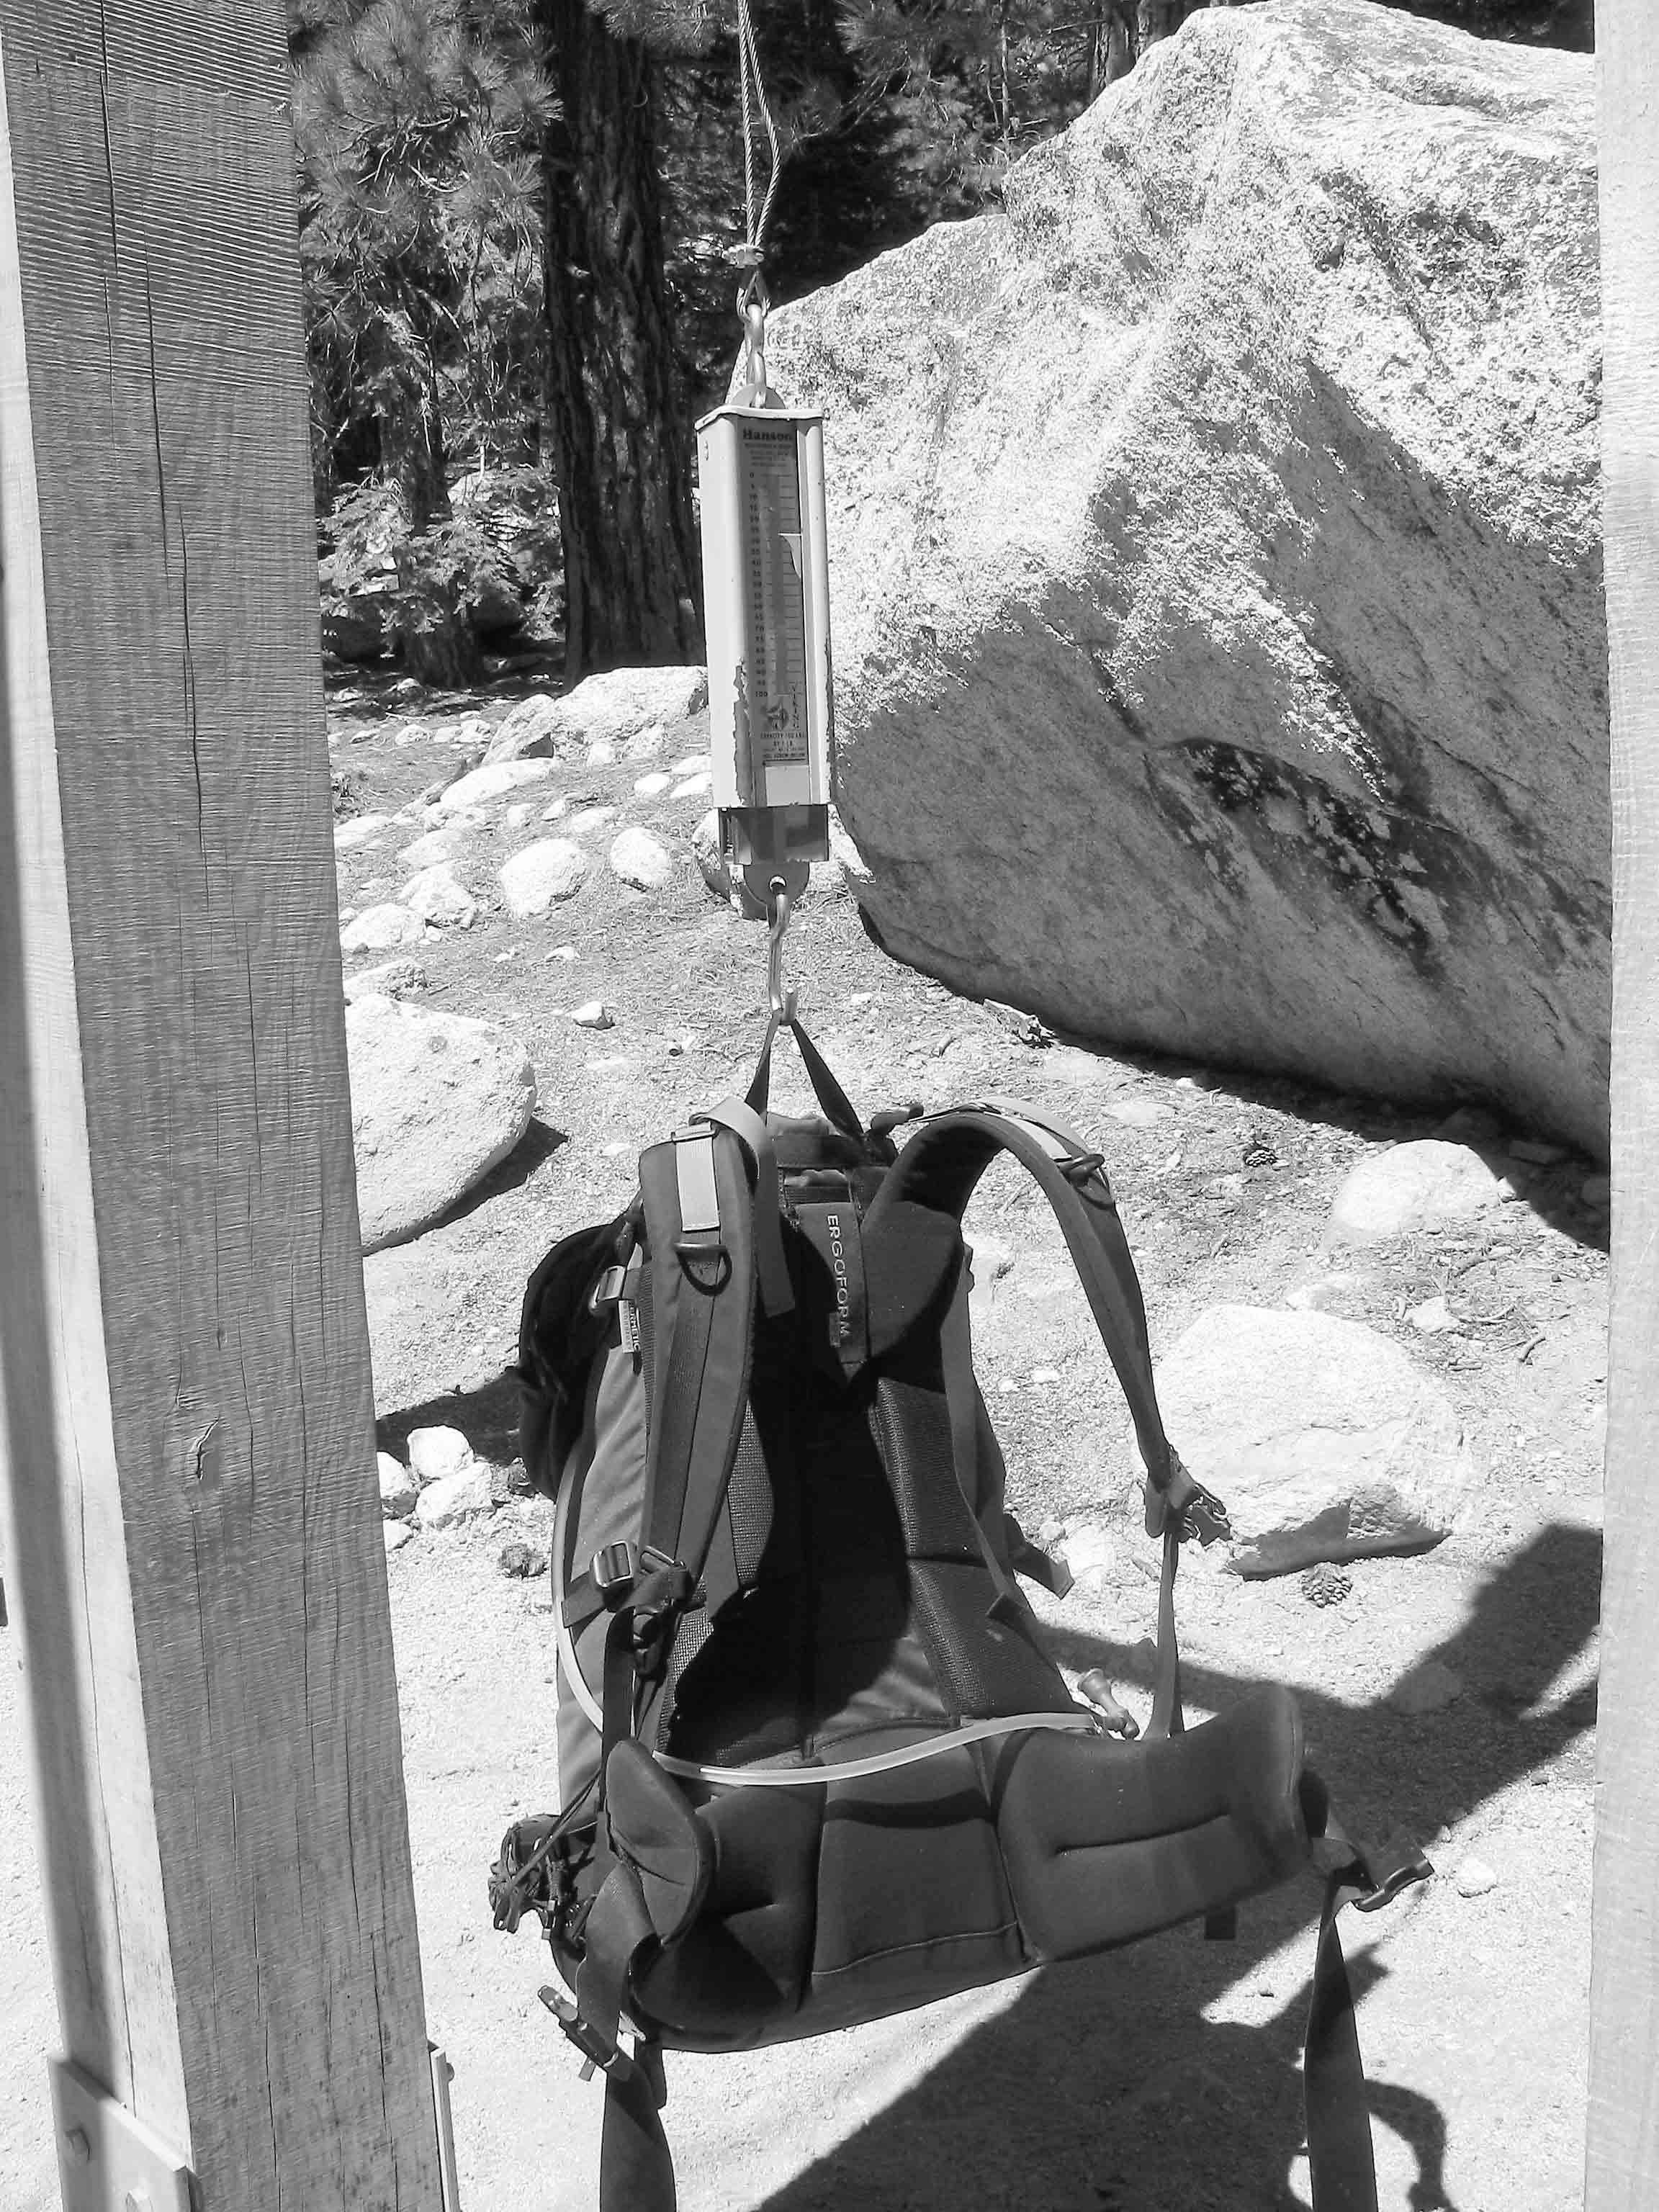
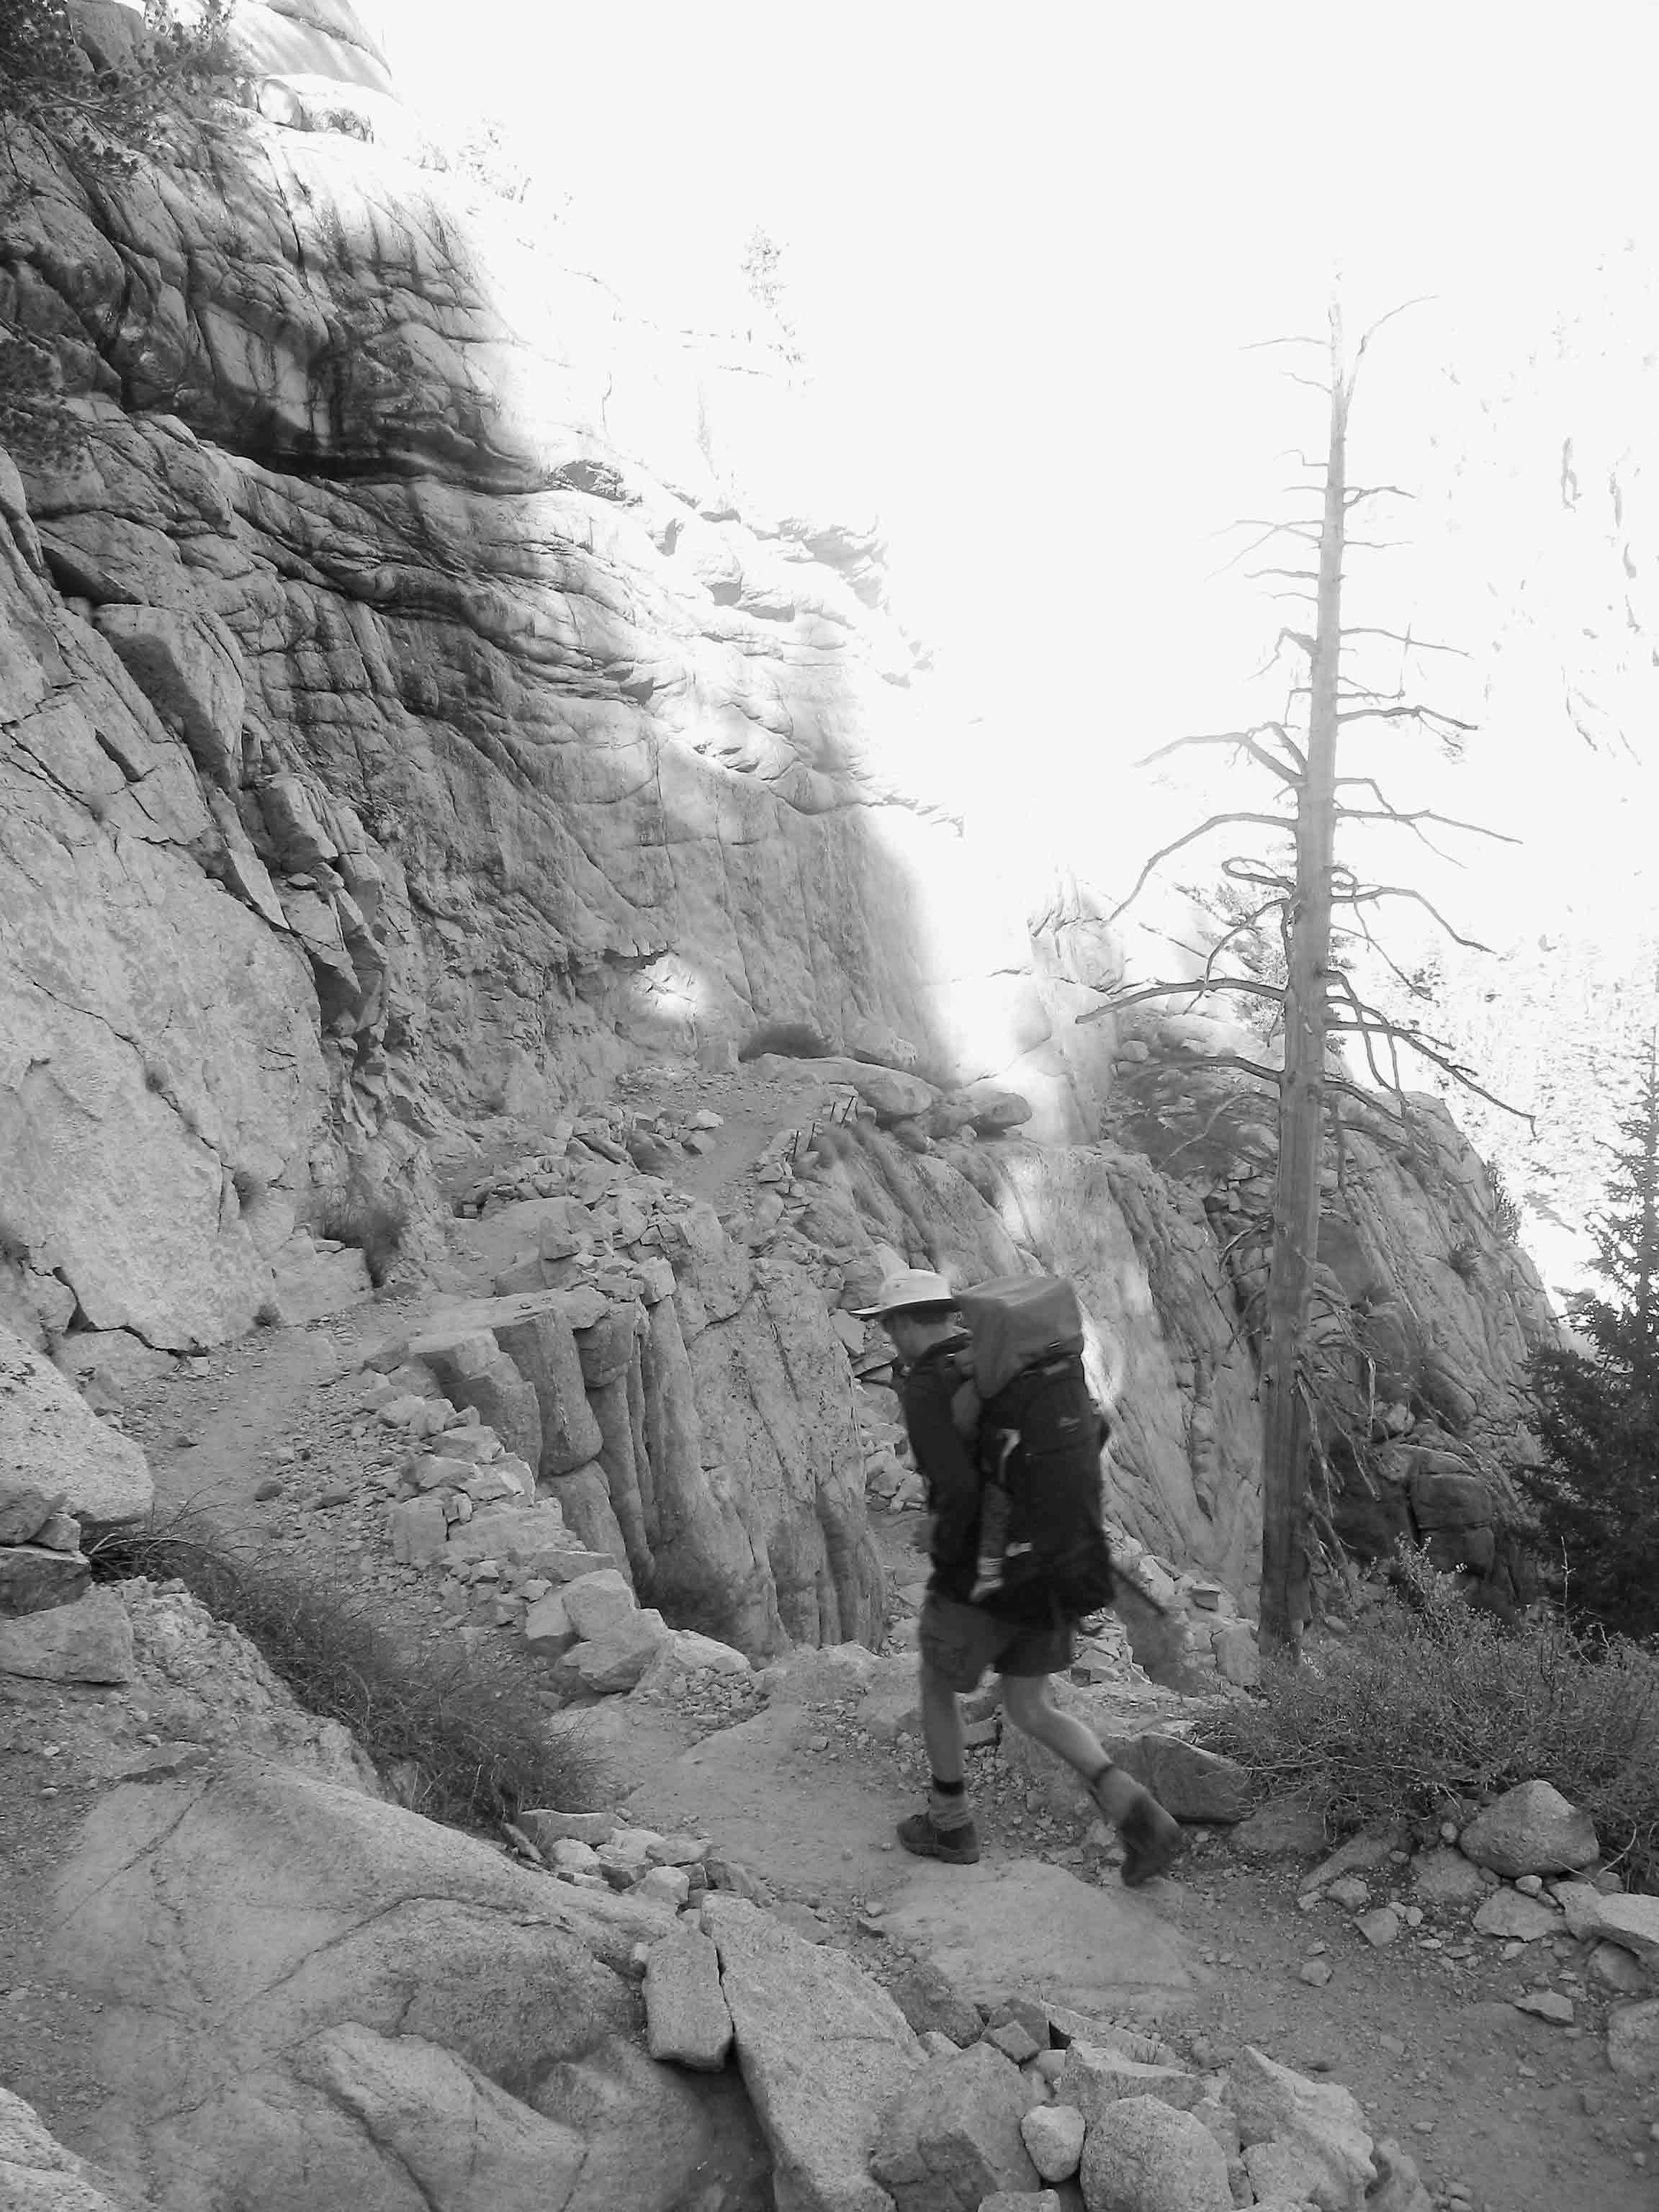
Weighing a pack at Whitney Portal
Once you have decided to climb Mt. Whitney, it’s time to start planning. The Mt. Whitney Trail, or more properly, the subset of the trail within the Whitney Zone, is currently the only location in the Sierra Nevada that imposes a quota on dayhikers. In addition, like nearly every trailhead in the Sierra, quotas limit the number of backpackers departing from the Whitney Portal trailhead. The implementation of the day-use quota in 1996 was an excellent move: On my first ascent, in mid-September 1995, I reached the summit before 9:30 AM, and there were already 30 people vying for the best vista points on the summit. By noon, there were approximately 200 people crowding the area. So many people led to resource damage and detracted enormously from each person’s wilderness experience. The number of people on the trail certainly disturbed me and I avoided the summit for several years. It is still a busy trail, but thanks to the quotas, which limit the number of hikers to 100 dayhikers and 60 backpackers, there are few enough people on the trail that you actually begin to recognize (and greet) people as the hike progresses. (Beginning in 2008, the dayhike quota included permits obtained by dayhikers ascending the use-trail up the North Fork of Lone Pine Creek to the technical routes on Mt. Whitney—further diminishing the number of people on the Mt. Whitney Trail.) The downside is that hiking Mt. Whitney cannot be a spur-of-the-moment decision, as you need to choose whether you want to dayhike or backpack, as well as your preferred hiking dates, by February 1, the date when the permit lottery opens for the season.
Dayhike vs. Overnight
Some people enjoy attempting the summit in a single, 21-mile day, while others prefer to spread their ascent over two, three, or more days. While many factors may influence your decision, the debate usually comes down whether you want to put in the extra effort required to carry overnight gear for the pleasure of a more relaxing ascent and a backcountry camping experience.
Here are some reasons to dayhike:
- You dislike carrying an overnight pack.
- Permits are easier to obtain for a dayhike, especially if you have limited choices of dates.
- You prefer the faster walking pace possible with only a daypack on your back.
And some reasons to do an overnight trip:
- You prefer the more leisurely pace associated with backpacking.
- You enjoy spending a night in the middle of the mountains.
- You want the extra night(s) to acclimatize at an intermediate elevation before pushing for the summit.
- You know your legs and feet do not wish to travel 21 miles in a single day.
I’ve summited Mt. Whitney, and many other peaks, both as long dayhikes and as part of a backpacking trip, and the experiences are completely different. On a backpacking trip, the camaraderie of my climbing partners and the time spent together in camp are important parts of the excursion. I tend to spend more time enjoying my surroundings and really appreciate that I am in the middle of an amazing wilderness area. On a long dayhike, I focus more on the physical requirements of getting up and down the mountain safely, knowing I will be exhausted by the end of the day, but also keeping in mind I must make it back to the car by dark. I enjoy the physical and mental challenges that come with pushing myself hard, but there is decidedly less “wilderness experience” in my trip. A backpacking trip along the Mt. Whitney Trail merges a bit of both experiences, since summiting a tall peak is still the goal of the trip. But a dayhike accentuates the endurance aspects of the hike.
When to Go
Like most people hiking the Mt. Whitney Trail, you probably care most about maximizing your chances of summiting. This means you should pick a time of year when the hike requires the least physical and mental exertion and has the lowest likelihood of bad weather. This is a probability game, since you can’t shift your summit date by a week to match the weather forecast. In the Sierra Nevada, the absolute best conditions generally exist during July and August. However, we are blessed with a long summer, and most days between June and September are pleasant on the mountain.
Factors that might influence your preferred summit date include:
- Snow on the trail: Your first consideration should be to pick a date after most snow has melted—early to mid-July is a safe bet most years. Slogging through residual snow on the trail, especially on the 99 switchbacks above Trail Camp, is very tiring. Your feet slip around with each step, and if the day is warm, you will posthole (sink into the snow). In addition, you are more likely to get blisters if your feet get wet.
- Thunderstorms: Most thunderstorms occur in late July and August, but they can also occur during June, early July, and September.
- Strong winds: Powerful winds, which are more common in June and September than in midsummer, will sap your energy.
- Temperature: The warmest days are in mid- to late July.
- Pacific storms: Weak Pacific storms are often still blowing through in early June, and they return by early to mid-September. The late spring and early fall storms usually drop little precipitation but are very blustery and cold for 12 to 24 hours while they pass.
- Day length: As long as you are content to walk up much of the mountain in the dark, this is not a major consideration, but days start getting shorter much more rapidly in mid-August. (I prefer starting in the dark and enjoying the alpenglow on the peaks once I am already above Mirror Lake.)
- The moon cycle: A few days after a full moon is the best time for early-morning walking, because the moon will not set until after the sun rises. A few days before a full moon is my favorite time for backpacking, because evenings are moonlit. For some people, summiting at dawn on the day of the full moon and simultaneously watching moonset and sunrise is well worth the effort of hiking 10.5 miles in the dark.
- Air quality: Forest fires around the Sierra (and beyond) can result in a perpetual haze in the Sierra during midsummer. The clarity tends to increase following the first small Pacific front to blow through in September.
Wilderness Permits
The most likely stumbling point during the planning stage is getting a permit to enter the Mt. Whitney Zone. (Note: This information pertains only to the Mt. Whitney Trail; certain regulations are different for other trails in the region.)
HINT: If you miss the lottery but can arrange your schedule to do a midweek dayhike, there is a very good chance there will be unclaimed permits. These are available at noon the day before your intended hike—and they’re free. Many days, there are 20 unclaimed permits, but you must be at the Eastern Sierra InterAgency Visitor Center outside of Lone Pine at noon the day before you wish to hike to take advantage of these.
Permits are required for both dayhikes and overnight backpacking trips, and trailhead quotas are in effect from May 1 to November 1. To request a permit, you must enter the permit lottery by submitting an application by mail sometime during the month of February. (Permits postmarked earlier in February have an advantage over those submitted at the end of the month.) There are no first-come, first-served permits available, and only occasionally can you get a permit if someone cancels (see “Hint”). The maximum group size for a permit is 15.
To submit your application, download a form from www.fs.fed.us/r5/inyo/recreation/wild/whitneylottery.shtml, fill it out, and mail the form, as well as a $15 per-person check, to Inyo National Forest:
Inyo National Forest Wilderness Permit Offices
351 Pacu Lane, Suite 200
Bishop, California 93514
760-873-2485 (Wilderness Information)
There are a few quirky rules to the permit process:
- Since permits are not transferable, list alternate leaders on your permit application if you want to make sure your group can still use the permit if the original “leader” is unable to go on the trip.
- You cannot apply for permits for two successive days. If you wish to do a moonlight ascent, you must reach the Mt. Whitney Zone boundary no earlier than midnight—or cheat by a few hours and assume the rangers aren’t also doing a moonlight ascent.
- If you wish to do a longer backpacking trip, you can hike in at a different trailhead, such as Cottonwood Pass, New Army Pass, or Kearsarge Pass, and have an easier time obtaining a permit. See other Wilderness Press books, including Sierra South, Sequoia National Park, and John Muir Trail for details on doing this.
HINT: To better your chances of getting a Whitney Zone permit:
- Get your permit reservation in the mail on February 1.
- Include many possible dates.
- Include midweek options.
You will be notified by mail that you have received your permit, and if you don’t get a permit, the agency will return your check. However, if you get a permit for dates that you cannot make, you will not get your money back.
To pick up your wilderness permit, you must go to the Eastern Sierra InterAgency Visitor Center (760-876-6222), located 2 miles south of the center of Lone Pine, at the southeast corner of the intersection of Hwy. 395 and State Rte. 136. Overnight permits must be picked up or confirmed by 10 AM on the departure date. Dayhike permits must be picked up or confirmed by noon the day before the permit date. To confirm your permit, call the Inyo National Forest Wilderness Permit Reservation Office at 760-873-2483. If you wish to pick up your permit after hours, call the number above and have your permit left in the night box, located in a small kiosk along State Rte. 136. For additional information on Mt. Whitney Zone permits, see www.fs.fed.us/r5/inyo/recreation/wild/mtwhitney.shtml.
Training
Hiking 21 miles is a major undertaking (especially if you choose to do it in a day), and climbing well over 6000 feet requires a lot of effort. Long before you start worrying about acclimatizing to high elevation, you need to get used to walking long distances up and down hills. In other words, you need to be in relatively good aerobic shape, have toned the needed muscles, and have excellent endurance. You do not need to be fast.
Any aerobic exercise will help you get in shape, but the muscles used extensively for walking up and down hills can really only be conditioned by walking up and down hills. If you live somewhere with hills, the best form of training is, unsurprisingly, to take long walks. However, if your surroundings are flatter, or you don’t have time to hike hills regularly, cities are full of training opportunities: walk up and down staircases in a tall building, walk up and down bleachers in a local stadium, or use a stair machine at a gym. Do not underestimate the descent; this long downhill section catches many people unprepared. Also, knee injuries are more likely if the muscles you need to descend gracefully are not strong.
Testing your endurance ahead of time is important in ensuring that you are physically and mentally ready to walk for many hours. If you can do a fast-paced 10- to 12-mile hike in hilly terrain, your physical capabilities are unlikely to limit your success. For many newcomers to hiking (or other endurance sports), the mental game is equally difficult. You need to know how to keep going once you are tired—such as on the way back down, when you’ve reached your goal and the car is still 10.5 miles away. Successfully finishing training walks and other workouts, even if you are tired or bored, is one good way to know you are ready for Mt. Whitney.
The final reason for training hikes is to break in a pair of hiking boots or shoes (see more on footwear). You are more likely to succeed on summit day if painful feet aren’t stopping you.
ACCLIMATION HIKES
The final stage in your training for Mt. Whitney is to get your body acclimatized to higher elevations. It is best if you can spend several days hiking at moderate elevations just before attempting Mt. Whitney. However, I also recommend that you spend at least one weekend during the previous month (or months) hiking above 10,000 feet. Indeed, research has shown that repeated exposure to high elevations can help you prepare for a tall summit, even if it isn’t immediately before your climb.
If you live in northern California, a weekend trip to the Tahoe area, the Tuolumne Meadows section of Yosemite, or anywhere in between provides ample hiking options. If you live in southern California, 11,502-foot Mt. San Gorgonio, 10,834-foot San Jacinto Peak, and 10,064-foot Mt. San Antonio (a.k.a. Mt. Baldy), are good acclimation hikes.
In addition to acclimation hikes you take over the previous month, it is best to do one or more high-elevation hikes within two days of attempting the mountain, especially if you will be dayhiking Mt. Whitney. Three possibilities near Whitney Portal are: the trail to Trail Pass from the Cottonwood Pass parking area, the Cottonwood Lakes Trail to the Cottonwood Lakes Basin, and the trail from Onion Valley toward Kearsarge Pass. Remember, your goal is to acclimate your body, not to tire your legs or bash your feet. A 1000- to 2000-foot climb and a 5- to 8-mile day is all you should do the day before you head up the Mt. Whitney Trail, and you may choose to do only a portion of one of the hikes described below. If you decide to hike up a trail not listed here, select a trailhead between 8000 and 10,000 feet—not too high, not too low.
| HIKE 1 | Cottonwood Pass Trailhead to Trail Pass and Beyond |
| Distance: 7.4 miles out and back |
| Elevation: ± 1200 feet |
| Maps: Tom Harrison Golden Trout Wilderness Trail, USGS 7.5-minute Cirque Peak |
| Overview: This short walk leads you through exquisite foxtail pine forests as you climb to Trail Pass and then follow the Pacific Crest Trail south toward Mulkey Pass. |
| How to Get There: From Lone Pine, drive 3.5 miles west along the Whitney Portal Road and then turn left onto the Horseshoe Meadow Road. Continue straight ahead approximately 20 miles until you reach the end of the road, the Cottonwood Pass Trailhead. |
Leaving the Cottonwood Pass Trailhead, head west to skirt the northern edge of Horseshoe Meadow. After 0.3 mile, you reach a junction and turn left (south), toward Trail Pass. Now crossing sandy mounds characteristic of open flats in the southern Sierra, you cross a stream and climb slightly into foxtail pine forest. The trail climbs gently as it circles around the head of the smaller Round Valley meadow, and then begins switchbacking to Trail Pass. This stretch of trail is through beautiful forest of foxtail pines, whose needles encircle the tips of the branches, giving them the appearance of bottlebrushes. As you climb higher, the trees have ever more character after a lifetime of being bashed by winter winds.
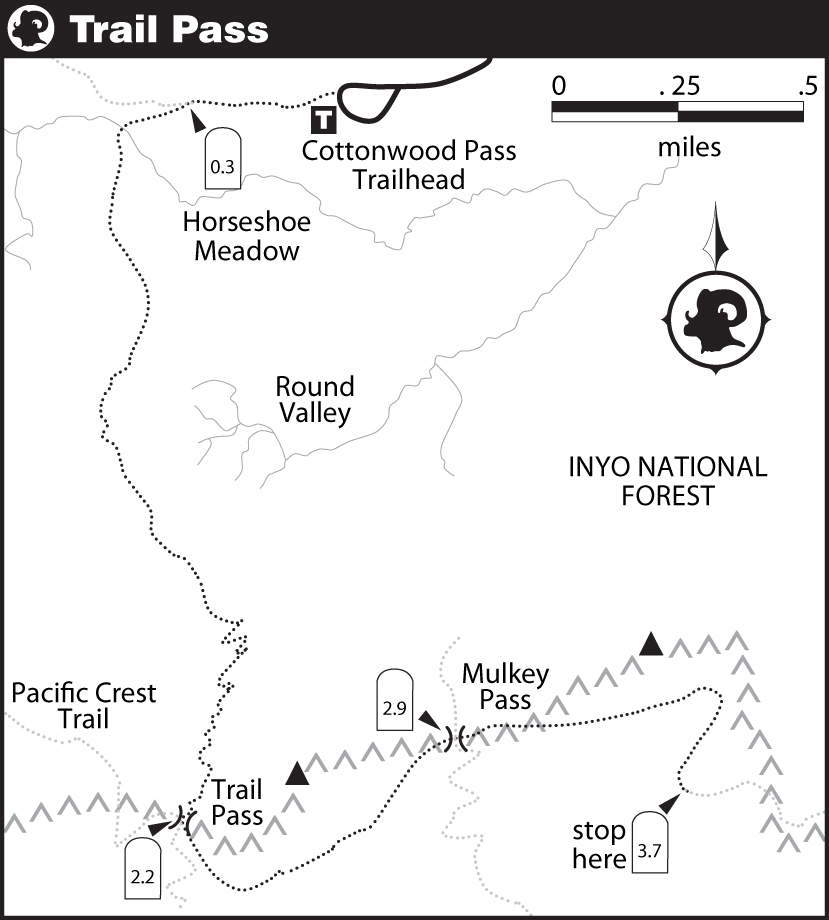
After 1.9 miles and a 600-foot climb, you reach Trail Pass and a junction with the Pacific Crest Trail (PCT). You can now follow the PCT in either direction for as long (or short) as you wish. I recommend heading south (left), where you will be treated to sporadic views of the Kern Plateau, with its expansive meadows separated by craggy granite outcrops and perfectly round cinder cones. After 0.7 mile, you reach Mulkey Pass, at which point you will cross another (less well-maintained) trail leading from Horseshoe Meadow. Another 0.8 mile leads you up to a collection of granite outcrops dotted with exquisite, weather-beaten trees. This is a good vista, and a nice place to have lunch and turn around.
| HIKE 2 | Cottonwood Lakes Trailhead to Cottonwood Lakes Basin |
| Distance: 9.6 miles out and back to Cottonwood Lakes |
| Elevation: ± 1100 feet to Cottonwood Lakes |
| Maps: Tom Harrison Golden Trout Wilderness Trail, USGS 7.5-minute Cirque Peak |
| Overview: This is a lovely trail to walk, for although it starts high, it climbs just slightly more than 1000 feet to reach the Cottonwood Lakes, an easy walk through forest and open meadows. |
| How to Get There: From Lone Pine, drive 3.5 miles west along the Whitney Portal Road, and then turn left onto the Horseshoe Meadows Road. Continue 20 miles until you reach signs pointing you right, toward the trail to Cottonwood Lakes and New Army Pass. Take the right-hand fork, and follow the road, which climbs slightly. Pass a turnoff to the local pack station, and continue to the hikers’ parking lot near a pair of campgrounds. |
The trailhead is located at the northwestern edge of the parking lot, next to the large information board and the toilets. The trail heads west from this point. (Note that some 7.5-minute USGS maps do not accurately portray the configuration of the trailhead or the beginning of this trail.) The first miles of this trail are nearly flat, passing alternately through stands of lodgepole pine and foxtail pine. The former prefers the flatter, more sheltered terrain, while the foxtails thrive on the more exposed, sandy, dry slopes.
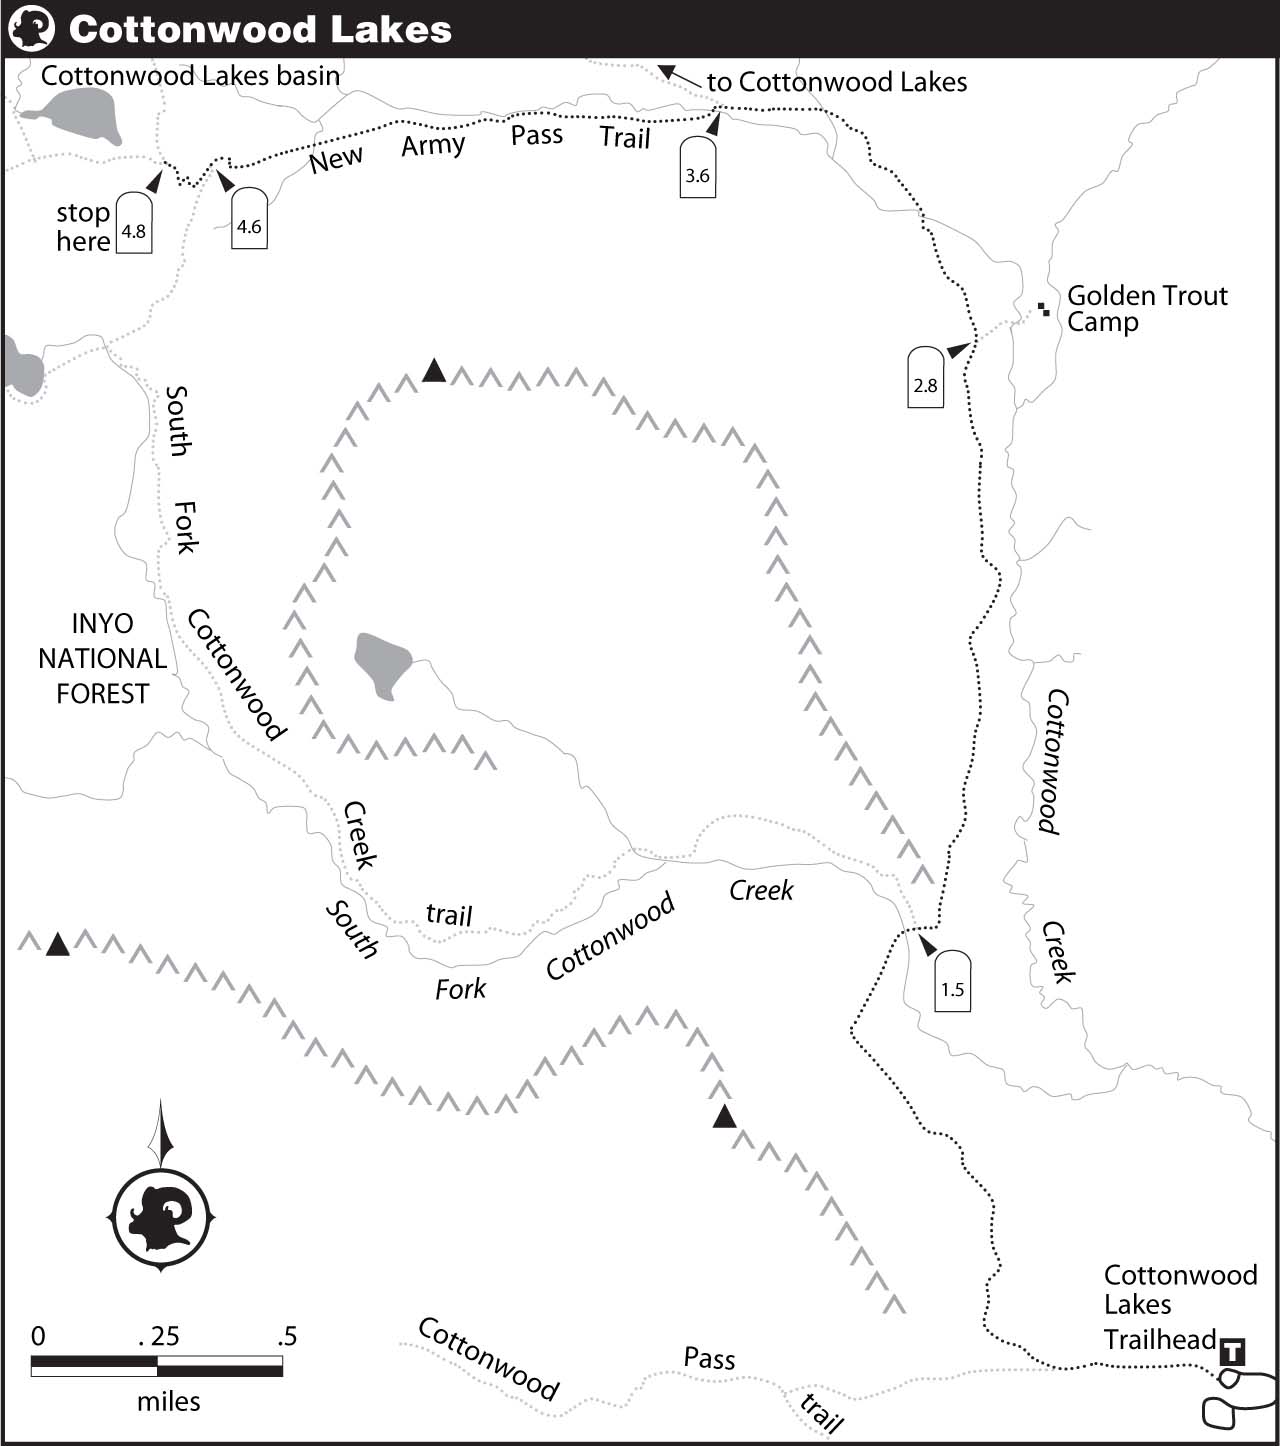
The trail continues through the forest, crosses the South Fork of Cottonwood Creek, and after 2.8 reaches an unsigned junction (stay left) for the Golden Trout Camp before a large meadow.
Shortly after the junction for the Golden Trout Camp you enter John Muir Wilderness. Beyond the Golden Trout Camp, the trail trends to the left, passes through another meadow, and begins a steeper climb to the Cottonwood Lakes basin. Soon thereafter, the trail bends nearly due west, and follows this trajectory up to and through the Cottonwood Lakes basin.
Stay left at a junction labeled Cottonwood Lakes, right at the junction to the South Fork lakes (at 11,000 feet), and, just beyond a third junction, you reach the first of the Cottonwood Lakes, 2.0 miles after the wilderness boundary. Stop here and enjoy lunch along the banks of this lake. Unlike in most of the High Sierra, trout are native to the Cottonwood Lakes basin. As a result, special fishing regulations are in place to protect the local populations of golden trout.
| HIKE 3 | Onion Valley Trailhead toward Kearsarge Pass |
| Distance: 7.8 miles out and back to the plateau below Kearsarge Pass |
| Elevation: ± 2000 |
| Maps: Tom Harrison Kings Canyon High Country Trail; USGS 7.5-minute Kearsarge Peak |
| Overview: The trail to Kearsarge Pass skirts several lakes that are popular fishing locations and campsites, and then it climbs to timberline for a vista of craggy ridges. |
| How to Get There: From Lone Pine, drive 15 miles north along Hwy. 395 to the town of Independence. From the center of Independence take Market Street (Onion Valley Road) 12.5 miles westward to its terminus at the Onion Valley Trailhead. |
Several trails depart from this large parking area, and the Kearsarge Pass Trail is due west, beyond the toilets and the cluster of bear boxes. From the edge of the parking area, you climb an open slope dotted with dry site shrubs, including sagebrush. Except for a brief interlude beneath tall red firs, the trail continues through similar vegetation for 1.5 miles. Throughout this section, there are views down-canyon to the parking area and beyond.
The trail then skirts above Little Pothole Lake, passing through a few stretches of moister vegetation. After another 0.7 mile, you reach the outlet of Gilbert Lake, around which there are several campsites. The next section of trail passes through a lodgepole pine forest, providing welcome shade.
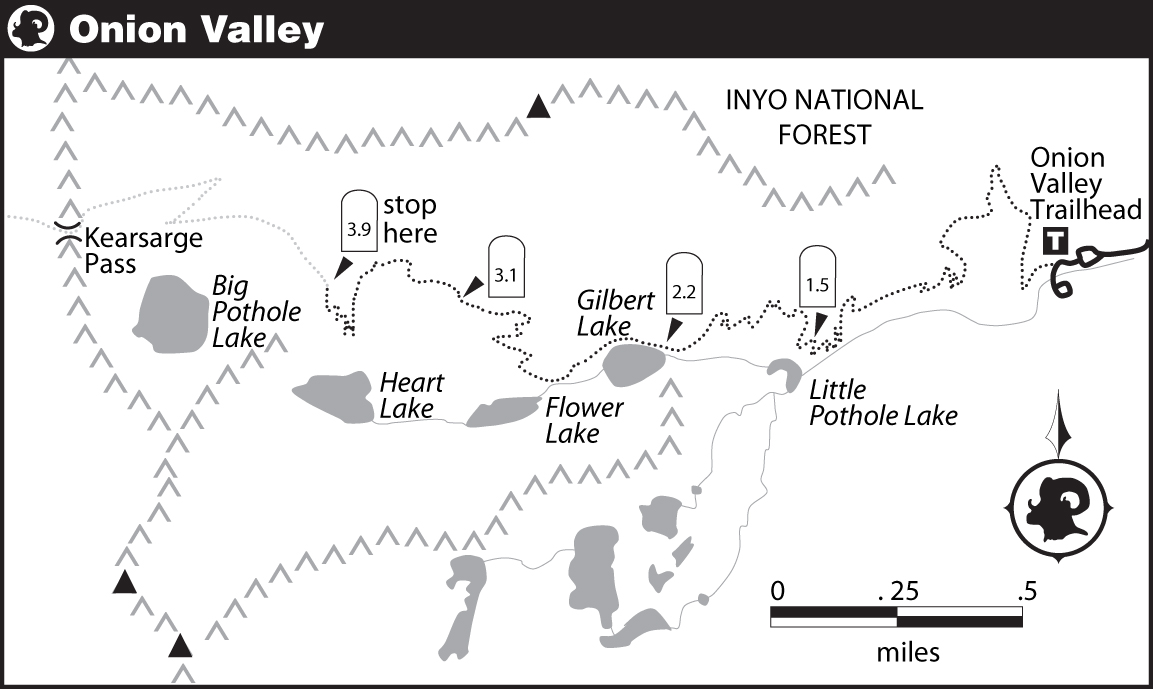
A short distance beyond Gilbert Lake, you spy Flower Lake, another lovely picnic location, to the left of the trail. The trail now turns away from the drainage, switchbacking up the slope to the north. Approximately 0.9 mile beyond Gilbert Lake, the trail emerges from the forest in a little subalpine flat. Bright pink Sierra primroses are common beneath boulders along this section. Steep talus slopes loom above you as the trail bends left and skirts across a barren slope, leading to a series of tight switchbacks up a slope dotted with stunted whitebark pines. Far below, Heart Lake is visible, accessible via the inlet to Flower Lake.
After another 0.8 mile, the grade lessens—a good turnaround spot, as you have now hiked 3.9 miles and climbed 2000 feet. The trail continues up an increasingly steep slope of sand, gravel, and the occasional boulder to Kearsarge Pass. Switchbacks are visible all the way to the top of the pass, somewhat to the right of the ridge’s low point.
Considerations for Summiting
By the time you reach Whitney Portal, you will have spent many hours planning, training, and assembling your pack of summit gear. This section covers a few more considerations for your trip: group dynamics, pace, and breaks. These are topics to read about before you leave home and to have firmly etched in your mind during your hike. For each of these, I can provide advice, but no tangible “rules,” because how you implement my suggestions is affected by individualistic factors: what pace and break schedule works best for you, and your judgment and attitudes about pushing yourself, safety, and group etiquette.
GROUP DYNAMICS
If you will be ascending Mt. Whitney as part of a group, it is important to know each other’s expectations before you begin your hike. Realizing partway up the mountain that you have different criteria for turning around, different paces, or simply different goals for the excursion can easily lead to bad feelings and a disappointing hike—not to mention an unsuccessful summit bid. You should discuss these factors thoroughly and honestly with all potential hiking companions.
In my experience, the single greatest source of problems between group members has been neglecting to communicate before reaching the trailhead about levels of experience and goals for the trip. On a trip to 14,370-foot Mt. Williamson, someone assured me he had experience at high altitude, only to explain later that he had only once been to 10,000 feet. On many trips, people have indicated they do not mind hiking by themselves if the group should wish to continue faster. But often it turns out that they expressed that opinion only because they wished to join a trip, not because they were actually comfortable hiking alone. On the trip itself, they become resentful if the group continues ahead without them.
However, most trips run smoothly. Usually the group remains together, with the faster hikers taking more time to take in their surroundings and the slower hikers feeling a bit pushed, but not dreadfully so. This works because all group members make small compromises and all have the same timeline and agenda in mind.
Also bear in mind that hiking as part of a group will probably cause the entire group to ascend a bit more slowly, because each person will be slowest at a different point in time. However, it also tends to be a lot more fun to have friends with whom to share the experience than to pound up the trail on your own.
Nearly every hiking team—unless you are accompanying a few friends whose pace you know—will be comprised of people with different hiking speeds. This requires compromises, patience, and understanding by everyone as you figure out how to accommodate the pace of different group members. Slower hikers may feel bad for holding up the group, and therefore agree to turn around even though they would very much like to summit. If the group has agreed in advance to take a certain amount of time for the hike and remain as a group, and you are still within that timetable, the group should stick together. Encourage the slower person to keep going and take some weight from his/her pack. In contrast, a hiker who cannot keep up the designated pace should realize this fact, and agree to wait, alone or with a friend, while others continue to the summit. Because there is a trail to the top and there are many other people on the trail, it is usually even safe to hike on your own if the weather is good and it is not late in the day.
If you are part of a particularly large group, people are likely to spread out a little as the hike progresses; pick a “buddy” in advance, and stick with that person as you hike. A group of more than four or six may even agree to reassemble only at the summit—a big group generally has considerable inertia, as each person is likely to slow down the group at different times.
If the decision is made for the group to split, make sure everyone has agreed where the group will reassemble, whether it is at the car or somewhere up the trail. It is very important that everyone knows exactly where and when the meeting location is: Many a trip has turned sour when different people are waiting at different locations and cannot find their friends.
Some of the following questions will help you determine important concerns (if any) in your group’s dynamics:
- Do group members think it is necessary to stick together, or can each person go at his or her own pace? While it is easiest to hike with people with similar paces, this rarely occurs. Most people have the best endurance when they hike at their preferred pace, neither too fast nor too slow. A good strategy is to allow people to pace themselves, but to regroup every mile or two at a predesignated break spot. However, group members should always stick together in the dark or in bad weather.
- Do you plan to stick with a strict turnaround time? If the answer is yes, as it should be, decide on a timetable in advance (see for likely travel times) and agree to turn around at the whatever time you should have reached the summit. Since many mountaineering problems arise on the way down, especially if you are faced with waning daylight, you should never continue upward after a predetermined turnaround time.
- Under what weather conditions would each person prefer to turn around? People differ in the amount of risk they are willing to tolerate when seeking the summit. No one should feel obliged to continue to the summit if they think conditions are risky—or particularly unpleasant. If you are the gung-ho person, you should continue to the summit on your own only if it is not late in the day and there are not whiteout conditions.
- Does everyone have the goal of summiting Mt. Whitney? If a group member is just coming to take a nice hike, never intending to continue past Trail Camp, he or she should express that in advance, since that person will be less inclined to take short breaks and forgo photo stops to stick to a timetable.
- Is one person the “group leader,” calling the shots, or are you hiking as a cooperative, where a consensus must be reached for each decision? The advantage of reaching a group resolution is that everyone’s interests have been discussed and no one feels disenfranchised. However, everyone’s preference is unlikely to be accommodated and much time can be spent discussing the relative importance of each person’s viewpoint. If there is a group leader, that person must listen to everyone’s input and attempt to make a fair decision. I generally find that if the group leader is considerate—and that person is one of the most experienced hikers in the group—this leads to faster and often fairer decisions. A good group leader will take into account everyone’s needs, even those of less vocal participants who might otherwise be ignored.
As you discuss these considerations, start to develop a plan for your hike. Make sure everyone has agreed upon a starting time, whether from Whitney Portal or a campsite along the trail. Nothing sets a day off to a worse start than pacing around at 4 AM, waiting for someone who hasn’t yet gotten around to filling water bottles, taping heels, and the many other “quick” tasks that expand into a half-hour (or longer) delay. If you know you are slow in the morning, get organized the night before and wake up extra early.
PACE
One key to successfully completing a long hike is determining the pace that allows you to continue for the longest distance before your legs tire. The more practice hikes you take, especially at moderately high elevations, the better you will learn what pace gives you the best endurance. I have learned that I have a bit of a range of paces that feel “good” to my body, but if I have to move more quickly, I need far too many breaks and my legs get tired prematurely. Alternately, if I hike more slowly than my normal pace, my legs and breathing never settle into a sustainable rhythm, and both my endurance and motivation are much reduced.
In mountaineering, “slower and steady” wins the race—and that rule certainly applies to a hike up the Mt. Whitney Trail. As you ascend the mountain, keep reminding yourself that, regardless of your speed, having a slower, steady pace is preferable to moving in short, quick, bursts interrupted by breaks.
When hiking at high elevation, most people’s pace is determined by their lung capacity for the first part of the walk, and—if they are acclimatized—by their legs toward the end of a long walk. If you find yourself continuously out of breath and needing frequent stops, slow down until your breaths and steps are in a steady, sustainable rhythm. It is difficult to find a pace to overcome tired legs; most people resort to short spurts and quick breaks to compensate for sore muscles. To avoid reaching this state too early, stretch before starting your walk, let your legs warm up during the first mile, avoid too many long breaks on the way up, and keep eating food.
Observations and experience have taught me that most people start out too fast, even though it’s advisable to start off more slowly. When you begin your hike, you need to give your muscles a chance to warm up and should therefore go more slowly than your “normal” pace for the first half mile to mile. On this trail, I force myself to move at about 70 percent of my normal pace until I cross the North Fork of Lone Pine Creek, 0.9 mile from the trailhead. At that point, I speed up a little, but I keep reminding myself that my legs have a long climb ahead and I need to walk slightly more slowly than I would on a shorter hike.
It’s also advisable to slow down at high elevation. Between Trail Crest and the summit, much of which is fairly flat, people often attempt to hike along at a fast clip. With few exceptions, they stop every five (or fewer) minutes, exhausted and gasping for air. Meanwhile, slightly slower hikers walk by them during these breaks and inevitably reach the summit first. A good rule of thumb at high elevation is to keep slowing down until your lungs no longer determine your break schedule. This is, of course, an ideal that is difficult to reach, and even well-paced walkers will need to stop for 30-second quick breathers at the highest elevations.
Descending an elegant set of switchbacks below Bighorn Park
BREAKS
As you are ascending Mt. Whitney, you will likely take many different sorts of breaks: 30-second breaks to catch your breath, especially on the switchbacks and the last miles to the summit, five- to 10-minute breaks to eat some food or patch blisters, and a couple longer breaks for a more substantial snack or lunch. No matter how well you pace yourself, everyone will end up taking lots of half-minute breathers—and quick drink breaks—especially at the highest elevations. Taking all these types of breaks is necessary, as they allow your body to recharge itself (and allow you to enjoy a quick conversation with your companions)—but don’t dawdle beyond the suggested times, because you rapidly lose precious minutes.
You should plan on taking a five- to 10-minute break every one to two hours, making sure to eat snacks before your body feels low on energy. In addition, most groups will take one to two 20-minute breaks during the ascent and smart planners will schedule at least an hour for the summit. Be careful not to let short, half-minute breathers take up more than that; you don’t want your leg muscles to cool down, and you don’t want to lose the good walking rhythm you have established. Note that the suggested hiking times assume that in addition to quick breathers, you take a 10-minute break for each hour on the trail, such that for a nine-hour ascent, you can take 90 minutes of breaks. If you require additional breaks, your summit times will be greater.
If you are the fastest member of a group, it can be difficult to remember that the break begins, not ends, when the last person arrives. Make sure the stragglers also get five minutes to rest their legs and eat some food. If you are antsy to get going, volunteer to fill water bottles to take your attention off your watch.
What to Bring
One must balance safety, comfort, and weight when deciding what to bring on a hike. My basic rule is to carry sufficient gear to spend a night (albeit an unpleasant one) in the mountains. Most injuries occur late in the day, when you are tired and walking downhill. If your injury means you need assistance getting off the mountain, it will probably not arrive until the following morning. In other words, don’t plan on being saved right away by one of the 200 others who will be on the same trail. This is a tall mountain in a remote wilderness, and the number of others on the trail is meaningless if you are alone or off the trail at the time of a serious accident.
Second, always remember you are carrying extra clothes and a first-aid kit for an emergency that could occur on the summit, not just an incident halfway up or down. Temperatures will be much cooler and winds stronger near the summit. Therefore, even if it’s a warm and beautiful day, don’t be tempted to stash your emergency gear halfway up the trail. And also don’t get too upset with my recommendations when you descend from the summit having never worn more than shorts, a T-shirt, and maybe a windbreaker on the summit. I often wear none of the warm clothes I carry, but I never ascend to high elevation without them.
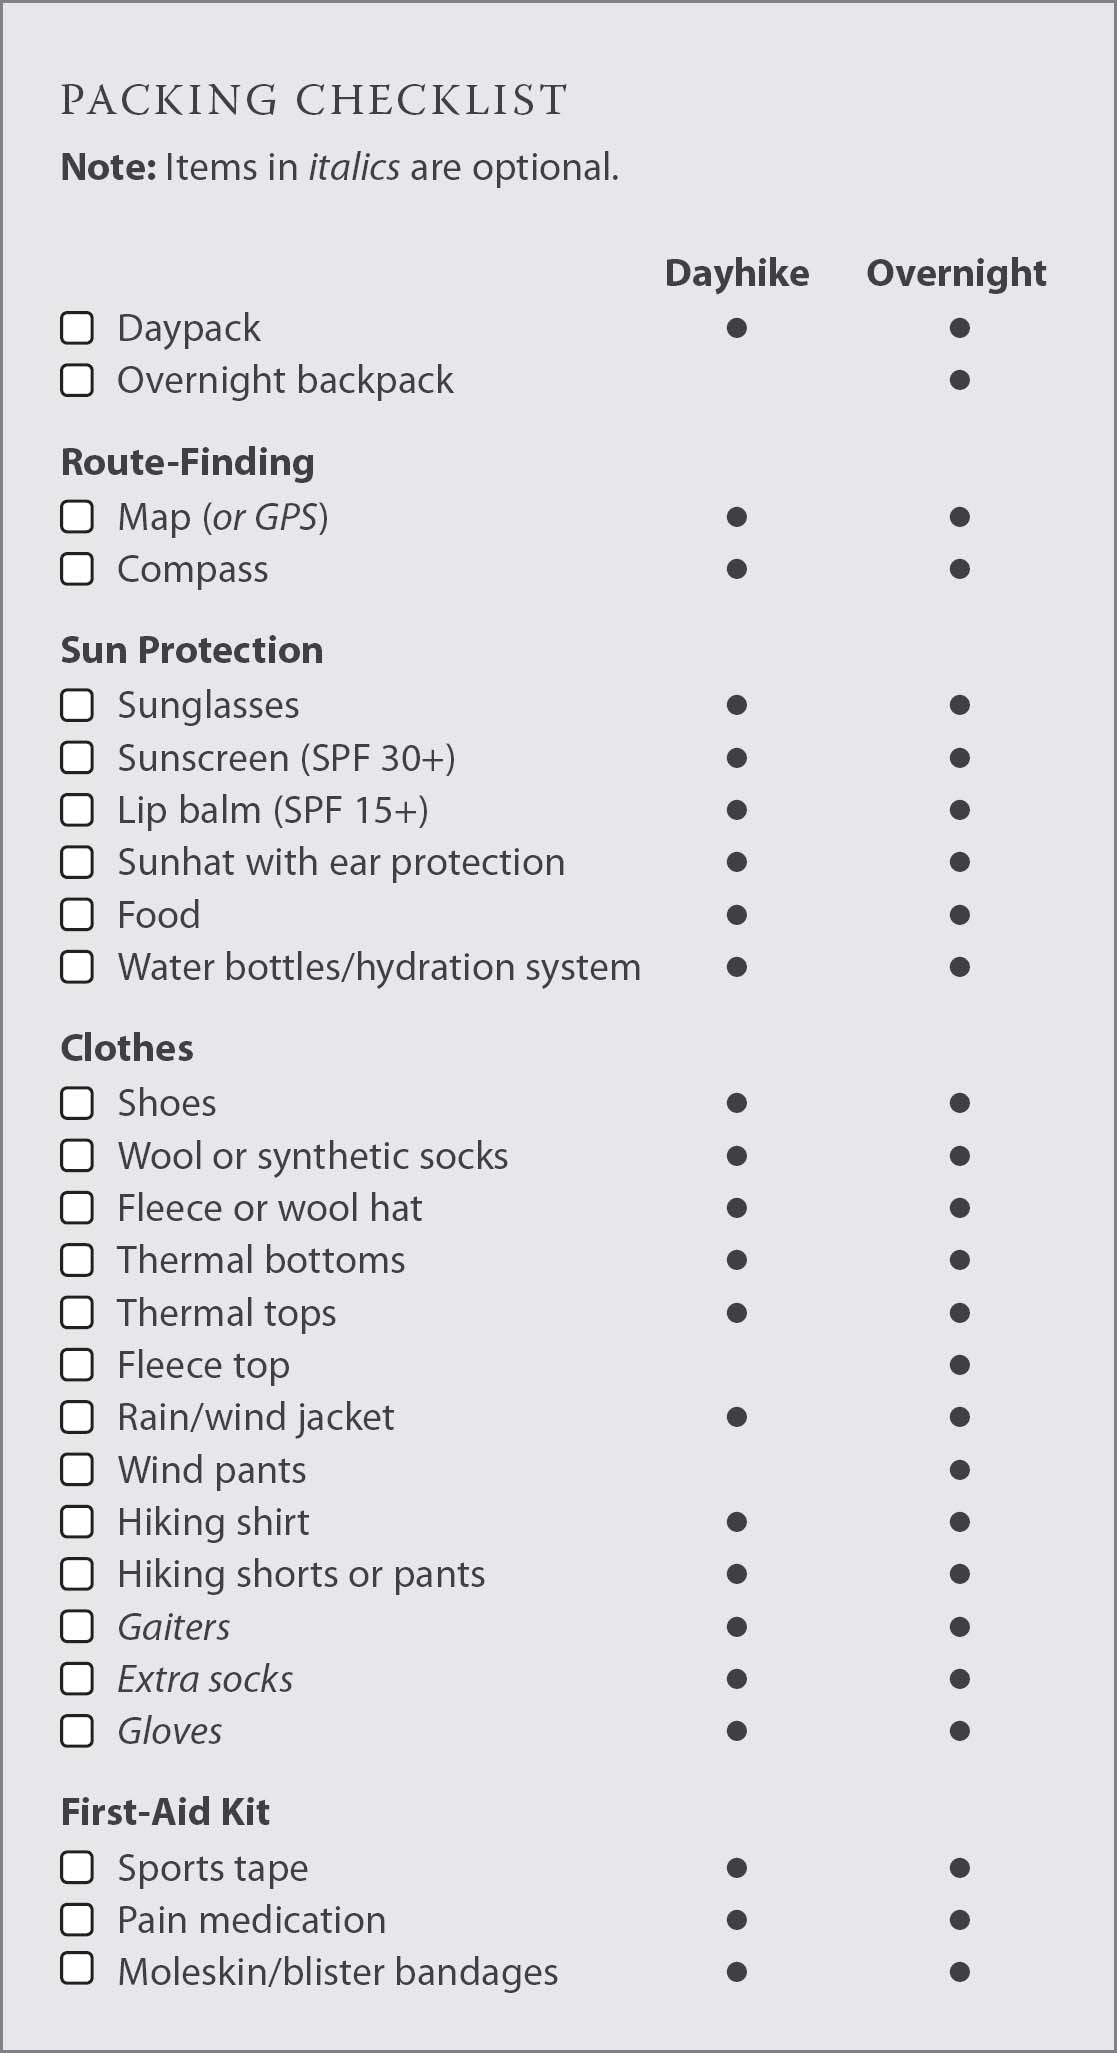
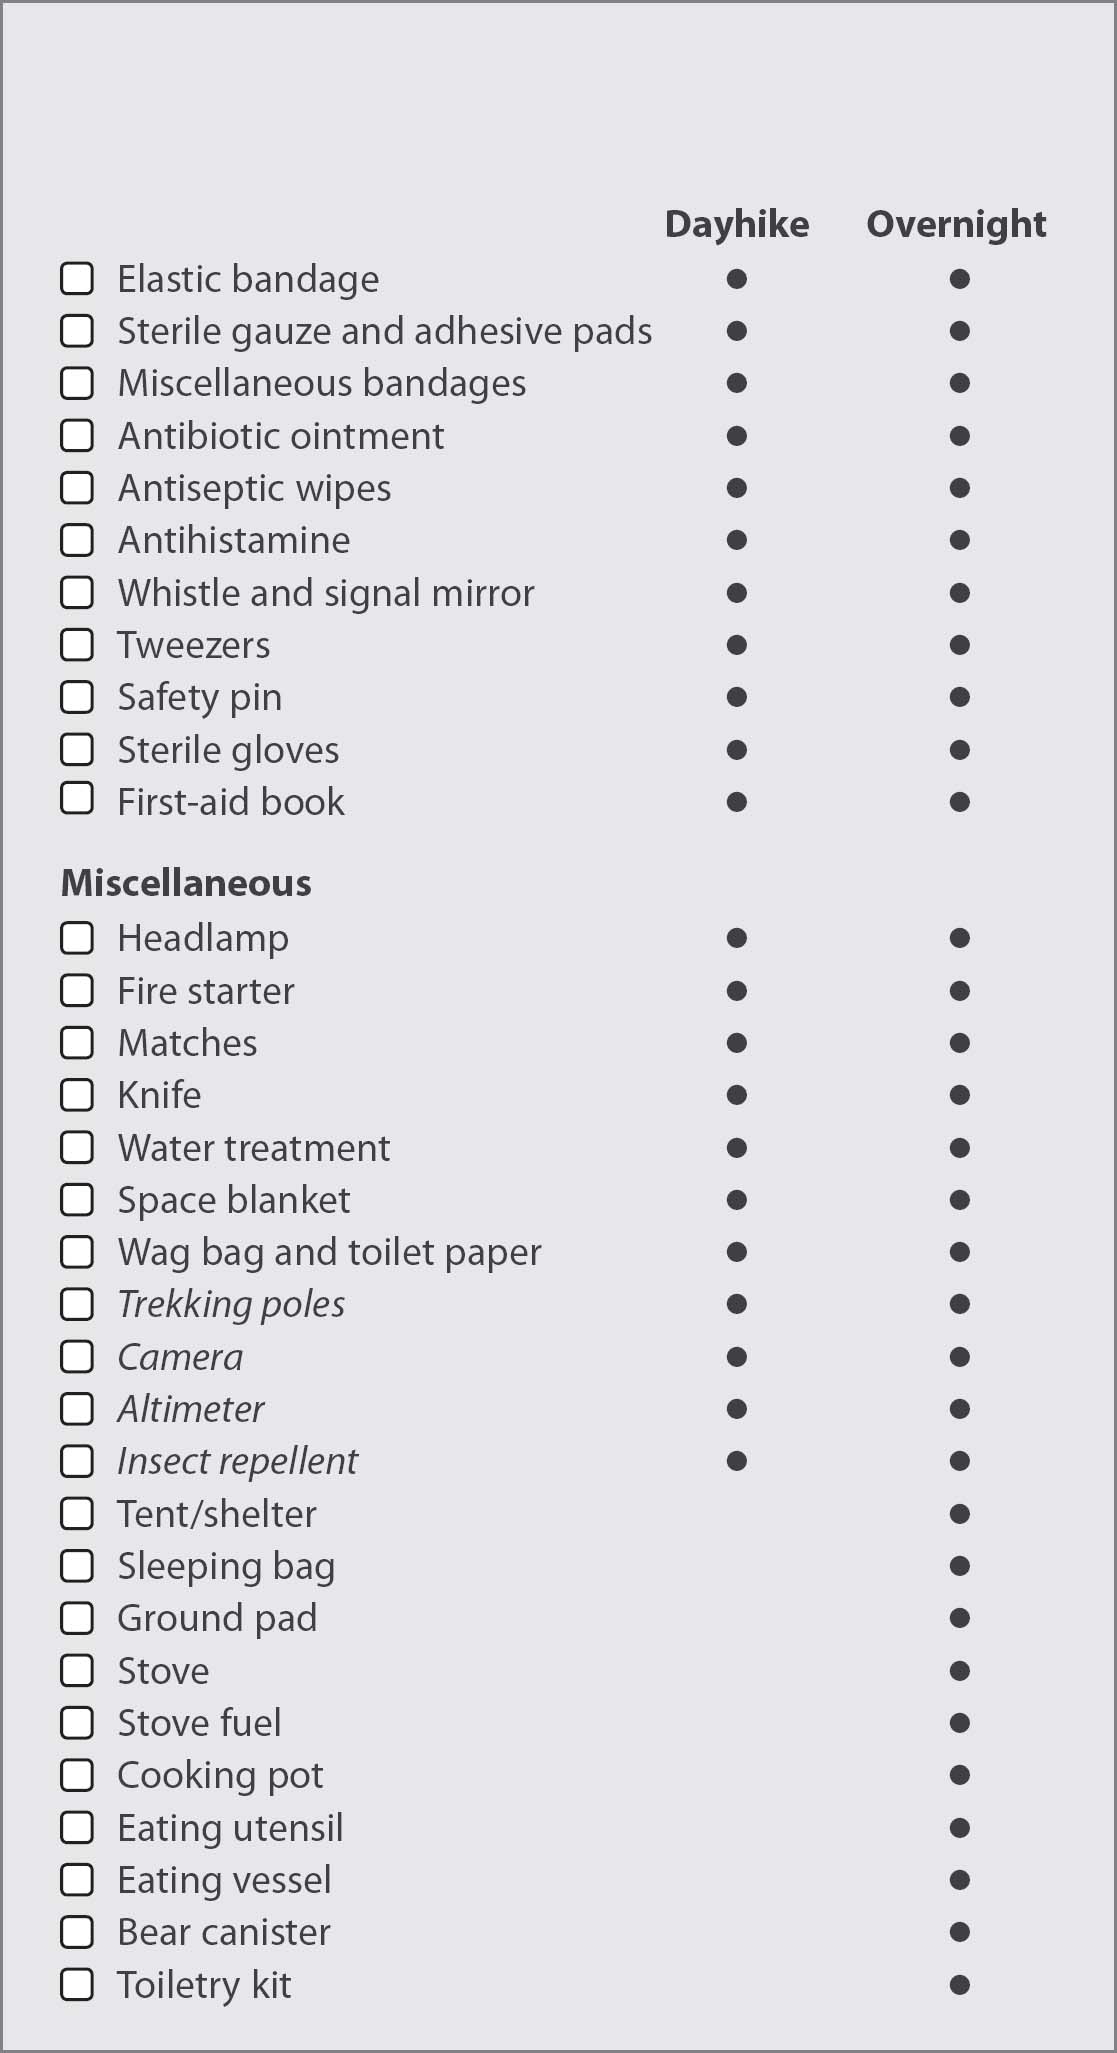
I have divided my recommendations on what to pack into four sections: footwear, the 10 essentials, additional gear for a dayhike, and additional gear for a backpacking trip. (Backpackers will need to read through all lists.) A checklist of the items in each of the lists.
FOOTWEAR
It is difficult to advise others on appropriate hiking footwear, as each person’s feet (and ankles and knees) have different needs. The only consensus among the people I’ve hiked with is to wear a pair of comfortable, well broken-in, but not worn-out shoes on a long hike. These shoes could be full leather hiking boots, lightweight cloth and leather hiking boots, trail runners, or lightweight running shoes.
Full disclosure: I’m biased toward heavy hiking boots, which provide the ankle and foot support that I require. In lighter shoes, I end up with very sore feet. I also appreciate being able to walk through creeks or snow without getting wet feet. The downside is that I often get blisters, but I successfully combat them with multiple layers of sports tape, applied before I start walking. Some years back, I stopped trying to convince friends that such boots were the best solution, because they kept coming back from trips—even off-trail, talus-hopping, rocky Sierra expeditions—complaining that they wished they had worn running shoes. They disliked having to pick up a heavy boot every step of the way, they got bad blisters, and they ended up with sore feet.
The moral is that making sure you have the right pair of shoes to wear to the summit of Mt. Whitney is as important as making sure you’re in shape for the hike. These should be shoes that you have worn on many practice hikes, so that you know their shortcomings (if any) and have a plan to combat problems likely to occur.
Here are a few footwear suggestions that should transcend the “lightweight” versus “lots of support” debate:
- Consider bringing more than one pair of footwear. Before my first hike up Mt. Whitney, a friend advised me to wear running shoes to Trail Camp and then switch into hiking boots for the upper portion of the trail. This meant I had to haul hiking boots up the first 6 miles. But the advantage was that I got to wear lightweight, shock-absorbent shoes for the lower, sandier stretches of trail, and hiking boots with good ankle support and a tough tread for the higher-elevation, rockier sections of trail.
- If you wear trail runners, don’t choose a pair with a tall, hiking bootlike “platform.” This elevates your foot above the ground and raises your foot’s center of gravity. Since you do not have any ankle support, this increases your chances of twisting an ankle, but it has no advantages.
- Don’t wear old running shoes with worn-out padding. You will take approximately 75,000 steps on this hike, which will make any foot sore in a worn-out shoe.
- Bring an extra pair of socks. If your feet start to feel beat up on the descent, switch to a clean pair of socks with not-yet-compressed padding to give your feet new life.
- Wear a pair of ankle-high gaiters to keep pebbles and sand out of your shoes. Keeping the inside of your shoes clean reduces the likelihood of blisters.
TEN ESSENTIALS
The oft-mentioned list of 10 essentials covers nearly everything you will need for a summer dayhike up the Mt. Whitney Trail. The official list is: map, compass, sunglasses and sunscreen, extra food and water, extra clothes, headlamp or flashlight, first-aid kit, fire starter, matches, and a knife. To elaborate:
| 1. | Map: Simply put, it is dangerous to be in the mountains without a map. Although you’re unlikely to get lost along the Mt. Whitney Trail, if you wander off the trail (as may happen in the dark) or mistakenly take the wrong trail junction (as do many people at the junction with the John Muir Trail, especially on the descent), you need to determine where you are and how to return to the trail. The Mt. Whitney map from Wilderness Press or Tom Harrison’s Mt. Whitney Zone map are excellent choices. (While a GPS unit can provide the same information, remember it runs on batteries might stop working if dropped.) |
| 2. | Compass: The only time you are likely to use a compass is if you become disoriented and need to orient your map, identify some basic landmarks, and thereby determine the direction to the trail or which direction to follow the trail. (Note that many GPS units do not include a compass.) |
| 3. | Sunglasses and sunscreen: Sunscreen and sunglasses (and a wide-brimmed hat) are a must in the Alpine Zone. If you don’t protect yourself from the sun, you could get more than a nasty burn. Repeated exposure can lead to skin cancer and cataracts. Your sunscreen and sunglasses should protect you against both UVA and UVB, your sunscreen should be at least SPF 30. To avoid chapped or split lips, I also suggest bringing lip balm that is at least SPF 15. Apply sunscreen at least twice during your long hike up Mt. Whitney. |
| 4. | Food: As discussed in the fuel section, you will burn thousands of calories on an ascent of Mt. Whitney, and it is unlikely you will consume as many calories as you will expend on your walk. Dayhikers should carry enough food to be able to eat a 200- to 500-calorie snack every two hours and a larger lunch on the summit. In addition, bring 50 percent extra food in case something goes wrong or you underestimated your appetite. (Even experienced hikers find their appetite is unpredictable from day to day, especially at high elevation). Bring a variety of different foods and foods you expect to find palatable when you are exhausted and at high altitude, where many people find it difficult to eat. |
| My snacks tend to consist of energy bars, granola bars, nuts, dried fruit, cookies, and jerky with a slightly larger snack I call “lunch” that includes bread and toppings that I reserve for the summit. Easily digestible foods, like Gu, provide your body with a rapidly accessible supply of energy and are also generally more appetizing when you are exhausted. I also recommend mixing electrolyte mix into at least some of your water. Full-strength Gatorade or Hydralyte (my favorite) are too strong for me. Sometimes, in a separate bottle I mix a liter at half strength and drink it slowly throughout the day. Likewise, it is a good idea to eat salty foods. |
HINT: Make sure you consume calories regularly, rather than pushing yourself after you begin to feel hungry; it can take your body a long time to regain its energy if you continue upward after you have depleted your muscle’s energy stores.
| 5. | Water:, staying hydrated is incredibly important in reducing the likelihood you will suffer from a headache, muscle cramps, or unnecessary fatigue. Hydration also lowers your susceptibility to altitude sickness. Also remember that your body needs you to balance water consumption with food intake—otherwise your electrolyte levels will decrease. |
| On this hike, 5 to 9 quarts of water a day should be adequate for most people. A rule of thumb among mountaineers is if your urine is a light yellow color, you are well-hydrated. This is very useful on an expedition up a remote, snow-covered mountain. Unfortunately, when you (especially if you are a woman) are trying to sneak behind a small boulder on the Mt. Whitney Trail and quickly pee into the gray gravel underfoot, you don’t necessarily get a good look at your urine. Instead, at each break, check your water supply and make sure it is disappearing at the rate of a quart every 2 to 3 miles. | |
| It is also important to pack a hydration system or water bottle that has a capacity of at least a gallon. For the first 6 miles, you will cross a stream every few miles, but there is no water from the spring a few hundred feet above Trail Camp to the summit. This means that for 8.8 miles of the hike, when you are at the highest elevations, you cannot refill your water bottles. Many people leave the summit with empty water bottles—a bad idea. I leave the final water source carrying one gallon of water. | |
| In addition to carrying enough water up the mountain, you actually need to drink it. During your training and acclimation hikes, determine a system that works for you. I highly recommend a bladder-and-tube hydration system like the CamelBak. I nearly doubled my water consumption when I switched to this system, because I drank a few sips every five minutes, whereas I’d previously procrastinated on taking out my water bottle until I was really thirsty—once every half hour at best. If it’s a cool day and you’re not inclined to drink much, you may want to set a watch alarm to beep every five or 10 minutes to remind yourself to take a few sips. | |
| Lastly, if you plan to treat or filter your water, pack the appropriate device. See for a description of options. |
HINT: Before you head up Mt. Whitney, determine a water-carrying and consuming method that works for you. For instance, a bladder-and-tube hydration system lets you drink as you are walking, letting you slowly and steadily consume water throughout your hike. Alternatively, carrying a water bottle lets you efficiently gulp large quantities of water, but you need to be disciplined to stop frequently to drink.
| 6. | Extra clothes: You should carry sufficient clothes to spend a night out on the trail—up to an elevation of 14,505 feet. If you get lost or injure yourself late in the day, a rescue is unlikely until morning. At minimum, bring thermal tops and bottoms, a fleece hat, and a waterproof, wind-resistant jacket. Adding a fleece top and a pair of polypropylene gloves will greatly increase your comfort if a problem occurs, yet weigh less than a pound. If you are hiking early or late in the season, when you may encounter snow, throw in an extra pair of socks, as you may end up with wet feet. (If you don’t own clothing made from fancy outdoor fabrics, it doesn’t mean you’ll be unsafe. Make sure you bring a warm, non-cotton top and a pair of non-cotton pants.) |
HINT: When walking downhill in the dark, I sometimes hold my headlamp at waist level, as I make more shadows that highlight irregularities in the trail when lighting the path at this angle.
| 7. | Headlamp or flashlight: Nearly everyone walks part of this trail in the dark and will therefore need a light source. A headlamp is preferable, since it lets you have both hands free. My favorites are light-emitting diode (LED) headlamps, which weigh only a few ounces and run on a triplet of AAA batteries for at least 50 hours—the light gets dimmer with time but never quite gives out. In addition, the dimmer, diffuse light from the LEDs is better for walking than the brighter, more directed light from incandescent bulbs: Your pupils remain sufficiently dilated to see the edge of the trail, and irregularities in the trail surface stand out better. Indeed, I prefer half-used batteries for night walks. |
| 8. | First-aid kit: Your first-aid kit will most likely be used to prevent and treat blisters, limit an altitude-induced headache, and dull the pain from sore knees. If you sustain a serious injury, it also needs to keep you comfortable and medically stabilized, in case you need to wait to be evacuated. |
A basic first-aid kit for a dayhike or short backpacking trip should contain:
- Sports tape: This essential first-aid component can be used to prevent or treat blisters, to tape anything in place, and to provide compression. An ideal anti-blister tape stays in place for many days, but isn’t too thick. I am very fond of simple, thin, cheap sports tape. If I use long pieces, it stays put and doesn’t add bulk to my feet. However, many people complain that cheap sports tape rubs off very easily, especially if you have sweaty feet. Some recommend using duct tape, which I dislike, because duct tape makes a permanent sticky mess of socks. Other suggestions for thicker, very sticky tapes include Leukoplast (only available in Europe/Australia/New Zealand, but adored by all hikers from those regions).
- Anti-inflammatory pain medication: For mild pain relief and to relieve swelling following an injury, ibuprofen, aspirin, and naproxen are all available over the counter. Acetaminophen is not an anti-inflammatory drug, but it is a very effective painkiller. Of these, ibuprofen and acetaminophen are easier on your stomach. If you take any of these, make sure you are well hydrated (to avoid kidney damage) and follow the indications on the product or the advice of your physician.
- Moleskin, blister bandages, or pads: Examples of blister bandages include Spenco 2nd Skin Blister Pads and Band-Aid Blister Block Cushions. Blister pads are expensive but highly recommended by people with persistent blister problems: They are gel pads that keep out dirt and germs, while providing cushioning, so your blister won’t bother you for the rest of your hike.
- Elastic bandage: With an elastic bandage, you may be able to make slow progress down the trail with a strained or sprained ankle or knee. You can also use sports tape for this purpose.
- Sterile gauze or adhesive pads: These are handy to halt bleeding of a wound. There are many inexpensive brands of adhesive pads to cover wounds. The more expensive Tegaderm adhesive pads are permeable to water, vapor, and oxygen, but they provide a barrier to microorganisms, making them ideal if you can’t reach a doctor within a few hours. Sanitary pads can also be used for this purpose, although they won’t breathe.
- Bandages: Carry a variety of sizes, including butterfly closures. Band-Aids are great for any small cuts, while Steri-Strips can effectively close a larger wound to reduce bleeding.
- Antibiotic ointment: Apply antibiotic ointment (triple-action formulas are best) to a wound before dressing it.
- Antiseptic wipes: Use these to clean a wound before applying dressing.
- Antihistamine: Carry an over-the-counter antihistamine in case you have an allergic reaction or allergies. If you are severely allergic to something, you may need to carry something prescription strength, like an EpiPen.
- Whistle and signal mirror: Use these to attract attention to yourself if you are alone when injured.
- Tweezers: Use these to remove splinters.
- Safety pin: These are useful for fashioning clothing into slings or large bandages. Large, sturdy ones are handy for small repairs, from broken zippers to backpack straps. Zip ties also work well for fixing broken backpacks.
- Sterile, non-latex gloves: Wear these if you are treating an open wound on another person.
- Small first-aid book: Pamphlet-sized books are available at most outdoor stores.
Other items you may choose to carry in your first-aid kit include:
- Wire splint
- Chemical hand-warmer packets
- Prescription pain medication
- Anti-diarrhea drug, such as loperamide
- Knee brace
| 9. | Fire starter and matches: These are important safety items to carry, always living in my backpack. Along the Mt. Whitney Trail, they should be used only in an emergency, and then only to create a smoke signal to help rescuers pinpoint your location. It is against the Forest Service regulations to build a fire along the entire length of the Mt. Whitney Trail. Moreover, above Mirror Lake, there is little to nothing to burn—and tugging away at the very slow-growing shrubs and trees would do enormous environmental damage. Be sure to carry sufficient clothing to survive a night at any elevation along the trail. |
| 10. | Knife: A small pocket knife, especially one with a pair of scissors, is important for cutting first-aid supplies—and probably for preparing your lunch. |
DAYHIKE GEAR
In addition to the 10 essentials, dayhikers should carry the following:
- Daypack: Any small backpack will work. Some daypacks that are covered with gadgets and many small pockets can weigh 4 or more pounds, but they aren’t necessary for this hike. Pick a simple one. Some people prefer a hip pack, but make sure you bring one that can accommodate a gallon of water.
- Water-treatment method: See for options.
- Space blanket: A space blanket costs less than $5, weighs about 3 ounces, and can help you retain body heat. Bring one to reduce the possibility of hypothermia if you spend an unplanned night on the mountain. I consider this as important as the 10 essentials.
- Wag Bag: You will receive one of these human-waste disposal kits free when you pick up your wilderness permit. Although they include a small amount of toilet paper, you may want to bring additional supplies. See for more information.
Optional items include:
- Trekking poles: Increasing numbers of hikers carry trekking poles. Their many advantages include taking weight off your knees, transferring some of the “work” to your arms, and providing extra balance, thereby minimizing your risk of falling.
- Camera: A camera is hardly optional for most people setting out for Mt. Whitney, but it’s not required for your safety.
- Altimeter: You might find that the climb passes more quickly (or more slowly!) if you can watch yourself making continual progress.
- Insect repellent: During June and early July, the section of the trail between Lone Pine Lake and Mirror Lake may be home to swarming mosquitoes. If you march steadily through this area without any breaks, they shouldn’t be too bothersome.
OVERNIGHT GEAR
In addition to the 10 essentials and the dayhike gear, backpackers should carry the items in this section. I provide few details on the different sorts of backpacks, tents, sleeping bags, and stoves—many books are written on these subjects and much information is available on the web and at outdoor stores if you are planning to buy new gear for this excursion.

One last glance to the Whitney crest before descending past Trail Camp
- Overnight backpack: Either an internal or external frame backpack works well.
- Additional clothes: In addition to the clothes in the 10 essentials list, make sure you have a warm fleece jacket and a pair of wind pants. During June or September, you might choose to bring a down vest or jacket to make your evening at 12,000 feet more pleasant.
- Sleeping bag: In summer, if you are a warm sleeper, a 30°F to 35°F bag should suffice, while cooler sleepers will prefer a 20°F bag.
- Ground pad: Either a closed-cell foam pad or an inflatable mattress works well. To save weight, I carry a short pad and place clothes and my empty backpack under my feet.
- Tent, tarp, or bivy sack: If the weather forecast is for clear skies, a tent isn’t necessary—although it is a good windbreak and provides extra warmth. Also note that mosquitoes are not much of a problem at Trail Camp, but might be pesky at Outpost Camp. Despite what many detractors say, it is perfectly feasible to pitch a non-free-standing tent in the Sierra, even on slabs or shallow soil; you just have to be creative with string and rocks.
- Stove and fuel: Most choices will work, but note that fuel canisters do not work as well as white gas stoves at high elevation or in the cold.
- Pot: Any lightweight camping pot works well. One 2-liter pot works well for groups of one to three, while larger groups might choose to carry a second pot.
- Bear canister: Bear-resistant food canisters are required along the Mt. Whitney Trail. The Sierra Interagency Black Bear Group website (www.sierrawildbear.gov/foodstorage/approvedcontainers.htm) lists the bear canisters approved for use in the Sierra Nevada. Of these, the Garcia canisters are the most widely available and can be rented from any Inyo National Forest ranger station, usually for $5 per trip (no reservations necessary). I use the lighter-weight Bearikade canister that can be bought or rented only from the manufacturer, Wild Ideas (805-693-0550 or www.wild-ideas.net/index2.html).
- Additional food: In addition to lunch and snacks, be sure to carry hearty breakfasts and dinners. I always start my dinner with a cup of instant soup. My body needs the salt and enjoys the warm liquid.
- Eating utensils and eating container
- A simple toiletry kit: This should include a toothbrush and toothpaste, personal medications, extra toilet paper, and tampons or sanitary pads, if applicable. Keep it simple, since toiletries need to be stored in your bear canister at night.
Getting There
The small town of Lone Pine is located at the eastern base of the Sierra, 13 linear miles east of the summit of Mt. Whitney. If you’re coming from out of town to hike Mt. Whitney, Lone Pine or one of the campgrounds near the trailhead, Whitney Portal, will be your base. Lone Pine is located along Hwy. 395 in the Owens Valley in southeastern California; by car, it is approximately four hours north of Los Angeles, seven hours southeast of San Francisco, and five hours south of Reno, Nevada.
The following directions are written from the major airports. Please consult a map for additional information.
From Los Angeles International Airport in western Los Angeles: As you exit the airport, head east on Interstate 105. After 1.5 miles, exit and drive north on Interstate 405, toward Santa Monica. Continue for 29 miles to the junction between Interstate 5 and Hwy. 14. Drive north on Hwy. 14 for 118 miles to the Hwy. 395 junction near Ridgecrest. Continue north on Hwy. 395 for 65 miles to Lone Pine. Total distance: 214 miles.
From Ontario International Airport in eastern Los Angeles: Exit the airport onto Interstate 10, and head east, toward San Bernardino. After 2.5 miles, drive on Interstate 15, and continue for 30 miles to the Hwy. 395 junction. Take Hwy. 395 north for 164 miles to Lone Pine. Total distance: 197 miles.
From San Diego International Airport: From the airport, head south on Interstate 5, but turn north onto Hwy. 163 after 0.5 mile. After 10.5 miles, merge north onto Interstate 15 and continue north for 127 miles. Shortly before Hesperia, turn north on Hwy. 395 and follow it 164 miles to Lone Pine. Total distance: 302 miles.
From the San Francisco International Airport: Head south on Hwy. 101 for 7 miles and then turn east onto Hwy. 92, toward Hayward. After 14 miles, you reach Interstate 880 and head north for 3.5 miles. Now turn onto Interstate 238 south, which you follow for 3 miles until it merges with Interstate 580. Head east on Interstate 580, continuing for 29 miles, until you are east of Altamont Pass at the junction between Interstate 580 and Hwy. 205.
You then have the choice of heading north, via Yosemite National Park, or heading south down the Central Valley. Both routes require a similar amount of time from this junction.
If you head north, take Hwy. 205 for 13.5 miles to Interstate 5. Drive north on Interstate 5 for 2 miles, and then turn east onto Hwy. 120. After 6 miles, turn north onto Hwy. 99. Continue for 2 miles, and then continue east on Hwy. 120. Follow Hwy. 120 through Oakdale, the Sierra foothills, and through Yosemite National Park to Lee Vining, a distance of 155 miles. From Lee Vining (east of Yosemite), drive south on Hwy. 395 for 121 miles. The only words of warning: Hwy. 120 through Yosemite National Park is usually closed from late October until at least Memorial Day weekend, and you’ll have to pay the National Park Service entrance fee to drive through Yosemite. Total distance: 357 miles.
If you choose to head south, continue an additional 17 miles on Interstate 580 to Interstate 5, follow Interstate 5 south for 167 miles, and then turn east onto Hwy. 46 and follow it for 25 miles to Hwy. 99. Head south on Hwy. 99 for 20 miles, taking you to Bakersfield. In Bakersfield, turn east onto Hwy. 58, and follow it for 58 miles across Tehachapi Pass to the Hwy. 14 junction. Head north on Hwy. 14 for 44 miles, and then merge with Hwy. 395, heading north for an additional 65 miles to Lone Pine. Total distance: 455 miles.
From Reno-Tahoe International Airport: Drive south on Hwy. 395 for 257 miles.
Once you reach Lone Pine, here are directions for getting to Whitney Portal: The Mt. Whitney Trail trailhead lies 13 miles west of Lone Pine (Hwy. 395 doubles as Lone Pine’s Main Street). Turn west at the only stoplight in town onto Whitney Portal Road. The road winds through the Alabama Hills and eventually climbs steeply up to Whitney Portal. (See for a map of Whitney Portal.)
Lone Pine and Whitney Portal
Beginning around 1863, people began to inhabit Lone Pine to provide supplies for the nearby mining towns; by the 1920s, Lone Pine became a hub for the film industry, especially for westerns. Since then, 300 films have been shot in the surrounding Alabama Hills. The declining popularity of westerns in the 1950s brought fewer film crews to Lone Pine, but even today, commercials and films are regularly shot in Owens Valley (where Lone Pine is located)—the desert foreground flanked by steep mountains is an undeniably dramatic setting. (To learn more about Lone Pine’s movie history, visit the Lone Pine Film Museum; see for details.)
Whitney Portal, the trailhead for Mt. Whitney, was established following the construction of the Whitney Portal Road between 1933 and 1935. The private cabins near the Whitney Portal campground were erected beginning in 1934, and the Whitney Portal Store was built in 1935. The store, a mainstay of the Whitney experience that serves food off the grill and hosts a fantastic web message board (www.whitneyportalstore.com), has been run by its current owners, Doug and Earlene Thompson, since 1987. It is also packed with last-minute essentials you need for your hike, including snacks, ponchos, and maps. Many people doing the Mt. Whitney Trail as a three-day trip plan to return to Whitney Portal before 11 AM to get a plate of pancake. (Yes, that’s “pancake,” not “pancakes.” It is so large, they’ll give you your money back if you can finish it.) Also, grab a copy of the Thompson’s book, Mount Whitney: Mountain Lore from the Whitney Store (Westwind Publishing Company, 2003) for more stories and tidbits about Whitney’s history.
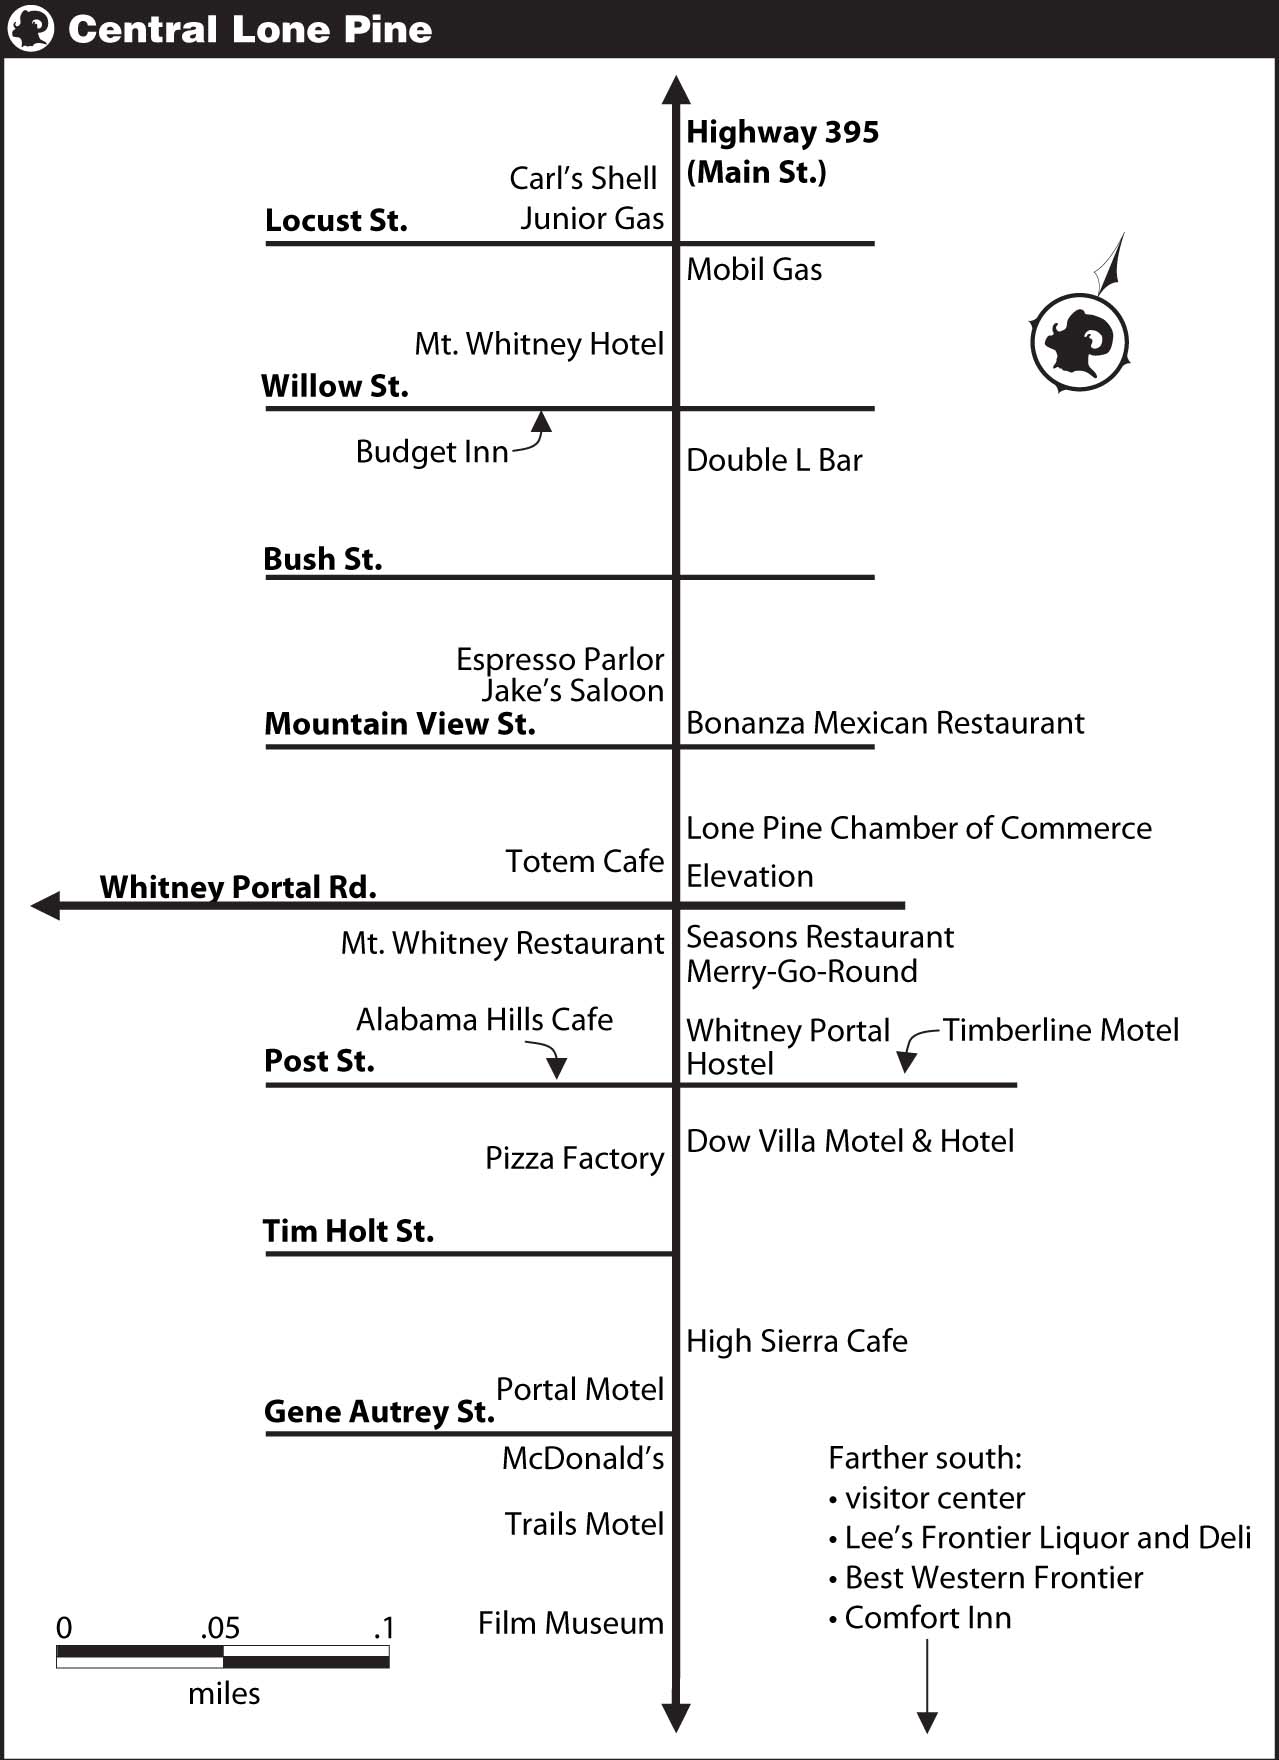
Lodging and Camping
Due to the popularity of the Owens Valley and Whitney region of the Sierra Nevada as tourist destinations, there are many nearby lodging and camping choices. Most of the independently owned motels in Lone Pine have similar prices. The newly opened and economical Whitney Portal Hostel is run by the Thompsons, the Whitney Portal Store owners. At the hostel are five public showers ($5) open 24 hours a day. Campgrounds exist on both public land and on land owned by the Los Angeles Department of Water and Power. Staying at the higher-elevation campgrounds is recommended during the summer: Temperatures are more pleasant, and camping up high will help your body acclimate. For additional information about lodging in Lone Pine, visit the Lone Pine Chamber of Commerce website at www.lonepinechamber.org.
LONE PINE HOTELS AND MOTELS
Best Western Frontier
1008 S. Main Street
760-876-5571 or 1-800-528-1234
Budget Inn & Hotel
138 W. Willow Street
760-876-5655 or 1-877-283-4381
Comfort Inn
1920 S. Main Street
760-876-8700 or 1-800-800-6468
Dow Villa Motel & Hotel
310 S. Main Street
760-876-5521 or 1-800-824-9317
Mt. Whitney Motel
305 N. Main Street
760-876-4207 or 1-800-845-2362
Portal Motel
425 S. Main Street
760-876-5930 or 1-800-531-7054
Timberline Motel
215 E. Post Street
760-876-4555 or 1-800-862-7020
Trails Motel
633 S. Main Street
760-876-5555
Whitney Portal Hostel
238 S. Main Street
760-876-0030
RV FACILITIES
Boulder Creek RV Resort
2550 S. Main Street (Hwy. 395, 4 miles south of Lone Pine)
760-876-4243 or 1-800-648-8965
CAMPING
Note: None of these camping options offer RV hookups.
Inyo National Forest: For campgrounds in this section that accept reservations, you can reserve online at www.fs.fed.us/r5/inyo/recreation/campgrounds.shtml.
Whitney Trailhead
Located adjacent to the Whitney Portal parking area, this campground has 10 first-come, first-served walk-in sites. One night stay only. Price: $8 per site. Amenities: water, pit toilets.
Whitney Portal and Whitney Portal Group
Located 1 mile east of Whitney Portal, at the Meysan Lakes Trailhead on the Whitney Portal Road, this campsite has 43 sites and three group sites, all of which are available by reservation. Camping at Whitney Portal the night before your hike will help your body acclimate, so this is a good spot to choose if you plan to dayhike the mountain. Price: $16 per traditional campsite and $45 per group site. Amenities: water, flush toilets.
Lone Pine and Lone Pine Group
Located off Whitney Portal Road: From Lone Pine, drive 6.5 miles west on the Whitney Portal Road and look for the campground on the south side of the road. There are 43 campsites and one group site here, all of which are available by reservation. Price: $14 per traditional site and $45 per group site. Amenities: water, pit toilets.
Bureau of Land Management:
Tuttle Creek
Located off Horseshoe Meadows Road: From Lone Pine, drive 3.5 miles west on the Whitney Portal Road, and turn left (south) to drive 1.5 miles on the Horseshoe Meadows Road. From there, follow signs to the campground. Tuttle Creek has 85 first-come, first-served campsites. Price: $5 per site. Amenities: pit toilets, but no potable water.
Los Angeles Department of Water and Power:
Portagee Joe
Located off Whitney Portal Road: From Lone Pine, drive less than 1 mile west on the Whitney Portal Road, and turn left (south) to drive 0.1 mile on Tuttle Creek Road. This campground has 15 sites, which you can reserve by calling 760-873-5577. Price: $10 per site. Amenities: water, pit toilets.
Diaz Lake County Park
Located on the west side of Hwy. 395, 2 miles south of Lone Pine, this campground has 200 sites, which you can reserve by calling 760-876-5656. Price: $14 per site. Amenities: water, flush toilets.
Restaurants
Lone Pine has plenty of restaurants to choose between, from fast food to pricier, but very tasty steak houses. A selection of menu items are provided. Note that only summer hours are listed.
Whitney Portal Store
Located at Whitney Portal
760-876-0030
Hours: June and September, 8 AM to 8 PM; July and August, 7 AM to 9 PM. Menu: breakfast, burgers, sandwiches, and more off the grill
Alabama Hills Cafe and Bakery
111 W. Post Street
760-876-4675
Hours: Wednesday through Monday, 5:30 AM to 2 PM; closed Tuesday. Menu: freshly baked bread, breakfast, burgers, sandwiches, pasta, and steak
Bonanza Mexican Restaurant
104 N. Main Street
760-876-4768
Hours: Saturday through Sunday, 8 AM to 8 PM; Monday through Friday, 11 AM to 8 PM. Menu: full selection of Mexican food
Carl’s Junior
403 N. Main Street
760-876-1035
Hours: Friday, 6:30 AM to 11 PM; Saturday through Thursday, 6:30 AM to 10 PM. Menu: burgers and other fast food
Espresso Parlor
123 N. Main Street
760-876-9110
Hours: Daily, 6 AM to 7 PM. Menu: coffee, espresso drinks, and smoothies
High Sierra Cafe
446 S. Main Street
760-876-5796
Hours: 24 hours a day. Menu: Full selection of classic diner food, including breakfast, sandwiches, and dinner; the only option for a 3 AM breakfast out before hitting the trail
Lee’s Frontier Liquor and Deli
1900 S. Main Street (next to the Chevron)
760-876-5844
Hours: Daily, 4 AM to 8 PM. Menu: deli sandwiches, soup, and fried chicken
McDonald’s
601 S. Main Street
760-876-4355 or 760-876-4366
Hours: Daily, 5 AM to 9 PM. Menu: burgers and other fast food
Merry-Go-Round
212 S. Main Street
760-876-4115
Hours: Daily, 5 PM to 10 PM. Menu: steaks and seafood
Mt. Whitney Restaurant
227 S. Main Street
760-876-5751
Hours: Daily, 6:30 AM to 9 PM. Menu: Breakfast, lunch, and dinner; specializes in a diverse selection of burgers, including venison, buffalo, and ostrich
Pizza Factory
301 S. Main Street
760-876-4707
Hours: Friday and Saturday, 11 AM to 10 PM; Sunday through Thursday, 11 AM to 9 PM. Menu: Pizza and salad
Seasons Restaurant
206 S. Main Street
760-876-8927
Hours: Daily, 5 PM to 10 PM. Menu: steak and seafood
Totem Cafe
131 S. Main Street
760-876-1120
Hours: Daily, 7 AM to 9 PM. Menu: breakfast, sandwiches, burgers, steak, and seafood
Outdoor Equipment Shops
Elevation, Sierra Adventure Essentials
125 N. Main Street
760-876-4560
Note: This is Lone Pine’s only well-outfitted mountaineering shop, with equipment rentals available, even after hours (the owner’s number is on the store door).
Gardner’s Home and Sporting Center
(True Value Hardware)
104 S. Main Street
760-876-4208
High Sierra Outfitters
130 S. Main Street
760-876-9994
Lone Pine Sporting Goods
220 S. Main Street
760-876-5365
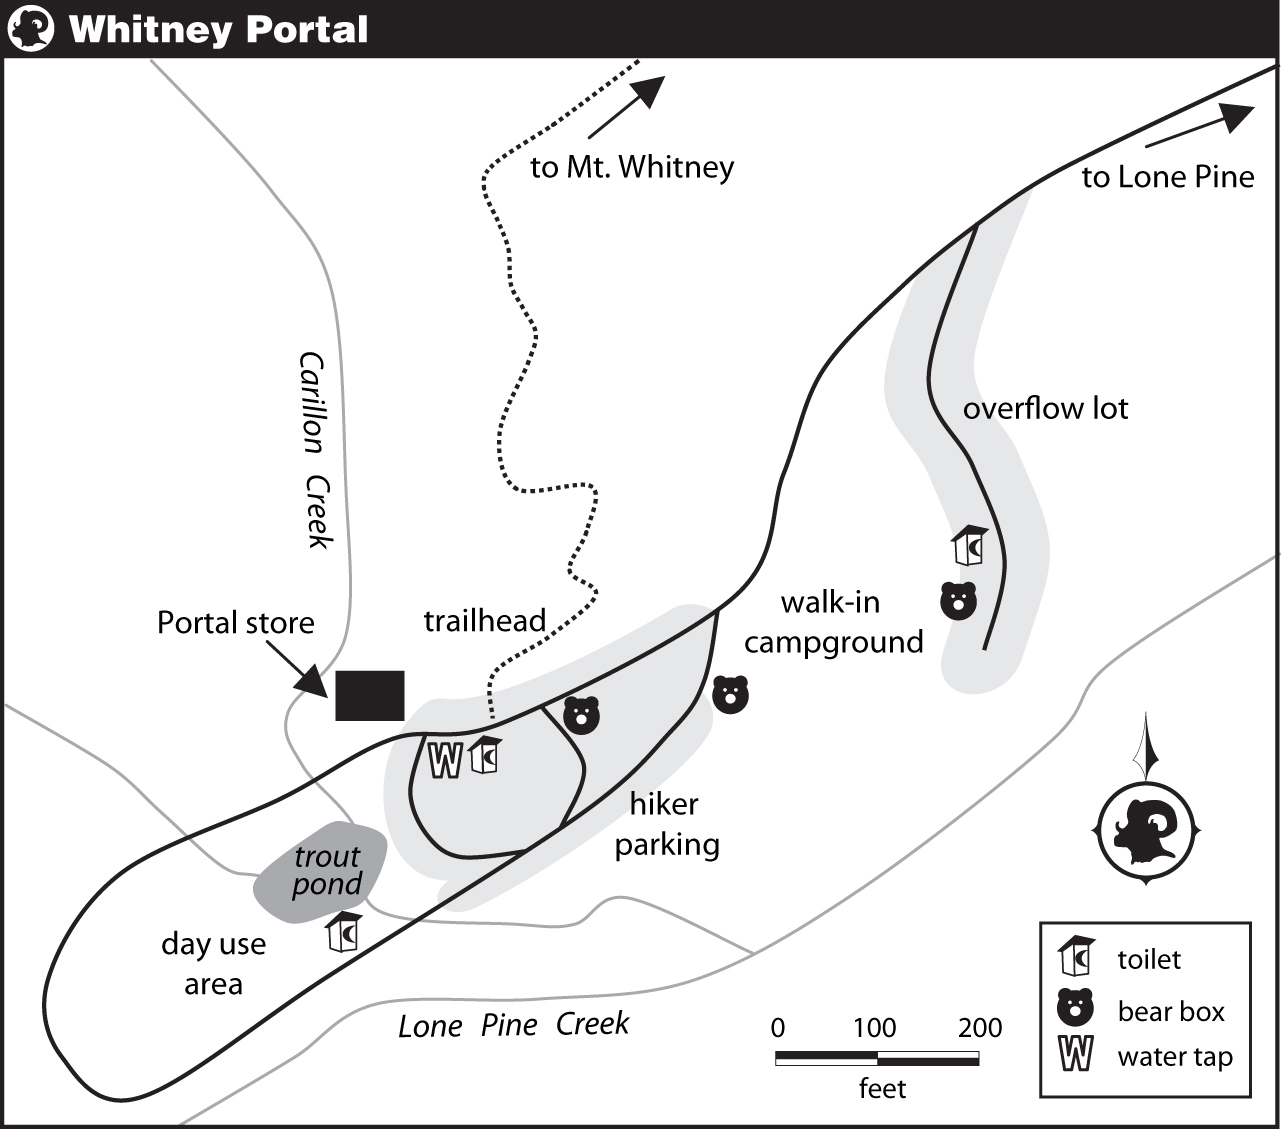
The layout of Whitney Portal is really quite straightforward—when it is light out. As you’re trying to get organized to start hiking at 2 am, it helps to know in advance where to find bear boxes, the water tap, toilets, and the trailhead.
