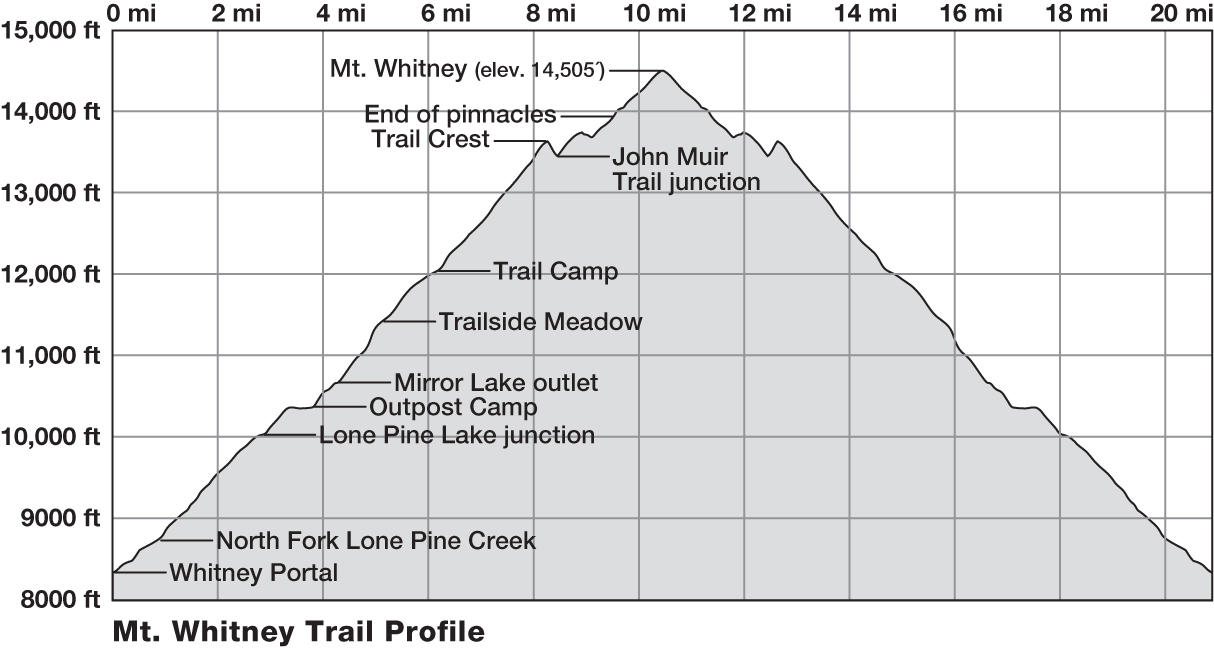
4
4
Hiking Mt. Whitney
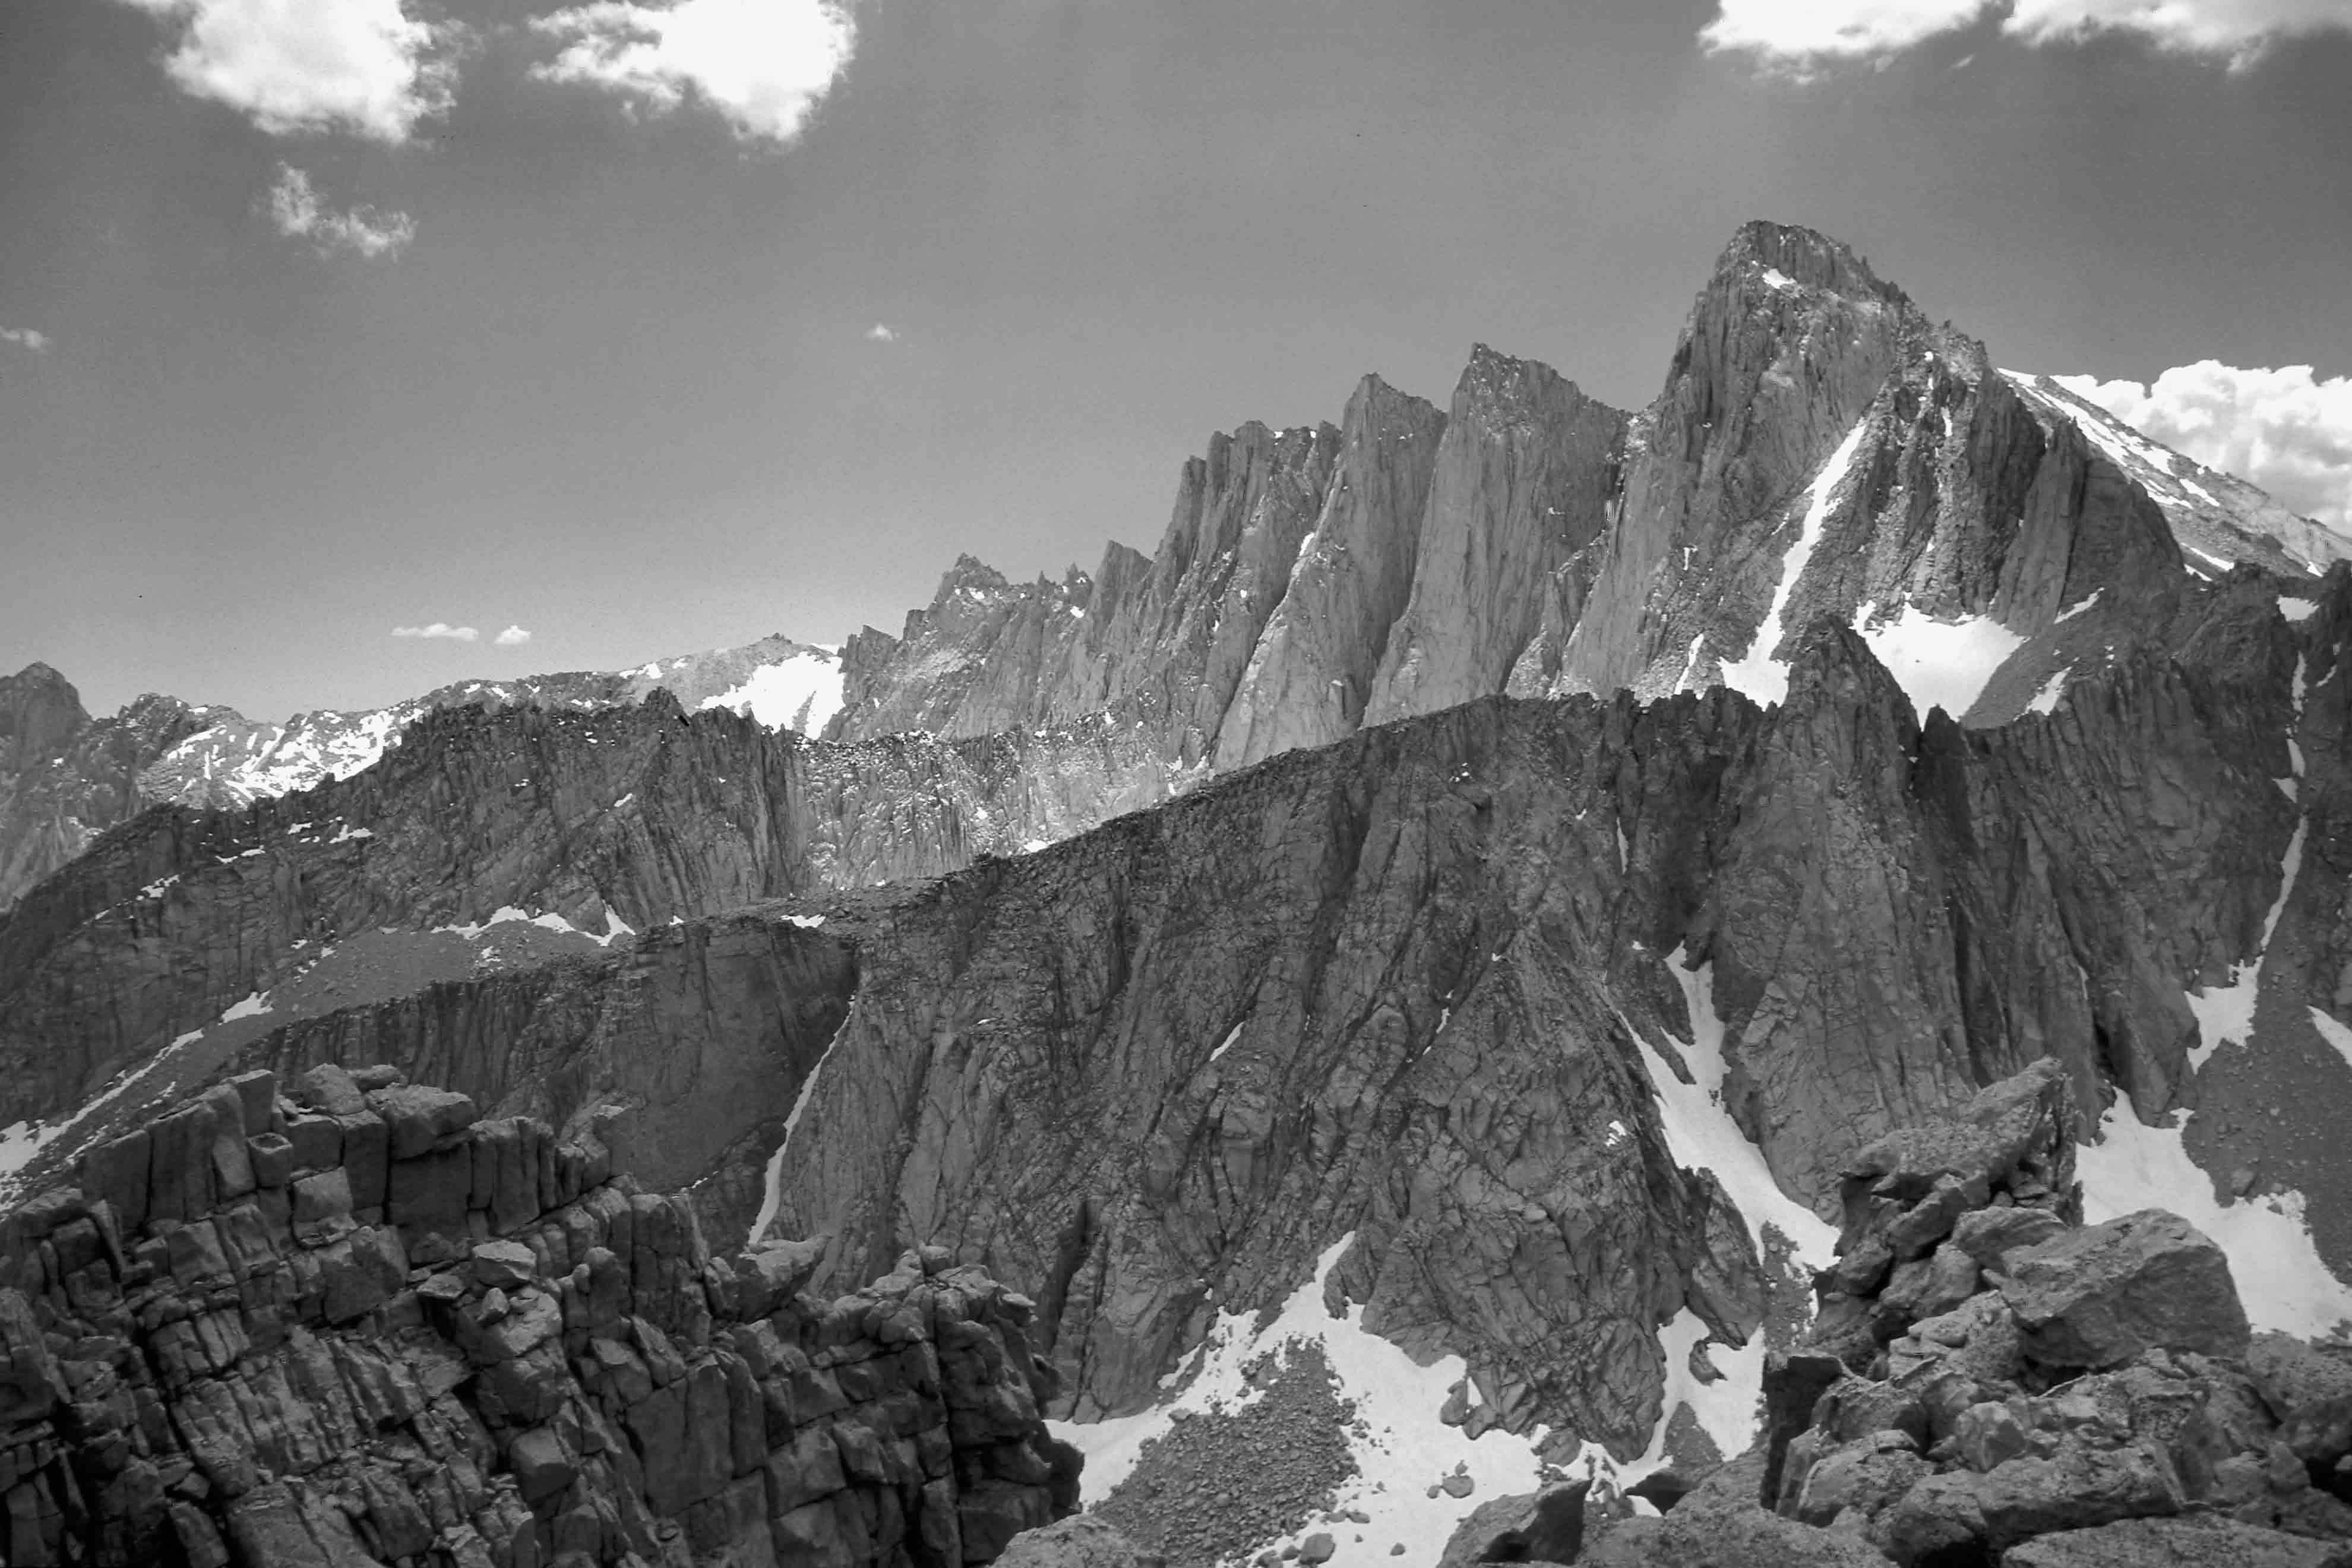
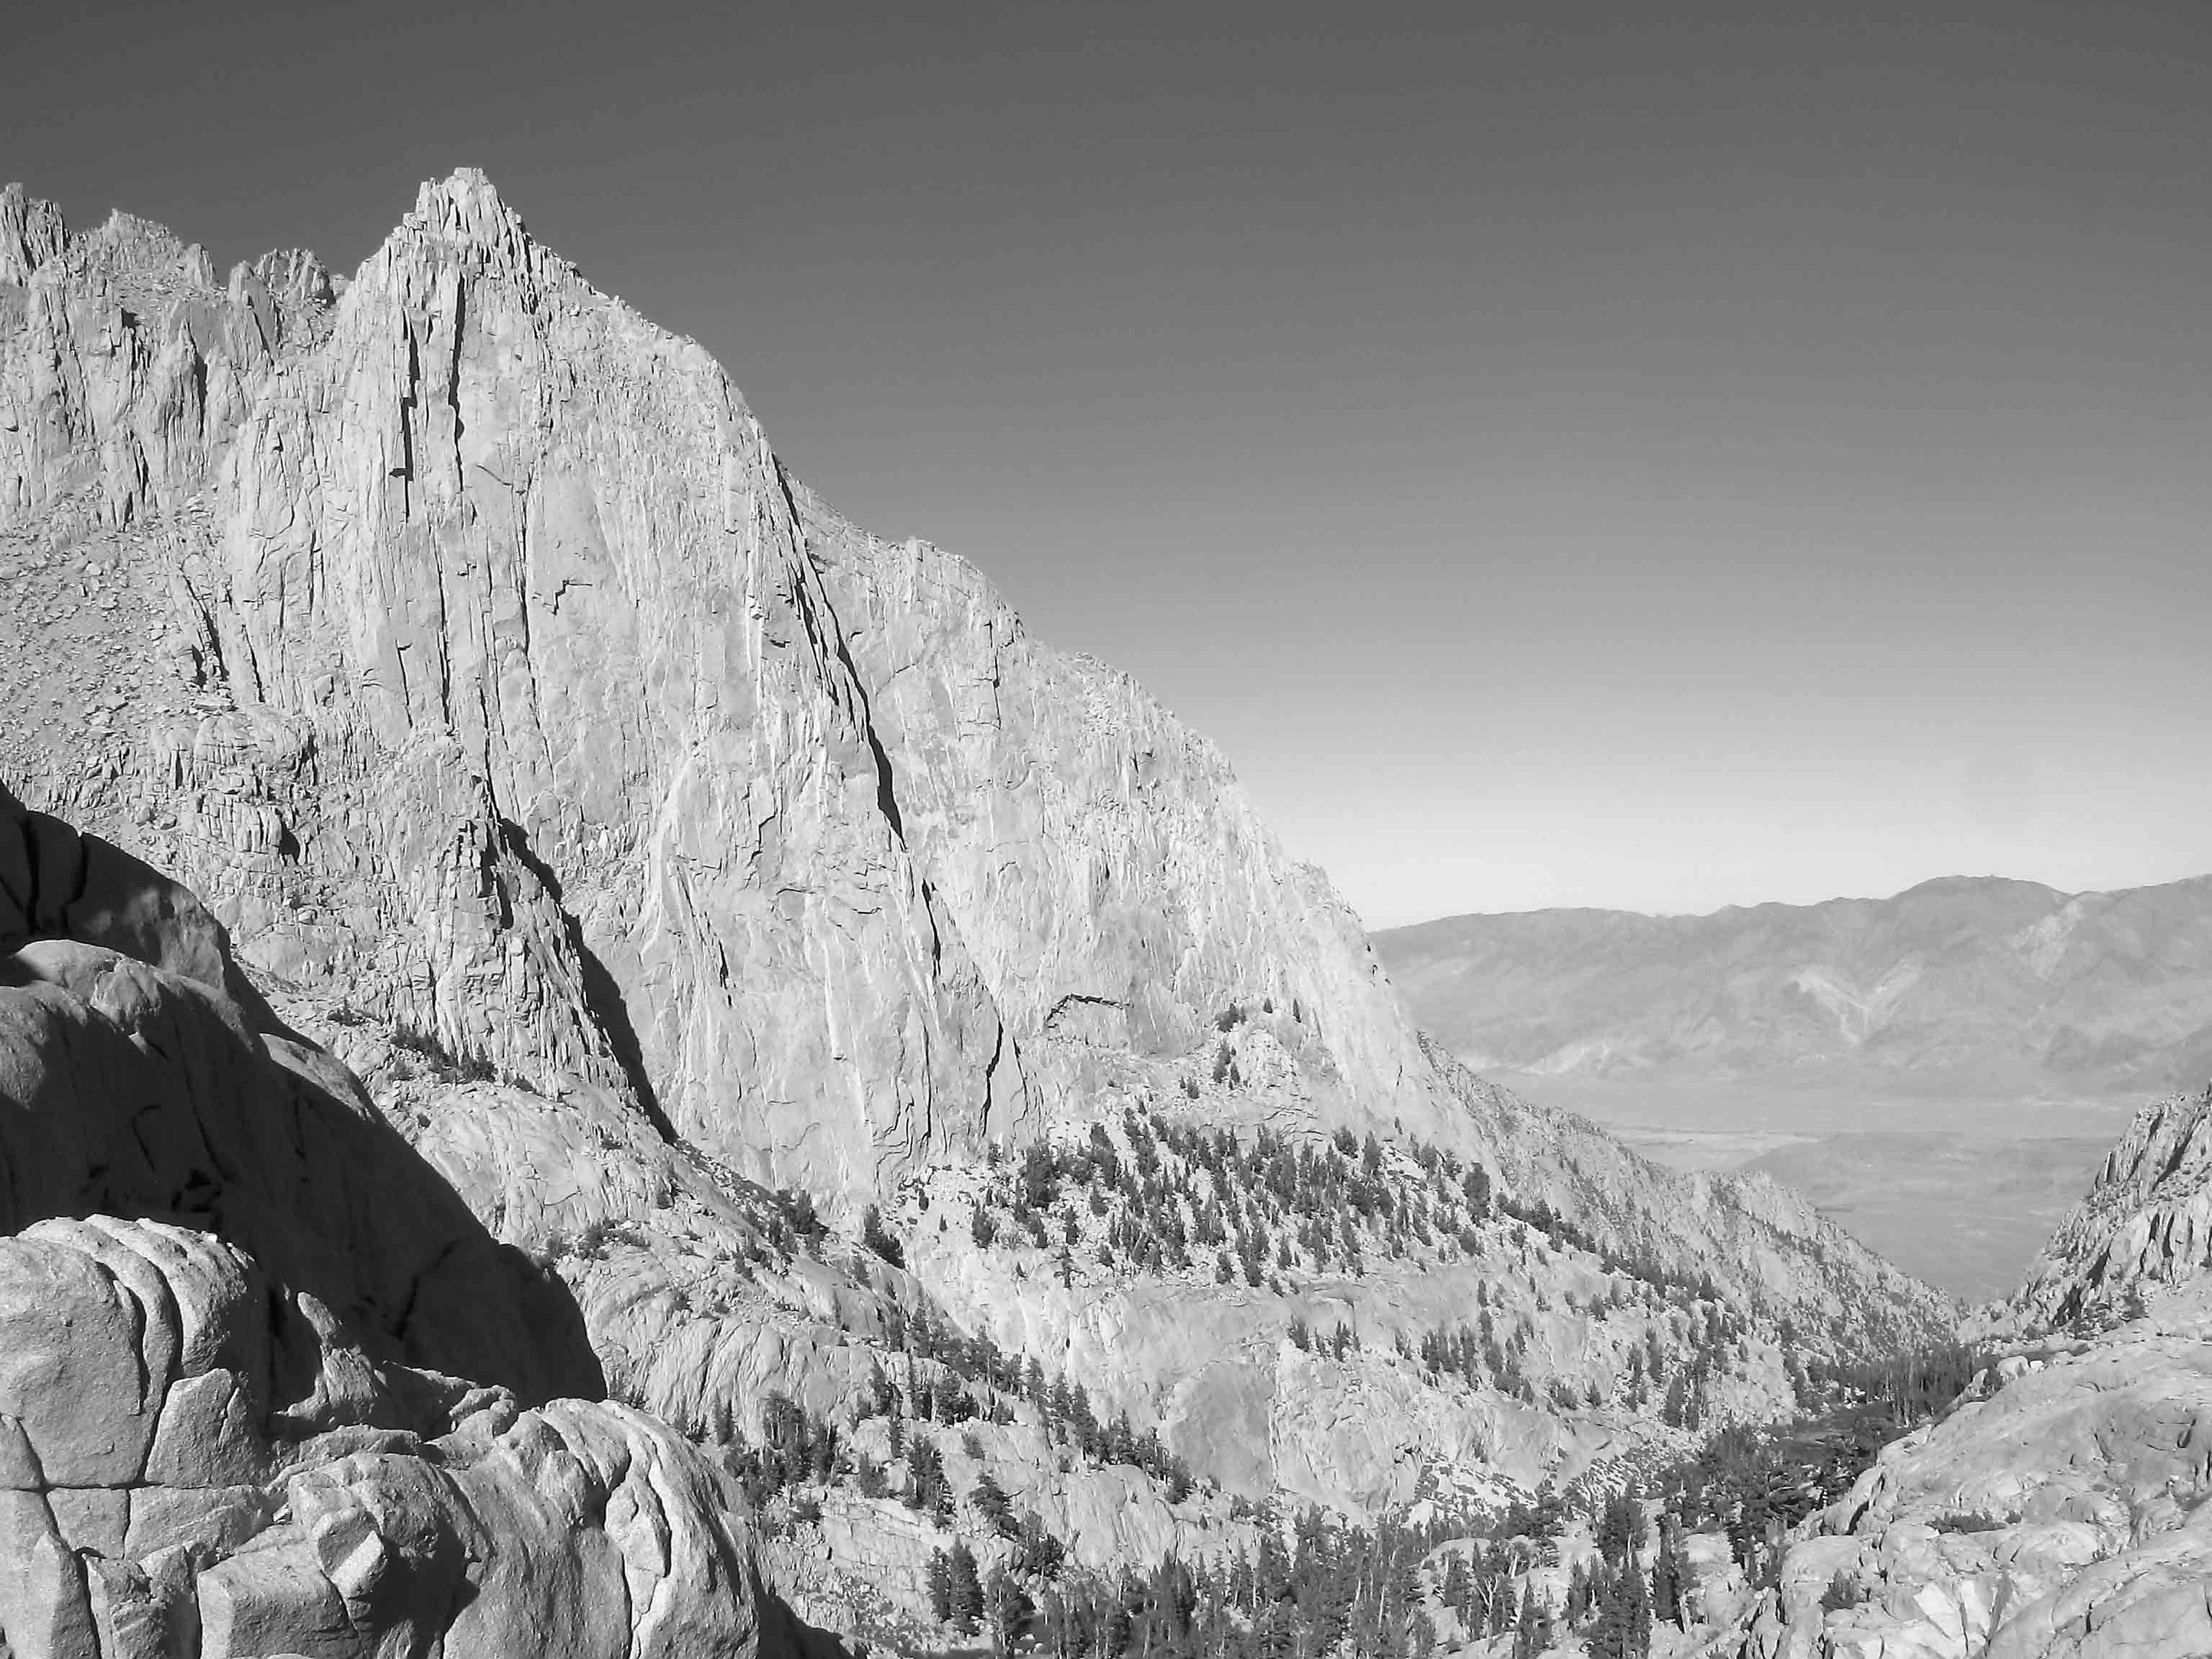
Thor Peak and the Whitney crest, including Crooks Peak, Keeler Needle, and Mt. Whitney, from the Whitney Portal Road
How Long It Takes
The amount of time you require to reach the summit is determined by your pace and the time you spend taking breaks. The formula is different for each person, and the optimal solution for you can only be determined through practice. When you are on training hikes, try different walking paces on different days, to learn how your lungs and legs feel under different conditions. Over time, you will discover a pace that feels “right.”
There are two tricks to converting that knowledge into a successful hike up Mt. Whitney. First, take enough training hikes so that you know exactly how your lungs and legs feel when your pace is good, rather than how fast you were going on a given day. After all, the actual distance covered and elevation gained per time can be wildly different on different trails, but you’ll have the same pairs of legs and lungs. Second, on a very long hike, such as this one, force yourself to go about 80 percent of your good pace, because you have a long way to go. I have hiked with many very fit, gung ho hikers who sped past me during the first hours of the walk but ran out of reserves long before the top and were unable to summit.
DAYHIKE TIMING
The hike up the Mt. Whitney Trail to the summit of 14,505-foot Mt. Whitney is approximately 10.5 miles, with nearly 6500 feet of altitude gain. First-time dayhikers should expect the ascent to take between nine and 11 hours, especially because you are at high elevation. A quite fast time to the summit is between five and six hours.
Most people will find the descent faster, likely taking you between half as long to two-thirds as long. (The fastest round-trip time on the Whitney Trail is purported to be less than four hours.)
To determine when to leave, work backward from the latest acceptable return time—plan to be back at Whitney Portal an hour before dark. Going uphill in the dark isn’t a problem, but at the end of a long day, it is simply too easy to trip walking downhill in the dark. (It is also more difficult to illuminate the trail while walking downhill.) In addition, if an accident does occur, you don’t want it to be in the dark, when help will probably not arrive until the following morning.
The math to determine your trip time is as follows:
- Plan to take between nine and 11 hours to ascend. If this is your first time on such a long hike, it is, of course, difficult to estimate exactly how long it will take you. Based on conversations with a variety of first-timers, I’ve determined that most people climbing the mountain for the first time take nine hours, and about a quarter of hikers need at least 11 hours. (These estimates include 10 minutes of breaks for each hour. If you anticipate taking longer breaks on your ascent, give yourself extra time.)
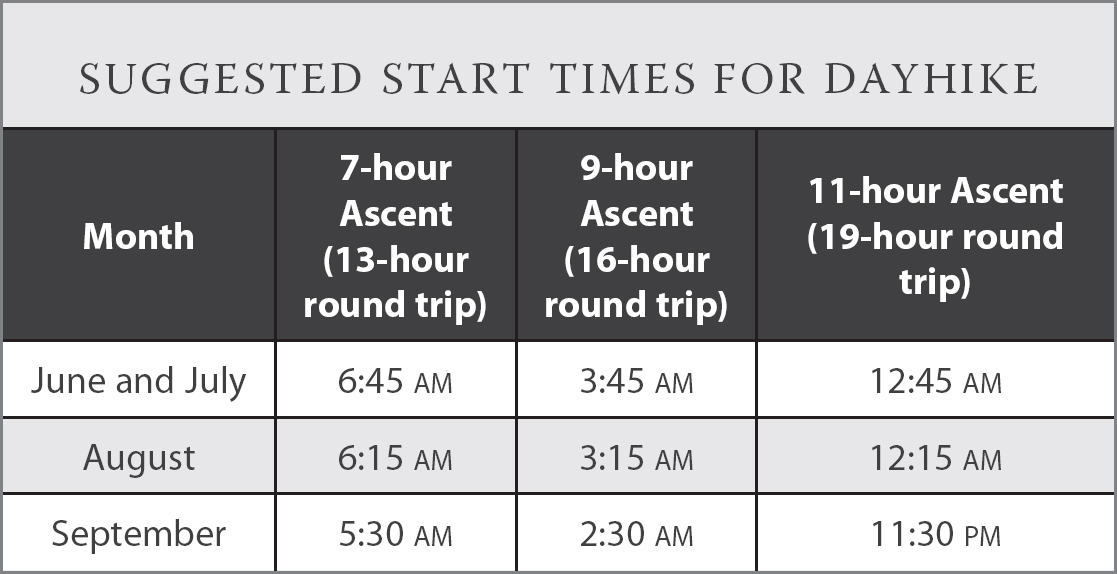
- Give yourself an hour on the summit.
- Plan to take between five and seven hours to descend.
- Plan to return an hour before dark. In June and July, it gets dark around 8:45 PM, in August it gets dark around 8:15 PM, and by mid-September, it is dark at 7:30 PM.
When planning your start time, be conservative. I recommend leaving no later than 6 AM, even if you expect to ascend quickly. The calculations described here do not take into account thunderstorm activity, which would mean you’d need to be off the summit by noon (thus requiring an earlier departure time). If you leave too early, the worst that happens is that you get to take a longer summit break or get back to Lone Pine for an earlier dinner. See the hike timetable for more details.
BACKPACK TIMING
If you will be backpacking, your first day will be shorter in distance, elevation gain, and time, than if you plan to do Whitney in a day, but it is nonetheless a tough hike. The distance to either Outpost Camp (3.8 miles) or Trail Camp (6.15 miles) is unlikely to be the limiting factor. Instead, it is the relentless elevation gain: The trail goes straight up, and you gain approximately 2000 feet if you stay at Outpost Camp, and 3700 feet if you stay at Trail Camp. An average hiker will require four hours to reach Outpost Camp and nearly seven hours to reach Trail Camp. Between the trailhead and Mirror Lake (a 4.3-mile stretch), the trail is very hot midday, so it is best to start hiking by 8 AM and get the early miles under your belt before lunch. Arriving at your campsite early gives you time to relax and enjoy your surroundings.
How Long It Takes
Your choice of campsite (see next section) will determine the length of your approach hike as well as the time required to summit Mt. Whitney the next day. A rule of thumb is that it takes an hour to backpack 2 miles on flat ground, and you add an additional hour for each thousand feet of elevation gain. In effect, to reach Trail Camp, it takes:
6.15 miles ÷ 2 = 3.05 hours
3700 feet ÷ 1000 = 3.7 hours
Total one-way time = 6.75 hours

Descending toward Trailside Meadow after a successful climb
This time takes into account about 10 minutes of breaks per hour, but not lengthy lunches. Using this formula, the amount of time required to reach each of the suggested campsites is included in the table that follows. Excepting those wishing to bivy on or near the summit, there is plenty of daylight to reach these campsites, although I still recommend leaving by 8 AM to avoid ascending the lower stretches of the trail in the heat of the day. Once you reach camp, expect to spend two hours setting up camp, cooking, and eating dinner. Before retiring for the night, make sure you have an agreed upon wake-up time. Organize your summit pack, fill your water bottles, and pre-pack your lunch (and then store it inside your bear canister). Mornings are chilly at high elevation, and it is easy to forget something when it is dark and you are half asleep, so do as many of these tasks as possible the day before.
Although your summit day does not require as much of a pre-dawn start as it does for those dayhiking from Whitney Portal, you should still set out from Trail Camp between 6 AM and 7 AM and Outpost Camp between 4:30 AM and 6 AM—and perhaps an hour earlier if you want to take your time or need to return to Whitney Portal in the afternoon. The table indicates how long you will likely require to summit. Remember to budget an extra hour to pack up camp once you have completed the summit, and also keep in mind that it will take you about half to two-thirds as long to descend as it did to ascend. Plan to be back at the trailhead an hour before dark.
Where to Camp
Along the Mt. Whitney Trail, backpackers have a limited selection of campsites, as there is relatively little flat real estate in the vicinity of water (see table). The largest sites are at Outpost Camp (at 10,365 feet) and Trail Camp (at 12,040 feet), and these are obviously well used, especially the ones at Trail Camp, where close to 50 people camp each night, all summer long. Fortunately, the underlying substrate is sandy, so these sites are not dusty like heavily used camps at lower elevations. In past years, nearly everyone stayed at Outpost Camp and Trail Camp to take advantage of the solar toilets. Now that these have been removed, people have begun to drift more toward the smaller sites.
A few small sites (at 10,860 feet) exist beneath foxtail pines on the slope above Mirror Lake, although the closest water is at least a 10-minute walk back down the trail to Mirror Lake. (Camping is prohibited along the banks of Mirror Lake.) Between Trailside Meadow (camping prohibited) and Trail Camp, there are scattered sites (between 11,500 and 11,900 feet) in sandy patches between granite slabs, mostly less than a five-minute walk from water. If you wish to camp farther from the trail, there are sites near the shores of Consultation Lake (11,680 feet) or south of Trail Camp.
Trail Camp
Here are some considerations to make in deciding the best site for you:
- Regulations: Regulations detailed on your wilderness permit indicate you should camp 100 feet from the trail or water sources, and you should never camp on vegetation, including meadows. The fragile subalpine and alpine meadows can take years to recover from disturbance, so please take the ecology into account if you wander off the trail in search of a campsite. Camp only in sandy flats and previously used sites.
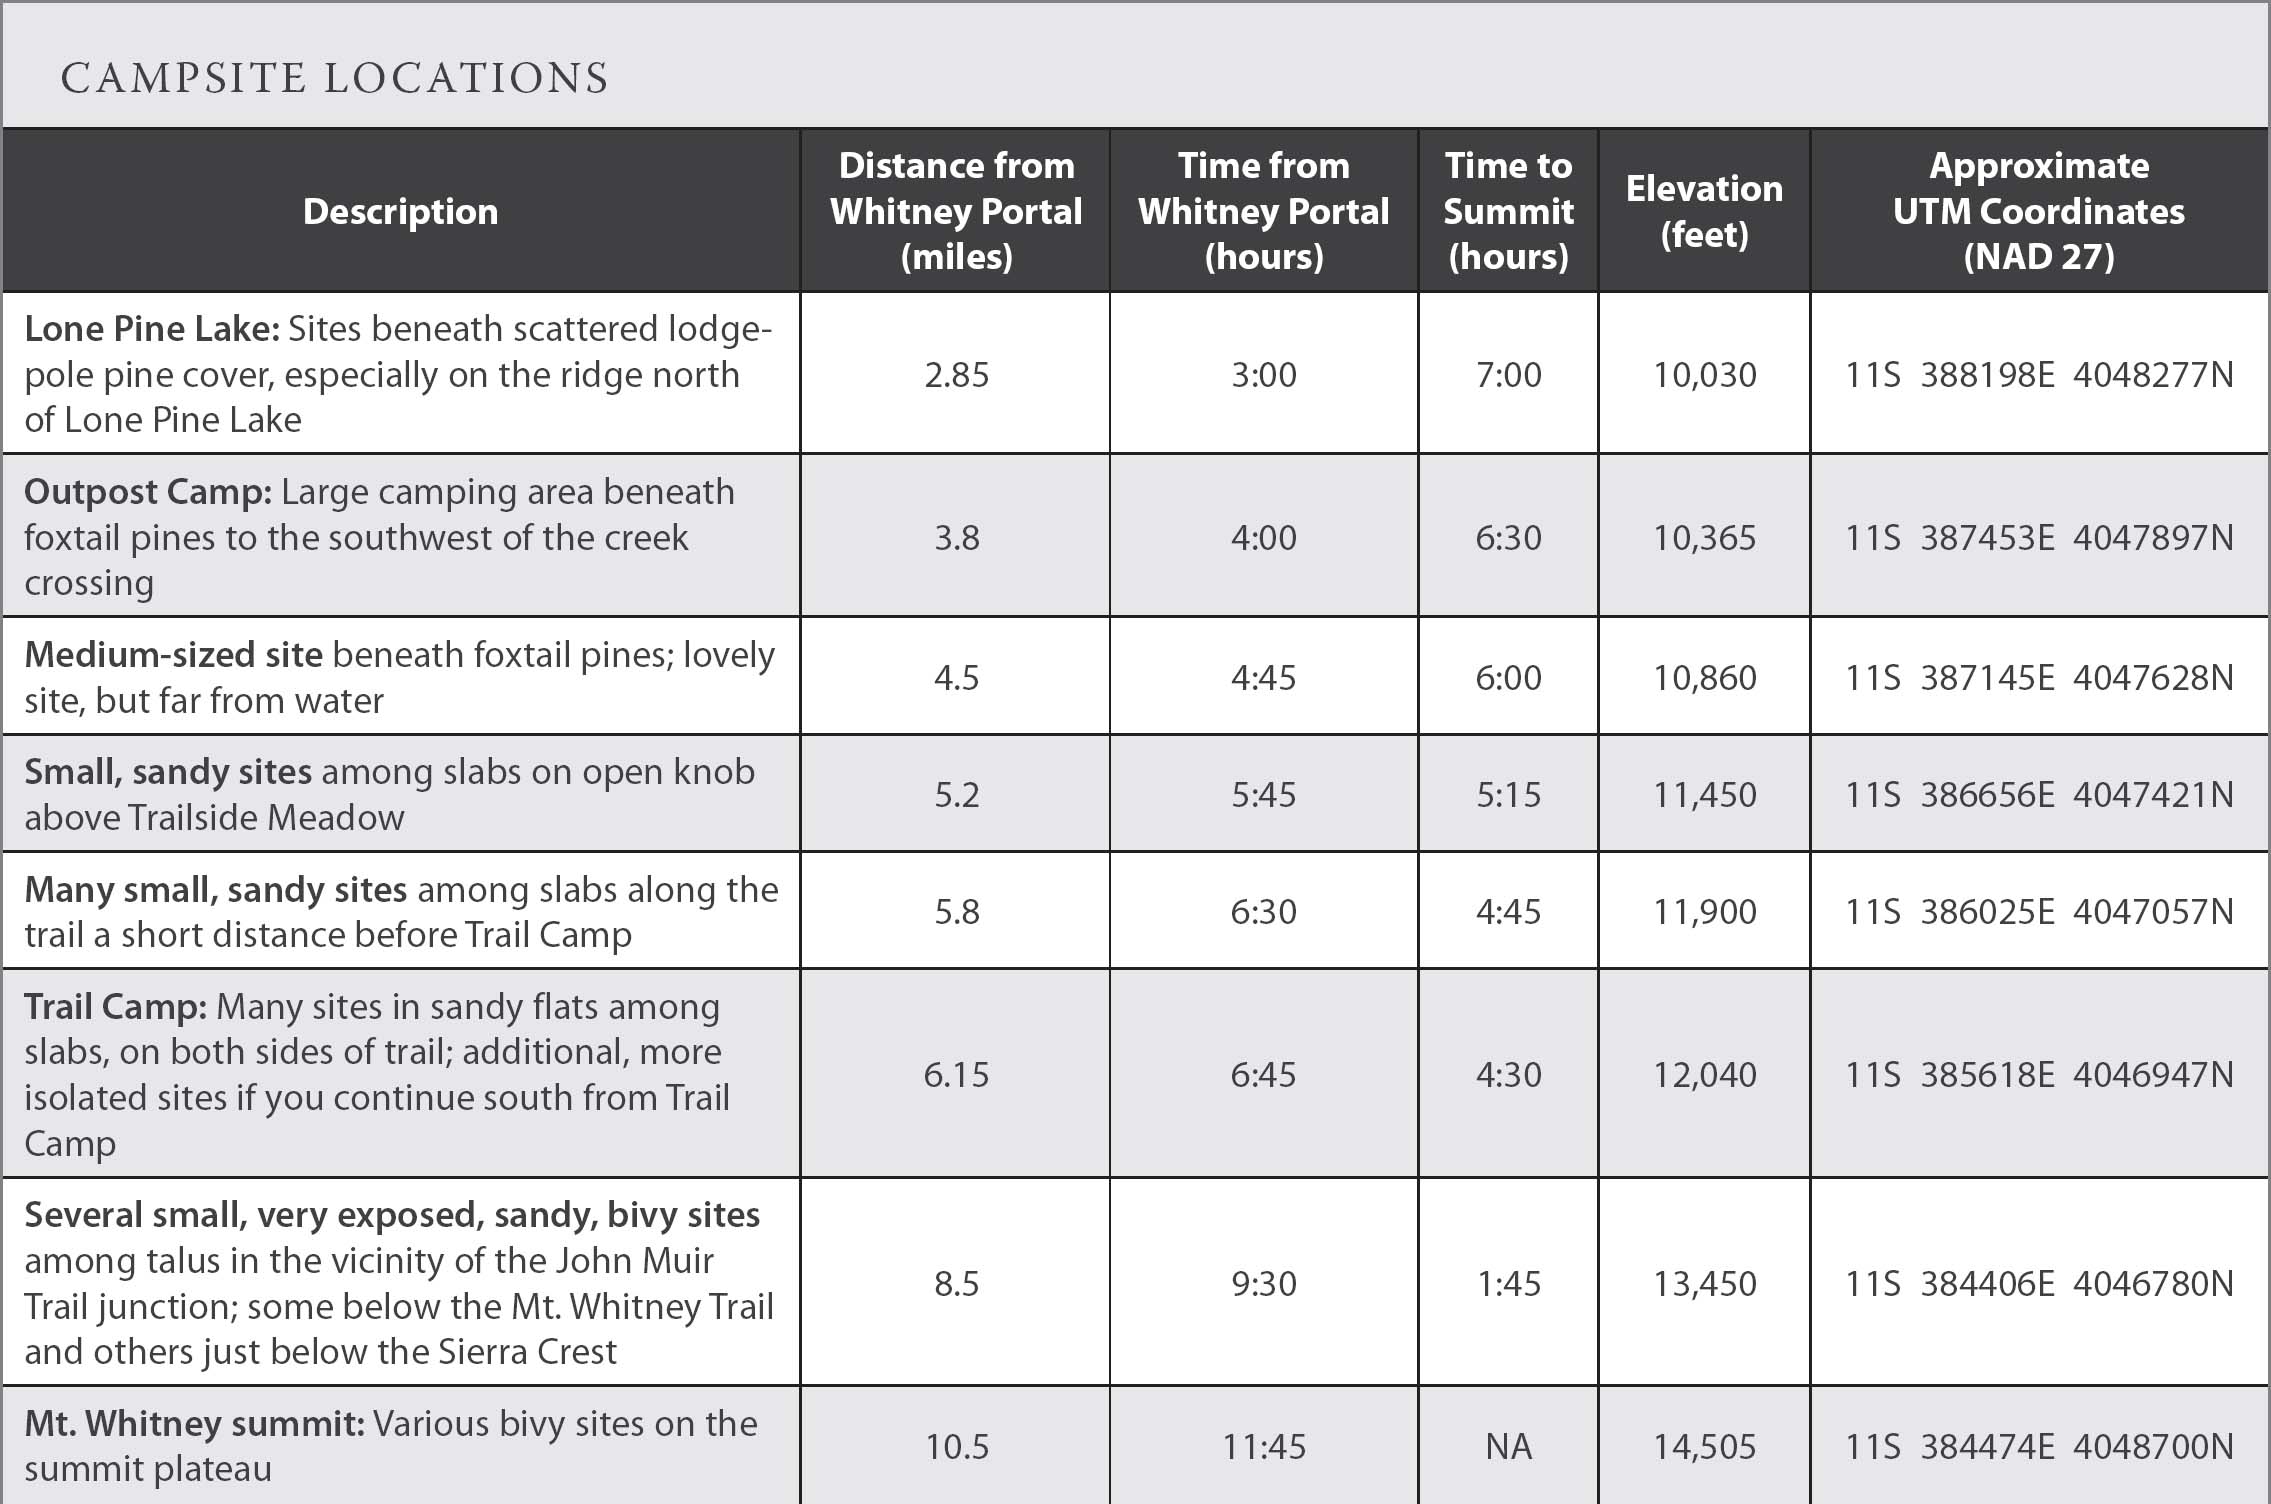
- Elevation: If you camp higher, you put yourself at greater risk for altitude sickness, but you also will have a more leisurely summit day. Few people coming from low elevation sleep well at 12,000 feet, but the advantages of an alpine perch may outweigh the headache and lack of appetite the night before. Nonetheless, if you have never camped above 10,000 feet, and have not spent the previous day (or days) doing an acclimation hike, I recommend camping at Outpost Camp: You will probably sleep better and will therefore enjoy your hike to the summit.
- The bivy sites near the John Muir Trail junction (13,450 feet) or on the summit of Mt. Whitney offer the most spectacular alpine views, but they are also cold, windy, and high enough that you’ll be guaranteed to feel the elevation.
- On trail or off trail: There are advantages and disadvantages to camping on and off the trail. If you camp at the designated sites, you won’t have to detour from the trail to search for a flat spot of sand. On the other hand, you’ll have more privacy if you do take the time to find a site off trail.
- Distance from summit: Your summit day will be shorter if you select a higher campsite. However, do not force yourself to camp high if you are concerned that you will spend the night feeling sick due to the altitude—this will decrease you chances of summiting the next day.
- Crowds: The large number of tent sites at Outpost Camp and Trail Camp mean that you will have many neighbors at these locations. However, they are picturesque sites with very easy access to water and plenty of flat campsites.
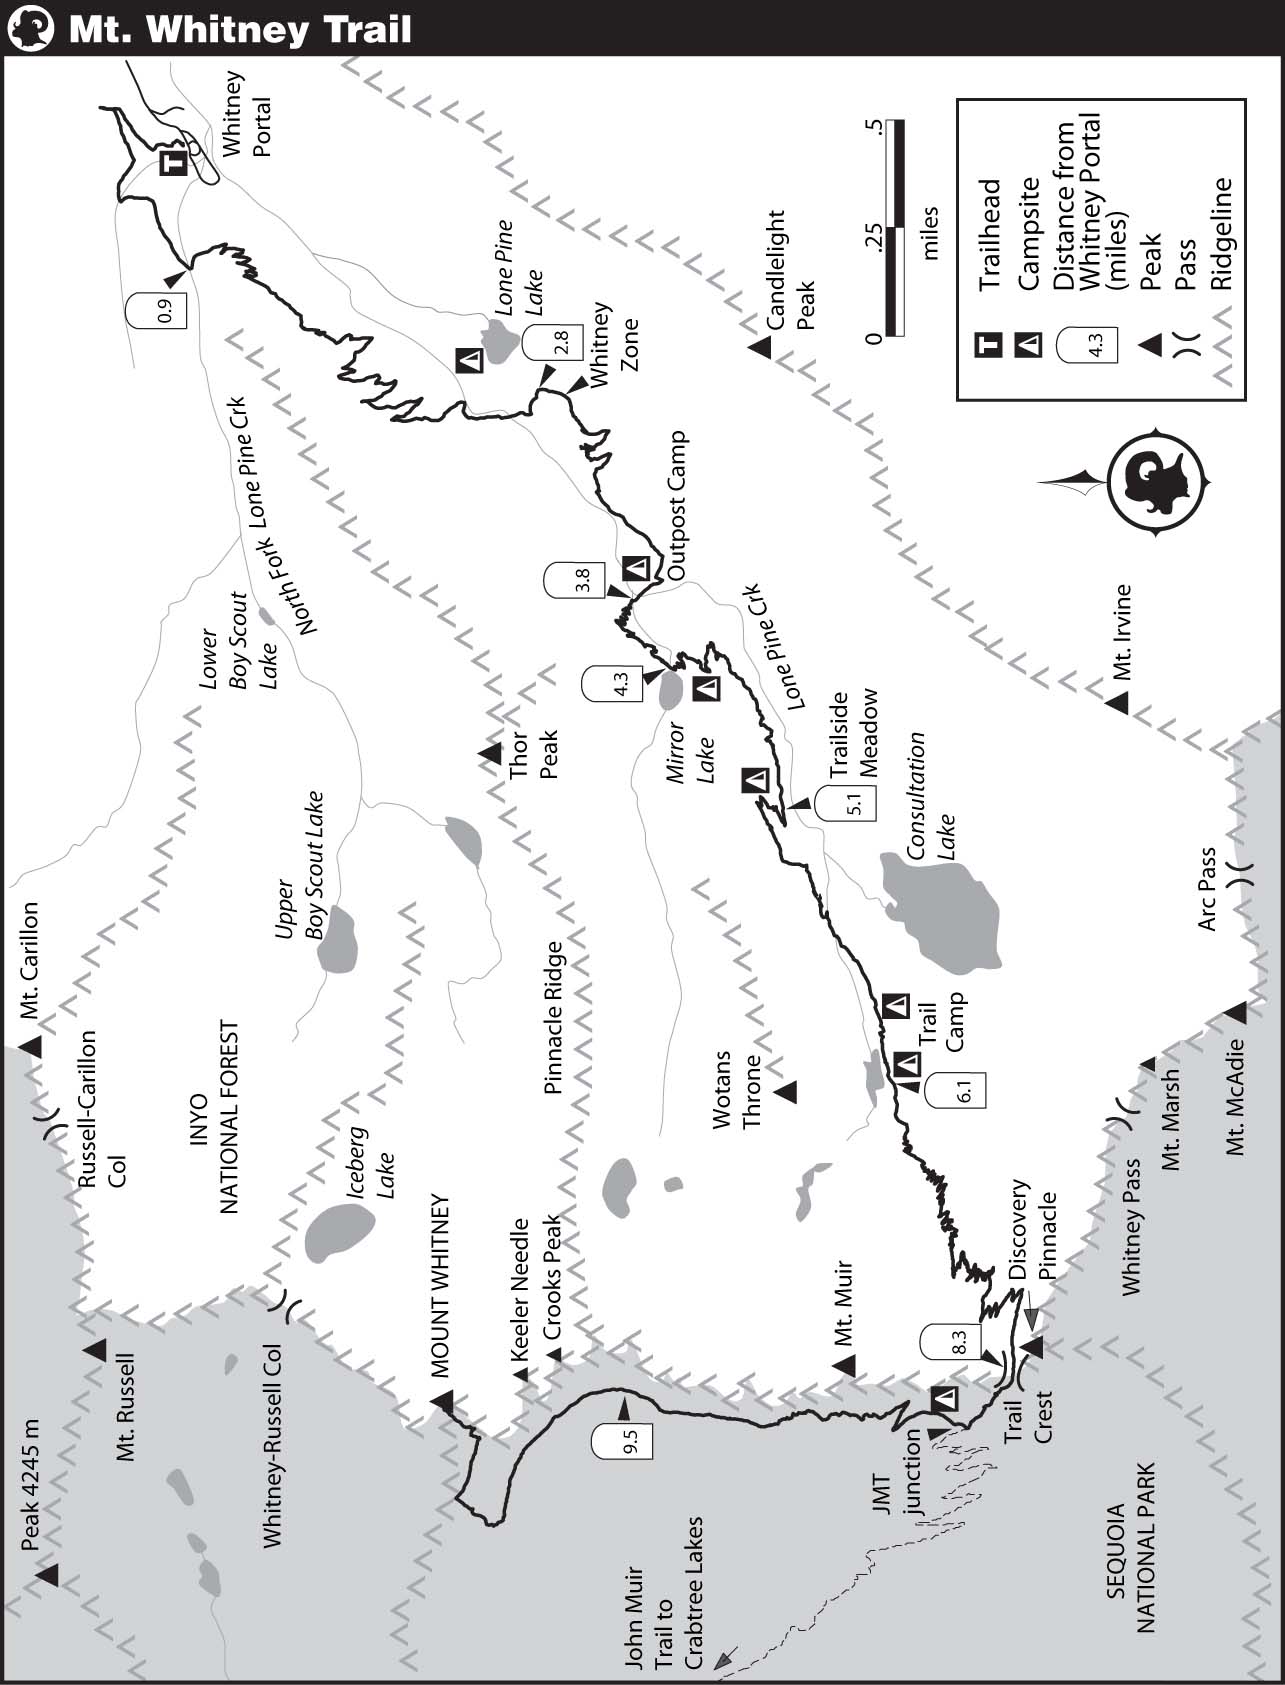
The Hike Itself
The table below divides the hike up the Mt. Whitney Trail into nine sections, and includes necessary statistics for each part—distance, elevation gain, estimated timing, and UTM coordinates. The suggested time itinerary is provided for seven- nine-, and 11-hour ascents. The amount of time needed takes into account distance, elevation gain, and altitude (it assumes you will go more slowly the higher you get). While rest breaks are not explicitly indicated, this time table allows for 10 minutes of rest breaks per hour. In each case, the point-to-point and cumulative (in parentheses) information is provided. The elevation gain numbers include the extra ups and downs of the trail itself, so don’t be confused when you see that the total climb is greater than the 6175-foot elevation difference between Whitney Portal and the summit of Mt. Whitney.
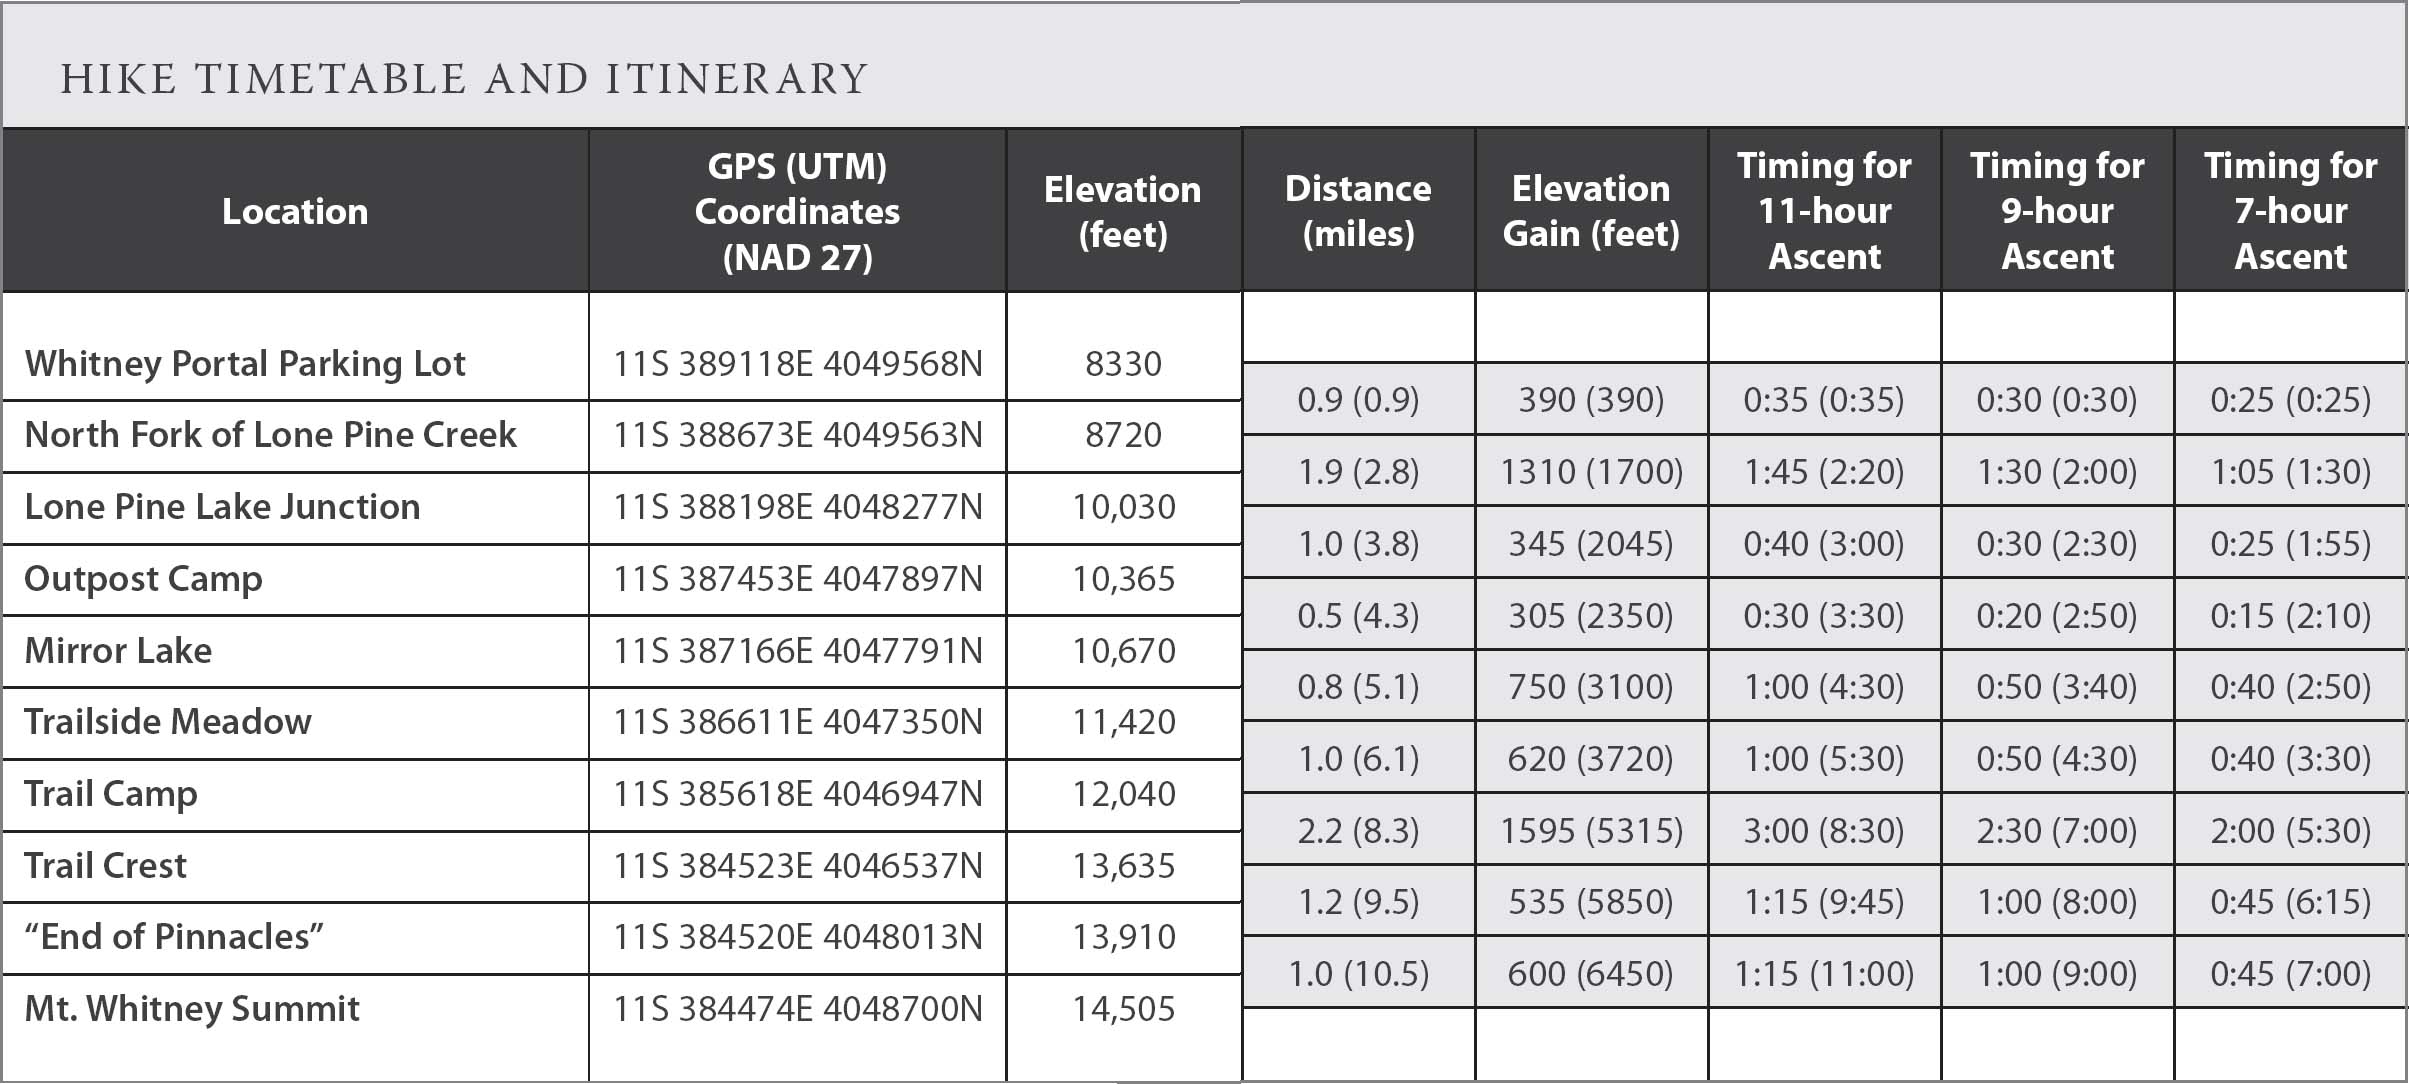
Figures in parentheses indicate cumulative information
| SECTION 1 | Parking Lot to the North Fork of Lone Pine Creek |
Leaving the parking lot, head north for the sign pointing to the trailhead; you will pass large information plaques and a handy scale to weigh your pack. The trail begins by heading north, with a couple of quick switchbacks. After crossing a small creek, you emerge onto a dry, sandy slope. After about 0.3 mile, you complete an east-trending switchback, and begin a long, westward traverse along the south side of the canyon. Gaining little elevation, you cross this open slope, which is dotted with drought-tolerant shrubs and sports an understory of colorful flowers in spring and early summer. Along the way, you cross several small trickles, which might make for short sections of a muddy trail. Nearby, watch for patches of rose thickets to the side of the trail. In the distance is a collection of pinnacles—the Sierra Crest, just south of Mt. Whitney. Some distance below are the tips of the pine and fir trees growing in the Whitney Portal parking lot. Just before you cross the North Fork of Lone Pine Creek, look for a sign pointing right (northwest) to a use trail: This is the route hikers and climbers take to access the east face of Mt. Whitney and the Mountaineers Route. It also services climbs on 14,088-foot Mt. Russell. You stay on the main trail, crossing the creek on large boulders—or possibly getting your feet wet during the highest flows. On the return trip, you’ll appreciate the soft sand underfoot along this stretch of trail.

The first view after leaving Whitney Portal: Thor Peak, Crooks Peak, and Keeler Needle
HINT: Take your time getting started: Slow and steady is the mantra for success on this hike. Give your legs at least 15 minutes to warm up before speeding up to full pace—your leg muscles will thank you later.
| SECTION 2 | North Fork of Lone Pine Creek to the Lone Pine Lake Junction |
After crossing the North Fork of Lone Pine Creek, sidle around to the head of the canyon, and climb up a long series of switchbacks. They are well-graded, and the trail is sandy with few protruding rocks; if you’re doing the one-day hike, this is straightforward walking in the dark. The slope begins under a tree cover of Jeffrey pines and white fir, and then emerges onto a drier slope of chaparral plants. Higher still, some of the larger shrubs disappear, and the slope is covered with a variety of short shrubs and flowers. Near the end of this climb, the trail veers toward Lone Pine Creek, and passes vegetation that requires moister soils—these plants tend to have bigger, thinner leaves. Since this entire stretch of trail is on a single slope with no stream crossings and no junctions, it can feel rather endless; if it is light out, focus on the changes in vegetation and the changing view down-canyon to remind yourself you are indeed making progress. Just past one open patch with a small meadow and a cluster of lodgepole pines, you reach the Lone Pine Creek crossing. A series of raised logs allows you to traverse the broad crossing easily, although during the highest flows you may get wet while approaching these logs. Beyond the stream, you switchback briefly up through lodgepole pine forest and promptly reach the signed Lone Pine Lake junction. Heading left (east) leads to the beautiful round lake, perched on the edge of the long drop-off to Whitney Portal. The Mt. Whitney Trail continues up to the right (southwest).

Enjoying scattered Jeffrey Pines on the ascent toward Lone Pine Lake
HINT: Your feet may start to develop blisters along this long stretch of switchbacks. If you feel rubbing, stop promptly to apply moleskin, blister bandages, or sports tape. Stopping for five minutes now will save you time later.
| SECTION 3 | Lone Pine Lake junction to Outpost Camp |
At the beginning of this section, you enter a sandy flat and pass the sign declaring your entry into the Whitney Zone, where you are required to have a permit. To the south is a blocky talus field flanked by tall, steep cliffs; this is the north face of what is unofficially called Candlelight Peak. Sandier sections mark an area with recurrent rock fall and avalanches. Shortly, a series of switchbacks begins, taking you in and out of scattered foxtail pine cover as you ascend. In places, elegant rock walls support the trail. Along this stretch, the lodgepole forests are replaced with the more scattered tree cover characteristic of foxtail pine stands. At the end of the climb, the trail drops slightly into Bighorn Park, a marshy meadow beneath towering cliffs. To your right (north) is the meandering Lone Pine Creek, and to your left are little wet crevices with an enticing collection of small, wetland plants that are rare elsewhere along this trail. At the west end of the meadow is Outpost Camp, the first of the two large campsites along the Mt. Whitney Trail. There are a few small campsites northeast of the trail, but most people choose to pitch their tents southwest of the trail, beneath tall foxtail pines. South of these campsites, Lone Pine Creek cascades over a cliff face in a tumbling waterfall.

The sign indicating the beginning of the Whitney Zone
Looking back to Lone Pine Lake and the Owens Valley on the ascent to Bighorn Park and Outpost Camp
HINT: Be sure to stop and have a snack as soon as you are hungry. Your body’s performance may decrease for the next many hours, if you keep exerting yourself once your muscles start to deplete their glycogen stores.
| SECTION 4 | Outpost Camp to Mirror Lake |
For this short stretch of trail, you diverge from Lone Pine Creek, and head slightly north to climb switchbacks along the north wall of the canyon. These south facing slopes are dry and hot and correspondingly covered with plant species that do well with very little water. The shrub bush chinquapin, with prickly fruit and golden-backed leaves, dominates much of this section, with various colorful flowers growing underfoot. Shortly, the trail intersects the stream drainage and you climb briefly on slabs alongside the creek, before crossing the Mirror Lake outlet on large blocks of rock. To the north is Thor Peak, the large mountain whose steep cliff faces extend all the way to the shores of Mirror Lake. Note that camping is prohibited at Mirror Lake.
Bighorn Park and Outpost Camp
HINT: Check your water supply at Outpost Camp or as you cross the Mirror Lake outlet. You should have drunk at least 1.5 quarts by now. If you haven’t consumed enough, keep reminding yourself to stop and drink.
| SECTION 5 | Mirror Lake to Trailside Meadow |
Above Mirror Lake, the trail climbs to the top of a small granite ridge and then heads south, back to the main Lone Pine Creek drainage. Scattered campsites exist along this climb, but if you choose to use them, you must carry water up from Mirror Lake, about 0.2 mile below. As you ascend, the views down to Lone Pine Lake and Owens Valley are exquisite, especially when early morning light illuminates the granite walls. Along this climb, you pass the last trees, mostly foxtail pines, along with a few stunted whitebark and lodgepole pines. Now in the Alpine Zone, you walk on granite slabs, with a collection of shrubs, herbs, and grasses growing from the base of boulders and out of cracks in the slab. The tall granite walls of the surrounding peaks are suddenly much closer, and to the north, Mirror Lake is already far below you. The trail mostly follows the crest of a small granite ridge, occasionally dropping into sandy flats that formed along fractures in the rock. Some distance later, you reach Trailside Meadow, an important waypoint: It is almost exactly the halfway point in terms of both distance and elevation. The small meadow, covered with shooting stars, is a refreshing place to take a short break, but camping here is prohibited.
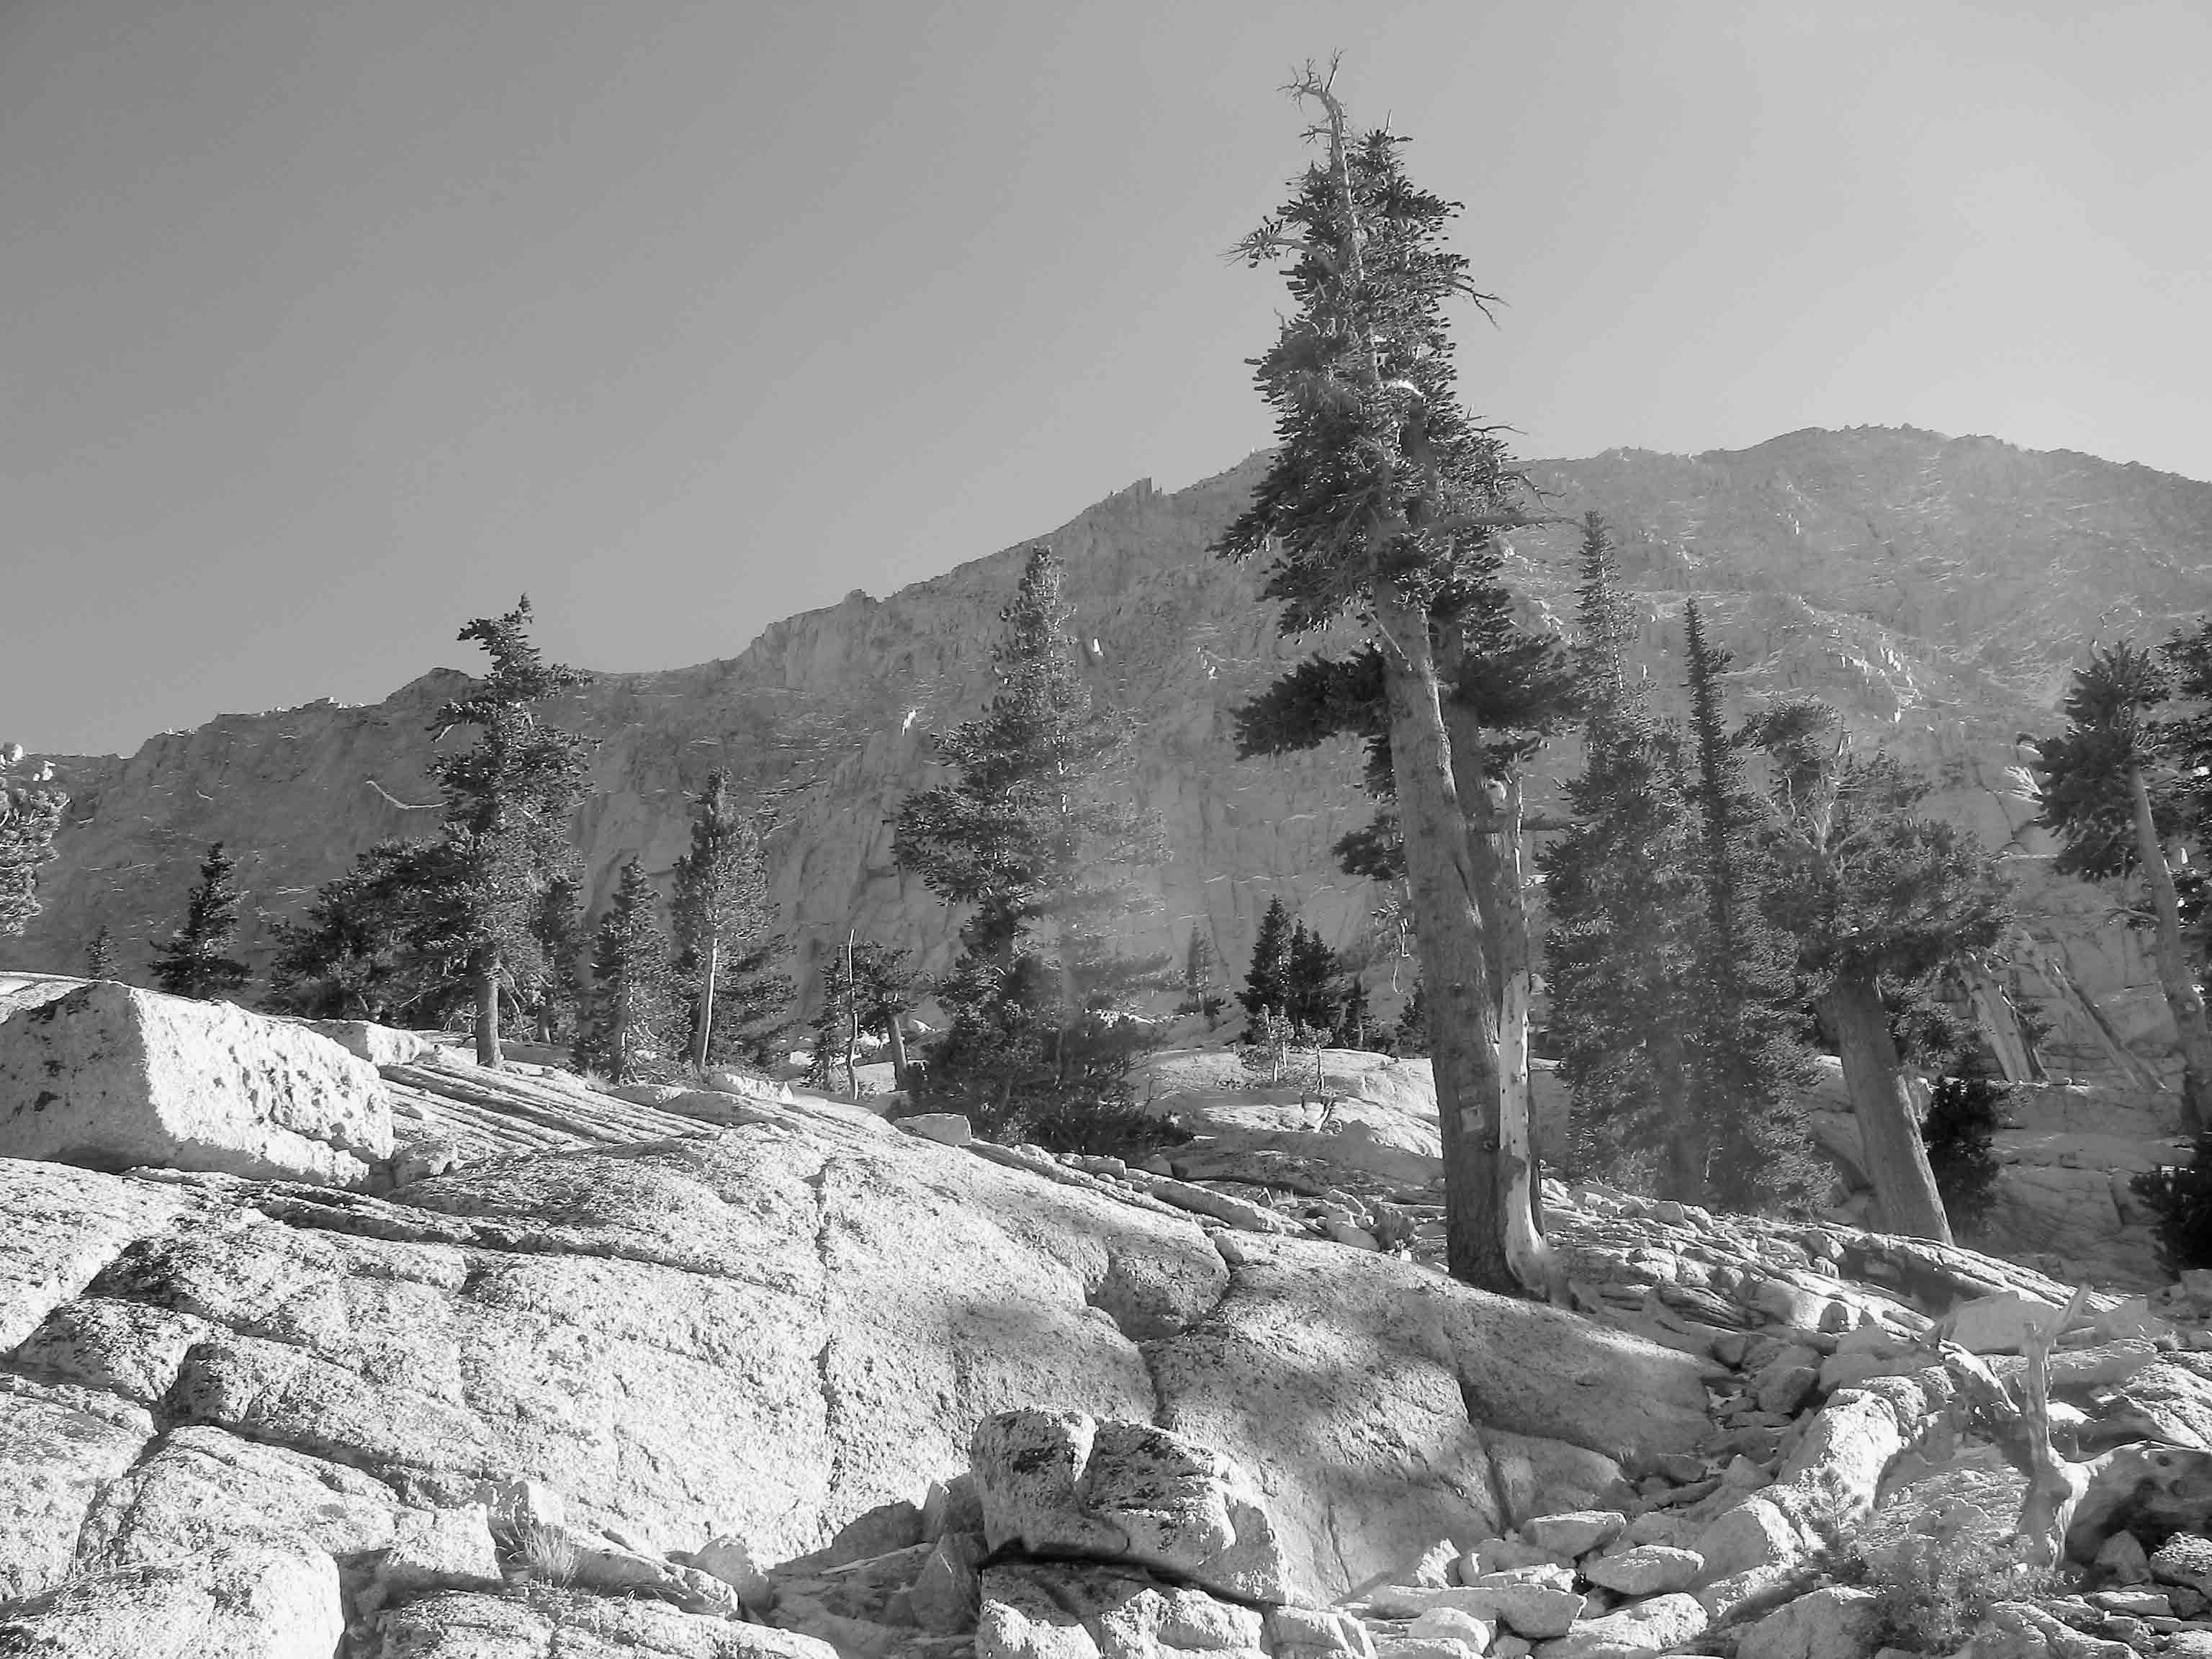
A stand of foxtail pines above Mirror Lake
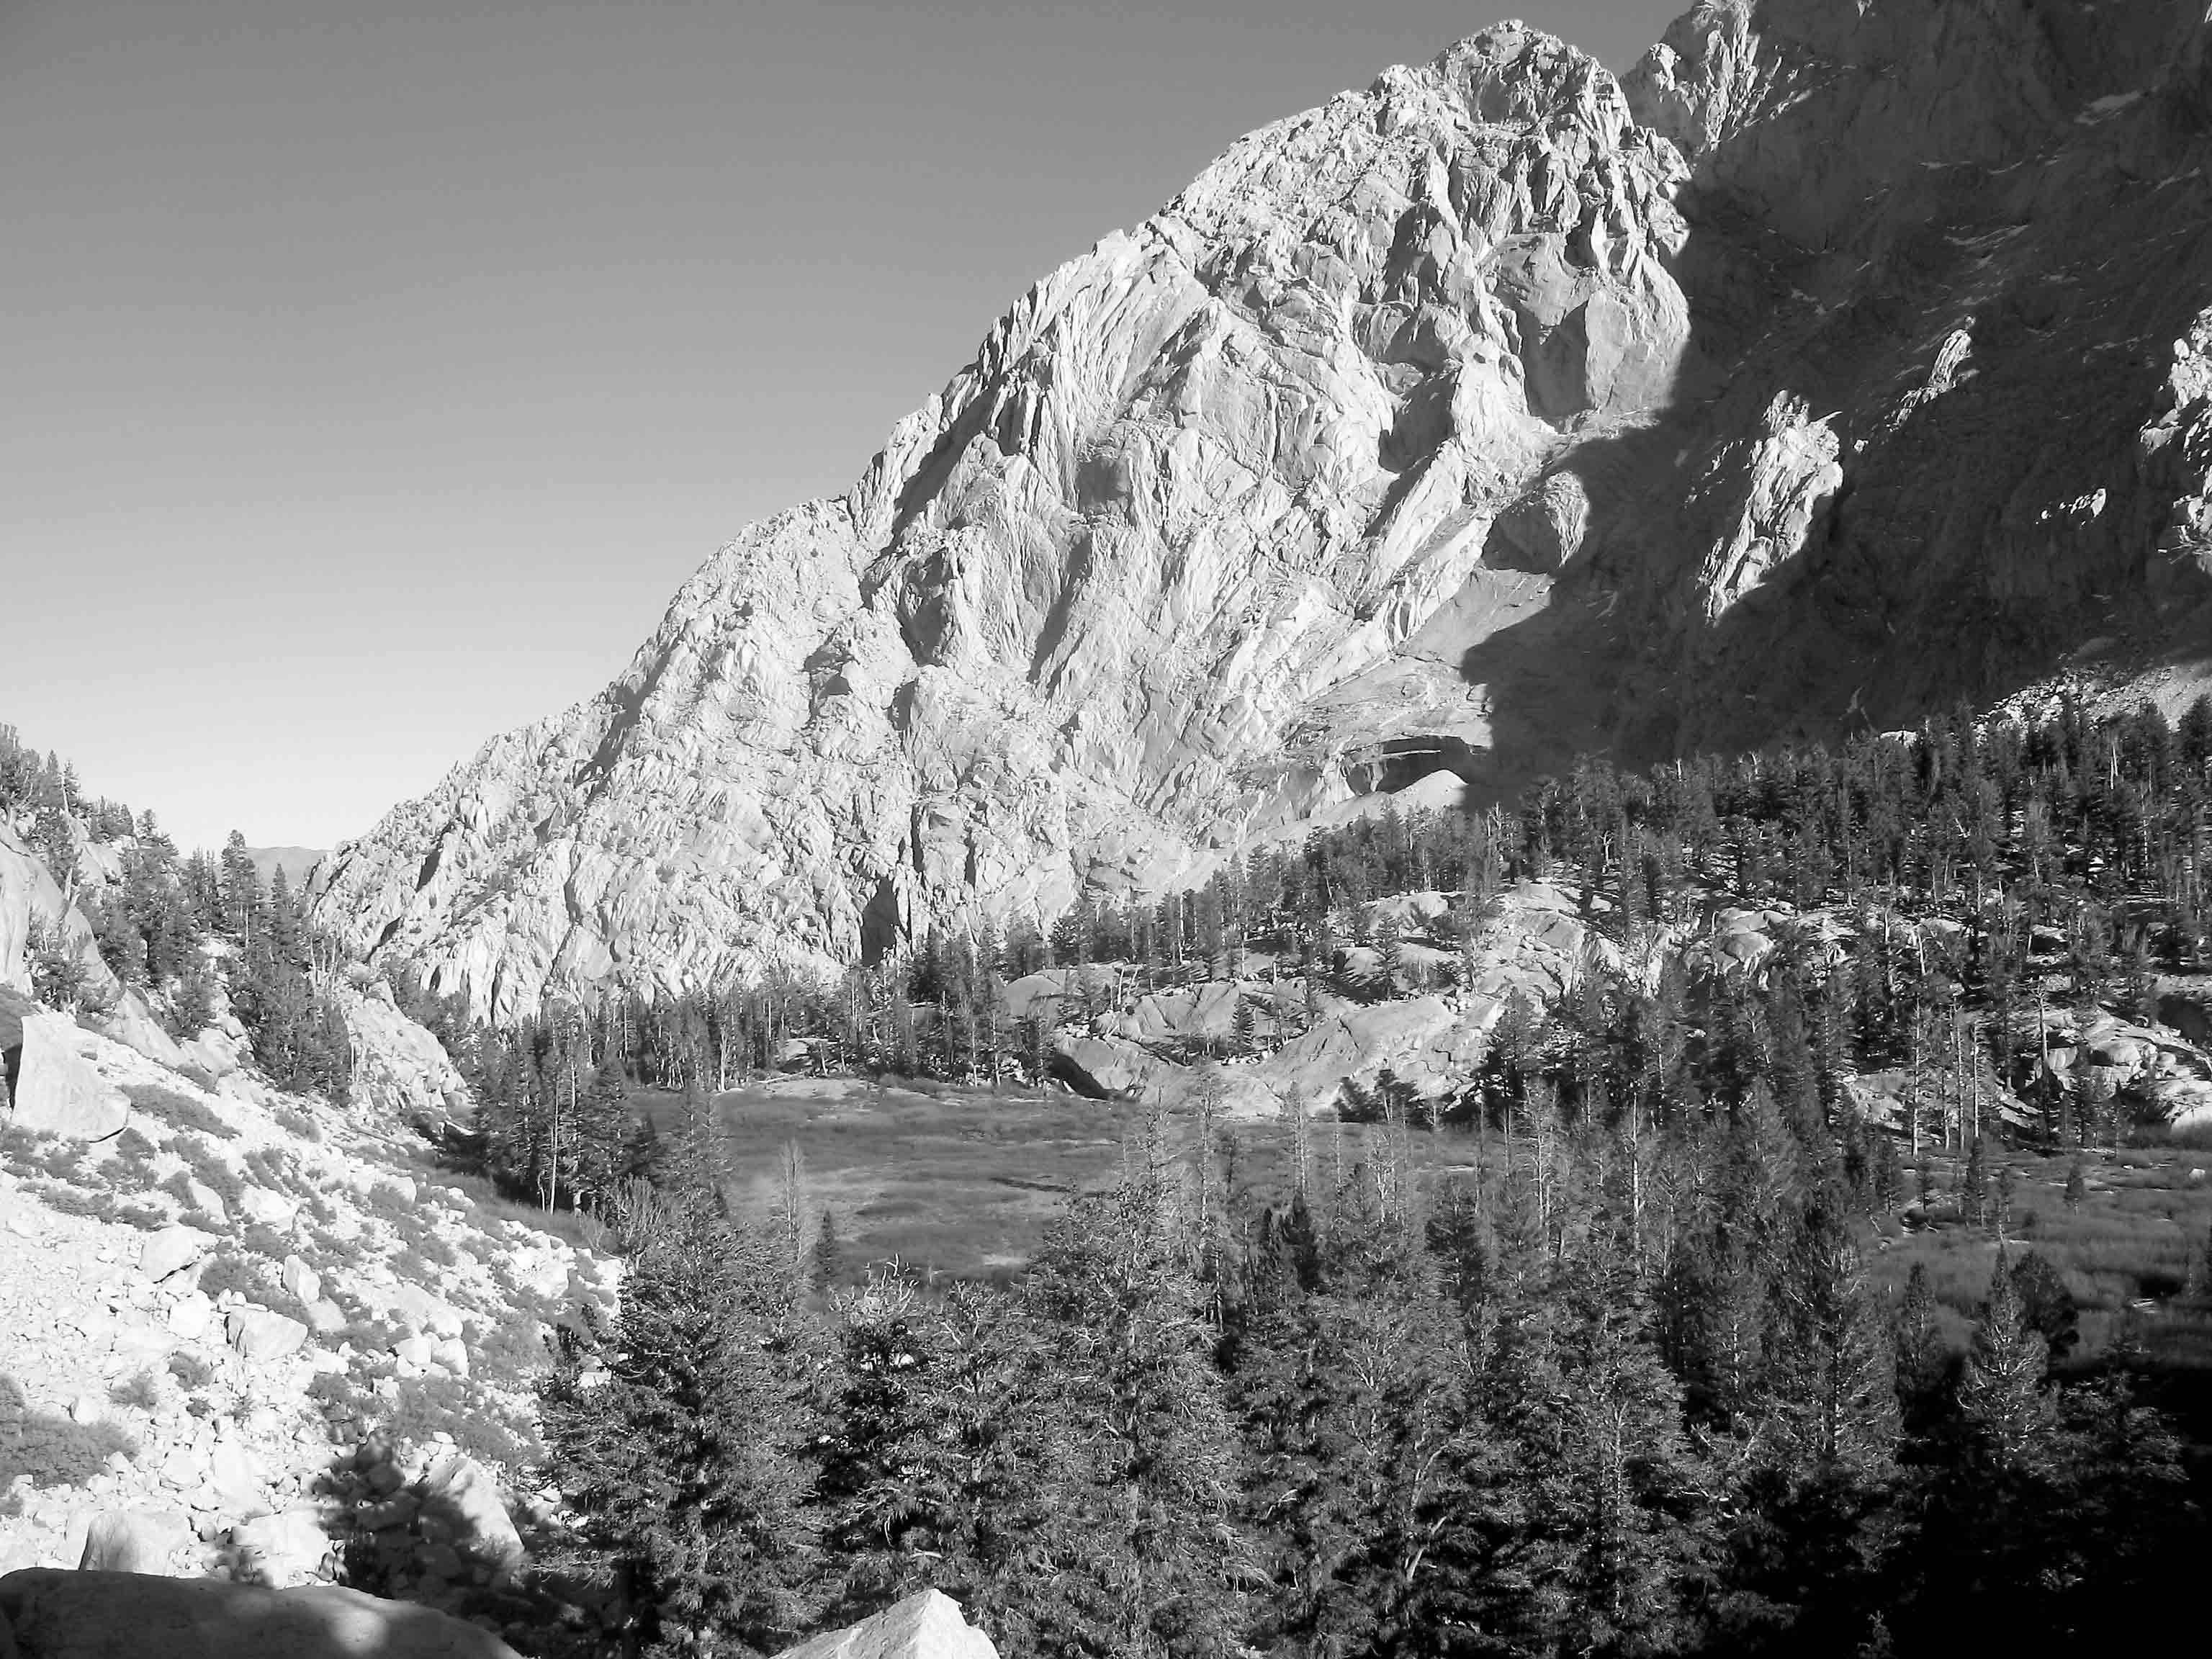
Looking back to Thor Peak and Bighorn Park as you approach Trailside Meadow

Trailside Meadow
HINT: Although the path you are following appears flat compared to the surrounding slopes, the trail continues upward at a good clip—take it easy and pace yourself.
| SECTION 6 | Trailside Meadow to Trail Camp |
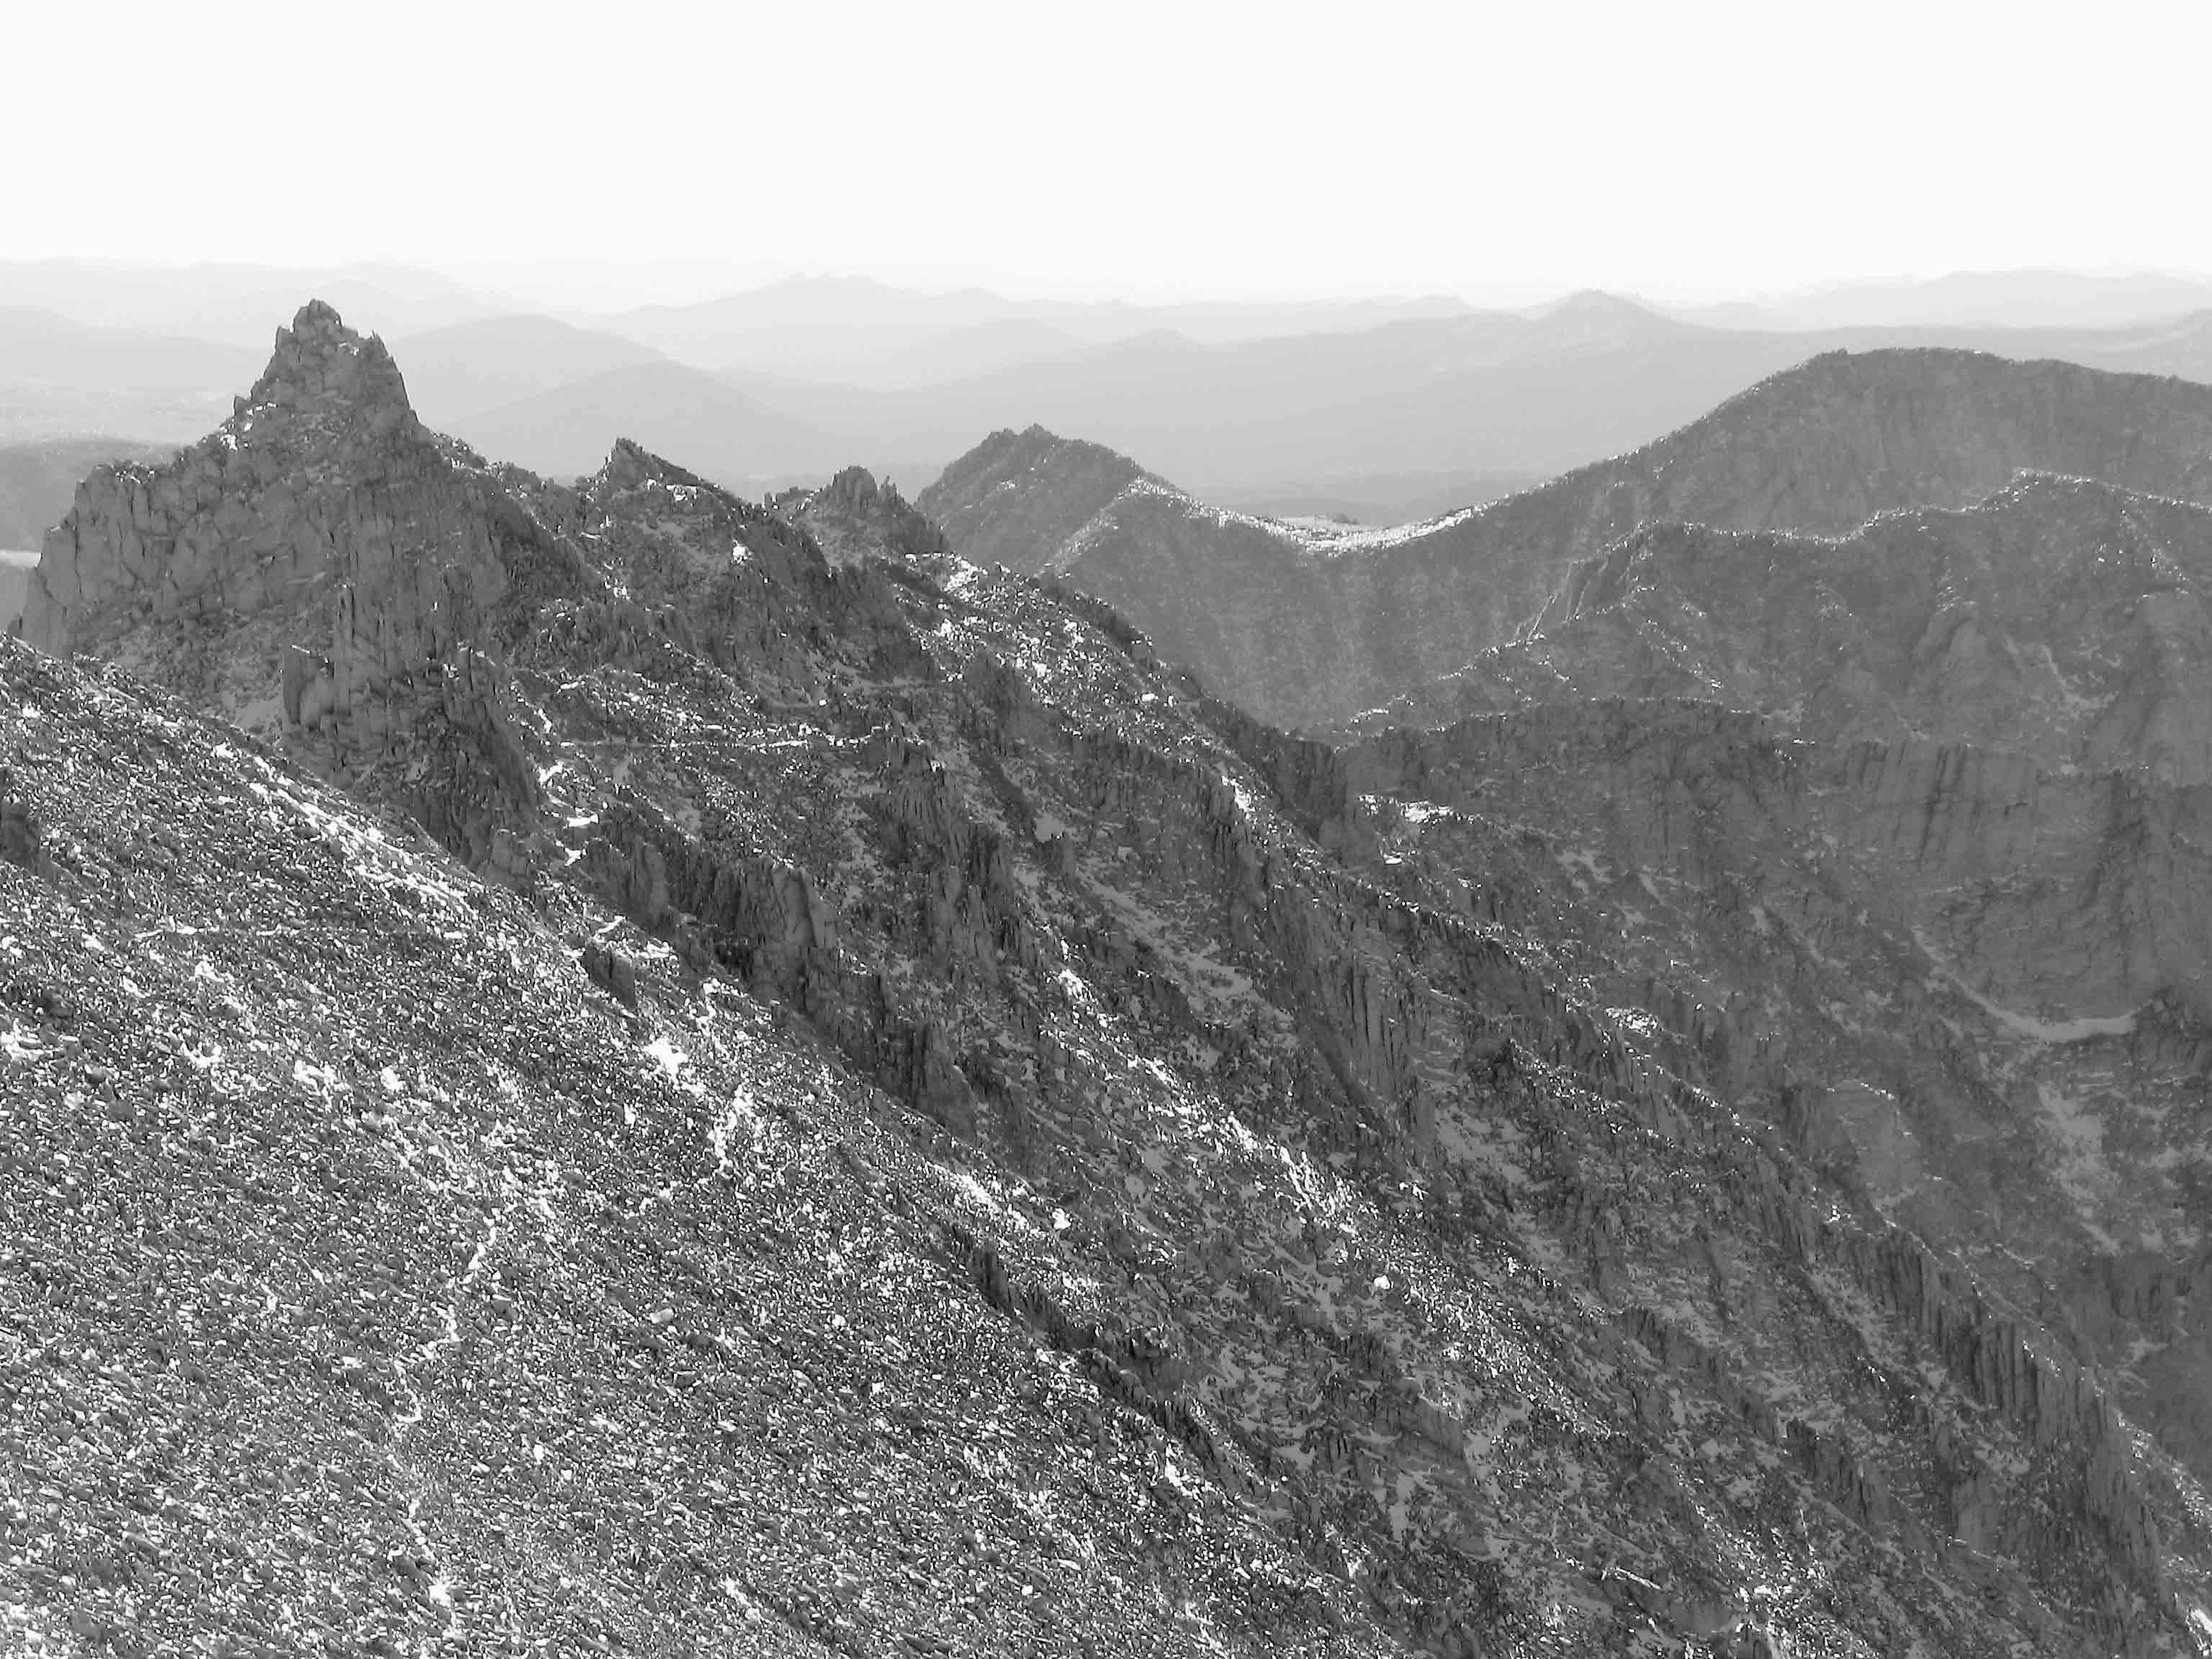
Above Trailside Meadow, the trail makes a couple small switchbacks as it climbs out of the drainage and back up onto slabs. If you look at a topo map, you’ll see that you have been following the nose of a small ridge radiating east from Wotans Throne. But shortly, you begin a traverse across a steep slope leading back into the creek drainage. You cross Lone Pine Creek, which is particularly flower-lined at this location, and proceed up more granite slabs toward Trail Camp. To the south, the skyline from left to right is: Mt. Irvine, appropriately shaped Arc Pass, Mt. McAdie, and Mt. Marsh, a small summit just beyond Mt. McAdie. Consultation Lake lies below Arc Pass.
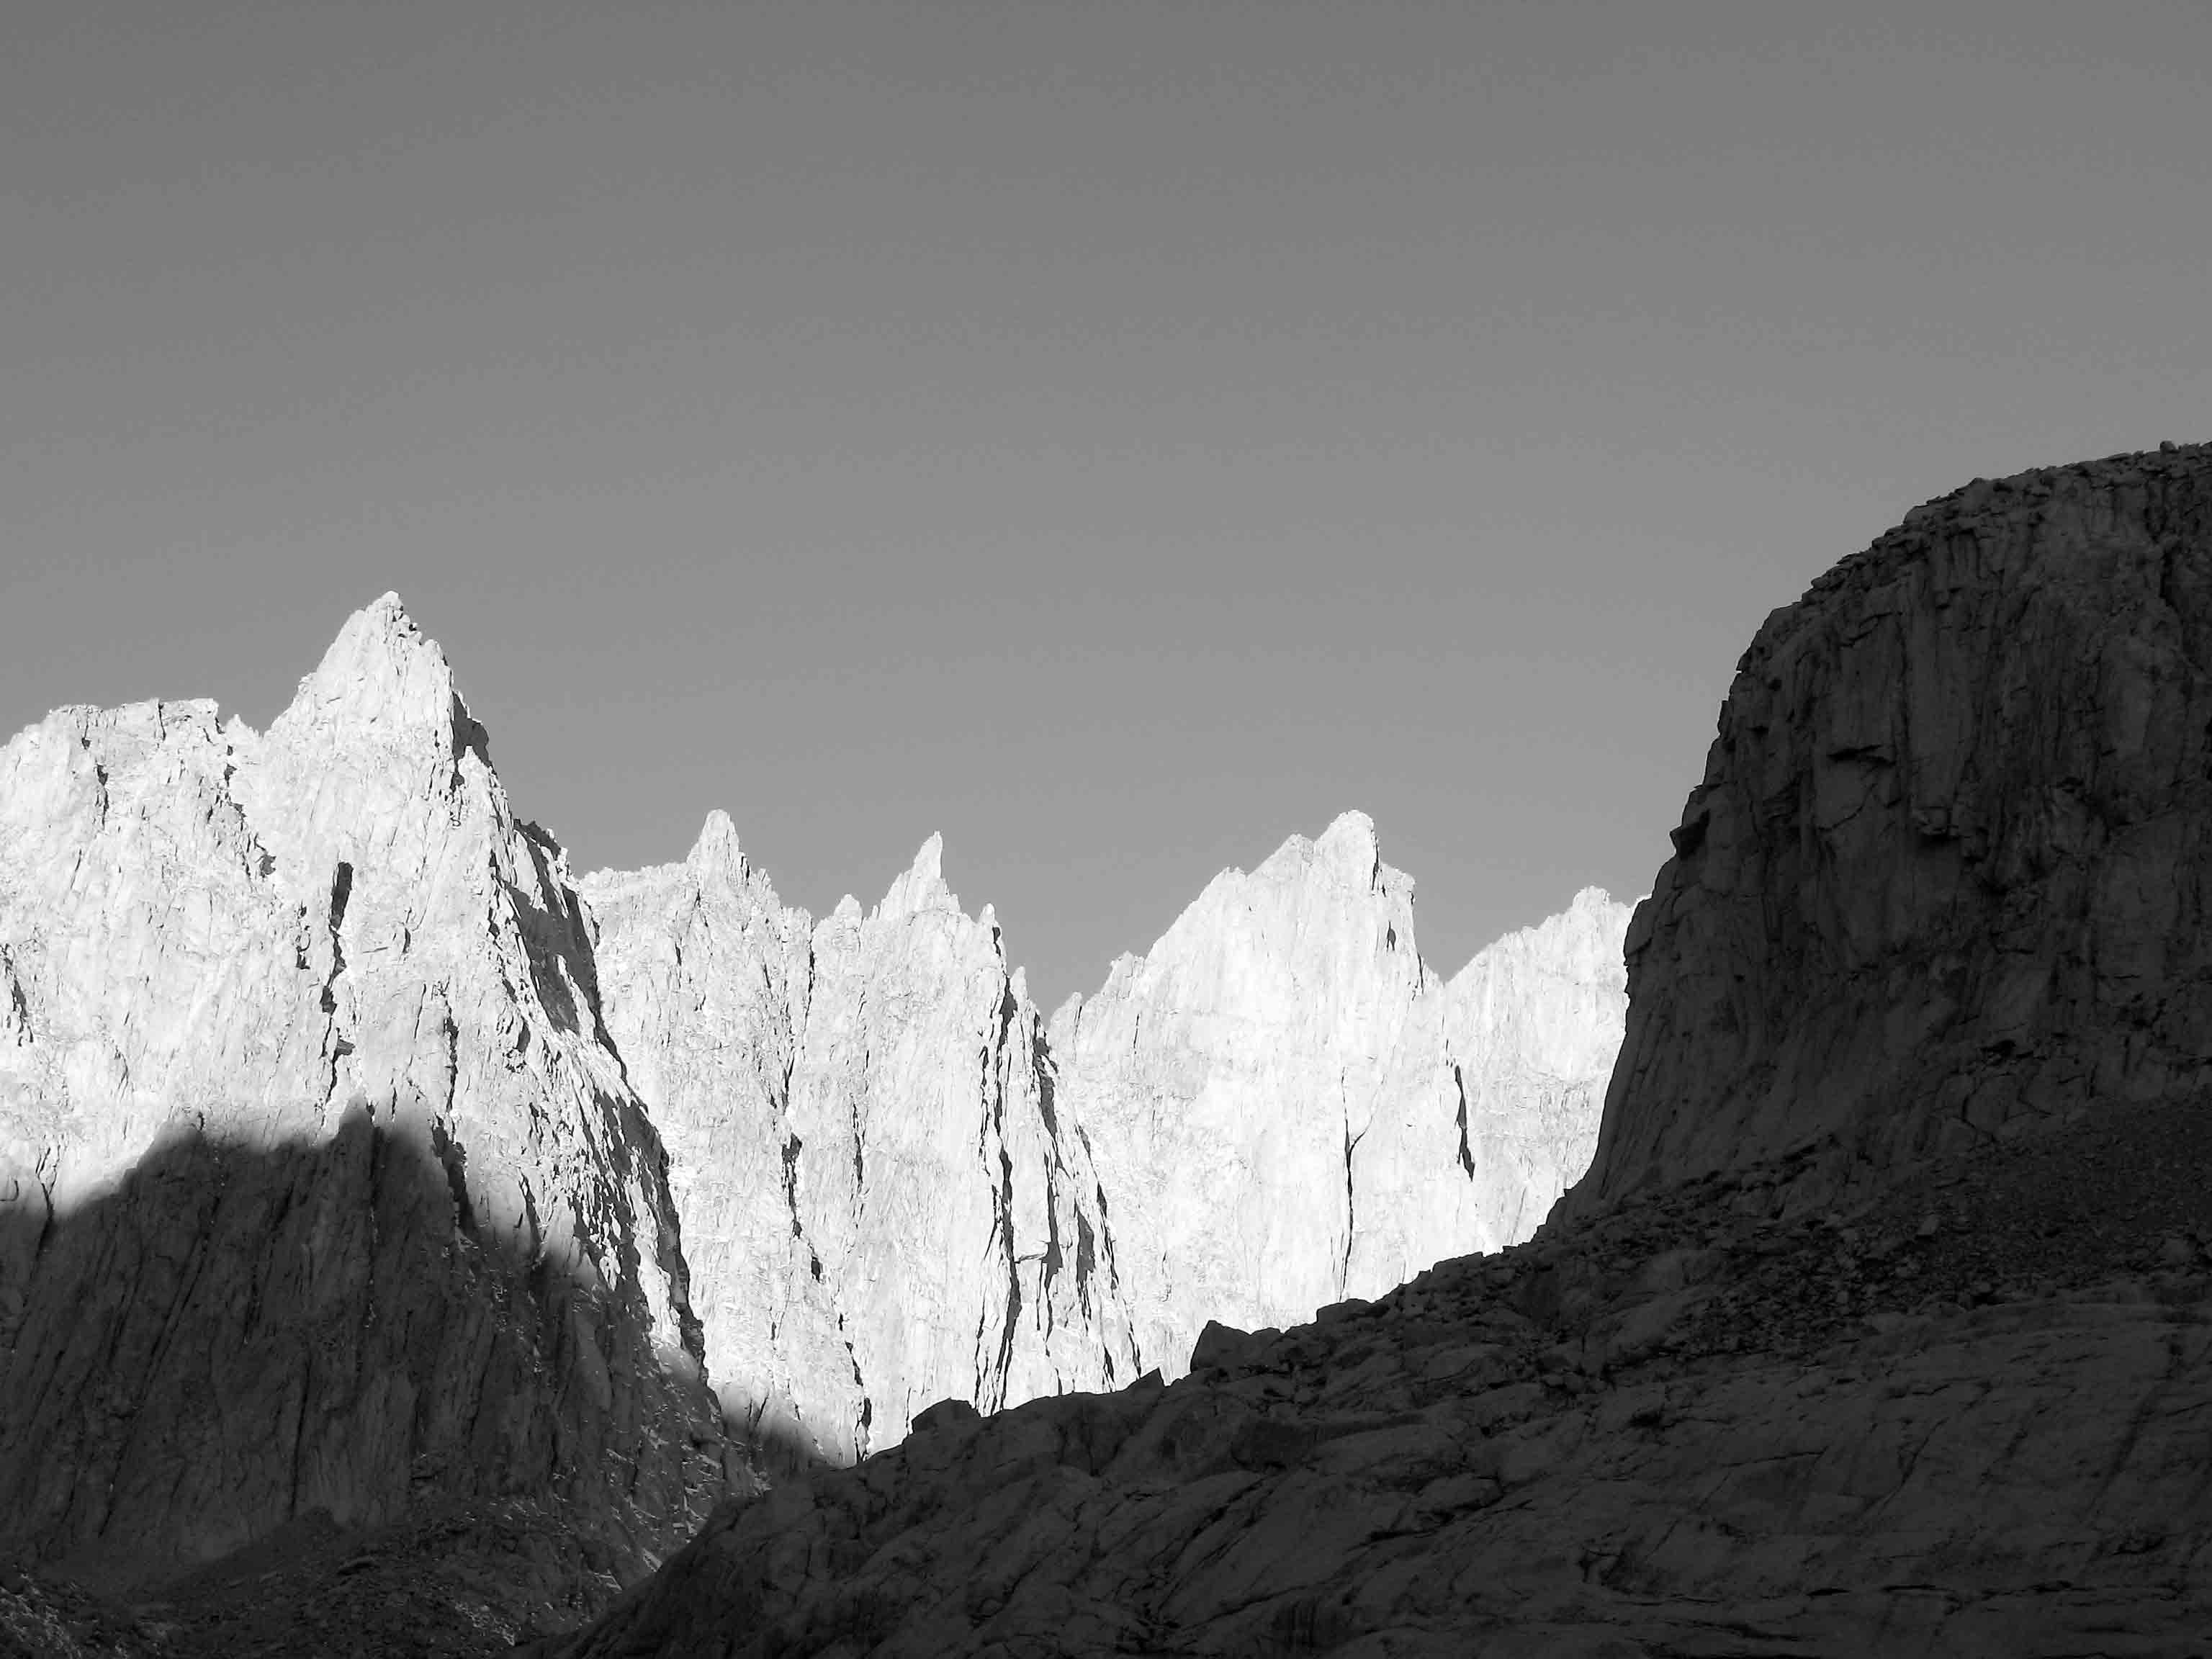
Stopping at Trail Camp to enjoy the first light on the Whitney crest from Mt. Muir north to Crooks Peak
Along the last 0.3 mile to Trail Camp, there are many camping options, with water from Lone Pine Creek just a short distance away. Trail Camp itself is a wonderfully scenic campsite and therefore often a zoo of people and tents. There are ample tent sites for everyone, although you can expect to hear the noise of other backpackers and dayhikers long before first light. Since there are no longer toilets tethering you to this specific location, if you want more privacy, search for alternate campsites a bit farther south, or select one of the campsites before you reach Trail Camp.
Mt. Muir with the lake at Trail Camp in the foreground
HINT: Make sure you have refilled your water bottles before you leave Trail Camp, or fill them at the small spring about a half mile up the switchbacks above Trail Camp. From Trail Camp, you have nearly 9 miles of hiking before you return to water.
| SECTION 7 | Trail Camp to Trail Crest |
No one denies that this is a tough stretch of the trail. You are already at 12,000 feet and face a 1600-foot slope with a relentless set of approximately 99 switchbacks—some short, some long, and, luckily, all well-graded. These switchbacks lead to a long talus field via a route that avoids both cliff bands and a large snowfield that can hug the western side of the slope well into the summer. About a third of the way up, you intersect a prominent cliff band where the trail has been blasted into rock. Snow and ice can persist here throughout the summer, so a handrail has been installed for safety. Take a moment to gaze down the steep slab of rock extending below the trail and look up at the colorful and jointed rock above the trail. Above this section, the meager vegetation becomes even sparser. See the section on natural history to identify some of the plants here.
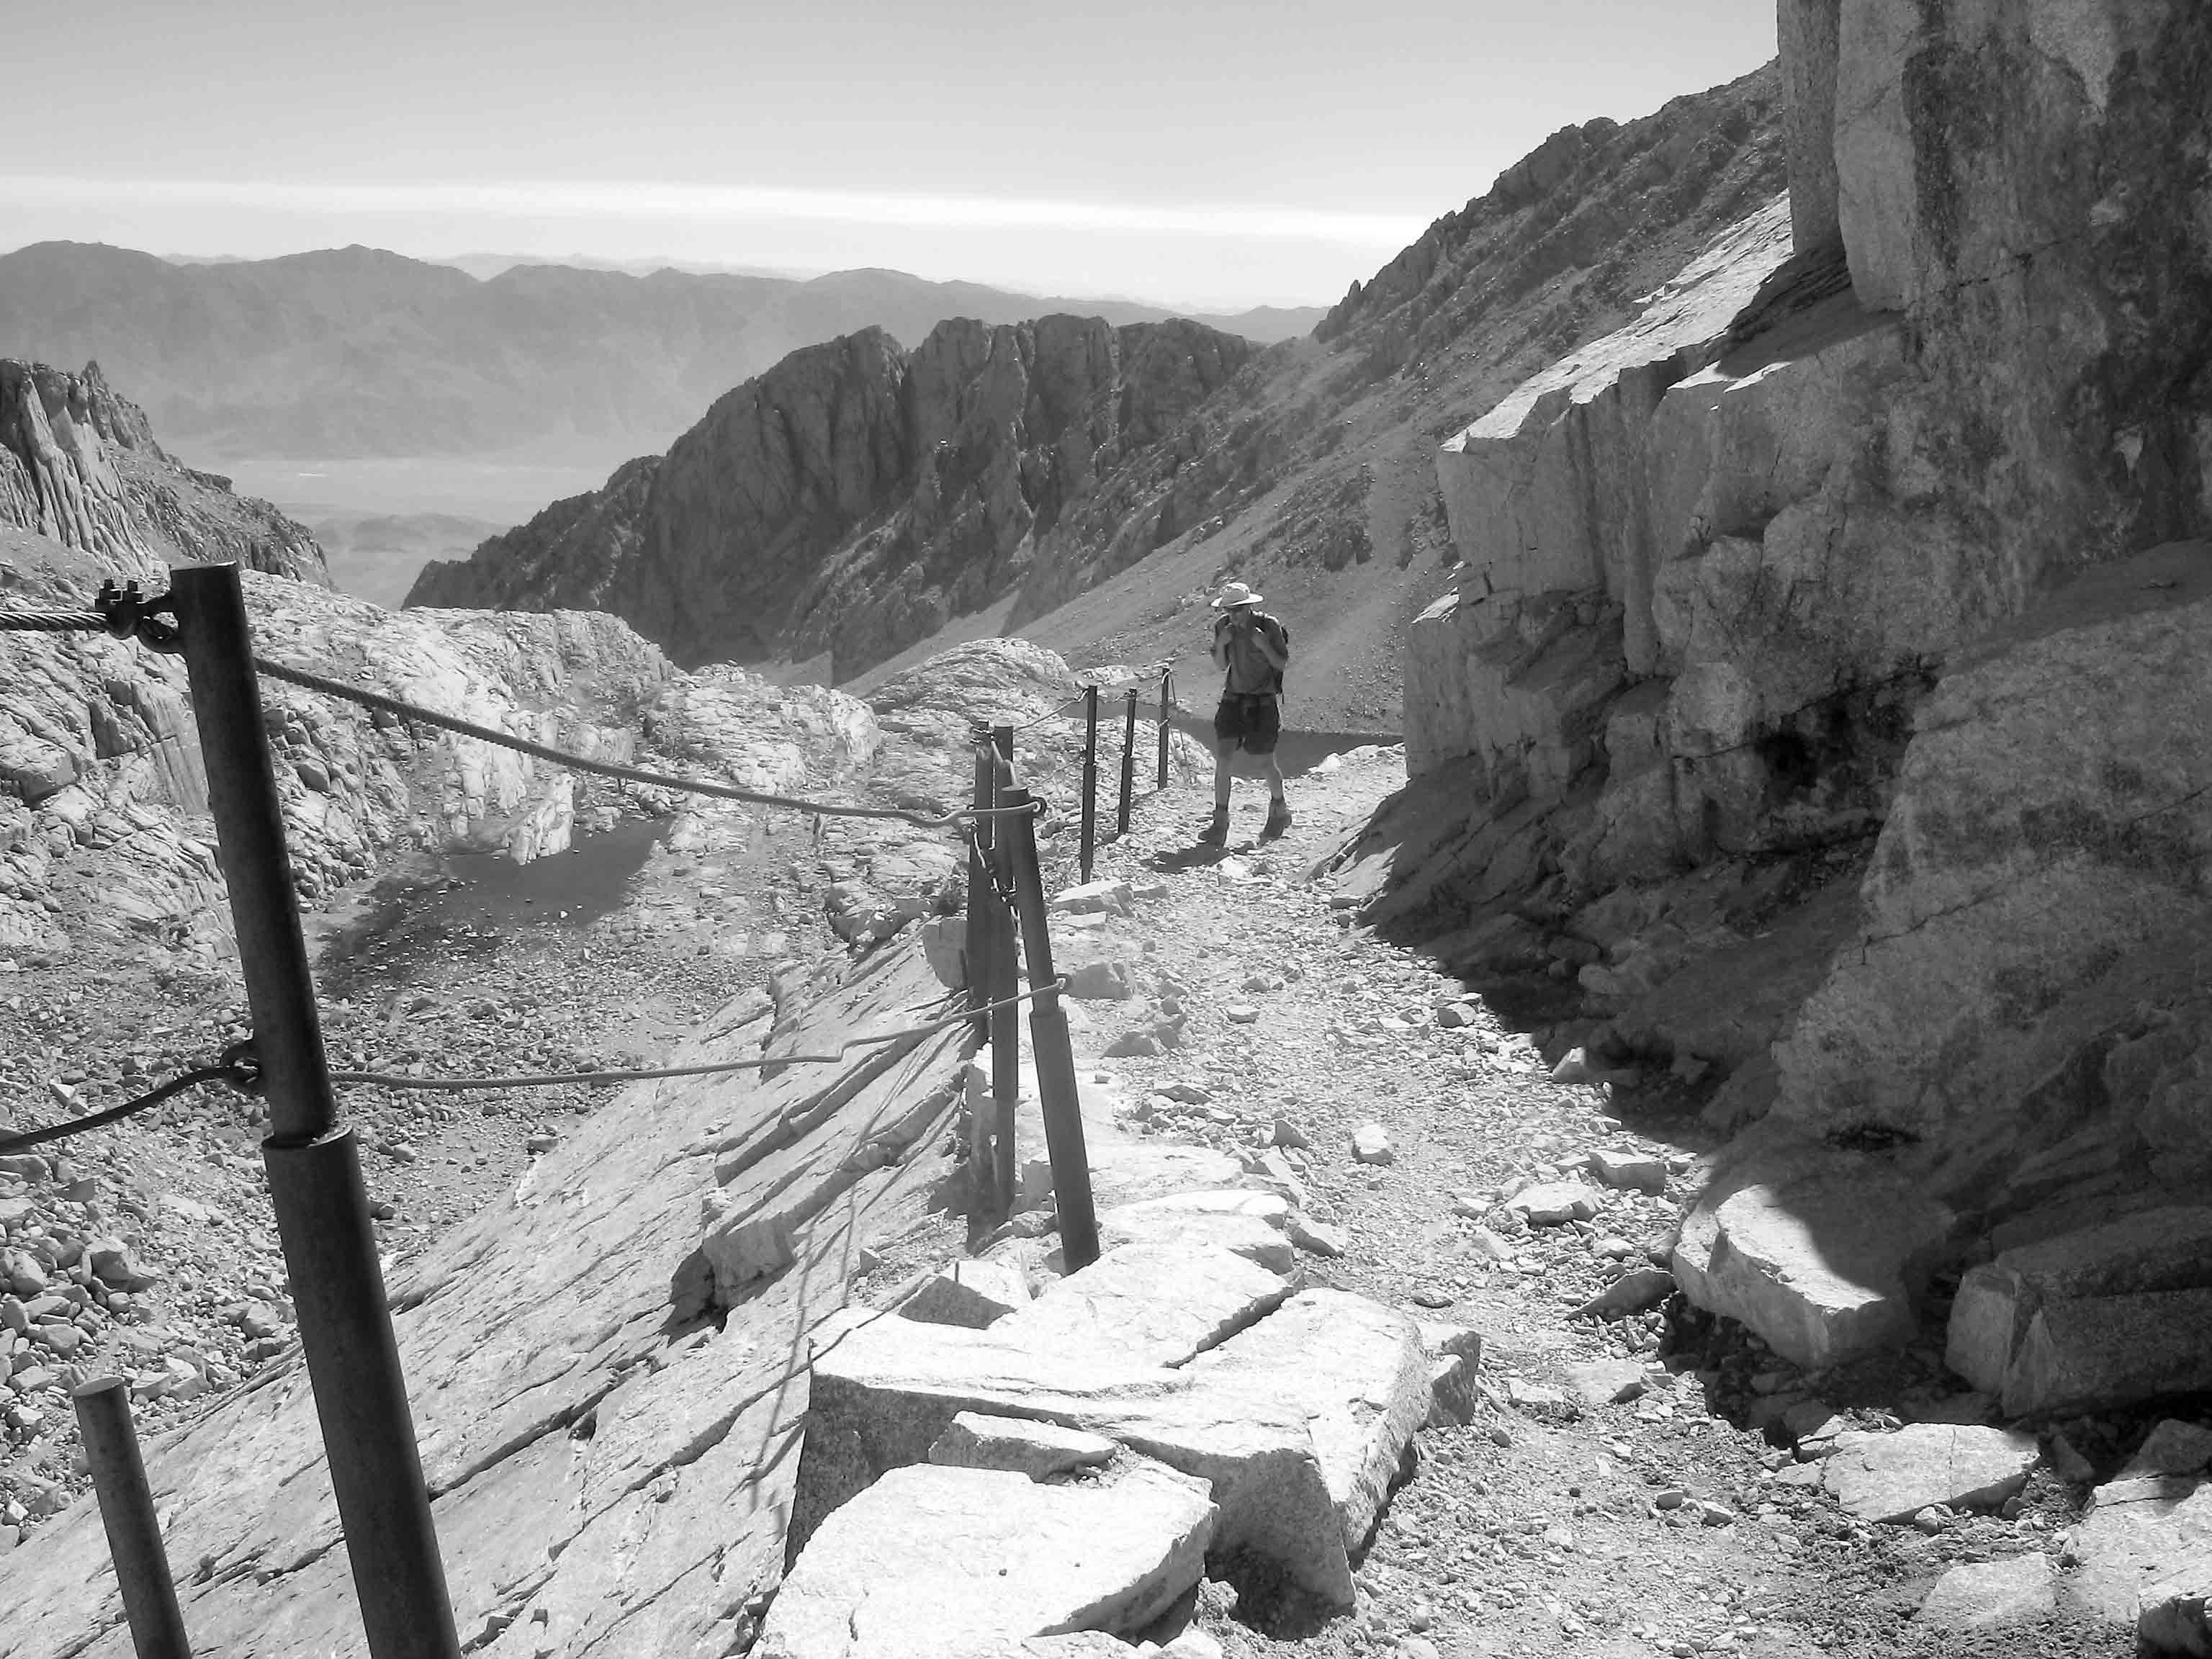
Ascending the stretch of switchbacks blasted into a steep face
As you take breathers, stop to look at the mountains. The higher you climb, the more peaks come into view. Mt. Muir, with a sharp summit and tall, steep east arête is the peak nearly due west of Trail Camp, and it dominates the view as you ascend the switchbacks. North of Mt. Muir is the long ridge of pinnacles ending with the flat-topped Mt. Whitney. Mt. Whitney is visible from the lowest switchbacks, but then not again until you are nearly at Trail Crest; Keeler Needle, the next summit south, blocks Mt. Whitney from your view. To the northwest is notably steep Mt. Russell, and to the northeast is the talus field that leads to the summit of Mt. Carillon. The last few switchbacks are longer, and after one final westward traverse, you reach Trail Crest and cross to the west side of the Sierra Crest.
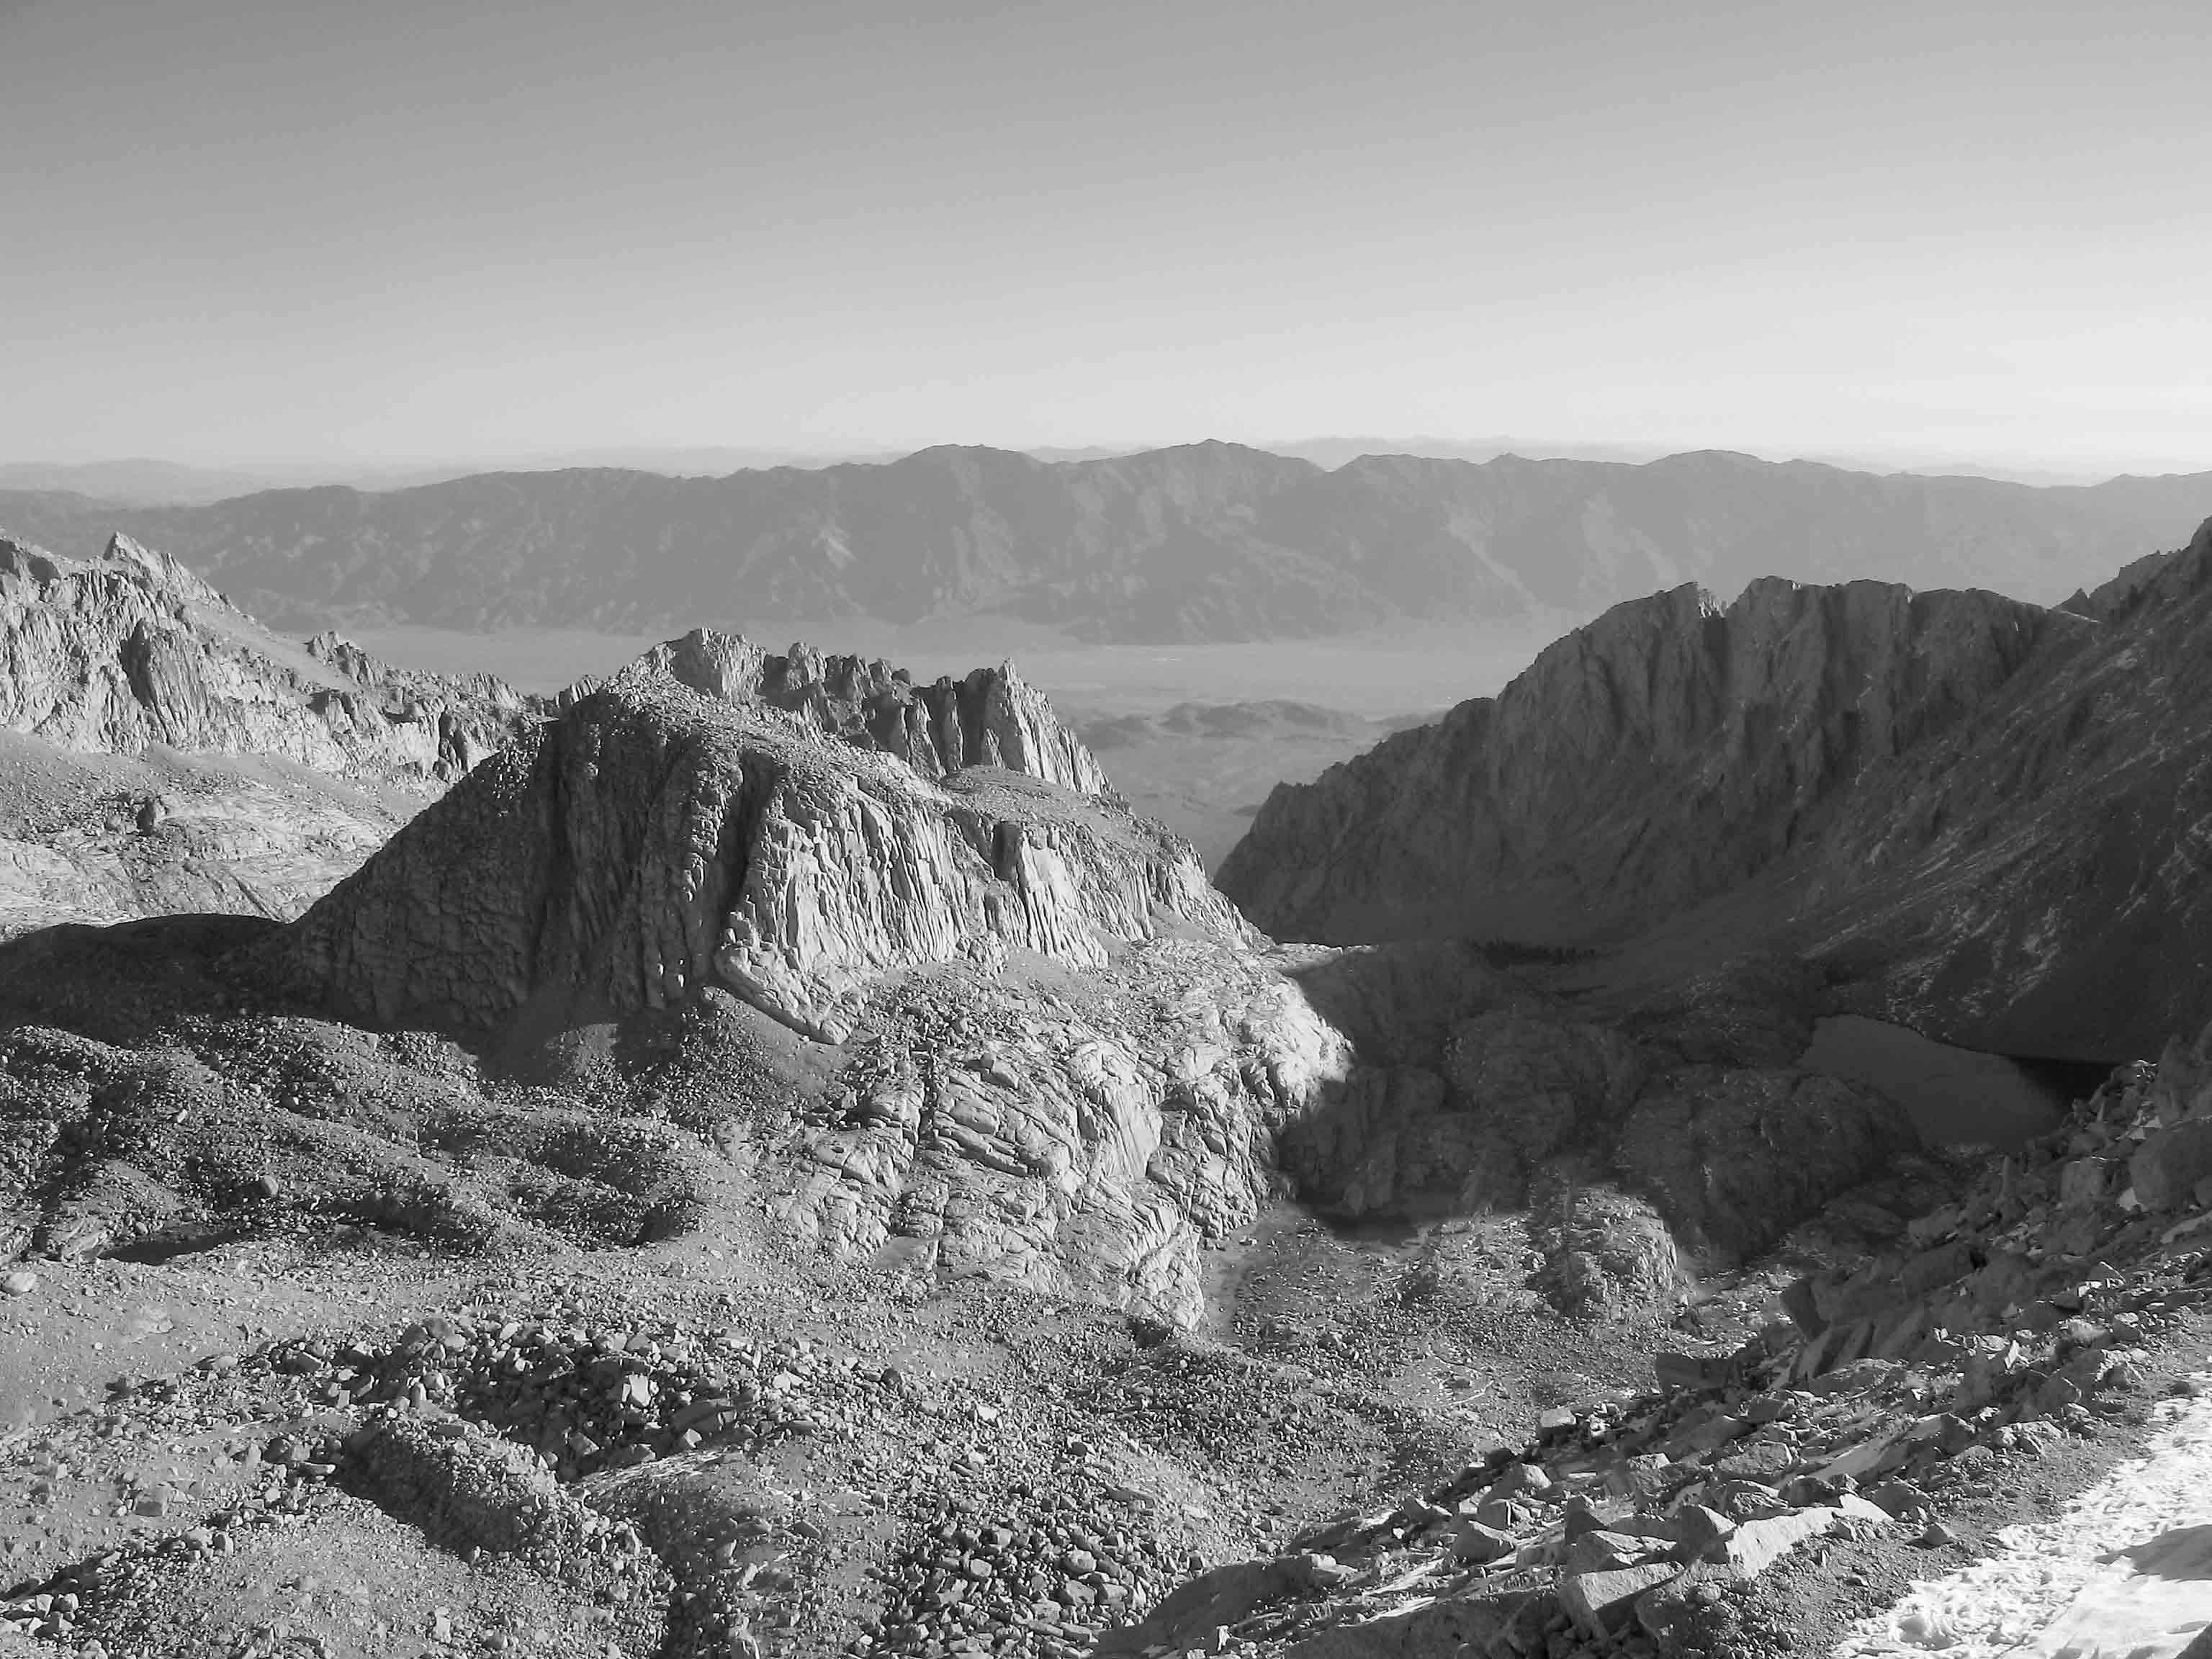
The view down to Wotans Throne and Trail Camp while ascending the 99 switchbacks
HINT: Many people find it easier to ascend a long slope like this if they can mentally tick off little bits of it as they go. Some possibilities:
- Count switchbacks.
- Carry an altimeter or GPS that tells you the elevation.
- Watch the peaks to the north become ever more prominent.
- Or, my bizarre favorite when I’m tired: count steps. I just count to 1000 steps over and over again. It keeps my mind focused and I go faster and farther.
| SECTION 8 | Trail Crest to “End of Pinnacles” |
The last miles of the trail to the summit of Mt. Whitney traverse the slope just west of the crest in Sequoia National Park, crossing talus fields and winding among jagged pinnacles. From Trail Crest, you descend briefly but steeply, skirting past a few rock towers and enjoying the view down to the Hitchcock Lakes and up to Mt. Hitchcock. Almost immediately, you reach the junction with the John Muir Trail, where you head right (north). From here to the summit of Mt. Whitney, the Mt. Whitney Trail and the John Muir Trail follow the same path. You may see backpacks stashed around this junction, as backpackers arriving from the west generally choose to carry only minimal gear to the summit. Note that the John Muir Trail, which descends the western slope of Mt. Whitney, is more pronounced than the Mt. Whitney Trail at this junction, so be sure to take the correct (right-hand) branch. Beyond the junction, you cross a talus field, dotted with bivy sites, some of which are nearly on the Sierra Crest.
Pinnacles just north of Trail Crest
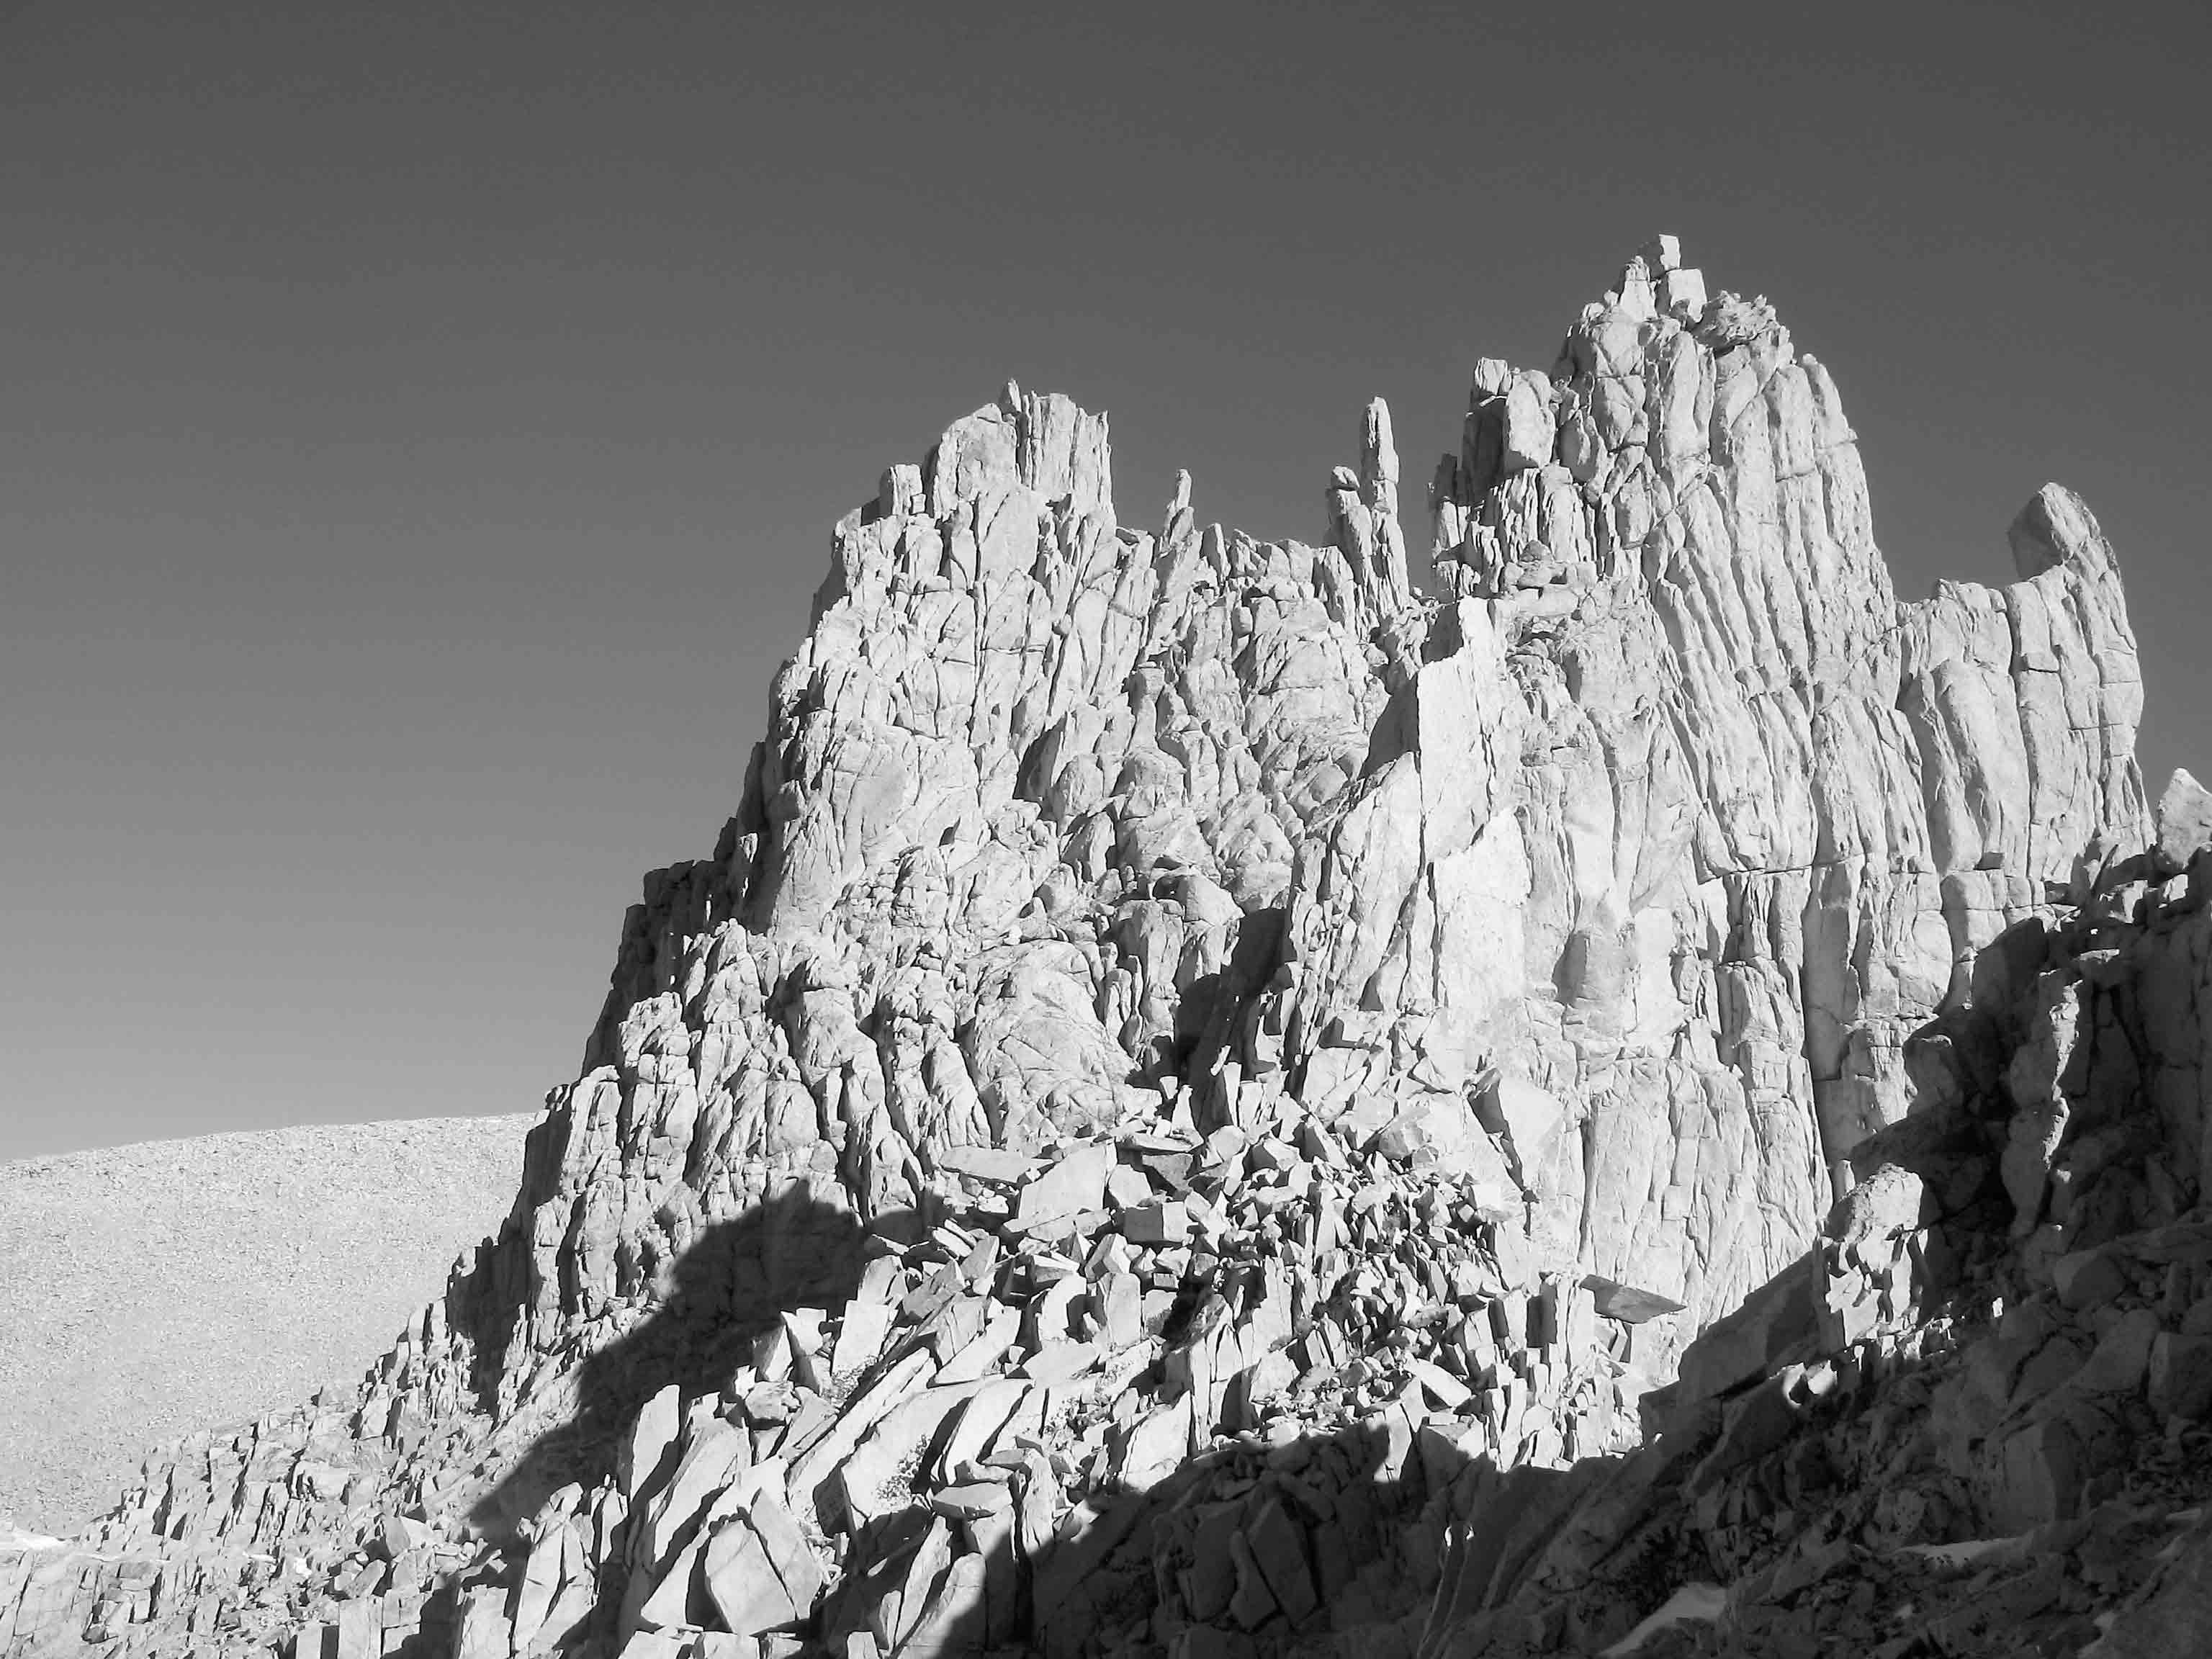
At about 13,800 feet, the trail levels off and enters a maze of pinnacles. The slope here has a scalloped appearance, due to the many avalanche chutes that transect it. The many ridges of pinnacles mark the boundary between two avalanche chutes. Between pinnacles, you have open views to the west; in the distance are the dark, jagged Kaweah peaks, while granite slopes dominate the foreground. You repeatedly pass narrow notches, with jaw-dropping views straight down to the east. Near the beginning of this traverse, you may note some rock cairns and well-trod use trails that leave the Mt. Whitney Trail in the direction of 14,012-foot Mt. Muir, a few hundred feet to the east.

Lone Pine Peak and Wotans Throne (in the foreground) can be viewed through many of the “windows” along the trail
HINT: Along this stretch, you are at nearly 14,000 feet. Try to walk so slowly that you don’t need to stop more than once every 15 minutes. Just keep thinking, “breathe-step-breathe-step” or even take two breaths per step—just try hard to find that “slow and steady” pace that lets you keep going.
Mt. Muir, viewed from the north on the final switchbacks up Mt. Whitney
| SECTION 9 | “End of Pinnacles” to Mt. Whitney Summit |
Leaving the pinnacles behind, you are just 1 mile from the summit. Before you is a large, barren talus field. Large boulders are embedded in sand, with ever smaller numbers of alpine gold and sky pilot growing in sheltered crevices. Traverse across the western face of Crooks Peak (previously named Day Needle) and Keeler Needle, two 14,000-foot points that are too indistinct from Mt. Whitney to be considered true peaks. (Both are straightforward talus climbs from the Mt. Whitney Trail, but they have vertical eastern faces.) Beyond Keeler Needle, the trail bends westward for a stretch, before beginning the final climb to the summit. There are a few half-hearted switchbacks up the last talus field. Nearly all the people heading down will encourage you onward with calls of, “You can’t see the summit hut yet, but you’re almost there.” In fact, due to the summit plateau’s very shallow angle, you don’t see the summit hut until just minutes before you reach the top. All of a sudden, the views open in every direction. See the labeled panoramic picture to help you identify the peaks. A large summit register sits by the entrance to the stone hut. Sign your name, then head to the giant boulders a short distance east to take a long, well-deserved break.

The western slopes of Keeler Needle and Crooks Peak are simply talus piles

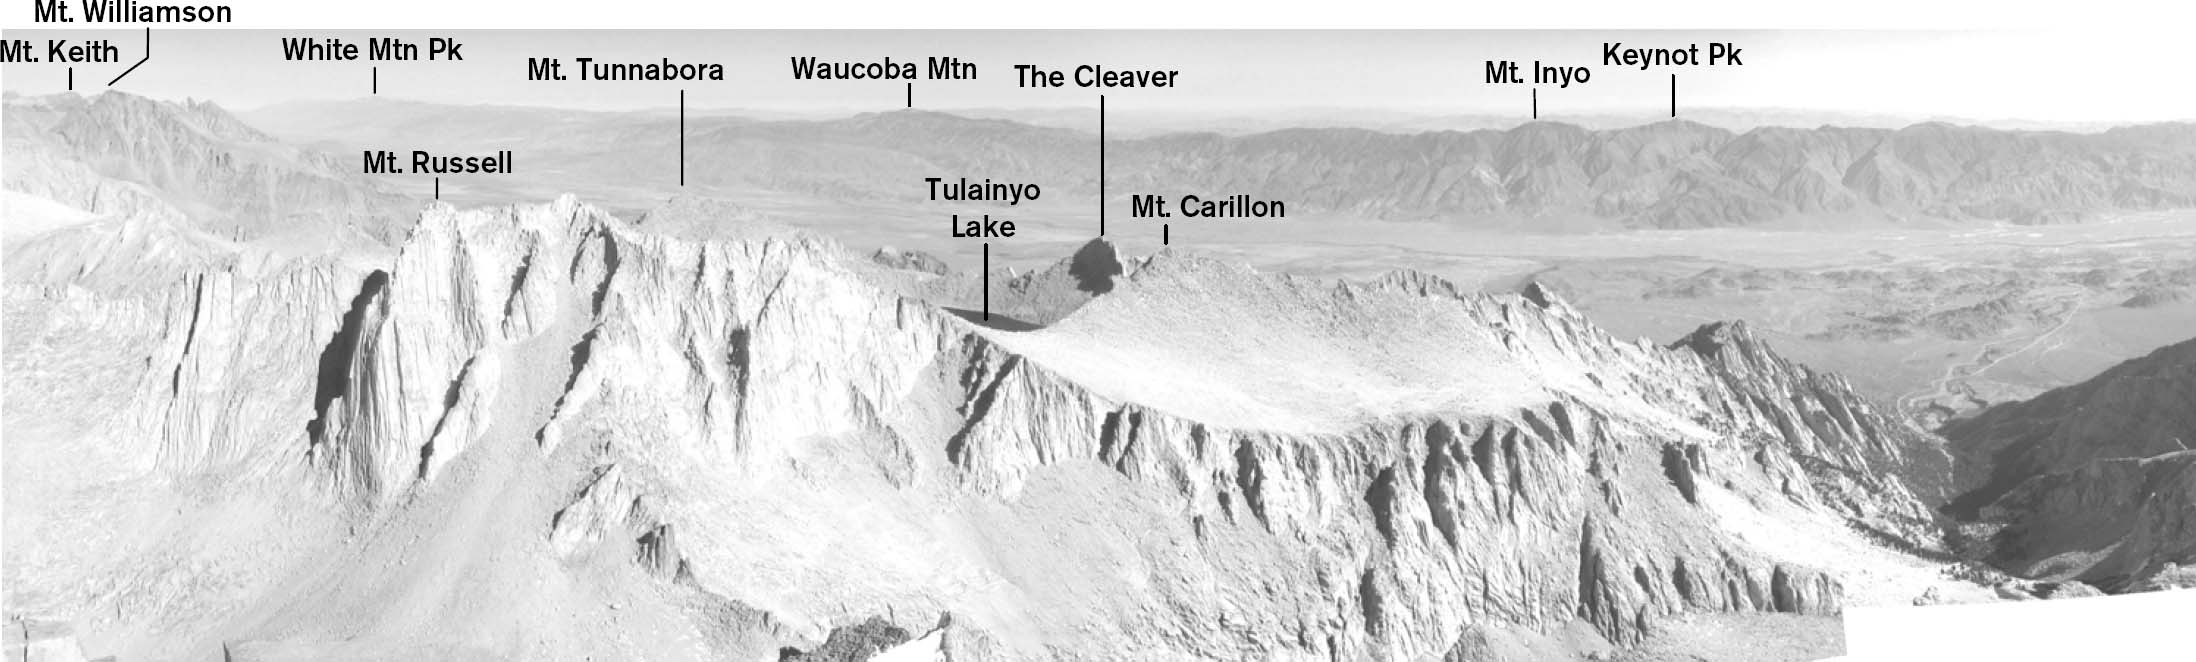
The view west from Mt. Whitney to the Kern Canyon, Kaweah Basin, and the Kaweah peaks

Giant talus blocks dot the summit as you approach the summit hut
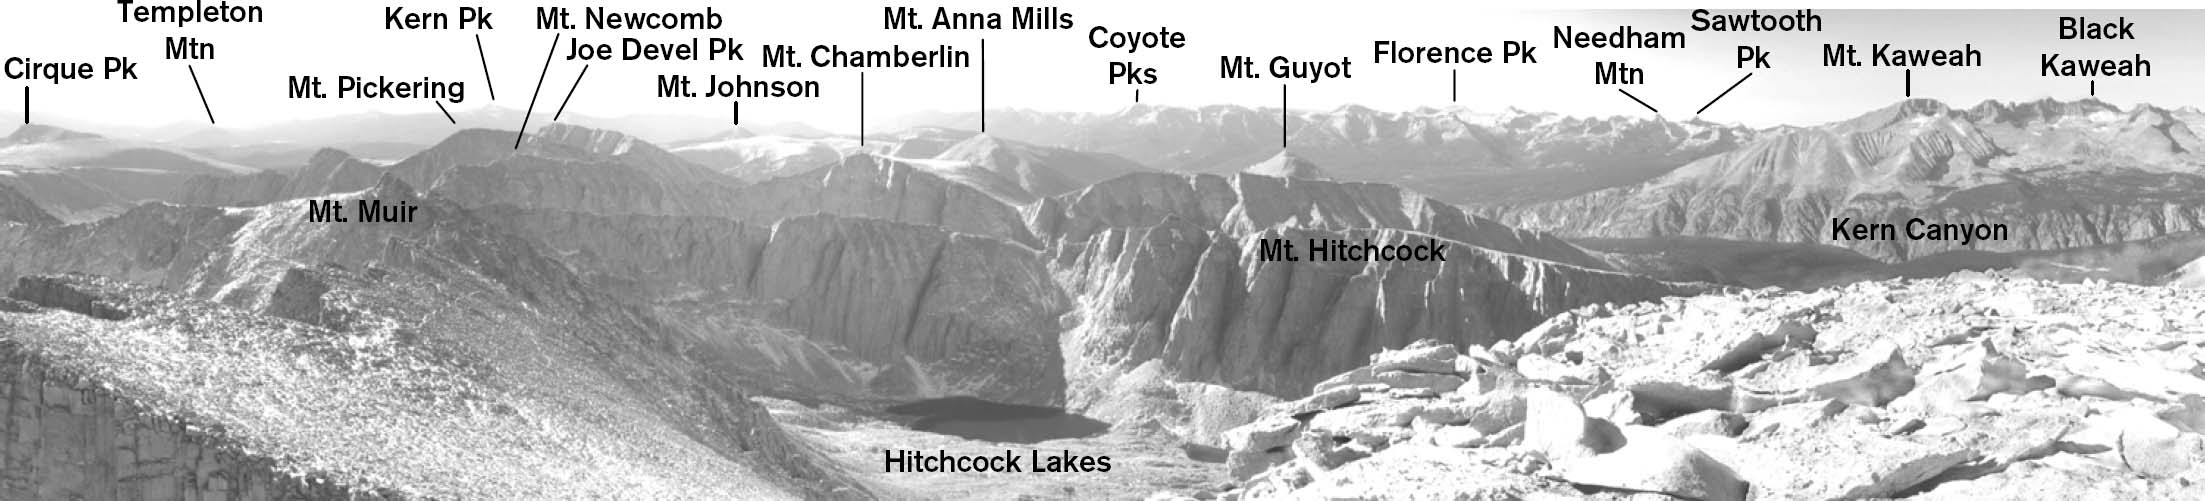
PANORAMIC VIEW FROM THE SUMMIT OF MT. WHITNEY
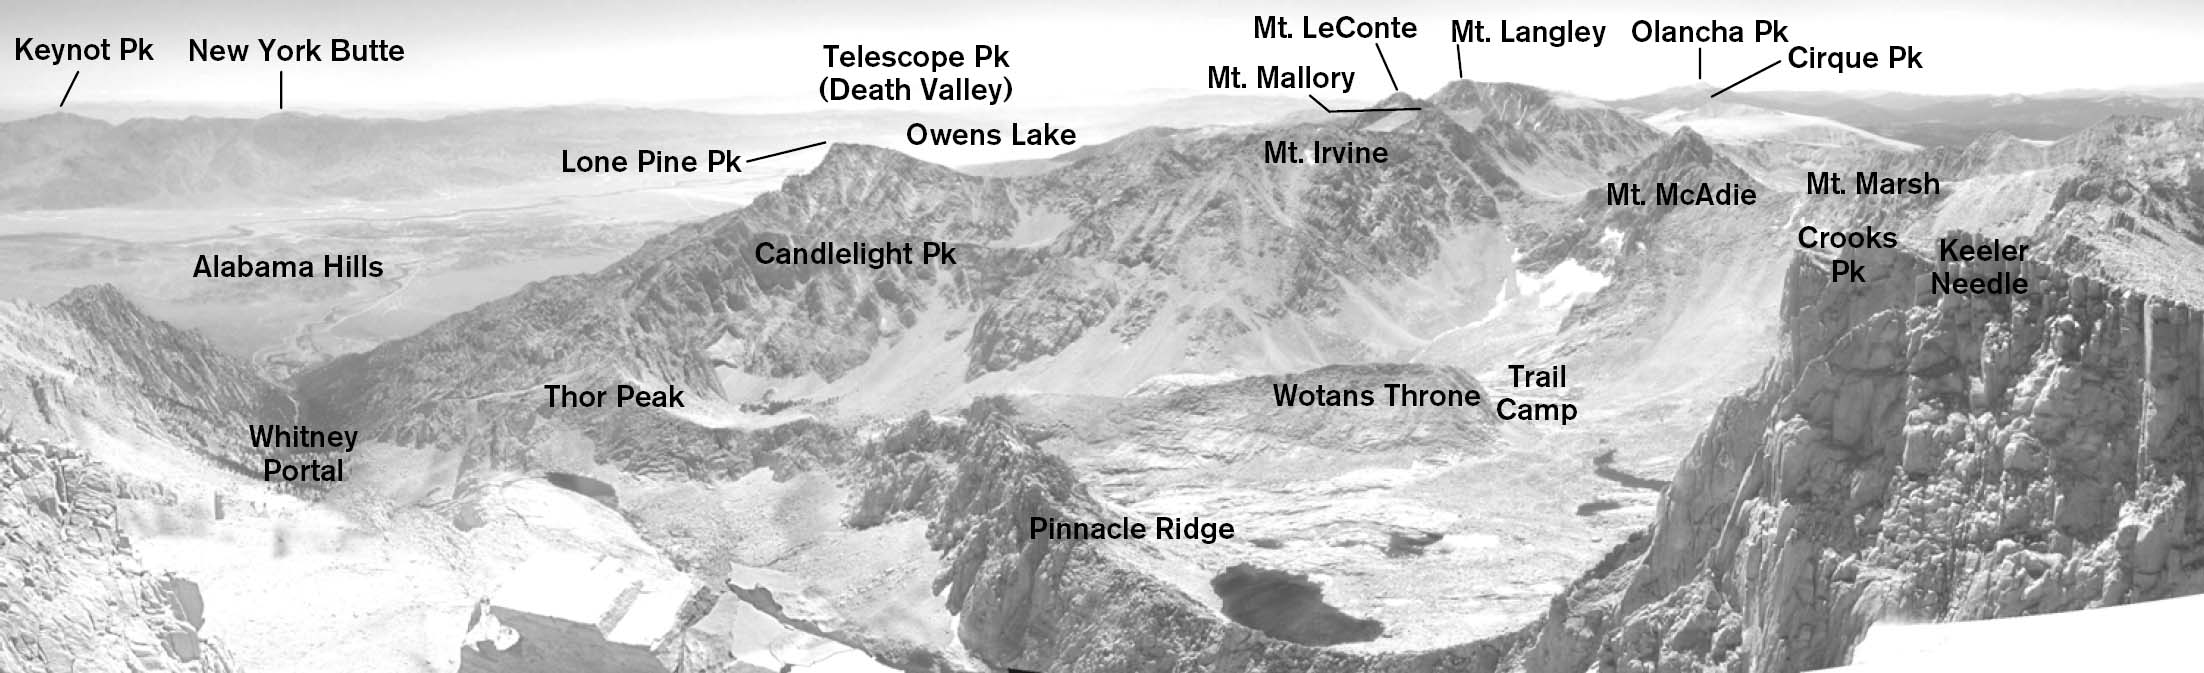

Namesake peaks visible to the south of Mt. Whitney include Mt. Irvine, Mt. Mallory, Mt. Langley, and Mt. McAdie
The Descent
As you retrace your steps to Whitney Portal, keep the following in mind:
- At the junction with the John Muir Trail, the Mt. Whitney Trail heads up to Trail Crest, which means you go south (left).
- Until you are below Outpost Camp, the trail is gravelly and hard underfoot. Thrashing your feet pounding down the upper stretches of the trail is not a wise idea.
- It is especially important to watch you footing on the gravel-covered granite slab between Trail Camp and a bit below Trailside Meadow.
- Keep drinking water and eating food.
- Most accidents occur on the way down a mountain, when you are tired. While you want to get home and minimize hiking after dark, take it easy and take breaks. Also avoid running down the mountain—most injuries, including twisted knees and ankles, occur at the end of the day when you are tired.

Descending the 99 switchbacks in the late afternoon