2
Adjusting Patterns for a Better Fit
Perfect fit depends on buying the correct pattern size and then adjusting it for your body. Even when sewing with knit fabrics, simple pattern adjustments will make every garment fit as if it was designed just for you. The following pages explain how to choose the most appropriate fabric, how to measure your body so you can determine your correct pattern size, how wearing ease and design ease play a part in the fit of the garment, and whether you need to make simple fit adjustments to the paper pattern. Basic length and circumference pattern adjustments are also explained in detail.

Fabric & Pattern Selection
It is important to understand the compatibility of your pattern and fabric. You could make the same pattern in five different fabrics and it would probably fit five different ways. Understanding the stretch factor of your knit, the amount of wearing ease that you prefer, and the amount of design ease that is built into the pattern (see Understanding Ease on the opposite page) you will be able to make better fabric and pattern choices and achieve a better fit.
Fabric Selection
Stable knits, such as ponte knit, double knit, and other knits with little or no stretch are not meant to be sewn into styles that are snug or close fitting; instead, they look best made in styles that skim the body. These fabrics need the same amount of ease as patterns designed for woven fabrics. This is considered positive ease.
Knits that stretch in all four directions, often used for garments like wrap tops and dresses, athletic wear such as yoga pants, and swimwear, require negative ease in the range of minus 1/2" to 1" (1.3 to 2.5 cm). Negative ease is for garments that are meant to expand to allow the body to move.
Garments made from soft and stretchy knits that stretch in two directions, will probably fit larger than expected, so the amount of ease can be reduced before cutting out the pattern, or you can choose a smaller size pattern. For instance, a fitted or semifitted top made in soft jersey or interlock needs only about 1/2" to 1" (1.3 to 2.5 cm) additional bust ease.
Pattern Selection
If you are new to sewing knits, select a pattern that is relatively simple, with few fussy details, so that you become accustomed to working with the fabric before having to correct fit issues. Avoid zippers, buttonholes, plackets, cuffs, and tailored details at first.
Conventional Patterns
Conventional patterns are generally designed for woven fabrics that do not stretch. Check the description of the garment and the recommended fabrics on the pattern envelope. If knits are not listed, then you will need to either select a different pattern or measure the pattern to determine how it is designed to fit (see Understanding Ease). If you decide to use a conventional pattern, you might need to start with a smaller or larger pattern size than you typically choose or sew smaller or larger seam allowances.
For-Knits-Only Patterns
Many patterns are designed specifically for knit fabrics and this information appears on the pattern envelope. While a conventional pattern can be made in a knit, it is difficult to reverse that theory. A garment intended for a knit would likely be too small when made in a woven fabric.
Patterns made for knits-only have varying seam allowance widths. The most common seam allowance for conventional patterns is 5/8"-wide, but many patterns for-knits-only have 1/4"-wide seam allowances.
Understanding Ease
Ease is one of the most overlooked aspects of fitting and sewing, but it is one of the most important concepts. There are two types of ease, wearing ease and design ease and, combined, they are used by the pattern designer to create both comfort and style. When determining how a pattern will fit, you will need to consider the amount of ease built into the pattern pieces.
Wearing Ease
Wearing ease is the amount of extra circumference of fabric in a garment that allows you to move and feel comfortable. Wearing ease is a very personal choice. Some people like close-fitting garments, while others prefer a looser fit, even in the same style garment.
Design Ease
Design ease is the amount of extra fabric in a garment that creates the style, as intended by the pattern designer; it is the extra inches (cm) of fabric added beyond wearing ease. If you measure a pattern that would appear to be your size (according to the measurement chart) and the pattern measurements are much larger than your body measurements, then the designer purposely designed this style to be a loose-fitting garment.
The first words in the pattern description (on the envelope) are indicators of what the designer intended as a fitting category.
• Fitted. Garments touch the body without constraint.
• Semifitted. Garments skim the contours of the body.
• Loose Fitting and Very Loose Fitting. Garments hang away from the body in varying amounts.
Design Ease Chart
You can determine how much total ease has been added to a pattern by comparing measurements between the bust, waist, and hip measurements indicated on the size chart to the measurements of the actual pattern pieces (see Measuring Your Pattern for Personalized Fit). For example, if the size chart indicates a bust measurement of 34" (86 cm) and the pattern measures 38" (96.5 cm), the amount of ease over the bust area is 4" (10 cm). Or, you can refer to the chart on the opposite page for the typical amount of ease added for different garment types and different fitting styles. This information tells you how much ease the garment will have once you finish making it, so that you can make some pattern adjustments, if you wish, for a closer or looser fit.
Design Ease Chart for Woven Fabrics and Stable Knits
The amounts of ease listed in the chart are considered the maximum for knit garments because the degree of stretch of each particular knit fabric determines how much ease you want or need. Use this chart as a baseline for stable knits. For stretch knits, the amount of ease you add is a personal choice based on your shape, how you like garments to fit, and the degree of stretch in the fabric you are working with. Generally, the more the fabric stretches, the less ease you need to add.
Ease Chart for Woven Fabrics and Stable Knits |
||||||
These amounts are considered the maximum amounts of ease for knit garments. |
||||||
Style |
Bust Ease |
|||||
|
Blouse/Dress |
Jackets |
Coats |
|||
Fitted |
3" to 4" (7.6 to 10.2 cm) |
31/2" to 41/2" (8.9 to 11.4 cm) |
5" to 7" (12.7 to 17.8 cm) |
|||
Semifitted |
4" to 5" (10.2 to 12.7 cm) |
41/2" to 51/2" (11.4 to 14 cm) |
7" to 8" (17.8 to 20.3 cm) |
|||
Loose Fitting |
5" to 8" (12.7 to 20.3 cm) |
51/2" to 10" (14 to 25.4 cm) |
8" to 12" (20.3 to 30.5 cm) |
|||
Very Loose Fitting |
more than 8" (20.3 cm) |
more than 10" (25.4 cm) |
more than 12" (30.5 cm) |
|||
|
Upper-Arm Ease |
|||||
|
1" to 2" (2.5 to 5 cm) |
2" to 41/2" (5 to 11.4 cm) |
4" to 51/2" (10 to 14 cm) |
|||
Ease Chart for Woven Fabrics and Stable Knits |
||||||
These amounts are considered the maximum amounts of ease for knit garments. |
||||||
Style |
Pant and Skirt Ease |
|||||
|
Full Hip |
Waist |
Stride Length |
|||
Fitted |
2" to 3" (5 to 7.6 cm) |
1" to 2" (2.5 to 5 cm) |
1" (2.5 cm) if hips are less than 37" (0.94 m) |
|||
Semifitted |
3" to 4" (7.6 to 10.2 cm) |
|
11/2" (3.8 cm) if hips are 37" to 40" (0.94 m to 1 m) |
|||
Loose Fitting |
4" to 6" (10.2 to 15.2 cm) |
|
|
|||
Very Loose Fitting |
more than 6" (15.2 cm) |
|
2"+ (5+ cm) if hips are 40" (1 m) or more |
|||
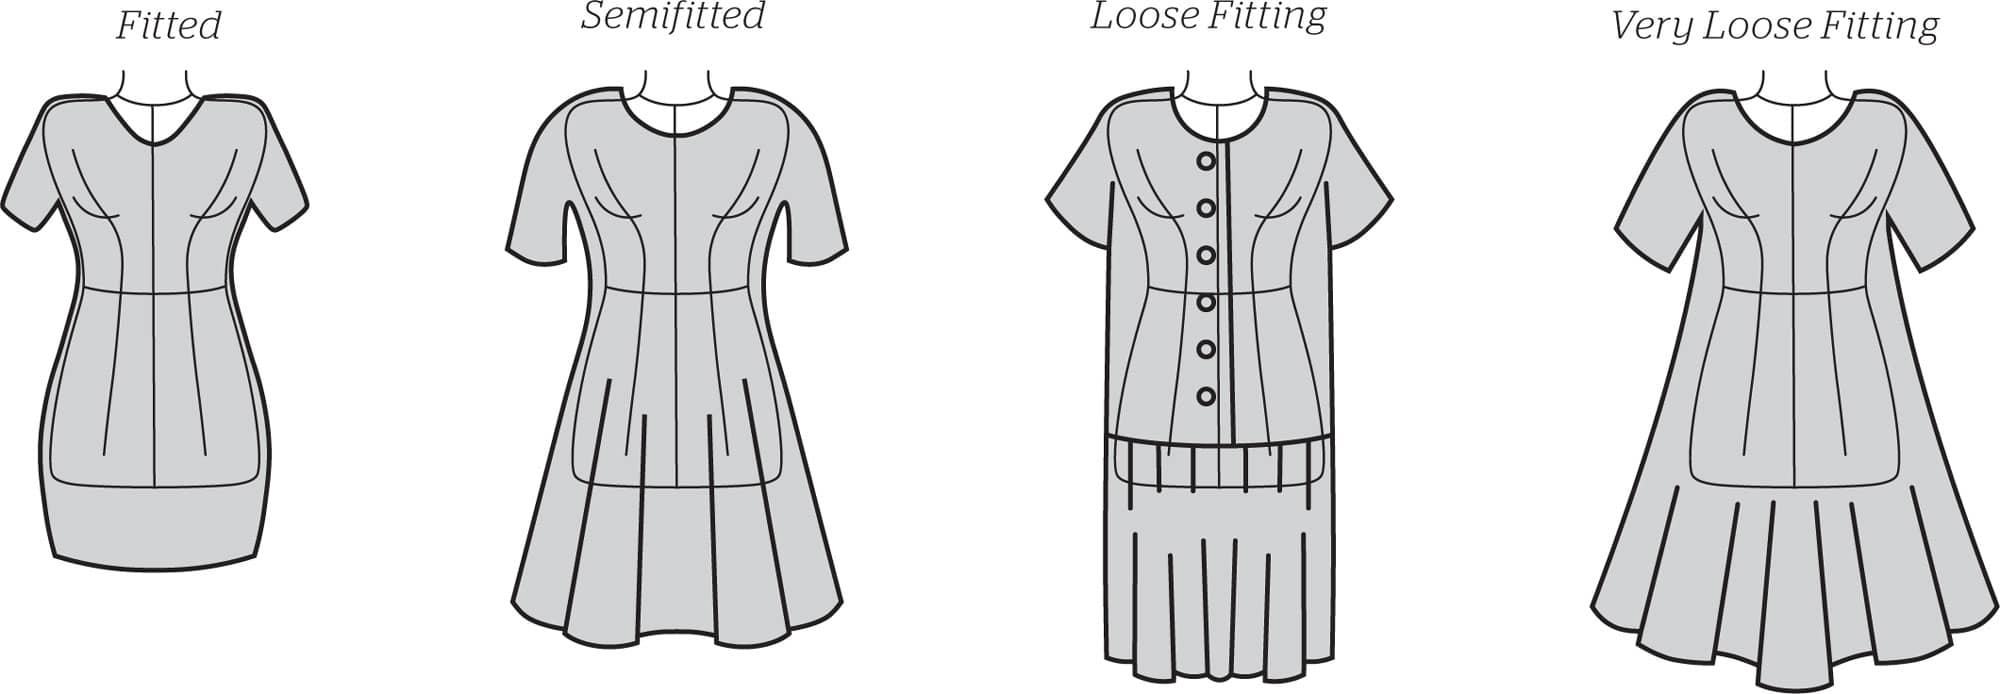
Garment ease from fitted to very loose fitting.
Taking Accurate Measurements
This section covers the tools you will need, as well as how to take accurate measurements for yourself or for someone else.
Tools
You will need a few specific tools in order to measure yourself (or someone else) accurately.
• Tape measure. A tape measure with the number one (1) at both ends, but on opposite sides of the tape.
• Elastic. A length of elastic that fits easily around your waist. The width of the elastic should correspond to the width of a waistband, usually 1" (2.5 cm) wide. The elastic is used as a point of reference for taking measurements that begin or end at the waist.
• Mirror. A floor-length mirror is very important when taking your own measurements.
• Measurement Chart. Photocopy of the chart on the opposite page so you can record your measurements.
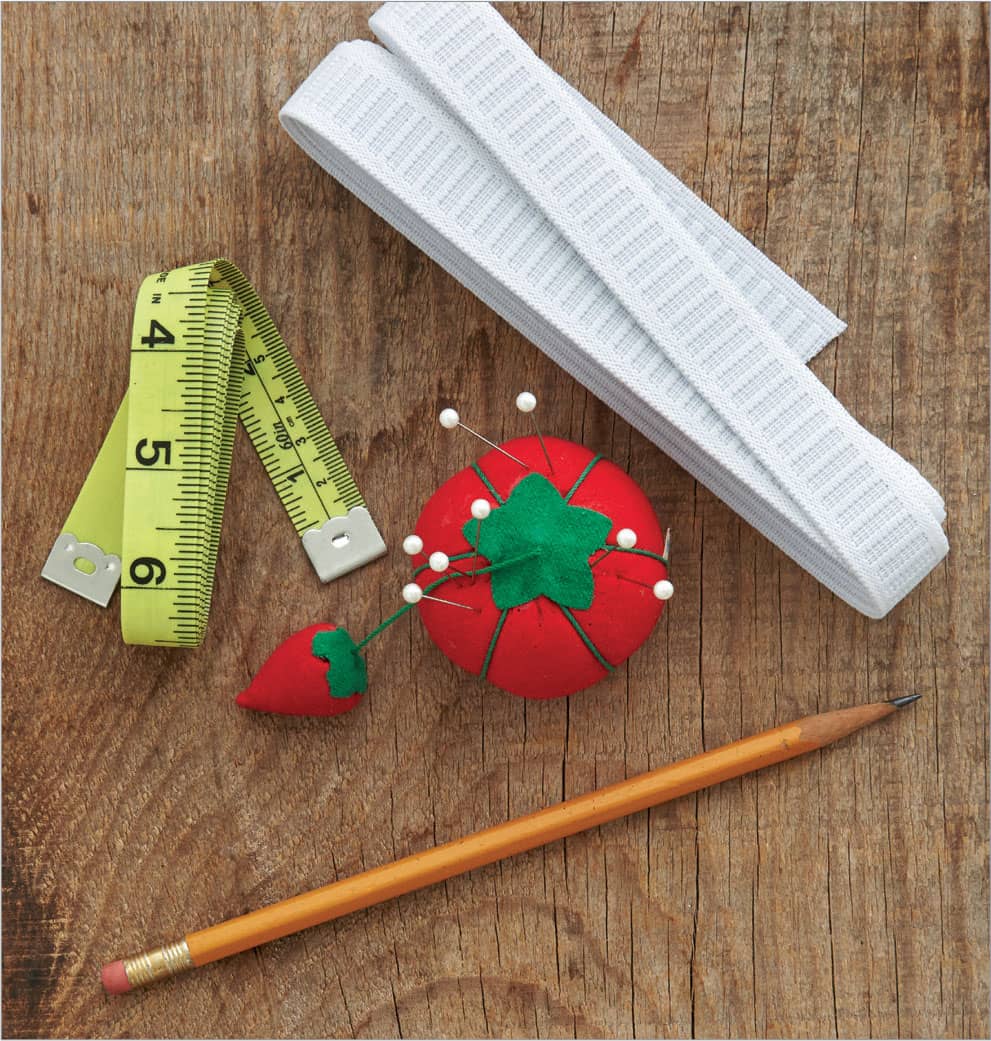
Tools for measuring.
Taking Your Measurements
Take all your measurements over the undergarments that you normally wear. Even if you often wear form-fitting bodywear, don’t wear it when you are taking your measurements. You want to record realistic numbers.
Measurement Chart

The measurements (see below) are the basic measurements needed to determine your starting size and to make preliminary adjustments to your pattern. More fine tuning may be needed once the garment is constructed, but not finished.
Standing in front of the full-length mirror, take the following measurements. For each measurement, make sure the tape measure is level and not pulled too tight. Relax and breathe. Fill in the body measurement (column A) on the measurement chart.
1. Full Bust Circumference: Position the tape measure over the fullest part of the bust and measure around the body. Keep the tape measure level.
2. Shoulder to Bust Point: Measure from the center of the shoulder line to the bust (apex) point.
3. Bust Point to Bust Point: Measure the distance between the bust points.
4. Shoulder Width: Find the point at which the neck bends and the outer point along the shoulder where you can feel the drop-off and measure between these points. If you can’t locate either point by yourself, stand in front of a mirror and put a tape measure along your shoulder line and find a distance that is pleasing to the proportions of your body.
5. Arm Length: With the arm slightly bent, measure from the arm drop-off point to just below the wrist bone.
6. Upper-Arm Girth: If you are taking this measurement on your own, attach a small D-ring at the 1" (2.5 cm) mark at one end of the tape measure. Place the tape measure around the upper arm about 1" (2.5 cm) below your armpit. When recording this measurement, add 1” (2.5 cm) to the measurement to adjust for the D-ring attachment.
7. Back Waist Length: Measure from the back of the neck to the waist.
8. Waist Circumference: Wrap and pin the elastic around the waist. Place the tape measure around the elastic and measure, leaving one finger behind the tape measure for a little extra ease.
9. Full Hip Circumference: Find the fullest part of the hips, whether that is high or low, and measure at that level.
10. Distance from Waist to Full Hip: Measure the distance from the elastic around the waist to the full hip.
11. Stride: Place one end of the tape measure right under the elastic at the back waist, bringing it through the crotch to the bottom of the elastic in the front. Add 1" (2.5 cm) to this measurement for sizes below 16 and add 2" (5 cm) to this measurement for sizes above 16.
12. Pants Length: Without shoes, stand on the 1” (2.5 cm) mark at one end of the tape measure. Bring the tape up to the bottom of the elastic along the outside of the leg.
Skirt/Dress/Coat Length: The easiest way to determine a skirt, dress, or coat length is to measure the finished length of a garment that you enjoy wearing. You can also do this to determine pants length.

Buying a Pattern
Choosing the best pattern size for a top, jacket, and some dresses is based on your bust measurement. The size for skirts, shorts, pants, and close-fitting dresses is based on your hip measurement. For a full-skirt you can use your waist measurement as a guide.
Look at the size chart on the pattern envelope and find the size closest to your body measurement. This will be your starting size. Once you know your pattern starting size, you can purchase the pattern and then make adjustments for a more personal fit.
Standard Pattern Size Measurements | |||
|---|---|---|---|
SIZE | Bust | Waist | Hip |
XS | |||
6 | 31" 77.5 cm | 241/2" 61.3 cm | 34" 85 cm |
SM | |||
8 | 321/2" 81.3 cm | 251/2" 63.8 cm | 35" 87.5 cm |
10 | 34" 85 cm | 261/2" 66.3 cm | 36" 90 cm |
MED | |||
12 | 36" 90 cm | 271/2" 68.8 cm | 37" 92.5 cm |
14 | 38" 95 cm | 29" 72.5 cm | 391/2" 98.8 cm |
LG | |||
16 | 40" 100 cm | 31" 77.5 cm | 411/2" 103.8 cm |
18 | 42" 105 cm | 33" 82.5 cm | 431/2" 108.8 cm |
XL | |||
20 | 44" 110 cm | 35" 87.5 cm | 451/2" 113.8 cm |
XXL | |||
22 | 46" 115 cm | 37" 92.5 cm | 471/2" 118.8 cm |
Measuring Your Pattern for a Personalized Fit
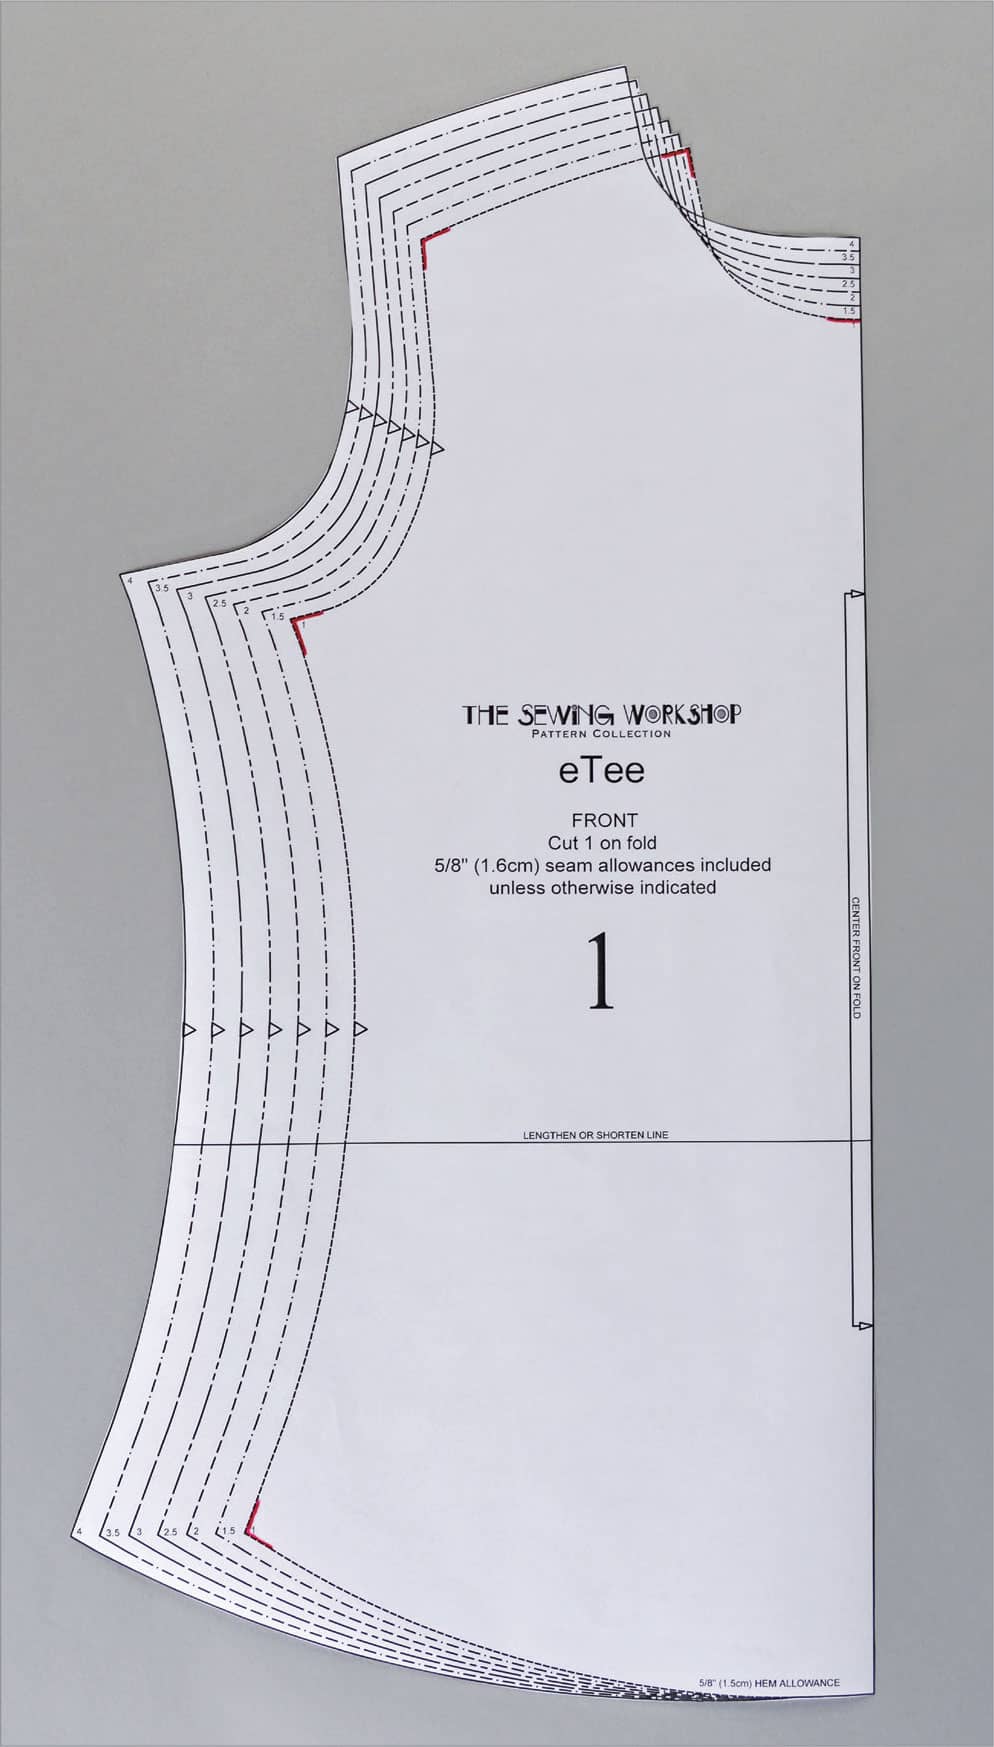
Actually measuring the tissue pattern (called flat pattern measuring) and comparing these measurements to your body, keeping ease allowances in mind, is the most important aspect of fitting.
Many commercial patterns feature several sizes in one envelope, all marked on the same tissue (multi-sized patterns). This is quite handy if you are one size on top and a different size through your hips.
If you are using a multisized pattern with lots of cutting lines, use a red pencil to mark your starting size at the corners of all the pattern pieces directly on the tissue.
Tools

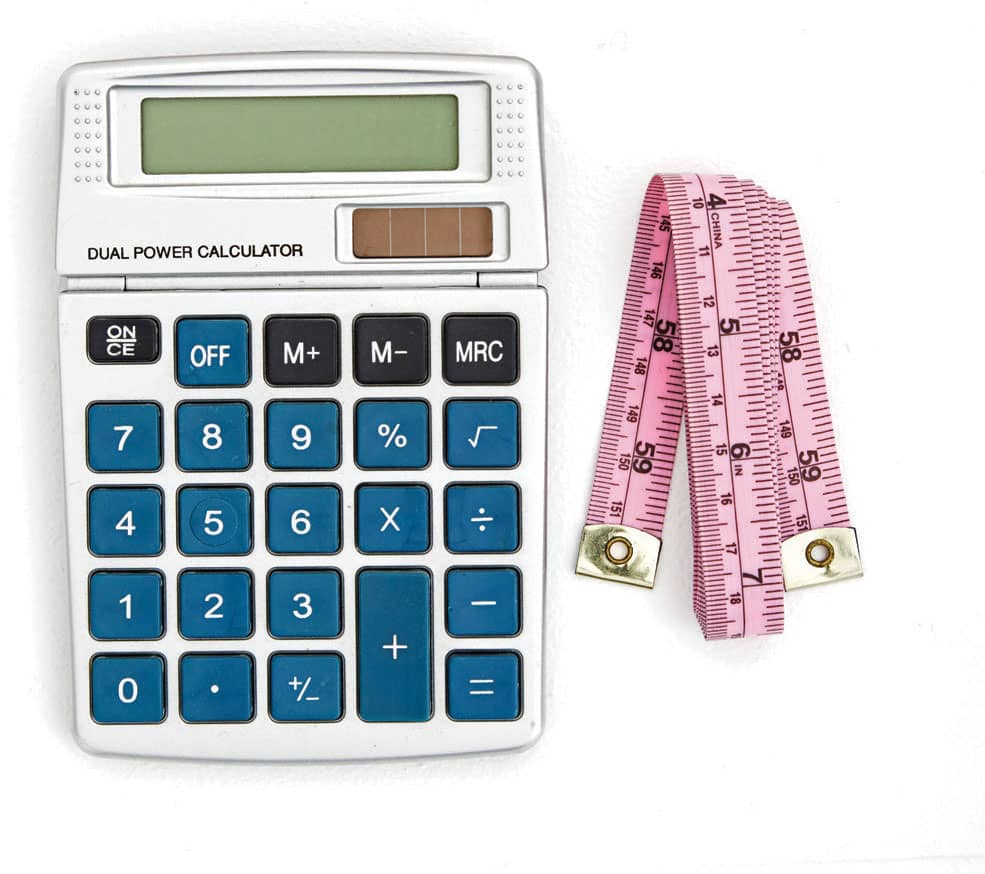
Gather these tools to measure your pattern accurately.
• Tape measure
• Red pencil: A pencil by Prismacolor, Carmine Red 200045 has an eraser and is perfect for pattern work.
• Calculator
How to Measure the Pattern
Measure the pattern pieces as indicated and fill in the pattern measurement (column B) in the measurement chart. Remember, most patterns include seam allowances, so do not include them in your pattern measuring; measure between fold lines and center front lines to get finished measurements. Additionally, most patterns are either one half of the total garment and are cut as two pieces or they are cut on the fabric fold (resulting in a total piece). Add the dimensions of the front and back pieces to get total circumference.
Upper-Body Measurements
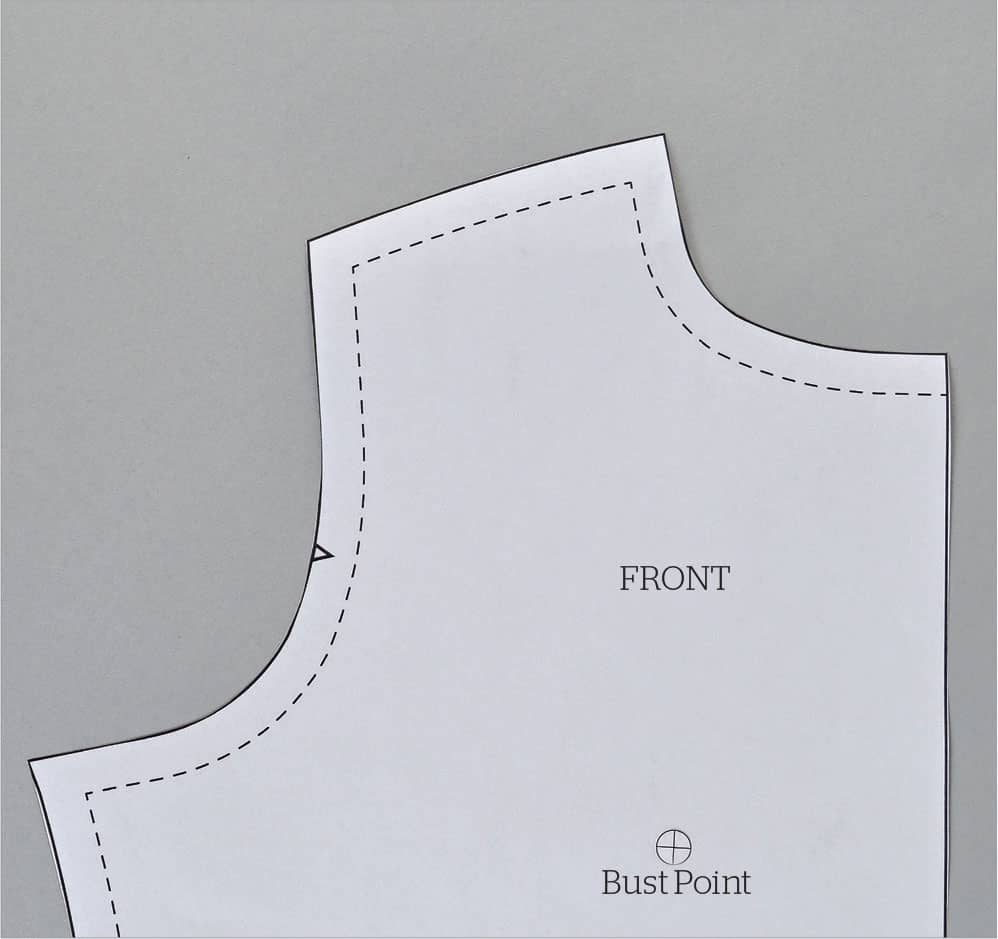
Locate the bust point: Many patterns use this symbol to indicate the bust point.
Back waist length: Measure from the back of the neck to the waist.
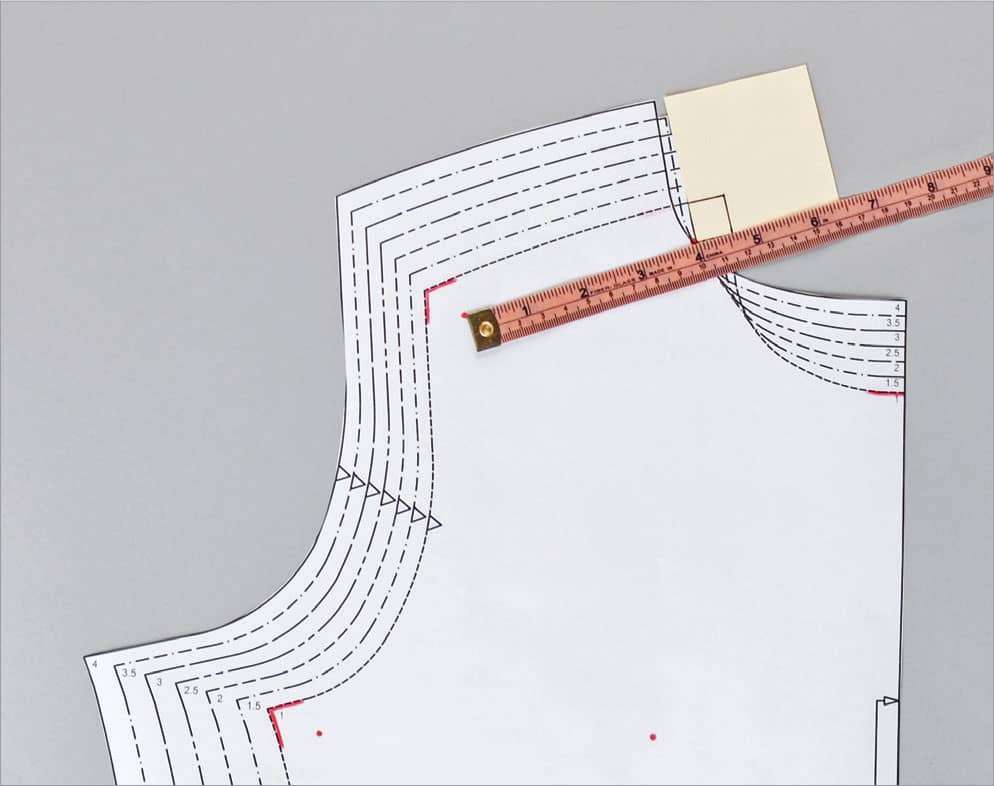
Shoulder width: Measure the shoulder from the neck to the top of the sleeve.
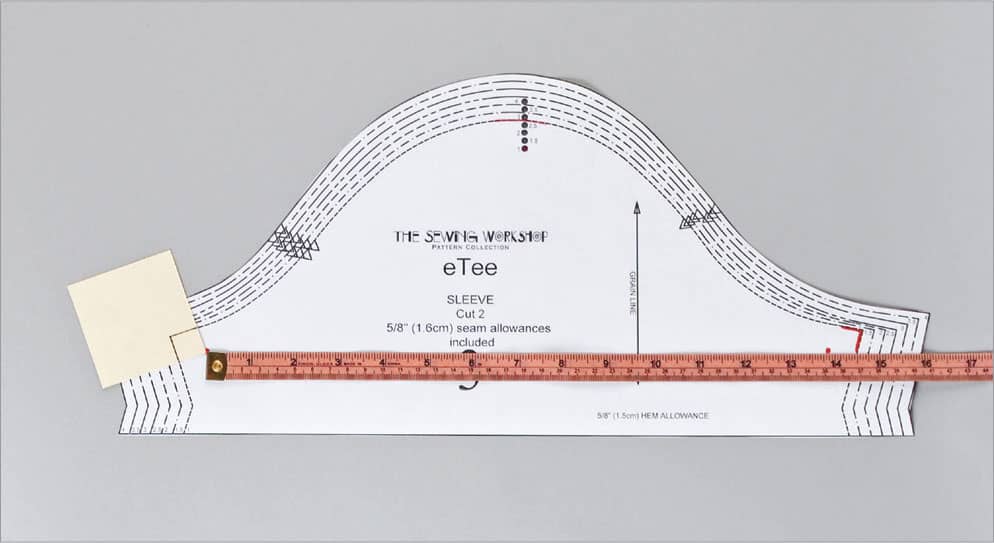
Arm girth: Measure the pattern just below the shaped sleeve cap.
Lower-Body Measurements
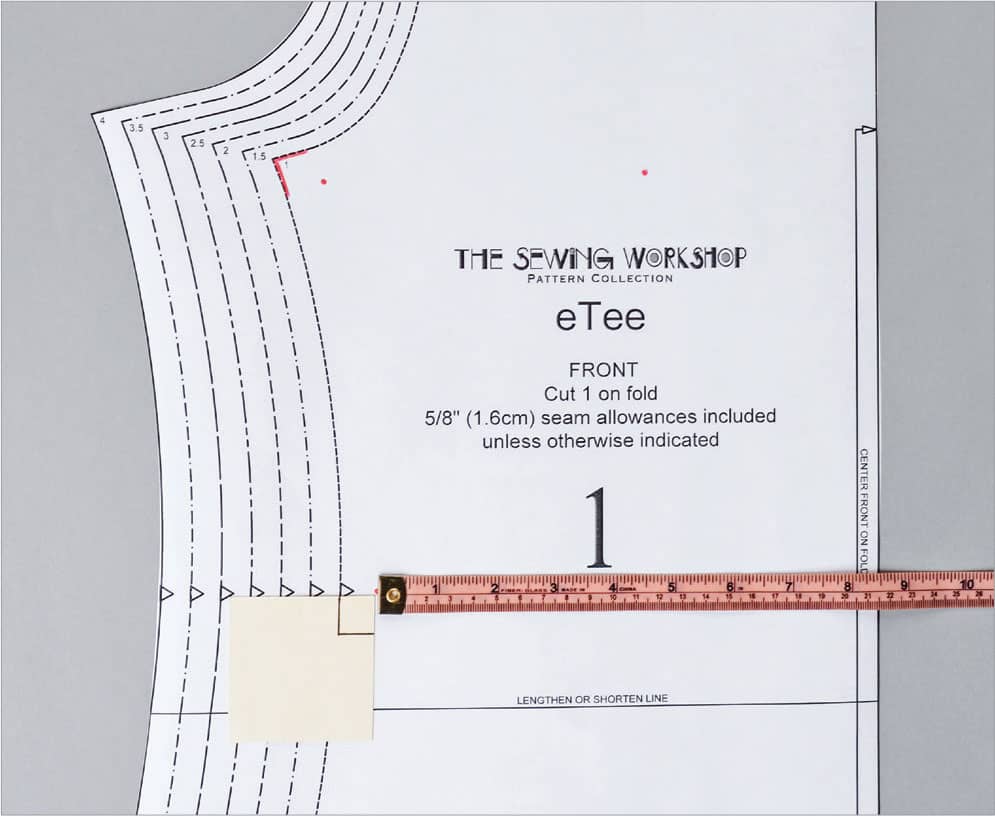
Waist circumference: There may be a waistline indicator on your pattern. If so, use it to measure the waist circumference. If there is not an indicator, refer to your “back waist length” measurement. Or, you can hold the tissue pattern up to your body and mark where the pattern hits your waist on the pattern. Measure from seam allowance to seam allowance at the waist marking on both the front and back patterns. Add these measurements and multiply the number by two if the front and back pieces will be cut on the fabric fold.
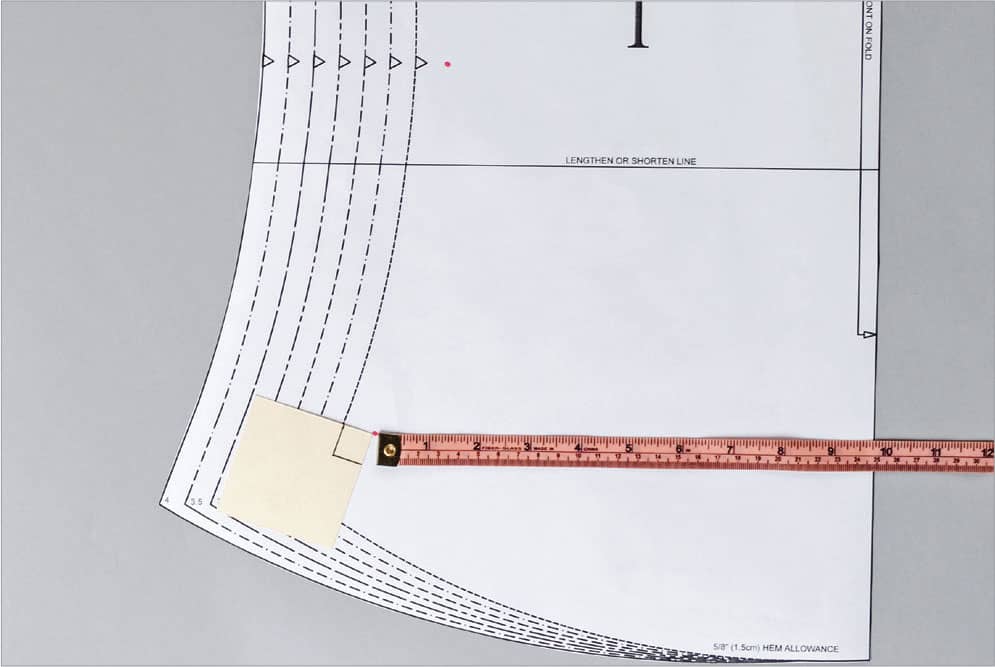
Full hip circumference: Refer to your “distance from waist to full hip” measurement and measure that distance on your pattern from the waist down toward the hem, and make a pencil mark. Then measure the hip circumference at that pencil mark as for the waist above.
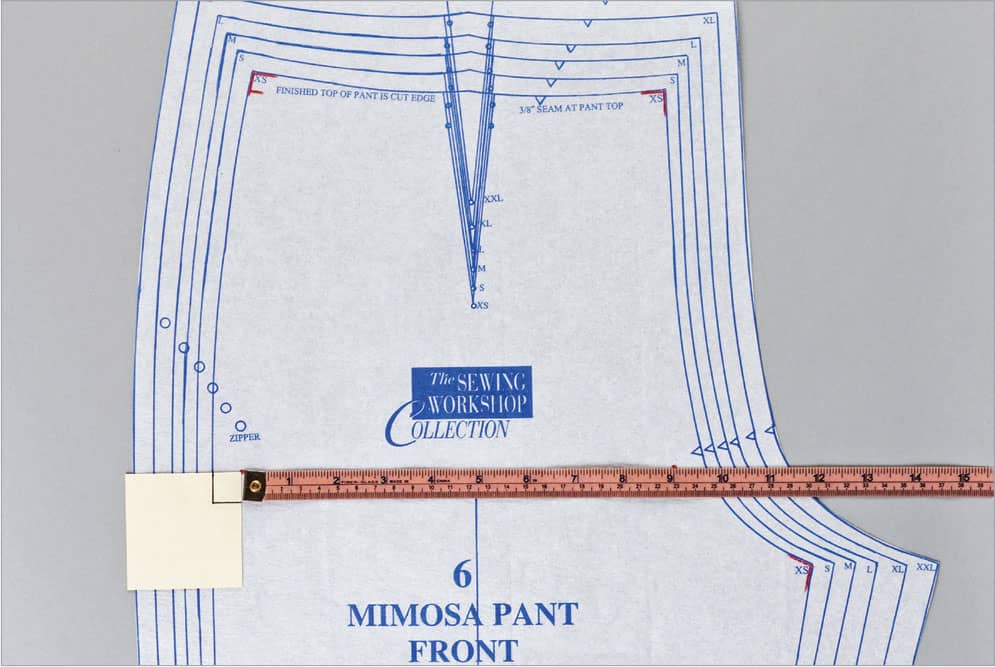
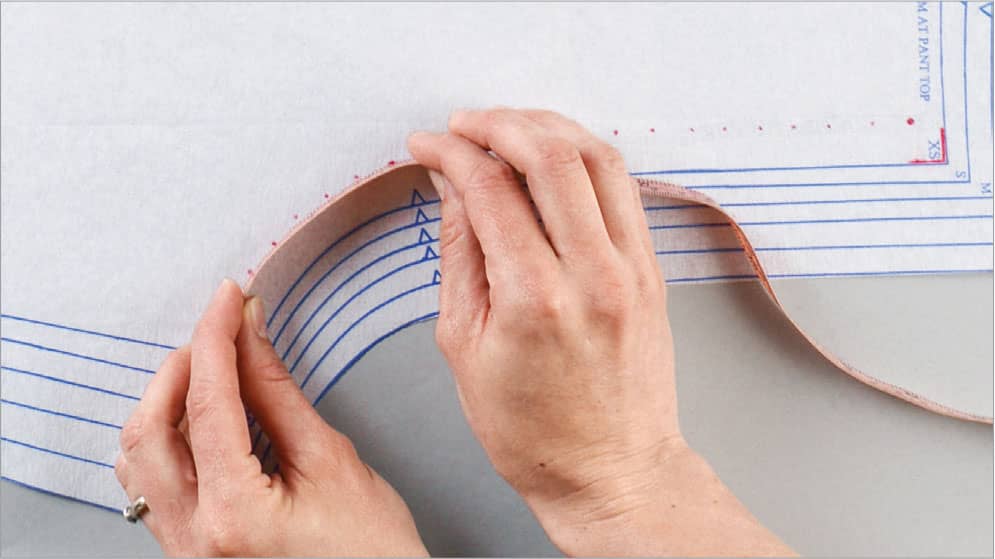
Stride: With the tape measure on its edge (not flat), measure the front and back crotch from the waist seam to the inseam and add the two measurements for the total stride length.
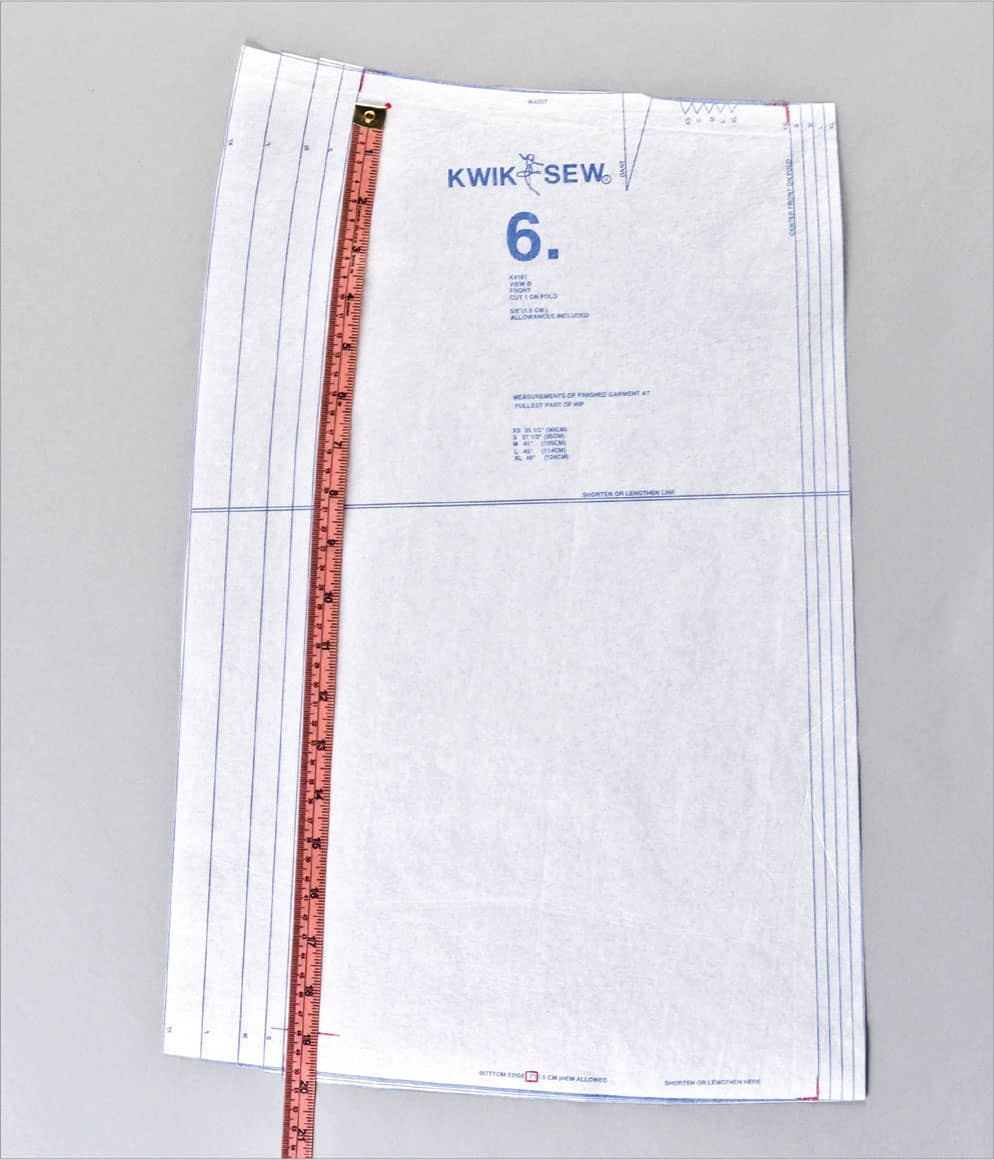
Skirt length: Measure from the waist seam to the finished hemline along the side seam.
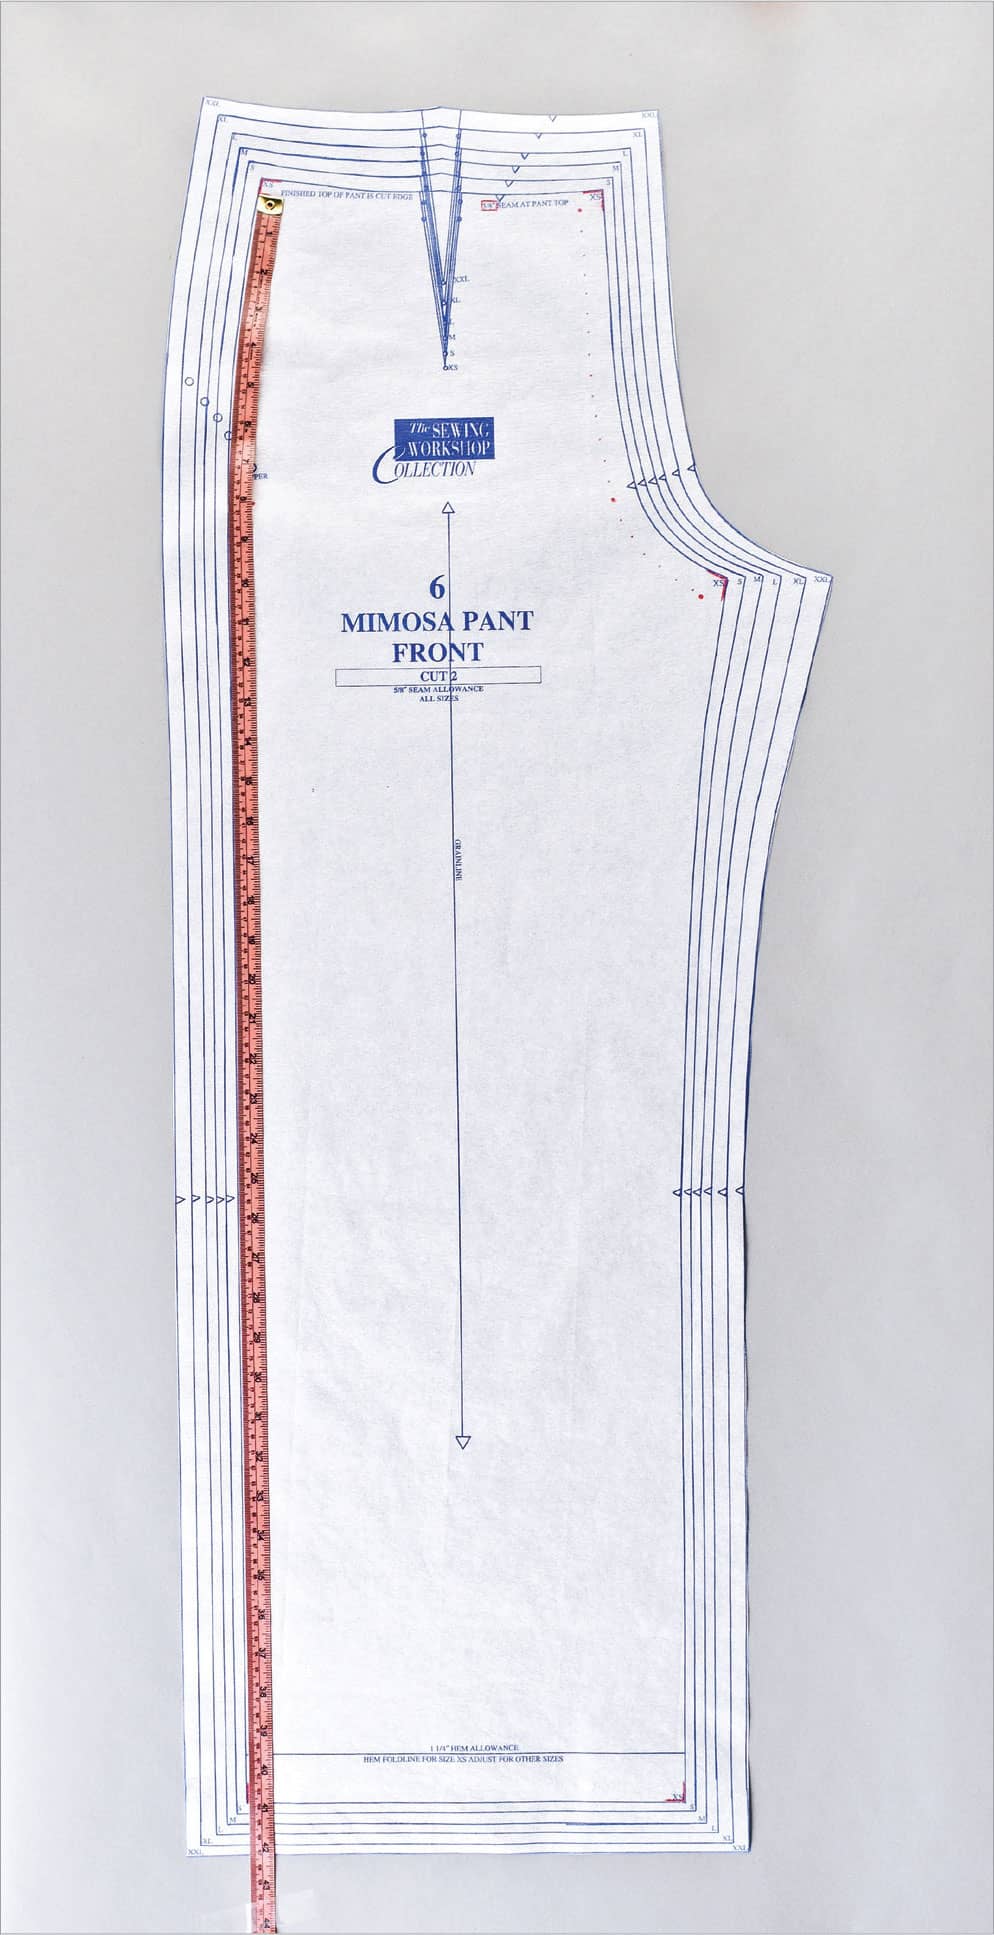
Pants length: Measure from the waist seam to the desired finished hemline along the side seam.
Tissue Fitting
Actually trying on the paper pattern is a quick way to determine how well a knit garment will fit. You will be able to immediately see if the pattern is too small. This works best for a top pattern and is more difficult for a pants pattern.
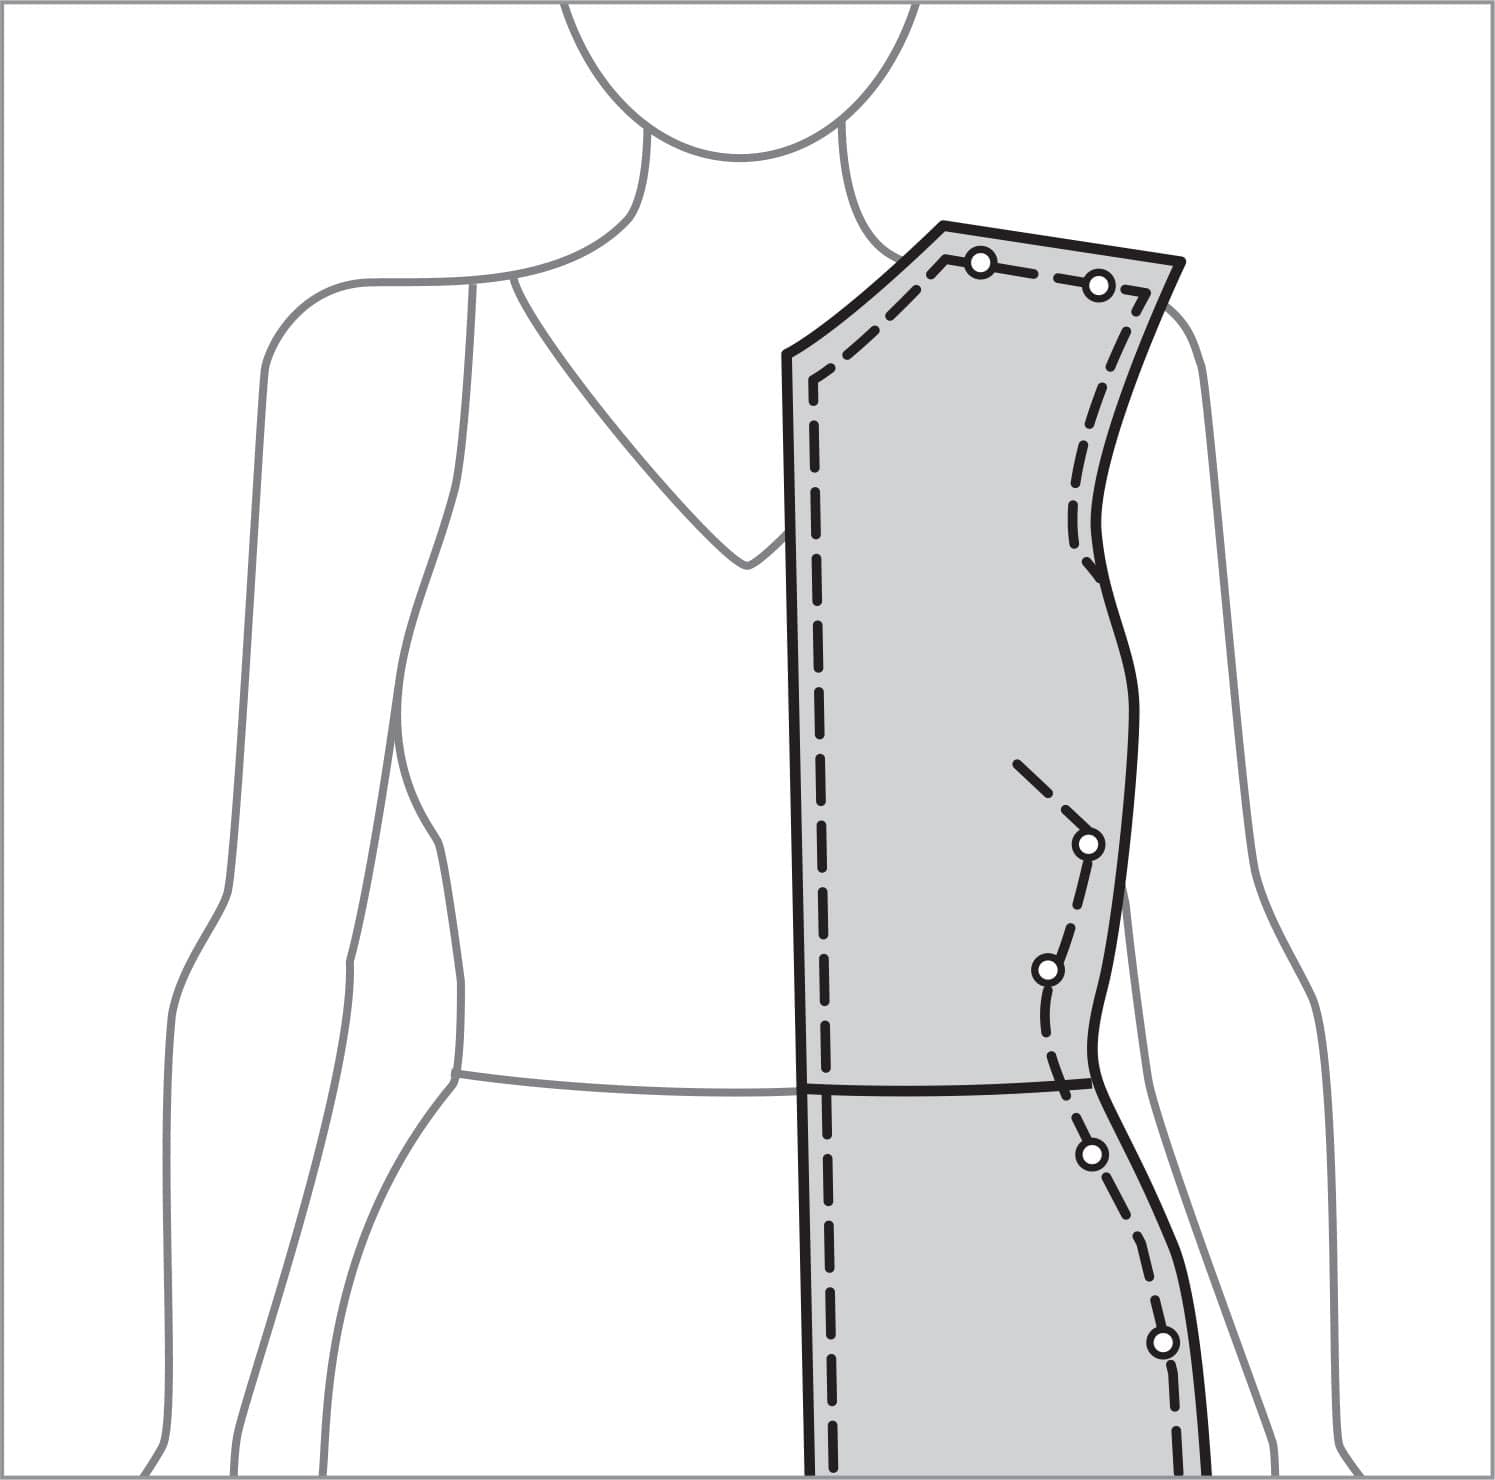
Cut out the pattern slightly outside your starting size cutting lines. Pin any darts or other details that shape the pattern. Then, pin the pattern together at the shoulder and side seams with the seam allowances on the outside.
Stand in front of a mirror and take a look. Since you will usually be working with one half of the pattern, make sure that the center front and center back are aligned with the center of your body. You will know instantly whether the pattern is too small or too large and whether it sits well on your shoulders.
Adjusting Your Pattern
Making adjustments to your pattern before cutting out your fabric eliminates potential fitting problems and improves the overall appearance of the finished garment.
Tools
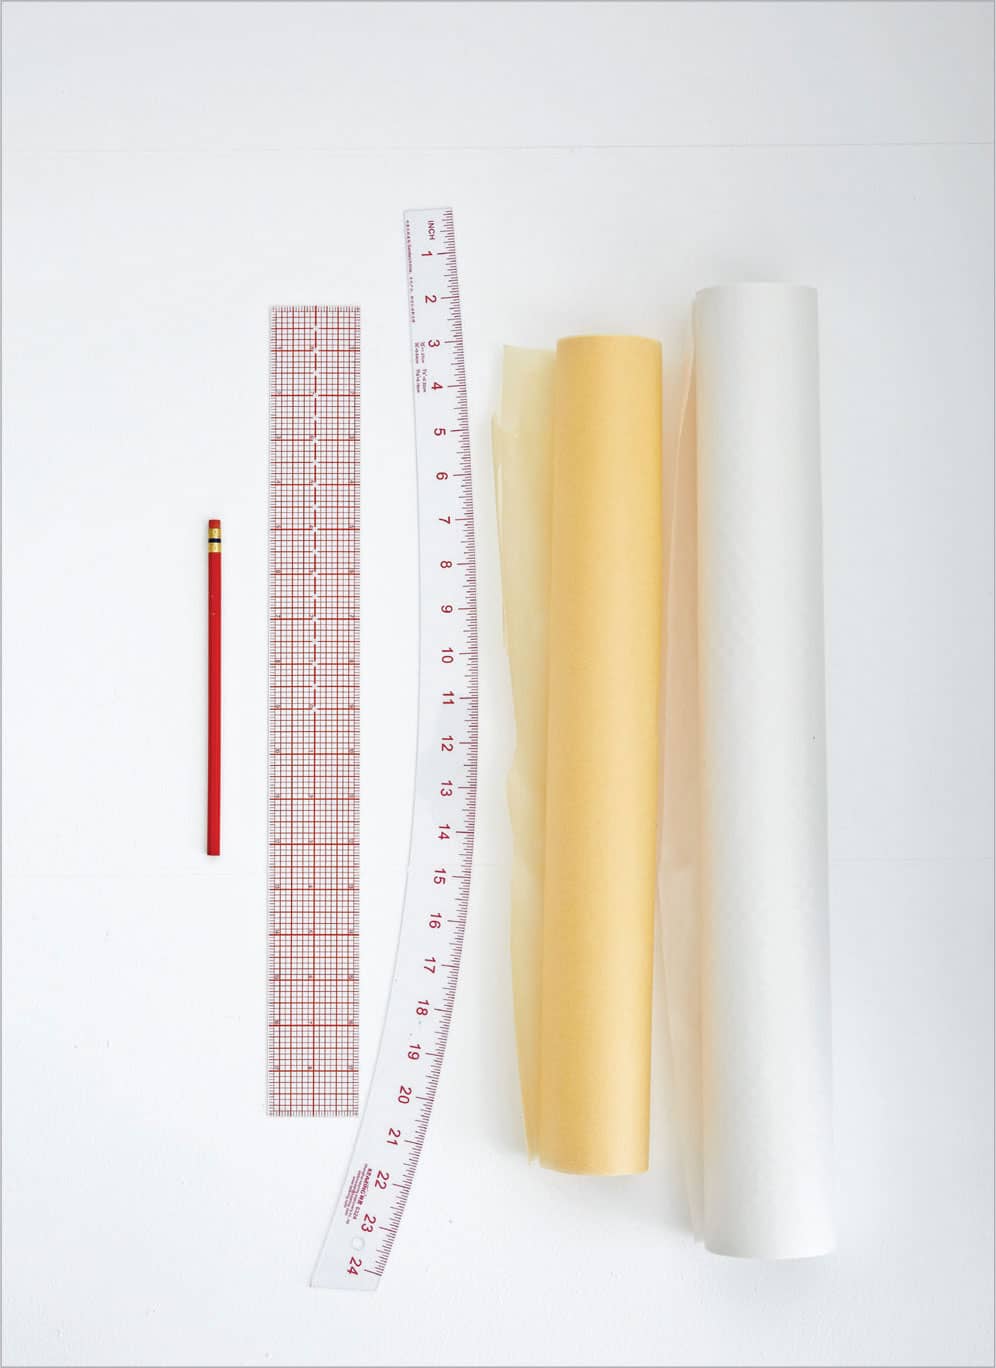
Having the right tools will help you measure and adjust patterns more professionally. Here are the essentials.
Pattern drafting paper
Use paper that is see-through, stays together with clear tape, and shows hand-drawn lines well.
Red pencil
Use a pencil rather than a permanent marker because you may want to make changes and need to be able to erase all markings.
Removable tape
Scotch Removable Tape can be moved and/or removed without damaging the tissue pattern when you need to fold and unfold the tissue or add paper to extend the existing pattern paper.
Rulers
Rulers used for drafting patterns are available in either metal or plastic. Clear plastic rulers are easier to use and may be less expensive. You’ll need a variety of styles.
Straight ruler
Use a flexible clear ruler that is not too large and has 1/8" (3 mm) grid marks.
Hip curve
This is the most universal of the large curved drafting tools.
French curve (not shown)
This is a classic drafting tool with several curves for restoring and smoothing shaped seamlines.
Considering Ease
You have already noted your body measurements (column A) and the pattern measurements (column B) on the measurement chart, so now you need to compare the two figures and record the difference in column C.
Then refer to the ease chart shown here and record the standard ease for your pattern style in column D. Consider how the amount of designer-added ease (column D) relates to the actual amount of ease (column C) and based on how you want the garment to fit, compute the amount of change that needs to be made to the pattern and enter it in column E.
Then divide that amount of change indicated in column E by the number of seams affected by the desired change. The total amount to be added or subtracted to a circumference is divided by the number of seams in the garment and this amount is entered in column F. For example, if there are only side seams, the amount to be added or subtracted is divided by 4 (because there are 4 cut edges/2 seams). If there are side seams and center front and back seams, the amount is divided by 8 (8 cut edges/4 seams).
Length Adjustments
Make all length adjustments, no matter whether to a top or a bottom first, before any circumference adjustments. If there are length adjustment lines indicated on the pattern, use them. If not, there are specific places to make these adjustments (see below).
Basic Lengthening Technique
1. Cut the pattern apart along the adjustment line.
2. Tape a piece of pattern paper to one cut edge of the original pattern. Use the red pencil to extend the grainline (which may be a center front or center back foldline) (A).
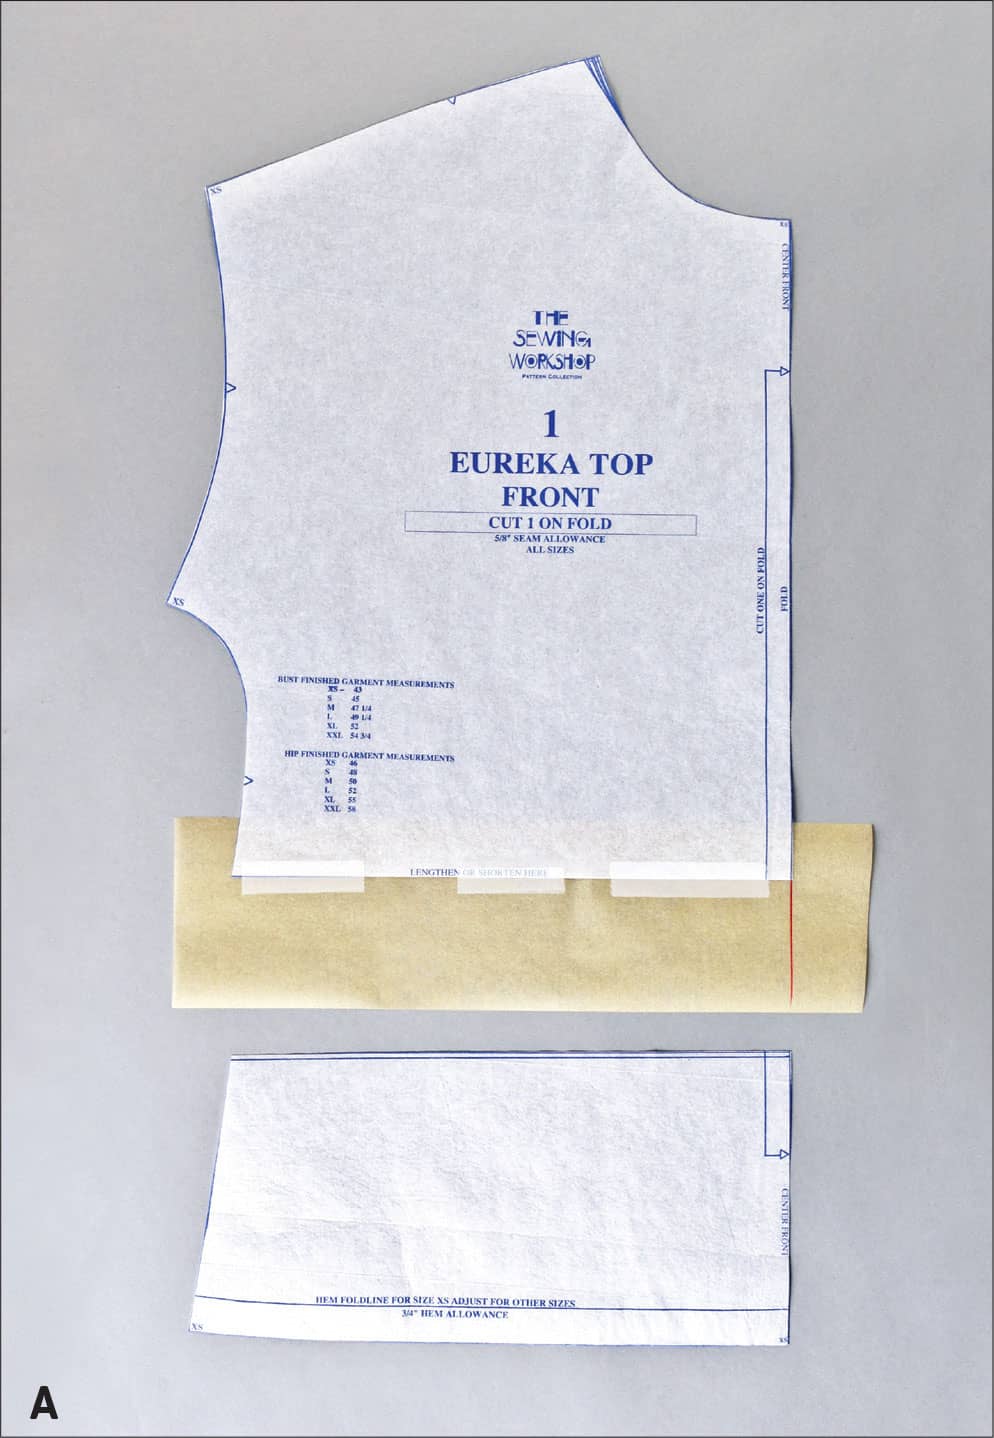
3. Measure and mark the desired amount you want to lengthen the pattern on the grainline you just drew.
4. Draw a line perpendicular to the grainline. Tape the remaining pattern piece along this new line.
5. Use a straight or curved ruler to restore the cutting lines (B).
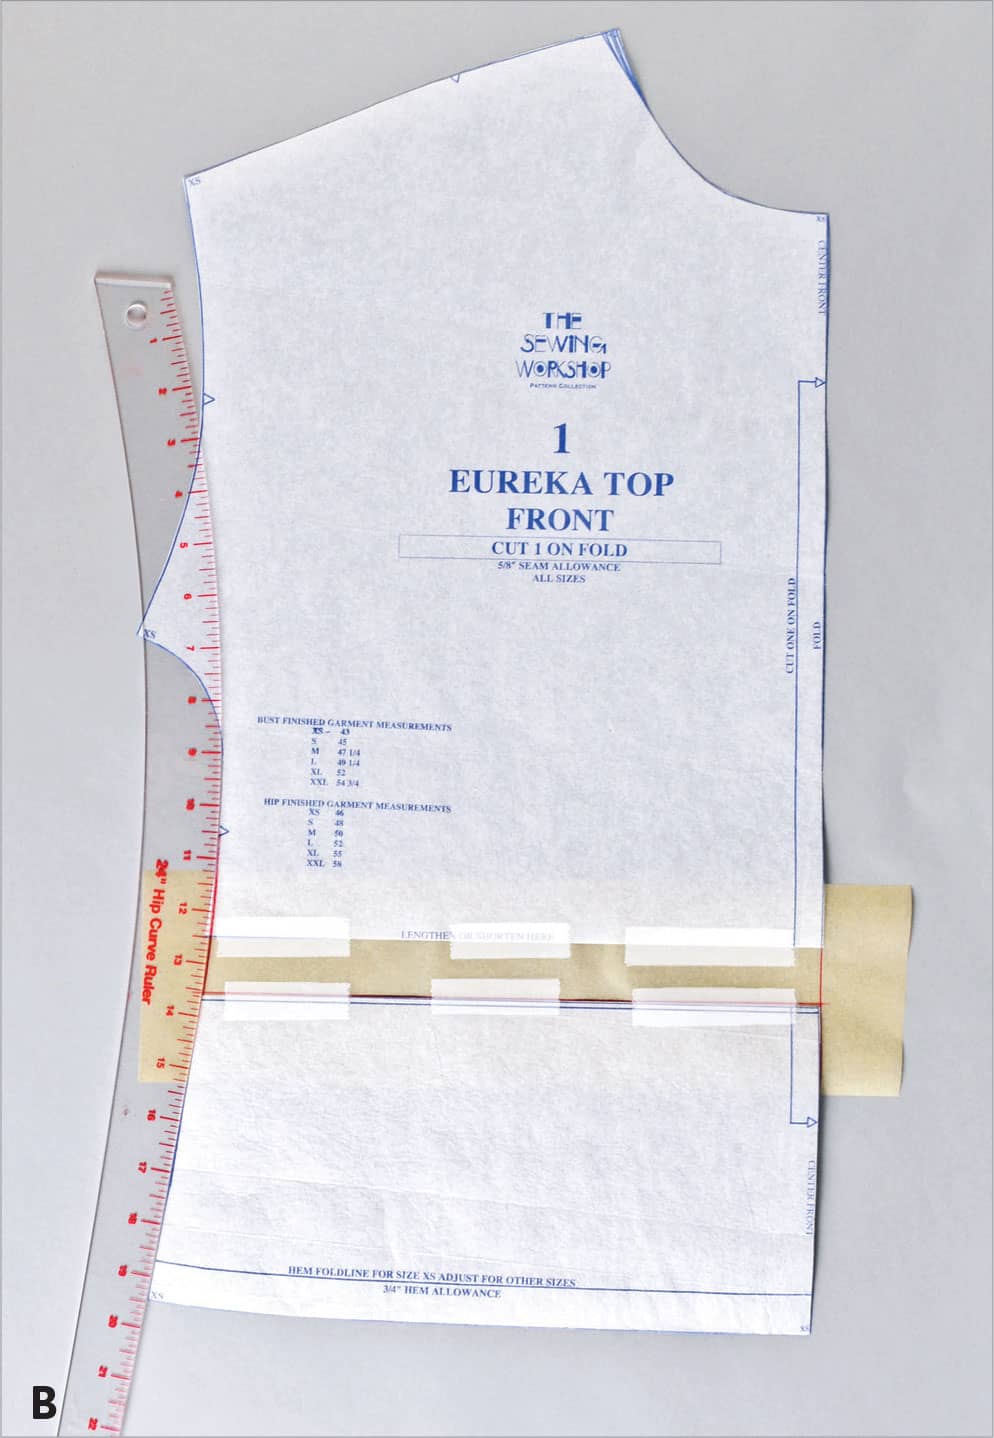
Basic Shortening Technique
1. Fold the pattern on the adjustment line, one half the desired amount that you want to shorten the pattern. Make sure the straight grainlines meet. For example: To shorten a pattern 2" (5 cm), make a 1" (2.5 cm) fold.
2. Use a straight or curved ruler to restore the cutting lines (A).
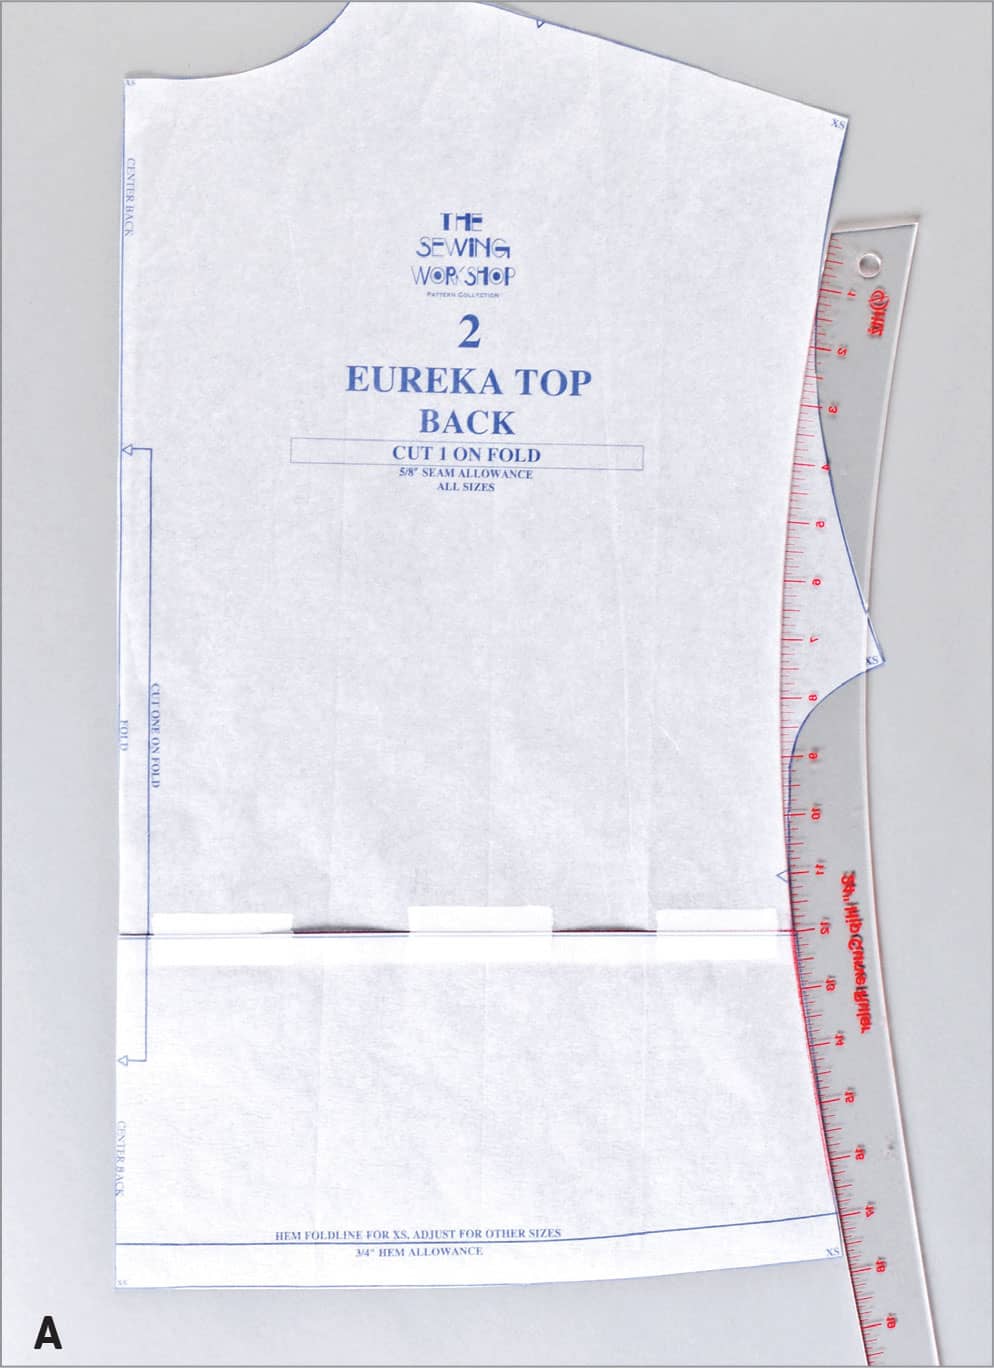
Where to Lengthen and Shorten
If there are no length adjustment lines marked on the pattern pieces, use the following guidelines.
Lengthen or Shorten Tops, Jackets and Some Dresses at the Waist
Locate your waist (use your back waist measurement) on the pattern and measure up about 1" (2.5 cm) and make a mark. Draw a line at the mark perpendicular to the straight grainline. Lengthen or shorten the back and front pattern pieces along this line, making sure the new lengths match at the side seams. Restore the cutting lines.
Lengthen or Shorten Sleeves
Draw a line perpendicular to the straight grainline approximately 2" (5 cm) down from the bottom of the sleeve cap and lengthen or shorten along the line. Restore the cutting lines.
Lengthen or Shorten Pants
Fold the leg pattern in half so the finished hemline aligns with the top of the inseam. Draw a line perpendicular to the straight grainline and lengthen or shorten along this line. Restore the cutting lines.
Lengthen or Shorten Skirts
Most skirts can be lengthened or shortened at the bottom edge unless there are design details that prevent this, such as pleats, godets, or flared sections. If there are design details, find an area on both the front and back pattern pieces that is the straightest and without design details and draw a line perpendicular to the straight grainline. Lengthen or shorten the front and back pieces along this line. Make sure the adjustments are the same to the front and back patterns. Restore the cutting lines.
Circumference Adjustments
After making all length adjustments, alter a pattern's width in the following order. Find the columns noted on the Measurement Chart.
Shoulder Width
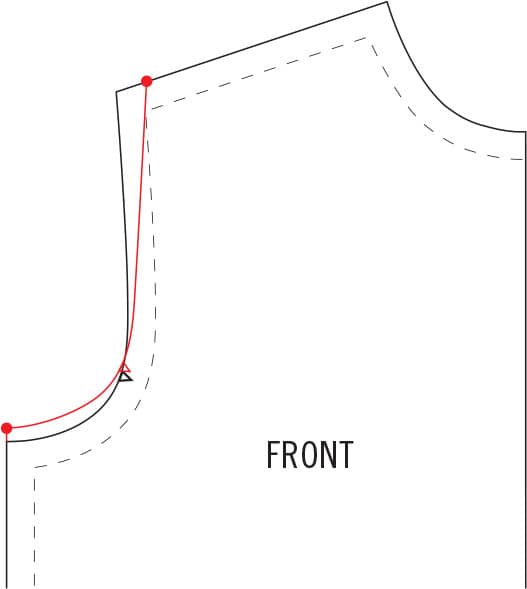
1. On drafting paper, trace in red the original cutting line of the front and back armhole.
2. Referring to column C, mark the desired width change along the shoulder cutting line, at the corner of the shoulder and armhole, either inside (to narrow) or outside (to widen). Do not include seam allowances.
3. Place the tissue pattern on top of the traced front armhole, with the new shoulder marking on the pattern over the original tracing. Pivot the pattern until the bottom of the original armhole is in line with the side seam cutting line. The distance inside or outside of the original starting size will be the same as the amount of shift at the side seam. Trace the original armhole in its new position onto the pattern. Repeat on the back pattern piece.
Waist and Hips Width
1. For long T-shirts or tops without a waistline seam, mark the waistline and add or subtract width along it at the side seam cutting lines of both the front and back patterns using column F as your guide.
2. If there are center front and center back seams, you might want to distribute the amount of width change between all the seams. Refer to shown here.
3. Use a hip curve to redraw the new cutting lines.
4. If the pattern has a seam at the waistline, draw a diagonal line from the waist up to the underarm point of the front. Cut along the line from the waist up to, but not through, the underarm cutting line. Spread or overlap the pattern by one fourth the total amount needed. Repeat on the pattern back.
1. For pants or skirts, refer to column F and mark the desired width change at the waistline and at the hipline on the side seam cutting lines of both the front and back pattern pieces. If there are center front and center back seams, you might want to distribute the amount of width change between all the seams. Refer to shown here.
2. At the side seams, use a hip curve to blend new cutting lines from hip to waist. Use a straight edge to redraw center front and back seams.
Arm Width
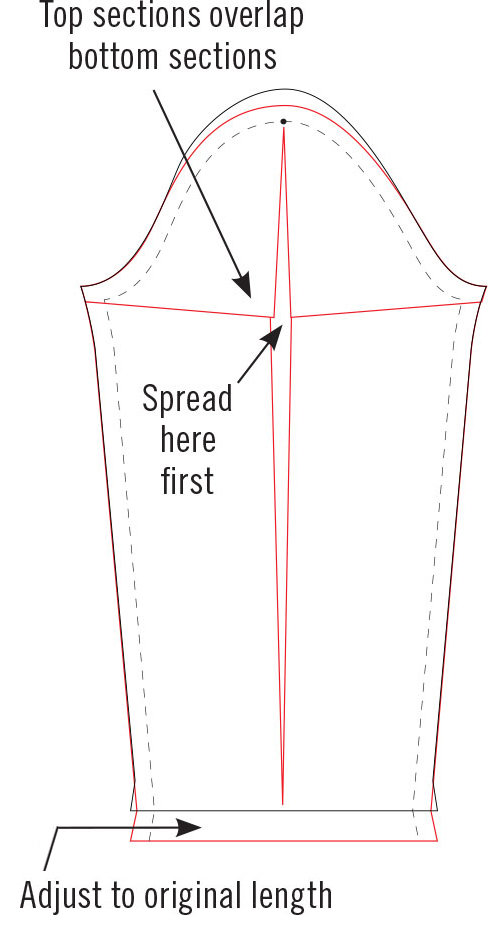
1. Draw a vertical line through the center of the sleeve. Draw a horizontal line perpendicular to the vertical line along the cap line.
2. Cut on these lines up to, but not through, the outer edges, forming a hinge.
3. Place drafting paper under the cut lines. To enlarge the width, pull the cut edges gently apart the desired amount and tape in place. To reduce the width, move the cut edges of the upper sections so they overlap those of the lower sections, forming a diamond shape in the center of the sleeve. Tape in place. Adjust or restore cutting lines, as needed, to the original or desired length.
Bust Fullness
There are two methods for adding ease in the bust area without adding darts. You can only make these adjustments if the pattern indicates a bust point or you locate yours on the pattern (shown here).
To Add Minor Ease
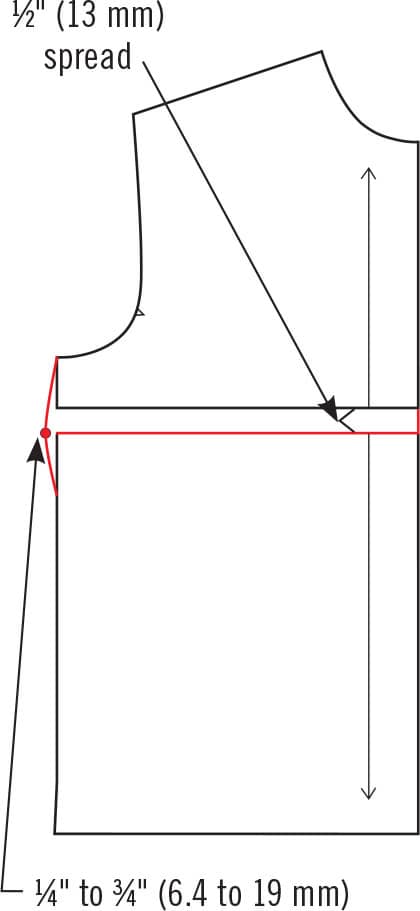
1. Draw a horizontal line from the side seam to the center front through the bust point. Cut along this line and spread the sections an even 1/2" (13 mm).
2. Mark a point 1/4" to 3/4" (6.4 to 19 mm) from the side seam at the spread area. Use a French curve to draw a curved shape at the side seam.
3. When sewing the garment together, ease the back to the front in the bust area to make the seam match from top to bottom.
To Add Major Ease
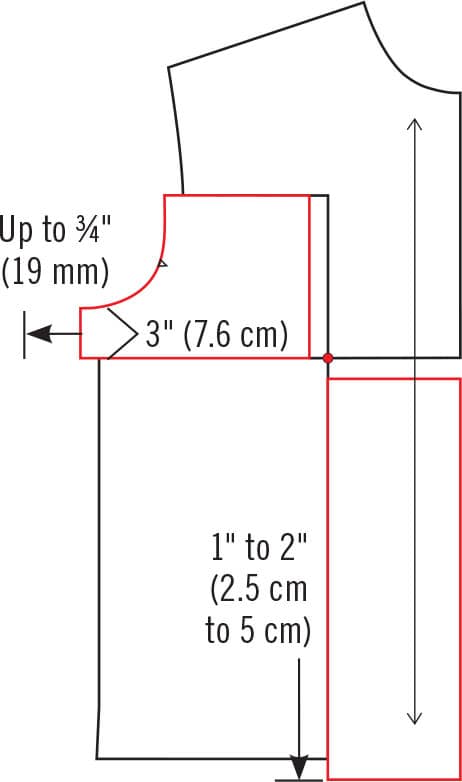
1. Locate and mark your bust point. Starting midway between the shoulder seam and the armhole notch, draw a line perpendicular to the straight grainline.
2. Pivot this line and extend it vertically to the bottom of the pattern. At 3" (7.6 cm) below the armhole, draw a line from the side seam to the center front perpendicular to the straight grainline.
3. Cut through all lines. Move the armhole section out (up to as much as 3/4" [19 mm]) for a total of 11/2" (3.8 cm) ease across the complete front bust area.
4. Move the lower center front section down 1" to 2" (2.5 to 5 cm) depending on your bust size and the amount that similar garments ride up.
5. Use a hip curve to restore the side seam and bottom hem, a French curve to restore the armholes, and a straight edge to align the center front.
To add additional bust ease, refer to standard methods of adding a bust dart recommended for woven fabrics.