Snacks & Small Plates
I admit it: I like to snack. But I’m not talking about noshing on chips and cookies. To me, snacking means eating small healthy meals over the course of the day. It keeps my metabolism humming along and helps me avoid feeling starved—and overeating when it’s mealtime.
I love the concept of small plates—just a few bites that I can enjoy on my own or share with others at my table—that’s popular in so many restaurants. It’s more fun to sample a lot of different flavors, and I don’t end up feeling overstuffed the way I do with many entrées.
Many of these recipes can be prepped and made ahead, and would make a perfectly lovely and elegant first course for a more formal seated dinner.
In this chapter you’ll find lots of ways to stave off the afternoon (or anytime) munchies while avoiding the snack aisle altogether. You’ll find lots of fun and easy ways to fit more vegetables, healthy grains, and legumes into your diet. I’ve even put my own spin on jerky, and movie night is made for my spiced-up popcorns.

As snack foods go, you could do a whole lot worse than a container of hummus and fresh vegetables. On the other hand, you could do a whole lot better with any of the dips and spreads included here! Not only are they more flavorful, they are much more versatile than you might think.
My “only bean dip you’ll ever need” and the fennel puree, for example, can wear many different hats. For entertaining, serve them with pita chips or crudités. Smear the spreads on toasted baguette slices, drizzle with olive oil, sprinkle with a bit of parsley, and voilà!—you’ve got healthy vegetarian crostini. Use them as a side dish or as a bed for grilled fish, or spread some on whole-grain toast and pile on the veggies for a healthy lunch. You can even thin them out with a bit of water or chicken broth for a suave pureed soup; garnish with a bit of crispy pancetta or a swirl of pureed roasted red pepper. These are pretty compelling reasons to keep one of these multitasking dips on hand at all times.


SERVES 4
I like guacamole but I LOVE pico de gallo. It’s practically fat-free, makes everything from fish and seafood to beans and grains of all kinds taste amazing, and is a guilt-free topping for tacos and dip for chips. You can reduce or increase the amount of chile to taste.
2 cups diced ripe tomatoes (about 2 large tomatoes)
1 serrano chile, minced
1 small shallot, minced
1 cup grated carrot (about 1 large carrot)
¼ teaspoon ground coriander
1 tablespoon chopped fresh basil leaves
1 tablespoon white balsamic vinegar
2 teaspoons extra-virgin olive oil
¾ teaspoon kosher salt
In a medium bowl, combine the tomatoes, chile, shallot, grated carrot, coriander, basil, vinegar, olive oil, and salt. Toss gently to combine.

The Only Bean Dip You’ll Ever Need
SERVES 6 TO 8
Serve this whenever you might reach for hummus. The flavor is a bit more nuanced, and the mascarpone makes it smooth and rich tasting without being heavy.
½ cup extra-virgin olive oil
3 garlic cloves, smashed and peeled
1 (15-ounce) can cannellini beans, rinsed and drained
¼ cup mascarpone cheese, at room temperature
2 teaspoons grated lemon zest
⅓ cup fresh lemon juice (from 2 lemons)
1¼ teaspoons kosher salt
1 (15-ounce) can chickpeas, rinsed and drained
In a small saucepan, warm the olive oil and garlic cloves over medium-low heat for about 10 minutes or until the garlic is golden brown and soft all the way through. Set aside to cool slightly.
Put the cannellini beans in the bowl of a food processor fitted with the metal blade. Add the mascarpone, lemon zest and juice, and salt. Pulse to combine. Add the cooled oil and garlic mixture and process until smooth.
Add the drained chickpeas and process until the dip is mixed but still has a bit of texture. Serve immediately or refrigerate until ready to use.
SERVES 4 TO 6

Enjoy this warm as a side dish or chilled as a snack with crudités, such as carrots, cucumbers, and peppers, and with pita chips, for dipping.
1 pound fennel, cored and cut into 1-inch pieces (1 large or 2 small bulbs)
1 tablespoon plus ¼ teaspoon kosher salt
3 tablespoons extra-virgin olive oil
1½ tablespoons nonfat plain Greek yogurt
In a medium saucepan, cover the fennel with cold water and sprinkle with 1 tablespoon of the salt. Bring to a boil over high heat, reduce the heat, and simmer the fennel for about 10 minutes or until very tender.
Drain the fennel well and transfer to the bowl of a food processor fitted with the metal blade. Add the oil, yogurt, and remaining ¼ teaspoon salt and process until smooth. Scrape down the sides of the processor as needed.
Serve warm, at room temp, or chilled.
SERVES 6 TO 8

Crudités—raw vegetables—are a staple in my house. Keep cut vegetables in the fridge for quick snacking. Plus, the leftover walnut butter is fabulous over chicken, steak, or fish, or tossed with pasta.
CRUDITÉS
1 fennel bulb, cored and cut into 8 thin wedges
8 red or breakfast radishes, halved
4 thin carrots, peeled and cut in half lengthwise
1 heart of romaine, leaves pulled apart
1 yellow bell pepper, cored, seeded, and cut into 8 wedges
1 pint cherry tomatoes
4 celery stalks, cut in half on the diagonal
1 baguette, sliced ½ inch thick on the diagonal
WALNUT BUTTER
½ cup toasted walnut halves and pieces (see Cook’s Note)
1 teaspoon chopped fresh thyme leaves
8 tablespoons (1 stick) unsalted butter, at room temperature
½ teaspoon kosher salt
⅛ teaspoon freshly ground black pepper
For the crudités: Arrange all of the vegetables and the baguette slices on a platter or board or in a basket.
For the walnut butter: Place the walnuts and thyme in the bowl of a food processor fitted with the metal blade. Pulse until the nuts are finely chopped. Add the butter, salt, and black pepper and puree until smooth. Scrape down the sides of the bowl as needed.
Serve the butter at room temperature alongside the crudités and bread.
SERVES 4

Even avowed eggplant-phobes will scarf up this velvety-smooth mixture. A bit of almond butter gives it depth and body.
1 (1½-pound) globe eggplant
1 head garlic
1 tablespoon extra-virgin olive oil
¾ teaspoon kosher salt, divided
2 tablespoons unsweetened almond butter
1 teaspoon grated lemon zest
1 teaspoon lemon juice
1 tablespoon chopped Italian parsley
Pita chips or crudités, for dipping
Preheat the oven to 350°F.
Pierce the eggplant all over with the tip of a paring knife and place on a rimmed baking sheet. Cut off the top third of the head of garlic and place on a sheet of aluminum foil large enough to enclose it. Drizzle the garlic with the olive oil and sprinkle with ¼ of the teaspoon salt. Bring the foil up and around the garlic and crimp to seal. Place the package on the baking sheet with the eggplant and bake for 45 minutes. After 45 minutes, remove the garlic from the oven and bake the eggplant an additional 30 minutes or until very soft and slightly deflated. Allow the eggplant to cool slightly.
Squeeze the roasted garlic into the bowl of a food processor. Cut the eggplant in half and use a large spoon to scrape out all of the flesh, leaving the skin behind. Add the flesh to the food processor along with the almond butter, lemon zest, lemon juice, and remaining salt. Puree on high for 2 minutes or until the mixture is smooth and silky. Place in an airtight container and chill completely. Serve cold, sprinkled with the parsley, with the pita chips or crudités for dipping.
MAKES 4 TO 6 SERVINGS

What kid wouldn’t love to find some animal- or star-shaped fruit roll-ups in their lunch box? You can use other types of fruit, such as raspberries and peaches. To use frozen fruit, thaw first, and then drain off any juices before blending.
1 pint strawberries, hulled and quartered
1 tablespoon fresh lemon juice
1 tablespoon agave syrup
Place an oven rack in the center of the oven and preheat the oven to 170°F or the lowest setting. Line a heavy rimmed baking sheet with a silicone baking mat.
Put the strawberries, lemon juice, and agave in a blender and blend until smooth. Pour the puree onto the prepared baking sheet and spread evenly with a spatula, leaving a 1-inch border on all sides.
Bake for 6 to 7 hours or until the center of the puree has set and is not sticky when touched. Allow to cool completely.
Using scissors, cut the baked puree into 1-inch-wide strips. The baked puree can also be cut into shapes using decorative-edged scissors or cookie cutters. Store in an airtight container with wax paper between the layers.
MAKES ABOUT 8 OUNCES OF JERKY

Spicy, sweet, tangy, and satisfying, this is a snack food you can feel good about munching.
½ boneless, skinless turkey breast, about 2 to 3 pounds
⅔ cup tamari
3 tablespoons agave syrup
1 teaspoon crushed red pepper flakes
1 teaspoon grated lemon zest
¼ teaspoon garlic powder
Trim any excess fat from the turkey breast and remove the tenderloin. Place the tenderloin and breast on a rimmed baking sheet and put it in the freezer for 1 to 2 hours or until partially frozen but not frozen solid. Then slice both pieces lengthwise into ¼-inch strips, making them as even as possible.
Place the turkey strips in a resealable plastic bag. To the bag add the tamari, agave, red pepper flakes, lemon zest, garlic powder, and ⅓ cup water. Seal the bag tightly and mix everything together to coat the strips. Marinate in the refrigerator for at least 6 hours or overnight.
Remove the turkey strips from the marinade and drain well on paper towels. Lay the slices in a single layer on the racks of a dehydrator, being sure not to overlap them. Set the dehydrator to 160°F and dry the jerky for 4 to 5 hours, depending on the thickness of the strips and how dry you prefer your jerky.
Remove the jerky to a paper towel–lined platter and allow to cool completely. Store in an airtight container for up to 3 weeks.
Because I travel a lot, often with a child in tow, I’ve learned that the best way to avoid airport junk food is to be armed with my own healthier alternatives. Once every couple of weeks or so I make a batch of homemade trail mix with almonds, walnuts, carob chips, and dried cranberries, strawberries, apricots, or other dried fruit. I store it all in a large glass jar to keep the mix from getting soggy and scoop some into snack-size plastic bags as needed.
HEALTHIES (4 PARTS OF THESE)
Nuts: These give you lots of protein for sustained energy. Go for the ones with the most nutrients—almonds, cashews, and walnuts—and opt for raw when possible and always unsalted.
Seeds: Another source of protein and antioxidants, these bring crunch to the mix. Think pumpkin, chia, and sunflower.
Grains: Add filling fiber with a bit of granola, popcorn, corn nuts, sesame sticks, or whole-grain cereal. Avoid processed foods that have a lot of carbs (I’m talking about you, sugary cereals and white-flour pretzels).
Like anything else in life, trail mix is about balance—and moderation. Don’t eat too much at a time; a portion should be less than what you can fit in your cupped hand. Avoid loading up on the sweet and starchy ingredients like sesame sticks, corn nuts, even M&M’s or marshmallows. The key is to maintain the right proportion of wholesome, nutritious ingredients to indulgent ones. You can mix and match from the list below, aiming for a four-to-one ratio of healthy foods to goodies.
GOODIES (1 PART OF THESE)
Dried Fruit: These add color, chewiness, and sweetness. While they come from natural-food sources, be careful about adding too much of them, as they bring sugar and calories, too. I like dried berries best; they’re small so they spread around the mix well, and they have plenty of fiber and antioxidants.
Sweets: Here’s where you get to have a little fun. Add bits of chocolate candies or yogurt-covered raisins, but not too much! Remember you want these treats to be the smallest part of your 4-to-1 ratio. And if you’re feeling extra nutrition-conscious, go for dark chocolate: it has heart-healthy antioxidants.

MAKES ABOUT 6 CUPS
This Midwestern fave, an addictive blend of peanuts, pretzels, and cereal coated with melted chocolate and peanut butter, then tossed in confectioners’ sugar to create individual “kibbles,” is something like party mix on steroids. To up the fiber, omega-3s, and antioxidant power, I’ve replaced the milk chocolate chips with dark chocolate and a handful of cocoa nibs, and subbed golden flaxseed meal and powdered chia for some of the confectioners’ sugar.
3 cups whole-grain cereal, such as Chex or Heritage Bites
1 cup unsalted peanuts
1 cup pretzel nuggets or broken pretzel rods
⅓ cup bittersweet or semisweet chocolate chips
⅓ cup natural peanut butter
1 cup confectioners’ sugar
⅓ cup golden flaxseed meal
⅓ cup chia powder
¼ cup cocoa nibs
Combine the cereal, peanuts, and pretzels in a large bowl. Set aside.
In a heat-proof measuring cup or bowl, combine the chocolate chips and peanut butter. Microwave on 50% power for 1 minute. Stir and return to the microwave, continuing to heat and stir in 30-second increments until the mixture is completely melted and smooth.
Drizzle the chocolate mixture over the cereal mixture and toss very well, coating everything thoroughly.
Sift the confectioners’ sugar into a bowl or onto a piece of wax paper. Add the flaxseed meal and chia powder and stir to combine.
Sprinkle the sugar mixture over the coated cereal mixture, tossing frequently to ensure every “kibble” is dusted with sugar and the pieces are separate and dry. Add the cocoa nibs and toss again. Store for up to a week in an airtight container.
Top Pops
For movie night, rainy afternoons, or any time hunger pangs rear their ugly heads, popcorn is my hands-down favorite snack food. I love how economical it is—a half cup of kernels costs less than a dollar and makes seven to eight cups of popped corn—as well as how unadulterated it is, especially if you pop your own. You can make it on the stovetop in a large heavy pan with a little oil, but recently I’ve been using a glass microwave air popper that lets me pop my corn without any oil at all. They are not expensive, and if you buy a lot of pre-packaged microwave popcorn, it will pay for itself quickly (and keep all that extra packaging out of the landfill!).
SERVES 4

The flavors of the Middle East meet corn from the Midwest.
1 teaspoon ground cumin
1 tablespoon chopped fresh flat-leaf parsley leaves
¼ teaspoon ground coriander
¼ teaspoon cayenne pepper
¼ teaspoon kosher salt
7 cups popped popcorn (from ½ cup of kernels)
2 tablespoons extra-virgin olive oil
In a small bowl, stir together the cumin, parsley, coriander, cayenne, and salt. Put the popped popcorn in a large bowl and drizzle with the olive oil. Toss thoroughly to distribute. Sprinkle with the spice blend and toss again to coat the popcorn with the seasonings.
SERVES 4
When autumn rolls around, these are nice flavors to add to popcorn.
7 cups popped popcorn (from ½ cup of kernels)
3 tablespoons unsalted butter, melted
1 tablespoon (packed) light brown sugar
1 teaspoon pumpkin pie spice
1 teaspoon instant espresso powder
Put the popped popcorn in a large bowl.
In a small bowl, stir together the butter, brown sugar, pumpkin pie spice, and espresso powder. Drizzle over the popcorn and toss gently until combined.
Serve immediately or store in an airtight container for up to 1 day.
SERVES 4
In Parisian movie theaters you can order sweet or salty popcorn—or the best of both worlds, a mixture. This is my nod to that tradition. Be sure to shake the pot continuously as the corn pops or the sugar will burn.
¼ cup canola oil
½ cup popcorn kernels
3 tablespoons sugar, preferably turbinado sugar
2 tablespoons fleur de sel (flaked sea salt)
Heat the oil in a heavy pot with a lid over medium-high heat. When hot, add the popcorn and sugar, swirl to distribute the sugar, and cover. Cook, shaking the pan continuously, for about 2 minutes or until the popping begins to slow.
Remove from the heat and set aside, covered, for 1 to 2 minutes. The residual heat will pop most of the remaining kernels.
Immediately turn the popcorn into a bowl and sprinkle with 2 tablespoons of the flaked salt or to taste. Use tongs to toss as the molten sugar is very hot.


SERVES 4
Zesty lemony popcorn with a little extra pop.
2 tablespoons (¼ stick) unsalted butter
Grated zest of 1 lemon
⅛ teaspoon cayenne pepper
7 cups popped popcorn (from ½ cup of kernels)
½ teaspoon kosher salt
In a small sauté pan, melt the butter over medium heat. Add the lemon zest and cayenne and swirl to let the flavors mingle. Pour the butter over the popcorn in a large bowl and toss gently to coat. Season with the salt and serve.
Drink Up!
Often when we think we’re hungry, we’re just thirsty. Especially when the temperatures climb, we’d all do well to remember this. While your body is pretty good at maintaining its temperature, it needs plenty of water to do the job. There are lots of ways to hydrate that go way beyond a plain glass of water. Give one of these ideas a swig!
Flavored Sparklers: I love juices and even some sodas, but you don’t always want all that sugar or flavor when you’re thirsty. I often dilute orange juice or ginger ale with sparkling water—one part juice to three parts water, or even more—and drink up without feeling weighed down. For a blackberry fizz, pulse some blackberries and a bit of sugar in a food processor. Strain the juice through a fine-mesh strainer into a pitcher to remove the seeds. Stir in some fresh lime juice and seltzer. Serve the fizz over ice.
Fruit Waters: It sounds fancy to say “infused water” when all you’re doing is adding a fresh ingredient or two to your water. Add some sliced strawberries, lemon, or cucumbers to a pitcher of cold water, and then let it sit for a few minutes before serving. The result: calming aroma and subtle flavor.
Fruity Ice Cubes: Add a few blueberries or blackberries, or a strawberry wedge or lemon wedge, to each compartment of an ice cube tray, then top with water. Freeze until firm and add the cubes to a tall glass of water—beautiful!
Homemade Ice Pops: There are all sorts of simple ways to make ice pops—and it’s so easy to find molds now. Use fruit juices or, my favorite, brewed tea. I like to add lemon juice, honey, and mint. Pour the mixture into molds and freeze. (For the recipe, see this page.)

SERVES 8
This refreshing and vitamin-rich lemonade can be served hot or cold. The soaked flaxseeds thicken the lemonade slightly, and then are strained out for easier digestibility. It has an appealing jelly-like texture.
2 tablespoons flaxseeds
1 cup sugar
Grated zest and juice of 3 large lemons
1 lemon, thinly sliced, for serving
Place the flaxseeds in a saucepan and add 4 cups water. Cover the pan and bring to a boil over high heat. Reduce the heat and simmer for 45 minutes, adjusting the heat as needed to maintain the simmer.
Add the sugar and lemon zest and simmer for 15 to 20 minutes longer or until the sugar dissolves. Remove from the heat and stir in the lemon juice. Strain the mixture through a fine-mesh strainer into a pitcher. Discard the seeds and zest.
Serve hot, at room temperature, or over ice. Garnish each serving with a lemon slice.


SERVES 4 TO 6
The Italian twist is basil simple syrup, a suave alternative to the more expected mint sprigs. Pack the lemonade along on your next picnic.
BASIL SIMPLE SYRUP
1 bunch of fresh basil, washed and stemmed
2 cups sugar
LEMONADE
2 cups fresh lemon juice (from 12 to 15 lemons)
2 cups sparkling water or cold tap water
Lemon zest twists, for garnish
For the basil simple syrup: In a saucepan, combine the basil, sugar, and 1 cup water. Bring to a simmer and cook for about 5 minutes or until the sugar dissolves. Strain the syrup through a fine-mesh strainer into a heat-proof bowl or glass measuring cup and cool. Refrigerate until needed. You will have about 2 cups.
For the lemonade: In a large pitcher, mix the lemon juice with the basil simple syrup. Add the sparkling water (or cold tap water) and stir. Serve right away in ice-filled glasses or refrigerate until ready to serve. Garnish each serving with a lemon twist.
Few foods make me happier than watermelon, whether in a cooling soup, in refreshing agua fresca, or just eaten out of hand. Packed with hydrating water (about 92 percent by weight), and sweet but light on calories (about 40 per cup), watermelon is a natural guilt-free heat-beater. No wonder it’s a picnic and barbecue staple.
With its high water and fiber content, watermelon also aids in digestion, helping to keep you satisfied; its choline content is believed to help memory and reduce inflammation. And whether you eat the usual red or more exotic orange or yellow varieties, watermelon is packed with antioxidants.

Watermelon Agua Fresca
SERVES 4 TO 6
Aguas frescas, Spanish for “cool waters,” are sold throughout shops in Mexico and the Caribbean to customers who stop for a thirst-quenching beverage. They’re made with fruits, nuts, and flowers, in flavors like mango, almond, and hibiscus. This is one to keep in your water bottle throughout the day.
¼ cup agave syrup
¼ cup packed fresh mint leaves
4 cups chopped seedless red watermelon (about ½ small melon)
¼ cup fresh lime juice (from 2 to 3 limes)
In a small saucepan, bring the agave and ¼ cup water to a simmer over medium heat. Turn off the heat, add the mint, and steep for 15 minutes. Strain the syrup through a fine-mesh strainer and set aside to cool to room temperature.
Put the watermelon and lime juice in a blender. Add ½ cup water and puree until smooth. Strain through the fine-mesh strainer into a large bowl or pitcher and stir in the reserved syrup. Refrigerate until ready to serve.
MAKES 12 ICE POPS

Who says you have to drink your tea? Start with a pitcher of brewed green tea, add lemon juice, honey, and mint, and you’re ready to freeze!
4 cups brewed green tea, chilled
Juice of 1 small lemon
2 teaspoons honey
¼ cup small fresh mint leaves
SPECIAL EQUIPMENT
12 ice pop molds
12 ice pop sticks
Place the green tea in a pitcher and add the lemon juice, honey, and mint leaves. Stir until the honey dissolves. Pour into the molds, filling each mold to the top. Insert an ice pop stick into each and freeze for 4 to 6 hours or until firm.
When ready to serve, run the molds under warm water for a few seconds to release the ice pops.

SERVES 2 TO 4
Hot and spicy harissa is a fiery North African chile paste used in cooking and as a condiment. Some prepared brands contain gluten, so if that is a concern for you, make sure to read the label carefully. If you can’t find it, use sriracha instead.
⅓ cup sugar
⅓ cup sherry vinegar
⅓ cup harissa
1 pound chicken wings, tips removed and wings split
Vegetable oil cooking spray
In a small saucepan, stir the sugar and vinegar over medium-high heat until the sugar dissolves. Reduce the heat to medium and simmer for 5 minutes longer or until the glaze is slightly thickened. Stir in the harissa and set the pan aside to cool completely.
Put the chicken wings in a resealable plastic bag. Add three-quarters of the glaze and seal the bag (set aside the remaining glaze). Turn the bag upside down several times to coat the chicken wings. Refrigerate the wings and the reserved glaze separately for 2 to 4 hours.
Preheat the oven to 400°F. Spray a small rimmed baking sheet with vegetable oil spray. Pour the contents of the bag, including the liquid, onto the baking sheet, spreading the wings out so they do not touch each other. Bake for 25 to 30 minutes, turning the wings after 12 to 15 minutes of cooking. The wings are done when they are browned and cooked through. Remove from the oven and brush with the reserved glaze.
Preheat the broiler to high. Slide the baking sheet under the broiler or transfer the wings to a broiler pan and broil for about 3 minutes or until the skin is crispy and the glaze is sticky. Serve warm.
Wing It!
A party just isn’t a party until the wings arrive. For something so petite, though, deep-fried chicken wings can pack a massive punch of fat and calories—as many as 200 per wing! Eat five or six of those babies and you can see how that adds up, no matter how many celery sticks you load your plate with. Rather than rule them out entirely, though, I was determined to make oven-baked, blue-cheese-free wings that were just as delicious as the ones that made Buffalo famous, and I’m pretty pleased with the results.
All three of these wing recipes are finger-licking good and full of flavor, and not one of them has ever seen the inside of a fryer. Baking them cuts down on the fat and calories and makes cleanup a snap, and the recipes are much easier to scale up for a crowd. Best of all, the wings and their sauces can be prepped and marinated the night before, so all you need to do is spread them onto a baking sheet and bake until cooked through and crisp. Then, pile them on a platter, pass around a big stack of napkins, and dive in without guilt.

SERVES 2 TO 4
All the bright, fresh flavors of a margarita cocktail are found in these wings.
1 pound chicken wings, tips removed and wings split
½ cup silver tequila
1 teaspoon grated orange zest
¼ cup fresh orange juice (from 1 orange)
½ teaspoon grated lime zest
3 tablespoons fresh lime juice (from 2 limes)
2 teaspoons agave syrup
¼ teaspoon kosher salt
4 to 6 pequin chiles, crushed, or ⅛ teaspoon smoked hot paprika
Vegetable oil cooking spray
Put the chicken wings in a resealable plastic bag.
In a small bowl, whisk the tequila with the orange zest and juice, lime zest and juice, agave, salt, and chiles. Pour the marinade over the wings. Seal the bag and turn it upside down several times to coat the wings with marinade. Refrigerate the wings in the bag for 2 to 4 hours.
Preheat the oven to 450ºF.
Spray a small rimmed baking sheet with vegetable oil spray. Pat the wings dry and position them on the baking sheet so they do not touch each other. Reserve the marinade in the plastic bag.
Bake the wings for 25 to 30 minutes, turning them after 12 to 15 minutes of cooking. The wings are ready to remove from the oven when nicely browned.
Heat a grill pan over medium-high heat. Transfer the wings to the grill pan and cook over medium-high heat for about 5 minutes or until the wings are golden and crispy. Transfer the cooked wings to a shallow heat-proof dish.
Meanwhile, pour the marinade into a small saucepan and bring to a simmer over medium-high heat. Simmer for 8 to 10 minutes or until the marinade reduces to a thick and sticky glaze. Pour the glaze over the wings and toss to coat. Serve immediately.
SERVES 2 TO 4

These wings are gingery and citrusy—the perfect Asian combination.
1 pound chicken wings, tips removed and wings split
⅓ cup low-sodium gluten-free tamari
1 tablespoon toasted sesame oil
3 tablespoons grated candied ginger
½ teaspoon grated lime zest
1½ teaspoons fresh lime juice (from 1 lime)
Vegetable oil cooking spray
1 tablespoon chopped fresh cilantro leaves
1 teaspoon toasted white sesame seeds
Put the chicken wings in a resealable plastic bag.
In a small bowl, whisk the tamari with the sesame oil, candied ginger, and lime zest and lime juice. Add 2 tablespoons water, stir well, and pour the marinade over the wings. Seal the bag and turn it upside down several times to coat the wings with the marinade.
Refrigerate the wings in the bag for at least 8 hours or overnight. Turn the bag a few times during marinating, if possible.
Preheat the oven to 400°F.
Spray a small rimmed baking sheet with vegetable oil spray. Pour the contents of the bag onto the baking sheet, spreading the wings out so they do not touch each other. Bake for 25 to 30 minutes, turning the wings after 12 to 15 minutes of cooking. The wings are done when they are golden brown and glazed with the marinade.
Allow the wings to rest at room temperature for 5 minutes. Before serving, sprinkle them with the cilantro and sesame seeds.

MAKES 24 MEATBALLS
These light, juicy meatballs are one of the most popular antipasti at Giada, my restaurant in Las Vegas. The meatballs, served with cremini mushrooms, make a great appetizer, and can be served over pasta or polenta, or piled on a hero sandwich.
¼ cup panko bread crumbs
2 tablespoons milk, at room temperature
⅓ cup plus 1 tablespoon Marsala wine
1 pound ground chicken breast
¼ cup grated Pecorino Romano, plus more for serving
1 large egg, beaten
2 tablespoons chopped fresh flat-leaf parsley leaves
1 teaspoon kosher salt, divided
⅛ teaspoon freshly ground black pepper
2 tablespoons extra-virgin olive oil, plus more for frying
8 ounces cremini mushrooms, sliced
1 large shallot, minced
1½ teaspoons all-purpose flour
1¼ cups low-sodium chicken broth
In a large bowl, mix together the bread crumbs, milk, and 1 tablespoon of the wine. Let the bread crumbs soak for about 5 minutes. Add the chicken, pecorino, egg, parsley, ½ teaspoon of the salt, and the pepper. Using your hands, gently mix the ingredients together. Do not overmix. Refrigerate for at least 2 hours or overnight.
In a medium skillet, add enough olive oil to come 1 inch up the sides of the pan. Heat the oil over medium-high heat until it registers 350°F on a deep-fry thermometer.
Working quickly, scoop about 2 tablespoons of the chicken mixture into your palms and roll into a ball. Do not handle the meat more than necessary. Repeat with the remaining meat mixture. Gently drop the meatballs, a few at a time, into the hot oil (do not crowd the pan, and let the oil regain its heat between each batch). The meatballs will better retain their shape the colder they are. Fry the balls, rotating them often with a long-handled wooden spoon, until they are golden brown all the way around. (They will continue to cook when added to the sauce later.) Transfer to a paper towel–lined plate and set aside.
In another skillet, heat 1 tablespoon of the olive oil over medium-high heat. Add the mushrooms and cook, stirring often with a wooden spoon, for about 5 minutes, until nicely browned. Add the shallot and the remaining ½ teaspoon salt and cook for another 2 minutes or until the shallot begins to soften.
Reduce the heat to medium and stir in the flour and the remaining tablespoon olive oil to form a paste. Add the remaining ⅓ cup wine and stir until the mixture is smooth. Whisk in the chicken broth and simmer for about 5 minutes or until heated through and smooth.
Add the meatballs to the sauce and simmer for an additional 5 minutes to let the flavors blend and to ensure the meatballs are cooked through. Serve warm, garnished with grated pecorino cheese.
It’s All About the Apps
When hosting a get-together at home, I like to offer my guests an assortment of appetizers rather than a more conventional meal. The key is to remember that you’re not running a restaurant; one or two hot items that require your supervision is plenty. Round out the spread with some room-temperature options so you’re not stuck in the kitchen while everyone else is having fun.
SERVES 8 TO 10

There are meatballs…and then there are my meatballs! In this version orzo takes the place of bread crumbs, and as they cook, the orzo absorbs the sauce, adding even more flavor to this already tasty dish.
1 large or 2 small shallots, minced
2 garlic cloves, minced
1 large egg
¼ teaspoon ground cinnamon
⅛ teaspoon ground nutmeg
1 pound ground chuck, 20% fat
¼ cup raw orzo
½ cup whole-milk ricotta cheese
¼ cup fresh basil leaves, chopped, plus whole leaves for garnish
½ teaspoon kosher salt
¼ teaspoon freshly ground black pepper
2 cups marinara sauce, homemade or store-bought
Shaved Parmesan cheese, for serving
In a medium bowl, whisk together the shallots, garlic, egg, cinnamon, and nutmeg. Using a wooden spoon, stir in the meat, orzo, ricotta, and chopped basil. Add ¼ cup water, salt, and pepper and mix well.
Bring the marinara to a simmer in a shallow 12-inch skillet. Form heaping tablespoonfuls of the meat mixture into balls. Drop the meatballs into the simmering sauce. Cover the pot and allow them to simmer for 15 minutes. Serve 3 to 4 meatballs per person, topped with shaved Parm and garnished with fresh basil leaves.
MAKES ABOUT 25 ARANCINI
Classic arancini are made vegan here by omitting the cheese; they are tasty and unusual.
ARANCINI
3 tablespoons extra-virgin olive oil
3 shallots, minced
3 garlic cloves, minced
½ teaspoon kosher salt
1 cup Arborio rice
1 cup dry white wine
1 tablespoon soy sauce
1 cup unsalted vegetable broth
¾ cup marinated artichoke hearts, cut into ¼-inch pieces
¼ cup fresh basil leaves, chopped
FOR FRYING
1 cup extra-virgin olive oil
1 cup vegetable oil
½ cup all-purpose flour
½ cup unsweetened almond milk
1 cup panko bread crumbs
2 cups warmed marinara sauce, homemade or store-bought, for dipping (optional)
Prepare the arancini: Heat a 3½-quart Dutch oven over medium-high heat. Add the olive oil, shallots, garlic, and salt. Cook, stirring often, for about 2 minutes, until soft and fragrant. Add the rice and toast, stirring constantly to coat in the oil, for about 2 additional minutes. Add the white wine and soy sauce and cook, stirring often, until the wine is almost entirely absorbed.
Combine the vegetable broth and 1 cup water in a measuring cup. Add ¾ cup of the broth mixture to the rice and stir until almost completely absorbed, about 4 minutes. Continue adding the broth, ½ cup at a time, stirring constantly and allowing each addition of broth to be absorbed before adding the next. Cook until the rice is tender but not mushy, about 20 minutes. Stir in the artichokes. Remove the pot from the heat and allow the mixture to cool for 15 minutes. Stir in the basil and spread on a rimmed baking sheet to cool completely, about 20 minutes.
Fry the arancini: Heat the oils in a large heavy-bottomed saucepan or Dutch oven over medium heat until a deep-fry thermometer reaches 350°F.
Set up a station with the flour, almond milk, and panko in separate shallow bowls. Using a small ice cream scoop, scoop about 2 tablespoons of the rice mixture into your hands and gently roll into a ball. Dredge the ball in the flour, then in the almond milk, and then into the panko, packing it on tightly. Continue with the remaining rice mixture. Fry the coated balls in batches of 4 or 5 for about 3 minutes or until golden brown on the outside and warmed through. Drain on paper towels. Serve with warm marinara for dipping if desired.
MAKES 12 DATES
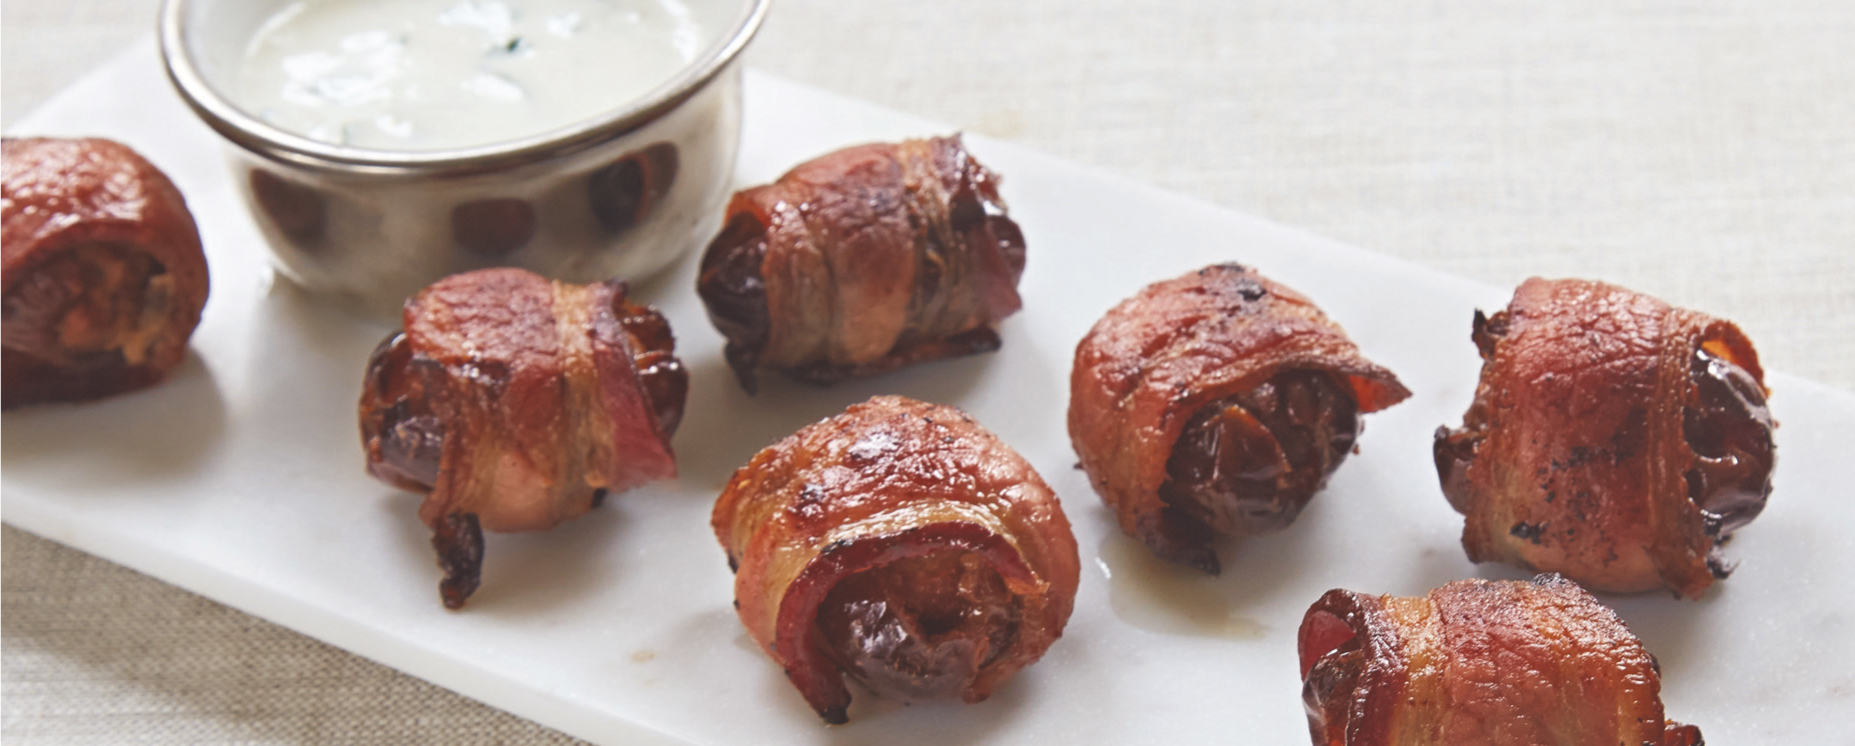
These sausage-stuffed dates broiled in bacon always get an especially warm welcome. They can easily be assembled well ahead of time, then baked off as needed.
2 tablespoons sour cream, at room temperature
1 tablespoon mascarpone cheese, at room temperature
1 teaspoon grated lemon zest
2 tablespoons fresh lemon juice (from 1 lemon)
¼ teaspoon kosher salt
3 tablespoons chopped fresh basil leaves
12 Medjool dates
2 links hot Italian sausage, casings removed
6 slices bacon (about 4 ounces), halved to make 12 short slices
In a small bowl, whisk together the sour cream, mascarpone, lemon zest and juice, and salt to make the crema. Fold in the basil. Cover and refrigerate for at least 1 hour to let the flavors marry.
Preheat the oven to 400°F.
Make a small lengthwise slit down the center of each date. Remove the pits and open the dates slightly, leaving the bottom intact.
Place about 2 teaspoons of the sausage meat in the cavity of each date. With your fingers, push the sides of the dates up and around the sausage to enclose it a little. Wrap each date with a piece of bacon. Transfer the wrapped dates to a rimmed baking sheet.
Bake the dates for 8 minutes. Remove from the oven and turn over each date. Bake for 8 to 10 minutes (or a little longer), until the bacon is crisp. Serve warm with the lemon-basil crema.
When it comes to hosting a large number of guests in a relatively stress-free way, a cocktail party is often the path of least resistence, and for good reason. It’s less structured than a dinner party (fewer timing issues to be worried about!), people can come and go as they please, and of course having a killer playlist and a house cocktail or two can do some of the heavy lifting to make sure the mood is appropriately festive. That doesn’t mean, though, that you shouldn’t put a little thought and effort into the food. If your cocktail parties have been stuck in cheese-and-cracker mode, it’s time to move on to some bites that are a bit more memorable.
The best cocktail party foods fall into one of two categories: First, there’s the kind that are a play on classics—but elevated. I’m a big fan of one- to two-biters. Think mini mac-and-cheese cupcakes or anything with bacon. The second type is anything in the form of a dip. Guests love to congregate around a big bowl of dip, from a creamy artichoke dip to tomato sauce whipped with mascarpone to a great pesto. Set out a few vehicles for the dips: Seasonal veggies, endive, fennel, crostini, homemade tortilla or pita chips, and grissini are all crowd-pleasers.

Heirloom LA makes some of the most striking platters and cocktail spreads I’ve ever seen, with a riot of different shapes, colors, and textures that make them a magnet for partygoers. Owner Tara Maxey shared her tips for creating an edible centerpiece your guests will want to congregate around:
• Just like assembling a floral bouquet, you need to start your platter with a focal point or three (uneven numbers are best) and build from that.
• Create different heights to make your platter more interesting and dimensional.
• Seasonal produce will be the prettiest and most fragrant, not to mention most flavorful. Get your produce from a local farmers’ market, if possible.
• Ask what kind of edible flowers are available. Don’t overlook flowering herbs; they are lovely to work with.
• Choose cheeses with different colors and textures, and break them up into slices and crumbles.
• If you are incorporating meats, they will be prettier if you fold the slices rather than arrange them in stacks. Globs of anything are not pretty.
• Place dips and spreads in little bowls or form them into quenelles (small ovals) using two spoons.
• When you mound dip in a bowl, make a little well in the center and add just a bit of olive oil to give it brightness. Top with chopped fresh parsley or edible flowers.

SERVES 12
Lots of tangy ingredients make these simple crostini anything but ordinary. Both the crostini and cheese mixture can be prepared ahead of time; use any leftover cheese mixture to fill an omelet or toss with hot pasta and peas.
36 (½-inch-thick) slices baguette bread
3 tablespoons extra-virgin olive oil
8 ounces soft fresh goat cheese
4 ounces cream cheese
2 teaspoons finely chopped fresh flat-leaf parsley leaves
2 teaspoons finely grated lemon zest
Salt and coarsely ground multicolored or black peppercorns
½ cup pitted Sicilian green olives or kalamata olives, finely chopped
2 tablespoons thinly sliced fresh chives
Preheat the oven to 375°F. Arrange the bread slices on 2 large heavy-rimmed baking sheets. Brush the oil over the bread slices. Bake until the crostini are pale golden and crisp, about 15 minutes. (The crostini can be stored in an airtight container for up to 2 days.)
Blend the goat cheese and cream cheese in a food processor until smooth and creamy. Add the parsley and lemon zest. Using the on/off button, pulse just to blend. Season to taste with salt and pepper. If not serving immediately, cover and refrigerate.
To serve, let the cheese mixture stand at room temperature for 1 hour to soften slightly if it has been refrigerated. Spread the cheese mixture over the crostini. Sprinkle with the olives, chives, and pepper. Arrange the toasts on a platter and serve.
SERVES 6 TO 8

Shrimp and goat cheese instead of the traditional chicken and blue cheese make this a lighter spin on a game day favorite.
1 pound jumbo shrimp, peeled and deveined
¼ cup plus 2 tablespoons hot sauce
4 garlic cloves, smashed and peeled and coarsely chopped
3 tablespoons extra-virgin olive oil
1 teaspoon grated lemon zest
1 tablespoon finely chopped shallot
¼ teaspoon ground cumin
¼ teaspoon smoked paprika
1 cup heavy cream, at room temperature
⅓ teaspoon plus ½ teaspoon kosher salt
4 ounces fresh goat cheese, at room temperature
1 tablespoon chopped fresh chives
1 tablespoon chopped fresh flat-leaf parsley leaves
In a medium bowl, toss the shrimp with ¼ cup of the hot sauce, the garlic, 2 tablespoons of the oil, and the lemon zest. Cover with plastic wrap and allow to sit at room temperature for 15 minutes. Heat a small saucepan over medium heat and when hot, pour in the remaining tablespoon of oil. Add the shallot and sauté for about 2 minutes to soften. Add the cumin and paprika and continue to cook, stirring with a wooden spoon, for 1 minute longer. Add the heavy cream and ⅓ teaspoon of the salt. Reduce the heat to low and simmer for about 5 minutes, until slightly thickened.
Whisk the goat cheese into the cream sauce a little at a time, until fully incorporated and smooth. Remove from the heat and allow the sauce to cool for 5 minutes. Stir the chives and parsley into the dipping sauce.
Preheat a grill or grill pan to medium-high heat.
Season the shrimp with the remaining ½ teaspoon salt and grill for 2 to 3 minutes on each side or until opaque all the way through. Remove to a clean bowl and toss with the remaining 2 tablespoons hot sauce. Serve with the goat cheese dipping sauce.
SERVES 4 TO 6

In the classic steakhouse version of this perennial favorite, the shrimp are boiled and often watery-tasting. When they are sautéed and served with a yogurt-mustard dipping sauce, the flavor is much more concentrated and lively.
1¼ cups plain yogurt
2 tablespoons mayonnaise
2 tablespoons whole-grain mustard
1½ tablespoons pure maple syrup
1 teaspoon ground turmeric
¼ cup chopped fresh basil leaves
Salt and freshly ground black pepper
2 tablespoons extra-virgin olive oil
1 pound jumbo shrimp, peeled, tail on, deveined
1 tablespoon herbes de Provence
In a medium bowl, mix together the yogurt, mayonnaise, mustard, maple syrup, and turmeric. When blended, fold in the basil and season to taste with salt and pepper.
In a large skillet, heat the oil over medium-high heat. Add the shrimp and herbes de Provence and season lightly with salt and pepper. Cook for about 3 minutes on each side or until the shrimp are pink and cooked through. Serve the shrimp with the dipping sauce.

Hot, cheesy, savory, and chewy, these crusty slices of heaven are top sellers at my restaurant and others around the world for a reason. I have a special connection to ’za, though. The dough-sauce-and-cheese layered variety we all know can trace its origins to Naples, where my grandfather was from. Some of my earliest kitchen memories are of making pizza with him. When Jade and I spend time tossing and topping dough, it takes me right back to those happy times.
If you don’t have the time or the inclination to make your own dough, pick some up at your local pizzeria or the grocery store’s freezer. Top with a quick sauce made of canned crushed tomatoes, a sprinkling of shredded mozzarella, and a few leaves of basil. That’s it for the basics. Beyond that, just about anything you can think of makes a great pizza topping for a bit of handheld happiness.
MAKES ABOUT 1 POUND
1 cup warm water
1 teaspoon active dry yeast
1 teaspoon honey
2¼ cups flour
1 teaspoon kosher salt
Extra virgin olive oil
To the warm water, add the yeast and honey. Stir to dissolve. Allow the mixture to sit for 3 minutes to make sure the yeast is alive. It should foam and start to bubble.
Place the flour and salt in the bowl of an electric mixer fitted with a dough hook. Add the yeast mixture and mix on low speed until the mixture starts to comes together. Turn the speed up to medium and mix for 8 minutes. The dough should start to pull away from the sides but still remain soft and slightly sticky at the bottom of the bowl. Add an extra tablespoon of flour if needed. Coat your hands in a bit of olive oil and form the dough into a ball. Place the dough in a bowl that is coated in olive oil. Cover with a towel and allow to sit in a warm place for 1 hour or until doubled in size. Knock down the dough and cut into 4 equal pieces if making small pizzas or simply reform into a ball and allow the dough to proof for an additional hour. The dough is now ready to use.
SERVES 4

This sweet, spicy, and salty combo is unique and completely addictive.
1 (1-pound) acorn squash
2 tablespoons pure maple syrup
1 tablespoon extra-virgin olive oil
1 teaspoon crushed red pepper flakes
½ teaspoon kosher salt
½ teaspoon freshly ground black pepper
All-purpose flour, for rolling the dough
1 pound pizza dough, homemade (opposite) or store-bought
1 cup shredded whole-milk mozzarella cheese
½ cup crumbled Gorgonzola cheese
1 cup arugula
Preheat the oven to 375°F. Line a rimmed baking sheet with parchment paper.
Slice the squash in half through the stem and scoop out the seeds. Slice the squash into ½- to ¾-inch-thick half-moons and place in a medium bowl. Toss the squash with the maple syrup, olive oil, red pepper flakes, ¼ teaspoon of the salt, and ¼ teaspoon of the pepper. Arrange the squash on the prepared baking sheet and bake until tender and golden, 20 to 25 minutes. Leave the oven on.
On a flour-dusted piece of parchment paper, roll the pizza dough into a circle 13 inches in diameter. Transfer the pizza and parchment paper to a baking sheet. Sprinkle the dough with the mozzarella and Gorgonzola. Bake until the crust is golden and cooked through, 25 to 30 minutes. Peel the skin off the squash pieces and arrange the squash atop the hot pizza. Scatter the arugula over it all and season with the remaining ¼ teaspoon salt and ¼ teaspoon pepper. Slice and serve.
SERVES 4 TO 6

A great appetizer, this focaccia is sweet and savory. I happen to love tangerines, but you can substitute any kind of orange or cherries for an equally delicious dish.
3 tablespoons extra-virgin olive oil
1 pound pizza dough, homemade or store-bought
½ tangerine, peeled and sliced thin, seeds removed
½ fennel bulb, cored, shaved thin on a mandoline
½ teaspoon fennel seeds
1 teaspoon coarse sea salt, for sprinkling
Preheat the oven to 400°F. Brush the bottom and sides of a 9 × 13-inch rimmed baking sheet with 2 tablespoons of the olive oil.
Stretch the pizza dough to fit the pan, pushing out the dough with your hands as needed. Using a pastry brush, cover the top of the dough with the remaining tablespoon of oil. Evenly distribute the tangerine slices, the shaved fennel, and the fennel seeds, pushing the items gently into the dough using your fingertips. Sprinkle with the salt.
Bake the focaccia until golden brown, 25 to 30 minutes. Cut into slices and serve.
SERVES 6
This may be the simplest pizza recipe I know and also one of the best. Flattened pizza dough is sprinkled with salt and thyme, baked for 15 minutes, then topped with slices of mortadella. Addictive.
1 pound pizza dough, homemade or store-bought
All-purpose flour, for rolling the dough
2 teaspoons extra-virgin olive oil
1 tablespoon chopped fresh thyme leaves
¾ teaspoon kosher salt
½ pound thinly sliced mortadella sausage
Position an oven rack in the center of the oven and preheat the oven to 450°F. Roll out the dough on a lightly floured work surface to ½ inch thick. Transfer the dough to a heavy large baking sheet. Using a fork, pierce the dough all over.
Drizzle the oil over the dough. Sprinkle with the thyme and salt. Bake until golden, about 15 minutes. Remove from the oven and drape the mortadella over the pizza. Cut into wedges or squares, and serve.


SERVES 6
Canapé-size pizzette are the perfect choice for game-day gatherings. Earthy mushrooms and kale combined with pungent Gorgonzola make a party bite that’s hard to pass up (and sneakily healthy).
8 ounces button mushrooms, stemmed and sliced
1 teaspoon extra-virgin olive oil, plus more for brushing and drizzling
½ teaspoon kosher salt
All-purpose flour, for rolling the dough
1 pound pizza dough, homemade or store-bought
¼ cup shredded mozzarella cheese
1 small bunch of Tuscan kale (about 4 leaves), ribs removed, leaves sliced into ribbons
2 ounces Gorgonzola cheese, crumbled
Position a rack in the center of the oven and preheat the oven to 400°F. Line 2 baking sheets, one rimmed, with parchment paper.
On the rimmed baking sheet, toss the mushrooms with the olive oil and salt, then spread the mushrooms in an even layer. Roast for 8 to 10 minutes, until they are golden brown. Set the mushrooms aside and increase the oven temperature to 475°F.
On a lightly floured surface, roll out the pizza dough to ¼ inch thick. Using a 3-inch round cookie cutter, cut out circles in the dough and transfer them to the second lined baking sheet. Brush the dough circles lightly with olive oil.
Place a teaspoon of mozzarella on each circle, then top with the mushrooms and kale, then the Gorgonzola. Drizzle a little more olive oil over each pizzette and bake until golden and bubbly, about 10 minutes. Arrange the pizzette on a platter and serve immediately.

SERVES 6 TO 8
These small eggplant bites are crisp and light. Japanese eggplants are the perfect size and shape for these bite-size portions, plus they have thin skins, which makes them easy to slice.
SAUCE
2 tablespoons extra-virgin olive oil
1 shallot, chopped
1 large garlic clove, minced
1 cup marinara sauce, homemade or store-bought
¼ cup finely chopped fresh basil leaves
1 teaspoon dried oregano
⅛ teaspoon crushed red pepper flakes
¼ teaspoon balsamic vinegar, plus more to taste
¼ teaspoon kosher salt
⅛ teaspoon freshly ground black pepper
EGGPLANT
1 cup panko bread crumbs
½ cup all-purpose flour
2 large egg whites
2 Japanese eggplants, sliced ¼ inch thick on the diagonal
⅔ cup extra-virgin olive oil
½ cup (packed) coarsely grated whole-milk mozzarella cheese
Small fresh basil leaves, for garnish
For the sauce: Place the oil in a heavy medium saucepan. Add the shallot and garlic to the saucepan. Stir over medium heat until very fragrant, about 2 minutes. Add the marinara sauce, basil, oregano, and red pepper flakes. Simmer the sauce, stirring often, until the flavors blend and the sauce thickens slightly, about 5 minutes. Mix in the vinegar, salt, and pepper, then more vinegar if desired. Puree the sauce in a blender. Cool, cover, and chill. The sauce can be made up to 2 days ahead of time.
For the eggplant: Put the panko and flour in separate medium bowls. Whisk the egg whites in a third bowl until broken up and very frothy. Dip each eggplant slice first in flour, then in egg whites, and finally in panko to coat completely. Arrange the eggplant slices on paper towels and let them sit at room temperature. The eggplant can be prepared to this point up to 2 hours ahead of time.
Heat the oil in a heavy medium skillet over medium-high heat for 2 to 3 minutes until shimmering and hot. Cook half of the eggplant slices for 1 to 2 minutes on each side or until deep golden brown on both sides. Taking care not to break the crispy crust, transfer the eggplant to a paper towel–lined plate. Fry the remaining eggplant slices and let them rest at room temperature. The eggplant can be cooked to this point up to 1 hour ahead of time.
Preheat the oven to 350°F.
Toss the mozzarella and Parmesan cheeses in a small bowl until blended.
Spread 1 generous teaspoon of sauce on each eggplant slice. Top with a rounded teaspoon of cheese and spread out to cover the slice. Press lightly to adhere. Transfer the eggplant slices to a rimmed baking sheet and bake for about 12 minutes or until the cheese melts and the eggplant is heated through and crisp.
Transfer the eggplant slices to a platter and garnish each with 2 small basil leaves. Let them stand for 2 to 3 minutes to cool a bit before serving.