CHAPTER 13
Operations management with GIS
Graffiti Removal System
LEARNING GOALS
- Build ModelBuilder models to automate an operations management system.
- Use Network Analyst to optimize routes for carrying out service deliveries.
- Use Python expressions to calculate fields.
- Prepare data for use in the Collector for ArcGIS® app.
- Prepare a map in ArcGIS Online for use in Collector.
- Use the Collector app to update data using a mobile device.
Introduction
This chapter is the second on GIS for operations management. Chapter 12 introduced operations management and GIS-based operations management systems for providing goods and services. In chapter 12, you built the Graffiti Mapping System, including tasks to prepare weekly data for mapping and an operations view using Operations Dashboard for ArcGIS with a map, queries, and bar chart useful for police in apprehending serial graffiti artists.
In this chapter, you build the Graffiti Removal System for the Public Works supervisor who oversees graffiti removal and the Public Works employee who removes the graffiti from public surfaces, such as buildings, walls, and bridges. More specifically, in tutorials 13-1 through 13-3, you’ll build three models that a Public Works department supervisor will run to schedule graffiti for removal at the beginning of each workweek:
- The Identify Graffiti for Removal model maps all graffiti sites that the supervisor has approved for removal but that have not yet had graffiti removed.
- The Calculate Optimal Route model uses Network Analyst analysis tools to calculate the optimal route for a set of graffiti sites selected by the supervisor for removal. The supervisor can create one or more routes for a week with multiple runs of this model. Each time a route is created, its graffiti sites are automatically removed from consideration in designing additional routes for the week.
- The Record Route Results model saves an optimal route as a feature class. Each time the supervisor calculates the route to follow, she uses this model to record its results, make a map of the route, and provide driving directions for the graffiti removal employee.
Note that the work is cumulative, so you must finish tutorial 13-1 to work tutorial 13-2, and you must finish tutorial 13-2 to work tutorial 13-3.
Before the actual graffiti removal, the supervisor must visit and survey each reported graffiti site. The supervisor may not approve graffiti removal for several reasons. For example, some 311 calls may give incorrect locations, some graffiti may have inaccessible locations, and some private property owners may not allow graffiti removal at their locations. In tutorial 13-4, you will build a Collector for ArcGIS application so that the supervisor can use a mobile device such as a smartphone to enter data while inspecting a site. The supervisor classifies graffiti by type, determines a method for removal, estimates the work time, and enters other data. You can also go to the book’s resource web page to access assignments 13-1 and 13-2 to build models that create optimal routing for new graffiti site inspections.
Tutorial 13-1: Build the Identify Graffiti for Removal model
This model resembles the model in tutorial 12-1 but includes new query criteria for sites that need graffiti removal.
Open the Tutorial 13-1 project
- 1.Open Tutorial13-1.aprx from Chapter13, and save it as Tutorial13-1YourName.aprx.
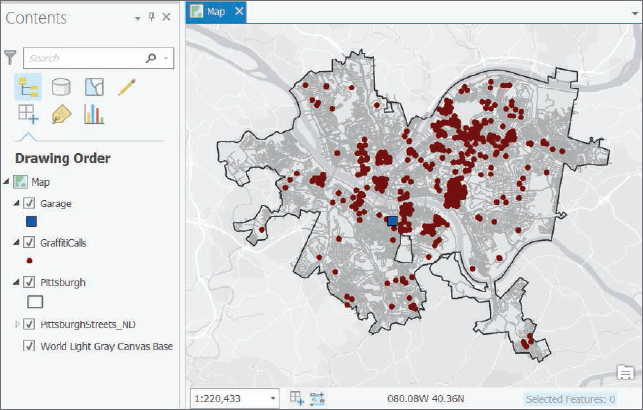
- 2.Use the Pittsburgh bookmark. The map has these layers:
- Garage, the location of the Public Works Department garage that is the start and end of every route
- GraffitiCalls, the up-to-date map layer of graffiti calls
- Pittsburgh, the boundary of Pittsburgh
- PittsburghStreets_ND, a network dataset based on Pittsburgh’s TIGER streets
- 3.In the Contents pane, turn off GraffitiCalls.
Build a model to query sites for graffiti removal
The first model identifies two kinds of sites that need graffiti removed:
- Graffiti that the Public Works supervisor has approved but not yet scheduled for removal.
- Graffiti that has been scheduled for removal but not removed for some reason—for example, because an employee ran out of time or supplies.
Although it’s possible for you to implement both criteria, for simplicity you’ll only implement the first one (also the main one).
You will use three attributes of GraffitiCalls to retrieve graffiti for scheduled removal:
- Date_Approved is the date that a supervisor approved a 311 graffiti site to have its graffiti removed.
- Date_Scheduled is the date that the supervisor assigned to remove graffiti from a site.
- Date_Finished is the date that graffiti was removed from a site.
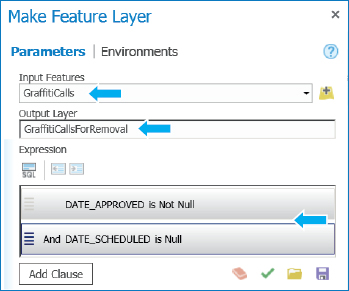
The expression of query 1 for case 1 is:

This compound query expression retrieves graffiti calls that have been approved but not yet scheduled for removal. If DATE_APPROVED IS NOT NULL, meaning that it has a date entered, the graffiti has been approved for removal by the supervisor. If DATE_SCHEDULED IS NULL, meaning that no date has been entered for DATE_SCHEDULED, the graffiti removal has not been scheduled. With the expressions joined with the AND connector and when both expressions are true, the graffiti is a candidate for including in a route for removal.
The expression of query 2 for case 2 is:

CURRENT_DATE () has the current date from your computer’s calendar, so the expression DATE_SCHEDULED < CURRENT_DATE() finds all graffiti sites scheduled in the past. The expression DATE_FINISHED IS NULL finds all graffiti sites that have not yet had graffiti removed. Together, connected with an AND, the expression also finds graffiti that was scheduled but not removed.
Queries 1 and 2 are combined with an OR, meaning that if either is true, a corresponding graffiti call is retrieved for scheduling a new route. As soon as a route is scheduled, its DATE_APPROVED attribute is given a date value, so that query 1 is false, and the graffiti call is not retrieved for additional scheduling.
You’ll use the Make Feature Layer tool to create a layer for graffiti calls that must be scheduled on the basis of just the first query expression.
- 1.Open the Catalog pane, expand Toolboxes, right-click the Tutorial13.tbx toolbox, click New, and then click Model. The new, empty model opens in edit mode, ready for you to add model processes.
- 2.In the Catalog pane, rename Model as a. Identify Graffiti for Removal, and hide the Catalog pane.
- 3.On the Analysis tab, click Tools, search for the Make Feature Layer tool, drag it from the Geoprocessing pane to your model, and close the Geoprocessing pane.
- 4.Click anywhere in the Model window to remove the grab handles from the Make Feature Layer process and its output.

- 5.Right-click the Make Feature Layer process in your model, and click Open.
- 6.For Input features, select GraffitiCalls, and for Output Layer, type GraffitiForRemoval, and create the query expression as shown in the figure. Alternatively, you can click the SQL button, and copy and paste the query expression from chapter13\Resources\Tutorial13-1Query.txt.
- 7.Click OK, and resize model elements as shown. The model elements get color, indicating that they are ready to run.

- 8.Right-click the output, GraffitiForRemoval, and click Add to Display. This option adds the GraffitiForRemoval map layer to the map after you run the model in the current edit mode.
- 9.Right-click the Make Feature Layer process, and click Run. GraffitiForRemoval is created and added to the map. If your model has an error, the error will be printed in red text in the message window. On your map, you will see 14 graffiti sites that must be scheduled with one or more routes.
- 10.Turn off the GraffitiCalls layer, and close the Model message window.
Symbolize output
- 1.Add the Apply Symbology From Layer tool to your model below the Make Feature Layer process, and open it.
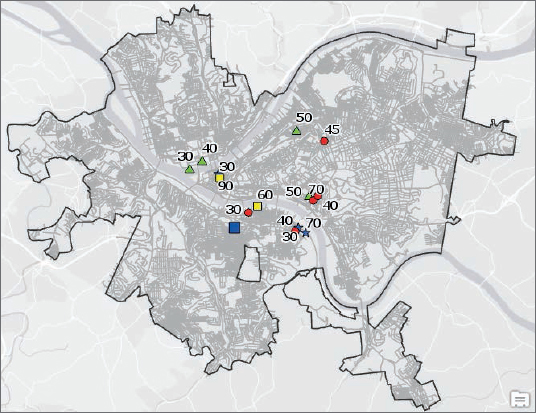
- 2.For input, select GraffitiForRemoval:1; for Symbology Layer, browse to Chapter13\Tutorials\Resources, and select Graffiti.lyrx. The Graffiti.lyrx file has unique symbols for Graffiti_Type_Code, plus labels for GraffitiCallsForRemoval. The labels display work time estimates (minutes) for graffiti removal at each site.
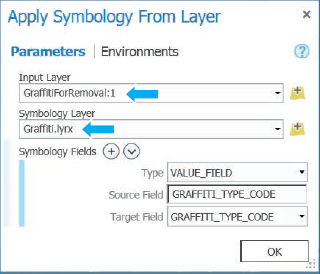
- 3.Click OK, close the Geoprocessing pane, and rearrange and resize elements of the model to improve its appearance. Note that process inputs and outputs must have unique names in a model, even when they refer to the same feature class or map layer. It does not matter, for example, if your model has GraffitiForRemoval (3) instead of GraffitiForRemoval (2), as long as the names are unique.
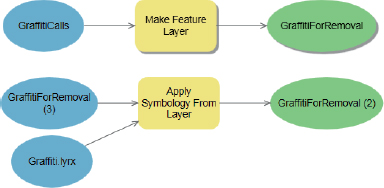
- 4.Right-click GraffitiForRemoval (2), and click Parameter. This step will cause the new layer to be added to the map when you open the model to run it from the user interface that ModelBuilder builds for the model. You’ll use the interface in a Your Turn assignment that follows.
- 5.Right-click the Apply Symbology From Layer process, click Run, and close the message window when the model is finished running. The GraffitiForRemoval map layer is symbolized in your map. The labels, from Graffiti.lyrx, show the estimated time for graffiti removal, provided by the Public Works supervisor. If the labels do not appear, you can right-click GraffitiForRemoval in the Contents pane and click Label.
- 6.On the ModelBuilder tab, click Save to save your model, and then close it. Note that if you must edit your model again, you can right-click it in the Catalog pane, and click Edit.
Select graffiti sites for removal
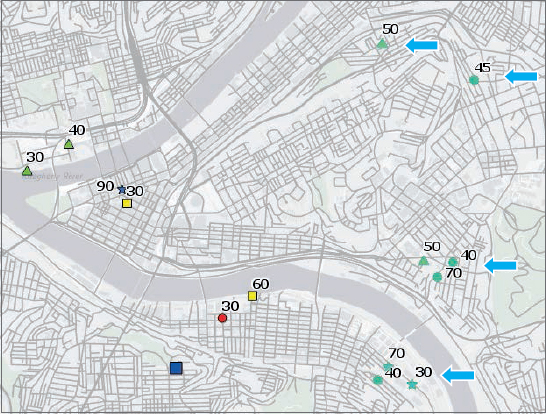
Your map now has 14 sites with graffiti for removal. Next, the supervisor will review the map and decide how many routes to create and which sites to include in each route. The employee who removes graffiti works 480 minutes per day. The employee can do other work if graffiti removal requires less time or if there are no routes on a particular day. If the employee doesn’t finish a route, that work will be scheduled in a future route. Scheduling within the 480-minute constraint takes some expertise and trial and error by the supervisor. After reviewing the map, suppose that she decides to make two routes for the 14 graffiti sites. The first route will have the eight sites indicated with arrows in the figure for step 8 that follows.
- 1.View your map, right-click GraffitiForRemoval, and click Zoom To Layer.
- 2.On the Map tab, use the Select tool to select the eight sites as shown in the figure. The routing model that you’ll build in tutorial 13-2 will use only the eight sites you selected in this step.
- 3.Save your project.
Tutorial 13-2: Build the Calculate Optimal Route model
This tutorial has the standard workflow for calculating an optimal route (with minimum travel time) for a typical problem encountered in sales. In the prototypical problem, a salesperson leaves the office each day, has a list of customer addresses for stops, and returns to the office at the end of the route. Similarly, in this case, the graffiti truck leaves its garage, stops at an ordered list of graffiti sites along the optimal route, and returns to the garage.
Create a route
- 1.Save your project as Tutorial13-2YourName in Chapter13\Tutorials.
- 2.In the Tutorial 13 toolbox, create a new model named b. Calculate Optimal Route.
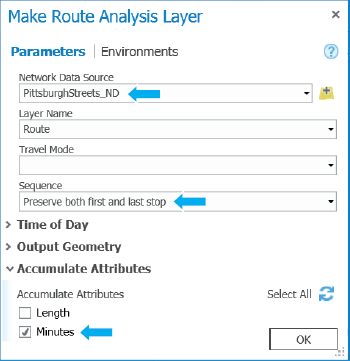
- 3.Add the Make Route Analysis Layer tool to the model, and open it. This process, when run, creates a group layer in the Contents pane with standard map layers for the solution of a routing problem. The process’s elements already have color fill, so you can run the process because it has default input street network data from ArcGIS.com. While working in this book, however, you will not use the default street network dataset because it consumes credits that require purchase. To learn more about credits, search for “Esri credits” on the Internet. Next, you’ll change the input network dataset to PittsburghStreets_ND, which is available and free in the data supplied with this book but less accurate than the default data source. Contact your instructor first if you want to use the default ArcGIS.com network dataset for a project or other work outside this book unless you know you have Esri credits available for use.
- 4.Choose the selections as shown for the Make Route Analysis Layer process. “Preserve both first and last stops” is an option that will create a network problem that resembles the prototypical problem described at the beginning of this tutorial. The Accumulate Attributes option of Minutes causes route statistics, including total length, to be reported in minutes (instead of miles).
- 5.Click OK.
- 6.Rearrange and resize inputs, temporarily move the PittsburghStreets_ND input up, delete Network data source, and rearrange the model elements as shown.

Add locations
You must add the garage as the first location, then add the selected graffiti locations, and finally add the garage again as the last stop in the route.
- 1.Add the Add Locations tool to your model three times, lining up the processes vertically.
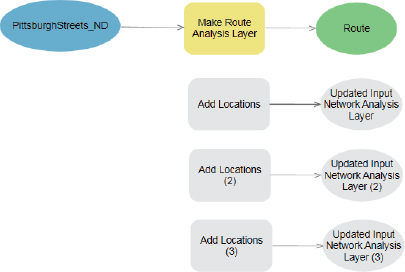
- 2.Open the first Add Locations process, and make your selections as shown.
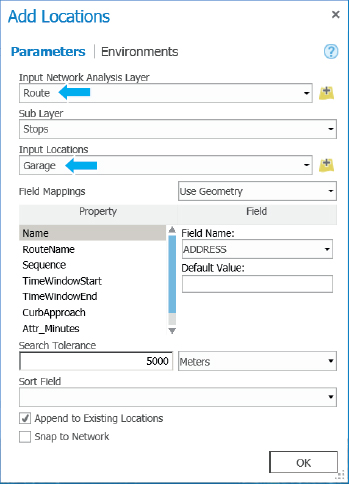
- 3.Similarly, configure the Add Locations (2) process with Route (2) as Input Network Analysis Location and GraffitiForRemoval as Input Locations.
- 4.Configure the Add Locations (3) process with Route (3) as Input Network Analysis Location and Garage:1 as Input Locations. As a reminder, every model element must have a unique name, hence the parentheses with digits after repeating names, such as Route (2) and Garage (2). It does not matter if the numbers in parentheses are in sequential order or if numbers are skipped, as long as all names are unique.
- 5.Rearrange and resize model objects as shown.
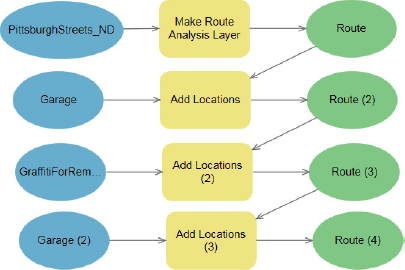
Add the Solve tool, and run the model
- 1.Add the Solve tool to your model, and open it.
- 2.As Input Network Analysis Layer, add Route (4), and click OK.
- 3.Right-click the output of the Solve process, Route (5), and click Add to Display.
- 4.Right-click Route (5) again, and click Parameter.
- 5.Save your model.
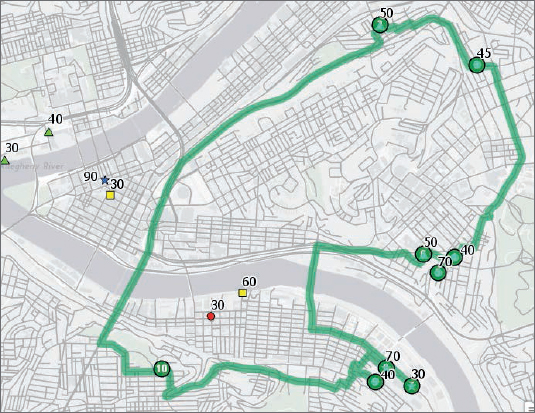
- 6.On the ModelBuilder tab in the Run group, click Run. Network Analyst found what appears to be a good route for the eight stops. If the supervisor does not like this route for any reason, she can remove it from the Contents pane, select different sites from GraffitiForRemoval, and create a different route with the Create Route model. To rerun the model in Edit mode, on the ModelBuilder tab in the Run group, you’d first have to click Validate. Each time you create a route, a new route is saved to the Tutorial13.gdb file geodatabase with the alias name Route.
Tutorial 13-3: Build the Record Route Results model
Now that you have a route, you’ll write driving directions for the graffiti removal employee, save the route as a feature class with a name that includes the route’s schedule date, and write a route name and schedule date in the master feature class, GraffitiCalls.
Create a model
- 1.Save your project as Tutorial13-3YourName in Chapter13\Tutorials.
- 2.In the Tutorial13 toolbox, create a new model named c. Record Route Results.
- 3.Add tools to your model as shown in the figure. The Directions process will write driving instructions for the graffiti removal employee. The Copy Features process makes a permanent feature class for a route. The first Calculate Field process writes the new route’s name in GraffitiCalls. The second Calculate Field process writes the scheduled date for the route in GraffitiCalls.
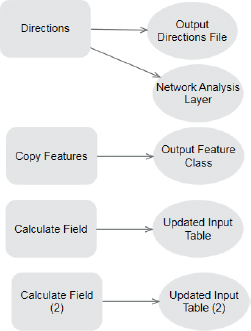
Create a variable
- 1.On the ModelBuilder tab in the Insert group, click Variable > OK to create a new string data–type variable. If you do not see the Insert group, you can widen your ArcGIS Pro window.
- 2.Right-click the new variable, click Rename, and name the variable RouteName.
- 3.Open the variable, type 20160613, and click OK. The date format, YYYYMMDD, has the desirable property that sorts chronologically.
- 4.Right-click the variable, and click Parameter. When this model is open and run from the user interface created by ModelBuilder, the user can type a new date value.
Configure the Directions process
- 1.Open Directions.
- 2.For Input Network Analysis layer, select Route; for the Output File, type Text, and then type Route%RouteName% as shown. The file name for the Output Directions file uses in-line substitution of the value stored in the RouteName variable for the text file name that is output from the Directions process. The percent delimiters around RouteName trigger the substitution, resulting in the file name Route20160613.txt.
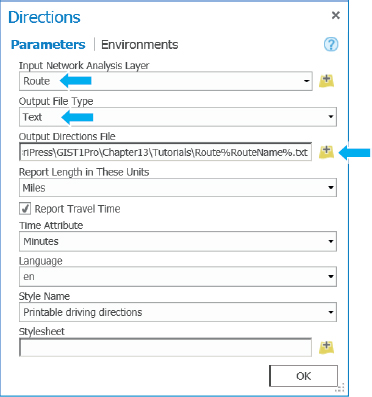
- 3.Click OK.
- 4.Right-click and run the Directions process.
- 5.Open the output text file in Chapter 13\Tutorials to see the driving instructions, and then close the file when you finish.
Configure the Copy Features process
- 1.Open the Copy Features process.
- 2.For Input features, select Route\Routes; for Output feature class, type Route%RouteName%. The output feature class’s name uses in-line substitution to include the date of the route.
- 3.Click OK.
- 4.Run the Copy Features process.
- 5.Add the newly created feature class, Route20160613, to your display.
- 6.In the Contents pane in the Route group, turn off Routes.
Configure the first Calculate Field process
Recall that the source of the GraffitiCallsForRemoval map layer is the GraffitiCalls feature class. So when you change attribute values in GraffitiCallsForRemoval, the changes are actually made in GraffitiCalls. GraffitiCalls is a master feature class that must be updated periodically with new 311 graffiti call data, at least weekly in this case. The updating work is not covered in this chapter, but you could do this work in a model using the Merge tool, in which update data is merged with the master feature class.
- 1.Open the first Calculate Field process.
- 2.Type or make your selections as shown. Ensure that you type the single quote marks around Route%RouteName%. The Python computer-language expression needs the quote marks to determine that Route%RouteName% is a string value.
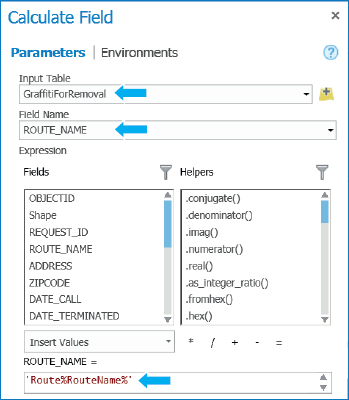
- 3.Click OK.
- 4.Run the Calculate Field process.
- 5.Open the GraffitiForRemoval attribute table and sort Route_Name descending to see that the process worked. All eight selected graffiti sites have the route name, Route20160613.
- 6.Close the attribute table.
Configure the second Calculate Field process
This process needs a Python computer-language code block to reformat the string-value date, 20160613, to a date value, with the Python format 13/06/2016, for writing into the Date_Scheduled field. You’ll copy and paste the code block (without having to type it). A version of the code with comments explaining syntax is available from Chapter13\Tutorials\Resources in the file Tutorial13-3CodeBlockComments.txt. The lines in that file starting with a hash sign are comments ignored by Python but available for you to read and understand the code. Note that you can learn some Python programming using free online tutorials from Esri (search for “Esri training Python” on the web).
- 1.Open the second Calculate Field process.
- 2.For Input Table, select GraffitiForRemoval:1; and for Field name, select Date_Scheduled.
- 3.Open Chapter13\Tutorials\Resources\Tutorial13-3CodeBlock.txt, and copy and paste the text as shown. The getdate line after Date_Scheduled runs the code block with the input value of RouteName in format YYYYMMDD. The variable ds in the code block returns a value for Date_Scheduled in the needed format of MM/DD/YYYY.
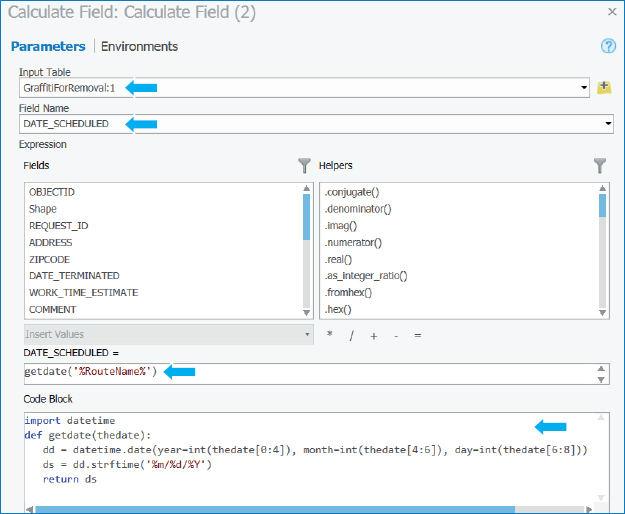
- 4.Click OK. You will see the completed model next.
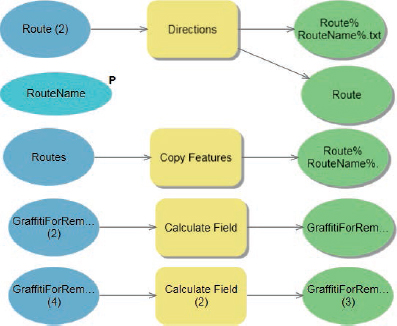
- 5.Run the second Calculate Field process.
- 6.Open your map, and in the Contents pane, turn off the Route group. You’ll see that the graffiti sites in the route no longer display for GraffitiForRemoval, because those sites no longer meet the query criterion that Date_Scheduled is null. Remaining are the graffiti sites for the second route, which you’ll schedule in the next Your Turn assignment.
- 7.Open the attribute table for GraffitiCalls, and sort Date_Scheduled descending. With Date_Scheduled sorted, you can see the eight calls just scheduled for 6/13/2016.
YOUR TURN
In your map, in the Contents pane, remove Route, and then select the six remaining graffiti calls of the GraffitiForRemoval map layer. Then run your b and c models successively by right-clicking and clicking Open (and not Edit). When you run model b, there are no parameters for you to supply, so just click Run. When you open model c, type 20160614 for RouteName, and then run the model. Look at your map and GraffitiCalls’ attribute table for Date_Scheduled and Route_Name, now 6/14/2016 and Route20160614, respectively.
Tutorial 13-4: Update data using Collector for ArcGIS
The Public Works supervisor who is in charge of graffiti removal must visit each graffiti site called in to 311 to make several assessments. She inspects graffiti and completes these tasks, including entering data for the call in GraffitiCalls using Collector:
- 1.Correct the location of a graffiti call, if in error.
- 2.Decide whether to terminate the removal process (for example, because no graffiti exists), and if the call is terminated, entering the date in Date_Terminated.
- 3.Enter the date in Date_Approved if she plans to schedule the graffiti for removal.
- 4.Classify and select the graffiti type for Graffiti_Type_Code.
- 5.Enter an artist’s tag or other identifier if the graffiti and its artist can be identified.
- 6.Choose the removal method, and select a value of Removal_Type_Code.
- 7.Estimate the time in minutes for removing the graffiti, and enter the value in Work_Time_Estimate.
You will create a map to use in Collector that displays only new graffiti calls that the supervisor must inspect and has a data entry form including the attributes she must enter. The form has drop lists for codes Graffiti_Type_Code and Removal_Type_Code to use in selecting code values instead of typing them.
Open the Tutorial 13-4 project
- 1.Open Tutorial13-4 from Chapter13, and save it as Tutorial13-4YourName.
- 2.Use the Pittsburgh bookmark. The GraffitiCalls map layer is made from the Tutorial13.gdb\ GraffitiCallsForCollector feature class. This feature class does not have certain properties set. Instead, you will learn to set the properties to enable capabilities in Collector.
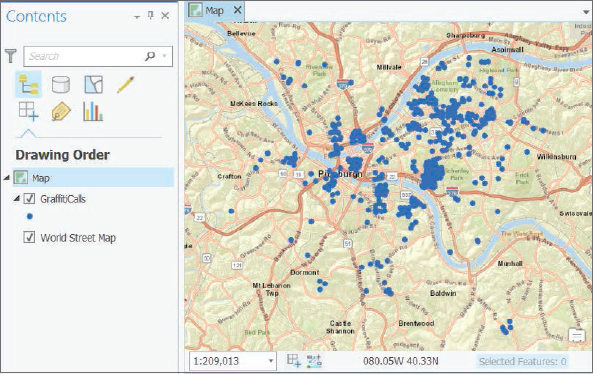
Create a coded value domain
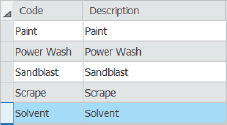
For data input or editing, attributes of feature classes that are codes, such as Removal_Type_Code and Graffiti_Type_Code, must have their values restricted to unique sets of code values. For example, Removal_Type_Code must have values from only the set: Paint, Power Wash, Sandblast, Scrape, and Solvent. Then when querying for graffiti calls, for example, that require power washing for removal, you are certain that the criterion, Removal_Type_Code = Power Wash, will retrieve all corresponding graffiti calls. There will be no calls with different spellings of Power Wash, such as “Powerwash.” Furthermore, data entry and editing are simplified, because instead of typing, you select code values from a drop list in a data entry form. In ArcGIS Pro, unique code values are implemented using coded value domains. Next, you’ll create a coded value domain for Removal_Type_Code.
- 1.Right-click GraffitiCalls, and click Design > Domains.
- 2.Click in the blank cell at the bottom of the Domain Name column, type RemovalType, and press Tab. In the next step, you will refer to the upper-right portion of the next figure.
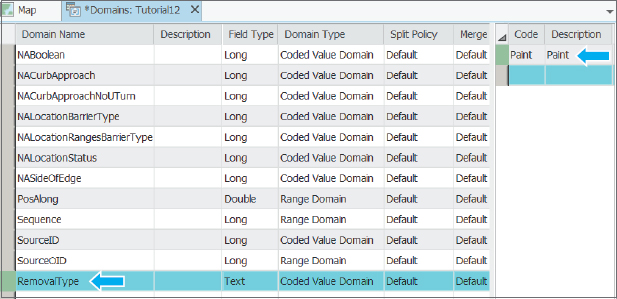
- 3.In the pane on the right of the Domains table, for both Code and Description, type Paint, and press Enter. You don’t need a separate description for removal types because the coded values are self-descriptive.
- 4.Type four more codes as shown in the figure. When typing Solvent in the Description column, do not press Tab or Enter; instead, click Solvent in the Code column to enter the Solvent value in the Description column. If you press Tab or Enter, a new code row opens, and you must type values in it, but Solvent is the last code value. If you accidentally add a new row after Solvent, you’ll have to delete the RemovalType domain and reenter it.
- 5.On the Domains tab, click Save, and close the Domains table.
YOUR TURN
In GraffitiCalls for the Graffiti_Type_Code attribute, create a second coded value domain, named GraffitiType. Add the coded values, both for Code and Description: Other, Piece, Tag, and Throw Up.
Apply a coded value domain
Now that you’ve defined domains, you must apply them to the Removal_Type_Code and Graffiti_Type_Code attributes in GraffitiCalls. If there was another feature class that had either of the codes as an attribute (there isn’t in this case), you’d apply the corresponding domain to it as well.
- 1.In the Contents pane, right-click GraffitiCalls, and click Design > Fields.
- 2.Click in the empty cell at the intersection of the Removal_Type_Code row and Domain column, and select RemovalType.
- 3.On the Fields tab, click Save.
YOUR TURN
Apply the GraffitiType domain to Graffiti_Type_Code in the GraffitiCalls feature class, and close the Fields view.
Rename a feature class
If you are in a class with students all publishing to the same ArcGIS Online organizational account, each feature class published must have a unique name across all students. You’ll publish the GraffitiCalls feature class in the exercise after this one, but first you must give it a unique name.
- 1.Open the Catalog pane.
- 2.Expand Databases > Tutorial13.gdb.
- 3.Rename GraffitiCallsForCollector as GraffitiCallsYourName, substituting your name or ID. If more than one person has the same first name in your class, you can add a middle name or otherwise make your name unique.
- 4.Hide the Catalog pane.
- 5.Add GraffitiCallsYourName to the Contents pane, and remove GraffitiCalls.
- 6.Symbolize GraffitiCallsYourName to have a Circle 1 point symbol and blue color and size 1.
Publish a web layer
Next, you’ll publish GraffitiCallsYourName to your ArcGIS Online organizational account. Then, after a few additional steps, it will be available for use in Collector by the Public Works supervisor in charge of graffiti removal.
- 1.In the Contents pane, right-click GraffitiCallsYourName, and click Share as Web Layer.
- 2.Make or type the selections as shown; for name, select GraffitiCallsYourName.
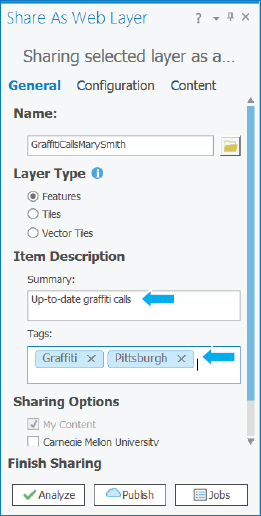
- 3.Click Publish.
- 4.After you publish the web layer, save and close your project and ArcGIS Pro.
Set the editing option for a web layer in ArcGIS Online
First, you must allow the supervisor to edit the layer so that she can enter data into the GraffitiCalls web layer.
- 1.Sign in to your organizational account on ArcGIS.com.
- 2.In My Content, point to the GraffitiCallsYourName feature layer, click its arrow, and click View Item Details.
- 3.On the Settings tab, scroll down, turn on Enable editing, turn on Keep track of who created and last updated features, and click Save. Note that for real use, you’d have to share the map with your organization to make it available to the supervisor. Here, you’ll keep the map private to you.
Create a map in ArcGIS Online
For this simple map, you will have just the GraffitiCallsYourName web layer and the Streets basemap, but you will add a filter to select only calls that need the supervisor’s review.
- 1.Click the Options button
 at the top left of the current web page, and then click Map.
 - 2.Click the Add Content to the Map button
 > Search for layers.
 - 3.For In, select My Content; for GraffitiCallsYourName in Results Found, click Add.
- 4.Click Done Adding Layers.
- 5.Change the basemap to Streets.
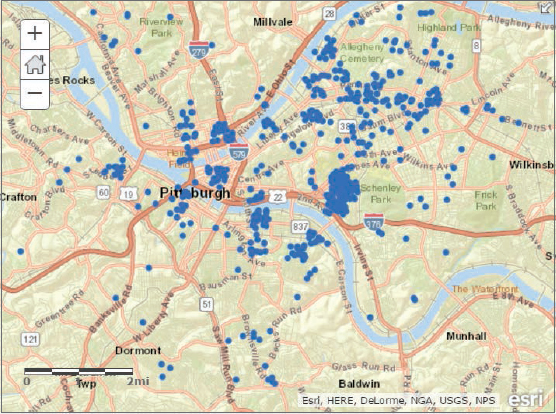
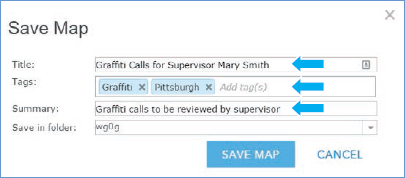
- 6.Click the Save button, and type the text as shown, substituting your name for Mary Smith, and then click Save Map. Your folder name will be different from the folder name shown.
Add a filter
For the filter (query), you’ll select records for Date_Approved and Date_Terminated that are Null (blank). The selected records will correspond to new graffiti calls that have not yet been reviewed by the supervisor and have not been deemed invalid or duplicate calls.
- 1.In the Contents pane, for GraffitiCallsYourName, click the Filter button
 .
. - 2.Make the selections as shown.
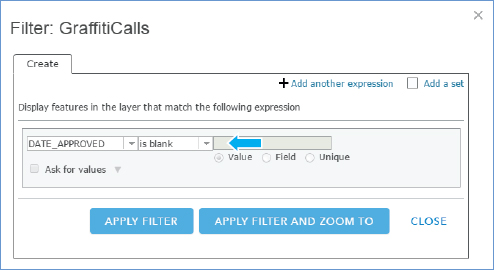
- 3.Click Add another expression, and make the selections as shown.
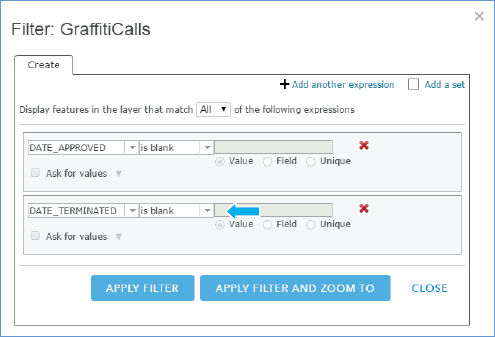
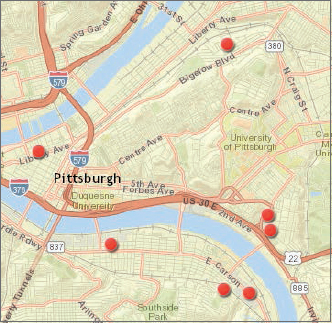
- 4.Click Apply Filter. You will see seven new graffiti calls for the supervisor to review.
Resymbolize GraffitiCalls
GraffitiCalls need a larger symbol for viewing.
- 1.In the Contents pane, for GraffitiCalls, click the Change Style button
 .
. - 2.Click Options > Symbols, choose the red circular symbol, and set its size as 30.
- 3.Click OK, click OK again, and click Done.
- 4.Save the map.
Configure pop-up windows
The data entry form for Collector is based on the pop-up window that you configure for GraffitiCallsYourName (which originally had GraffitiCallsForCollector as its source). The attributes of the layer that you will choose for the pop-up window are the ones that will appear on Collector’s form, which Collector automatically generates from the pop-up window.
- 1.In the Contents pane, for the GraffitiCallsYourName map layer, click the More Options button
 .
. - 2.Click Configure Pop-up, and then click Configure Attributes.
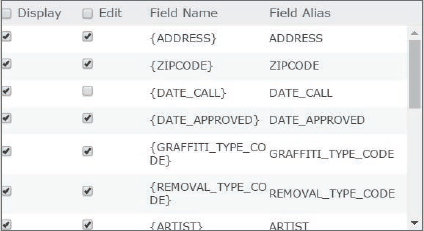
- 3.Select Display only these attributes: Address, ZipCode, Date_Call, Date_Approved, Graffiti_Type_Code, Removal_Type_Code, Artist, Work_Time_Estimate, Date_Terminated, and Comment. The supervisor can then see and enter or modify these attributes on a form in Collector.
- 4.Rearrange the order of the attributes to the order as listed in step 3 by selecting lines and using the vertical arrow buttons. You must use the vertical up arrow several times to move each attribute, which can be tedious. It is not critically important that the attributes be in the order as stated.
- 5.Select Edit for the attributes in step 3, but do not select Date_Call.
- 6.Click OK, and click OK again.
- 7.Save your map, and close ArcGIS Online. Your map is now ready to use in Collector.
Get started with Collector for ArcGIS
Collector is a free app available for your Android, Apple iOS, or Windows 10 device (on Google Play, the App Store, or the Windows Store, respectively).
- 1.Install Collector on your device.
- 2.Open the app.
- 3.Choose ArcGIS Online or http://www.arcgis.com, and sign in using your ArcGIS Online ID and password.
- 4.Tap My Maps, and then tap your map, Graffiti Calls for Supervisor Review, to open it. You do not need to establish location services for this tutorial. Your map opens on your device, displaying the seven graffiti sites for review. Next, the tutorial breaks into three separate editing sessions, one for each type of device: Android, Apple, and Windows 10.
Edit graffiti calls using an Android device
- 1.Tap the northernmost graffiti call point to select it.
- 2.Click the Options button
 in the lower right of your screen, and tap Edit feature. The entry form based on your ArcGIS Online pop-up for the GraffitiCalls web layer opens in edit mode.
Suppose that this graffiti call not only needs its attributes updated but also needs its location corrected.
- 3.Tap the Map button
 at the top of your screen. The symbol for the point being edited increases in size.
 - 4.Zoom far in, and tap a new location about a block away from the original location. The point symbol moves to the tapped location. Notice that you can restore the original location using the Reverse button at the bottom left of your screen.
- 5.Click the data entry form button
 at the top of your screen.
 - 6.For Date_Approved, tap Enter a date, and select today’s date, and tap OK. Using today’s date for instructional purposes saves you the time of searching for a realistic date for the case study.
- 7.For Graffiti_Type_Code, select Tag.
- 8.Tap Removal_Type_Code, and select Sandblast.
- 9.Tap Work_Time_Estimate, and type 30.
- 10.Tap the check mark
 at the top left of your screen. The updated attributes are written to your GraffitiCalls feature layer in ArcGIS Online.
YOUR TURN
Sign in to ArcGIS Online, and open your Graffiti Calls for Supervisor Review map. The northernmost point you just edited is no longer displayed. That point no longer meets the criteria of the filter for graffiti calls that the supervisor has not yet reviewed, given that it now has a value for Date_Approved.
Edit graffiti calls using an Apple device
- 1.Tap the northernmost graffiti call point to select it.
- 2.Click the Options button
 in the lower right of your screen, and tap Edit. If the Location Required warning message button appears, click OK to dismiss it. The entry form based on your ArcGIS Online pop-up for the GraffitiCalls web layer opens in edit mode.
Suppose that this graffiti call not only needs its attributes updated but also needs its location corrected.
- 3.Tap the Map button
 at the top of your screen. The symbol for the point being edited is increased in size.
 - 4.Zoom far in, and tap a new location about a block away from the original location. The point symbol moves to the tapped location. Notice that you can restore the original location using the reverse button at the bottom left of your screen.
- 5.Click the data entry form button
 at the top of your screen.
 - 6.Tap the Date_Approved cell, and then tap Done to use Today. Using Today for instructional purposes saves you the time of searching for a realistic date for the case study.
- 7.For Graffiti_Type_Code, select Tag, and tap Done.
- 8.Tap Removal_Type_Code, select Sandblast, and tap Done.
- 9.Tap Work_Time_Estimate, type 30, and tap Done.
- 10.Tap Update. The updated attributes are written to your GraffitiCalls feature layer in ArcGIS Online.
YOUR TURN
Sign in to ArcGIS Online, and open your Graffiti Calls for Supervisor Review map. The northernmost point you just edited is no longer displayed. It no longer meets the criteria of the filter for graffiti calls that the supervisor has not yet reviewed, given that it now has a value for Date_Approved.
Edit graffiti calls using a Windows 10 device
- 1.Zoom so that you can see all seven points (red circular symbols) in Pittsburgh that the supervisor must visit.
- 2.Select the northernmost graffiti call point to select it. The GraffitiCalls pop-up appears.
- 3.Click the Edit button
 at the bottom of the pop-up. The entry form based on your ArcGIS Online pop-up for the GraffitiCalls web layer opens in edit mode. Suppose that this graffiti call not only needs its attributes updated but also needs its location corrected.
 - 4.Zoom far in, and tap a new location about a block away from the original location. The point symbol moves to the tapped location. Notice that you can restore the original location by discarding edits (tap the Garbage Can icon at the bottom of the edit form).
- 5.Tap the Date_Approved cell, and then tap Done to use Today. Using Today for instructional purposes saves you the time of searching for a realistic date for the case study.
- 6.For Graffiti_Type_Code, select Tag, and tap Done.
- 7.Tap Removal_Type_Code, select Sandblast, and tap Done.
- 8.Tap Work_Time_Estimate, type 30, and tap Done.
- 9.Click Submit. The updated attributes are written to your GraffitiCalls feature layer in ArcGIS Online.
YOUR TURN
Sign in to ArcGIS Online, and open your Graffiti Calls for Supervisor Review map. The northernmost point you just edited is no longer displayed. It no longer meets the criteria of the filter for graffiti calls that the supervisor has not yet reviewed, given that it now has a value for Date_Approved.
Use a hosted feature layer for ArcGIS Pro processing
One step remains to integrate GIS processing in ArcGIS Pro and ArcGIS Online for GraffitiCalls. In a real operations management system, some GIS processing of GraffitiCalls would be done using both desktop and online systems. For example, new graffiti calls may be merged with GraffitiCalls using ArcGIS Pro and also scheduled, as done in tutorials 13-1 through 13-3. Then the supervisor and the employee who removes the graffiti would update GraffitiCalls records using Collector and ArcGIS Online. You will integrate the separate processing of desktop and online systems by using the hosted online feature layer as the source for GraffitiCalls in ArcGIS Pro.
- 1.Open Tutorial13-4YourName in ArcGIS Pro.
- 2.Open Properties for GraffitiCalls, and check its source. The current version of GraffitiCallsYourName resides on your computer’s hard drive, while a separate updated version resides in ArcGIS Online.
- 3.Close the Properties pane.
- 4.Remove GraffitiCalls from the Contents pane.
- 5.On the Map tab, click the Add Data button. The Add Data window opens.
- 6.In Portal, click My Content, then click GraffitiCallsYourName, and click OK. It takes a few moments for GraffitiCalls to add. When added, GraffitiCallsYourName is a group layer with one layer, GraffitiCalls, as you’ll see next.
- 7.In the Contents pane, expand GraffitiCallsYourName to see its GraffitiCallsYourName feature layer. Now ArcGIS Pro has the version of GraffitiCallsYourName that was updated by Collector. You could add to or modify the same GraffitiCallsYourName feature layer using ArcGIS Pro. You would have slightly slower response times if you completed the steps in Pro because of the remotely located feature layer.
YOUR TURN
In ArcGIS Pro, open the GraffitiCalls attribute table. Find some changes that were made using Collector. Make a change of one cell’s value in a GraffitiCalls record, note the ObjectID of the changed record, and then close the table. Open your ArcGIS Online account, go to My Content, select View Item Details for the GraffitiCalls feature layer, and click the Data tab. Scroll down in the table, if necessary, to the ObjectID of the record you changed to see the change. Then select the changed cell, and change it back to its original value or some other value. Finally, view the same record in ArcGIS Pro to see the new change. Close ArcGIS Pro and ArcGIS Online.
Assignments
This chapter has two assignments to complete that you can download from this book’s resource web page, esri.com/gist1arcgispro:
- Assignment 13-1: Build models for routing the supervisor’s assessment of new graffiti.
- Assignment 13-2: Create a Collector map for the Public Works employee who removes graffiti.