The Basics of Puff Pastry
Puff pastry is a marvel: a sheet of dough that bakes into seemingly infinite, tissue-thin, sublimely buttery layers that melt in your mouth. Not many people make it from scratch, but those who do are rewarded with treats that are second to none, and I’m not kidding. Really, if you’re going to make pastry, this is the biggest bang for your buck, among the most versatile doughs you could produce for the investment of your time: shaped any number of ways, excellent with any filling or left alone for a phenomenal treat in its own right. You might as well make a big batch—it freezes flawlessly, and having some on hand is like money in the bank. There are really only two rules to follow:
1. Take your time. The process is long and somewhat involved but not difficult. Rushing it will guarantee mediocre results. I succeeded in making puff pastry on my first try, and so will you.
2. Be mindful of the temperature of the ingredients and your kitchen. If at any step in the process the butter feels oily, refrigerate the dough for 30 minutes. Don’t try making this in a hot kitchen; you’ll never keep the butter cold enough. The dough should always be “doughy,” never oily nor so cold and hard it will be difficult to roll.
That said, it’s worth mentioning that some store-bought frozen puff pastry is not bad; check the ingredients: they should be mostly flour and butter. But it’s never as good as that you make yourself.
Croissants, Breton Butter Cakes, and Danish Pastry Dough are close cousins of puff pastry, and everything that is true about puff pastry can also be said of them. They’re distinct because they include yeast, so you’ll find them at the end of this section.
INGREDIENTS
BUTTER
Good butter is critical here, because it’s responsible for both the texture and the flavor that make puff pastry so fantastic. The steam escaping from the butter causes the layers of pastry to puff up and remain distinct from one another. By weight, there’s about as much butter as there is flour in puff pastry, and with so few other ingredients its flavor is at the forefront of every bite. Use the best quality you can find. Butter’s key role here means that a vegan version is tricky; however, if you’d like to veganize your pastries, Vegan Piecrust makes a fair substitute.
FLOUR
Not only does flour add structure to every layer of pastry; it also keeps the dough from sticking during many rounds of rolling, shaping, and folding, and when you add a bit of it to the butter slab (see page 462), it helps maintain an elastic consistency that doesn’t melt. Sprinkle it often using a light hand—too much extra flour will make the dough tough. It’s a good idea to dust off any excess with your hand or a brush each time you fold the dough so it doesn’t incorporate and gum up the layers.
Pastry flour, like cake flour, has a relatively low protein content, which means it can produce more tender baked goods, but I don’t bother with it. Even if the results are marginally more tender, many of these recipes, like Cream Puff Pastry and Croissants, actually need a bit of extra structure. Of course you can give it a shot and see what you think; if you can’t find pastry flour in a store, make your own by combining equal parts cake flour and all-purpose. (Whole wheat pastry flour is worth using, since whole wheat flour on its own can be a bit tough.)
A good rolling pin is essential. A brush is useful for dusting off flour and applying egg wash (see Baking). A bench scraper can be helpful for squaring off the dough or sweeping under rolled-out dough to lift it cleanly from your work surface—think of it as an extension of your hand. You’ll want a kitchen scale, since the basic recipe for puff pastry yields about 2½ pounds of dough but many recipes using it call for less; weighing the dough is the best way to ensure you use the right amount.
An ordinary baking sheet is all you need to cook the vast majority of puff pastry creations, from palmiers to turnovers. Having two sheets means you won’t have to shape, proof, chill, and bake in batches. If you get into playing around with the dough, you may also decide to buy molds for creating specific shapes like cream horn molds or mini tart pans.
TECHNIQUES
MAKING THE DOUGH
Puff pastry dough consists of two components that are folded repeatedly together: the base dough, called a détrempe, and the butter slab (beurrage) that’s folded into it. Each is chilled separately before you begin the process of incorporating them, which is called lamination. From the beginning, pay attention to the temperature of both; you need them to be soft enough that they’re pliable but firm enough that they remain distinct.
Shaping the détrempe, butter slab, and, later, the laminated dough in specific dimensions may seem like a pain, but there’s a good reason for it: It ensures that the dough and butter incorporate seamlessly for as many layers as possible. Overall, the process is more tedious than difficult.
LAMINATING
Laminate means “to split into layers.” That’s what you are doing when you make puff pastry: combining the base dough and the butter in a way that ensures the final pastry has many layers. (Picture pulling apart a dinner roll, which is more cushion-like, versus a croissant, which has literally hundreds of tiny pockets of air and paper-thin folds that cling to one another as you pull.)
To laminate, you must first wrap the détrempe around the butter slab to enclose it. After a quick chill, you roll that out into a large rectangle, fold up the rectangle, and chill it before rolling it back out (sometimes, if the dough is still firm and your kitchen is cool, you can roll and fold twice before chilling). This process—roll, fold, and chill—constitutes one complete “turn,” and you’ll do several turns (each recipe calls for a different number of turns) before shaping and baking. With each turn, you increase the layers of flour and butter. A classic way to keep track of the number of turns you’ve completed is to make shallow fingerprints in the dough before you put it back in the fridge.
There are two common ways of folding the dough: letter style, where you fold the dough in three layers as you would fold a business letter before stuffing it into an envelope; and book style, where you fold both short sides of the dough into the center like window shutters and then fold the dough in half once more, for a total of four layers. One method is no easier or more difficult than the other, but book-style folds create more layers of flour and butter, which makes them ideal for Real Puff Pastry and Shortcut Puff Pastry. Yeasted puff pastries like Croissants and Danish Pastry Dough, while still super-flaky, shouldn’t have quite so many layers, so they use letter-style folds.
Lamination is the defining part of making any puff pastry, and the exactitude can scare people off. It shouldn’t: As long as you take it slow and follow the directions, it’s difficult to mess up. With all the stops and starts, it’s also a flexible process that you can break up into manageable chunks over days or even weeks—see the timeline on page 464.
Making Puff Pastry, Croissant Dough, and Danish Pastry Dough

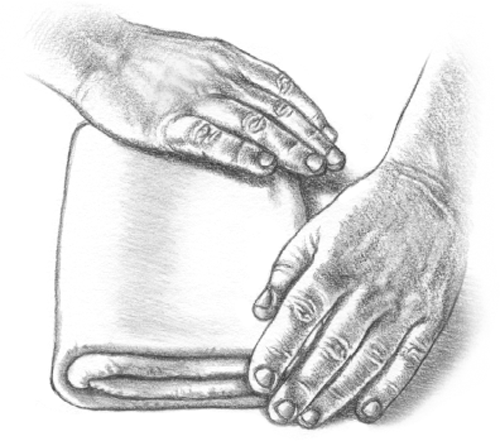
STEP 1
Once you remove the dough from the refrigerator, put it on a lightly floured surface and roll out to a large rectangle about ¼ inch thick. Put the butter slab in the center of the dough.
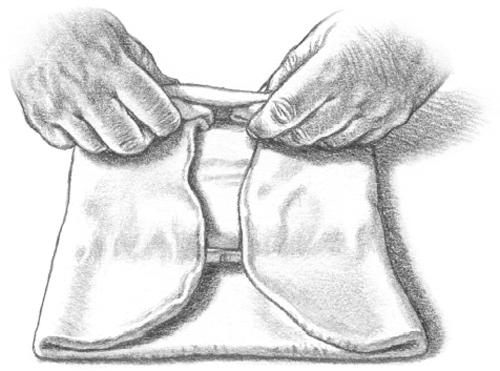
STEP 2
Fold over the short sides of the dough and then the long sides to completely enclose the butter. If necessary, chill for at least 15 minutes; it should be cool but still pliable. Roll out the dough into a large rectangle.

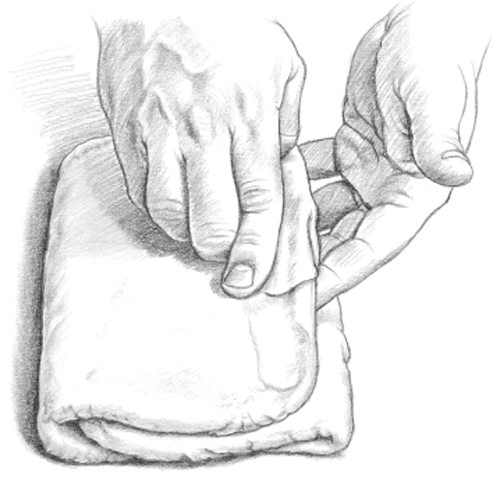
STEP 3
To make a book-style fold, bring each of the short ends of the rectangle together in the middle.
STEP 4
Then fold in half along the seam in the center.
STEP 5
Alternatively, to make a letter-style fold, fold the dough in thirds as if folding a letter.
FILLING
Puff pastry is the ideal crust for turnovers, toaster pastries, galettes, and more—collectively, there are nearly a hundred ideas for fillings between the lists on this page and the other recipes in this chapter. Take care not to overstuff them; if the pastries burst in the oven, the filling may scorch on the pan.
BAKING
Many pastries are brushed with egg wash just before they go into the oven. This is nothing fancy: just an egg beaten with a tablespoon of water. A thin coat adds a lovely sheen and promotes even, deep browning, both hallmarks of terrific pastry. It also works to seal two layers of dough for filled pastries or tarts. If you’re out of eggs, milk is a suitable substitute.
Since the success of puff pastry lies in its crisp-yet-tender texture, take care not to let it get soggy. Anytime you add filling, slash the tops of the sealed pastries to make vents for excess moisture to escape. The dough has so much butter that greasing the sheets feels superfluous, but baking the pastries on a sheet of parchment goes a long way to promote even browning and to keep any rogue fillings from sticking to the sheets.
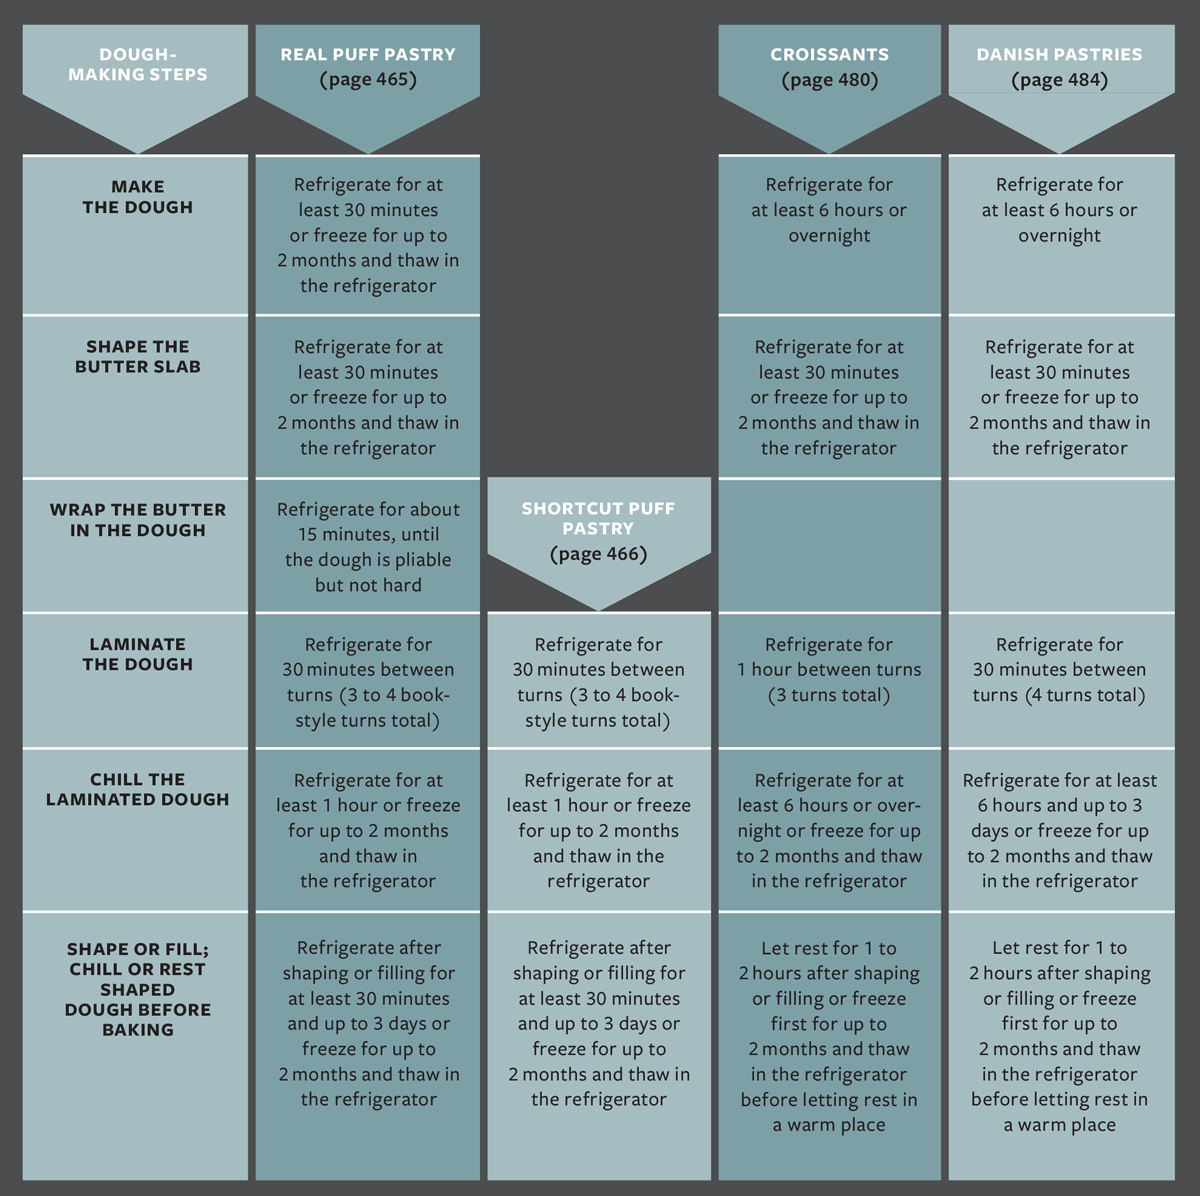
A Timeline for Laminated Doughs
The process of making any laminated dough alternates between active work and resting time. Luckily, you don’t need to do it all in one go—at many points along the way you can break up the work, coming back days or even weeks later to finish up. Be sure to maintain the correct temperature during all prep, and above all, don’t rush. If the dough gets too firm in the fridge, let it sit at room temperature until it’s malleable. As always, if you’ll be freezing anything, wrap it tightly and in multiple layers to avoid freezer burn, then thaw in the fridge before proceeding.
- • MAKE THE DOUGH: Refrigerate for at least 30 minutes or freeze for up to 2 months and thaw in the refrigerator
- • SHAPE THE BUTTER SLAB: Refrigerate for at least 30 minutes or freeze for up to 2 months and thaw in the refrigerator
- • WRAP THE BUTTER IN THE DOUGH: Refrigerate for about 15 minutes, until the dough is pliable but not hard
- • LAMINATE THE DOUGH: Refrigerate for 30 minutes between turns (3 to 4 bookstyle turns total)
- • CHILL THE LAMINATED DOUGH: Refrigerate for at least 1 hour or freeze for up to 2 months and thaw in the refrigerator
- • SHAPE OR FILL; CHILL OR REST SHAPED DOUGH BEFORE BAKING: Refrigerate after shaping or filling for at least 30 minutes and up to 3 days or freeze for up to 2 months and thaw in the refrigerator
- • MAKE THE DOUGH: Refrigerate for at least 6 hours or overnight
- • SHAPE THE BUTTER SLAB: Refrigerate for at least 30 minutes or freeze for up to 2 months and thaw in the refrigerator
- • LAMINATE THE DOUGH: Refrigerate for 1 hour between turns (3 turns total)
- • CHILL THE LAMINATED DOUGH: Refrigerate for at least 6 hours or overnight or freeze for up to 2 months and thaw in the refrigerator
- • SHAPE OR FILL; CHILL OR REST SHAPED DOUGH BEFORE BAKING: Let rest for 1 to 2 hours after shaping or filling or freeze first for up to 2 months and thaw in the refrigerator before letting rest in a warm place
- • MAKE THE DOUGH: Refrigerate for at least 6 hours or overnight
- • SHAPE THE BUTTER SLAB: Refrigerate for at least 30 minutes or freeze for up to 2 months and thaw in the refrigerator
- • LAMINATE THE DOUGH: Refrigerate for 30 minutes between turns (4 turns total)
- • CHILL THE LAMINATED DOUGH: Refrigerate for at least 6 hours and up to 3 days or freeze for up to 2 months and thaw in the refrigerator
- • SHAPE OR FILL; CHILL OR REST SHAPED DOUGH BEFORE BAKING: Let rest for 1 to 2 hours after shaping or filling or freeze first for up to 2 months and thaw in the refrigerator before letting rest in a warm place