Chapter 4. File Management
Chapter 3 introduced the Unix filesystem. This chapter explains how to name, edit, copy, move, find, and print files.
File and Directory Names
As Chapter 3 explains, both files and directories are identified by their names. A directory is really just a special kind of file, so the rules for naming directories are the same as the rules for naming files.
Filenames may contain any character except /, which is
reserved as the separator between files and directories in a pathname.
Filenames are usually made of upper- and lowercase letters, numbers,
“.” (dots), and “_” (underscores).
Other characters (including spaces)
are legal in a filename, but they can be hard to use because the shell
gives them special meanings.
So we recommend using only letters, numbers, dots, and underscore
characters.
You can also use “-” (dashes), as long as they aren’t the first character
of a filename, which can make a program think the filename is an
option.
If you have a file with a space in its name, the shell will be confused if you type its name on the command line. That’s because the shell breaks command lines into separate arguments at the spaces.
To tell the shell not to break an argument at spaces, put quote marks (“) around the argument. For example, the rm program, covered later in this chapter, removes files.
To remove a file named a confusing name, the first rm command, which follows, doesn’t work; the second one does:
$ls -ltotal 2 -rw-r--r-- 1 jpeek users 0 Oct 23 11:23 a confusing name -rw-r--r-- 1 jpeek users 1674 Oct 23 11:23 ch01 $rm a confusing namerm: a: no such file or directory rm: confusing: no such file or directory rm: name: no such file or directory $rm "a confusing name"$
Unlike some operating systems, Unix doesn’t require a dot
(.) in a filename;
in fact, you can use as many as you want.
For instance, the filenames pizza and
this.is.a.mess are both legal.
Some Unix systems limit filenames to 14 characters. Most newer systems allow much longer filenames.
A filename must be unique inside its directory, but other directories may have files with the same names. For example, you may have the files called chap1 and chap2 in the directory /users/carol/work and also have files with the same names in /users/carol/play.
File and Directory Wildcards
When you have a number of files named in series (for example,
chap1 to chap12) or
filenames with common characters
(such as aegis, aeon, and
aerie), you can use wildcards
to specify many
files at once.
These special characters are * (asterisk), ?
(question mark), and [ ] (square brackets).
When used in a file or directory name given as an argument on a command line, the following is true:
-
* An asterisk stands for any number of characters in a filename. For example, ae* would match aegis, aerie, aeon, etc. if those files were in the same directory. You can use this to save typing for a single filename (for example, al* for alphabet.txt) or to choose many files at once (as in ae*). A
*by itself matches all file and subdirectory names in a directory.-
? A question mark stands for any single character (so h?p matches hop and hip, but not help).
-
[] Square brackets can surround a choice of single characters (i.e., one digit or one letter) you’d like to match. For example, [Cc]hapter would match either Chapter or chapter, but [ch]apter would match either capter or hapter. Use a hyphen (-) to separate a range of consecutive characters. For example, chap[1-3] would match chap1, chap2, or chap3.
The following examples show the use of wildcards. The first command lists all the entries in a directory, and the rest use wildcards to list just some of the entries. The last one is a little tricky; it matches files whose names contain two (or more) a’s.
$lschap10 chap2 chap5 cold chap1a.old chap3.old chap6 haha chap1b chap4 chap7 oldjunk $ls chap?chap2 chap5 chap7 chap4 chap6 $ls chap[5-7]chap5 chap6 chap7 $ls chap[5-9]chap5 chap6 chap7 $ls chap??chap10 chap1b $ls *oldchap1a.old chap3.old cold $ls *a*a*chap1a.old haha
Wildcards are useful for more than listing files. Most Unix programs accept more than one filename, and you can use wildcards to name multiple files on the command line. For example, the less program displays a file on the screen. Let’s say you want to display files chap3.old and chap1a.old. Instead of specifying these files individually, you could enter the command as:
$ less *.old
This is equivalent to "less chap1a.old chap3.old“.
Wildcards match directory names, too.
You can use them anywhere in a pathname—absolute or
relative—though you still need to separate directory levels with
slashes (/).
For example, let’s say you have subdirectories named
Jan, Feb,
Mar, and so on.
Each has a file named summary.
You could read all the summary files by typing
"less */summary“.
That’s almost equivalent to
"less Jan/summary Feb/summary ...”
but there’s one important difference:
the names will be alphabetized,
so Apr/summary would be first in the list.
Creating and Editing Files
One easy way to create a file is with a Unix feature called input/output redirection, as Chapter 5 explains. This sends the output of a program directly to a file, to make a new file or add to an existing one.
You’ll usually create and edit a plain-text file with a text editor program. Text editors are somewhat different than word processors.
Text Editors and Word Processors
A text editor lets you add, change, and rearrange text easily. Two common Unix editors are vi (pronounced “vee-eye”) and emacs (“ee-macs”). Pico (“pea-co”) is a simple editor that has been added to many Unix systems.
Since there are several editor programs, you can choose one you’re comfortable with. vi is probably the best choice because almost all Unix systems have it, but emacs is also widely available. If you’ll be doing simple editing only, pico is a great choice. Although pico is much less powerful than emacs or vi, it’s also a lot easier to learn.
None of those editors has the same features as popular word processing software on personal computers. vi and emacs are sophisticated, extremely flexible editors for all kinds of plain text files: programs, email messages, and so on.
By “plain text,” we mean a file with only letters, numbers, and punctuation
characters in it.
Unix systems use plain text files in many places:
redirected input and output of Unix programs (Chapter 5),
as shell setup files (see Section 3.7
in Chapter 3),
for shell scripts (shown in Section 8.3
of Chapter 8),
for system configuration,
and more.
Text editors edit these files.
When you use a word processor, though, although the screen may look as if
the file is only plain text, the file probably also has hidden
codes (nontext characters) in it.
That’s often true even if you tell the word processor to “Save as plain text.”
One easy way to check for nontext characters in a file is by reading the
file with less; look for characters in
reversed colors, codes like <36>, and so on.
If you need to do word processing—making documents, envelopes, and so on—most Unix systems also support easy-to-use word processors such as WordPerfect and StarOffice (which are compatible, more or less, with Microsoft word processors). Ask your system staff what’s available or can be installed.
The Pico Text Editor
The Pico editor, from the University of Washington, is easy to use. If you send email with Pine, you already know how to use Pico; it’s Pine’s message editor. Like Pine, Pico is still evolving; if you use an older version than we did here (Version 3.7), yours may have some different features.
Start Pico by typing its name;
the argument is the filename you want to create or edit.
If you’re editing a Unix shell setup file or shell script, you’ll also
want the -w option; it tells Pico not to
break (“wrap”) lines at the right margin, but only when you press the
RETURN key.
If a line is longer than the right margin, like the line starting with
PATH= in Figure 4-1,
pico -w
marks the right end with a dollar sign ($).
When you move the cursor over the dollar sign,
the next 80 characters of that one line are displayed. For instance, to edit my .profile setup file,
I cd to my home directory and enter:
$ pico -w .profile
My terminal fills with a copy of the file (and, because the file is short, some blank lines too), as shown in Figure 4-1.
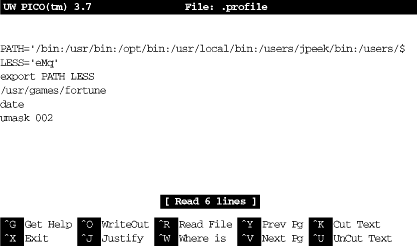
The bottom two rows of the window list some Pico commands. For example, CTRL-J justifies the paragraph you’re editing, making the lines fit neatly between the margins. For a complete list of commands, use CTRL-G, the “Get Help” command.
Pico tour
Let’s take a tour through Pico. In this example, you’ll make a new file with wrapped lines. So (unlike what you’d do when editing a system setup file) we won’t use the -w option. You can call the file anything you want, but it’s best to use only letters and numbers in the filename. For instance, to make a file named sample, enter the command pico sample. Let’s start our tour now.
Your screen should look something like the previous example, but the middle of the screen should be blank, ready for you to enter text.
Enter some lines of text. Make some lines too short (press RETURN before the line gets to the right margin). Make others too long; watch how Pico wraps long lines. If you’re using a window system and you have another terminal window open with some text in it, you can also use your mouse to copy text from another window and paste it into the Pico window. (Chapter 2 includes Section 2.4.2, which has instructions for copying and pasting between xterm windows.) To get a lot of text quickly, paste the same text more than once.
Let’s practice moving around the file. Pico works on all terminals, with or without a mouse, so it will probably ignore your mouse if you try to use it to move the cursor. Instead, use the keyboard to move the cursor. If your keyboard has arrow keys, they’ll probably move the cursor. Otherwise, try the cursor-moving commands listed in the help page, such as CTRL-F to move forward a character, CTRL-E to move to the end of a line, and CTRL-A to go to the start of a line. If your PAGE UP and PAGE DOWN keys don’t work, use CTRL-Y and CTRL-V, respectively.
Pico’s search or “where is” command, CTRL-W, can help you find a word quickly. It’s handy even on a short file, where it can be quicker to type CTRL-W and a word than to use the cursor-moving commands. The search command is also a good example of the way that pico can change its display momentarily. Let’s try it. Type CTRL-W; you should see a display like Figure 4-2.
Notice that the command list at the bottom of the display has changed since you started Pico (Figure 4-1). The cursor sits after the word “Search:”. You can type a word or characters to search for, then press RETURN to do the search. You also can do any other command listed, such as CTRL-T to go to a particular line number. Type CTRL-G to get a help display. Notice that if you type CTRL-W while the search command is active, it doesn’t start another search; it goes to the start of the current paragraph. After a search finishes, you can type CTRL-W again, then press RETURN to repeat the search.
If your text isn’t in paragraphs separated by blank lines, break some of it into paragraphs. Put your cursor at the place you want to break the text and press RETURN twice (once to break the line, another to make a blank line).
Now justify one paragraph. Put the cursor somewhere in it and press CTRL-J. Now the paragraph’s lines should flow and fit neatly between the margins.
Because pico doesn’t use a mouse, cutting/copying and pasting text works differently than it does with mouse-based editors you might have used before. Please choose some text to copy or cut, then paste.
The first step is to select the text to cut or copy. Move the cursor to the first character, then press CTRL-^ (control followed by the caret key,
^).Move the cursor to the last character you want and press CTRL-K. That cuts the text. Pico will “remember” the text you cut and let you paste it back as many times as you want until you cut some other text (or until you quit your pico session).
If you only wanted to copy the text, not to cut it, you can paste the text back where you cut it. Press CTRL-U to ``uncut''—that is, paste—the text at current cursor position.
Or, if you wanted to move the text somewhere else, move the cursor to that spot and press CTRL-U there.
As with any text editor, it’s a good idea to save your work from pico every few minutes. That way, if something goes wrong on the computer or network, you’ll only lose the work since the last time you saved it. (Pico saves interrupted work in a file named pico.save or filename.save, where filename is the name of the file you were editing. But I like to save by hand when I know that the file is in a good state.)
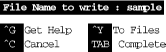
Try writing out your work with CTRL-O. The bottom of the display will look like Figure 4-3. The cursor sits after the name of the file you’re editing.
This part confuses some pico beginners. If you want to save the file with the same name it had as you started, just press RETURN; that’s all! You can also choose a different filename.
One way to use a different filename is to edit the filename in place. For instance, if you want to call the backup copy sample1, simply press the 1 key to add a 1 to the end of the filename before you press RETURN to save it.
You can backspace over the name and type a new one. Or move to the start or middle of the name by using the arrow keys, CTRL-B and CTRL-F, then add or delete characters in the name. As an example, you could edit the filename to be an absolute pathname such as /home/carol/backups/sample.
If you choose CTRL-T, “To Files,” you’ll go to a file browser where you can look through a list of your files and directories. You also can type part of an existing filename and use filename completion (see Section 3.5 in Chapter 3). By default, filename completion assumes that you started Pico from your home directory—even if you didn’t. (You can change this with the use-current-dir preference setting for Pine—which also affects Pico. See Section 6.5.5 in Chapter 6.)
Make one or two more small edits. Then exit with CTRL-X. Pico prompts you to save the file; see the explanation of CTRL-O earlier.

Managing Your Files
The tree structure of the Unix filesystem makes it easy to organize your files. After you make and edit some files, you may want to copy or move files from one directory to another, or rename files to distinguish different versions of a file. You may want to create new directories each time you start a different project.
A directory tree can get cluttered with old files you don’t need. If you don’t need a file or a directory, delete it to free storage space on the disk. The following sections explain how to make and remove directories and files.
Creating Directories with mkdir
It’s handy to group related files in the same directory. If you were writing a spy novel, you probably wouldn’t want your intriguing files mixed with restaurant listings. You could create two directories: one for all the chapters in your novel (spy, for example), and another for restaurants (boston.dine).
To create a new directory, use the mkdir program. The syntax is:
mkdir dirname(s)
dirname is the name of the new directory. To make several directories, put a space between each directory name. To continue our example, you would enter:
$ mkdir spy boston.dine
Copying Files
If you’re about to edit a file, you may want to save a copy first. That makes it easy to get back the original version.
cp
The cp program can put a copy of a file into the same directory or into another directory. cp doesn’t affect the original file, so it’s a good way to keep an identical backup of a file.
To copy a file, use the command:
cp old new
where old is a pathname to the original file and new is the pathname you want for the copy. For example, to copy the /etc/passwd file into a file called password in your working directory, you would enter:
$ cp /etc/passwd password
$
You can also use the form:
cp old olddir
This puts a copy of the original file old into an existing directory olddir. The copy will have the same filename as the original.
If there’s already a file with the same name as the copy, cp replaces the old file with your new copy. This is handy when you want to replace an old copy with a newer version, but it can cause trouble if you accidentally overwrite a copy you wanted to keep. To be safe, use ls to list the directory before you make a copy there. Also, many versions of cp have an -i (interactive) option that asks you before overwriting an existing file.
You can copy more than one file at a time to a single directory by listing the pathname of each file you want copied, with the destination directory at the end of the command line. You can use relative or absolute pathnames (see Section 3.1 in Chapter 3) as well as simple filenames. For example, let’s say your working directory is /users/carol (from the filesystem diagram in Figure 3-1). To copy three files called ch1, ch2, and ch3 from /users/john to a subdirectory called work (that’s /users/carol/work), enter:
$ cp ../john/ch1 ../john/ch2 ../john/ch3 work
Or, you could use wildcards and let the shell find all the appropriate files. This time, let’s add the -i option for safety:
$cp -i ../john/ch[1-3] workcp: overwrite work/ch2?n
There is already a file named ch2 in the work directory. When cp asks, answer n to prevent copying ch2. Answering y would overwrite the old ch2.
As you saw in
Section 3.1.5.2 in
Chapter 3,
the shorthand form . puts the copy in the working
directory, and .. puts it in the parent directory.
For example, the following puts the copies into the working directory:
$ cp ../john/ch[1-3] .
cp can also copy entire directory trees. Use the option -R, for “recursive.” There are two arguments after the option: the pathname of the top-level directory you want to copy from, and the pathname of the place where you want the top level of the copy to be. As an example, let’s say that a new employee, Asha, has joined John and Carol. She needs a copy of John’s work directory in her own home directory. See the filesystem diagram in Figure 3-1. Her home directory is /users/asha. If Asha’s own work directory doesn’t exist yet (important!), she could type the following commands:
$cd /users$cp -R john/work asha/work
Or, from her home directory, she could have typed "cp -R ../john/work work“. Either way, she’d now have a new subdirectory /users/asha/work with a copy of all files and subdirectories from /users/john/work.
Warning
If you give cp -R the wrong pathnames, it can copy a directory tree into itself—running forever until your filesystem fills up!
If the copy seems to be taking a long time, stop cp with CTRL-Z, then explore the filesystem (ls -RF is handy for this). If all’s okay, you can resume the copying by putting the cp job in the background (with bg) so it can finish its slow work. Otherwise, kill cp and do some cleanup—probably with rm -r, which we mention in Section 4.4.5.2 later in this chapter. (See Section 7.1 and Section 7.3 in Chapter 7.)
Problem checklist
- The system says something like “cp: cannot copy file to itself.”
If the copy is in the same directory as the original, the filenames must be different.
- The system says something like “cp: filename: no such file or directory.”
The system can’t find the file you want to copy. Check for a typing mistake. If a file isn’t in the working directory, be sure to use its pathname.
- The system says something like “cp: permission denied.”
You may not have permission to copy a file created by someone else or copy it into a directory that does not belong to you. Use ls -l to find the owner and the permissions for the file, or ls -ld to check the directory. If you feel that you should be able to copy a file, ask the file’s owner or a system staff person to change its access modes.
Copying files across a network
The cp program works on whatever computer you’re logged onto. But, unless your computer has a networked filesystem (see Section 3.1.3 in Chapter 3), you can’t copy files to other computers with cp. To do this, see Section 6.4 in Chapter 6.
Renaming and Moving Files with mv
To rename a file, use mv (move). The mv program can also move a file from one directory to another.
The mv command has the same syntax as the cp command:
mv old new
old is the old name of the file and new is the new name. mv will write over existing files, which is handy for updating old versions of a file. If you don’t want to overwrite an old file, be sure that the new name is unique. If your cp has an -i option for safety, your mv probably has one too.
$ mv chap1 intro
$
The previous example changed the file named chap1 to intro. If you list your files with ls, you will see that the filename chap1 has disappeared.
The mv command can also move a file from one directory to another. As with the cp command, if you want to keep the same filename, you only need to give mv the name of the destination directory.
Finding Files
If your account has lots of files, organizing them into subdirectories can help you find the files later. Sometimes you may not remember which subdirectory has a file. The find program can search for files in many ways; we’ll look at two.
Change to your home directory so find will start its search there. Then carefully enter one of the following two find commands. (The syntax is strange and ugly—but find does the job!)
$cd$find . -type f -name "chap*" -print./chap2 ./old/chap10b $find . -type f -mtime -2 -print./work/to_do
The first command looked in your working directory (.)
and all
its subdirectories for files (-type f)
whose names start with chap.
(find understands wildcards in filenames.
Be sure to put quotes around any filename pattern with a wildcard in it,
as we did in the example.)
The second command looked for all files that have been created or modified
in the last two days (-mtime -2).
The relative pathnames that find
finds start with a dot (./), the
name of the working directory, which you can ignore.
Linux systems, and some others, have the GNU locate program. If it’s been set up and maintained on your system, you can use locate to search part or all of a filesystem for a file with a certain name. For instance, if you’re looking for a file named alpha-test, alphatest, or something like that, try this:
$ locate alpha
/users/alan/alpha3
/usr/local/projects/mega/alphatest
You’ll get the absolute pathnames of files and directories with alpha in their names. (If you get a lot of output, add a pipe to less—see Section 5.2.3 in Chapter 5.) locate may or may not list protected, private files; its listings usually also aren’t completely up to date. To learn much more about find and locate, read your online documentation (see Chapter 8) or read the chapter about them in Unix Power Tools (O’Reilly).
Removing Files and Directories
You may have finished work on a file or directory and see no need to keep it, or the contents may be obsolete. Periodically removing unwanted files and directories frees storage space.
rm
The rm program removes files. The syntax is simple:
rm filename(s)
rm removes the named files, as the following example shows:
$lschap10 chap2 chap5 cold chap1a.old chap3.old chap6 haha chap1b chap4 chap7 oldjunk $rm *.old chap10$lschap1b chap4 chap6 cold oldjunk chap2 chap5 chap7 haha $rm c*$lshaha oldjunk $
When you use wildcards with rm, be sure you’re deleting the right files! If you accidentally remove a file you need, you can’t recover it unless you have a copy in another directory or in the system backups.
Warning
Do not enter rm * carelessly. It deletes all the files in your working directory.
Here’s another easy mistake to make: you want to enter a command such as rm c* (remove all filenames starting with “c”) but instead enter rm c * (remove the file named c and all files!).
It’s good practice to list the files with ls before you remove them. Or, if you use rm’s -i (interactive) option, rm asks you whether you want to remove each file.
rmdir
Just as you can create new directories, you can remove them with the rmdir program. As a precaution, rmdir won’t let you delete directories that contain any files or subdirectories; the directory must first be empty. (The rm -r command removes a directory and everything in it. It can be dangerous for beginners, though.)
The syntax is:
rmdir dirname(s)
If a directory you try to remove does contain files, you get a message like “rmdir: dirname not empty”.
To delete a directory that contains some files:
Enter "cd dirname" to get into the directory you want to delete.
Enter "rm *" to remove all files in that directory.
Enter "cd .." to go to the parent directory.
Enter "rmdir dirname" to remove the unwanted directory.
Problem checklist
- I still get the message “dirname not empty” even after I’ve deleted all the files.
Use ls -a to check that there are no hidden files (names that start with a period) other than
.and..(the working directory and its parent). The following command is good for cleaning up hidden files (which aren’t matched by a simple wildcard like*):$
rm .[a-zA-Z] .??*
Files on Other Operating Systems
Chapter 6 includes Section 6.4, which explains ways to transfer files across a network—possibly to nonUnix operating systems. Your system may also be able to run operating systems other than Unix. For instance, many Linux systems can also run Microsoft Windows. If yours does, you can probably use those files from your Linux account without needing to boot and run Windows.
If the Windows filesystem is mounted with your other filesystems, you’ll be able to use its files by typing a Unix-like pathname. For instance, from our PC under Linux, we can access the Windows file C:\WORD\REPORT.DOC through the pathname /winc/word/report.doc.
Your Linux (or other) system may also have the MTOOLS utilities.
These give you Windows-like (actually, DOS-like)
programs that interoperate with the Unix-like system.
For example, we can put a Windows floppy disk in the A: drive and
then copy a file named summary.txt into our
current directory (.) by entering:
$ mcopy a:summary.txt .
Copying summary.txt
$
The mcopy -t option translates the end-of-line characters in plain-text files from the Windows format to the Unix format or vice versa. In general, don’t use -t unless you’re sure that you need to translate end-of-line characters. A local expert should be able to tell you about translation, whether other filesystems are mounted or can be mounted, whether you have utilities like MTOOLS, and how to use them.
Printing Files
Before you print a file on a Unix system, you may want to reformat it to adjust the margins, highlight some words, and so on. Most files can also be printed without reformatting, but the raw printout may not look quite as nice.
Many versions of Unix include two powerful text formatters, nroff and troff. (There are also versions called gnroff and groff.) They are much too complex to describe here. Before we cover printing itself, let’s look at a simple formatting program called pr.
pr
The pr program does minor formatting of files on the terminal screen or for a printer. For example, if you have a long list of names in a file, you can format it onscreen into two or more columns.
The syntax is:
pr option(s) filename(s)
pr changes the format of the file only on the screen or on the printed copy; it doesn’t modify the original file. Table 4-1 lists some pr options.
|
Option |
Description |
|
-k |
Produces k columns of output. |
|
-d |
Double-spaces the output (not on all pr versions). |
|
-h "header" |
Takes the next item as a report header. |
|
-t |
Eliminates printing of header and top/bottom margins. |
Other options allow you to specify the width of columns, set the page length, etc.
Before using pr, here are the contents of a sample file named food:
$ cat food
Sweet Tooth
Bangkok Wok
Mandalay
Afghani Cuisine
Isle of Java
Big Apple Deli
Sushi and Sashimi
Tio Pepe's Peppers
	.
	.
	.
Let’s use pr options to make a two-column report with the header “Restaurants”:
$ pr -2 -h "Restaurants" food

Oct  6  9:58 2001  Restaurants   Page 1

Sweet Tooth              Isle of Java
Bangkok Wok              Big Apple Deli
Mandalay                 Sushi and Sashimi
Afghani Cuisine          Tio Pepe's Peppers
	.
	.
	.
$
The text is output in two-column pages. The top of each page has the date and time, header (or name of the file, if header is not supplied), and page number. To send this output to the printer instead of the terminal screen, create a pipe to the printer program—usually lp or lpr. The following section describes lp and lpr; Chapter 5 covers pipes.
lp and lpr
The command lp or lpr prints a file (onto paper as opposed to the screen). Some systems have lp; others have lpr. The syntax is:
lp
option(s) filename(s)
lpr
option(s) filename(s)
Printers on Unix systems are usually shared by a group of users. After you enter the command to print a file, the shell prompt returns to the screen and you can enter another command. However, seeing the prompt doesn’t mean that your file has been printed. Your file has been added to the printer queue to be printed in turn.
Your system administrator has probably set up a default printer at your site. To print a file named bills on the default printer, use the lp or lpr command, as in this example:
$ lp bills
request id is laserp-525  (1 file)
$
lp shows an ID that you can use to cancel the print job or check its status. If you need ID numbers for lpr jobs, use the lpq program (see Section 4.5.3.1 later in this chapter). The file bills will be sent to a printer called laserp. The ID number of the request is “laserp-525.”
lp and lpr have several options. Table 4-2 lists three of them.
| Option | ||
| lp | lpr | Description |
|
-d printer |
-P printer |
Use given printer name if there is more than one printer at your site. The printer names are assigned by the system administrator. |
|
-n# |
-# |
Print # copies of the file. |
|
-m |
-m |
Notify sender by email when printing is done. |
Windowing applications like StarOffice typically run lp or lpr for you, “behind the scenes.” They may have a printer configuration menu entry where you can specify any lp or lpr options you want to use on every print job.
If lp and lpr don’t work at your site, ask other users for the printer command. You’ll also need the printer locations, so you know where to get your output.
Problem checklist
- My printout hasn’t come out.
See whether the printer is printing now. If it is, other users may have made a request to the same printer ahead of you and your file should be printed in turn. The following section explains how to check the print requests.
If no file is printing, check the printer’s paper supply, physical connections, and power switch. The printer may also be hung (stalled). If it is, ask other users or system staff people for advice.
- My printout is garbled or doesn’t look anything like the file did on my terminal.
The printer may not be configured to print the kind of file you’re printing. For instance, a file in PostScript format will look fine when you use a PostScript viewer on your terminal, but look like gibberish when you try to print it. If the printer doesn’t understand PostScript, ask your system administrator to install a printer driver that handles PostScript.
You may be trying to print a file directly (with lp or lpr) that should be printed from its own application. For instance, if you have a StarOffice file named report.sdw, you should open that file from a StarOffice window and use the Print command on the StarOffice File menu.
Viewing the Printer Queue
If you want to find out how many files or “requests” for output are ahead of yours in the printer queue, use the program named lpstat (for lp) or lpq (for lpr). The cancel program lets you terminate a printing request made by lp; lprm cancels jobs from lpr.
If you have a graphical application such as StarOffice that does its printing with lp or lpr, you should be able to use these commands to check and cancel those print jobs.
lpstat and lpq
The lpstat program shows what’s in the printer queue: request IDs, owners, file sizes, when the jobs were sent for printing, and the status of the requests. Use lpstat -o if you want to see all output requests rather than just your own. Requests are shown in the order they’ll be printed:
$ lpstat -o
laserp-573  john  128865  Oct 6  11:27  on laserp
laserp-574  grace  82744  Oct 6  11:28
laserp-575  john   23347  Oct 6  11:35
$
The first entry shows that the request “laserp-573” is currently printing on laserp. The exact format and amount of information given about the printer queue may differ from system to system. If the printer queue is empty, lpstat says “No entries” or simply gives you back the shell prompt.
lpq gives slightly different information than lpstat -o:
$ lpq
laserp is ready and printing
Rank   Owner      Job  Files                  Total Size
active john       573  report.ps              128865 bytes
1st    grace      574  ch03.ps ch04.ps        82744 bytes
2nd    john       575  standard input         23347 bytes
$
The first line displays the printer status. If the printer is disabled or out of paper, you may see different messages on this first line. The “active” job, the one being printed, is listed first. The “Job” number is like the lpstat request ID. To specify another printer, add the -P option (Table 4-2).
cancel and lprm
cancel terminates a printing request from the lp program. lprm terminates lpr requests. You can specify either the ID of the request (displayed by lp or lpq) or the name of the printer.
If you don’t have the request ID, get it from lpstat or lpq. Then use cancel or lprm. Specifying the request ID cancels the request, even if it is currently printing:
$ cancel laserp-575
request "laserp-575" cancelled
To cancel whatever request is currently printing, regardless of its ID, simply enter cancel and the printer name:
$ cancel laserp
request "laserp-573" cancelled
The lprm program will cancel the
active job if it belongs to you.
Otherwise, you can give job numbers as arguments, or use a dash
(-) to remove all of your jobs:
$ lprm 575
dfA575diamond dequeued
cfA575diamond dequeued
lprm tells you the actual filenames removed from the printer queue (which you probably don’t need).
Exercise: manipulating files
In this exercise, you’ll create, rename, and delete files. First you’ll need to find out if your site has one or more printers and the appropriate command to use for printing.