
CHAPTER SIX
OVERLAPS
Overlapping is a simple technique that describes complex structures on plants and makes your composition very three-dimensional. An overlap occurs any time one form is in front of or behind another. This can be as simple as one flower petal slightly overlapping another, or as complex as many roots overlapping one another. Drawing through a hidden element and shading behind the form in front will make your overlaps more convincing, as long as all lines seem to continue even when part of a line is hidden. After all, realistic botanical drawing is all about creating the illusion of three-dimensional form on a two-dimensional piece of paper. To enhance this illusion, rendering realistic overlaps is key.
When creating overlaps, especially small ones such as of thorns, hairs, and roots, I always push color out of my mind and think only about what is in front and what is behind. I remember that light elements come forward while dark ones recede, so I make sure that my forms in front are lighter than those behind. Even if the forms in front are dark in color, I push that out of mind. I say to myself, “Well, light could be hitting this form and creating light areas, so therefore I can draw them as light and tone darker behind.” Because artists try to describe the structure of a plant, this convention of thinking of light and dark rather than color is used extensively in scientific illustration, much of which is in black-and-white—mostly pen and ink. I figure if it’s good enough for scientific illustrators, it’s good enough for me!
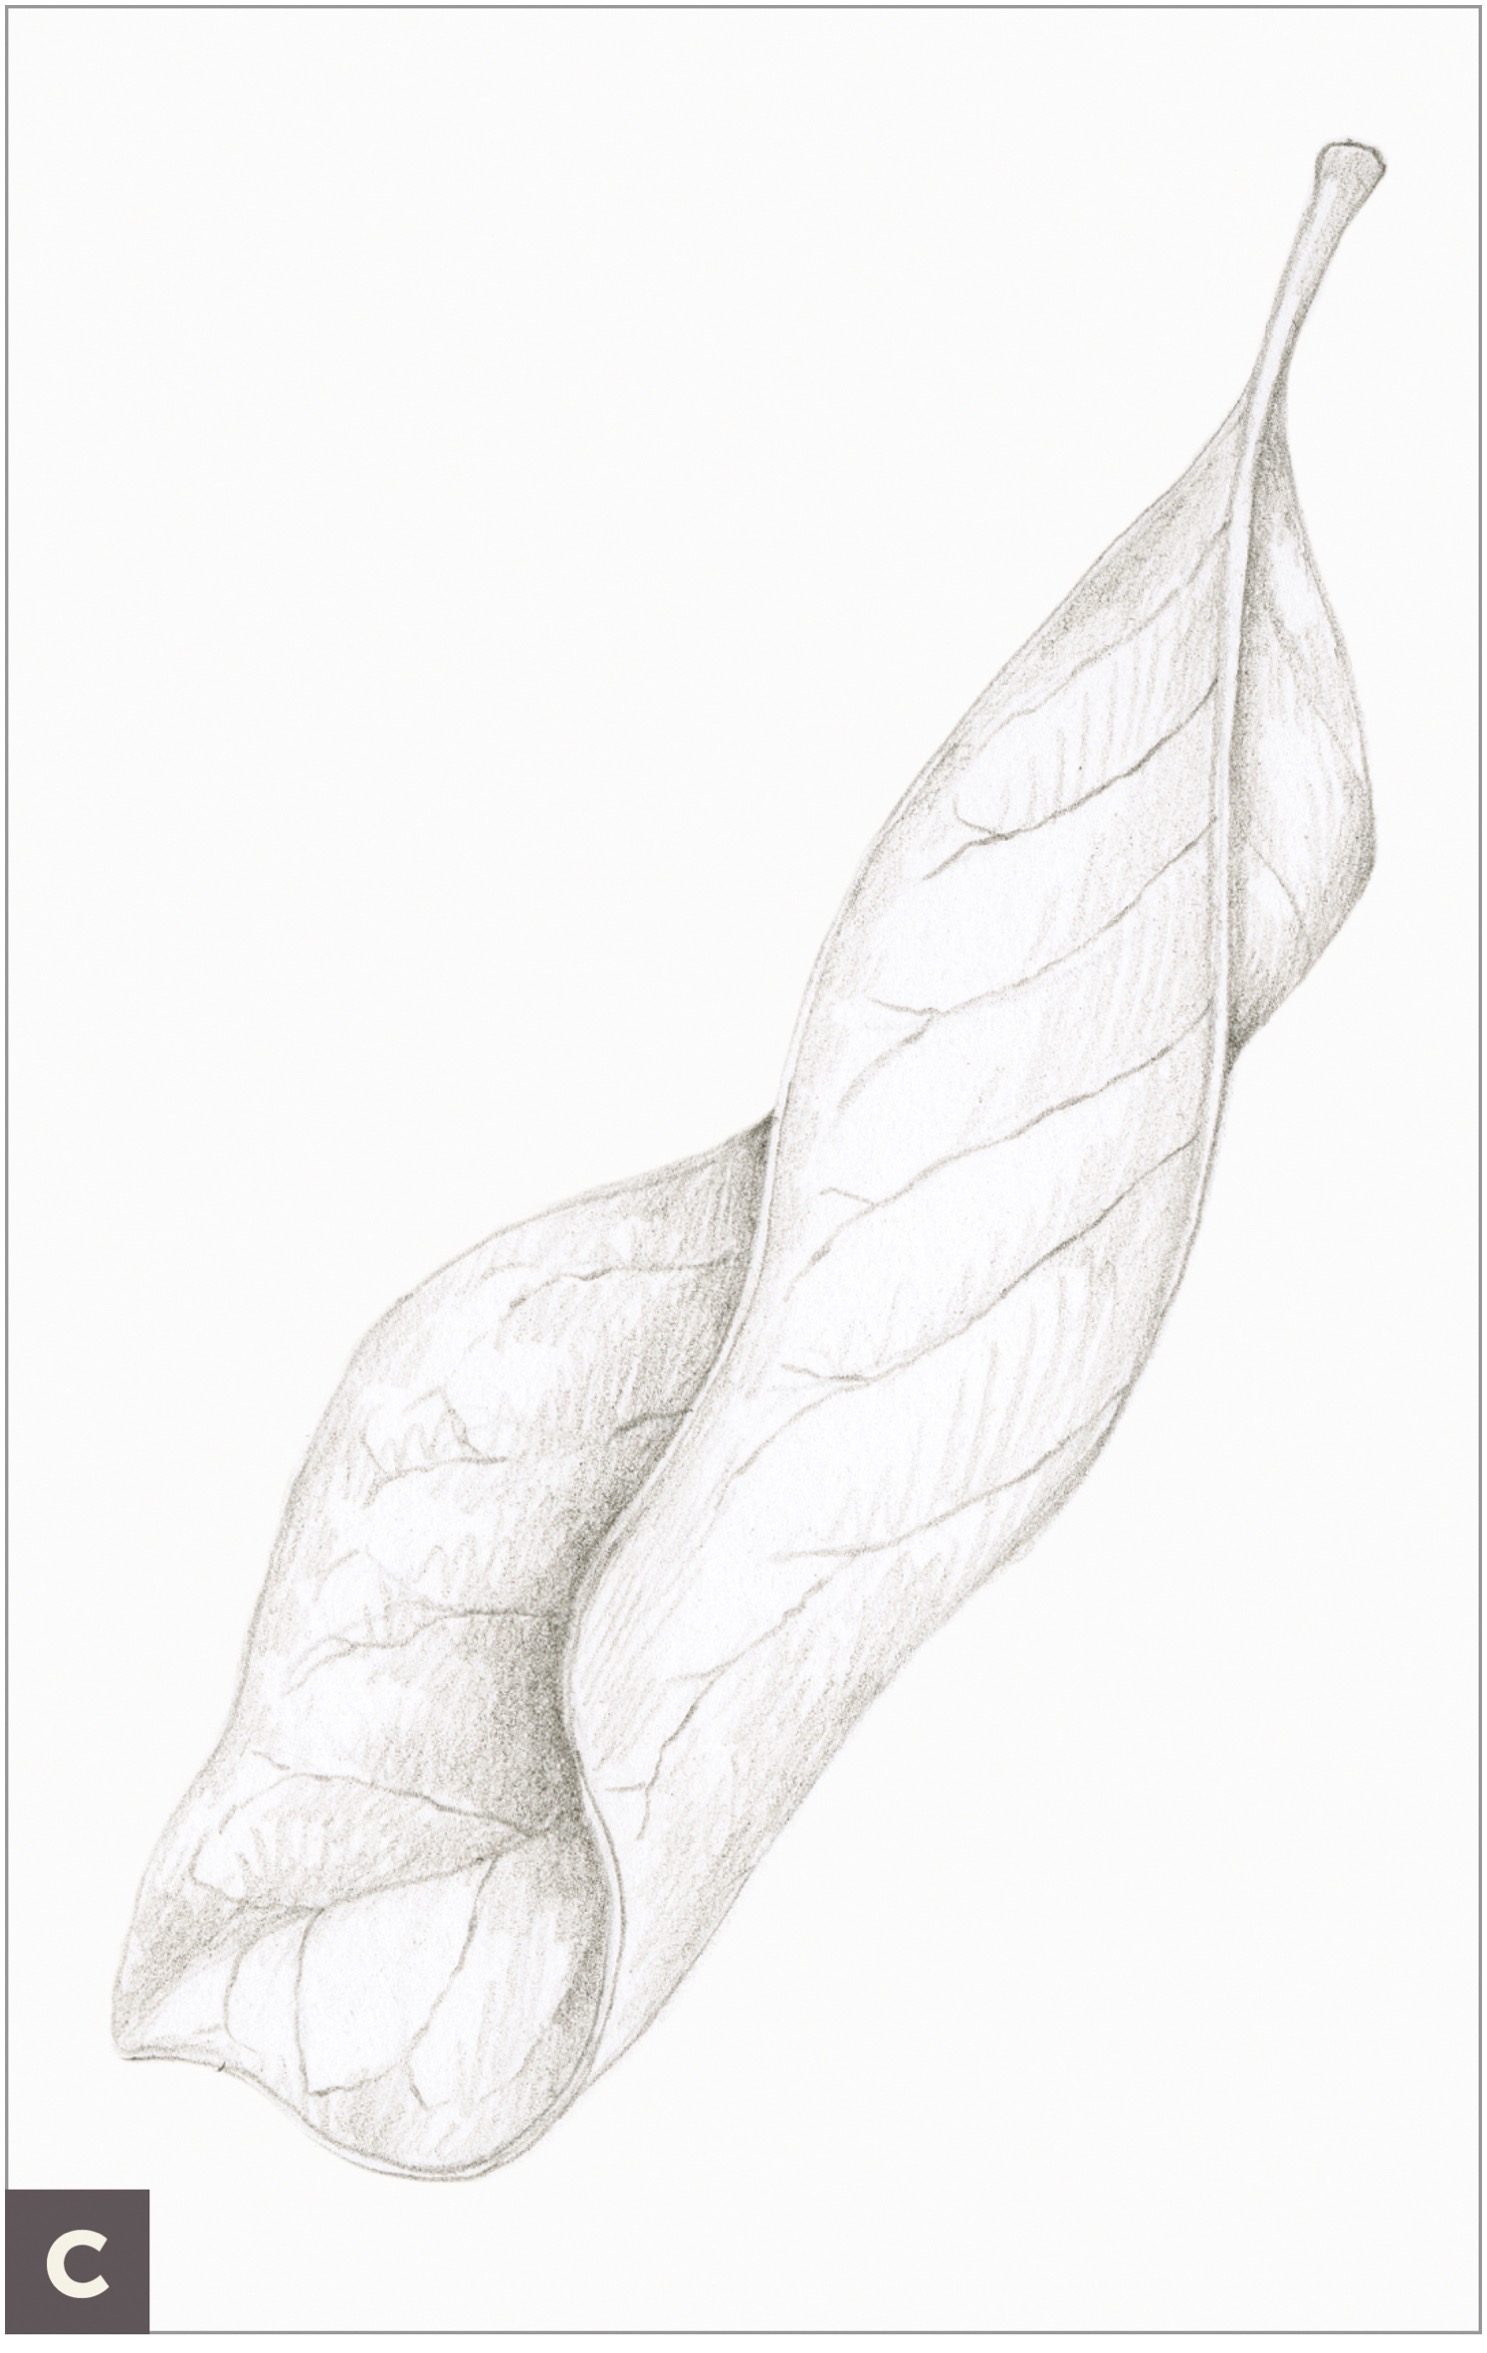
Overlapping Leaf
A net-vein leaf that twists and turns is a challenging but exciting subject. The overlapping parts of the leaf create an opportunity for good contrast in light and shadow. If you have access to a curling dried leaf, it will be easier to study how the edges of the leaf overlap. Again, a Magnolia grandiflora leaf is perfect for this lesson, because it holds its curled shape indefinitely, but other leaves will work as well.
Here’s the secret to a good overlapping leaf drawing: the lines should all connect, even as they disappear.
SUBJECT
Leaf with overlapping edges
ADDITIONAL MATERIALS
• Tracing paper
• Dark Sepia colored pencil #175
• Watercolor and colored pencils to match the colors of your leaf
COLORED PENCILS
#175

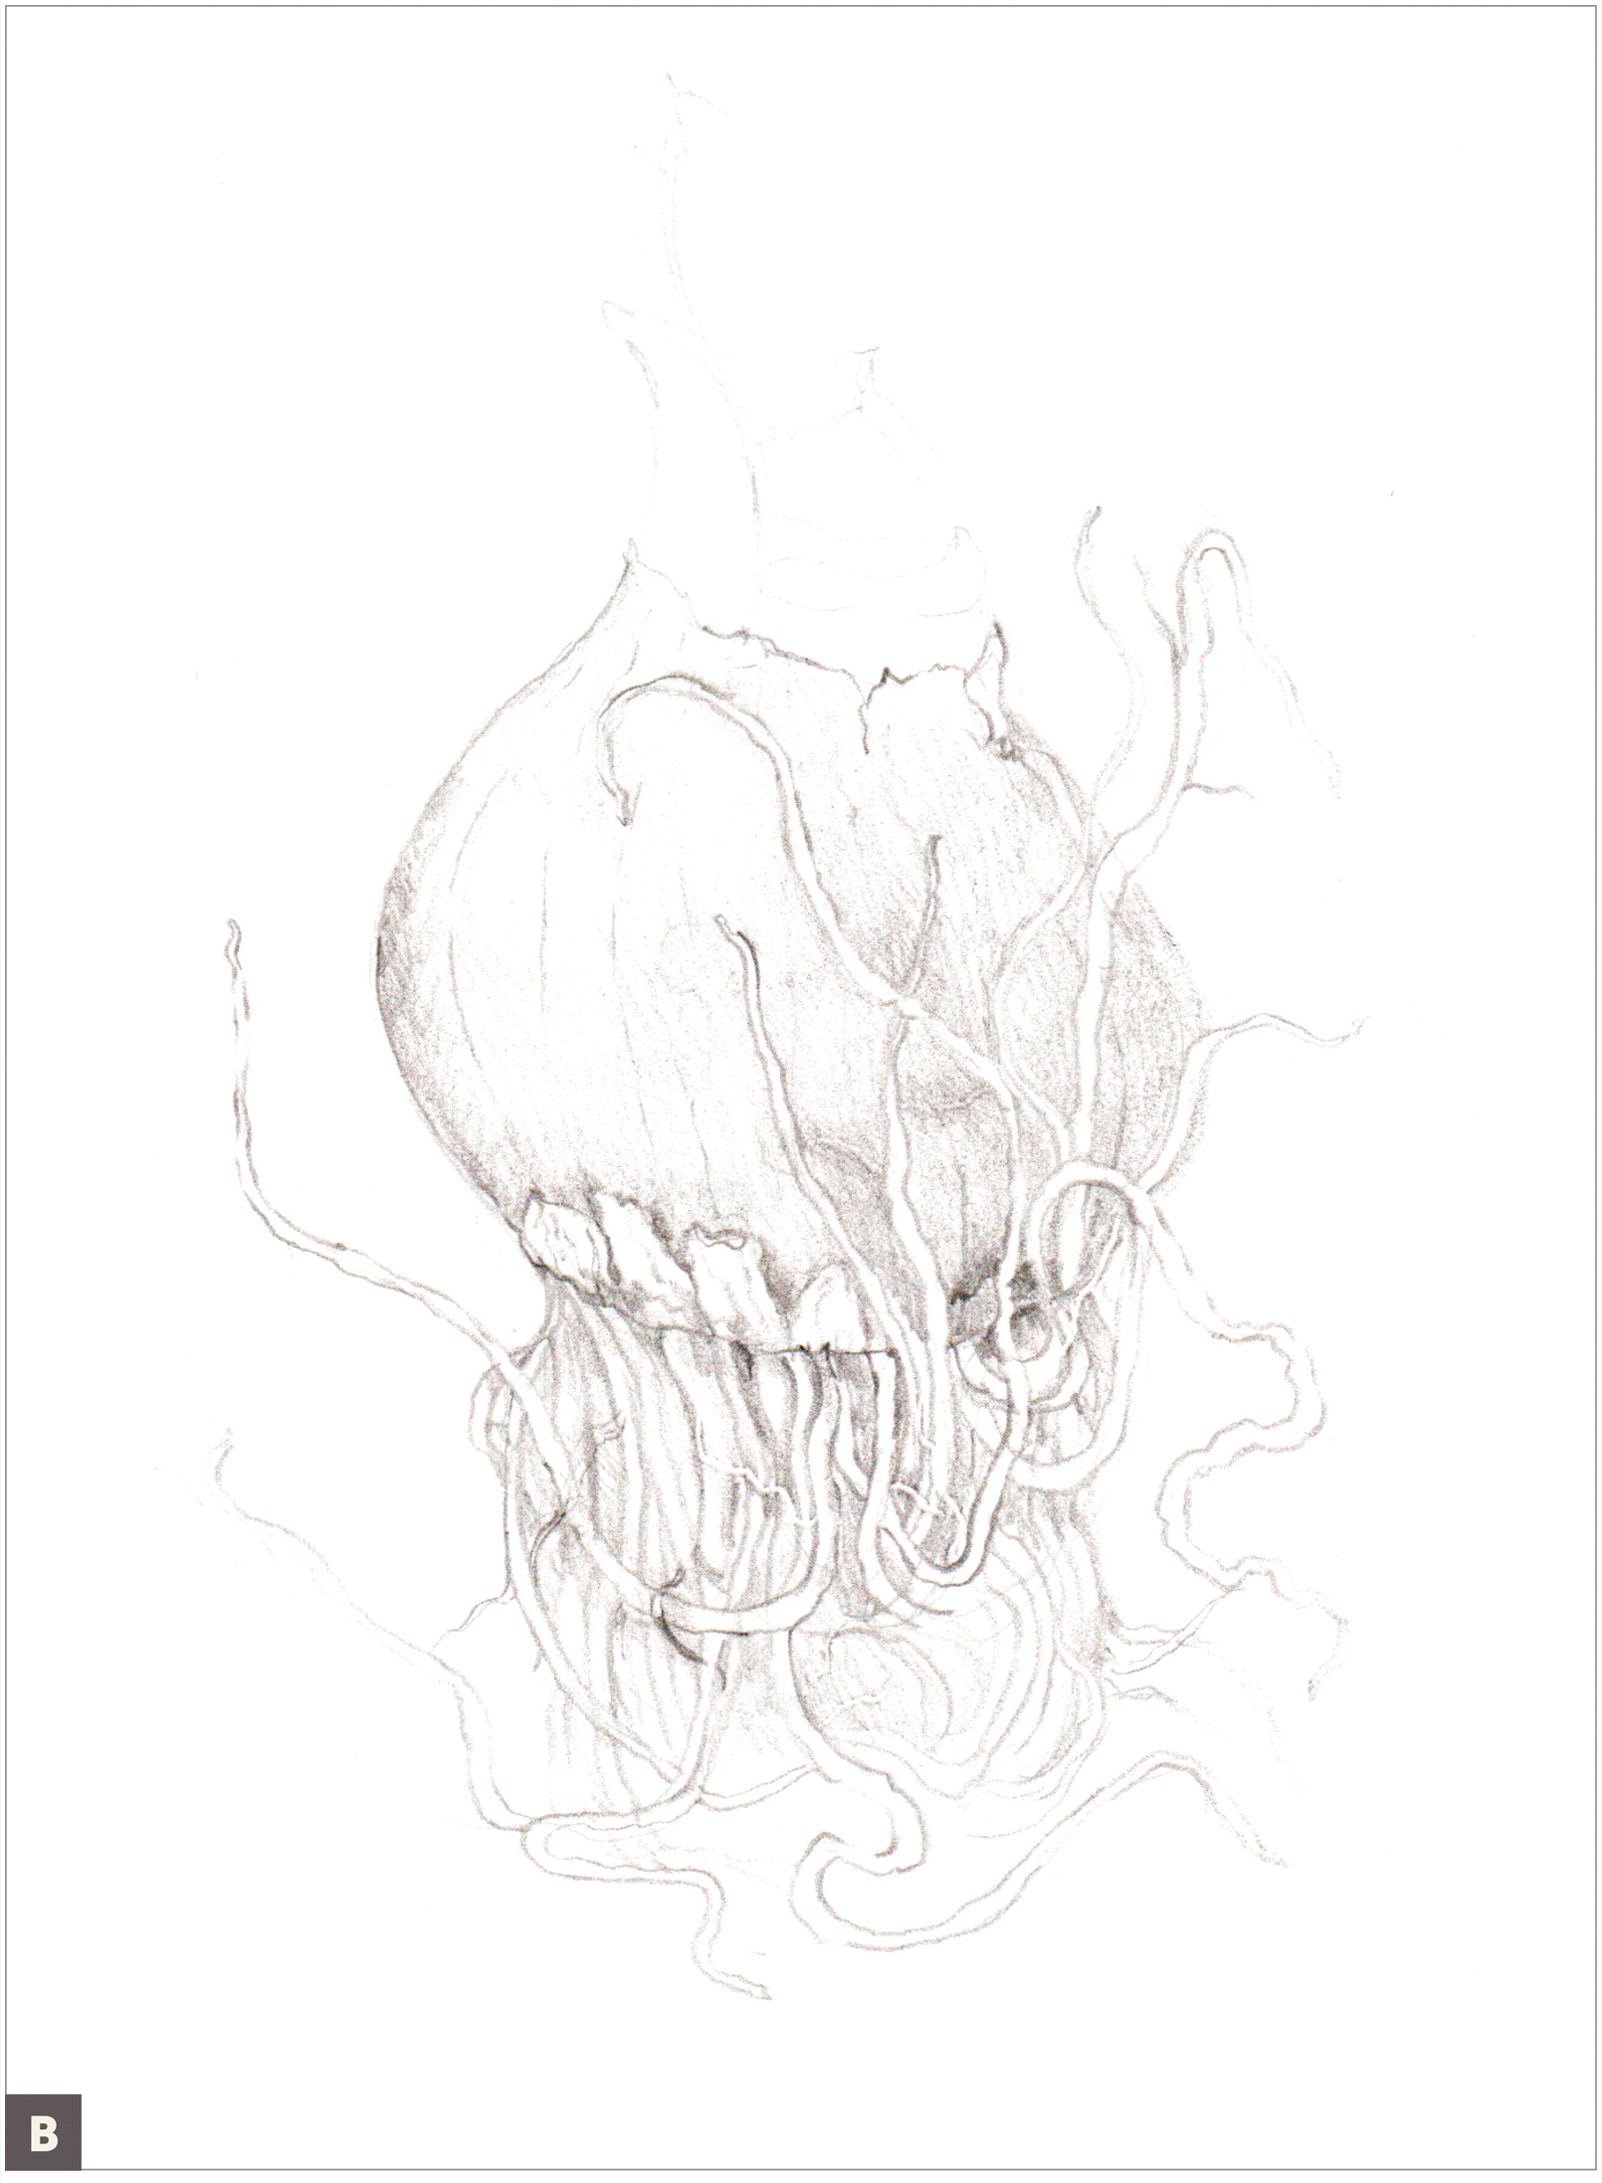
Begin by drawing your leaf lightly with a graphite pencil on tracing paper. Draw the entire center midvein, even if it’s hidden from view, and show how it curves. I’ve drawn all three lines with different colors to keep track of edges that are hidden, indicating the midvein with a red pencil and using a dotted line where it’s hidden from view.
Draw the edge of the leaf closest to your view. Try to mimic the curve of this edge exactly so that it appears graceful. I’ve indicated the edge closest to me in green.
Draw the back edge of the leaf in one continuous line—even when it’s hidden from view. I’ve drawn this edge in blue. (A)

Use your tracing-paper sketch as a guide to redraw your leaf on good paper with a graphite pencil. Make any necessary adjustments to ensure that the hidden edges and midvein appear visually connected. Indicate secondary veining. (B)

With a Dark Sepia colored pencil, tone the overlapping edges first so that there are shadow tones on the areas underneath the fold closest to you. Remember that dark tones recede and light tones visually come forward; this helps create the illusion of three-dimensional form. Tone the bending edges of the leaf to indicate the subtle shadows created when the form bends away from the light source. (C)
Add a layer of watercolor in the appropriate colors for each side of the leaf. (D)

Finish rendering the leaf with colored pencils, toning the petiole (stem) like a cylinder, and add in subtle veining and a cast shadow. (E)

Basic Root Overlaps
Look closely at a subject that has roots, such as a bulb, to understand the pattern that roots follow. Roots can be irregular, wrinkled, or hairy. Often a root is wider at the base and gets narrower toward the tip, just like veins on leaves. Repeat this lesson with similar subjects, such as other root vegetables or any plant with roots.
SUBJECT
Bulb with roots
ADDITIONAL MATERIALS
• Dark Sepia colored pencil #175
• Magnifying glass or other magnifier
COLORED PENCILS
#175
With a graphite pencil, draw an approximation of a single root: its shape, size, and width variations. (A)

With a very sharp Dark Sepia colored pencil, carefully redraw the root with a sensitive line (see this page), not a solid outline. Look through a magnifying glass to see the variations in your root. Draw a root behind the first root to create an overlap. (B)

Add tone at the edges where the roots meet to accentuate the idea that these forms are overlapping each other. Add the toning on the root underneath, creating a slight cast shadow. Tone where the roots connect to the bulb. (C)

Continue to add more roots, one behind the next, and tone them all, showing the overlaps. Remember your light-source model of a cylinder to tone each individual root. Reserve your darkest dark tones for the roots in the back and your lightest lights for the roots in front. (D)


SENSITIVE LINE PRACTICE
Sensitive lines is a phrase I use to describe variations in outlines. It’s useful to draw sensitive lines whenever depicting thin, undulating roots and edges on leaves and petals. We want to avoid drawing petals that look like solid shapes with hard edges; they should look more like delicate petals with variation in their edges and folds. To accomplish this, vary the pressure you put on your pencil to create lines that feel as if they move around a form, receiving light in places differently, rather than solid, hard outlines. By varying pressure, you can also create wider lines that taper and narrow. It helps to avoid making repeating patterns on your edges; vary your strokes so that things look irregular. Adding a subtle toning inside a petal edge next to a line helps as well.


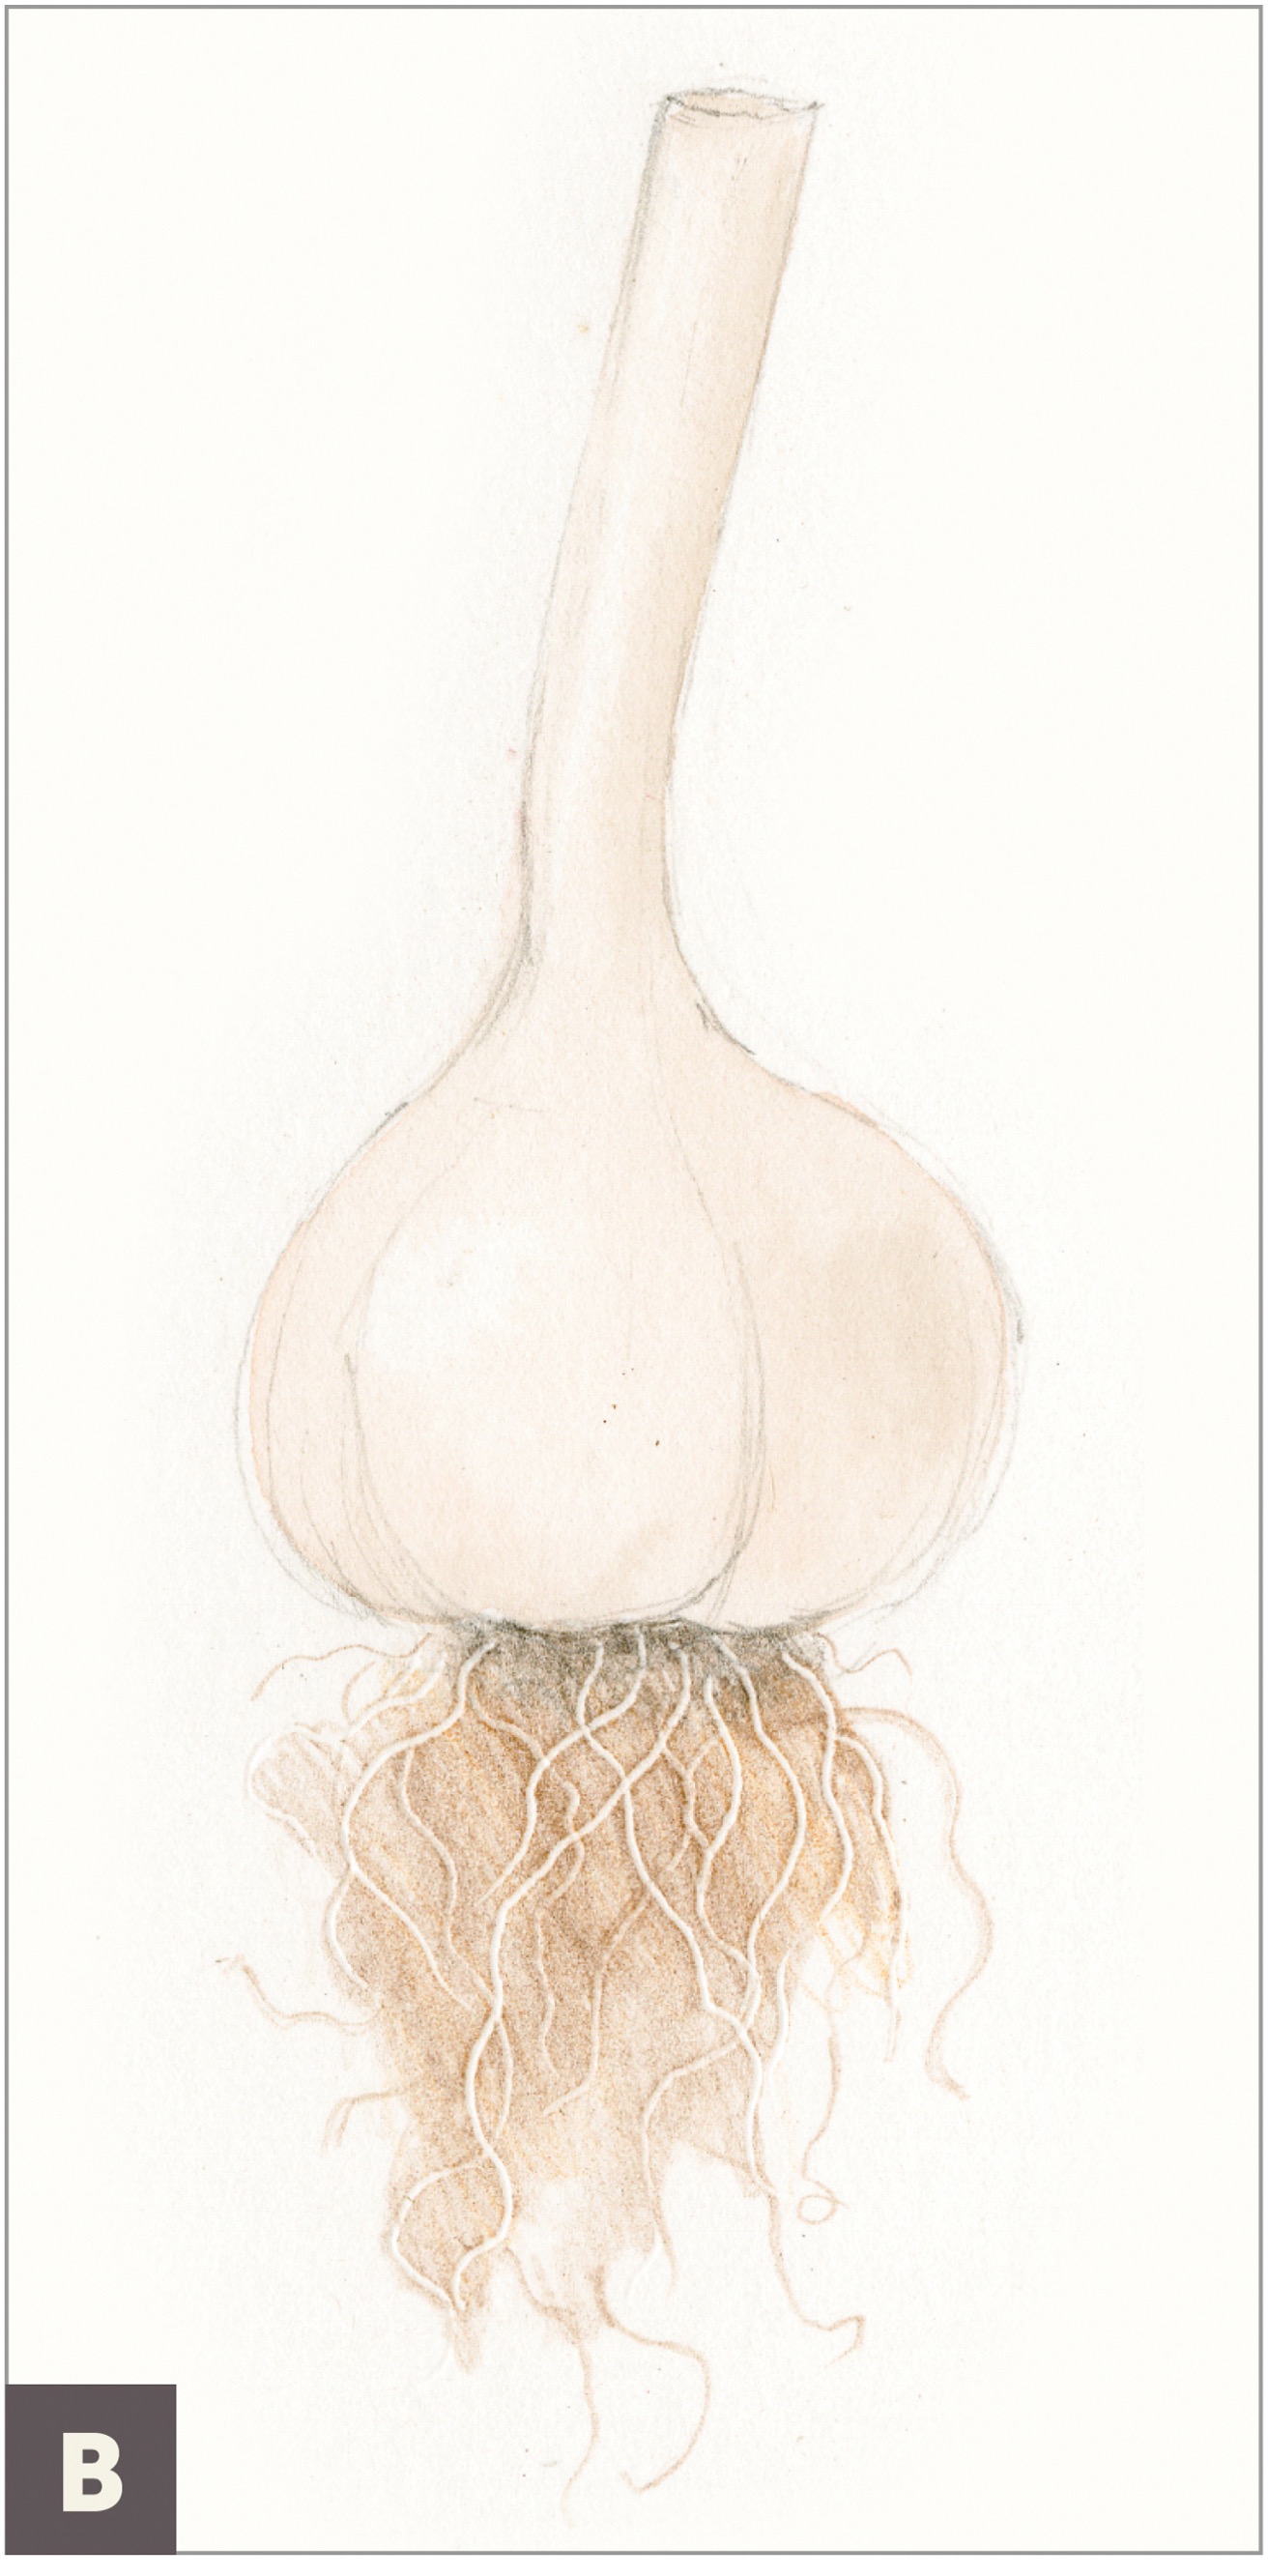
Drawing a Garlic Bulb with Thin, Hairy Roots
This lesson explores the techniques of embossing on skinny roots. In addition to an embossing tool, you’ll use wax paper to lift some of the pencil, creating more subtle roots in the back.
SUBJECT
Garlic bulb with small hairy roots
ADDITIONAL MATERIALS
• Embossing tools (small to medium)
• Dark Sepia colored pencil #175
• Brown Verithin pencil
• Watercolor brush #2
• Watercolor and colored pencils to match the colors of your bulb
• Wax paper (optional)
COLORED PENCILS
#175
Look closely at the roots of your subject and choose embossing tools in appropriate widths.
Draw the bulb and roots lightly, leaving plenty of room on the paper for the roots. Start with the roots sitting on top, closest to the viewer, and draw them with an embossing tool. With a Dark Sepia colored pencil, draw over the roots, and add more roots with the embossing tools. Draw some of the thin roots with the pencil as well, not just the embossers. (A)

Add some more embossing over the darker pencil areas, and again draw over those. You should have a few variations of roots that appear in front and some behind. You can keep building layers of roots this way, creating lots of convincing overlaps and lots of tangled roots. (B)
Keep building the roots, and refer back to your subject so that the ends of the roots terminate in a natural way. You can draw some roots or the ends of the roots with a Brown Verithin pencil to create variety, some embossed and some drawn. (C)

Work on the bulb as well, and pay close attention to the area where the bulb meets the roots; render this area nice and dark for good contrast, to create a feeling of mystery, and perhaps indicate some soil clinging to the roots. With a #2 brush, use layers of watercolor—as well as colored pencil—to draw the bulb. Think of the neck as a cylinder and the body as a round form for light source. Remember to have a good highlight on the bulb. Add in veining details that follow the cross-contour lines of the bulb. Create more subtle roots behind with an embossing tool; either do this directly on top of the paper or use the wax paper technique described in step 6 on this page. (D)

Use watercolor and colored pencils to darken roots where needed, and to create some good overlapping areas by darkening behind the roots you want to appear on top. Add toning and details on the bulb. (E)

Advanced Root Overlaps
I recently received an amaryllis bulb as a gift. It arrived ready to plant and grow an amaryllis flower, but before I planted it in a pot, I decided to draw it. This is a great way to practice drawing overlapping roots and a round form at the same time. (To see the blooms from this plant, turn to this page.)
Study a root and notice that it is not straight or a smooth curve, but perhaps a bit bumpy on its edges. A root is usually wider at the base and tapers and gets thinner and thinner at its end. The key to drawing realistic roots is capturing their irregular quality. Try not to approximate this idea, but study and draw it realistically. I allow for variation in my line thickness and values by varying the pressure on my pencil. Practicing line variation is quite relaxing. Your goal in this lesson is to give the roots many layers of depth and to make your bulb in the background very three-dimensional. You don’t need to follow your model exactly once you’ve created the correct pattern of the roots in terms of width variation, edges, and values as they bend away from and toward light.
SUBJECT
Bulb with overlapping areas of roots
ADDITIONAL MATERIALS
• Dark Sepia colored pencil #175
• Embossing tool (small)
• Burnt Sienna colored pencil #283
• Other colored pencils and watercolor pencils to match the local color of your bulb
• Burnt Sienna watercolor pencil #283
• Watercolor brush #2 or #6
• Permanent Green Olive watercolor pencil #167
• Brown Verithin pencil
COLORED PENCILS
#175
#283
WATERCOLOR PENCILS
#283
#167
With a graphite pencil, draw a life-size, light outline of the bulb and overlapping roots. No need to draw every root, just an idea of where they will go with an overall composition. (A)

Switch to a Dark Sepia colored pencil and carefully draw the roots that will appear in front. Continue to add in more roots. Consider allowing some roots to overlap others, and allow the lines to disappear at the overlaps.
Now use an embossing tool to add some skinny, hairy roots. Remember to draw sensitively with the embosser so that the lines look graceful and also have variation. Then use the side of the Dark Sepia to lightly tone a bit so that the embossed roots start to appear. You can tone over the embossed roots, but draw around the thicker roots in front so that they remain lighter in value. Begin toning the bulb, remembering to vary the tone values as on a round form with a clear light source coming from the upper left. (B)
Add layers of Burnt Sienna colored pencil (or whatever the local color of your bulb is) over the Dark Sepia. With small strokes and a sharp pencil, build the layers slowly, pressing softly in the beginning.
With Burnt Sienna watercolor and a #2 or #6 brush, add a layer of watercolor on the bulb to start to push the roots to the front. With Permanent Green Olive watercolor, add a watercolor wash to the developing stems at the top of your subject. (C)

Add more toning on the roots using a Brown Verithin pencil, which provides a soft color with sharp control in detailed overlapping areas. Continue to darken and add more tone on the areas behind those in front, whether on a root or the bulb. If there are other colors in your bulb or root, begin to indicate those. I’ve shown the veining visible on my bulb skin.
At this stage, you can create more depth and many overlapping layers of roots by varying the tone values on the roots, darkening those roots behind the roots you want to appear on top. This is the time to build your layers slowly and have fun with artistic license. No need to copy exactly. (D)

Continue to layer in more value variation to emphasize the overlaps, creating depth and the feeling of a tangle of roots. Work on the bulb surface behind the roots to help give dimension to the roots lying on it. (E)

Overlapping Petals of a Flower
Another way to practice overlaps that are similar in form to a leaf that curves over on itself is to practice the same drawing technique on flower petals. I’ve found good overlaps on a Hibiscus elatus, which has naturally curvy petals (see the complete flower on this page). This lesson uses the same toning technique for rolling and overlapping forms that we practiced previously with a leaf (see this page).
SUBJECT
Curvy or rolled flower petal
ADDITIONAL MATERIALS
• Tracing paper
• Colored pencils and watercolor pencils to match the local color of your petal
• Watercolor brush #2
• Dark Sepia colored pencil #175
COLORED PENCILS
#175
Use tracing paper to practice drawing the three important overlapping areas: the two sides of the petal and the center midvein (even if the petal doesn’t have a prominent midvein). It’s helpful to draw this with three different colors to keep track of the sides. (A)

Redraw your petal on good paper, with a pleasing, convincing curve to your overlaps. (B)

Begin to add tone with a neutral colored pencil (in my case, Red Violet) behind the areas of the petal that are on top. Define a good highlight on the top. If your petal has strong veining that follows the surface contour, be sure to stroke in this direction, as it will enhance the illusion of the petal overlapping and continuing on the underside. (C)

Using a watercolor brush #2, mix up a local color of watercolor, and add a layer of watercolor wash leaving a good highlight. (D)

Finish your drawing by continuing to add layers of colored pencil that match the local color of your subject. Emphasize details you see on your subject with toning and different colors. Use Dark Sepia colored pencil for dark shadows and burnish to blend the layers together, leaving a good highlight where appropriate. (E)

Overlapping on a Rolled Piece of Birch Bark
Once you’ve created several kinds of overlaps, it’s fun to practice on a piece of curling bark. Curling bark contains a spiral pattern common in many forms. I am fondly reminded of Leonardo da Vinci’s drawings of a small child with curly hair. Perhaps I’m so fond of these spiral patterns because I have extremely curly hair, and it’s fun to study and draw the corkscrew pattern. Tendrils on plants with vines also display the same spiral patterning, and often they conform to a cylinder shape.
SUBJECT
Rolled or curled piece of bark
ADDITIONAL MATERIALS
• Tracing paper
• Colored pencils and watercolor pencils to match your bark’s local color
• Dark Sepia colored pencil #175
• Watercolor brush #2
COLORED PENCILS
#175

Find an interesting piece of rolled bark for this lesson. Use a light-source model of a cylinder, and draw a thumbnail sketch as a reminder of the surface contour and the light source you’ll use.
Draw your rolled bark on tracing paper. Follow the edge closest to you, and draw with a colored pencil to trace the edge as it curls around. (A)

With a Dark Sepia colored pencil, draw your entire subject on good paper and shade the overlaps. Shade the areas underneath the top of your subject. Good contrast is important, and you can create contrast by juxtaposing very dark areas with light areas on top of them. (B)

Using a watercolor pencil that matches your subject’s local color and a #2 brush, add in layers of watercolor washes to indicate color variations, highlights, and shading. (C)

Finish your drawing by continuing to add layers of local colored pencil. Emphasize details you see on your subject with toning and different colors. Burnish to blend the layers together, leaving a good highlight where appropriate. Add more layers to distinguish details and add a cast shadow if you’d like. (D)

Overlapping on Small Fruits, Leaves, and Stems
In this drawing of plums, I used the concept of overlapping several times. Utilizing overlaps is a great way to create contrasting areas, which can give your drawings a good sense of depth. By darkening the area behind a form, that main subject is pushed forward (advancing toward the eye) while the other elements recede, and this creates a focal point—the spot on which you’d like viewers to focus. We’ve practiced drawing spheres, leaves, and cross sections. Now we’re going to put these elements all together in a small composition. Hopefully you’re excited to do this, just as I always am! When you start to gain confidence in one area, you will naturally want to keep adding on to your newfound skills.
SUBJECT
Any small fruits with stem and leaves attached
ADDITIONAL MATERIALS
• Tracing paper
• Dark Sepia colored pencil #175
• Red Violet colored pencil #194
• Colored pencils and watercolor pencils to match the local color of your subject
• Watercolor brush #2
COLORED PENCILS
#175
#194
On tracing paper, plan a small drawing with multiple fruits, leaves, and stems to practice overlapping. Indicate with toning where your overlaps will be.
With a graphite pencil, draw the subject with all the elements on good paper. (A)

With neutral colored pencils such as Dark Sepia and Red Violet, tone your overlaps. Make sure to tone the surface contour of the forms realistically where the shadows sit; try to avoid a dark, flat shadow on the fruit by varying your shadow values.
Once your overlaps are clearly established, continue your drawing with grisaille toning, remembering to use a clear light source. (B)

Use a #2 brush to add local color with watercolor layers. (C)

With colored pencils that match the local color of your subject, add layers of color. Darken and layer the colors as needed to retain good contrast between the overlaps.
Optional: Add elements to the composition such as a cross section of the fruit. (D)

