Simple Sampler Tablet Case
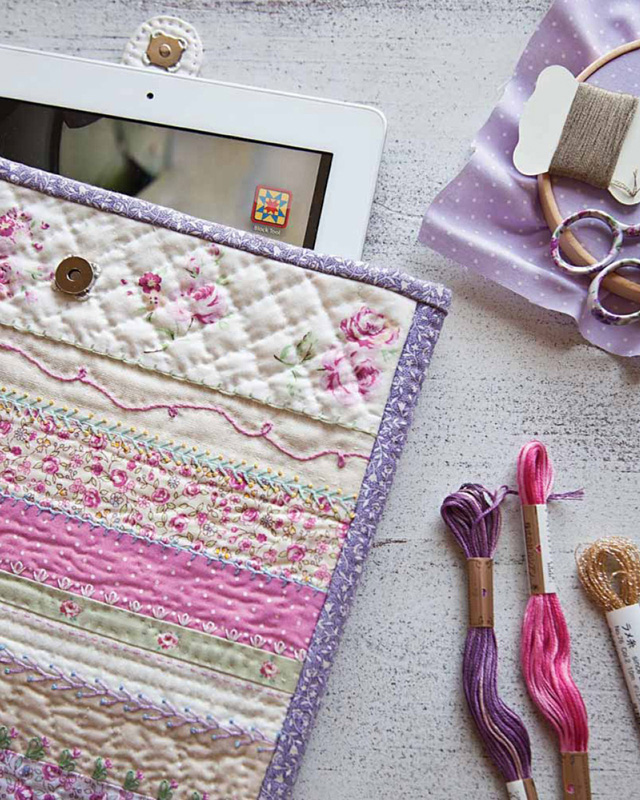
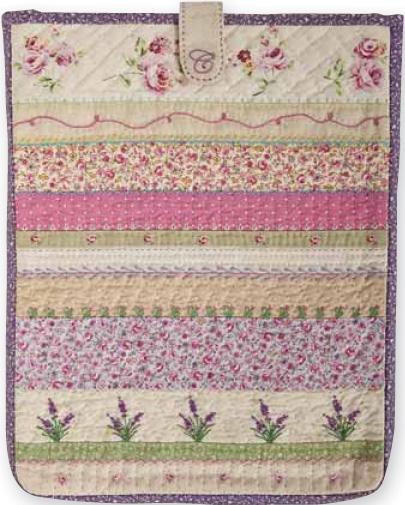
This design is a modern take on Victorian crazy quilting, which is typically chock-full of ornate fabrics and elaborate embroidery stitches. This toned-down version uses clean, straight lines and decorative embroidery stitches that are a little “fancy” in appear- ance but still fairly easy to execute. I also couldn’t resist the juxtaposition of making a case for a high-tech gadget using the “old-fashioned” design elements of patchwork, embroidery, and hand quilting.
A mix of small-scale prints, solids, and tone-on-tone fabrics works best for this design, although a medium-scale print works well for the top strip. All fabrics used in the photographed project are by Lecien. Most are from the Petit Fleur collection. The light-colored tone-on-tone prints and linen are from Meg Hawkey’s Whitewash collection.
by Kristyne Czepuryk of Pretty by Hand
Finished size:
10½″ wide × 13″ high × 1¼″ deep
• 11 assorted fabric scraps each 12″ long and at least 4″ wide
• 1 fabric scrap at least 5″ × 5″ for clasp
• ½ yard of fabric for back, sides, and binding
• ½ yard of fabric for lining
• ½ yard of 45″-wide fusible batting (or regular quilt batting if you can’t find fusible)
• 1 yard of 20″-wide fusible interfacing (optional; it just makes the case a little stiffer)
• 1 magnetic snap, ½″ in diameter
• Embroidery floss:*
Light cream (COSMO #151)
Medium blue (COSMO #2212)
Medium purple (COSMO #282)
Dark purple (COSMO #283)
Light green (COSMO #316A)
Medium green (COSMO #2317)
Dark green (COSMO #318)
Medium pink (COSMO #482)
Dark pink (COSMO #483)
Medium aqua (COSMO #563)
Medium yellow (COSMO #701)
* Or use colors to coordinate with your fabrics.
Embroidery Stitches
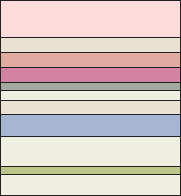
Arrange the 12″ fabric strips in a pleasing order from top to bottom. Then cut the strips in the following widths (they will be sewn together in this order from top to bottom):
2¾″ × 12″
1½″ × 12″
1¾″ × 12″
1½″ × 12″
1″ × 12″
1¼″ × 12″
1¾″ × 12″
2½″ × 12″
2″ × 12″
1″ × 12″
1½″ × 12″
2 pieces 2″ × 5″ for clasp
1 piece 12″ × 15″ for back
1 strip 2½″ × WOF* for sides
1 strip 2″ × 26″ for outer binding
2 pieces 12″ × 15″ for front and back
1 strip 2½″ × WOF for sides
4 bias strips 1 ″ wide for seam binding
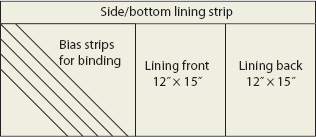
Suggested cutting layout for lining fabric
2 pieces 2″ × 5″ for clasp
2 pieces 12″ × 15″ for front and back
1 strip 2½″ × WOF for sides
2 pieces 12″ × 15″ for front and back
1 strip 2½″ × 40″ (it’s okay to cut this cross-wise as 2 strips 2½″ × 20″ and fuse each piece) for sides
1. To make the front, sew the 12″ strips together (Figure 1). The pieced rectangle should measure 12″ × 13½″. Trim to measure 11″ × 13½″.
2. Complete the embroidery, starting at the top of the pieced rectangle.
Stitch Seam 1 (between the first and second strips) in buttonhole stitch using light green floss.
Draw a loopy line freehand through the center of Strip 2. Stem stitch on the line using dark pink floss.
Stitch Seam 2 in fly stitch using medium aqua floss and colonial knots using medium yellow floss.
Stitch Seam 3 in cretan stitch using medium blue floss.
Stitch Seam 4 in lazy daisy and straight stitch using light cream floss on the Strip 4 side.
Stitch Seam 5 in running stitch using dark pink floss on the Strip 6 side.
Stitch Seam 6 in feather stitch using medium purple floss and colonial knot using medium blue floss.
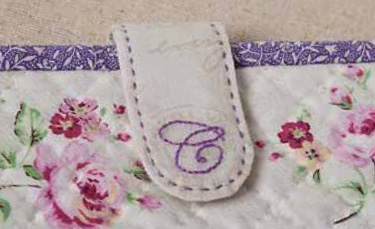
Stitch Seam 7 in lazy daisy stitch using medium green floss and straight stitch using dark pink floss on the Strip 7 side (Figure 2).
Stitch Seam 8 in cross-stitch using light cream floss on the Strip 8 side.
Stitch Seam 9 in backstitch using dark green floss and colonial knot using dark purple floss to create the flowers (Figure 3).
Stitch Seam 10 in herringbone stitch using medium pink floss.
3. Follow the manufacturer’s instructions to fuse the 12″ × 15″ fusible batting piece to the wrong side of the embroidery, or baste the wrong side of the embroidery to the 12″ × 15″ regular batting piece around the outside. Optional: Following the manufacturer’s instructions, fuse a 12″ × 15″ interfacing piece to the wrong side of the 12″ × 15″ lining piece.
4. Pin the embroidery/batting and lining layers wrong sides together.
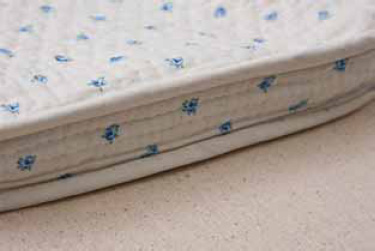
5. Quilt as desired.
6. To make the back, repeat Steps 3–5 with the remaining 12″ × 15″ back fabric, batting, optional interfacing, and lining pieces.
7. Trim the quilted front even with the embroidered front fabric, and trim the quilted back to match (11″ × 13½″).
1. To make the side/bottom piece, repeat Body Front and Back, Step 3, with the 2½″ × WOF strips of fabric, batting, optional interfacing, and lining. Trim this piece to measure 1¾″ × 38″.
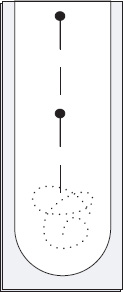
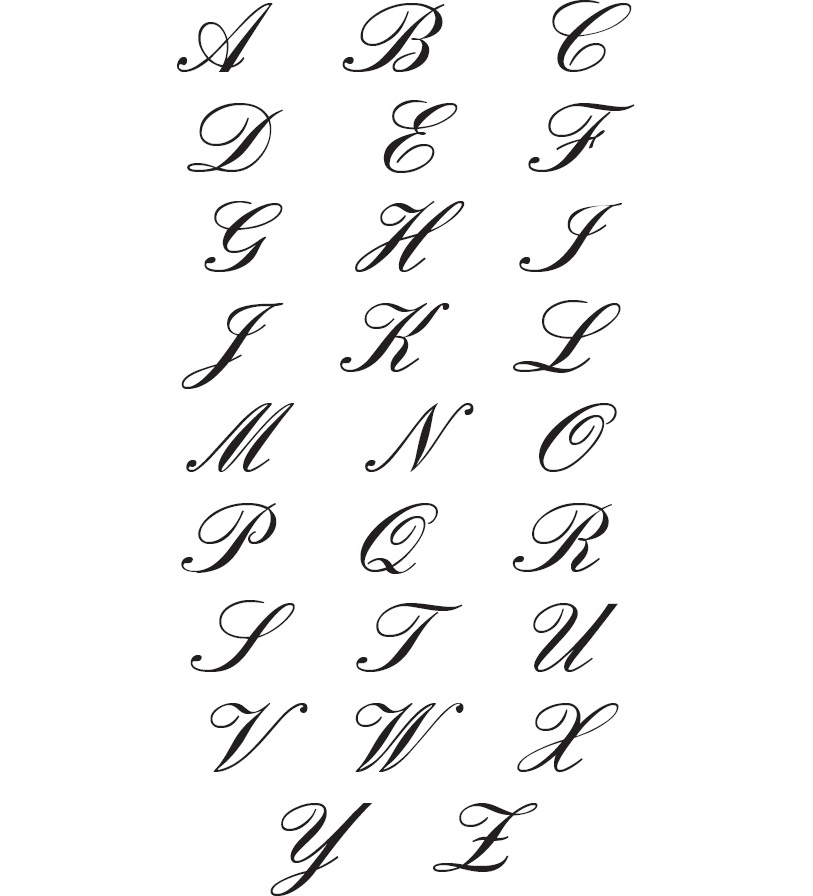
2. To make the clasp, trace and cut out a paper template using the clasp template pattern (Patterns are available to print from http://tinyurl.com/10939-patterns). Trace the monogram (page 31) onto a 2″ × 5″ fabric piece as indicated on the template pattern and embroider the initial with backstitch (Figure 4).
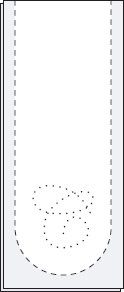
3. Lay the 2″ × 5″ clasp fabric pieces right sides together. Pin the paper template to the pieces, lining up the straight edges at the top (Figure 5).
4. Sew around the template, just outside the paper, leaving the top straight edge open (Figure 6).
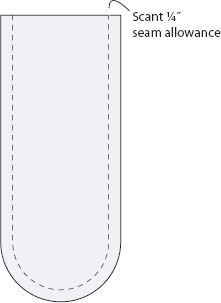
5. Trim the seam allowance to a scant ¼″ (Figure 7).
6. Turn the clasp right side out and press.
7. Using the paper clasp template, cut out the shape from the 2″ × 5″ batting piece. Insert the batting into the fabric clasp (tweezers are helpful). Press again.
8. Embroider a running stitch  ″ around the outside edge of the clasp in the same color as the monogram (Figure 8).
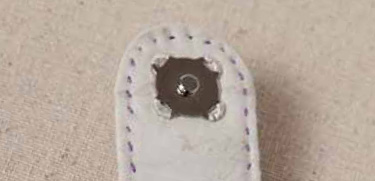
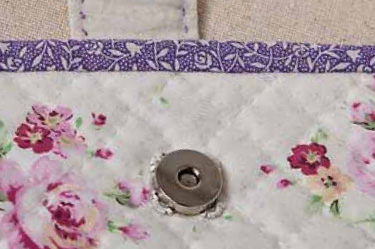
9. Following the manufacturer’s instructions, attach the male side of the magnetic snap onto the wrong side of the clasp (Figure 9). Use the mark on the clasp template pattern as a guide for positioning the snap.
10. To make the inside binding, sew the 4 bias-cut strips together. Press in half lengthwise, wrong sides together. Fold the outer edges in to the center crease and press again.
1. To attach the front to the side/bottom piece, mark the center of the bottom edge of the quilted front with a pin. Mark the center of the side/bottom piece with a pin. With right sides together, line up the pins, and then line up the rest of the bottom edge and the sides. Sew the front to the side/bottom piece.
2. Repeat Step 1 to sew the back to the side/bottom piece. Trim the strip ends even with the top of the front and back.
3. To finish the interior seams of the case, starting at the top of the case and working with the case inside out, align a raw edge of the bias binding strip, right sides together, with the raw edge of a side seam allowance. Pin in place and stitch by machine or by hand in the seam allowance, just past the outer fold of the binding so that the stitches won’t be seen on the outside. Wrap the binding around the seam allowance, fold the pressed binding edge under, and stitch in place by hand (Figure 10).
4. Repeat Step 3 to bind the other interior side seam. Turn right side out and press the edges.
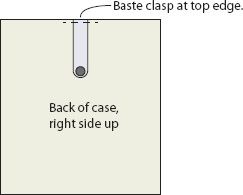
5. To attach the clasp, center it along the top edge of the back side, right sides together, and baste it in place (Figure 11).
6. Refer to Binding Basics (page 135) to bind the top edge of the case.
7. Following the manufacturer’s instructions, attach the female side of the magnetic snap to the front. Position the center of the snap 1¼″ down from the top edge (Figure 12).
* WOF = width of fabric