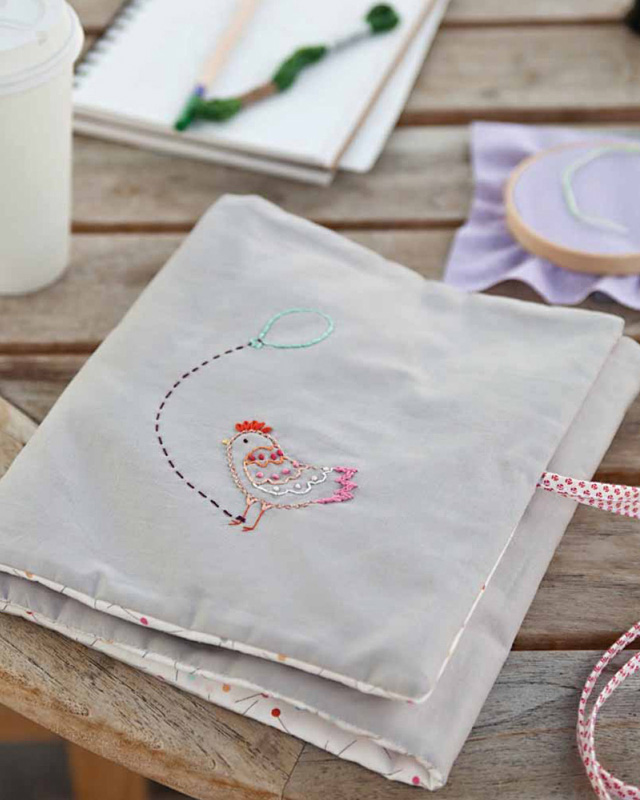
Party Chicken Project Organizer

Use this handy project pouch to keep all your stitching supplies together when working on an embroidery project. The pouch has five pockets of various widths. The center pocket can be used to store a hooped-up embroidery, as hoops up to 8″ in diameter fit easily. The pocket at the left can hold floss, and those on the right can accommodate scissors, a pencil, and a needle book. I used a Moda Bella Solid and Sew Stitchy by Aneela Hoey for Moda Fabrics.
by Aneela Hoey
Finished size:
9½″ × 10½″ (closed);
28½″ × 10½″ (open)
• 12″ × 30″ piece of gray solid fabric for exterior
• ½ yard of red print fabric for lining and ties
• 11″ × 29″ piece of white print fabric for pocket
• 11″ × 29″ piece of batting
• Embroidery floss:
Peach (COSMO #440)
Yellow (COSMO #701)
Orange (COSMO #758)
Pale orange (COSMO #753)
Dark pink (COSMO #206)
Pale peach (COSMO #751)
Medium pink (COSMO #353)
White (COSMO #100)
Pale pink (COSMO #351)
Burgundy (COSMO #226)
Aqua (COSMO #842)
Metallic orange (COSMO Sparkles #6)
11″ × 29″ piece for lining
2 strips 1″ × 35″ for ties
Embroidery Stitches
The embroidery design is on page 45.
1. Transfer the embroidery pattern to the right-hand side of the gray solid fabric (see Transferring the Printed Patterns, Patterns are available to print from http://tinyurl.com/10939-patterns). Place it about 3″ from the right-hand edge and 2½″ from the bottom edge of the fabric.
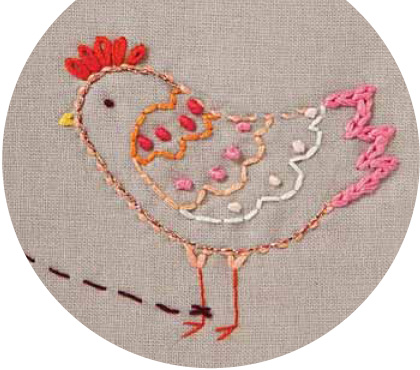
2. Embroider the design.
Peach:
Outline the chicken body in running stitch using 6 strands of floss.
Make the leg tops with straight stitches using 6 strands of floss.
Yellow:
Make the beak with 2 straight stitches using 6 strands of floss.
Orange:
Make the comb in lazy daisy stitch using 6 strands of floss.
Backstitch the legs using 1 strand of floss.
Pale orange:
Backstitch the top wing using 3 strands of floss.
Dark pink:
Embroider French knots on the dots in the top wing using 6 strands of floss.
Pale peach:
Backstitch the middle wing using 3 strands of floss.

Medium pink:
Embroider French knots on the dots in the middle wing using 6 strands of floss.
Outline the tail feathers in chain stitch using 6 strands of floss.
White:
Backstitch the bottom wing using 3 strands of floss.
Pale pink:
Embroider French knots on the dots in the bottom wing using 5 strands of floss.
Burgundy:
Make a French knot for the eye using 3 strands of floss.
Outline the balloon string in running stitch using 2 strands of floss.
Make 1 cross-stitch at the chicken’s leg using 2 strands of floss.
Aqua:
Backstitch the balloon using 6 strands of floss.
Metallic orange:
Backstitch just inside the head and tummy outline using 1 strand of floss.
3. Press.
2. Open out and then fold each of the long edges in toward the center crease (Figure 1). Press.
3. Turn a short edge over by ½″ to the wrong side (Figure 2). Press.
4. Fold in half along the length, so the 2 folded edges meet. Press.
5. Starting at the turned-over short edge, make a couple of backstitches and then topstitch down the length of the strip, a scant  ″ from the edge of the double folds (Figure 3).
6. Repeat Steps 1–5 to make the second tie.
1. Fold the pocket fabric in half lengthwise, wrong sides together. Press. Topstitch along the fold, ½″ from the edge.
2. Place the lining fabric, right side up, on top of the batting. Position the pocket along the bottom with the topstitched edge toward the center of the lining. Pin and baste the pocket in position.
3. Make a mark 5″ in from the right-hand side on the folded top edge of the pocket. Make a second mark 6½″ in from the right-hand side. Draw a vertical line from each of these down to the bottom raw edge of the pocket.
4. Stitch along the 2 vertical marked lines, backstitching at the beginning and end of each (Figure 4).
1. Position the ties horizontally across the center of the pouch, with the raw short edges positioned just above the left-hand top edge of the pocket (Figure 5). Loosely knot and baste the ties in place along the left-hand side to keep them out of the way during the next step.
2. Trim the gray embroidered fabric down to 11″ × 29″, making sure to trim evenly from each side.
3. Place the exterior wrong side up on top of the right-side-up lining and pocket, so that the embroidery is at the left. Pin and baste through all the layers, all around the outside edge.
4. Stitch all around the outside edge, leaving a 6″ gap along the bottom.
5. Turn right side out, making sure to turn the corners out well.
6. Hand sew the gap closed. Folded ends of ties
7. Along the top edge of the opened-out pouch, make a mark 9½″ from each of the sides. Draw a vertical line down from each mark to the bottom edge of the pocket.
8. Stitch along each vertical line, backstitching at the beginning and end (Figure 6).
