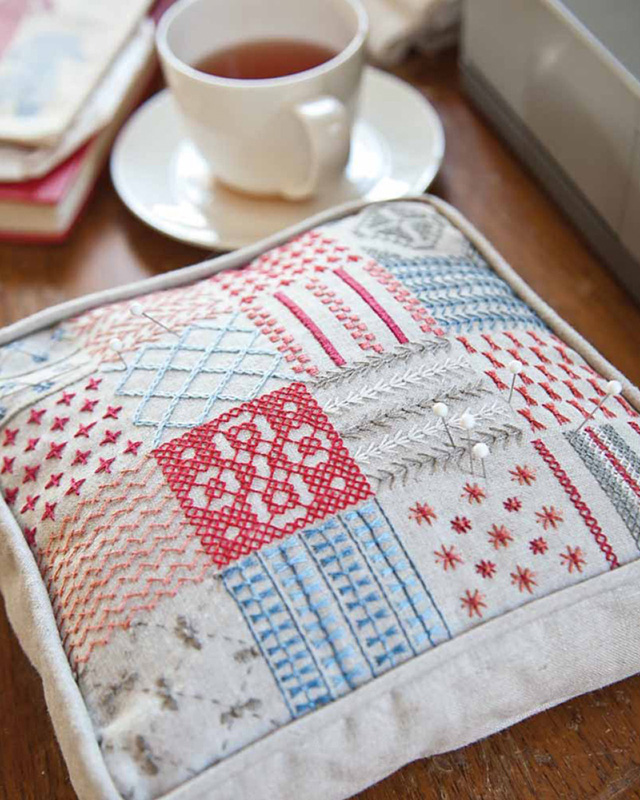
French General Sampler

This is the ideal decorative sampler to make when you want to learn or perfect your stitches. Use it as a pincushion, small pillow, or cushion. Just change the colors for the perfect addition to any decor.
by Kaari Meng of French General
Finished size:
8″ wide × 8″ high × 2″ deep
•  yard of linen fabric
• 2¼ yards of ¼″ cord for piping
• Embroidery floss:
Light red #1 (COSMO #464)
Light red #2 (COSMO #855)
Red (COSMO #858)
Bright red (COSMO #346)
Dark red #1 (COSMO #108)
Light blue (COSMO #163)
Light-medium blue (COSMO #164)
Medium blue (COSMO #733)
Medium-dark blue (COSMO #734)
Light gray (COSMO #712)
Medium gray (COSMO #715)
Dark gray (COSMO #893)
• Fiberfill
• 1 cup of ground walnut shells
Embroidery Stitches
2 squares 8½″ × 8½″
4 pieces 2½″ × 8½″
4 bias strips 2½″ wide
2 pieces 40″ long
1. To divide a linen square into a grid, lightly fold it in half both directions. Lightly mark along those folds with chalk or a disappearing marking pen. Then, draw lines parallel to the first lines 2″ out in each direction, and another set 2″ out from the second set (Figure 1).
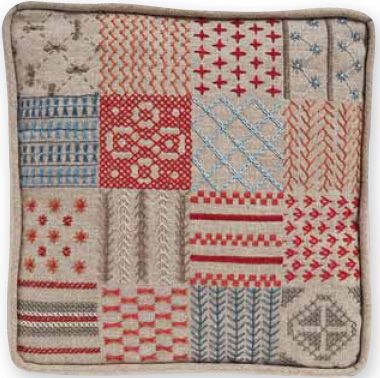
2. See Figure 2 to use my stitches and color choices to embroider the linen square, following the orientation of the arrows in each square, or use your own favorites.
For the cross-stitch designs, follow the charts below (Figure 3).
1. Sew 2 bias strips together on the diagonal to make a single bias strip at least 40″ long. Trim the seam allowance to ¼″ and press open.
2. Lay a 40″ length of cord, centered, on the wrong side of a bias strip. Fold and pin the fabric over the cord, aligning the raw edges.
3. Sew the length, as close to the cord as possible, using a zipper or piping foot.
4. Trim the seam allowance to ¼″.
5. Repeat Steps 1–4 to make a second length of piping.
1. Pin the piping to the right side of a linen square along the outside edges, aligning the raw edges and overlapping the ends of the piping (Figure 4).
2. Trim the piping so that the overlap is 1″. Open the seams on an overlapping end of the piping so that you can access the cord. Trim the cord (not the fabric) so it abuts the other end of the piping. Fold under the end of the piping fabric ¼″, nest the other end of the piping inside this folded-over loose end, and pin them down (Figure 5).
3. Baste the piping in place.
4. Repeat Steps 1–3 for the other square.
5. Sew the 2½″ × 8½″ pieces together on all the short ends, creating a loop. Press the seams open. Pin piping all around.

6. Pin the linen loop to the top linen square with right sides together (and the piping sandwiched between the layers). It might be easiest to pin the corners first, matching the seams between the rectangles with the corners of the square, then pinning in between.
7. Sew around the square, carefully pivoting at the corners.
8. Repeat with the back, but leaving a 3″ opening in a side.
9. Turn the cushion right side out through the opening. Stuff the pillow with fiberfill and then add the ground walnut shells in a layer under the fiberfill.
10. Hand stitch the opening closed.